Joto E-HP-JAR-DS-1620 User manual
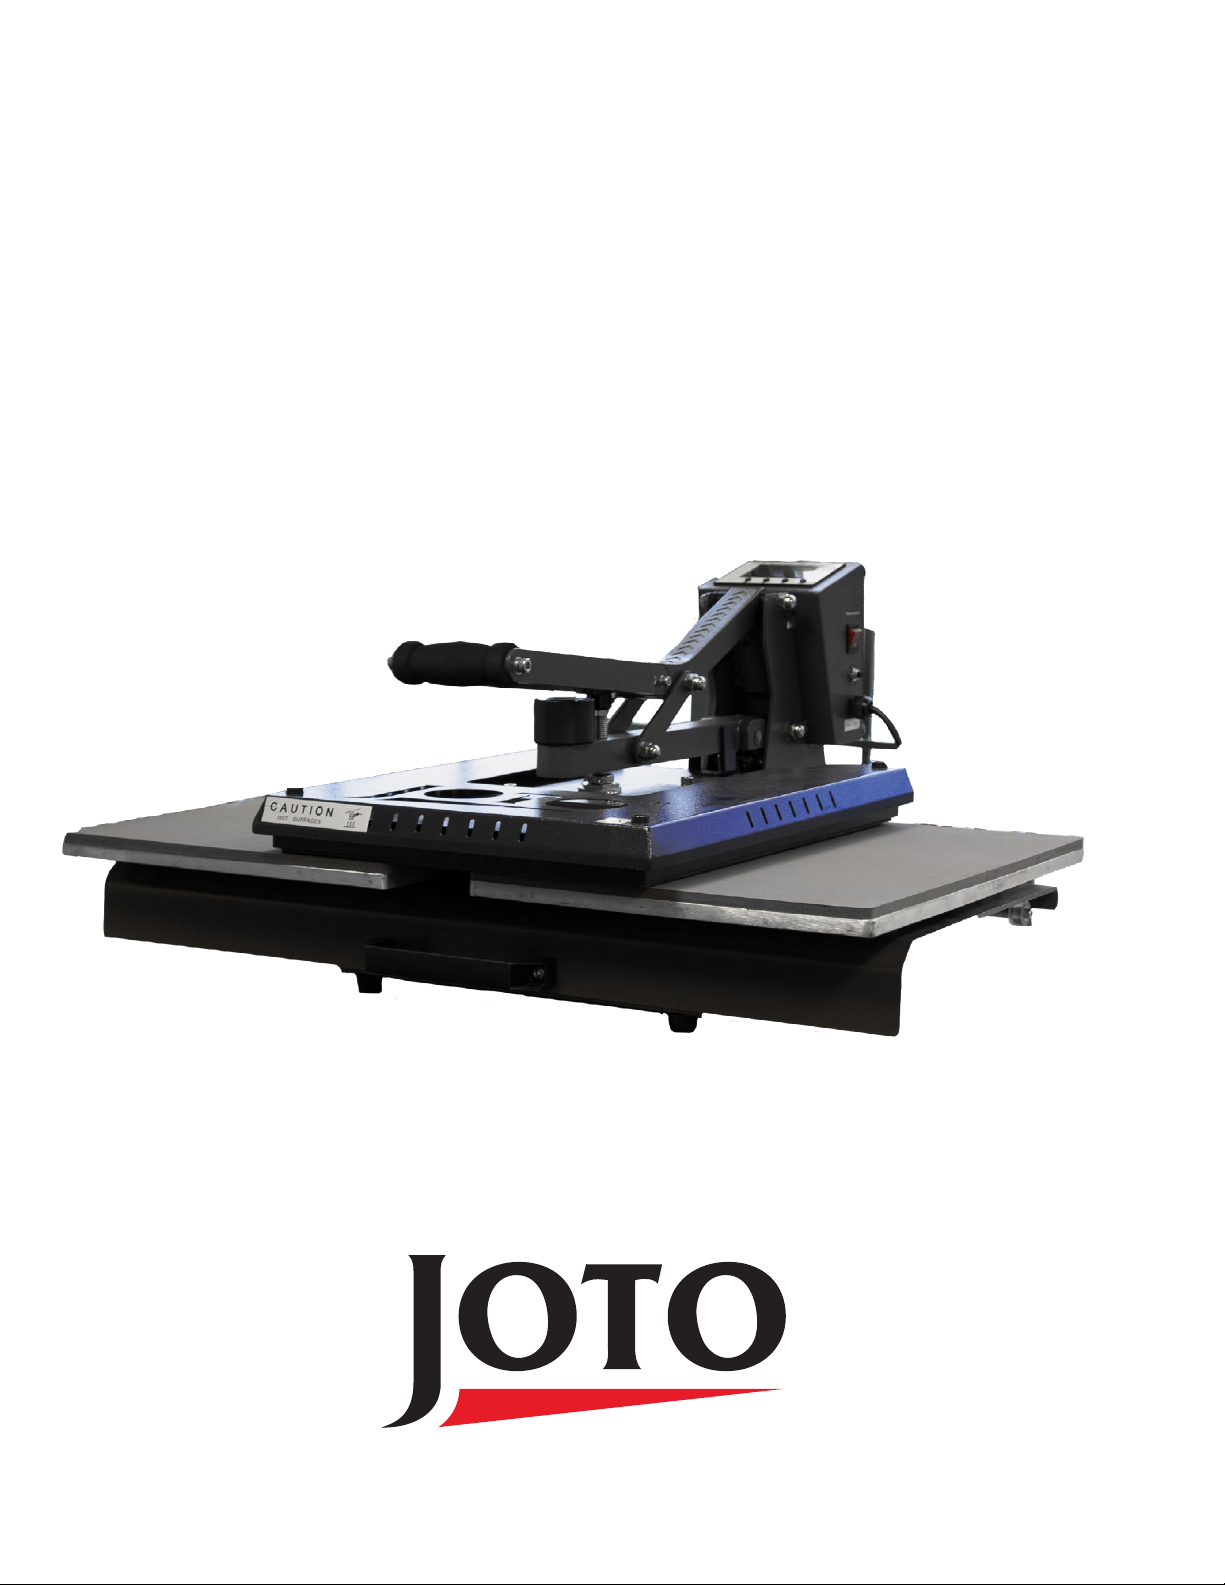
Joto Manual Shuttle Press Manual
Model No.: E-HP-JAR-DS-1620
OPERATOR’S MANUAL
Bringing images to life
TM
TM

2
Safety Instructions
For Use By Qualied Personnel Only
When using your Heat Press,
basic precautions should always be followed,
including the following:
Read all instructions.
Use heat press only for its intended use.
Keep the heat press dry at all times. Do not get the heat press wet to reduce the risk of electric
shock. Do not store heat press in a wet or damp area.
Never pull cord to disconnect the power, grasp plug and pull to disconnect from power outlet.
Protect the power cord by keeping it away from hot surfaces. Do not allow objects to sit on top of
the cord. This could cause damage to the cord and could become a re hazard risk.
Do not operate heat press with a damaged cord or if the equipment has been damaged. Do not
disassemble or attempt to repair the heat press to prevent risks to injury. Call or take it to a
qualied service person for examination and repair. Incorrect assembly or repair could increase the
risk of re, electric shock, or injury to persons when the equipment is used.
Supervision is necessary for any heat press being used by or near children. Do not leave equipment
unattended while connected.
Metal parts on the press can become hot. Burns may occur when touching hot metal parts. Take
caution when using the heat press
To reduce the likelihood of circuit overload, It is recommended to use a dedicated circuit if possible.
Care should be taken to arrange the cord so that it cannot be pulled or tripped over.
To reduce the likelihood of circuit overload, do not operate other high voltage equipment on the
same circuit.
If an extension cord is necessary, then a 20 amperage rated cord should be used. Cords rated for
less amperage may overheat. Care should be taken to arrange the cord so that it cannot be pulled or
tripped over.
Note: This heat press should not be set to exceed 210C. Setting the press temperature to above
210C may cause a re hazard.

3
Congratulations on your purchase of a Joto Manual Shuttle Heat Press! In order to work
professionally with the machine and start production, please make sure you read this manual
carefully. Reproduction of this manual requires written consent from Joto. Errors and
amendments of technical details excepted, all rights reserved. Joto is not liable for any direct or
indirect damages caused by the use of this product.
Table of Contents
Safety........................................................2
Introduction .............................................3
Setting Up Your Heat Press ......................4
Operating Instructions .............................6
Heat Press Overview ................................7
Maintenance .............................................8
Joto Sublimation/Transfer Vinyl Guide .... 8
Circuit Diagram .........................................9
Expanded View .......................................10
Contact ...................................................12
4
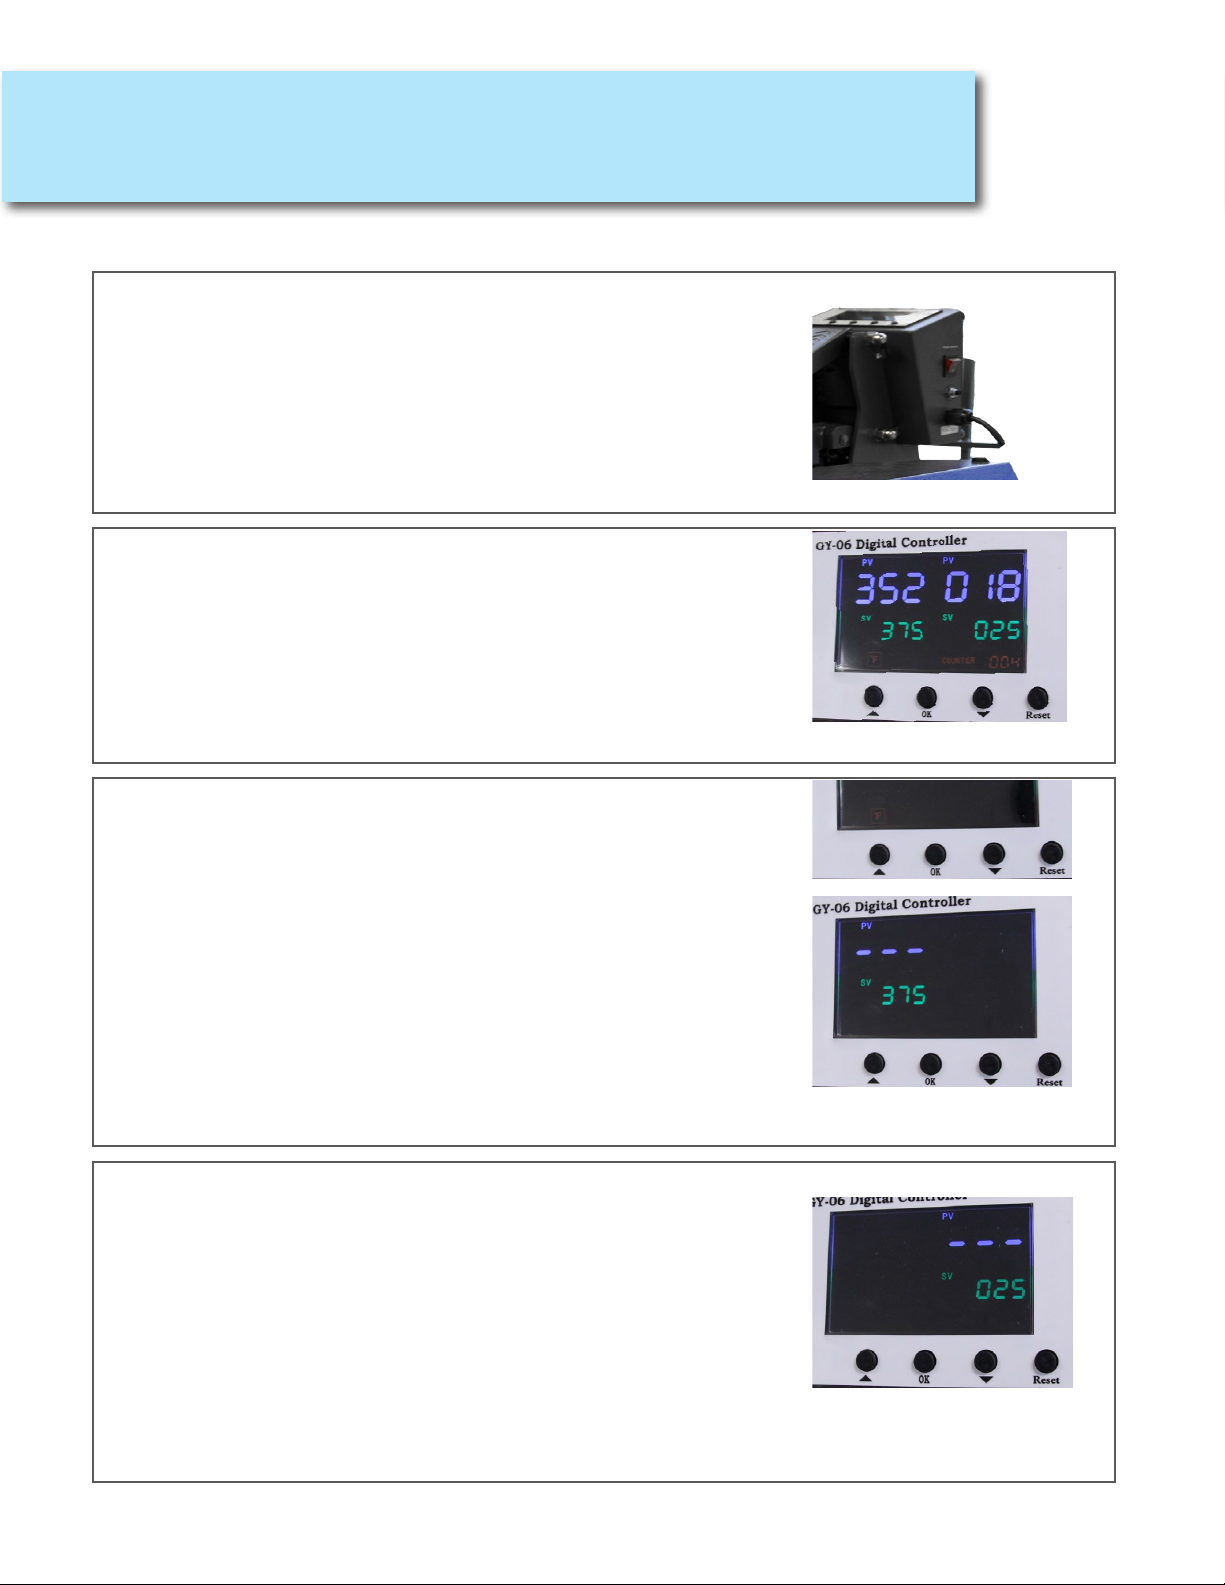
Turning On Your Heat Press
Turn the Main Power Switch on. The
Main Power Switch is at the side
of the heat press.
Current temperature, set temperature,
current time, set time will display.
How to Read The Display
1.) Left side PV value = Current Temperature
2.) Right side PV value = Current Time
3.) Left side SV value = Set Press Temperature
4.) Right side SV value = Set Press Time
Setting Press Temperature
Press OK to start. Use the up and down
arrows to choose to display in °F or °C.
°F stands for Fahrenheit
°C stands for Celsius
Once selection is made, press ok to save
Greensettemperaturevaluewillash.
Use the up and down arrows to set
press temperature value. Press ok to save
Setting Press Time
GreenSetTimeValuewillash
Use the up and down arrows to change
the value.
Press ok to save the value.
Wait until the current
temperature is the same as the set temperature
before using. The press will beep once set temperature
is reached. Close and open the press to stop the beeping
Setting Up Your Heat Press
Note:Settingthepresstemperaturetoabove210Cmaycausearehazard.

5
Operating Instructions
Pressing a T-shirt
1.) Turn on the Main Power Switch
2.) Set the appropriate Press Temperature, and Time as per your transfer vinyl
or sublimation instructions.
3.) Place your t-shirt on the heat press.
5.) Set the pressure by adjusting the air pressure adjust knob.
6.) Wait until current temperature is the same as the set temperature. Once the
press has reached set temperature, place transfer material on the shirt. For
Sublimation, place the paper with the image face down. For cuttable transfer
vinyl, place the matte side with the transparent carrier backing facing the heat
platen. If unsure, please refer to the instructions you received with your
transfer materials.
7.) Slide the heat platen towards the base plate you are pressing. Press the two
start switch buttons to close the press. Once press is closed the current time
value will start counting down. Once the timer reaches the last 2 seconds before
reaching0,itwillstarttobeeptowarnyou.Oncetimereacheszero,thepress
will open. Slide the heat platen over to press on the next plate.
Note: Once the press is closed, it cannot be opened manually until the timer
reacheszero.Inanemergency,youmaypresstheemergencyswitch
to force open the press. When pressing the emergency switch, the
press will open immediately without warning. Keep hands on the heat press
handle at all times during and after pressing the emergency switch. Not
securing the handle with your hands may cause injury.
8.) For most sublimation and transfer vinyl, the peel is hot. If unsure, refer to the
instructions that came with your transfer materials.
Operation of throttle valves:
On the right side of the press head there are two silver screws where the speed of the
press opening and closing can be adjusted. Tightening the top screw (turning clockwise)
will decrease the speed the press opens. Tightening the bottom screw (turning clock-
wise) will decrease the speed the press closes. Loosening the screws (turning counter
clockwise) will increase the speed. Adjust accordingly.

6
Heat Press Overview
Note: This heat press should not be set to exceed 210C. Setting the press temperature to
above210Cmaycausearehazard.
Technical Specs
Model No.: E-HP-JAR-DS-1620
Machine Type: Manual Shuttle Press
MachineSize: 34.5” x 29.5” x 14” (87.63cm x 47.93cm x 35.56cm)
HeatPressplatenSize: 16” X 20”
Maximium Thickness: 1.20” (30mm)
Controller GY-06 Digital Controller
Voltage: 120V 14amp
Power: 1500W
Time Range:
Maximum Temp:
0-999 Seconds
410°F (210°C)
PackingSize: 39.76” x 34.64” x 22.8346” (101cm x 88cm x 58cm)
Gross Weight: 209lbs (95kg)

7
Maintenance
Heat Press Guide
General Maintenance
Please switch off the machine and unplug the power cord when the machine is not
in use.
To protect the heat platen, do not allow any hard surface objects to be in direct con-
tactwiththeplaten.Thisincludeszippers,buttons,metalsublimationitems.When
pressing these items, place a protective sheet between the platen and the objects.
The heat-releasing fan will automatically starts when the temperature of heat platen
reaches 80 degree C (176 degree F). It helps to reduce the temperature of electrical
parts and prolong the service life of them.
Heat platen may pivot slightly back and forth. This is due to movement allowance
within the clamp assembly, and is normal.
Please add the lubrication oil regularly on the joints to prolong the life of your heat
press. The frequency will depend on how often you use your machine.
When changing parts, turn off the power, To ensure the accuracy of GY-06 controller,
rest time and temperature.
Note: This heat press should not be set to exceed 210C. Setting the press
temperature to above 210C may cause a re hazard.
MultiCut Ultra Matte
Temperature: 320F
Time: 20 seconds
Peel: Hot
MultiCut Flock Premium
Temperature: 320F
Time: 20 seconds
Peel: Hot
MultiCut Nylon
Temperature: 345F
1st Press Time: 3 seconds
2nd Press Time: 10 seconds
MultiCut Premium
Temperature: 320F
Time: 10 seconds
Peel: Hot
MultiCut Lustre
Temperature: 310-330F
Time: 15-20 seconds
Peel: Hot to Cold
MultiCut Style
Temperature: 310-330F
Time: 15-20 seconds
Peel: Hot to Cold

8
Sublimatable Ceramic Tiles
Temperature: 400F
Time: 360-420 seconds
Peel: Hot
Method: Substrate face down
Image face up
Porcelain Ornaments
Temperature: 400F
Time: 180-240 seconds
Peel: Hot
Method: Substrate face down
Image face up
MousePads/CanCoolers
Temperature: 400F
Time: 35-45 seconds
Peel: Hot
Method: Substrate face up
Image face down
Coasters/Fabric Puzzles
Temperature: 400F
Time: 35-45 seconds
Peel: Hot
Method: Substrate face up
Image face down
Phone cover inserts
Temperature: 360F
Time: 120 seconds
Peel: Hot
Method: Substrate face down
Image face up
Unisub Metals
Temperature: 400F
Time: 60 seconds
Peel: Hot
Method: Substrate face up
Image face down
Unisub Plastics
Temperature: 400F
Time: 75-80 seconds
Peel: Hot
Method: Substrate face up
Image face down
Unisub Wood
Temperature: 400F
Time: 75-80 seconds
Peel: Hot
Method: Substrate face up
Image face down
Unisub Plaques
Temperature: 400F
Time: 75-80 seconds
Peel: Hot
Method: Substrate face up
Image face down
ilumiPix Photo Panels
Temperature: 360-375F
Time: 120-140 seconds
Peel: Hot
Method: Substrate face down
Image face up
Sublimation Items
Heat Pressing Guide (continued)
9
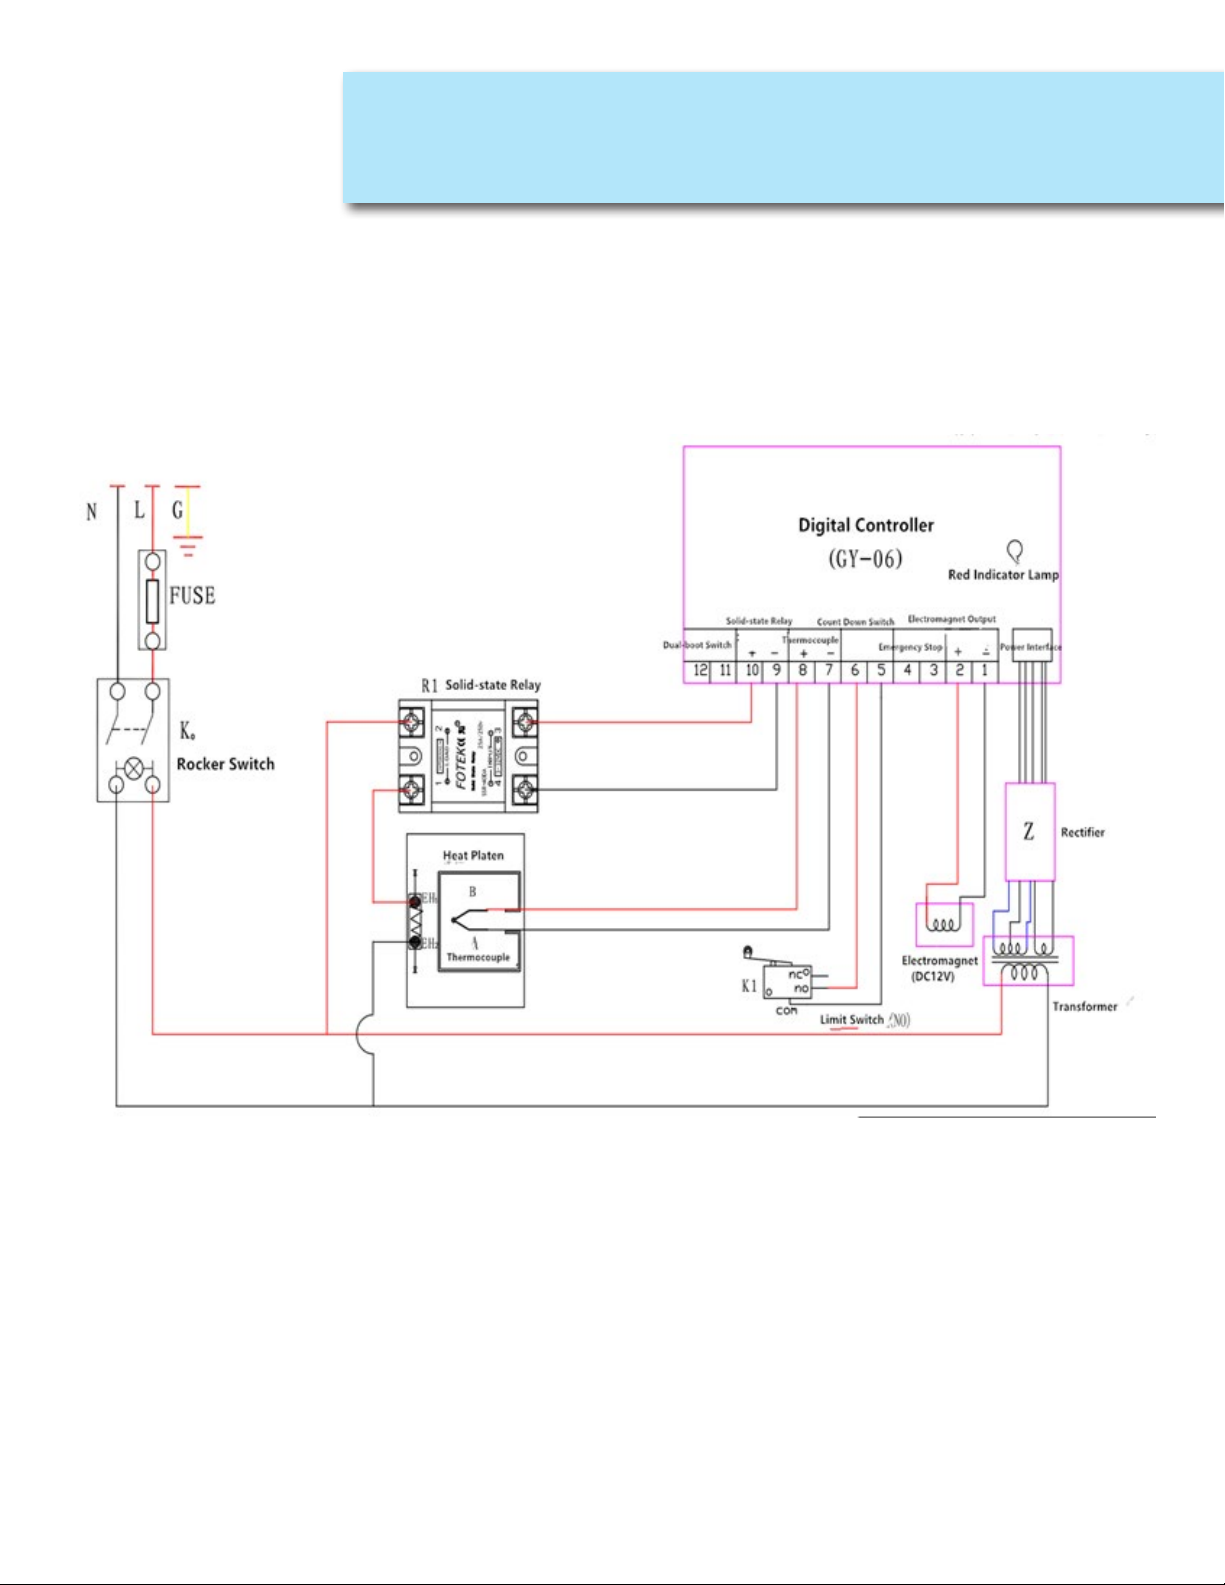
Circuit Diagram

10
Expanded Diagram
Other manuals for E-HP-JAR-DS-1620
1
Table of contents
Other Joto Power Tools manuals

Joto
Joto E-HP-JMP-51N User manual

Joto
Joto E-HP-JCH-51 User manual

Joto
Joto E-HP-JLF-3243 User manual

Joto
Joto E-HP-JAR-1515 User manual

Joto
Joto E-HP-JMP-1S2E User manual

Joto
Joto E-HP-JMP-1S7E User manual

Joto
Joto E-HP-JMP-2S5E User manual

Joto
Joto E-HP-JAR-DS-1620 User manual

Joto
Joto XSTM-40 User manual

Joto
Joto E-HP-JSP-1620 User manual


