JUKI JaNets JT Simple User manual

JaNets JT Simple
Instruction Manual
Congratulations on your purchase of a JUKI product.
To ensure safe use of the JaNets JT Simple, it is necessary to read this Instruction Manual
carefully and fully understand its contents before putting the JaNets JT Simple into use.
Keep this Instruction Manual at a prescribed position to make it available whenever
necessary.
Revision No. 00

CONTENTS
Introduction............................................................................................................................. 1
I. Operation of the terminal (for operators)......................................................................... 1
1. Terminal display........................................................................................................... 1
1-1. Display of power-ON of the sewing machine....................................................... 1
1-2. How to view the terminal display.......................................................................... 2
2. Correction of the quantity of output............................................................................. 3
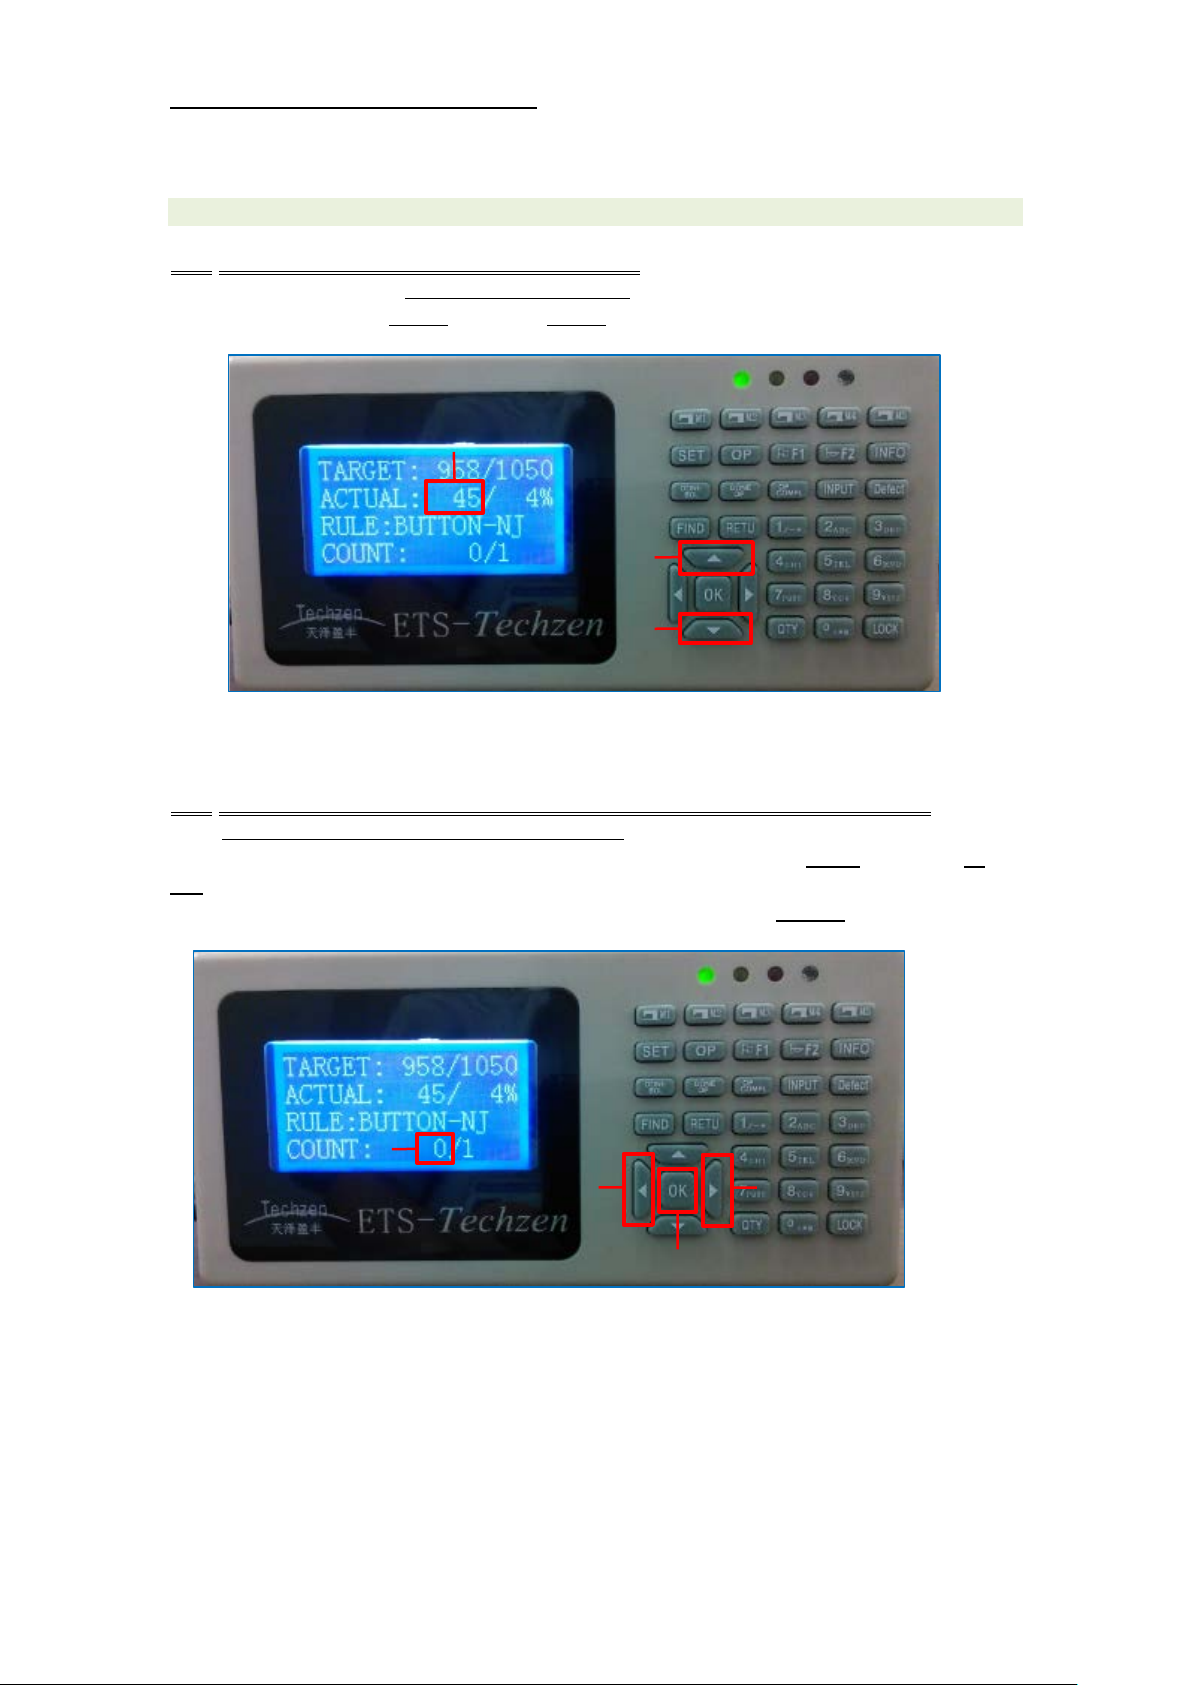
2-1. How to correct the quantity of output ................................................................... 3
2-2. How to correct the current number of times of thread trimming .......................... 3
3. Maintenance call ......................................................................................................... 4
3-1. Issuing a maintenance call................................................................................... 4
4. Confirmation and change of machine settings ........................................................... 6
4-1. Confirming the machine settings.......................................................................... 6
4-2. Changing the count condition .............................................................................. 7
4-3. Changing the final process................................................................................... 8
4-4. Changing the machine number............................................................................ 9
II. How to use the report system (for line managers) ....................................................... 10
1. Dashboard................................................................................................................. 10
1-1. Selecting a line................................................................................................... 10
1-2. Real-time display items .......................................................................................11
2. Progress management monitor................................................................................. 12
2-1. Selecting a line................................................................................................... 12
2-2. Real-time display items ...................................................................................... 13
3. Operation rate chart of the sewing machine............................................................. 15
3-1. Operation rate chart on a line-by-line basis ....................................................... 15
3-2. Operation rate chart on a machine-by-machine basis....................................... 18
3-3. Time-series operation rate chart of the sewing machine................................... 20
4. Output-quantity chart................................................................................................. 22
4-1. Output-quantity chart on a section-by-section basis.......................................... 22
4-2. Time-series output-quantity chart....................................................................... 25
5. Net processing time chart ......................................................................................... 28
6. Output of CSV files.................................................................................................... 30
6-1. Operation on the screen..................................................................................... 30
6-2. Event list items ................................................................................................... 31
III. Restarting the server and management PC (for managers)....................................... 32
1. System configuration................................................................................................. 32

2. Restarting the capturing PC...................................................................................... 33
3. Restarting the server................................................................................................. 34
IV. Troubleshooting (for managers) .................................................................................. 35
1. Trouble phenomena and causes / measures............................................................ 35
2. Reference materials .................................................................................................. 39

JaNets JT Simple Instruction Manual
1/ 45
Introduction
This Instruction Manual describes the operation of terminals that is carried out by sewing
machine operators and the operation of the report center that is carried out by the line
managers for grasping the production status.
This Instruction Manual describes the operation that is carried out after you have completed
the line setting so as to allow data to be collected from sewing machines within the sewing
line. If you have not yet completed the line setting, carry out setting of the line referring to
the "Instruction Manual for the setup and change of the line". Then, read this
Instruction Manual.
I. Operation of the terminal (for operators)
This section describes how to view the terminal display and how to operate the terminal
when the sewing machine operator uses the terminal during sewing work.
1. Terminal display
1-1. Display of power-ON of the sewing machine
When you turn ON the power to the sewing machine, the initialization screen, as shown
below, is displayed. When the initialization process is completed, today's quantity of output
is displayed.
Sewing Init
Completed !
TARGET: 650/ 800
ACTUAL: 630/ 97%
RULE:BUTTON-JU
COUNT: 0/1

JaNets JT Simple Instruction Manual
2/ 45
1-2. How to view the terminal display
While the power to the sewing machine is turned ON, the screen, as shown below, is
displayed.
●Target quantity of output
It displays the Current-time target quantity of output …①/ Daily target quantity of
output …②.
●Actual quantity of output
It displays the Actual quantity of output …③/ Current-time progress …④.
* Current-time progress …④= (Actual quantity of output …③/ Current-time target
quantity of output …①) x 100
* The aforementioned values allow you to get a grasp of delay or advance of your
sewing work.
∙Actual quantity of output …③exceeds the current-time target quantity of
output …①
∙Current-time progress …④exceeds 100 %
You should carry out the sewing work, while checking the pace of work so as
to achieve the following:
●Count condition …⑤
Predetermined condition for counting of the quantity of output is displayed.
BUTTON-JU: When the JUKI sewing machine button is pressed
Thread Trimmer: When the thread is trimmed
Pattern End: When the sewing-pattern sewing operation is completed
Cycle End : When the cycle-pattern sewing operation is completed
BUTTON-NJ: When the button is pressed during the process carried out by any
machine other than the JUKI sewing machine
●Count of thread trimming
Current number of times of thread trimming …⑥/ Number of times of thread trimming
for the process …⑦
* Every time the thread trimming is performed, the current number of times of
thread trimming …⑥is increased by one. When the number of times of thread
trimming for the process …⑦is reached, the quantity of output is increased by
one.
TARGET: 650/ 800
ACTUAL: 630/ 97%
RULE:BUTTON-JU
COUNT: 0/1
②
④
⑤
①
③
⑦
⑥

JaNets JT Simple Instruction Manual
3/ 45
2. Correction of the quantity of output
2-1. How to correct the quantity of output
If you want to correct the Actual quantity of output …①after a sewing failure or a trial
stitching, correct it with ▲ key …②and ▼ key …③.
2-2. How to correct the current number of times of thread trimming
If the Current number of times of thread trimming …④differs from the correct number
after the occurrence of thread breakage or re-sewing, correct it with ◀key …⑤and ▶
key …⑥to adjust the timing of counting of the quantity of output. In addition, the number
of times of thread trimming can be reset to "0 (zero)" by pressing OK key …⑦.
①
②
③
⑤
④
⑥
⑦

JaNets JT Simple Instruction Manual
4/ 45
3. Maintenance call
If any trouble occurs during sewing, the operator performs maintenance call operation from
the terminal to inform the line manager.
When the operator carries out the maintenance call, the sewing machine displayed on the
progress management monitor of the report system changes as shown in the figure below.
3-1. Issuing a maintenance call
When you press M3 key …①, the maintenance call confirmation screen is displayed.
Operate ▲ key …②and ▼ key …③to align the cursor on "Yes" and press OK key …
④to initiate the maintenance call.
* Since the sewing counter continues counting even during the maintenance call,
sewing work can be carried out continuously.
①
Maintenance call state
②
③
④
Is Call repair?
Yes
N o
Call machinc 18:
31:26

JaNets JT Simple Instruction Manual
5/ 45
Releasing the maintenance call
After the completion of maintenance work, press M3 key …①again.
The maintenance call ending confirmation screen is displayed. Operate ▲ key …②and
▼ key …③to align the cursor on "Yes" and press OK key …④to finish the
maintenance call.
②
③
④
Is Call repair?
Yes
N o
Machine repaid d
one

JaNets JT Simple Instruction Manual
6/ 45
4. Confirmation and change of machine settings
It is possible to confirm and change the sewing machine settings by operating the terminal.
This procedure is not needed during the normal sewing work. If it is necessary to carry out
this procedure, follow your line manager's instructions.
4-1. Confirming the machine settings
The sewing machine settings as listed in the table below can be confirmed by operating the
terminal.
When
you
press
RETU
key …①, the sewing machine setting information specified on the terminal is displayed.
Check the sewing machine setting information by turning the pages with ▲ key …②and
▼ key …③. This checking procedure is terminated with OK key …④.
* The screen display shown below indicates the display in the case of the
aforementioned
Item
Sample entry
Remarks
Factory name
SSC smart factory
Floor name
6F
Line number
16
Terminal ID
53368
Machine number
16012
Software version
01030361
Time to turn ON the power to
the sewing machine
14:01
①
②
③
④
SSC smart factor
y--6F--16ID:5336
8 - O - S Machin
e#16012 Machin
e SerialNo:53368
Machine Version
:01030361 Machin
E Connect Time:1
4:01

JaNets JT Simple Instruction Manual
7/ 45
4-2. Changing the count condition
Press M4 key …①
The screen for selecting the condition for counting the quantity of output is displayed.
Select the count condition with ▲ key …②and ▼ key …③.
*Refer to I.1.2 How to view the terminal display for the kinds of count conditions.
After you have selected the count condition, press OK key …④. Then, the selected data is
confirmed and the message "Ple. InputCount Value" is displayed.
Then, enter the number of times of thread trimming for the process using numeric keypad
…⑤and press OK key …④.
If the message "Setting Completed." is displayed, the count condition and the number of
times of thread trimming for the process have been successfully entered.
①
④
②
③
⑤
BUTTON-JU
THREAD TRIM
PATTERN END
CYCLE END
BUTTON-NJ
Ple. InputCount
Value
Setting Complete
d.

JaNets JT Simple Instruction Manual
8/ 45
4-3. Changing the final process
Press M5 key …①.
The screen for setting whether or not the process at which the terminal is installed is the
final process is displayed.
Select the "Finish Point" when it is the final process or "Not Finish Point" when it is not with
▲ key …②and ▼ key …③.
After you have made the selection, press OK key …④. Then, the data you have selected is
confirmed and the message "Setting Completed." is displayed.
①
④
③
②
Not Finish Point
Finish Point
Setting Complete
d.

JaNets JT Simple Instruction Manual
9/ 45
4-4. Changing the machine number
Press F1 key …①
The "Ple. Input Machine#" screen is displayed.
Enter the "Machine number" you want to change (20-digit figure at the maximum) with
numeric keypad …②.
After you have entered the machine number, press OK key …③. Then, the machine
number you have entered is confirmed and the message "Setting Completed" is displayed.
①
③
②
Ple. Input Machi
ne#
Setting Complete
d.
5 0

JaNets JT Simple Instruction Manual
10 / 45
II. How to use the report system (for line managers)
This section describes how the line managers should view the charts and information of
the report system.
1. Dashboard
The dashboard allows you to get a real-time grasp of the production status of each line.
1-1. Selecting a line
Select Dashboard …①of the report center. Then, select Factory …②, Floor …③and Line
…④in sequence. Then, press Search button …⑤.
The status of the line you have selected is displayed in real time.
②
③
④
⑤
①
Displayed in real time

JaNets JT Simple Instruction Manual
11 / 45
1-2. Real-time display items
This clause describes the items displayed on the dashboard.
●Elapsed time …①
The percentage of working hours elapsed with respect to the specified working hours of
the shift is displayed in a pie chart.
●Progress of the quantity of output …②
The percentage of the current quantity of output with respect to the specified target
quantity of output of the shift is displayed in a pie chart.
* It is possible to check whether the current production status is behind or in advance
of the schedule by comparing the progress of the quantity of output with Elapsed time
…①.
●Power activation status of the sewing machine …③
The ratio of the number of sewing machines power to which are turned ON with respect to
all sewing machines in the line that are connected to the system is displayed in a pie
chart.
●Time series chart of the quantity of output …④
The target quantity of output and the actual quantity of output are displayed in time series
in a bar chart. In addition, the accumulated target quantity of output and the accumulated
actual quantity of output are displayed in a line chart.
* This time series chart allows you to understand the production status from the start of
production to the current time at a glance.
①
②
③
④
Target quantity
of output
Target quantity of
output (accumulated)
Actual quantity
of output
Actual quantity of
output (accumulated)

JaNets JT Simple Instruction Manual
12 / 45
2. Progress management monitor
It is possible to understand the production status of each sewing machine in the line in real
time.
2-1. Selecting a line
Select the Line monitoring > Real-time line monitoring …①of the report center. Then,
select the Factory …②, Floor …③and Line …④in sequence. Then, press Search button
…⑤.
Or, click the Progress of the quantity of output …⑥on the dashboard.
Then, the production status of each machine in the currently-selected line is displayed in
real time.
②
③
④
⑤
①
⑥
Displayed in real time

JaNets JT Simple Instruction Manual
13 / 45
2-2. Real-time display items
This clause describes the items displayed in the real-time line monitor.
●Sewing machine name …①
The name of the sewing machine that is registered is displayed.
●Output-quantity display …②
"Actual quantity of output / target quantity of output" is displayed.
* The target quantity of output can be changed over between the today's target and the
real target by setting the Target type …⑤.
Today's target : The target quantity of output at the end of shift production
Real target : Target quantity of output at the current time (This target value
changes with time.)
●Maintenance call display …③
This display appears when the maintenance call operation is carried out on the terminal.
* The maintenance call display is continuously shown on the screen until the
maintenance call is released on the terminal.
Refer to I.3. Maintenance call for how to operate the terminal.
④
③
②
①
DDL-9000CF_1
630/1000
⑤

JaNets JT Simple Instruction Manual
14 / 45
●Progress signal display …④
This signal display indicates whether the production progress is behind / ahead of schedule
based on the determination value obtained by the below-stated formula by changing the
color so as to allow you to understand at a glance.
Determination value (%) = (Actual quantity of output / target quantity of output at the
current time - 1) x 100
* The threshold for changing the color is adjustable according to the management level.
Refer to II.8. Setting the threshold for color of the smileys in the "Instruction
Manual for the setup and change of the line".
Caution: Excessively advanced (+5 % or more)
Normal (+5 % ~-5 %)
Caution: Excessively delayed (-5 % ~-10 %)
Warning: Excessively delayed (-10 % or less)
Power OFF or Not yet communicated

JaNets JT Simple Instruction Manual
15 / 45
3. Operation rate chart of the sewing machine
With this chart, it is possible to check the operation rate and the average number of
revolutions of the sewing machine on a line-by-line basis and on a machine-by-machine
basis. In addition, hourly and daily changes in the operation rate of each sewing machine
can be checked in time series.
Use the operation rate chart as an indicator for keeping track of the production-line
downtime (machine failure, waiting time for goods in process, etc.), evaluating the
operators' skill, improving the sewing work, increasing the operation rate of automatic
machine, etc.
3-1. Operation rate chart on a line-by-line basis
When you select the Operation rate of sewing machine > Line by line …①of the report
center, Operation rate chart on a line-by-line basis …②is displayed.
●Selection of the period
One of the six periods shown below can be selected.
②
①
* Current shift * For the past 7 days
* Current day * For the past 31 days
* Previous day * Arbitrary setting
* The period is set by setting the starting date
and the ending date.

JaNets JT Simple Instruction Manual
16 / 45
●Selection of the line
Narrow down the line you want to display on a chart using the Selection of the factory,
floor and line …③.
* To display all of the lines registered with the system
Factory: Not selected yet Floor: Not selected yet Line: Not selected yet
* To display all of the lines in the selected factory
Factory: Select the factory Floor: Not selected yet Line: Not selected yet
* To display all of the lines in the selected floor
Factory: Select the factory Floor: Select the floor Line: Not selected yet
* To specify the line you want to view its operation rate
Factory: Select the factory Floor: Select the floor Line: Select the line
●Retrieval of the data
After you have selected the period and line, press the Search button …④. Then, the data
that meets the specified condition such as the period and line will be retrieved and
displayed on a chart.
③
④

JaNets JT Simple Instruction Manual
17 / 45
●Explanation of the items displayed on a chart
The operation rate (%) of the selected line is displayed in a bar chart. The average
number of revolutions of the sewing machine is displayed in a line chart.
Use this chart to help improve the operation rate without reducing the number of
revolutions of the sewing machine for increasing productivity and improving sewing work.
* When you click the Line bar chart …⑤, the operation rate chart for the sewing machine
registered in the line you have clicked is displayed.
⑤
: Network fault, terminal power-supply
disconnection
: Maintenance call, temporary stop (automatic
machine)
: Sewing machine power-supply disconnection
: Sewing machine is at rest
: Sewing machine rotates
: Average sewing speed
Other manuals for JaNets JT Simple
1
Table of contents
Other JUKI Sewing Machine Accessories manuals

JUKI
JUKI MP-G20R-TH User manual

JUKI
JUKI PS-800SB-2850 Series User manual

JUKI
JUKI DDL-7000A-7 Series User manual

JUKI
JUKI IP-420 User manual

JUKI
JUKI MP-G10-TH User manual

JUKI
JUKI IP-200 User guide

JUKI
JUKI MP-G50-TE User manual

JUKI
JUKI PS800-8045 User manual

JUKI
JUKI AK84 User manual

JUKI
JUKI IP-410 User manual