JUKI NA-11UT Series User manual

NA-11UT Series
INSTRUCTION MANUAL

CONTENTS
1. Brief introduction ..................................................................................... 1
2. Mainspecications .................................................................................. 1
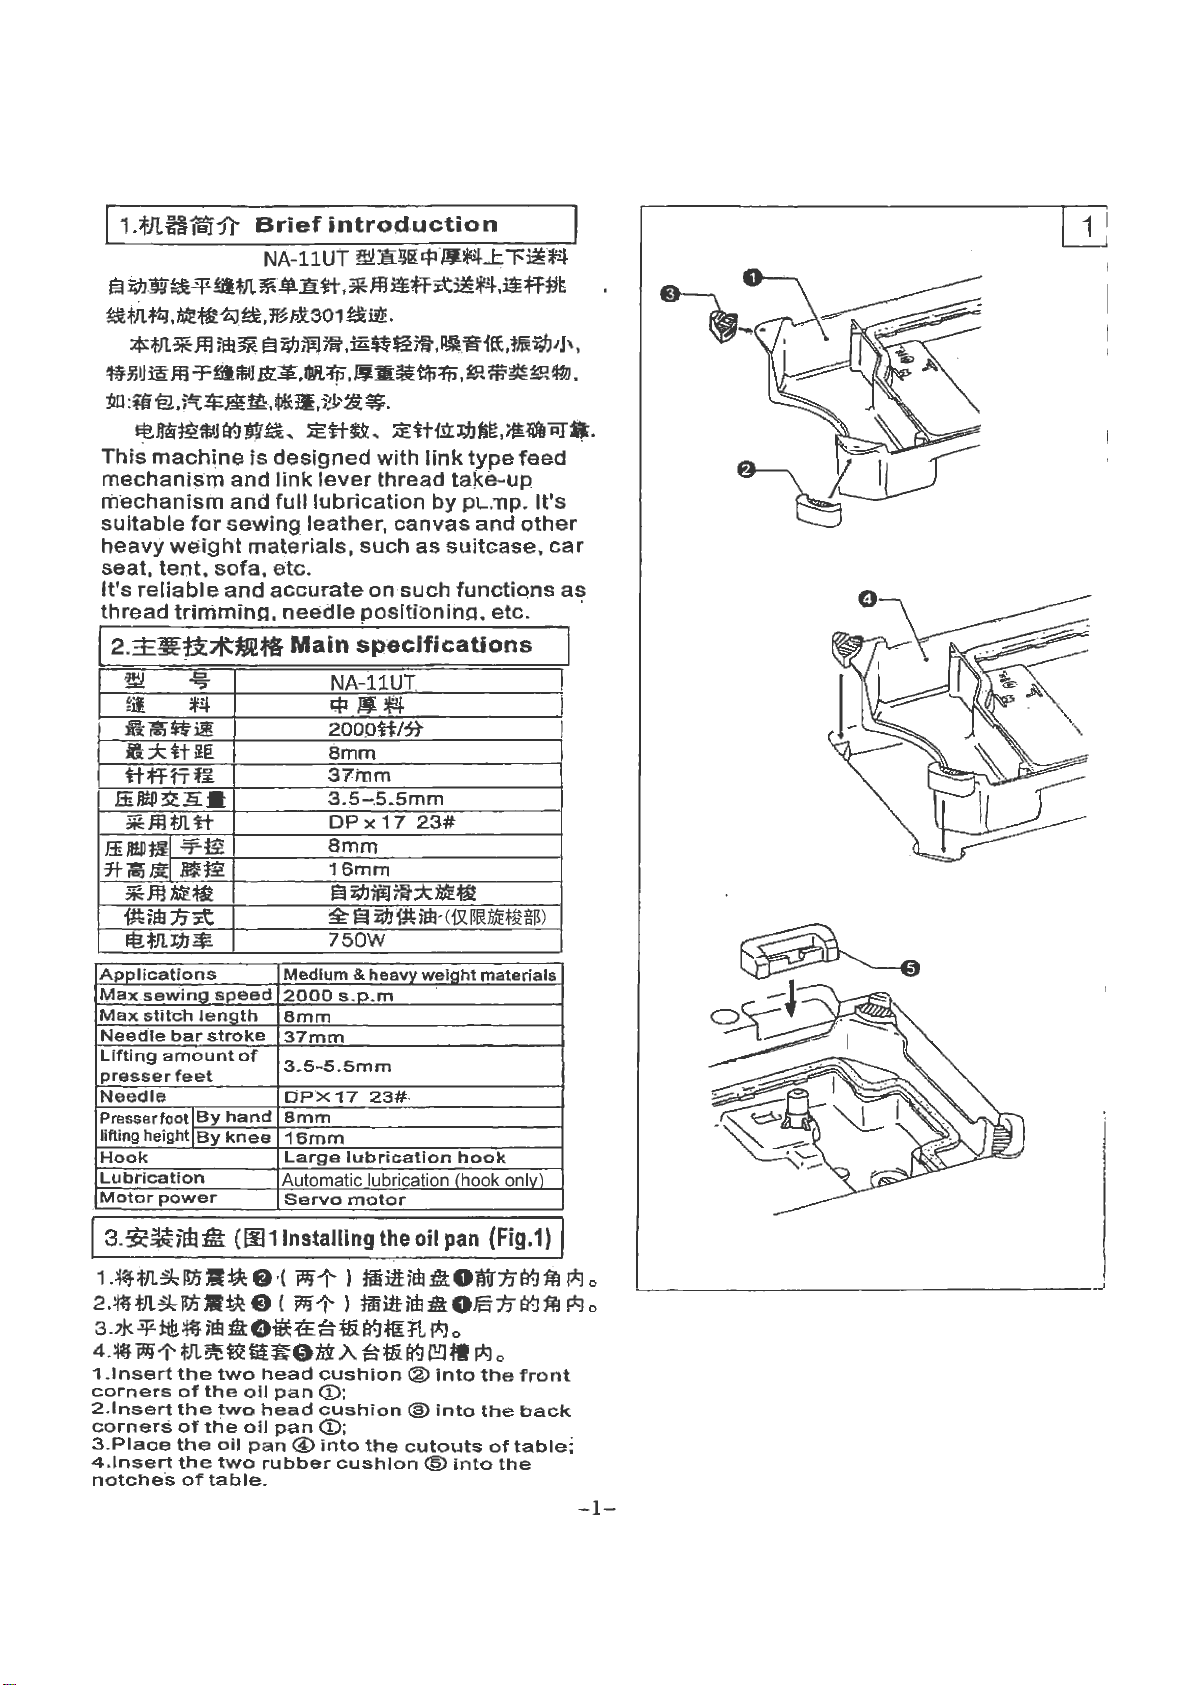
3.
Installing the oil pan
................................................................................. 1
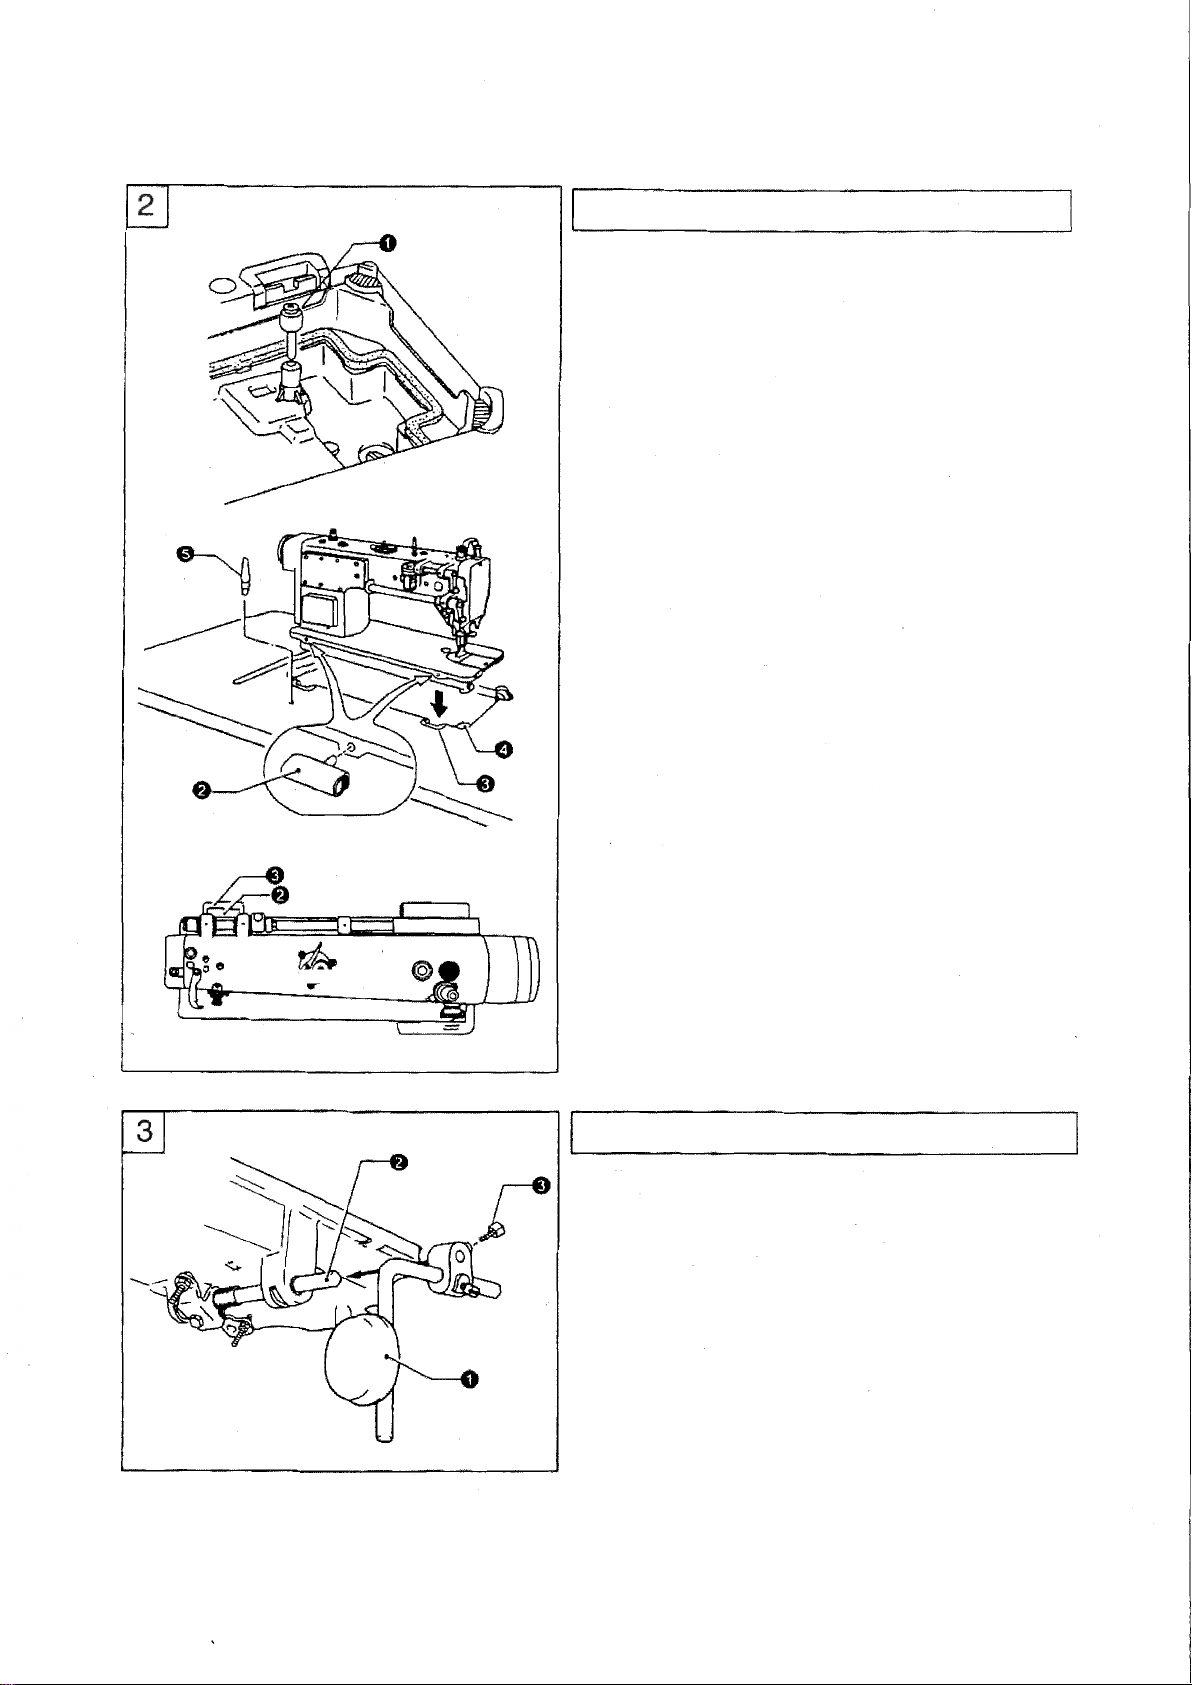
4. Installing the machine head .................................................................... 2
5. Installing the knee lifter assy .................................................................. 2
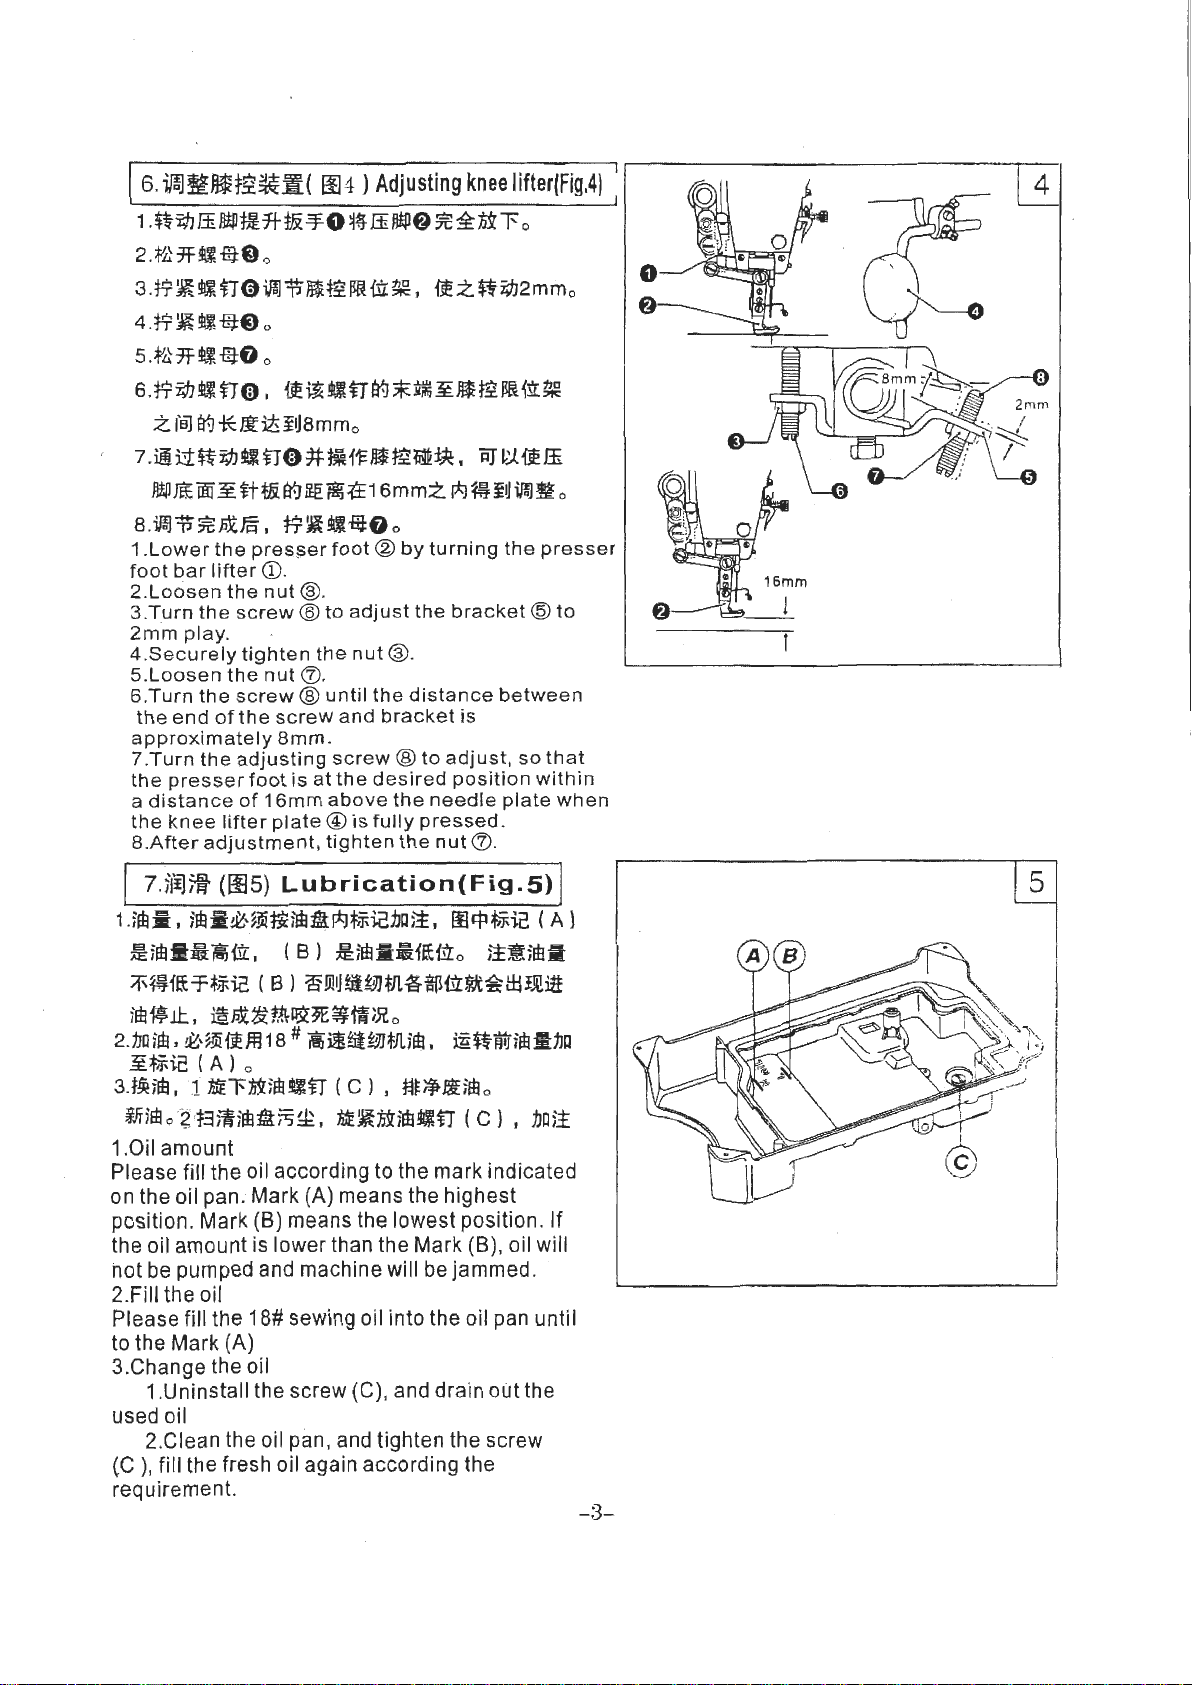
6. Adjusting the knee lifter ........................................................................... 3
7. Lubrication ................................................................................................ 3
8. Test operation ........................................................................................... 4
9. Installing the needle ................................................................................. 5
10. Removing the bobbin case .................................................................... 5
11. Windingthe bobbin thread .................................................................... 5
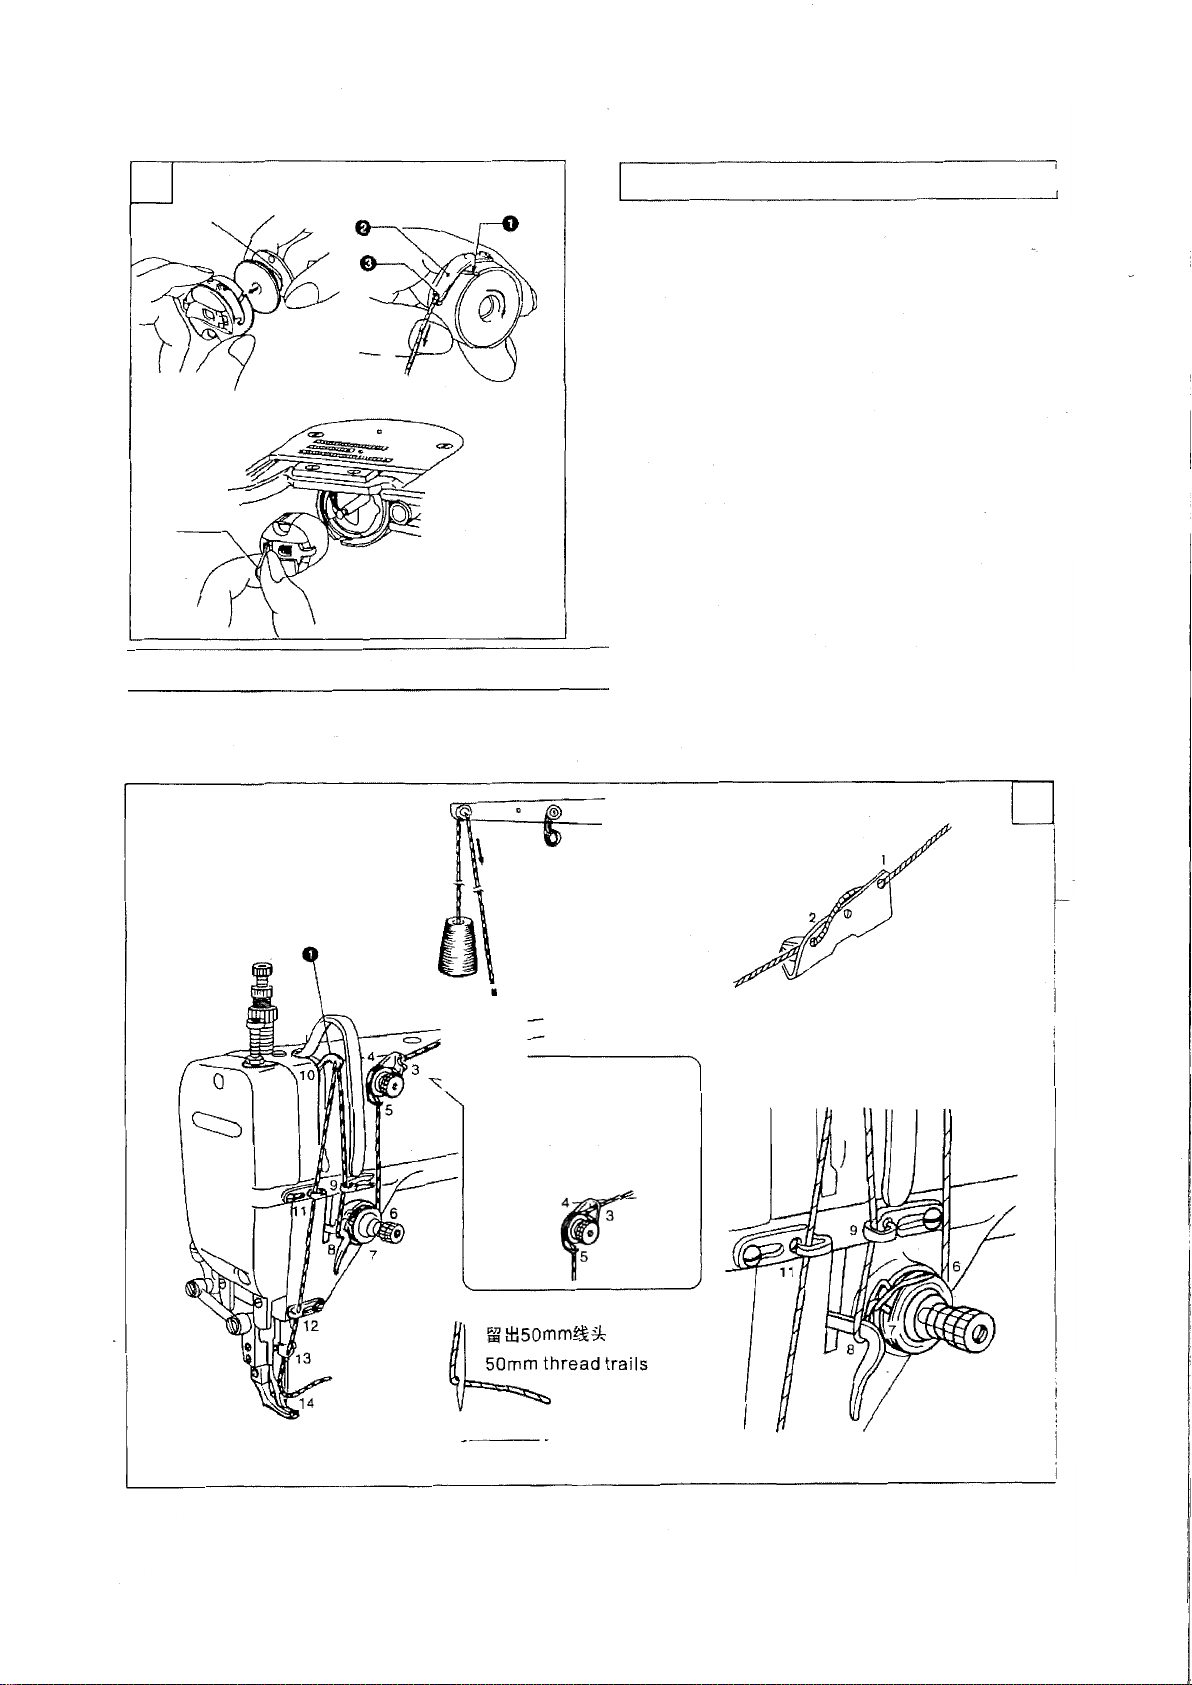
12. Threading the bobbin thread ................................................................. 6
13. Threading the needle thread ................................................................. 6
14. Adjusting the stitch length .................................................................... 7
15. Sewing and backtacking ........................................................................ 7
16. Adjusting the thread tension ................................................................. 8
17. Adjusting the presser foot pressure ..................................................... 8
18. Adjusting the trailing length after thread trimming ............................. 9
19. Adjusting the thread tension spring ..................................................... 9
20. Adjusting the upper thread guide ....................................................... 10
21.
Adjusting the presser foot height
........................................................
10
22. Adjusting the feed dog height ............................................................. 10
23. Adjusting the feed dog angle ...............................................................11
24. Adjusting the difference of stitch length between the forward and
back tacking ..........................................................................................11

25. Adjusting the tension release ..............................................................11
26. Adjusting the timing of needle and feed mechanism ....................... 12
27. Adjusting the rotary hook lubrication amount .................................. 12
28. Adjusting the height of needle bar and the timing with hook .......... 13
29. Adjusting the oil pump ......................................................................... 13
30. Adjusting the lifting amount of presser feet ...................................... 14
31. Adjusting the trimming mechanism ................................................... 15
32. Clean ...................................................................................................... 18

I1.机器筒介 Briefintroduction ‑I
NA‑llUT 型直眼中厚料上下送料
自劫剪錢平縫机系単直針 ,采用逹杵式送料珪杵挑
錢机手勾.旋稜勾錢形成301
銭追
一本机采用油奈自劫洞滑.逗特経滑,嗅音低,振劫小,
特別造用干緯制皮革. 帆布.厚重装怖布,鋲帝英年物`
如:
箱包
,汽牢座塾絲蓬,沙笈等.
卑肺控制的剪錢、定針数、定針位功能,准礁可掌
Thismachjneis designedwith link typefeed
mechani$rn andlink lever thread take‑up
mechanismandfuU lubrication bypL.11p .It's
suitable forsewingleather,canvasandother
heav.yweigh't ma¥erials,suchassuitGase, car
seat. tent. sofa. etc.
It's re.liable andacGurateon・suchfunctiqns
a~
thread trimminQ, needleposffiijniho. etc.
[2主要技木如格Mainspecifications ‑I
型号NA‑iiUT
埴床斗
中厚料
最高結速
200.0針/分
最大針蹂
iamm
針杵行程
37‑tam
圧脚交互量
3.5‑,pSmm
采用机廿 DPx1723#
圧脚提
I手・控 8mm
升高度
I
膝拉
16mm
米用旋稜
自劫淘滑大旋悛
供油方式
一
全自劫
,1共油ヽ(1又限旋稜部)
串机功率 750W
Applications Medium&heavV wei~ht materials
M~x-
sewing
speed 2000s.P.m
Maxstitch lenath 8mm
Needle barstroke 37mm
Lifting amountof 35‑5.Smm
presserfeet
Neeijle DP:X17 23#‑
PresserfootlBy hand 8mm
lifting heightlBy knee 16mm
Hook Large lubrication hook
Lubrication Automaticlubrication /hook onlv)
Motorpower Servomotor
1TI
r3.安装油盆 (001 ln;talliQg theoil pan (Fig.1) j
1将机沃防震袂f),(西介)描遊油盆0前方的角内。
2. 将机決防震訣9(商介)描追油盆〇后方的角内。
3.水平地将油盆:O嵌在台板的桓孔内。
4将両介机売絞筵套〇放入台板的凹槽内。
1.lnsertthetwoheadcushion② into thefront
corners oftheoil pan①;
2.lnsert thetwoh,eadcushion③ into theback
cornersoftheall pan①;
3.PlaoE! the oil pan④ into thecutouts oftable;
4,lnsert thetworubl:>er cushion ⑤ into the
notches oftable. ‑1‑

2
-
「
。
O屯歹
3
。

Is 洞整膝控装置(固4)Adjusting knee lifterjFig.4) ;
1桔劫圧脚提升板手〇将圧脚0完全放下。
2松升螺母〇。
3. 杵緊螺打〇洞芍膝控限位架,使之特幼2mm。
4抒紫螺母0。
5松汗螺母〇。
6. 杵劫螺打0, 使核螺打的末端至膝控限位架
之向的托度述到8mm。
7通近桔劫螺釘◎井操作膝控礎決,可以使圧
脚底面至針板的距商在16mm之内得到洞整。
8.洞芍完成后,杵緊螺母〇。
1.Lowerthe presserfoot ② byturning the presser
foot bar lifter ①.
2.Loosen the nut ③
3.Turn the screw⑥ to adjust the bracket ⑤ to
2mmplay. ・
4.Securely tighten the nut ③.
5.Loosen the nut ⑦.
6.Turn the screw⑧ until the distance between
the endof the screwand bracket is
approximately 8mm.
7.Turn the adjusting screw⑧ to adjust, sothat
the presse「foot is at the desired position within
adistance of 16mmabovethe needle plate when
the knee lifter plate ④ is fully p「essed.
8.After adjustment, tighten the nut ⑦
I7洞滑{固5) Lubrication(Fig.5)I
1油量油量必須按油盆内椋氾加注,固中椋氾 (A)
是油量最高位, (Bl 是油量最低位。 注意油量
不得低子椋氾 (Bl 否則縫匈机各部位就会出蜆迭
油停止,造成笈熟咬死等情況。
2加油,必痰使用 18 #高速縫銃机油, 逗桔前油量加
至栃氾 (Al 。
3.換油 ,1旋下放油螺釘 (Cl' 排浄度油。
新油。 2打清油盆汚坐,旋緊放油螺釘 (C}' 加注
1.0il amount
Please fill the oil according to the markindicated
onthe oil pan. Ma
「k(A) meansthe highest
position.Ma
「k(B) meansthe lowest position. If
the oil amountis Iowe「than the Mark(B), oil will
hot be pumpedand machinewill bejammed.
2.Fill the oil
Please fill the 18#sewing oil into the oil pan until
to the Mark(A)
3.Changethe oil
1.Uninstall the screw (C), anddrain out the
used oil
2.Clean the oil pan, andtighten the screw
(C), fill the f
「esh oil again according the
requirement. ‑:3‑
,5

6

I9.安装机針(回ア)Installing the needle (Fig. 7)I
1
緒劫上斡使机針上升至最高位置。
2
旋松央針螺釘
0。
3
将机針
0
直銭挿入到底げ並到針杯孔的底部カ
止).礁保妖槽向左.然后杓紫螺釘
0。
1.Turn the machinepulley to movethe needle
bar ① to its highestposition;
2.Loosen the screw②
3.lnsert the needleRinastraight line asfar as
it will go, making sure that the long groove on
the needle is at the left 蟹andthen securely
tighten the screw②
I1o.
装卸核芯套(回
8)Removing the bobbin case(Fig. 8) I
1
装稜心套的吋候,机針卑咳在最高位置。先拉升
稜fl 蓋e.
之后把稜心套放入旋稜中。放入吋清注
意稜心套上的定位板是否已鑑和旋稜心紬上的定位
檀相拉合。
2
卸稜心套吋,必須将稜
n
套向外叛升井且板足.
之后捏着叛汗的稜
il
盆徐徐地取下核心套.如此才
能使稜心套鈎住稜心,不辻稜心脱落。
1.Turn the machine pulley to lift the needle bar
to its highest position. Pull the latch ① of the
bobbin caseupward andthen put the bobbin into
the bobbin case, finally insert the complete
bobbin casewith bobbin into the hookshaft.
2.Toremovethe bobbin case, pull the latch and
drawthe bobbin caseout of the hook.
111
盗取稜芯銭(幽)
Winding the bobbin thread (Fig. 9) I
1.打汗屯源。
2.
将稜芯描入錢錢紬〇的底部。
3
根提箭決所示的方向,先将銭在稜芯上続几圏。
4
叛功続銭捏杵
0o
5.将庄脚拾走苔来。
6
蹂下踏板,便升始自劫錢底銭了。
7.
当稜芯錢満后,続錢撲杵〇便会自劫復位。
*如果稜芯錢排列不芥,可以通近松汗辺錢架螺釘〇及
移劫続錢捏杵〇的位萱送行洞市。
*続銭量由満銭跳板上的満銭度洞市螺釘〇加以洞市。
注意:造当的続錢量力平行続践至稜心外径的
80%。
1.Turn the poweron・
2.Place the bobbin ①onto the bobbin winder
shaft ②;
3.Wind the thread several circles around the
bobbin in the direction indicated byarrow;
4.Push downthe bobbin presserarm③;
5.Lift the presserfoot;
6.Depressthe treadle, the winding operation
will start;
7.Oncefinished, the bobbin presserarm③ will
recoverautomatically.
*If the thread winding is not neatandeven,
loosen the screw④ to adjust the position of
bobbin winderbase.
*Turnthe screw⑥ to adjust the bobbin winding
amount
● Tighten the screwto increase the winding
amount;
● Loosenthe screwto decrease the winding
amount
Note:
Theproperwinding amountshould bearound
80%of the bobbin capacity.
7
面
正
¢
□
一
檀
゜□
凹
淘
長
X合
儒
8
誡x
量
80[
圃゜
%
土鳳纏 x
‑5‑

10
o
广
。
竺
碍
L

一
晕
*
「
。
2
1-0
13
育
「

正常线迹
亨-
--
一,
1
I
l「』
1+ 1
I
乙勹
I
亡
『

18.洞芍剪銭后銭決的沃度(圏16)
18. Adjustingthetrailing lengthafter
threadtrimming(Fig.16)
通近特劫小央錢螺母〇来洞芍。
•在剪銭的肘候,央銭器松升,面銭只有小央践器提供的咲力。
・中示准面銭錢決的任度7'J40‑70mm。
●如果小央錢螺母〇旋蹂,那公而銭的践共沃度就短。
如果小央錢螺母〇旋松,那仏面践的錢共長度就沃。
Turnthenut① to adjustthetrailing length
• Atthetimeofthreadtrimming. thethread
tension mechanismwill releaseandtheneedle
threadtension is onlyapplied bythethread
guide
①;
• The"standardtrailing length fortheneedle
thread is 40‑70mm;
• If increasethethread guidetension, the
trailing length will beshort; if decreasethe
threadguidetension, thetrailing length will be
longer
19調芍挑銭黄(囲17)
i9. Adjustingthethreadtension
spring(Fig. 17>
*挑錢簑的椋准位置7<J :当匠脚〇放下吋,大錢勾
0的上表面至挑践簑05‑Bmm
1放下圧脚〇。
2.
松汗固定螺釘〇。
3
結劫央銭組件〇洞整央銭黄的位聟。
4.tキ紫固定螺釘0。
*挑践簑的椋准強度力0.30.6N。
5将面銭拉出夫銭器〇少汗,井用手指按住c
6将面銭向下拉,使挑銭簑0
与大銭勾〇上表面
一致,返吋就測定挑銭貸的強度。
7.用汗刀描入央践螺釘槽0中,通近結劫汗刀来
洞芍挑錢簑〇的力度。
注意:
当使用測力器0清漠取対准紅錢J:. 的那介数字。
*Thestandardposition oftheth「eadtension
spring ① is 5‑Bmmabovetheuppersurfaceof
thethreadguide③ whenthepresserfoot② is
lowered.
1.Lowerthe presserfoot②;
2.Loosenthescrew④;
3.Turnthethreadtension bracket⑤ to adjust
thespring position;
4.Tighten thescrew④.
*Thestandardtension ofthespring is
0.3‑0.SN.
5.Pushtheneedlethreadwith yourfinger until
it is slightly higherthanthethreadtension
bracket⑤ andsothattheupperthread is not
pulled out;
6.Pull theneedlethreaddownuntil thespring
① is atthesameheightwith theuppersurface
ofthread guide③,andthenmeasurethe
tensionofthespring.
?.Inserta screwdriverinto theslot ofthe
threadtension stud⑥,andturn thestud to
adjustthetensionofthespring ①
Note:
If usinga tension gauge⑦ to measurethe
tension, takethereading fromthescaleon
thesideofthe redline.
‑9‑
16
17
0.3 ‑0.6N
ぃ
I i
40‑70mm

勹
三
19
。
20
3
全
O
o

°
*
*
邑令酝雹三芦m
—
`
砃今 -三-St昙ard
。
CD.
一
L

24
@
_
25
小大
(`\
g
g

|
o
。
O
今
.
26
|
|
-13-
B
--L
|
工
1
27

28
0
)
C
O

刀架
1
/
勹亡,',入
仆
「
「
「
「
A
30
/
87.5
;
`
)
f1
岁
`
j'
-15-

33
\}
、
l-
o

. 咖 七~
B
二鸾
7~
-竺文今~
了
I尸奇:t
声,
一
乏
归
Il'
孚一上\
何
飞
雯 .
-17-
Other manuals for NA-11UT Series
1
Table of contents
Other JUKI Sewing Machine manuals

JUKI
JUKI DDL-9000A User manual

JUKI
JUKI LBH-772NV-1 User manual

JUKI
JUKI PLC-2710NVM User manual

JUKI
JUKI Sewing Machine User manual

JUKI
JUKI DLN-6390 User manual

JUKI
JUKI HZL-60ce User manual

JUKI
JUKI MO-103 User manual

JUKI
JUKI UnionSpecial 36200UAD52 Setup guide

JUKI
JUKI L-1 Series User manual

JUKI
JUKI LK-1900A-SS User manual

JUKI
JUKI HZL - 355Z Series User manual

JUKI
JUKI MP-200NS User manual

JUKI
JUKI LBH-1790 Series User manual

JUKI
JUKI MO-2404 User manual

JUKI
JUKI LH-4500C Series User manual

JUKI
JUKI AP-874S User manual

JUKI
JUKI LK-1900AN-SS User manual

JUKI
JUKI HZL-350Z series User manual

JUKI
JUKI PS-800-12080 User manual

JUKI
JUKI LK-1900B series User manual