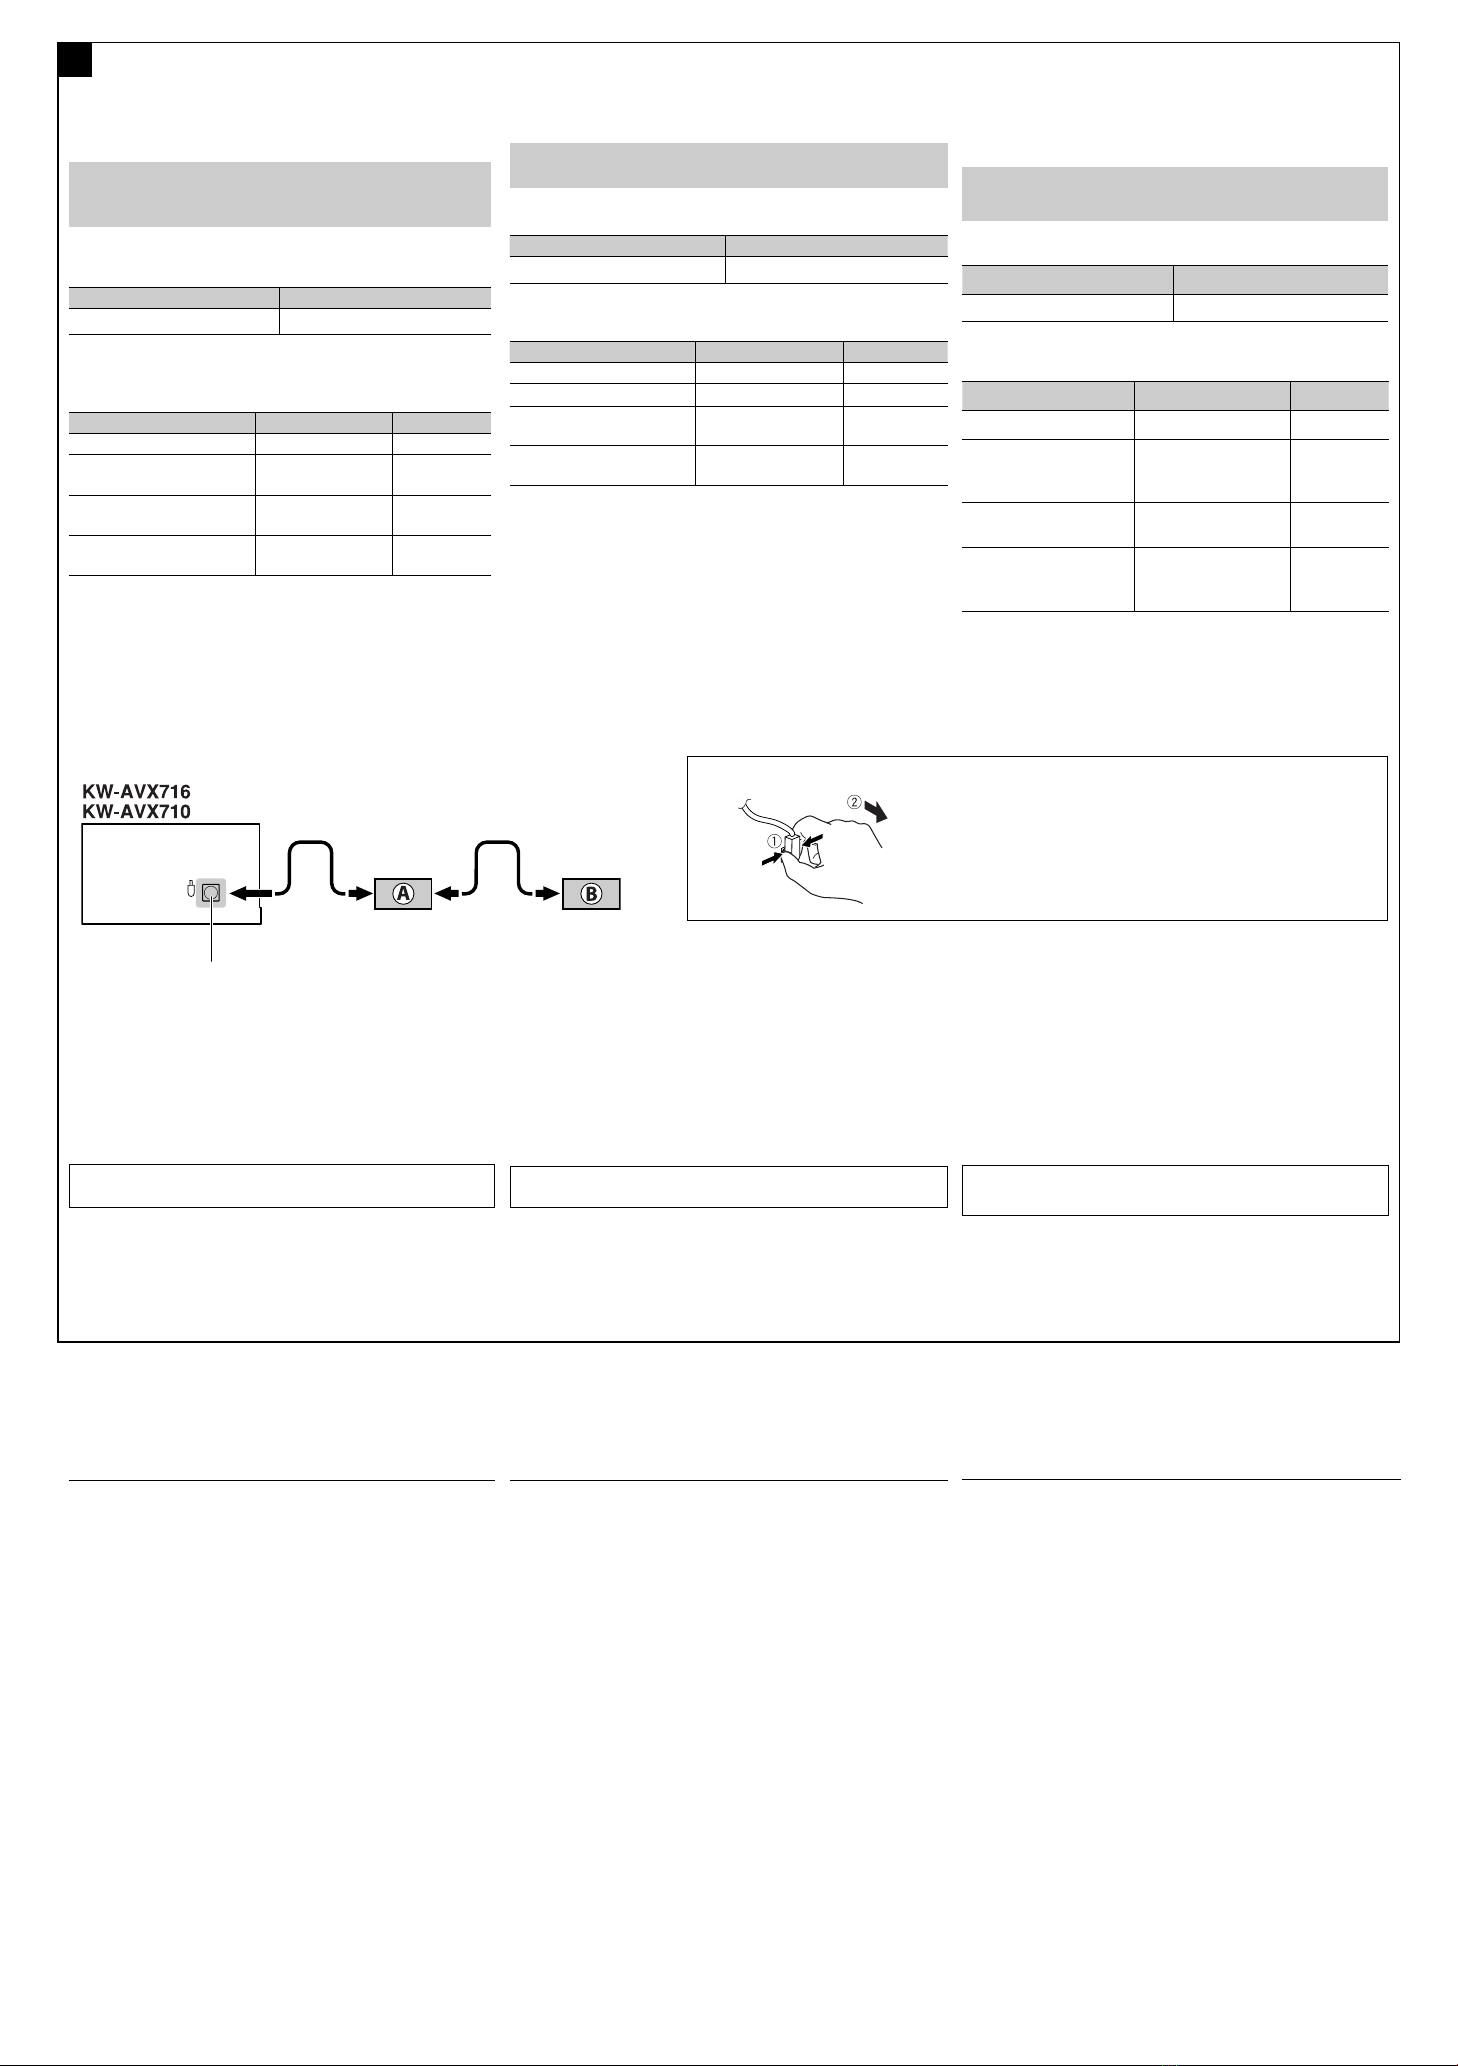
KW-AVX716/KW-AVX710
Installation/Connection Manual
ϰ༬ો˿
°“√µ‘¥µ—Èß/§ŸË¡◊Õ°“√µ‘¥µ—Èß
Crimp connector
қʪᏃ
¢—È«µËÕ”À√—∫Àπ’∫
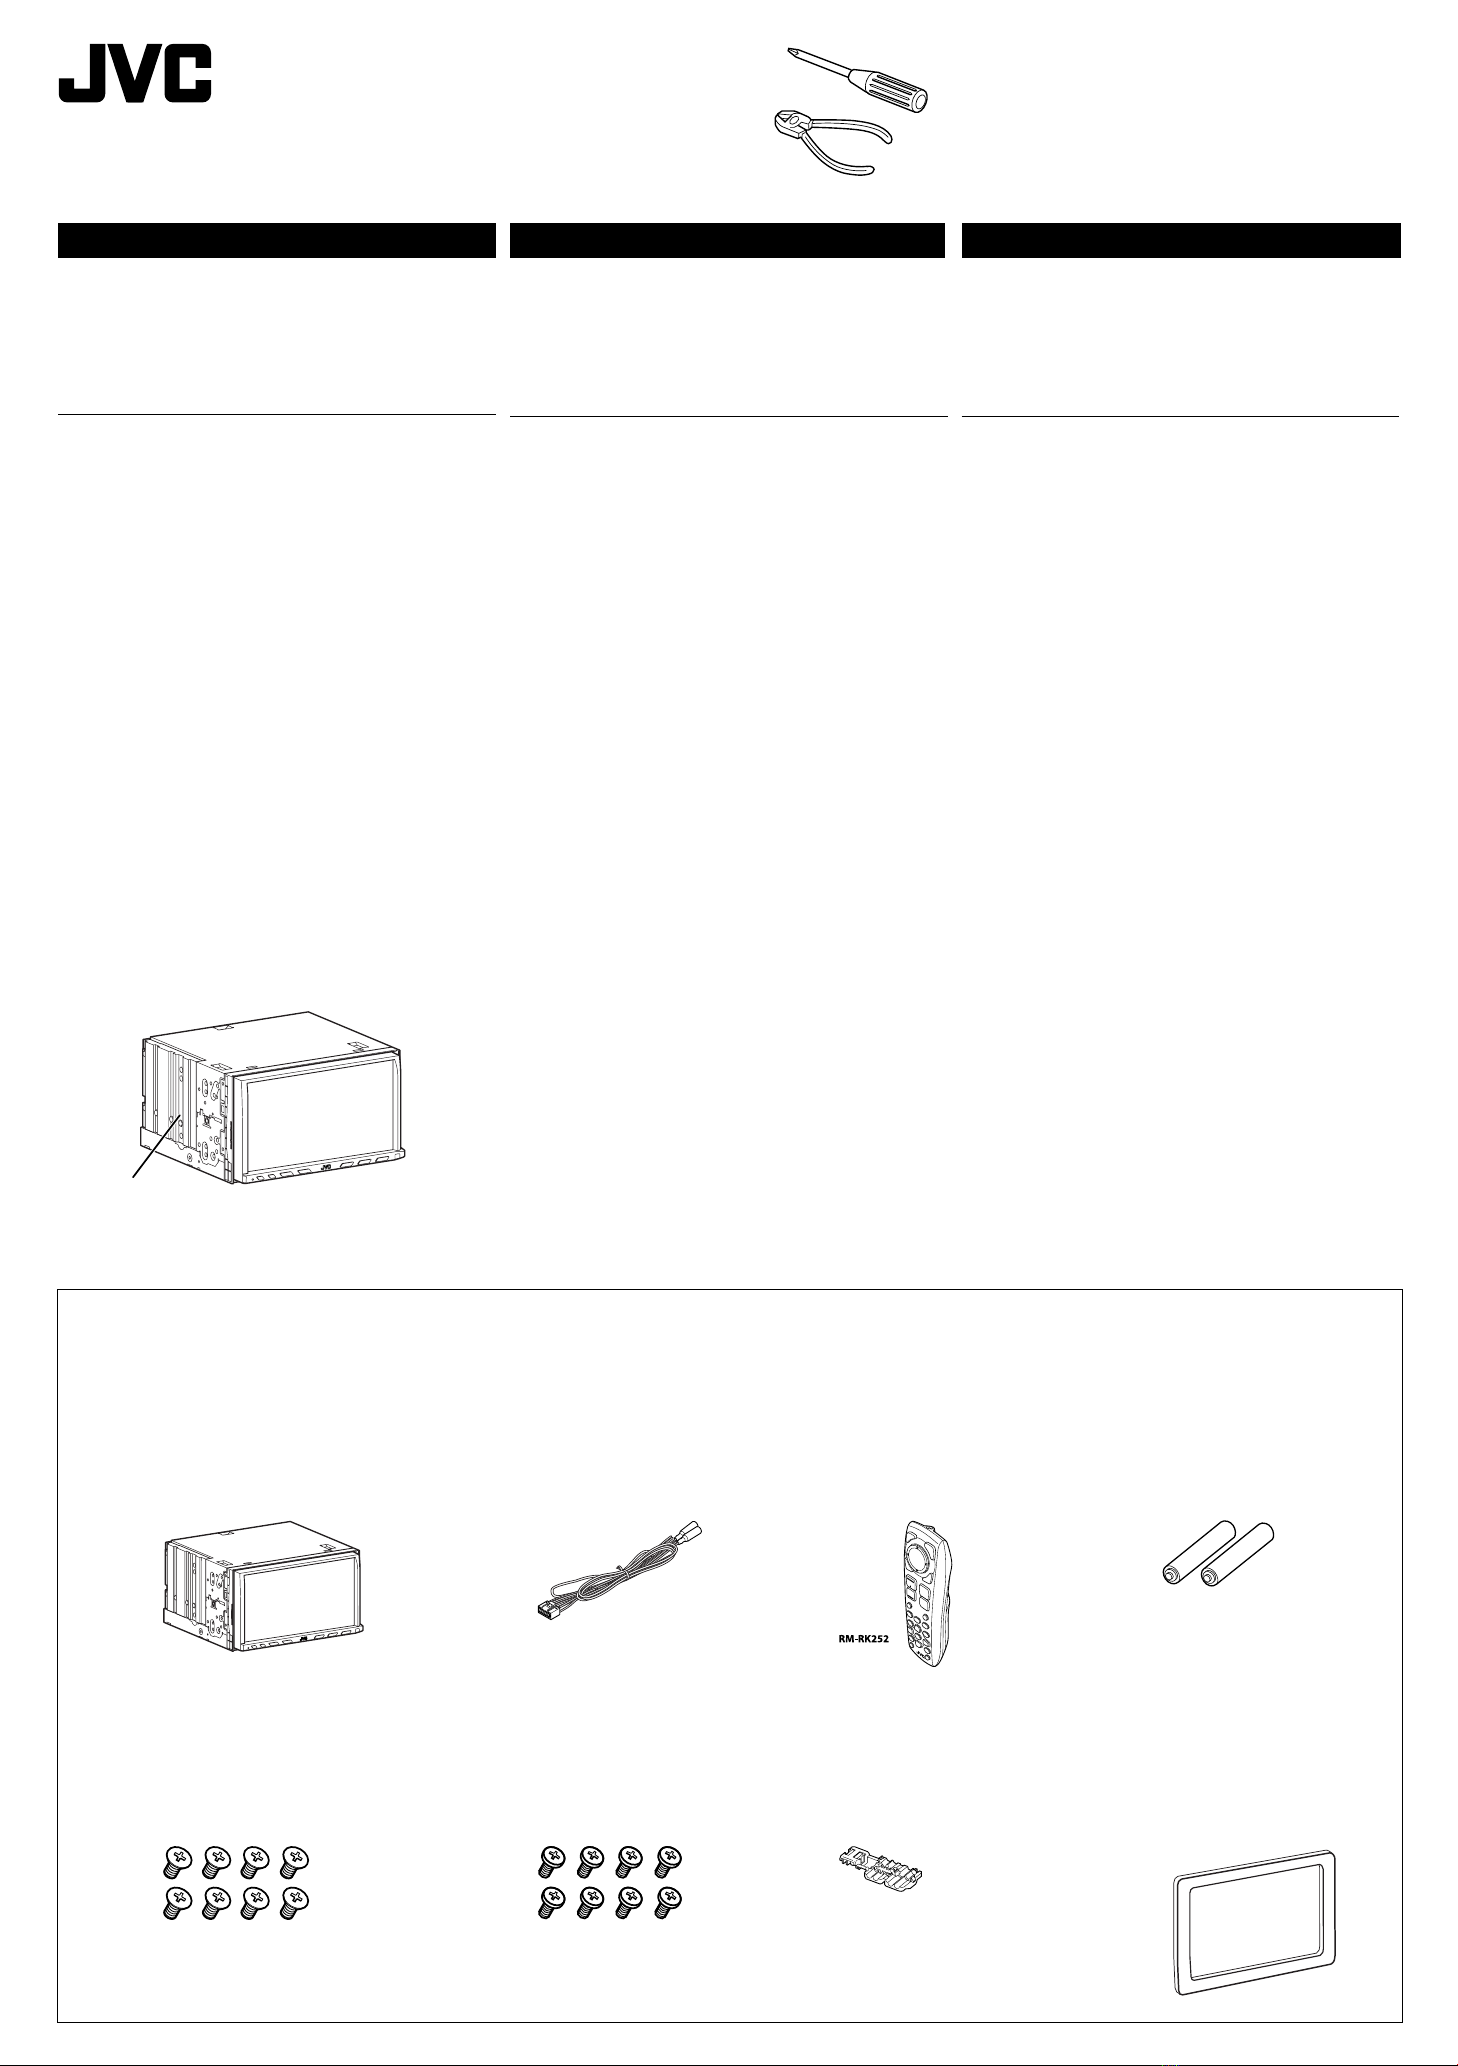
Power cord
ྐཔ·ڄለӧ
“¬‡§‡∫‘≈°”≈—ß
Batteries
ྐЖ
·∫µ‡µÕ√’Ë
Heat sink
ಞᇊ
·ºËπ√–∫“¬§«“¡√ÈÕπ
1
1207MNMMDWJEIN
EN, CT, TH
©2008 Victor Company of Japan, Limited
Remote controller
ჲ
√’‚¡µ§Õπ‚∑√≈
Parts list for installation and connection
The following parts are provided for this unit.
If anything is missing, contact your dealer immediately.
Main unit
ጅ
µí«‡§√◊ËÕß
Round head screws (M5 x 8 mm)
ฐᏃᒘീ (M5 x 8 mm)
°√ŸÀ—«°≈¡ (M5 x 8 ¡¡)
Flat head screws (M5 x 8 mm)
Ꮓᒘീ (M5 x 8 mm)
°√ŸÀ—«·∫π (M5 x 8 ¡¡)
LVT1780-008A
[U/UT]
ENGLISH
This unit is designed to operate on 12 V DC, NEGATIVE ground
electrical systems. If your vehicle does not have this system, a
voltage inverter is required, which can be purchased at JVC car audio
dealers.
WARNINGS
• DO NOT install any unit or wire any cable in a location where;
– it may obstruct the steering wheel and gearshift lever operations,
as this may result in a traffic accident.
– it may obstruct the operation of safety devices such as air bags, as
this may result in a fatal accident.
– it may obstruct visibility.
• DO NOT operate any unit while manipulating the steering wheel, as
this may result in a traffic accident.
• The driver must not watch the monitor while driving. It may lead to
carelessness and cause an accident.
• If you need to operate the unit while driving, be sure to look around
carefully or you may be involved in a traffic accident.
• If the parking brake is not engaged, “Parking Brake” flashes on the
monitor, and no playback picture will be shown.
– This warning appears only when the parking brake wire is
connected to the parking brake system built in the car.
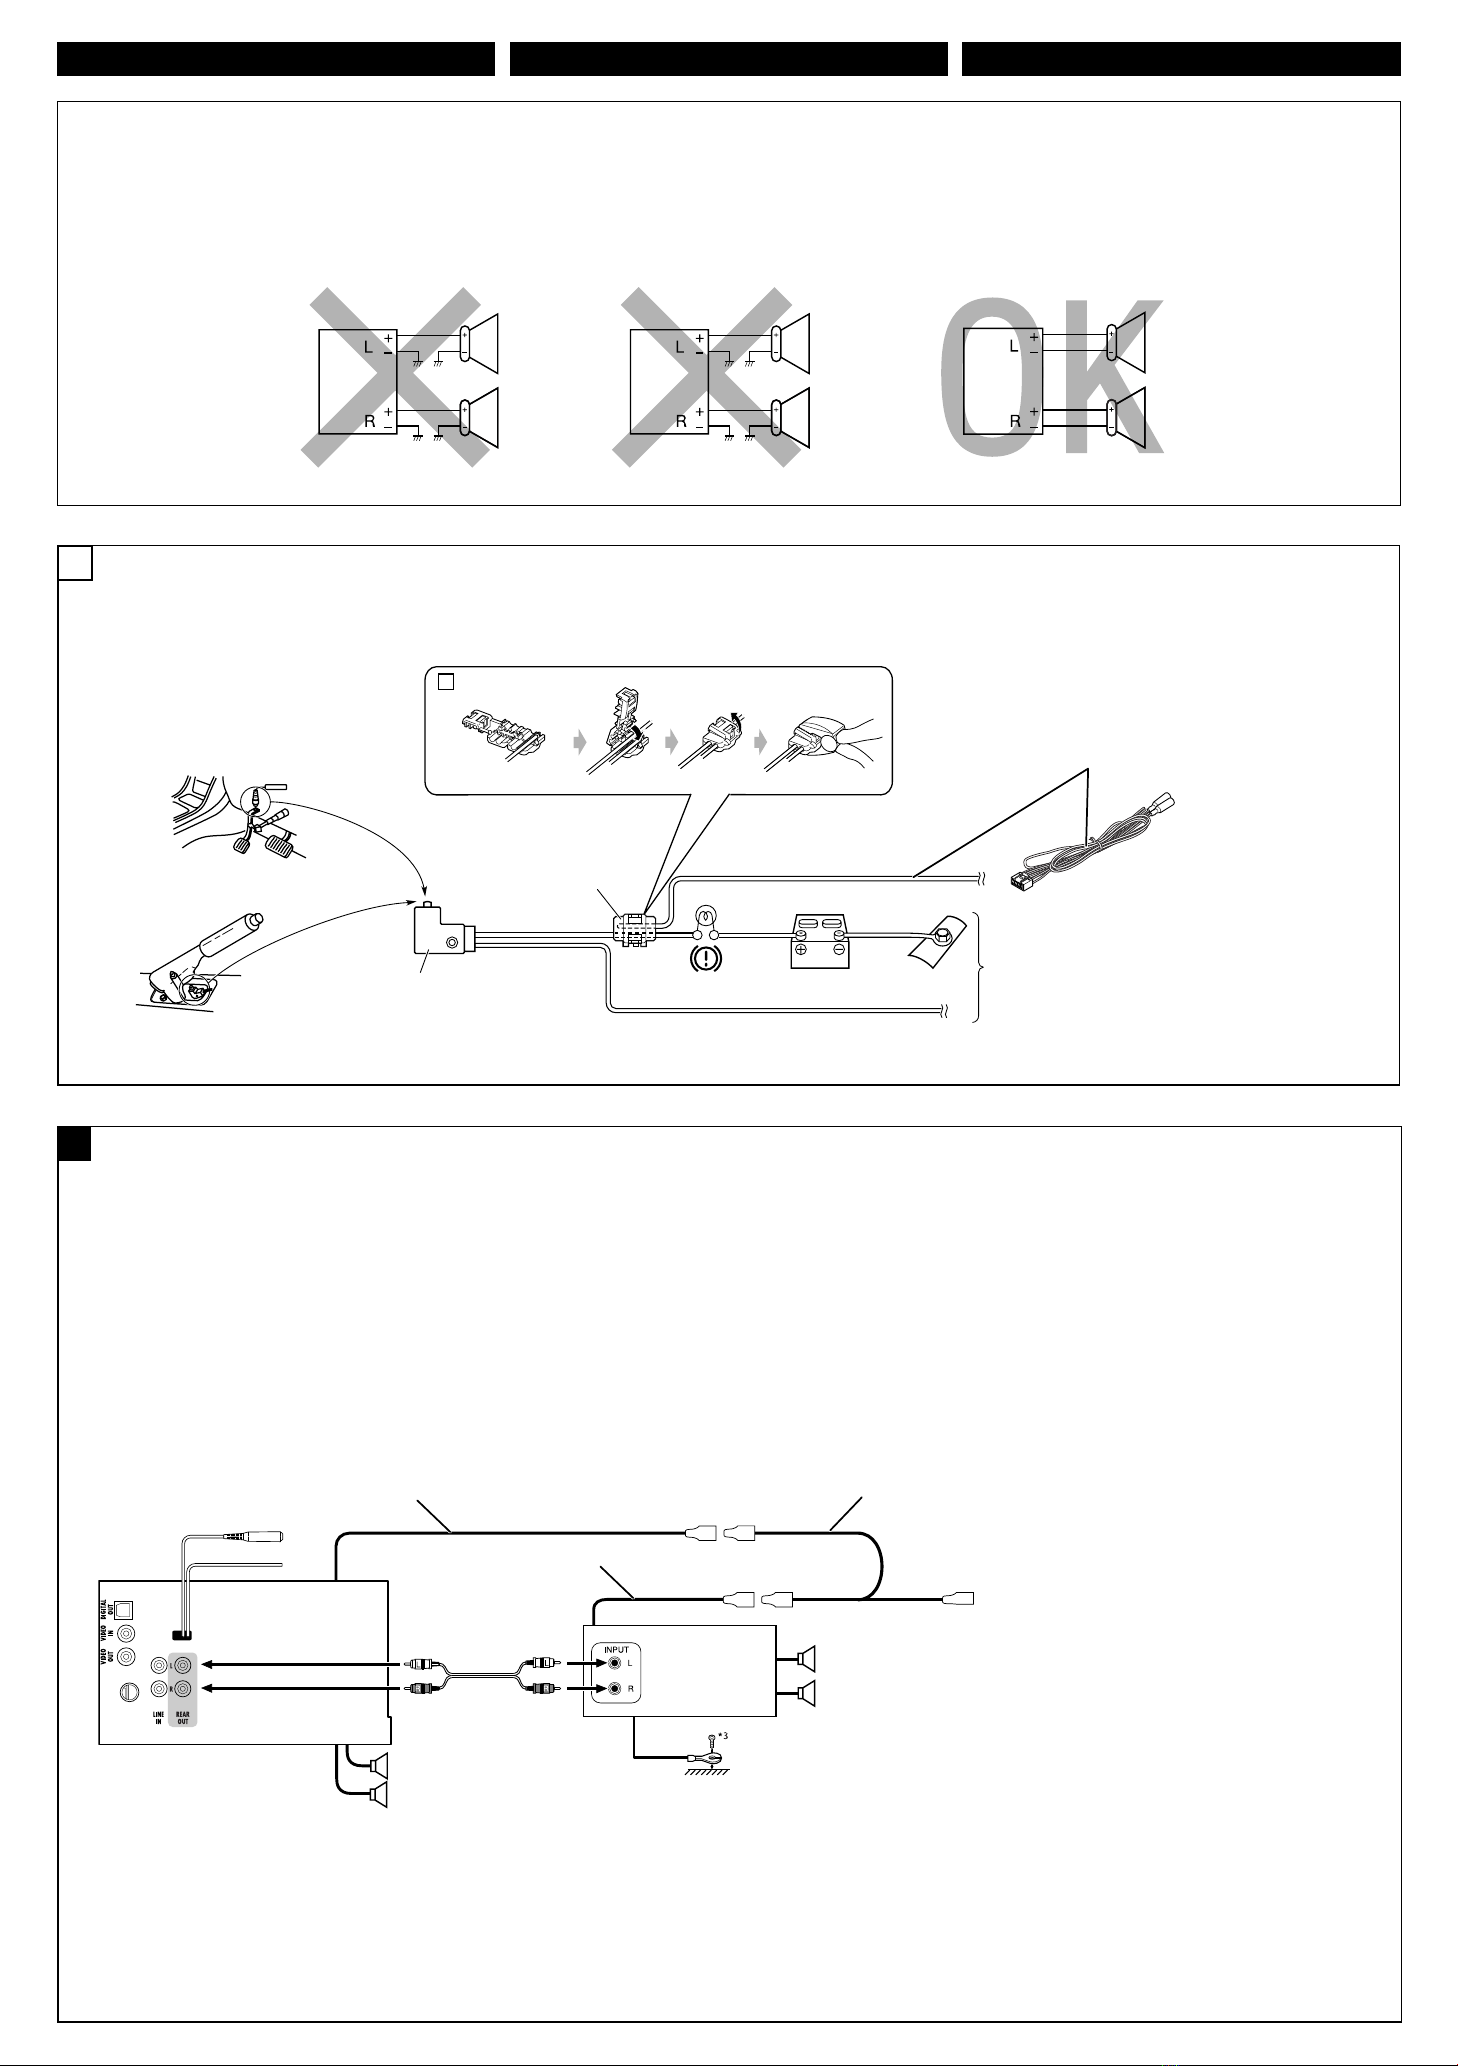
Notes on electrical connections:
•Replace the fuse with one of the specified rating. If the fuse blows
frequently, consult your JVC car audio dealer.
•It is recommended to connect speakers with a maximum power
of more than 50 W (both at the rear and at the front, with an
impedance of 4Ω to 8 Ω).
If the maximum power is less than 50 W, change “Amplifier Gain”
setting to prevent the speakers from being damaged (see page 49 of
the INSTRUCTIONS).
•To prevent short circuits, cover the terminals of the UNUSED leads
with insulating tape.
•The heat sink becomes very hot after use. Be careful not to touch it
when removing this unit.
Plate for use with a Nissan car
·ؠ୕ԆԾڄ
·ºËπ”À√—∫„™È°—∫√∂π‘—π
ˁ
ʹጅ෮՟·ڈޠ12 V é࠸ોϚڅྑກԧéϨسڄԾቩ
ԅЉɾྐԦç۱ᄔ࠱ɾࡴྐᏫ᜵ಗçϚJVCԆԾ
ࡖᛏ˜ኀளකռé
ᙲѿ
• ˝ˡϚʓтϯ༫ʹጅྐង;
– Ҟᗉዬѕώᇟ֜᜵ᐑଁڄтѴ۱˺ചΟ
Ֆݭé
– Ҟᗉዬѕϯη༫çϨϯηெമڄтçѴ۱
˺ചࠓ֡ڄΟՖݭé
– Ҟᗉඁ௴ڄтé
•
˝ˡϚዬѕώᇟڄཫദˀዬѕʹጅçѴ۱˺ചΟՖݭé
• ኢአçኢአ࢜˝ˡႌԠΕéࠓՓ˺ചՖ
ݭé
• Ϛኢአཫദˀࠜᄔ࠱ዬѕʹጅç˝৩࠱ં˝ٌำۮçѴ۱
˺ചΟՖݭé
• ࠜ˾۫ԾͶ⽂ϐç“Parking Brake” ϪᆟϚΕʕᖼç
ٗᆑ؞࿌é
– ෮ະ˾۫ԾለႩԆԾ˖ڄ˾۫ԾԦߟЏᙱѾۑ
ࣥʼé
нྑཕોٍิ:
• ӕۘᎳീӦಗᖃ׆࠷மࡩڄۘᎳീéϨسۘᎳീગጛᖢç
ቁώJVC ԆԾࡖᛏ˜ኀ༿é
•
݈֜ۮಙᑵڄఛʨ᎔ʈᏻʨؠ50 Wçմۇӏ
4Ωü8 ΩéϨسఛʨʮؠ 50 Wçቁቆ
“Amplifier Gain”
׆ࡩçՎಙᑵ๑ᖢé
(
ኌ՟·იاڄ୶49ࡗ
)
é
• Վྐഠཔçቁ·ഽሇઘу͵՟·ྐለڄၷʪé
• ʹጅ՟·݈çಞᇊ݃ᇊéϕЏçϚ୰ʹጅçʮ˻ʿ࠱
᙮ညಞᇊé
‰∑¬
™ÿ¥ª√–°Õ∫π’ȉ¥È√—∫°“√ÕÕ°·∫∫¡“‡æ◊ËÕ„™Èß“π°—∫√–∫∫ °√–·‰øøÈ““¬¥‘π¢—È«≈∫°√–
·µ√ß 12 ‚«≈∑Ï À“°√∂¬πµÏ¢Õߧÿ≥‰¡Ë‰¥È„™È√–∫∫π’È µÈÕß„™È‡§√◊ËÕß·ª≈ß°√–
·‰ø™Ë«¬ ´÷Ëß“¡“√∂À“´◊ÈÕ‰¥È®“°√È“π¢“¬‡§√◊ËÕ߇’¬ß√∂¬πµÏ JVC
§”‡µ◊Õπ
• լ˓µ‘¥µ—È߇§√◊ËÕ߇≈ËπÀ√◊Õ‡¥‘𓬉ø„πµ”·ÀπËß∑’Ë;
– Õ“®°’¥¢«“ß°“√∑”ß“π¢Õßæ«ß¡“≈—¬·≈–§—π‡°’¬√Ï ‡æ√“–Õ“®°ËÕ„Àȇ°‘¥Õÿ∫—µ‡Àµÿ¢÷È
–
Õ“®°’¥¢«“ß°“√∑”ß“π¢ÕßÕÿª°√≥ϪÈÕß°—𧫓ª≈Õ¥¿—¬ ‡™Ëπ ·Õ√Ï·∫§ ‡æ√“–
Õ“®°ËÕ„Àȇ°‘¥Õ—πµ√“¬√È“¬·√ß∂÷ß™’«‘µ¢÷Èπ‰¥È
– Õ“®°’¥¢«“ß“¬µ“
• լ˓„™Èß“π¢≥–¢—∫¢’Ë ‡æ√“–Õ“®°ËÕ„Àȇ°‘¥Õÿ∫—µ‘‡Àµÿ¢÷Èπ‰¥È
• ºŸÈ¢—∫µÈÕ߉¡Ë¡Õß∑’ˮաÕ𑇵Õ√Ï¢≥–¢—∫¢’Ë ‡æ√“–Õ“®π”‰ªŸË§«“¡ª√–¡“∑‡≈‘π‡≈ËÕ·≈–
°ËÕ„Àȇ°‘¥Õÿ∫—µ‘‡Àµÿ‰¥È
•À“°µÈÕß°“√„™Èß“π‡§√◊ËÕߢ≥–¢—∫¢’Ë µÈÕß·πË„®«Ë“‰¥È„™È§«“¡√–¡—¥√–«—ßլ˓ߥ’
‡æ◊ËÕÀ≈’°‡≈’ˬ߰“√‡°‘¥Õÿ∫—µ‘‡Àµÿ
•À“°‰¡Ë‰¥È„ˇ∫√°¡◊Õ ¢ÈÕ§«“¡ “Parking Brake” ®–°–æ√‘∫∑’ËÀπÈ“®Õ ·≈–®–
‰¡Ë¡’¿“淥ߢ÷Èπ¡“
– §”‡µ◊Õππ’È®–ª√“°Ø¢÷Èπ‡©æ“–‡¡◊ËÕµËÕ“¬‡∫√°°—∫√–∫∫‡∫√°„π√∂¬πµÏ‰«È‡∑Ë“π—Èπ
¡ÈÕπŸ≈„π°“√•ËÕ√–∫∫‰ø:
•„™Èæ‘°—¥®”‡æ“–·∑πøî«À“°øî«Ï¢“¥∫ËÕ¬ „ÀȪ√÷°…“√È“ π¢“¬‡§√◊ËÕ߇’¬ß√∂¬πµÏ JVC
•¢Õ·π–π”„ÀȵËÕ≈”‚æß ∑’Ë¡’°”≈—ߢ—∫ßÿ¥‡°‘π°«Ë“
50 W
(∑—ÈߥȓπÀπÈ“·≈–¥È“πÀ≈—ß
¡’§Ë“§«“¡µÈ“π∑“π 4Ω∂÷ß 8 Ω)∂È“°”≈—ߢ—∫µË”°«Ë“ 50 W „Àȇª≈’ˬπ§Ë“
“Amplifier Gain” ‡æ◊ËÕªÈÕß°—π‰¡Ë„ÀÈ≈”‚æß™”√ÿ¥ (¥ŸÀπÈ“
49
§”·π–π”)
•°“√ªÈÕß°—π°“√≈—¥«ß®√ ®–µÈÕßæ—π¢—È«“¬µ–°—Ë« ∑’ˉ¡Ë„™È·≈È«¥È«¬‡∑ ªæ—𓬉ø
•
·ºËπ√–∫“¬§«“¡√ÈÕπ®–√ÈÕπ¡“°À≈—ß®“°„™È √–¡—¥√–«—ßլ˓‰ª —¡º—‡¡◊ËÕ∂Õ¥™ÿ¥ª√–°Õ∫π’È
Έءϰ༬֝ોڅྒྷέଢశ
ʹጅకʓྒάé
ࠜചথ˲έщɾάྒάçቁѮոᑷുڄ˜ኀé
√“¬°“√Ë«πª√–°Õ∫”À√—∫µ‘¥µ—Èß·≈–‡™◊ËÕ¡µËÕ°—π
Ë«πª√–°Õ∫µËÕ‰ªπ’È„ÀÈ¡“°—∫™ÿ¥ª√–°Õ∫π’È À“°¡’‘Ëß„¥‰¡Ë§√∫ °√ÿ≥“µ‘¥µËÕµ—
«·∑π®”ÀπË“¬‚¥¬∑—π∑’
THCT1-3_AVX710-008A.indd 1THCT1-3_AVX710-008A.indd 1 12/6/07 3:37:44 PM12/6/07 3:37:44 PM