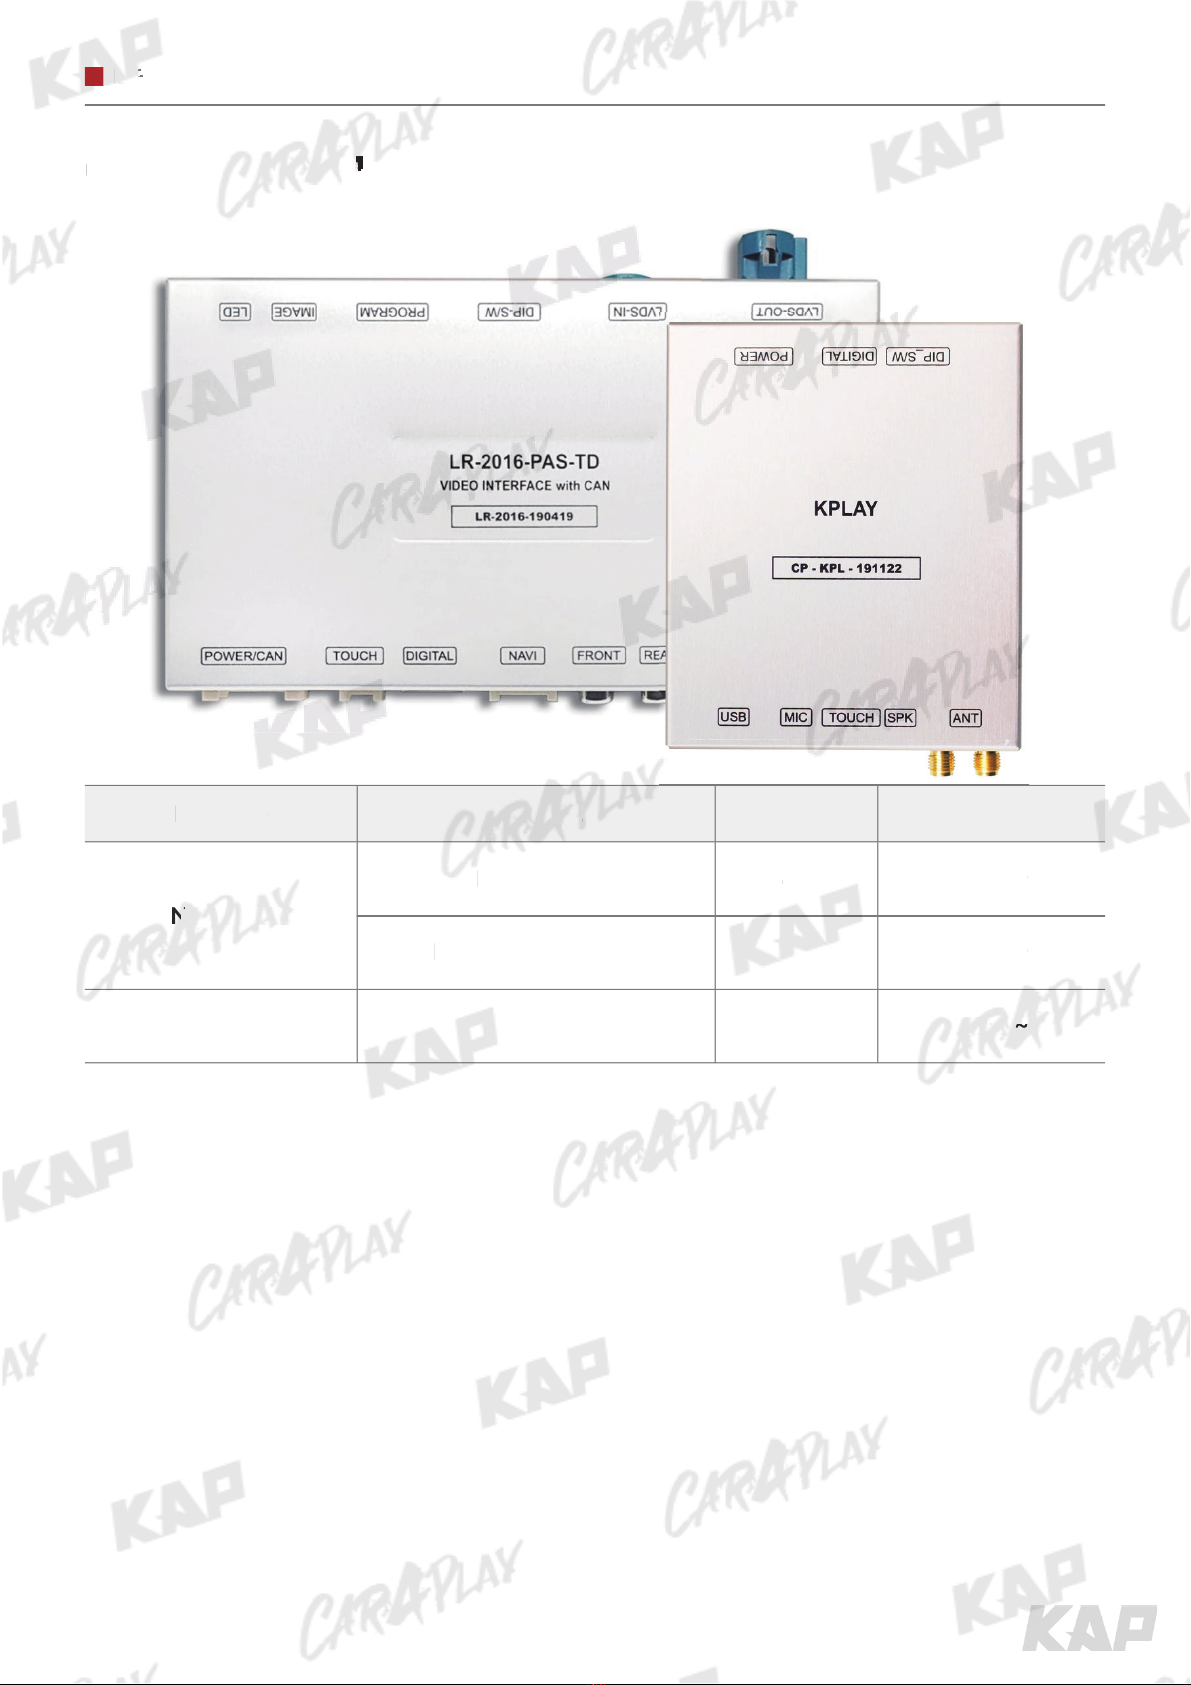
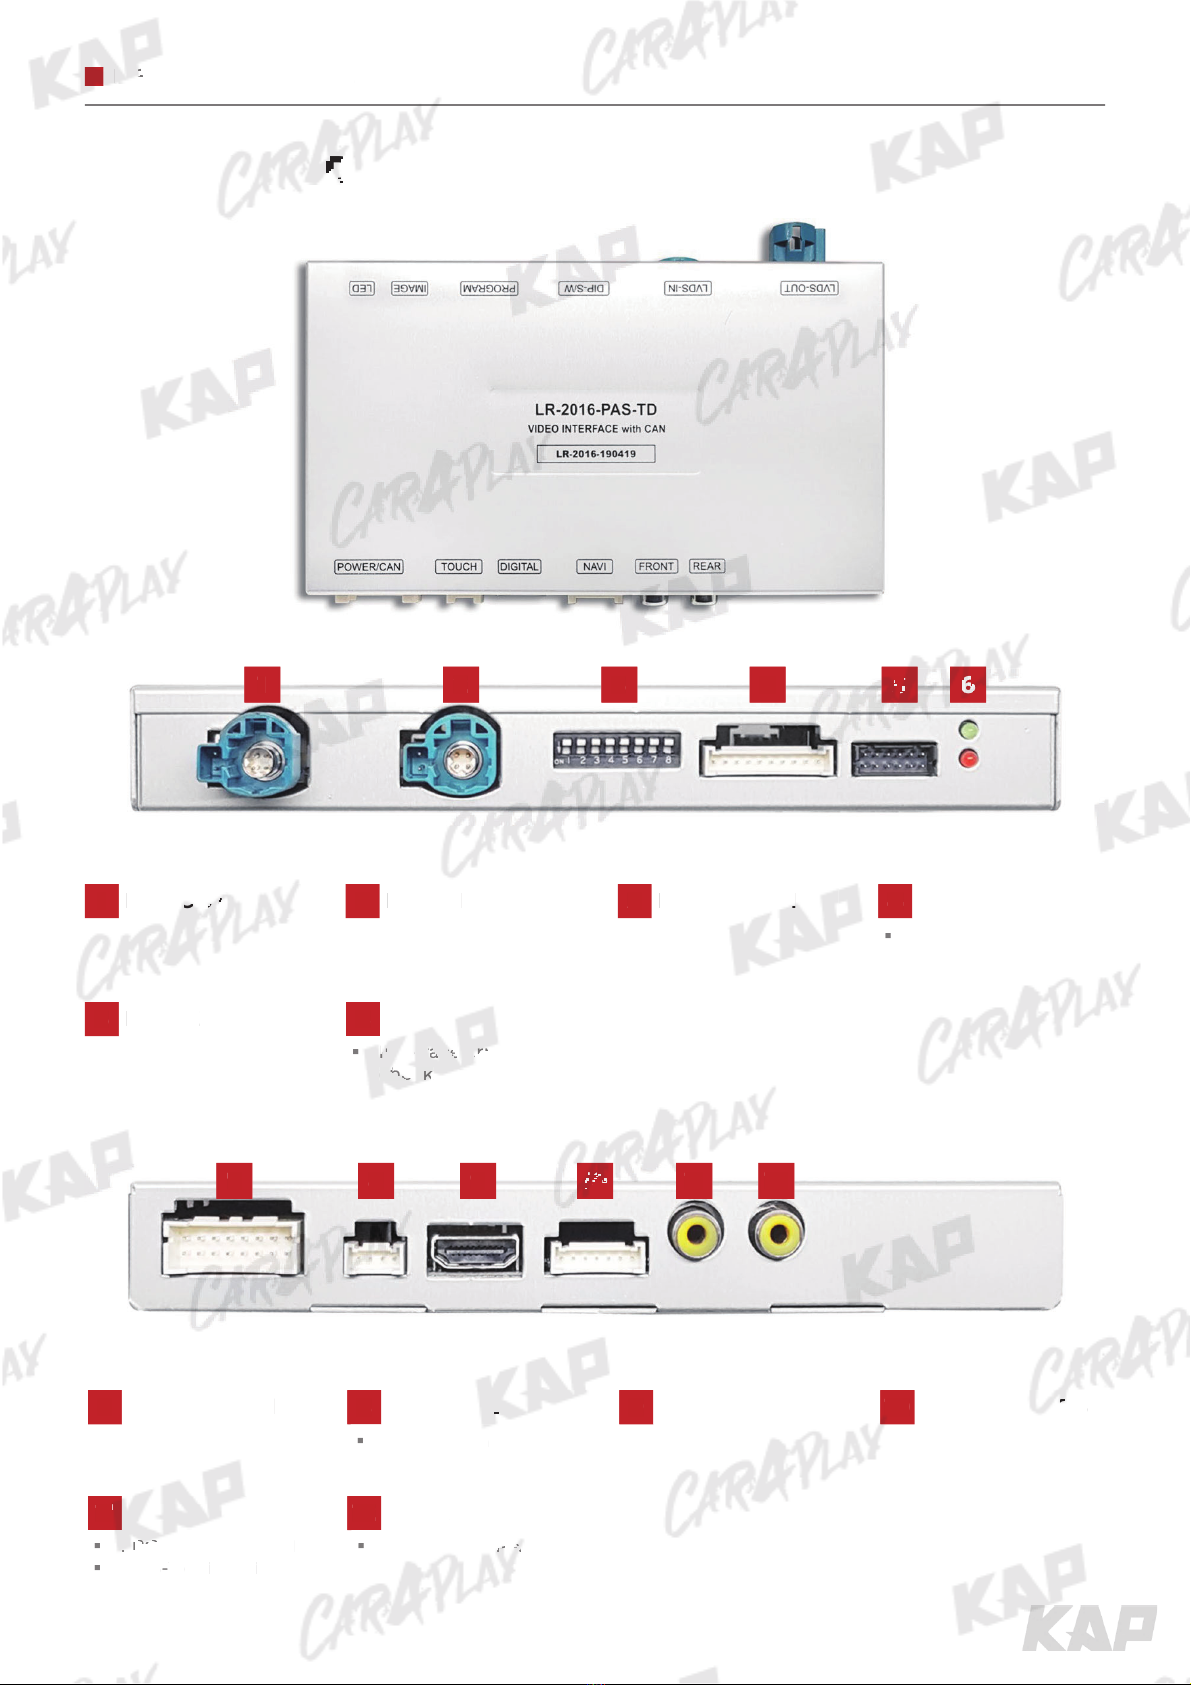
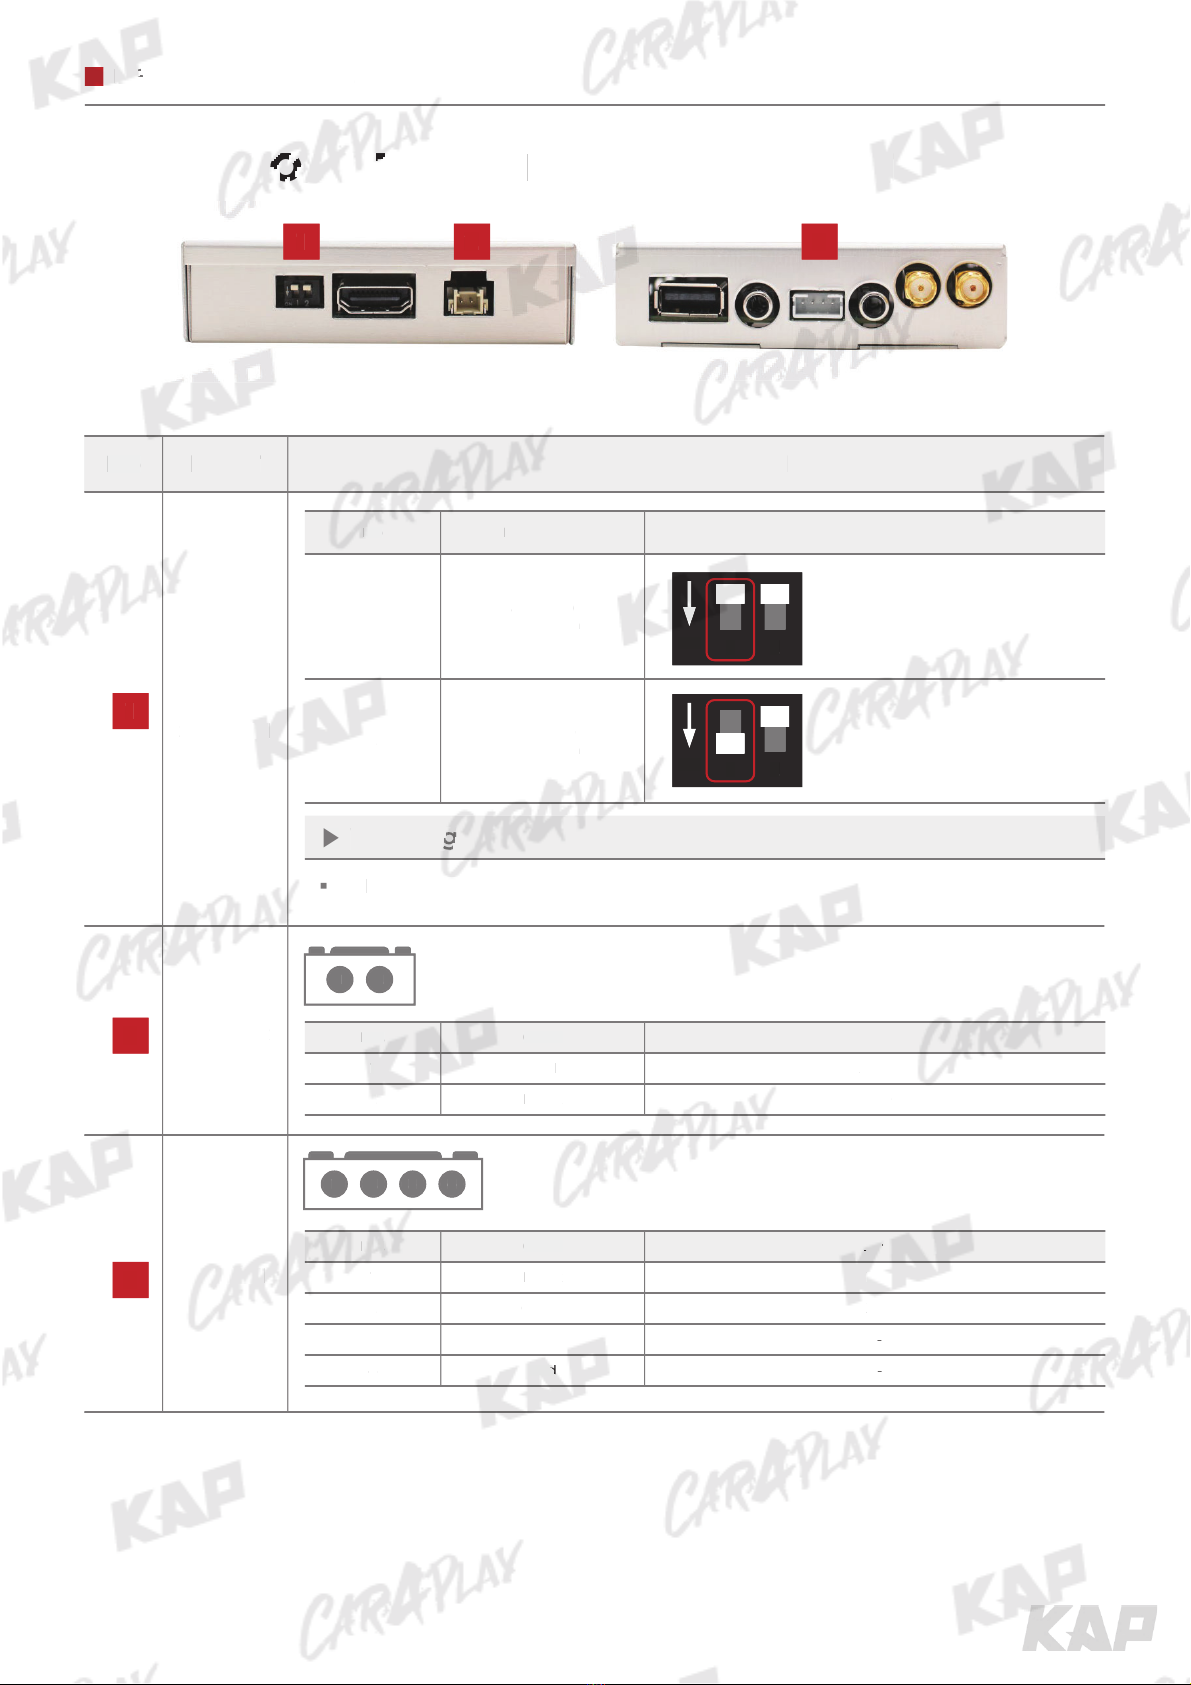
KAP CARAPlay LR-2016-PAS-TD User manual

INSTRUCTION
MANUAL
CONTACT
W kaptrader.com
A (05854) A-912 RM Tera-tower2, 201
Songpa-Dearo, Songpa-gu, Seoul, Korea
F (+82) 6204 - 0913
DATA.
Video Interface and Wireless Connected Car System
LAND ROVER 2016 TD
2020.04.16
Land Rover Interface

INSTRUCTION MANUAL
CAR COMPATIBILITY SHEET
BRAND MODEL SCREEN YEAR
LAND ROVER
Discovery 8˝ 2016 ~
Discovery Sports 10.2˝ 2016 ~
JAGUAR XE 10.2˝ 2017 ~
IN
IN
N
S
S
ST
R
UC
TI
O
N MAN
U
A
L
C
AR
C
O
O
M
M
PP
A
A
T
T
I
I
BILITY
S
HEE
T
BRAND
MOMO
DE
DE
L
L
SC
REE
N
YEAR
LA
ND
ND
RR
OVOV
ER
ER
D
i
scover
y
8˝
20
1
6
~
D
i
scover
y
Sp
orts
1010
2
.2
˝
˝
20
1
6
~
J
A
G
UAR
XE
1
0.2
˝
20
20
17
17
~
~

INSTRUCTION MANUAL
COMPONENT
Warning
Please contact your dealer if any component is missing.
Warning
Please contact your dealer if any component is missing.
KPLAY KPLAY Power Cable HDMI Cable
MIC Wifi/Bluetooth Antenna AUX Cable
Interface Power Cable LVDS Cable
OSD Board
IN
IN
N
S
S
ST
R
UC
TI
O
N MAN
U
A
L
CO
MP
O
O
N
N
EE
N
N
T
T
Wa
Wa
Wa
rn
rn
rn
ininin
g
g
P
lease contact
y
our deal
er
er
er
i
f
f
f
ananan
y
y
y
coco
co
mp
m
m
onent
i
s m
i
ss
i
n
g
.
Please contact your deal
er
e
r
i
f
ananan
y
y
coco
co
mp
m
m
onent is missing.
KPLAY
KP
KP
LAY Power Ca
ble
HD
MI
MI
CC
abab
le
le
M
IC
Wi
fi
/
Blu
et
oo
oo
th
t
Antenn
a
AUX Cable
Inter
f
ac
e
Po
Po
wer Ca
ble
LVDS Ca
bl
e
OSD
Bo
Bo
ar
ar
d
d

INSTRUCTION MANUAL
INTERFACE SPEC
2INPUT
•1 x DIGITAL RGB IN (HDMI PORT)
•1 x ANALOG RGB IN (7PIN)
•1 x CVBS FRONT CAM IN
•1 x CVBS REAR CAM IN
•1 x LVDS IN CAMMAND SYSTEM
3OUTPUT
•1 x LVDS OUT OPERATION
5POWER
•Input Power : 8VDC ~ 24VDC
•Consumption Power : 12Watt, Max
6SWITCH INPUT MODE
•Possible to select CAR model while switching mode by DIP S/W
•By button on the Commander in the car via CAN
4TOUCH
•VIRTUAL ANALOG TOUCH (4PIN)
•UART DIGITAL TOUCH
1KPLAY INPUT
•Wireless APPLE CARPLAY
•Wired APPLE CARPLAY
•Wired ANDROID AUTO
•USB storage media
IN
IN
N
S
S
ST
R
UC
TI
O
N MAN
U
A
L
INTER
F
F
AA
CC
EE
S
S
P
P
E
C
2
I
NPUT
•
•
1
x
x
DI
DI
GITAL RGB IN
(
HDMI PORT
)
•
1 x ANALOG RGB IN
(
7PIN
)
•
1 x
C
VB
S
FR
O
NT
C
AM
I
I
N
N
•
1 x
C
VB
S
R
EA
A
R
R
CA
CA
M
M
IN
IN
•
1 x LVD
S
IN
C
AMMAND
S
Y
S
TE
M
3
OU
TP
UT
•
1 x
LV
V
DS
DS
O
O
UT
UT
OO
P
PE
RATI
O
N
5
5
5
PO
WE
R
•
I
n
p
ut Power :
8V
V
DC
DC
~
~
2
4V
4V
DC
D
•
Cons
um
m
pt
pt
io
io
nn
PoPo
wewe
r : 12Watt, Ma
x
6
S
WIT
C
H INP
U
T M
O
DE
•
P
ossible to select CAR model whi
le
e
s
s
wi
tchin
g
mode b
y
DIP S
/W
•
By
but
to
to
n
n
o
on
the Commander
i
n the car v
i
a CA
N
4
4
4
TO
U
CH
•
V
IRTUAL ANALOG TOU
CH
CH
(
(
4P
4P
IN
IN
)
)
•
U
ART DI
G
ITAL T
OUC
H
1
K
PLAY INP
UT
•
W
i
r
e
l
ess
A
PPLE
C
ARPLA
Y
•
W
i
r
ed
A
P
PL
PL
E
E
C
ARPLA
Y
•
Wi
Wi
re
re
d
d
AN
AN
DR
DR
O
ID A
U
T
O
•
U
SB stora
g
e med
ia

INSTRUCTION MANUAL
EXTERNAL DEVICE SPECIFICATIONS
3 4 5 6
7 8 9 10 11 12
2LCD IN
1LCD OUT
5IMAGE 6LED
7POWER/CAN 8RESISTIVE TOUCH 9DIGITAL RGB 10 ALNALOG RGB
11 FRONT 12 REAR
Interface error
check
4PIN Touch
FRONT CAMERA IN
DVB-T or DVD IN
REAR CAMERA IN
1 2
4PROGRAM
3DIP SWITCH
OSD connection
IN
IN
N
S
S
ST
R
UC
TI
O
N MAN
U
A
L
EXTER
N
N
AA
LL
D
D
E
E
VI
C
E
S
PE
C
IFI
C
ATI
O
N
S
3
4
5
5
5
6
6
6
7
8
9
1010
10
11
12
2
L
C
D IN
1
L
C
D
OU
OU
T
T
5
IMA
GE
6
L
ED
7
POWER
/
CAN
8
RE
S
I
S
T
IV
V
E
E
TOTO
UC
UC
H
9
DI
G
ITAL R
GB
10
1
ALNAL
O
G
G
RG
RG
B
11
1
FR
FR
ON
ON
T
T
12
REA
R
In
In
In
t
te
te
rf
f
acac
a
e
e
e
er
er
er
r
ro
r
ch
h
h
ec
ec
ec
k
k
k
h
h
h
k
4
PIN Touc
h
FR
FR
FR
O
O
ON
T
C
AMERA
IN
DVB
DVB
-
T
T
or
DVD
DVD
IN
IN
R
EAR
C
AM
ER
R
R
A
A
A
IN
1
2
4
P
R
OG
RAM
3
D
IP
S
WIT
CH
H
O
SD connect
i
o
n

INSTRUCTION MANUAL
DIP SWITCH SETTING
PIN FUNCTION
INFORMATION
ȽOFF ȾON
1 NAVIGATION USE Do not use
2 AV1 (DVB-T) USE Do not use
3 AV2 (DVD) USE Do not use
4~5 No function
6~8 Car Type
ON 1ON 1
2 2
3 3
ON 6 7 8
JAGUAR
XE (10.2˝ / 2017~)
ON 6 7 8
LAND ROVER
Discovery (8˝ / 2016~)
ON 6 7 8
LAND ROVER
Discovery (8˝ / 2019~)
IN
IN
N
S
S
ST
R
UC
TI
O
N MAN
U
A
L
DIP
S
W
W
I
I
TT
CC
H
H
S
S
ETTIN
G
PI
N
FUN
C
TI
ON
INF
O
RMATI
O
N
Ƚ
O
F
F
Ⱦ
Ⱦ
ON
1
N
AVI
G
ATI
O
N
USE
Do
n
ot
use
2
A
V1
(
D
VB
B
-
T
)
USE
Do
n
ot
use
3
A
V2
(
D
VD
D
)
)
USE
DoDo
Do
n
n
n
ot
ot
ot
u
u
u
s
s
se
4
~
5
No
No
f
un
un
ct
c
ion
6
~
8
Car T
y
p
e
ON
ON
ON
1
O
N
1
2
2
3
3
3
3
O
N
6
7
8
J
A
GU
AR
XE
(
10.2
˝
/
/
20
20
17
7
~)
~
O
N
6
7
8
LAND
ROVER
D
i
sc
c
ov
ov
er
r
y
y
(8
(8
˝
/
2016~
)
O
N
6
7
8
L
AND R
O
VER
D
i
scovery (8
˝
/
20
19
9
~)
~)

INSTRUCTION MANUAL
No PORT INFORMATION
1POWER
/CAN
2TOUCH
3RGB
NAVI
No. Color Signal Assignment No. Color Signal Assignment
1 Yellow BATTERY 2
3Brown REARDET 4
5 Green CAN1-L 6 Brown CAN1-H
78
9Blue LIN 10
11 12 Red REAR POWER
13 14 Green MODE
15 Black GND 16 Black GND
CONNECTOR PIN ASSIGNMENT
1 3 5 7 9 11 13 15
2 4 6 8 10 12 14 16
1 2 3
No. Color Signal Assignment
1Red Y-
2 Green X-
3Blue Y+
4 White X+
1 2 3 4
No. Color Signal Assignment
1 Red R DATA
2 Green G DATA
3 Blue B DATA
4 White SYNC
5Black GND
6 Green DVB-T IR
7 Orange DVD IR
1 2 3 4 5 6 7
1
2
3
IN
IN
N
S
S
ST
R
UC
TI
O
N MAN
U
A
L
No
PO
R
T
I
NF
O
RMATI
ON
P
O
WE
R
/
CA
N
T
O
U
CH
RG
B
NA
VI
N
o.
C
olo
r
Si
g
nal Assi
g
nme
me
nt
nt
N
o.
C
olor Si
g
nal Assi
g
nme
m
nt
1
Ye
ll
ow
BATTERY
2
3
B
r
o
w
n
REAR
DET
4
5
5
G
ree
n
C
AN
1
-
L
6
Bro
Br
wn
wn
C
AN
1
-
H
7
8
9
B
l
ue
LIN
LIN
1
0
11
12
Red
R
EAR P
O
WER
13
14
G
reen M
O
D
E
1
5
B
l
ack
G
ND 1
6
B
l
ack
G
ND
CO
NN
E
E
CC
T
T
OO
RR
P
P
IN A
SS
I
G
NMEN
T
1
1
3
5
7
9
11 1
3
1
5
2
4
6
8
1
0
1
2
14 1
6
1
2
3
3
3
N
o.
C
olo
r
Si
g
nal Assi
g
nme
e
nt
nt
1
Red
Y
-
2
2
G
ree
n
X
-
3
B
l
ue
Y
+
4
W
h
i
te
e
X+
1
2
3
4
No.
C
olo
r
Sig
nal As
sig
nmen
t
1
Red
R D
ATA
2
Gre
Gre
en
en
G
DATA
3
Blu
Blu
e
e
B
DAT
A
4
W
h
i
te
SYN
SYN
C
5
Bl
ac
k
G
N
D
6
G
ree
n
DVB
-
T
IR
7
O
ran
ge
DVD
IR
11
1
2
2
2
3
4
5
6
7
1
2
3

INSTRUCTION MANUAL
EXTERNAL DEVICE SPECIFICATIONS
1 2 3
4 5 6 7 8
1DIP SWITCH 2DIGITAL 3POWER
4USB 5MICROPHONE 6RESISTIVE TOUCH 7SPEAKER
8WIFI/BLUETOOTH ANTENNA
4PIN TouchSmartphone
USB storage
IN
IN
N
S
S
ST
R
UC
TI
O
N MAN
U
A
L
EXTER
N
N
AA
LL
D
D
E
E
VI
C
E
S
PE
C
IFI
C
ATI
O
N
S
1
2
3
4
5
6
7
8
8
8
1
DIP
SW
SW
IT
IT
CH
CH
2
DI
G
ITAL
3
P
O
WE
R
4
US
B
5
MI
CR
OP
HO
NE
6
RE
SI
ST
IV
E
TO
UC
H
7
SP
EA
KE
R
8
W
IFI
/
BLUETOOTH ANTENNA
4PIN Touc
h
Smar
tp
h
on
e
US
B
US
B
s
t
ora
g
e
t

INSTRUCTION MANUAL
KPLAY CONNECTOR PIN ASSIGNMENT
1 2 3
No PORT INFORMATION
1DIP
SWITCH
2POWER
3TOUCH
No. Color Signal Assignment
1 Red ACC
2Black GND
1 2
1 2 3 4
1
2
3
No FUNCTION
1800x480
Resolution
21280x480
Resolution
ON 1 2
ON 1 2
Warning
DIP switch No. 2 has no function
No. Color Signal Assignment
1 Black Y+
2 Green X+
3 White Y-
4Red X-
IN
IN
N
S
S
ST
R
UC
TI
O
N MAN
U
A
L
KPLA
Y
Y
CC
OO
NN
N
N
E
E
C
T
O
R
PIN
A
SS
I
G
NMEN
T
T
1
2
3
No
PO
R
T
I
NF
O
RMATI
ON
D
IP
S
WIT
CH
H
POWE
R
TO
TO
UCUC
HH
N
o.
C
olo
r
Si
g
nal Assi
g
nme
e
nt
nt
1
Red
ACC
2
2
Black
G
N
D
1
2
1
2
3
4
1
2
3
N
No
F
UN
C
TI
O
N
1
800
x4
80
Resolutio
n
2
1
280
x4
80
R
eso
l
ution
O
N
1
2
O
N
1
2
W
arn
i
n
g
g
g
D
IP
s
w
it
ch
N
o.
2 h
as
n
o
f
u
n
ctio
n
No.
No.
C
olo
r
Signal
As
As
sig
sig
nm
nme
n
nt
1
Bla
ck
Y
Y+
2
G
ree
n
X
+
3
W
h
i
t
e
Y
-
4
Red
ed
X
-

INSTRUCTION MANUAL
KPLAY CONTROL
MAIN SCREEN
1 2 3 4
1APPLE CARPLAY 2ANDROID AUTO 3USB MEDIA 4SETTINGS
VIDEO
MUSIC
IMAGE
Wireless
Cable
Cable
Apple CarPlay – 800 x 480
Apple CarPlay – 1280 x 480
Android AUTO – 800 x 480
Android AUTO – 1280 x 480
IN
IN
N
S
S
ST
R
UC
TI
O
N MAN
U
A
L
KPLA
Y
Y
C
C
OO
NN
TT
R
R
O
O
L
MAIN
SC
R
R
R
E
E
E
E
N
1
2
3
4
1
A
PPLE
C
ARPLAY
2
ANDR
O
ID
AU
AU
TO
TO
3
3
3
US
B MEDI
A
4
S
ETTIN
GS
V
IDE
O
MUSIC
MUSIC
IMA
G
E
Wi
reles
s
C
a
ble
Cbl
C
a
bl
e
Appl
eCarP
l
a
y
–
800
x 4
80
Ap
p
p
pl
pl
pl
e
e
e
CarPla
y
–
1
280
x 4
80
A
ndro
i
d A
U
T
O
–
800
x 4
80
An
An
An
dr
drdr
oioi
oi
d
d
d
AU
AU
AU
TO
TO
TO
–
1
280
x 4
80

INSTRUCTION MANUAL
KPLAY CONTROL
SETTINGS
No INFORMATION SELECTION FUNCTION
1Language
settings Languages You can change the language of the settings screen
2Connection
settings
Auto Phone
Connect
(Only for wired
connection)
Activation Automatically launch Android AUTO or Apple CarPlay
when smartphone is connected
Disabled Charge only when connecting a smartphone, select icon
to launch Android AUTO or Apple CarPlay
Driver Position
Left Use when driver's position is left
Right Use when driver's position is right
Wireless
Carplay
Activation Connect Apple CarPlay wirelessly
(Bluetooth)
Disabled Used to wire Apple CarPlay
Use touch on
Android Auto
Activation Touch is available when running Android Auto
Disabled Touch not available when running Android Auto
Link Type
Android Android Auto
Carlife do not select
(Update Coming Soon)
3Firmware
Information
Reset Factory reset
Sys Update Update firmware using USB
1
2
3
1
2
3
IN
IN
N
S
S
ST
R
UC
TI
O
N MAN
U
A
L
KPLA
Y
Y
C
C
OO
NN
TT
R
R
O
O
L
S
ETTIN
G
S
S
S
No
I
NF
O
RMATI
ON
S
ELE
C
T
IO
IO
N
N
F
UN
C
TI
ON
Lan
g
ua
ge
sett
i
n
gs
L
an
g
ua
g
e
s
You can chan
g
e the lan
g
ua
g
e of the sett
i
n
g
s scree
n
Connect
i
o
n
sett
i
n
gs
Auto Phone
C
onnec
t
(Onl
y
for wired
c
onnect
i
on)
A
ct
iv
at
i
on
A
utomat
i
cally launch Andro
i
d AUTO or Apple
C
arP
l
ay
w
hen smar
tph
ph
on
one
is connecte
d
D
i
sable
d
C
har
g
e onl
y
whe
whe
n c
n c
onn
nn
ectect
in
ing
a smartphone, select icon
t
o lau
nch
nch
An
An
dro
dro
id
id
AUTO or A
pp
le
C
arPla
y
Dr
i
ver Pos
i
t
i
on
Left Use when driver's
p
osition is left
Ri
gh
t
U
se when dr
i
ver's pos
i
t
i
on
n
is
s
rig
rig
ht
ht
Wireless
C
arpla
y
Act
i
vat
i
o
n
Con
nec
c
t A
pp
le
C
arPla
y
wir
wir
e
ele
ssl
y
(
Bluetooth
)
D
i
sab
l
ed
Used to wire A
pp
le
C
arPla
y
U
se touch on
And
An
roi
oi
d Ad A
ut
o
Act
i
va
tio
o
n
n
T
ouch
i
s ava
i
lable when runn
i
ng Andro
i
d Auto
Di
sable
d
T
ouch not ava
i
lable when
ru
ru
nni
nni
ng
n
And
An
ro
i
d Auto
L
i
nk Typ
e
Andro
i
d
A
nd
ro
oi
d A
d A
uto
uto
Car
l
i
f
e
do not select
(
Update Com
i
ng Soon)
F
irmw
a
r
e
Information
R
eset
F
actor
y r
eset
S
y
s Update
Upd
d
ate
ate
fi
fi
rmw
rmw
are
are
us
i
n
g
US
B
1
2
2
2
3
1
2
3

INSTRUCTION MANUAL
KPLAY CONTROL
MEDIA CONTROL
KPLAY
TOUCH SPK ANT
POWER DIGITAL DIP_S/W
MICUSB
APPLE
CARPLAY
Smartphone
connection
Connect AUX to your car and use KPLAY's microphone
No INFORMATION Can be used CONTROL NOTICE
1Apple
CarPlay
Wireless
connection
Use all
Apple CarPlay
Functions
•AUX
•MIC
•TOUCH
•Multiple connections are not supported
•Only one device can be connected
unconditionally
Cable
Connection
2Android
AUTO
Cable
Connection
Use all
Android AUTO
Functions
3USB Media Connection Music, Photo,
Video
USB Media
ANDROID
AUTO
or
IN
IN
N
S
S
ST
R
UC
TI
O
N MAN
U
A
L
KPLA
Y
Y
C
C
OO
NN
TT
R
R
O
O
L
MEDIA
C
O
O
O
N
N
TR
O
L
KPLAY
T
O
U
CH
S
P
K
ANT
P
O
W
ER
DI
G
ITA
L
DIP_S
/W
MI
C
U
SB
APPL
E
C
ARPLAY
Sma
Sma
rtp
hone
con
con
nect
i
on
C
onnect AUX to
y
our car and use KPLAY's
mi
m
c
cr
op
op
ho
ho
ne
ne
No
I
NF
O
RMATI
ON
Ca
C
n
n
be
be
use
d
CO
NTR
O
L
NO
TI
CE
E
1
A
pp
l
e
CarP
l
a
y
W
i
reless
connect
i
o
n
U
se all
A
ppl
e
C
arP
l
a
y
Funct
i
ons
•
A
UX
•
MI
C
•
TOU
T
CH
•
Mul
tip
le con
nec
ne
tio
tio
ns are not s
upp
orte
d
•
Onl
y
one dev
i
ce can be connected
u
ncond
i
t
i
onall
y
Cab
Cab
le
Con
o
nectio
n
2
A
ndro
i
d
A
UT
O
C
a
bl
e
C
onnect
i
o
n
Use
e
al
al
l
l
Andro
i
d AUTO
Funct
i
ons
3
3
US
B Med
ia
C
onnectio
n
Music
,
Ph
oto
,
Vid
d
eo
eo
USBUSB
Me
M
d
ia
ANDR
O
ID
A
U
T
O
or

INSTRUCTION MANUAL
KPLAY CONTROL
iPhone Wireless connection - Connection method
1. Activate Wireless Carplay in KPLAY Settings
Menu
(If Wireless Carplay is enabled, you cannot
connect by wire)
2. Choose CarPlay-BT in Bluetooth on iPhone
3. PIN Number “0000” enter 4. “Allow” select
5. “Use CarPlay” select
(Once connected, Bluetooth will be
disconnected and connected via Wi-Fi)
6. Enjoy CarPlay!
In KPLAY on iPhone
on iPhoneon iPhone
on iPhone In KPLAY
IN
IN
N
S
S
ST
R
UC
TI
O
N MAN
U
A
L
KPLA
Y
Y
C
C
OO
NN
TT
R
R
O
O
L
i
Ph
o
n
e
W
W
W
i
i
i
r
e
l
ess
co
nn
ectio
n
-
C
onn
e
e
e
c
c
c
t
t
t
i
on method
1.1.
A
A
ct
t
iviv
at
at
e
W
i
r
e
l
ess
C
arp
l
a
y
i
n KPLAY Sett
i
n
g
s
Me
Me
n
u
(
If W
i
r
e
l
ess
Carpla
y
i
s enabled,
y
ou cannot
connect by w
i
r
e
)
2
.
Ch
h
oo
o
se
se
Ca
Ca
rP
l
a
y
-
B
T
i
n Bl
uetoot
h
o
n
i
Ph
o
n
e
3
.
PIN
N
u
m
be
r “
0000”
e
n
ter
4.
“
A
ll
o
w
”
se
l
ect
5
.
“U
se CarP
l
a
y
y
”
select
(
O
nc
c
e
e
co
co
nn
nn
ec
ec
t
te
d, Bluetooth w
i
ll be
di
i
sc
c
on
on
ne
ne
ct
ct
ed
a
n
d
co
nn
ected
v
ia
W
i
-
Fi)
6
. En
j
o
y
C
arP
la
la
y
y
!
!
In KPLAY
o
n iPh
o
n
e
o
n iPh
o
n
e
o
n iPh
o
n
e
on
on
on
iPh
o
n
e
In
In
In
K
K
K
PLAY

INSTRUCTION MANUAL
KPLAY CONTROL
If your iPhone fails to connect
Forget Bluetooth history
1. Make sure Siri is active
2. Delete the Bluetooth and CarPlay records as shown below,
3. disable and re-enable WiFi and Bluetooth, then try to connect again.
Forget CarPlay History
Warning
Due to the nature of the wireless connection, sometimes the connection is not working
properly
If you follow the same procedure as above, but the connection is not working properly,
reboot KPLAY and iPhone and try again
IN
IN
N
S
S
ST
R
UC
TI
O
N MAN
U
A
L
KPLA
Y
Y
C
C
OO
NN
TT
R
R
O
O
L
If
y
our
i
P
h
h
h
one fa
i
ls to connec
t
For
g
et Bluet
oot
oot
oot
h h
h
h
ist
st
st
or
r
ry
1.
M
ake sure S
i
r
i
i
s act
i
ve
2
.
De
l
ete
t
h
e
Bl
uetoot
h
a
n
d
C
arPla
y
r
e
co
co
co
rd
rd
rd
s
s
s
as
s
h
o
wn
be
l
ow
,
3.
d
i
sab
l
e
a
n
d
r
e
-
e
n
ab
l
e
WiF
i
a
nd Bluetooth, then tr
y
to connect a
ga
ga
ga
in
in
n
.
For
g
et CarPla
y
H
i
stor
y
Warn
in
n
g
g
g
Du
Du
D
e
e
e
to
to
to
t
t
t
h
he
he
nature of the w
i
reless connect
i
on, some
ti
ti
ti
me
me
me
s
s
s
thth
th
e
e
connect
i
on
i
s not work
i
n
g
pr
pr
pr
op
erl
y
If you follow the same
p
p
p
ro
ro
o
cece
e
dududu
re
re
re
a
a
a
s
s
s
ab
ove, but the connect
i
on
i
s not work
i
ng p
ro
ro
ro
pepe
pe
r
rl
rl
y,
y
y
reboot KPLAY a
nd
nd
nd
i
i
i
PhPh
Ph
on
on
on
e
e
e
ananan
d
d
d
tr
y
a
g
a
in

INSTRUCTION MANUAL
KPLAY CONTROL
If your Android Phone fails to connect
Warning
Android Auto may not run even if the cable is not broken
If you follow the same procedure as above, but the connection is not working properly,
reboot KPLAY and iPhone and try again
ANDROID AUTO APP Download
1. Check if your smartphone has ANDROID AUTO application
2. Replace the cable
Changing the cable
IN
IN
N
S
S
ST
R
UC
TI
O
N MAN
U
A
L
KPLA
Y
Y
C
C
OO
NN
TT
R
R
O
O
L
If
y
our An
d
d
d
ro
i
d Phone fa
i
ls to conn
e
e
c
c
c
t
t
t
Warn
i
n
g
An
n
n
dr
d
d
o
oi
oi
d
d
d
A
A
Au
to ma
y
not run even
i
f the cable
i
s not
br
r
okok
ok
e
en
en
If
If
y
y
ou
o
o
f
f
f
o
o
ol
low the same procedure as above, but the
c
c
c
on
on
on
ne
ne
ne
ct
ct
t
i
on
i
s not work
i
n
g
properl
y
,
reboot KPLAY and
i
Phone an
d
d
d
tr
y
y
y
agag
ag
a
a
ai
n
ANDROID AUTO
AP
P
P
P D
P
P
own
l
oa
d
1.
Check
i
f your smartphone has AND
R
RO
R
I
IDID
A
A
A
UTUTUT
O
O
O
app
l
i
cat
i
on
2
.
R
e
p
lace the cabl
e
C
C
Cha
n
gi
n
g
the cable

INSTRUCTION MANUAL
FIRMWARE UPDATE
1. Add the firmware file provided in root folder
* of the USB
3. Select 'Sys Update' from the Settings menu
2. Connect USB to the KPLAY board with the
update file. The USB media will be scanned
automatically
Press the Home button on the top right
corner of the USB Media screen and select
the Settings menu
4. After the device reboots, check the
message and wait for the update to complete.
firmware files
Root folder
*Root folder : Top-level folder without adding folder
Warning
If USB with firmware is connected, the update will be performed every time the device is
rebooted
IN
IN
N
S
S
ST
R
UC
TI
O
N MAN
U
A
L
FIRM
W
W
AA
RR
EE
U
U
P
P
DATE
1
1.
A
dd the f
i
rmware f
i
le
p
rov
i
ded
i
n r
oot
f
o
l
de
de
r
r
*
o
f the
USB
3
. Select 'S
y
s Update' from the Sett
i
n
g
s menu
2.
C
onnect
US
B to the KPLAY board w
i
th the
up
up
da
da
te
te
f
f
il
l
e
e.
T
T
he USB med
i
a w
i
ll be scanned
au
au
to
o
ma
ma
ti
ti
c
ca
ll
y
P
ress the Home button on t
he
h
t
t
op
op
r
ig
ig
ht
ht
c
orner of the USB
Me
Me
di
di
a
a
sc
sc
re
re
en
en
a
nd
nd
select
the Sett
i
n
g
s men
u
u
4.
A
fter the dev
i
ce reboots, check the
m
essa
g
e and wa
i
t for the
u
u
pd
pd
at
at
e
e
t
to
complete
.
fir
fir
fir
mwa
mwa
mwa
re
fi
le
s
Root
f
older
*
Root
f
older :
T
o
p
-
l
evel folder w
i
thout add
i
ng folde
r
r
Wa
Wa
Wa
rn
rn
rn
in
inin
g
g
If USB w
i
th f
i
rmware
i
s
co
o
nn
nn
n
ec
ec
ec
te
t
t
d,
d,
d,
t
t
t
he
h
h
update w
i
ll be performed ever
y
t
i
me the dev
ic
e
e
is
s
s
r
ebooted

INSTRUCTION MANUAL
BUTTON CONTROL
Change Mode to Interface Screen
MAP
BUTTON PRESS FUNCTION
MAP
Long press OEM screen to interface screen
Interface screen to the OEM screen
Screen change sequence : OEM > NAVI > AV1 > AV2 > OEM
Other Button Short press to OEM screen
IN
IN
N
S
S
ST
R
UC
TI
O
N MAN
U
A
L
B
U
TT
O
O
N
N
CC
OO
N
N
T
T
R
R
OL
Chan
g
e
M
M
M
ode to Interface Scree
n
MAP
B
U
TT
ON
PR
PR
ES
ES
S
FU
NC
N
TI
O
N
MAP
L
ong press
O
EM
sc
sc
re
e
enen
tt
o
o
inin
te
te
rf
f
ac
ac
e screen
I
nte
rf
f
acac
ee
sc
c
rere
e
en
to the
O
EM scree
n
Sc
Sc
Sc
rerere
e
en
e
c
h
ange sequence :
O
EM > NAVI > AV1 > AV
2
>
O
EM
EM
EM
O
ther
Bu
Bu
tttt
on
on
S
hort
p
ress to
O
EM scree
n

INSTRUCTION MANUAL
Warning
To use the steering wheel button, "SteeringWheelBtn“ / “Steering Channel” must be "ON" in
the OSD menu
BUTTON CONTROL
Change Mode to Interface Screen
BACK
BUTTON PRESS FUNCTION
VOICE
Long press OEM screen to interface screen
Interface screen to the OEM screen
Screen change sequence : OEM > NAVI > AV1 > AV2 > OEM
LEFT / RIGHT Short press (in CarPlay Mode) Next Track / Previous Track
IN
IN
N
S
S
ST
R
UC
TI
O
N MAN
U
A
L
Warn
i
n
g
T
o use the steer
i
n
g
wheel button, "
S
tee
ri
i
i
ng
ng
ng
Wh
Wh
Wh
eeeeee
lB
lB
lB
tn
tn
t
“
“
“
/ “Steerin
g
Channel” must be "ON" in
t
he
OS
D men
u
B
U
TT
O
O
N
N
CC
OO
N
N
T
T
R
R
OL
Chan
g
e
M
M
M
ode to Interface Scree
n
BA
BA
BA
CKCK
CK
BUTT
ON
P
RE
S
S
S
F
UN
C
TI
O
N
VO
VO
I
C
E
L
on
g
pres
s
O
EM screen to
i
nterf
ac
c
e
e
sc
sc
re
e
en
en
I
nter
f
ace screen to th
e
e
OE
OE
M
M
scree
n
Screen c
ha
ha
a
ng
ng
ng
e sequence :
O
EM > NAVI > AV1 > AV
2
>
O
EM
M
LEFT
/
RIGH
T
Sh
o
or
t
t
pr
pr
es
es
s
s
(i
nCarPla
y
Mode
)
Next Track
/
Previous
TT
ra
ra
c
ck

INSTRUCTION MANUAL
TOUCH CONTROL
Touch Calibration
/'07 %QPHKI 0#8+
15& (CEVQT[4GUGV 'ZGEWVG%CPEGN
+4%VTN %CNKDTCVKQP 'ZGEWVG %CPEGN
7VKNKV[ 8GTUKQP +PVGTHCEGXGTUKQP
or
Select OSD menu> Utility> Calibration.
Press and hold the display for longer than
10 seconds.
+ Touch according to the shape
coordinates
On interface Screen
(NAVI, AV1, AV2)
Warning
Touch control icon in DVBT / DVD
IN
IN
N
S
S
ST
R
UC
TI
O
N MAN
U
A
L
T
OUC
H
H
C
C
OO
NN
T
T
R
R
OL
Touch
C
a
l
l
l
i
i
i
b
b
rat
i
o
n
/'07
%QP
H
K
I
0
0#
0#
#
0
8
8
8
8+
15&
(
CEVQT[
4
GUGV
'
Z
GEW
V
G
G
G
G
G
%C
P
EG
N
+4
%
VTN
%C
%C
%C
NK
N
D
T
C
VK
Q
P
'
Z
GEW
V
G
%C
P
EGN
7
VKNKV
[
[
[
8G
8G8G
T
T
TU
KQ
P
+
PV
G
T
HCEG
X
G
T
U
K
Q
P
ororor
Select OSD menu> Ut
i
l
i
t
y
> Cal
i
brat
i
on.
Press
an
an
d
d
hold the d
i
spla
y
for lon
g
er than
10
10
se
se
co
co
nd
nd
s.
+ Touch accord
i
n
g
to the shape
coo
r
di
n
ates
O
n
i
nterface Scree
n
(
NAVI,
A
A
A
V1
V1
V1
,
,
,
AV2
)
Warn
i
n
g
Touch control icon in DVBT
/
D
VD
D
D

INSTRUCTION MANUAL
PARKING CONTROL
Parking Line / OPS Display
Parking Line ON Screen Parking Line OFF Screen
1Parking Line Display
2Horizontal / Vertical
Adjust the position of Parking Line
•Pressing this Horizontal / Vertical menu, The OSD screen automatically disappears.
•Please adjust from the parking line Screen.
/'07 •0RYHWKHJXLGHOLQHSRVLWLRQWRWKHOHIW
5'. •0RYHWKHJXLGHOLQHSRVLWLRQWRWKHULJKW
72 •0RYHWKHJXLGHOLQHSRVLWLRQXSZDUGV
&190 •0RYHWKHJXLGHOLQHSRVLWLRQGRZQZDUG
/'07 2CTMKPI 4'#4
%QPHKI 125&KURNC[ 1HH
1RVKQP .KPG&KURNC[ 1HH
+OCIG 9CTPKPIU.CPI 'PINKUJ
5ETGGP *QTK\QPVCN
2CTMKPI 8GTVKECN
IN
IN
N
S
S
ST
R
UC
TI
O
N MAN
U
A
L
PARKI
N
N
G
G
CC
O
O
N
N
T
T
R
OL
Parkin
g
L
L
i
i
i
ne / OPS Displa
y
Parkin
g
Line ON Screen
P
arkin
g
Line
O
FF
S
creen
1
P
ark
i
n
g
L
i
ne D
i
spla
y
2
H
orizontal
/
/
VV
er
er
ti
ti
cal
A
d
ju
st the pos
i
t
i
on of Park
i
ng
L
i
n
e
e
e
•
Pressing this Horizo
n
nt
al
al
/
/
V
V
er
er
ti
ti
cal menu, The OSD screen automatically dis
ap
p
pe
pe
ar
s.
•
Please ad
j
ust from t
he
e
park
i
n
g
l
i
ne Screen.
/'07
•
0RYHWKHJXLGHOLQHSR
VLW
VLW
LRQLRQ
WR
R
WK
WK
HO
H
HIWHIW
5
'.
•
0RYHWKH
J
XLGHOLQHSR
VLW
LW
L
LRQ
WRWKHUL
J
KW
72
72
•
0RYHW
K
H
JXL
G
H
O
LQH
SR
VLWLRQ
XS
ZDU
GV
&
1
90
•
0RYHWKH
J
XLGHOLQHSRVLWLRQ
GR
G
ZQZDU
G
/
/
'0
7
2C2C
2C
TMTM
TM
KP
KP
KP
I
II
4
'#
4
%QP
H
K
I
125&KUR
N
C
[
[
[
1
HH
1R
R
R
VK
VK
VK
QP
QPQP
.
KPG&KUR
N
C
[
1
HH
+O
+O+O
CI
CI
CI
G
G
9CTP
K
PIU.CP
I
'
PI
N
KU
J
5
ETGGP
*
QTK\QPVC
N
2
CT
M
KP
I
8GTVKE
CN
N
This manual suits for next models
3
Table of contents
Other KAP Car Video System manuals

KAP
KAP CAR4PLAY TYT-CR 2018-TD User manual

KAP
KAP HD-MIB2 User manual

KAP
KAP CADILLAC 2016 PAS TDL2 User manual

KAP
KAP TOYOTA 2018 TD User manual

KAP
KAP MB 2019 NTG6.0 D User manual

KAP
KAP JEEP 2014 KPLAY User manual

KAP
KAP HYUNDAI-KIA 10b User manual

KAP
KAP FORD-SYNC3-TDC2 User manual

KAP
KAP ML2016-PAS-TDL2 User manual

KAP
KAP TC2018-180413 User manual