Kett FD-660 User manual

Infrared Moisture Analyzer
FD-660
Operating Manual
Thank you for purchasing this product.
Please read the operating manual carefully and use this product properly.


CONTENTS
1. Safety Precautions ...........................................................................................................................4
2. Measuring Principle and Features..................................................................................................6
■ Measuring principle ....................................................................................................................6
■ Features .....................................................................................................................................6
■ Measurable objects ....................................................................................................................6
3. Specications ...................................................................................................................................7
4. Part Names........................................................................................................................................8
4-1. Names of Main Unit Parts ......................................................................................................8
4-2. Accessories ............................................................................................................................9
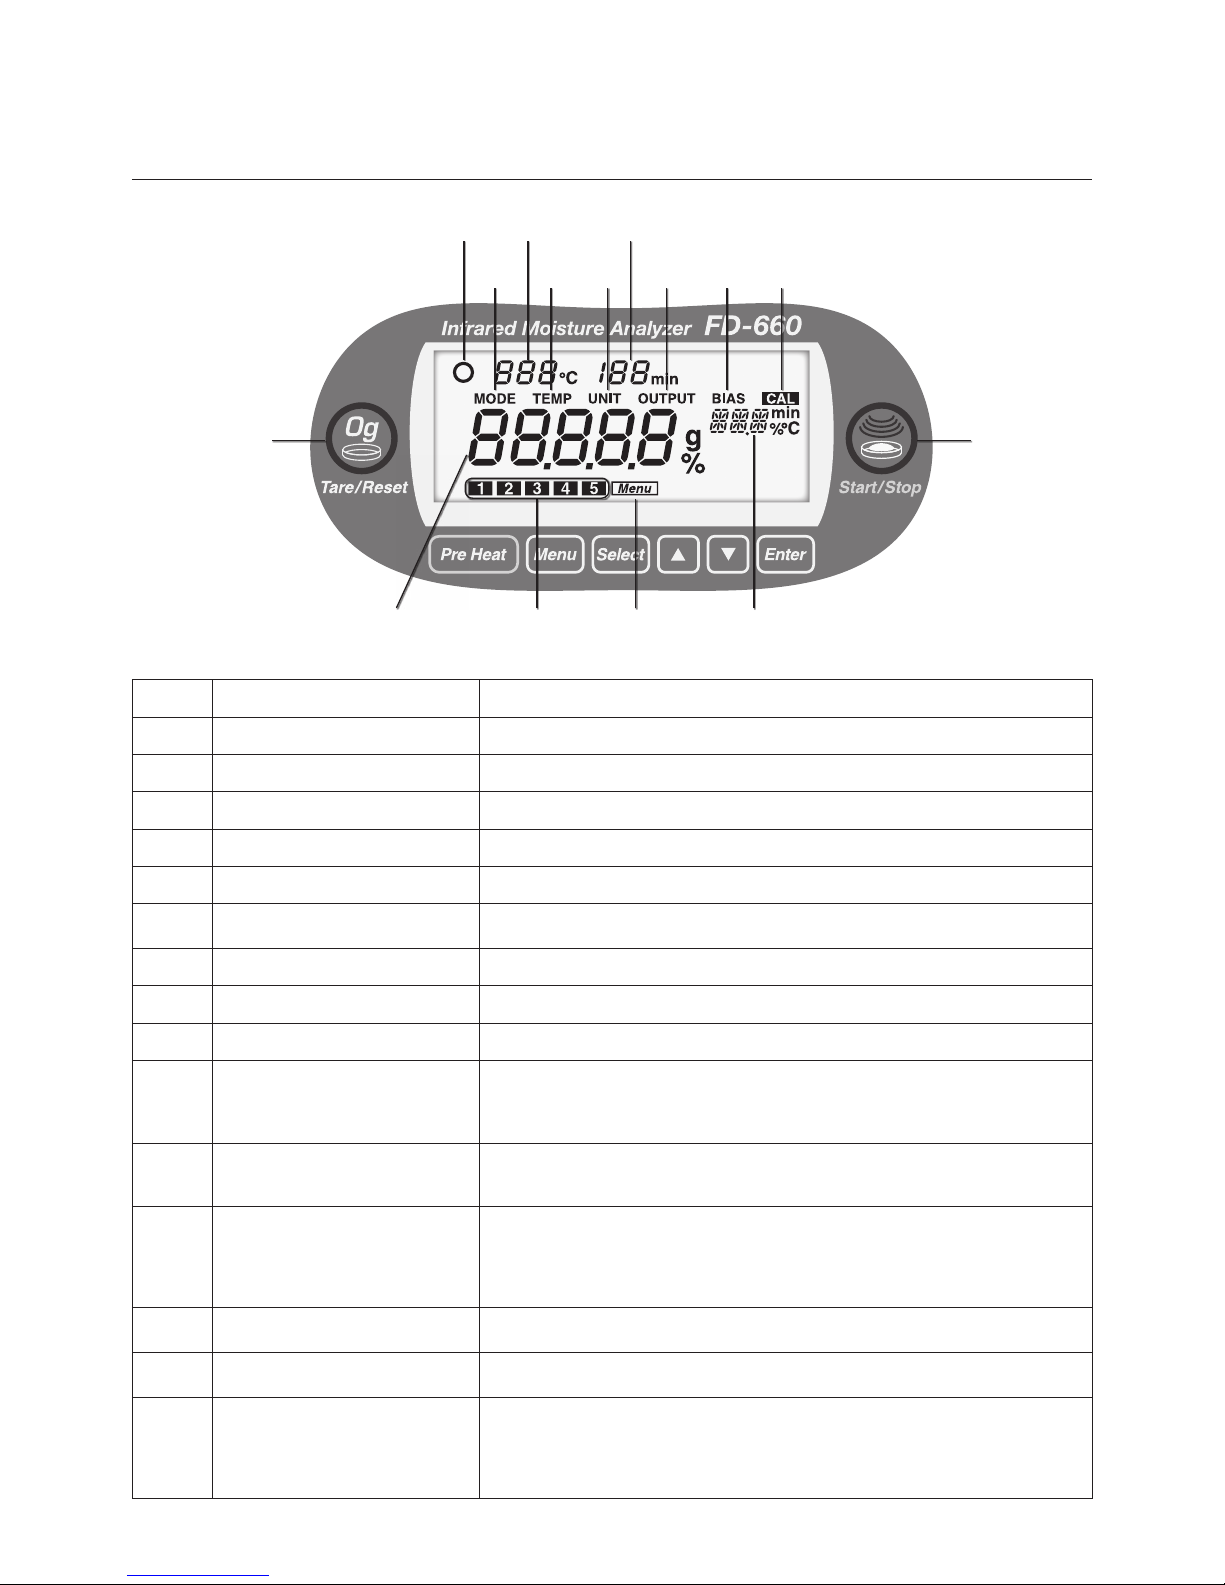
4-3. Display .................................................................................................................................10
4-4. Control Panel Functions ....................................................................................................... 11
5. Assembly and Installation .............................................................................................................12
■ How to manually specify the power supply voltage .................................................................14
6. Measurement Procedure................................................................................................................15
■ Tips on how to ensure accurate measurements ......................................................................18
● First measurement ..........................................................................................................18
● For multiple measurements in succession ......................................................................19
● How to use sample dish and aluminium foil sheet ..........................................................19
● Measurement of powdered, particulate, and viscous samples .......................................19
● Measurement of liquid sample ........................................................................................19
● Measurement of large particulate sample .......................................................................19
● Removal of soil, sample gas, and others ........................................................................19
● Deodorizing windshield case ..........................................................................................19
7. Specifying Measuring Settings .....................................................................................................20
8. Menu Settings.................................................................................................................................22
8-1. Setting for MODE (measuring mode) ...................................................................................22
● Setting for AUTO (automatic) mode ................................................................................22
● Setting for TIME (timed) mode ........................................................................................24
8-2. Setting for TEMP (drying temperature) ................................................................................26
8-3. Selection of UNIT (measurement standard and minimum display digit) ..............................28
8-4. Selection of OUTPUT (output format) ..................................................................................30
■ Outputting Past Measurement Data ...............................................................................32
■ Sample Printer Output ....................................................................................................32
■ Computer Interface .........................................................................................................32
■ Setting UP and Transmitting Data ..................................................................................32
■ Computer Output Format ................................................................................................33
8-5. Setting for BIAS (offset value) ..............................................................................................34
8-6. CAL (scale calibration) .........................................................................................................36
9. Maintenance....................................................................................................................................40
9-1. How to Perform Maintenance ..............................................................................................40
9-2. Fuse Replacement ...............................................................................................................40
9-3. Heater Replacement ............................................................................................................41
10. Error Display.................................................................................................................................42

4
1. Safety Precautions
Improper use of the infrared moisture tester in violation of the following safety notes may result in death, injury
or damage to property due to re, smoke and other problems. Furthermore, the infrared moisture tester has high
temperature components which can cause burns if proper safety guidelines are not followed.
■ Please observe the safety precautions.
Please read the precautions noted in the operating manual.
■ Do not use if broken.
If you suspect a problem or malfunction in the unit, discontinue use and immediately have the unit inspected by
certied Kett service personnel.
■ Warning symbol explanation.
In order to prevent damage resulting from erroneously operating the equipment, the following symbols are
indicated in the operating manual and on the product.
Please review the descriptions.
Warning Failure to observe these items may lead to death or injury to the user.
Caution Failure to observe these items may lead to injury to the user or damage to property.
Note Items which the user should be aware of in order to safely use the unit.
Warning
• Do not measure materials that may cause a dangerous chemical change by the application of heat.
• Failure to observe this may result in an explosion or generation of poisonous gas.
• Do not place ammable materials near the infrared moisture tester.
• Some parts of the infrared moisture tester become extremely hot during operation and could lead to fire if
ammable materials are placed nearby.
• This product should be used only with the applicable power supply voltage.
• Using this product with incorrect voltage may cause the product to be overheated, which may result in trouble or
re.
• Do not attempt to disassemble, modify or rebuild the infrared moisture tester.
• Doing so may result in an accident, electric shock, or other problems. If you believe the unit may be
malfunctioning take it to an authorized Kett service center for service.
• Do not allow the unit to come in contact with water.
• The infrared moisture tester is not waterproof. Do not allow water or other liquids to get into the unit’s enclosure
as this may lead to electric shock or malfunction.
Caution
• Do not touch the heat-dispersing component of the heater cover or the sample dish with your bare hands. Doing
so may result in burns. The infrared moisture tester is at a high temperature during and immediately after making
measurements. When touching the unit, only use the specied control knobs and accessories.
Be sure to follow proper procedures during operation.
• When opening or closing the lid to the heater, always be sure to use the handle.
• Place the wind shield, sample dish tray, and sample dish appropriately (see "5. Assembly and Installation" on
page 12).
• When removing a sample dish, do not allow your hands to come into contact with the heater or any of the metal
parts around the heater, as doing so could result in burns.
• The sample dish and area around the sample dish will be very hot immediately after performing a measurement.
Be sure to place the sample dish in an appropriate place to allow it to cool.

5
Never perform measurements using hazardous materials
• Heating materials which would present a risk of explosion or combustion, or materials which could give off
noxious fumes when heated, is extremely dangerous and this instrument should never be used with any such
materials. The same also applies to the use of any materials which might cause hazardous chemical reactions to
take place when heated.
• When heating materials that would first dry along the surface, and then allow the internal pressure to rise
excessively, there is a danger that heating such materials could cause them to rupture. Such materials should
never be measured, as doing so could be dangerous.
• If any materials being measured ignites, immediately remove the power plug from its socket and take appropriate
measures to extinguish the re.
• Never place any easily ammable objects near the product.
• The components of the infrared moisture tester can become very hot when measurements are being taken or
immediately after measurements have been taken. This heat could cause objects or materials to catch re if
they were to come into contact with the unit. No easily ammable objects or materials should be kept near the
product.
• Never place any objects which might easily be damaged by heat near the unit, as doing so might result in
deformation or damage to the objects in question.
• No objects should ever be placed upon the heater.
• If you see re coming from the unit or notice smoke, an odd smell, or any other sign of abnormal functioning,
remove the power plug from its socket, and take whatever other steps would be appropriate to deal with the
problem.
Notes on using the control keys
• Never turn on the power to the unit while holding down any of the control keys.
• Never press any keys other than those directed or press two or more keys together at the same time unless
directed to do so.
• When there is any danger that the unit might be damaged by lightning, remove the power plug from its socket.
Stopping operation
• The [Start/Stop] key can be pressed at any time during operation to halt operation. If you suspect for any reason
that the product is not operating properly or that there is any sort of danger, immediately press the [Start/Stop]
key to halt operation.
Setup and storage
• Avoid using or storing the unit in a location where it would be exposed to excessively high or low temperatures,
high levels of humidity, direct sunlight, electromagnetic interference, corrosive gases, or large amounts of dust.
• Place the unit on a at and stable surface where it will not be subjected to signicant vibration during use.
• When moving the unit, never tilt it any more than necessary.
• Take care never to drop or bump the unit or otherwise allow it to be subjected to strong shocks or the application
of excessive force.
• When removing the power cord or RS-232C interface cable, never pull on the cord or cable and instead, hold the
plug or cable connector when removing.
• When the unit is not to be used over an extended period of time, remove the power plug from its socket.
• Use the supplied power cord and make sure to connect to the protective earth.

6
2. Measuring Principle and Features
■ Measuring principle
This unit determines the moisture and solid contents of samples by heating them using infrared illumination
and measuring changes in mass due to evaporation. This is referred to as the loss on drying method and is
the simplest method for determining moisture content and thus mandated by many public regulations related to
measurement standards.
■ Features
● Auto Taring mechanism
The auto taring mechanism is incorporated in this instrument. This mechanism allows for measurement while
performing a zero point calibration, and therefore, scale drift is eliminated even when a test is performed over a
long period of time. This feature allows for reliable measurement.
● Organic carbon heater
An organic carbon heater is introduced for the heat source. This heater emits infrared rays more than 2 times
stronger than a halogen heater in the wavelength range (2.5 to 3μm) in which moisture reacts with heat. This
feature provides extremely efcient drying.
The service life is 7,000 hours* which is approximately 4 times the life of a comparable conventional infrared
lamp. In addition, it is better for the environment as polluting halides and metals are not used.
* Indicates actual measured time for the operation of infrared heater. This is not a guarantee of service life.
● 2 types of measuring modes
This product provides 2 types of measuring modes, and therefore, can perform measurement under appropriate
drying settings in accordance with the drying characteristics of the sample to be measured. (Automatic mode,
Timed mode)
● Pre Heat mode
This product is equipped with a Pre Heat mode to eliminate a measurement error occurring immediately after
turning on the power or when the temperature inside the measuring instrument is not stable.
● The ability to store measuring settings
Five (5) measuring settings storage numbers are provided. Storing various sample measuring settings on
numbers allows users to perform measuring preparation smoothly.
● Data memory function
This unit is able to store up to 50 sets of measurement data in memory, thus making it possible to output large
batches of data all at one time.
● PC connectivity
The connection of a PC and the use of the data logger, “FDL-02” (option) allows the drying state during
measurement, nal measurements, graphs, and the like to be displayed on the PC.
● Printer port
The connection of the printer (option) allows the drying state during measurement, nal measurements, and the
like to be printed out.
● Stainless-steel sample dish with 10 mm in diameter
● Scale calibration
■ Measurable objects
● Materials from which only water evaporates by heating
● Materials for which no dangerous chemical reactions or other changes occur as a result of
heating
* Measurements can be performed using virtually any material meeting these conditions.

7
3. Specications
Measurement method :Detection of weight loss by heating & drying
Sample weight :1 - 80g optional weight sampling format
Minimum displayable units :Moisture content (solids): 0.1% or 0.01% (selectable), Weight: 0.005g
(* The indication of 0.01% is not a guarantee of accuracy.)
Measurable quantities :Moisture content (wet base & dry base), weight, solid content
Measurement range :0 - 100% (wet base, solids)
0 - 500% (dry base)
Reproducibility
(Standard deviation)
:Samples with a weight of 5 g or higher: 0.1%
(When using standard samples and measuring settings as determined by Kett
Electric Laboratory)
Measurement Mode :Automatic mode
Timed mode (1 - 120 min.)
Temperature setting range :30 to 180ºC (in steps of 1ºC, temperature on dish)
Display :Backlit LCD display (96 x 40mm)
External output :RS-232C interface
Communications :Data output from "the data logger software FDL-02" (option)
Storage of measurement
settings
:5 types
Temperature/humidity op-
erating range
:5 - 40ºC, 85% RH or less (no condensation)
Heat source :Organic carbon heater (280 W x 2)
Temperature sensor :Thermistor
Power supply :AC 100V-120V (50/60Hz) : Power cord A (Flat blade attachment plug, Type A-1)
AC 200V-240V (50/60Hz) : Power cord B (Round pin attachment plug, Type C-4)
Power consumption :Max. 900 W
Dimensions and weight :222 (W) x 360 (D) x 196 (H) mm, 3.2 kg
Sample dish :Stainless steel (110 mm in diameter, 11 mm in depth)
Accessories :2 sample dishes, sample dish handler, wind shield, sample dish tray, spoon,
spare fuse (8A) ×2, package of aluminium foil sheets (10 per package), Power cord
A or B (Power plug conversion adapter), operating manual
Options :Printer set (includes a VZ-330 printer, a printer interface cable (VZC-14), printer pa-
per, and an AC adapter), printer paper (10 rolls), package of aluminium foil sheets
(500 sheets), RS-232C cable (VZC-52), Data Logger software FDL-02, Sample
crusher TQ-100, Deodorizing windshield case FW-100

8
4. Part Names
4-1 Names of Main Unit Parts
Heater lid
Heater
Sample dish
Wind shield
Display and control panel
Power switch
Power conversion switch
AC inlet
RS-232C output terminal

9
Sample dish (2 pcs)
A-1
Wind shield
A-3
Sample dish stand
A-4
Spoon
A-5
Spare fuse (8A)×2
A-7
Sample dish handler
A-2
Aluminium sheets x10
A-6
Power cord A with 3P-2P plug adapter A-8
or
Power cord B A-9
Operating Manual
A-10
4-2 Accessories
* The aluminium sheets (A6) are 500 pieces per box when ordered additional.

10
4-3 Display
Item No. Name Description
1Stability indicator Displayed when the internal scale becomes stable.
2Temperature display Used to display the temperature under the heater lid.
3Measuring time display Used to display the amount of elapsed time during measuring.
4Mode setting display Displayed when the measuring mode is selected.
5Drying temperature setting display Displayed when the drying temperature is specied.
6Display for measurement standard
and minimum display digit
Displayed when the measurement standard and minimum display digit are
selected.
7Measurement data output display Displayed when a measurement data output format is selected.
8Bias setting display Displayed when the offset value of the moisture (or solid) is specied.
9Calibration display Displayed when the scale is calibrated.
0Tare/Reset display
Lights up when taring (zero adjustment) can be performed.
Blinks during taring (zero adjustment).
Lights up when the screen can be returned to the weight display screen after
measurement.
!Start/Stop display
Lights up when the unit can start measuring.
Blinks during measurement.
Lights up when measurement can be forcibly terminated.
@Moisture/Solid/Weight display
When measuring weight (i.e., when in idling mode), used to display the weight
in grams. When performing measurements, used to display the moisture content
and solids content as percentages.
"oL" is displayed when the weight exceeds the measurable range at measuring
a weight.
#Measuring settings area number
display
Used to display the number of the currently selected measuring settings area
number.
$Menu display Displayed when a measuring setting number, a measuring mode, a
measurement standard, an output format, or an offset value is specied.
%Setting value display
Each item and its value are displayed when a measuring mode, a drying
temperature, a measurement standard, measurement data output format, or an
offset value is specied.
The measuring mode is displayed during measurement.
When an offset value is specied, the value is displayed after the measurement.
1
468
579
0!
@ # $ %
2 3

11
4-4 Control Panel Functions
Item No. Name Description
1Tare/Reset key
Used to perform zero adjustment (blinks during taring).
Also used to perform a reset after an error has occurred.
Also used to return to display of weight after completion of measurement.
2Pre Heat key
Used to warm up the whole system before measuring a sample. Also
used to warm up the measuring instrument when it is cooled because of
a long measuring interval (see page 18 for further information).
[Temperature: 130ºC, time: 5 minutes] xed
Replace the sample dish after preheating.
3Menu key
Used at the start and end of specifying a measuring mode, a drying
temperature, a measurement standard, measurement data output
format, or an offset value.
4Select key Used to select different settings or setting values.
5▲ (Up) key Used to raise the setting value.
6▼ (Down) key Used to lower the setting value.
7Enter key Used to conrm currently selected settings.
8Start/Stop key
Used to start measuring or to abort a measuring operation.
Used to forcibly terminate the measurement.
Also used to turn off the alarm which sounds to indicate that a
measuring operation has been completed.
1 2 4 6
358
7

12
5. Assembly and Installation
① Opening the package
Open the package and check to make sure all listed
items are included. (see page 9)
② Installing the main unit
Place the unit on a flat and stable workbench that is
insensitive to external vibration, wind, and the like.
③ Checking the power supply voltage
Check to see whether the power conversion switch
on the rear panel of the main unit is set to the working
voltage side.
* It is set to the (100-120 volts) side in Japan and the US.
If the switch is not set to the working voltage side, the
error (Er701) is displayed when the power is turned on.
④ Attaching the wind shield
Open the heater lid.
Place the wind shield so that the ▽ mark on the shield
points downward.
When the wind shield is appropriately placed, no
backlash or rotation may be created.
* Be careful not to apply excessive force on the center
shaft when attaching the wind shield. Failure to observe
this may damage the instrument.
⑤ Placing the sample dish stand
Engage the sample dish stand (trivet) with the wind
shield so that the △ mark on the stand is aligned with
the ▽ mark on the shield. When the wind shield is
appropriately placed, no backlash or rotation may be
created.
* Be careful not to apply excessive force on the center
shaft when placing the sample dish stand. Failure to
observe this may damage the instrument.
Made in Japan
SER No. BC10001

13
⑥ Placing the sample dish
Gently place the sample dish on the sample dish stand.
* Put the sample dish on the proper place on the sample
dish stand, and be careful not to put the dish on the edge
of the stand.
⑦ Close the heater lid
⑧ Connecting the power cord
Connect the power supply cord to the power supply input
on the rear panel. After that, plug the power cord into a
100 VAC wall outlet.
⑨ Connecting the printer (option)
When a printer is used, use the printer-specic cable that
is supplied with the printer. Connect the cable to the RS-
232C output terminal.
Refer to "the VZ-330 Printer User’s Manual" supplied with
the printer for descriptions about the printer.
* Some parts must be oriented in a fixed direction for
assembly. Note that placing parts in the wrong direction
may result in errors in operation or in erroneous readings
being obtained, and that you should take care that all parts
are put into place in their proper positions.
AC inlet
RS-232C output terminal

14
⑩ Turning on the power
Turn on the power switch located at the rear of the unit.
A beep sounds, and all contents are displayed. After that,
the power supply voltage that has been automatically
detected by the instrument is displayed with "CHE5",
"CHE4", ... and "CHE0".
When the power is turned on for the rst time after purchase
or when the instrument is used with a power supply voltage
other than the previous voltage, the power supply voltage is
displayed with "-----".
After ensuring that the power supply voltage is correct by,
press the [Enter] key.
The screen changes to the weight display screen with a
beep.
If the power supply voltage that has been automatically
detected by the instrument is wrong, or if the instrument
cannot automatically detect the power supply voltage and “Er
701” is displayed (see page 42), follow the procedure below
to perform manual setting.
When the power is turned on for the rst time,
ensure that the power supply voltage is correct and
press the [Enter] key.
■ How to manually specify the power supply voltage
Turn on the power while holding the [Menu] key down.
A beep sounds, "All contents displayed" → "CHE5" → "-----" are
displayed, and the power supply voltage is displayed.
When the power conversion switch is set to 100 - 120 V or 220 -
240 V, "100" or "220" is displayed respectively.
* If "Er 701" is displayed, selection with the power conversion
switch is wrong. Make a selection with the switch correctly
(see 3on page 12).
Make a selection of the power supply voltage in accordance with
the power supply voltage to be used.
Press the [Select] key to select a power supply voltage.
Applicable voltage
• 100 - 120 V: 100 V/110 V/120 V
• 200 - 240 V: 220 V/230 V/240 V
After selection, press the [Enter] key.
Turn on the power while holding the [Menu] key down.
After selection, press the [Enter] key.
"CHE4", "CHE3", ..., and "CHE0" are displayed, and the screen
changes to the weight display screen with a beep.
The measuring mode (see page 22) is displayed on the setting
value display.
Made in Japan
SER No. BC10001
+
Beep
① ②
Beep

15
6. Measurement Procedure
If a measurement is performed immediately after turning on the power, an error may be caused. It is recommended
to leave the instrument for approx. 30 minutes after turning on the power or perform "Pre Heat" (see "■ Tips on
how to ensure accurate measurements, ● First measurement" on page 18).
Before beginning a measurement, check to make sure that the sample dish is appropriately placed and there is no
residue remaining in the sample dish. Proceed to the measurement procedure after ensuring that every part of the
main unit is stable and that the heater lid is rmly closed in particular (see "5. Assembly and Installation" on page 12).
① Settings
When performing measurements for the first time,
or when you wish to change current settings before
measuring, then you should specify the measurement
settings.
(see "7. Specifying Measuring Settings" on page 20)
② Zero Point Adjustment
Check to make sure that the stability indicator (O) is being
displayed, and then press the [Tare/Reset] key.
“-----” is displayed on the screen. The sample dish and
wind shield move vertically and the zero adjustment is
performed.
The procedure is completed after the [Tare/Reset] key
lights with a beep and “0.000g” is displayed.
* Always confirm that the heater lid is closed when
performing a tare. Also make sure that the tester is not
exposed to drafts or wind, or subjected to any vibrations
when a tare is being performed.
③ Placing a sample on the sampling tray
Open the lid to the heater and place the sample inside.
Be sure to place the sample as at as possible into the
tester so that heat is evenly applied to the sample during
measurement.
(See “■ Tips on how to ensure accurate measurements”
on page 18 for further information.)
○
×
During zero adjustment (taring)
Beep

16
④ Starts measurement
Close the heater lid.
Check to make sure that the stability indicator (O) is being
displayed, and then press the [Start/Stop] key.
* There may be times when the stability indicator (O) is
not displayed because of external vibrations or drafts or
wind. In such a case, measurement can be performed but
the measurement result may not be accurate. You should
always be sure to conduct measurements in a location as
free as possible of vibrations, drafts, wind, or any other
harmful inuences.
* Pressing the [Start/Stop] key while the heater lid is open
will cause a safety alert buzzer to sound and measuring to
be stopped.
Heating & drying will begin.
The display switches from the weight (g) display to the
moisture content (%) display and the measuring time is
also displayed.
The measuring time shows the elapsed drying time
(minute).
The zero adjustment is automatically performed once
every minute (and once every 30 seconds when the
measurement is about to nish) during moisture content
measurement.
* Never open the heater lid during moisture content
measurement. Doing so is not only hazardous but also
could contribute to making it impossible to obtain accurate
measurements. When the heater lid still needs to be
opened to observe the sample during measurement or for
other reasons, open it for less than 15 seconds (a warning
buzzer sounds 10 seconds after opening the heater lid,
the measurement stops 15 at seconds, and "ER306" is
displayed).
* To stop a measurement in progress, press the [Start/Stop]
key.
⑤ Completion of the test
After completion of the test, the measured results are
displayed and the BIAS setting value (see page 34) is
displayed on the setting value display. At the same time,
the [Tare/Reset] key lights up and a buzzer sounds for 10
seconds.
To stop the buzzer, press the [Start/Stop] key.
The measured results continued to be displayed.
* If this product is connected to a printer (option), pressing
the [Enter] key causes the signature field to be printed.
(See “Sample Printer Output” on page 32 for further
information.)
blip, blip, blip, ...
To add a signature field on a
printout, press the [Enter] key.
For
stopping
a buzzer

17
⑥ Reset
Press the [Tare/Reset] key.
The display of the results of the measurement (i.e.,
moisture content) will disappear and be replaced by a
display of the weight of the sample after drying.
* Reset cannot be performed while a buzzer sounds.
⑦ Disposing of samples after measurement
Open the heater lid, remove the sample dish with the
sample dish handler, and dispose of measured sample.
* Note that the sample and sample dish may be very hot and
you should be careful in handling them at this time.
⑧ Preparing for the Next Measurement
Leave the lid to the heater open to allow the tester to cool.
When performing sequential measurements, make sure
that the entire unit has cooled before proceeding to the
next measurement.
You should also keep a spare (cooled) sample dish
available to use in the next measurement.
(See “■ Tips on how to ensure accurate measurements”
on page 18 for further information.)
* The guideline is for “the entire unit” is when 40ºC or lower
is displayed.
When ready, return to step ② and begin the next
measurement.
⑨ Turning off the power
When all the measurements have been completed,
remove the power plug from the power outlet.
When not using the main unit, always remove the power
plug from the power outlet.

18
■ Tips on how to ensure accurate measurements
● First measurement
If a test is performed immediately after turning on the power, a measurement error may be caused.
It is recommended to turn on the power 30 minutes before use to optimize instrument stability.
In addition, we recommend using the Pre Heat function available with the instrument.
How to operate the Pre Heat function
1
Place the sample dish, and close the heater lid.
* No sample is necessary.
Press the [Pre Heat] key.
2
The [Start/Stop] key blinks, heating begins.
It is heated at 130ºC.
3
Pre heating will nish in 5 minutes.
The [Tare/Reset] key lights up.
4
Press the [Tare/Reset] key.
“PrEH” will disappear and weight is displayed.
5
Open the heater lid, and remove the sample dish with the
sample dish handler.
* Note that the sample dish may be very hot and you
should be careful in handling it at this time.
Leave the heater lid open to allow the tester to cool.
6
Ensure that the entire unit has cooled, and place the spare
(cool) sample dish.
* The guideline for "the entire unit has cooled" is 40ºC or
lower on the display.
Use a cool sample dish.

19
● For multiple measurements in succession
Placing a sample onto a sample dish which is already warm may cause moisture from the sample to evaporate
before the test is begun and cause errors to occur in measurement. Always be sure to use a cool sample dish
when performing a second or subsequent measurements.
You should also take care to allow an even amount of time to elapse between measurements, as errors in
measurement may occur if the temperature of the internal scale of the unit does not remain at a constant level.
* Two sample dishes are supplied with this unit.
● How to use sample dish and aluminium foil sheet
It is impossible to obtain accurate measurements if residue from the sample last measured remains on the sample
dish. To avoid such problems, either wipe the sample dish clean of any dirt or soil (see “9. Maintenance” on page
40 for further instructions) or use disposable aluminium foil sheets to protect against residues, soil, or dirt.
* Ten disposable aluminium foil sheets are supplied with the unit.
● Measurement of powdered, particulate, and viscous samples
The easier it is to heat the surface of a sample material, the easier it is for projecting portions of the material or
for material at the top of a mound of material to become burnt. If the material is placed in a mound on the dish or
if the material is not at and evenly laid out, this is likely to happen, thus making it impossible to obtain accurate
measurements.
Note that while the precision of measurement improves the more flatly and evenly samples are placed and
the higher the amount of sample material used, the quantity of sample material used is too great if the surface
becomes burned before lower layers are fully dried.
Always be sure to lay out samples atly and evenly as indicated in the diagram below.
● Measurement of liquid sample
Virtually all liquid materials will coagulate after being dried, and when working with such materials they should be
placed on the provided sheets of aluminium foil. Note that these aluminium foil sheets are water-permeable, thus
making it possible to obtain wide and even placement and making them effective for use in shortening measuring
times and obtaining accurate measurements.
Depending on the sample in question, the use of sand to speed up drying (Silica sand or ocean sand with a mesh
of 20 or so) may be even more effective.
● Measurement of large particulate sample
A long time may be required to thoroughly dry samples if the sample grains are large. In
addition, the sample surface may be burned, thus making accurate measurement impossible.
For this reason you should always crush samples to an appropriate size. The Sample Crusher
TQ-100 (option) is excellent for this purpose.
● Removal of soil, sample gas, and others
Depending on the sample, oil and volatile substances may stick to the temperature sensor and on the inside of the
heater base when the sample is being dried.
If the sample is in the form of a powder, under certain circumstances, the powder may accumulate on the upper
side of the heater lid or in the space between the heater and lid. These types of powder substances can change
the temperature around the sample and the air ow in the dryer section of the machine, resulting in an error in
measured moisture.
A substantial error can easily arise if the upper side of the heater lid gets clogged with deposited material.
Frequently clean the end of the sensor, the inside of the heater base, the upper side of the heater lid, and the
space between the heater and lid. Remove any dirt or sample residue.
• Wipe off the dirt with a dry, soft cloth.
• If dirt remains, wipe with a damp cloth (not dripping) with a water/neutral detergent mix. Then, dry the instrument
after rinsing the cloth in running water, wringing it well, and wiping off the detergent.
● Deodorizing windshield case
If the impact of exterior wind (from air-conditioners etc.) on the body is unavoidable, or if the sample generates a
bad odor during moisture content measurement, or if the device is in an environment that will accumulate powder
on its body from the sample, it is possible to lower reduce the impact of these problems by placing the device
inside the deodorizing windshield case FW-100 (option).
T Q -10 0

20
7. Specifying Measuring Settings
When moisture content is measured, test settings such as drying temperature and measurement mode need to be
specied in advance.
The specied measuring settings can be stored in the measuring setting storage areas.
There are 5 measuring setting storage areas as shown in the circle below 1 to 5.
There are 5 menu items that need to be specied in the (see the circles below).
First, select a measuring setting storage area from 1 to 5.
Next, specify MODE (measuring mode), TEMP (drying temperature), and BIAS (offset value).
UNIT (measurement standard and minimum display digit) and OUTPUT (output format) are common in all areas.
The stored settings can be always recalled, and therefore,
storing settings for each sample type to be measured is
useful.
Refer to the next chapter, "8. Menu Settings (pages 22 or
later)" for details on how to set each menu item.
The following factory settings are stored in the 1 to 5
areas.
• MODE : Automatic mode
(change in moisture content: 0.1%,
monitoring time: 1 minute)
• TEMP : 120 ºC
• BIAS : 0.0 %
The following common menu items are stored.
• UNIT : Wet base
• OUTPUT : Printer Output
MODE : Measuring mode
TEMP : Drying temperature
UNIT : Measurement standard and
Minimum display digit
OUTPUT
: Output format
BIAS : Offset value
Table of contents
Other Kett Measuring Instrument manuals
Popular Measuring Instrument manuals by other brands

ESD SYSTEMS
ESD SYSTEMS SPl-20686 Operation installation and maintenance

Effigis
Effigis CPAT FLEX ARD4 user manual

Larson Davis
Larson Davis SoundTrack LxT user manual

Extech Instruments
Extech Instruments MA150 user manual

Extech Instruments
Extech Instruments MO265 user guide

Tunix
Tunix EO-250 instruction manual