PSI PlantPen/N-Pen N 110 Manual


Page | 2
Manual Version: 2021/12
© PSI (Photon Systems Instruments), spol. s r.o.
www.psi.cz
This document and its parts can be copied or provided to a third party only with the express permission of PSI.
The contents of this manual have been verified to correspond to the specifications of the device. However, deviations cannot be ruled out.
Therefore, a complete correspondence between the manual and the real device cannot be guaranteed. The information in this manual is
regularly checked, and corrections may be made in subsequent versions.
The visualizations shown in this manual are only illustrative.
This manual is an integral part of the purchase and delivery of equipment and its accessories and both Parties must abide by it.

Page | 3
TABLE OF CONTENT
1Information before using N-Pen device ............................................................................................................ 5
2General Description ......................................................................................................................................... 6
2.1 Technical Specification..............................................................................................................................................7
3Device Description ........................................................................................................................................... 9
3.1 List of equipment and customer information..........................................................................................................10
3.2 Care and maintenance............................................................................................................................................10
4Principle of measurement.............................................................................................................................. 11
4.1 Leaf optical properties and nitrogen.......................................................................................................................11
4.2 N-Pen configuration................................................................................................................................................12
4.3 Nitrogen nutrition...................................................................................................................................................13
5Getting started............................................................................................................................................... 14
5.1 Calibration ..............................................................................................................................................................14
5.2 Measurement .........................................................................................................................................................14
6Control menu tree.......................................................................................................................................... 15
7USB Connection ............................................................................................................................................. 20
8Bluetooth connection..................................................................................................................................... 21
8.1 Bluetooth pairing....................................................................................................................................................21
9FluorPen software.......................................................................................................................................... 24
9.1 Software installation...............................................................................................................................................24
9.2 Menu and icons explanation...................................................................................................................................25
9.2.1 Main menu .............................................................................................................................................................25
9.2.2 Menu settings.........................................................................................................................................................26
9.2.3 Menu online control ...............................................................................................................................................26
9.3 Data transfer and export ........................................................................................................................................27
10 Firmware update............................................................................................................................................ 28
11 GPS module ................................................................................................................................................... 30
11.1 GPS/N-Pen operation..............................................................................................................................................30
11.2 Data download .......................................................................................................................................................31
12 References..................................................................................................................................................... 32
13 Warranty terms and conditions...................................................................................................................... 33

Page | 5
1INFORMATION BEFORE USING N-PEN DEVICE
Read this manual carefully before operating the device. If you are not sure about something in the manual, contact the manufacturer for
clarification.
By accepting the device, the customer agrees to follow the instructions in this guide.
Always follow corresponding manuals while working with the N-Pen device or doing the maintenance.
It is forbidden to interfere with the hardware or software of the N.Pen device in any way without previous agreement with the
manufacturer.
The following table presents basic highlight symbols used in this manual:
Symbol
Description
Important information, read carefully.
Complementary and additional information.
Tab. 1 Used symbols.

Page | 6
2GENERAL DESCRIPTION
N-Pen N 110 is a light-weight, battery-powered reflectance-based instrument that provides a convenient, cost-effective method for
effective nitrogen management in plants throughout their growing season. Essentially, the N-Pen characterizes nitrogen amount by
means of reflectance and by the concept of a close link between chlorophyll content and nitrogen content in plants.
Rugged and compact N-Pen can be used for plant biology research or for education. Due to an inbuilt GPS module and splash-proof cover
is N-Pen suitable for field experiments. The measurement is non-destructive and permits quick, repeated monitoring throughout the
growing season. The device is equipped with rechargeable Li-ion battery.
Measured data are sequentially stored in the internal N-Pen memory. Data transfer is via USB or Bluetooth communication.
Comprehensive FluorPen 1.1 software provides data transfer routines and many additional features for data presentation in tables and
graphs.

Page | 7
2.1 TECHNICAL SPECIFICATION
Protocols
Normalized Difference Greenness Index
NDGI = (R780 –R560)/(R780 + R560)
Nitrogen content
- Correlated with NDGI
- Measured in percentage
- Calibration for maize, wheat and barley
LED emitter
565 nm and 760 nm
Detector
PIN photodiode with bandpass filters
From 500 to 800 nm
Internal memory capacity
Up to 16 Mb
Internal data logging
Up to 100,000 measurements
Data transfer
USB cable
Bluetooth (transfer up to 3Mbps for distance up to 20m)
PC software
FluorPen 1.1 (Windows 7 and higher)
Battery
Li-Ion rechargeable battery
Capacity 2000 mAh
Max. charging current 0.5 A
Charging via USB port - PC, power bank, USB charger, etc.
70 hours typical with full operation
Low battery indicator
Sample holder
Mechanical leaf-clip
Display
Graphical display
Keypad
Sealed, 2-key tactile response
Turns off after 5 minutes of no use
Built in GPS module
Ultra-high sensitivity down to -165dBm
High accuracy of <1.5 m in 50% of trials
Size
135 x 65 x 33 mm
Weight
188 g
Operating conditions
Temperature: 0 to +55 °C
Relative humidity: 0 to 95 % (non-condensing)
Storage conditions
Temperature: -10 to +60 °C
Relative humidity: 0 to 95 % (non-condensing)
Warranty
1-year parts and labor

Page | 8
Bluetooth module compliance data:
Category
Country
Standard
Radio
USA
FCC Part 15 Subpart B: 2008 Class B
FCC CRF Title 47 Part 15 Subpart C
FCC ID:
T9J-RN42
Europe
ETSI EN 301 489-1 V1.8.1
ETSI EN 301 489-17 V2.1.1
ETSI EN 300 328 V1.7.1
Canada
IC RSS-210 low power comm. device
Certification number:
6514A-RN42
EMC
USA
FCC CFR47 Part 15 subclass B
Europe
EN 55022 Class B radiated
EN61000-4-2 ESD immunity
EN61000-4-3 radiated field
EN61000-4-6 RF immunity
EN61000-4-8 power magnetic immunity

Page | 9
3DEVICE DESCRIPTION
Fig. 1 Device description.

Page | 10
3.1 LIST OF EQUIPMENT AND CUSTOMER INFORMATION
Standard version of the N-Pen device package consists:
•N-Pen N 110
•Carrying Case
•FluorPen software and driver (on a USB flash disc)
•Operation Manual (PDF on a USB flash disc)
•USB Cable
•Other Accessories or Optional Features (according to your specific order)
For data download via USB connection, the USB driver needs to be installed on the PC. It can be found on the
installation disk (USB driver folder).
If any item is missing, please, contact the manufacturer. Also check the carton for any visible external damage. If
any damage is found, notify the carrier and the manufacturer immediately. The carton and all packing materials
should be retained for inspection by the carrier or insurer.
3.2 CARE AND MAINTENANCE
N-Pen
•Never submerge the device in water!
•The device should not come in contact with any organic solvents, strong acids or bases.
•Keep the optical part clean and dry. If cleaning is needed, use soft, non-abrasive tissue.
Li-ion battery
•Avoid fully discharging of the battery.
•Do not keep the battery at full charge for all the time.
•Keeping at high temperatures shortens battery life.

Page | 11
4PRINCIPLE OF MEASUREMENT
Based on reflectance measurement at 565 nm and 760 nm, the N-Pen calculates NDGI (normalized difference greeness index) and
predicts relative nitrogen content (N-content) in dry matter. As leaf structure specifically influences plant reflectance profile, N-content
quantification was calibrated for three separate crops: wheat, barley and corn.
4.1 LEAF OPTICAL PROPERTIES AND NITROGEN
The N-Pen assesses N amount by means of spectral reflectance and by the concept of a close link between chlorophyll content and N
content in soil and plants (Evans, 1983, 1989; Penuelas et al., 1994; Schlemmer et al., 2005). Since the presence of chlorophyll affects
reflectance properties of leaves, optical methods based on spectral reflectance have been suggested to detect chlorophyll concentration
(Yoder and Pettigrew-Crosby, 1995; Richardson et al., 2002; Gitelson et al., 2003).
Spectral reflectance is one of the optical methods widely used for indirect quantification of crop physiological status, which can be
influenced by various factors, such as plant nutrients or pathological status. Chlorophyll absorption spectrum contains two absorption
bands, one in the red and one in the blue region of visible spectrum (Fig. 2). Reflectance spectrum of green leaves roughly complements
the absorption spectrum (compare A and B in Fig. 2), indicating that the presence of chlorophyll is critical for optical properties of leaves
(Thomas and Gausman, 1977; Gitelson Merzlyak, 1994).
Fig. 2 Absorption and reflectance specrtra (A) leaf pigment extract (B) reflectance of leaf surface.
To determine optimum wavelength for N-content prediction, several experimental plant groups with different levels of N nutrition were
examined by measurement of spectral reflectance (Klem 2008). The reflectance values at each wavelength along reflectance spectrum
were correlated with N-content in experimental plant groups. Pearson’s correlation coefficient was used as a statistical measure of the
strength of linear relationship between the paired data (Fig. 3A). The highest correlation was found for reflectance in the ranges 530 –
630 nm and 700 –720 nm (negative correllation) and in the NIR region 750 –900 nm (positive correlation). Indices based on reflectance
in the green region (around 560 nm) were reported to be more sensitive to N and chlorophyll content (Gitelson et al. 1997) than indices
based on reflectance in chlorophyll absorption maxima (e.g. NDVI).
Normalized Difference Greenness Index (NDGI) is calculated from leaf reflectance at wavelength bands 565 nm and 760 nm (equation 1),
NDGI = (R760 –R565) / (R760 + R565) (Equation 1),

Page | 12
where R565 and R760 are reflectance values at indicated wavelengths. Based on a close relationship between NDGI and N-content in
barley leaves at mid-tillering stage (Fig. 3B), the NDGI index was proposed to be a convenient tool for determination of N-content and N-
nutrition state in barley (Klem, 2008).
Determination of NDGI index is strongly dependent on plant and leaf developmental stage as well as on environmental variability of field
cultivation. Especially the first rapidly expanding leaf and the older leaves at the onset of senescence exhibit high variability of NDGI
results. The most evident relationship between NDGI and N-content was reported in the second and the third youngest leaf (Klem 2008).
Fig. 3 Correlation between N content in barley dry matter and reflectance at particular wavelengths indicated as Pearsons correlation coefficient along
the reflectance spectrum (A). Relationship between NDGI index and N content in barley dry matter (B) can be interpreted as a sigmoid curve. Vertical
bars represent 95 % confidence intervals.
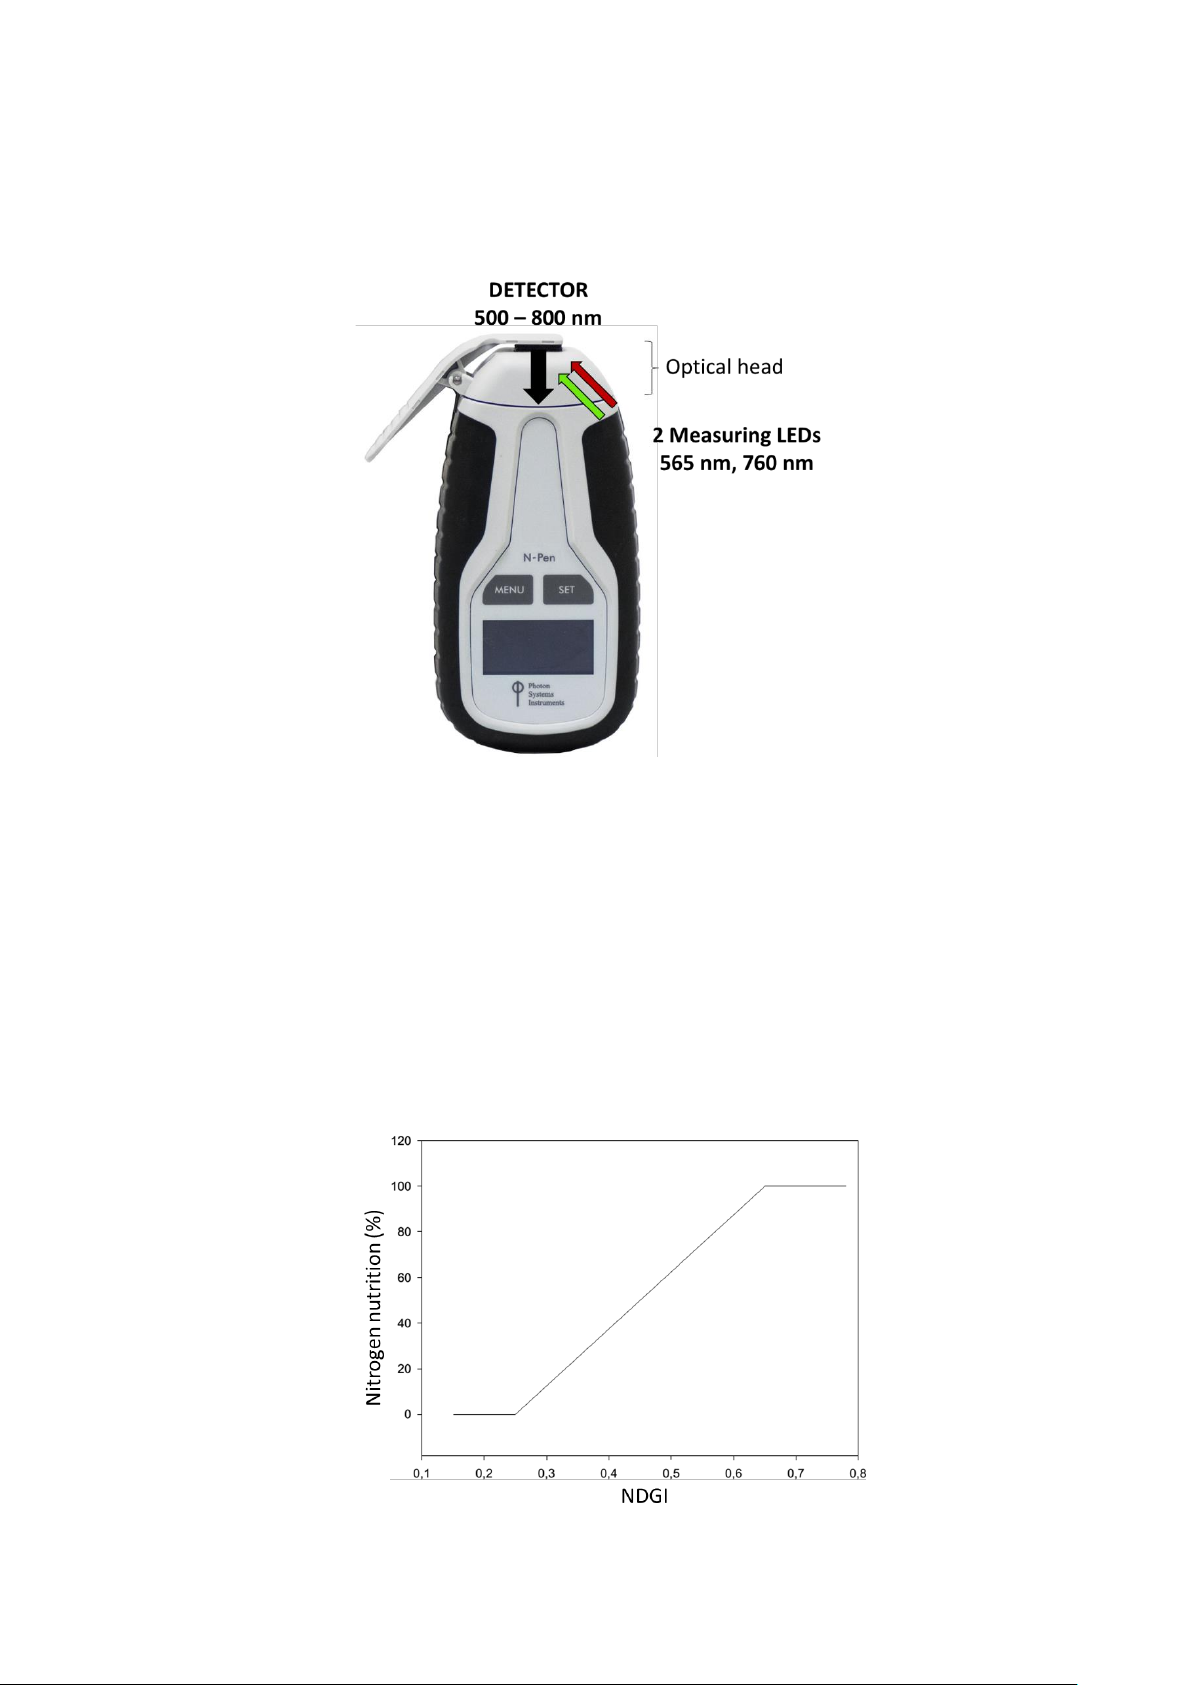
4.2 N-PEN CONFIGURATION
The N-pen N 110 is configured to quantify reflectance of the leaf illuminated with two LED light sources (565 nm or 760 nm, Fig. 4),
calculate the NDGI index from average reflectance values and to predict the relative N-content in dry matter of plants or the postharvest
grain N- content. Due to differences in leaf structure of various crops, formulas for calculation of N content were developed specifically
for wheat, barley and corn. Each crop was tested on several varieties with similar results.
The N-Pen is pre-set by the manufacturer for a series of 10 measurements. After completing the series, the instrument calculates average
NDGI value and the corresponding nitrogen content in plant dry matter (%). The average value is then calculated as follows: the maximum
and minimum values are extracted and the average is calculated of the remaining eight values. If one (or more) of the 8 values significantly
differ from the rest (outliers), the device does not accept it (them) and asks you to repeat one or more measurements.
The outliers typically arise with high variability of measured values, eventual leaf damage, disease infection or inproper fixing of leaf to
measuring chamber. To exclude the outliers from the measurement the instrument uses Grubbs's test for outliers, where a t value is
calculated as the largest absolute deviation from the sample mean. The t value is then compared with critical values stated in the table
of Grubbs' critical values. If the calculated t value were higher than the critical value, the value is excluded due to high probability that
the value is an outlier.
Page | 13
4.3 NITROGEN NUTRITION
The outcome of the measurement with N-pen is formulated as relative N-content in plant dry matter (%). Another practical interpretation
of the NDGI value, is the N nutrition state (Fig. 5). The maximum NDGI value is set to 100 % and the minimum reflectance is set equal to
0 % as follows:
1. NDGI > 0.65 indicates 100% N nutrition state (N = 100 %)
2. NDGI < 0.25 indicates 0 % N (N = 0 %)
3. If 0.65 > NDGI > 0.25, then nutrition state is calculated as N (%) = (NDGI - 0.25) * 250
As a general rule, nutrition state at early stages of development characterized by onset of tillering should be maintained at higher levels.
Later, during shoot elongation and emerging flag leaf, (Novoa and Loomis 1981).
Fig. 4 N-Pen configuration.
Fig. 5 Prediction of relative N nutrition from NDGI.

Page | 14
5GETTING STARTED
Define the number of samples per each experimental group. The measurement is performed as a series of measurements, where the
number of measurements can be set in range from 6 to 20. The pre-set number 10 can be used, for example, to measure 10 plants (each
plant is measured once) or to measure 5 plants (each plant is measured twice). In case of high variability, the user is advised to reconsider
the sampling method or to increase the sampling scale.
The N-Pen is controlled using two buttons:
•Use the MENU key to scroll through sequential menu options on the digital display.
•Use the SET key to select a menu option based on cursor (>) position.
5.1 CALIBRATION
Calibration assures you that your measurements are accurate within the specification limits that led you to select the instrument in the
first place. It is better to calibrate your device before every set of samples. For Calibration of N-Pen use white reflectance standard.
Before calibration, make sure that the optical part of the device, including the inner part of the sample holder, is
clean.
It is necessary to calibrate N-Pen after every switch ON.
Prior measurement perform the calibration as follows:
•For calibration use white reflectance standard (It is part of leaf clip)
•Turn ON device –hold SET button for 1 sec.
•Close the leaf clip (white standard is on bottom part of the leaf clip)
•Go to Calibration (“Insert white sample” appears on display)
•Press SET button to confirm the calibration and wait until the calibration step is completed.
•Calibration is automatically stored into the device memory.
•The device is now ready to measure other samples.
5.2 MEASUREMENT
Please follow these instructions to perform a measurement:
•Select Measurement in the main menu and select the type of crop (i.e. wheat, barley or corn). Then select the type of prediction,
which is either N-content in dry matter of plant, or the postharvest grain N-content. When ready, the display shows the number
of remaining measurements, for instance “Meas. left: 10“. You can change the pre-set number in Settings > Readings.
•Select the second or the third youngest leaf and clip the leaf in the mid part along the leaf axis to the detector chamber.
•Start the measurement by pressing SET to obtain and store the readings. The display shows the number of remaining measurements
when ready for the next measurement.
•Repeat the previous step to complete the whole series of measurement.
•When complete, the instrument displays NDGI index value and the nitrogen prediction.
•During the measurement all data are stored into the device memory.

Page | 15
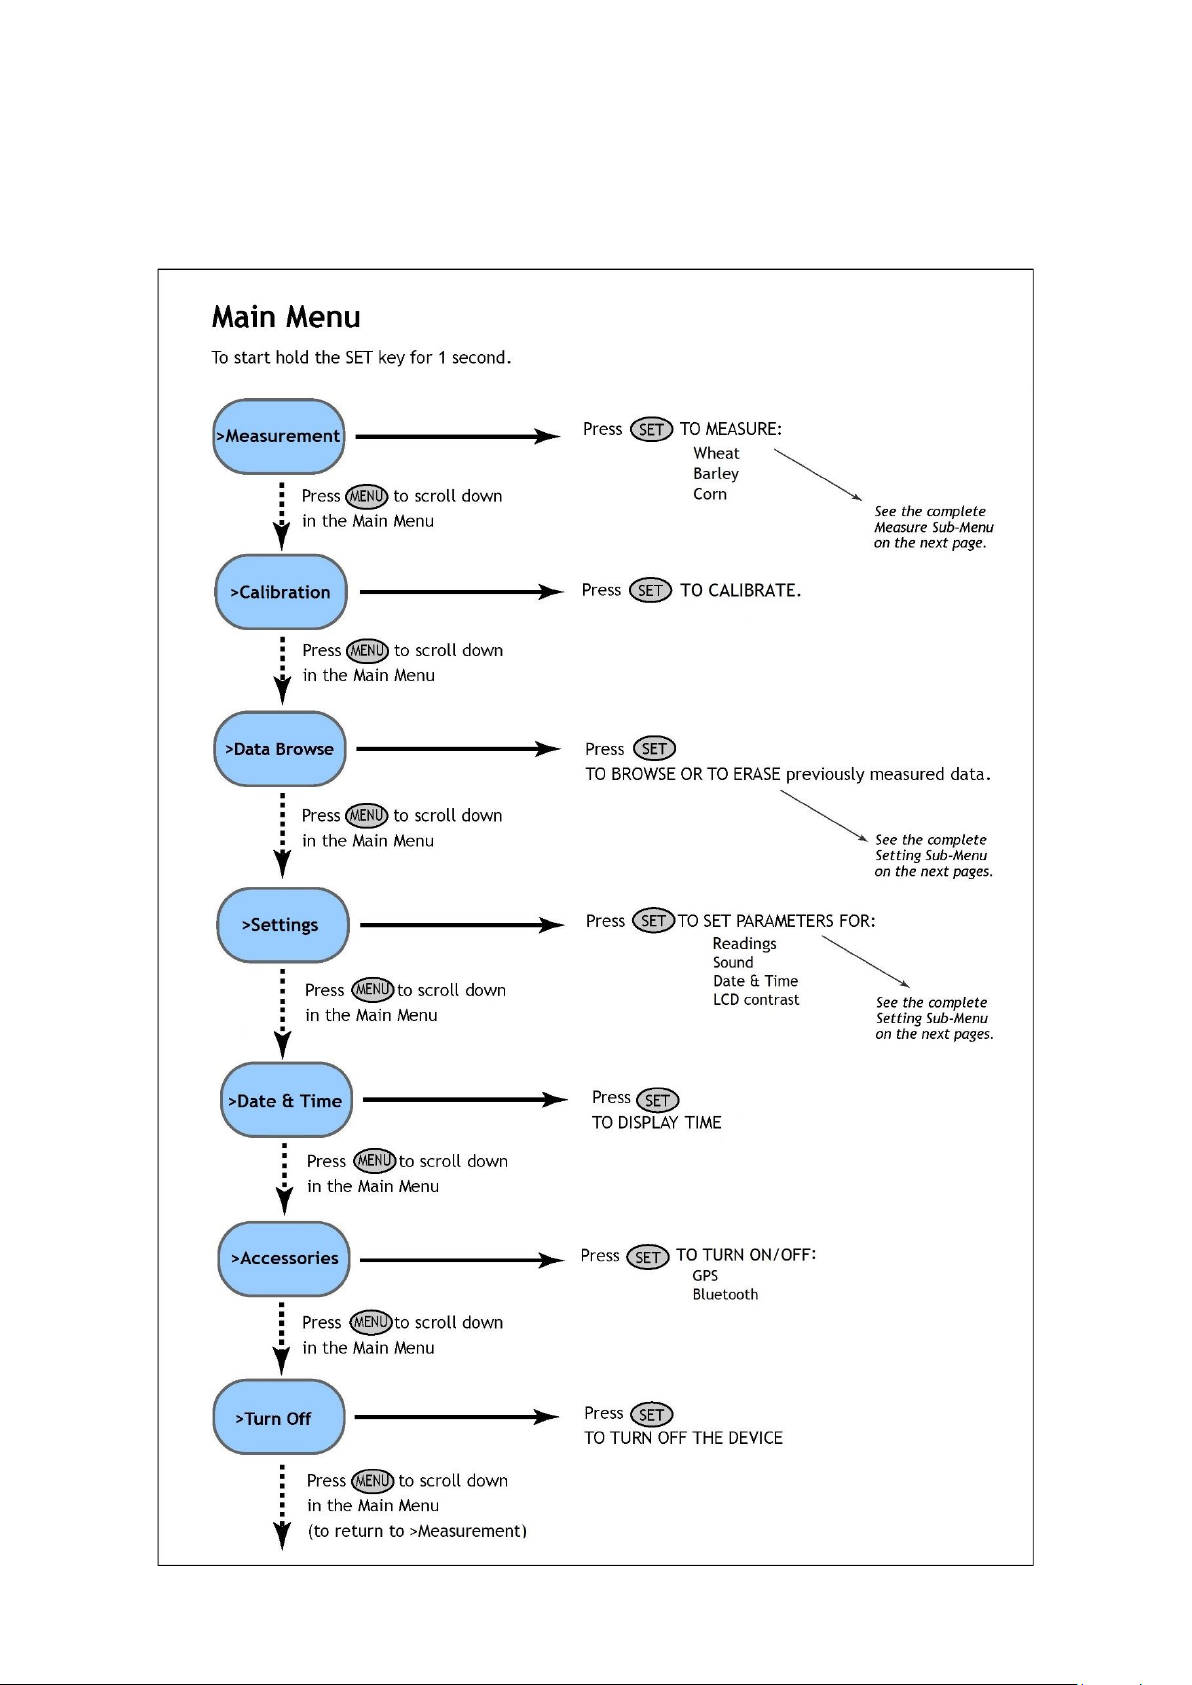
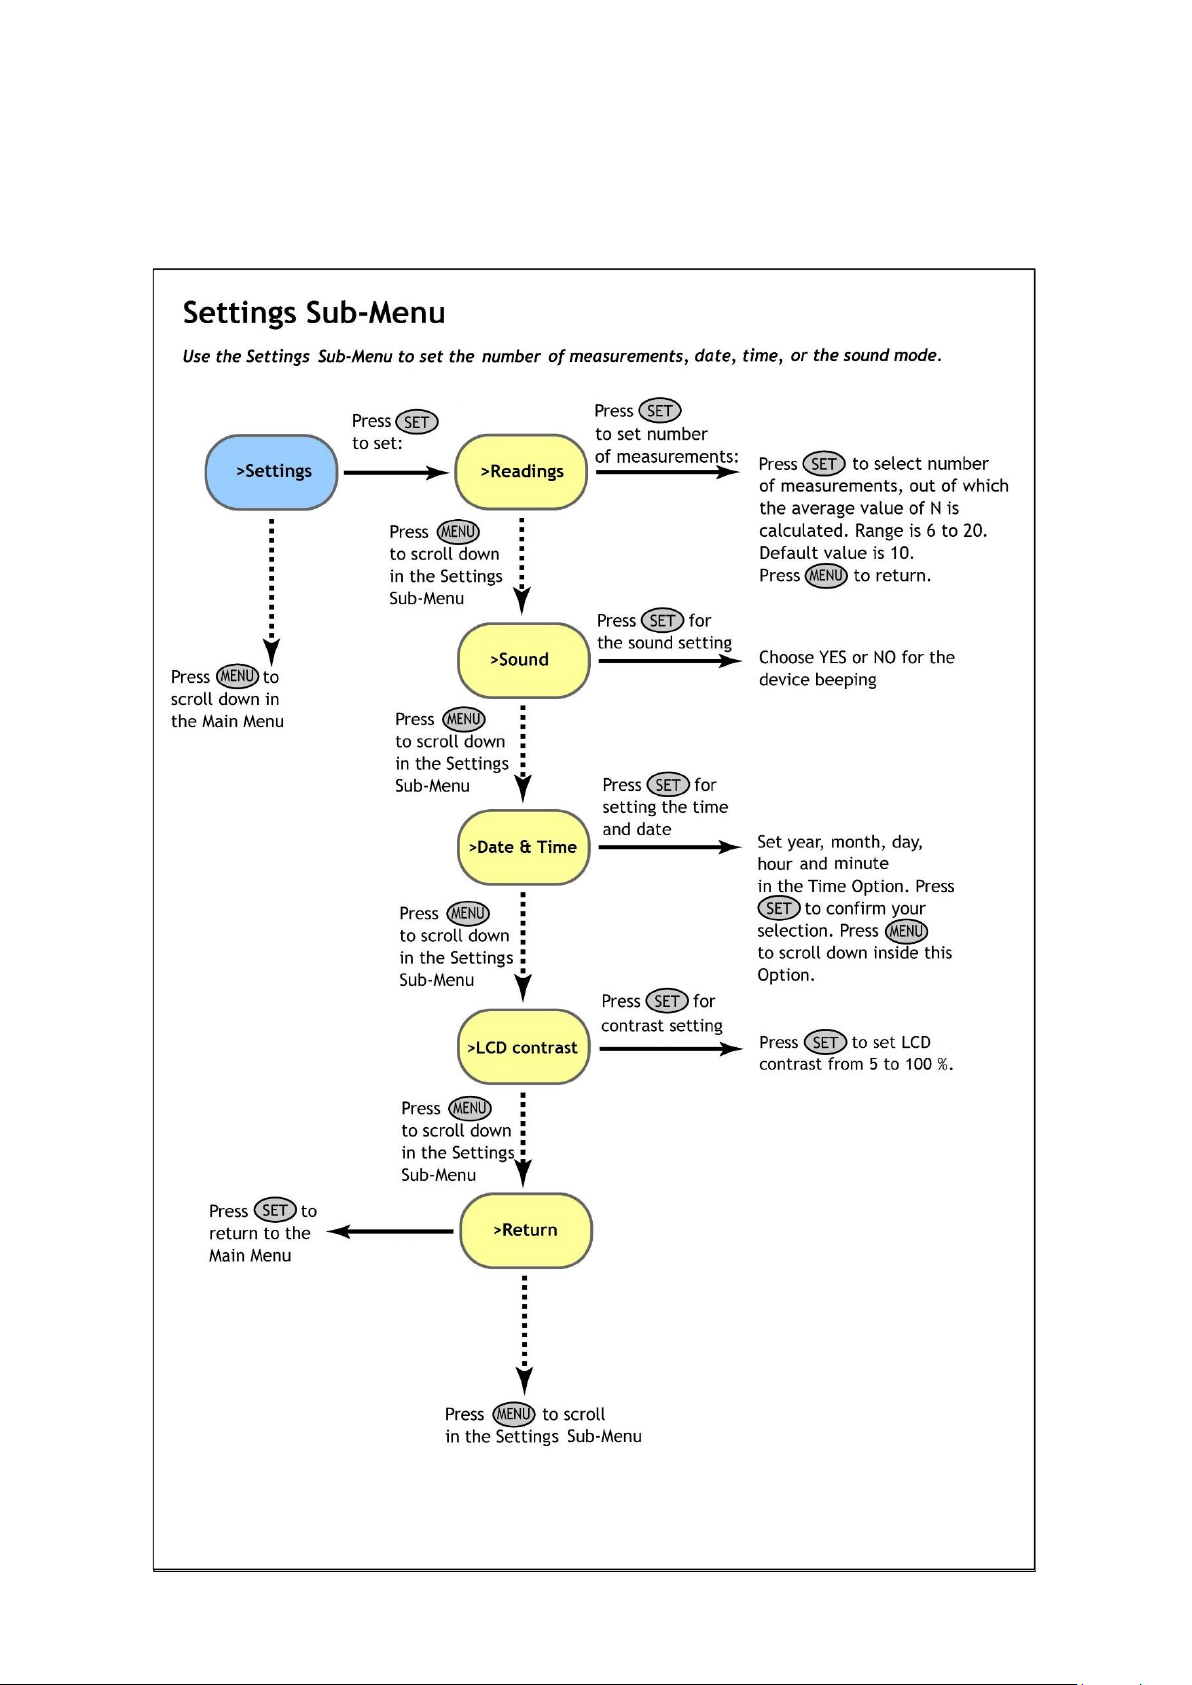
6CONTROL MENU TREE
The next few pages of this manual show the structure of the firmware menu on the N-Pen device, and explain in a
schematic way the operation of the N-Pen. The schematic shows the Main Menu, first-level Sub-Menus and second-level
Sub-Menus.
•The blue color represents the Main Menu and its Options.
•The yellow color represents the first-level Sub-Menus and their Options.
•The green color represents the second-level Sub-Menus and their Options.
•Full-line arrows are used to indicate the SET key operations.
•Dashed-line arrows are used to indicate the MENU key operations.
Page | 16

Page | 17

Page | 18
Page | 19

Page | 20
7USB CONNECTION
N-Pen comes with the USB cable that is required for charging of the Li-ion battery and can also be used for data transfer to the PC after
completion of measurements. To connect the USB cable with the N-Pen device follow the picture instructions below. Please note that
a lock in system is used to secure the USB cable to the N-Pen and extreme caution has to be used when setting up this connection to
avoid damage to the cable pins.
When connecting the USB cable take extra caution to prevent damage to the cable connector pins. Ensure correct
orientation of the cable as shown in the pictures below so the circled portion of the plug and the cable in photo
A and B are perfectly lined up prior to pushing them together. Once this connection is achieved the cable may be
secured in position by turning the metal cover of the cable and locking the cable in position.
To connect N-Pen with your computer please follow steps below in Fig. 6:
Fig. 6 How to connect N-Pen with PC.
A) connector on the N-Pen device. B) Portion of the USB cable with pins. C –E) Position the cable horizontally and line up the green circled
parts of the cable and the connector, plug in the inlet and screw the securing screw. F) Correct connection of the USB cable and Pen
device.
Once the cable is securely attached to the N-Pen the other end may be connected to the USB port on a PC. The N-Pen switches ON
automatically after connecting the cable to the PC. For the USB connection to be successful the USB driver and the FluorPen software
need to be installed on the PC. Both may be found on the installation disk (USB driver folder) delivered with the device. Once the USB
driver is installed the Device Manager in Windows will list the USB serial port in the device tree. The USB driver may also be downloaded
from PSI websites www.psi.cz . Once the driver is installed correctly the connection between the N-Pen device and the computer is
initiated by selecting in the software on the computer Setup > Device ID.
For more information about FluorPen software see chapter 9.
Table of contents
Other PSI Measuring Instrument manuals


Popular Measuring Instrument manuals by other brands

Bushnell
Bushnell GForce DX 1300 ARC user guide

Thermo Scientific
Thermo Scientific Orion AQUAfast II instruction manual

Emerson
Emerson Rosemount CT5100 Reference manual

Siemens
Siemens SIMEAS P 7KG7750 operating instructions

Center
Center 342 instruction manual
Icon Process Controls
Icon Process Controls truflo UltraFlo 2000 Series operating manual


