Kettler 07859-900 User manual

Computer- und Trainingsanleitung
für Crosstrainer XTR 1 Art. Nr. 07859-900
Der Umwelt zuliebe: Wir drucken auf 100% Altpapier!
D
GB
F
NL
E
I
PL

2
Zu Ihrer Sicherheit
■Lassen Sie vor Aufnahme des Trainings durch Ihren Hausarzt
klären, ob Sie gesundheitlich für das Training mit diesem
Gerät geeignet sind. Der ärztliche Befund sollte Grundlage
für den Aufbau Ihres Trainingsprogrammes sein. Falsches
oder übermäßiges Training kann zu Gesundheitsschäden
führen
.For Your Safety:
■Before beginning your program of exercise, consult your doc-
tor to ensure that you are fit enough to use the equipment. Base
your program of exercise on the advice given by your doctor.
Incorrect or excessive exercise may damage your health.
Pour votre sécurité
■Avant de commencer, consulter son médecin traitant pour s'as-
surer que l'entraînement avec l'appareil n'est pas nuisible à la
santé. Son diagnostic devrait servir de base pour la composi-
tion de son programme de travail. Un entraînement exagéré
ou mal organisé peut être nuisible à la santé.
Voor uw veiligheid
■Raadpleeg alvorens met de training te beginnen uw huisarts en
vraag of de training met dit apparaat voor u geschikt is. Zijn
diagnose is belangrijk voor het bepalen van de intensiviteit
van uw training. Een verkeerd uitgevoerde of te intensieve trai-
ning kan uw gezondheid negatief beïnvloeden
Para su seguridad
■Antes de iniciar el entrenamiento consulte a su médico de cabecera
para saber ciertamente si el entrenamiento con este aparato es con-
veniente para su salud. Organice su programa de entrenamiento
ateniéndose a los resultados de su reconocimiento médico. Un ent-
renamiento falso o exagerado puede provocar daños a su salud.
Per la vostra sicurezza
■Prima di iniziare l’allenamento chiarite con il vostro medico di fi-
ducia se siete adatti dal punto di vista fisico ad effettuare l’allena-
mento con questo attrezzo. Il reperto medico dovrebbe essere la
base per la programmazione del vostro allenamento. Un allena-
mento sbagliato o esagerato può causare problemi di salute.
Bezpieczeństwo
■Przed rozpoczęciem treningu należy skonsultować się lekarz-
em i wyjaśnić, czy nie ma przeciwwskazań zdrowotnych do
treningu na tym przyrządzie. Opinia lekarza powinna stano-
wić podstawę dla opracowania indywidualnego programu tre-
ningowego. Niewłaściwy lub nadmierny trening może być sz-
kodliwy dla zdrowia.

3
1.0 Anzeigen vor dem Training
1.Raumtemperatur Bild 1 [vor und nach dem Training]
2.Vollanzeige Bild 2 [nach Pedaltreten oder Tastendruck, 1 sec]
3.Gesamtkilometer Bild 3 [alle gefahrenen Kilometer, 8 sec]
4.Startanzeige Bild 4 [mit Tastendruck oder nach 8 Sekunden
2.0 Pulserfassung
Diese Anzeige bietet drei Möglichkeiten zur Pulserfassung:
1. mit den Handpulssensoren
2. mit dem Ohrclip
3. mit einem Cardio Puls Set Art.- Nr. 7937-000 (als Zubehör im
Fachhandel erhältlich)
Hinweise zur Pulsmessung
Es ist gleichzeitig nur eine Art der Pulserfassung möglich.
(Ohrclip oder Handpulssensoren oder Cardio Puls Set)
Sie haben die Startanzeige (Bild 4) eingestellt. Ihr aktueller Puls
wird an Position (7) angezeigt.
Pulserfassung mit den Handpulssensoren
Die Hände umfassen die Handpulssensoren
Pulserfassung mit dem Ohrclip
Stecken Sie den Ohrclip in die Buchse (14)
Reiben Sie ein Ohrläppchen zur besseren Durchblutung
Stecken Sie den Ohrclip an das Ohrläppchen
Pulserfassung mit dem Cardio Puls Set
Beachten Sie die dazugehörige Anleitung
Pulsanzeige
Das Herzsymbol (j) blinkt im Takt Ihres Pulsschlages
Der Pulsschlag wird als Wert (7) angezeigt
3.0 Training ohne Trainingsvorgaben
Treten Sie in die Pedalen. Alle Werte zählen aufwärts. Countup
(Hochzählmodus).
4.0 Training mit Trainingsvorgaben
4.1 Die Programmarten
Das Ergometer verfügt über neun verschiedene Programmarten:
•Countup (Hochzählmodus)
•Countdown (Rückzählmodus)
•6Programme ➊-➏ (vorgegebene Trainingsintervalle in vorgegebener
Zeit)
•Pulsgesteuertes Programm ( Belastungsteuerung anhand Ihrer Puls-
vorgabe)
Nach dem Einschalten wird automatisch CountUp (Bild 4) aktiviert.
4.2 Auswahl der Programme (Bild 5- 8)
Sie haben die Startanzeige (Bild 4) eingestellt. Drücken Sie ohne Pe-
daltreten mehrmals die Program-Taste (11). Die Programme werden durch
die jeweiligen Programmsymbole in der Anzeige blinkend dargestellt.
Bei Countup, Countdown und HRC wird Text im Grafikfeld (f) an-
gezeigt. Bei den Programmen ➊-➏wird zusätzlich das Trainingsprofil in
einer komprimierten Form im Grafikfeld (f) angezeigt. Die durch das Pro-
gramm vorgegebene Trainingszeit wird im Zeitdisplay (3) angezeigt (Bild 7).
Bedienungsanleitung für den Trainingscomputer mit Digi-
talanzeige
Werte
1KILOJOULE Energieverbrauch..0 - 9999 [KJ]
Raumtemperatur.....................0 - 50 [°C]
odo Gesamtkilometer..............0 - 9999 [km]
2RPM Pedalumdrehungen .........20 - 199 [Umdrehungen/min]
3TIME Zeit ..............................0:00 - 99:59 [min:sec]
4 KM/H Geschwindigkeit..........0 - 99,9 [km/h]
5KM Entfernung.......................0 - 99,9 [km]
6WATT Leistung.......................25 - 400 [Watt]
7PULSE Pulsschlag ...................50 - 199 [Pulsschläge/min]
Symbole
a ▲▼ [Pfeile] . . . . . . . . . .Pedalumdrehungen ändern
bø[Durchschnitt] . . . . .PPM + km/h + Leistung + Puls
c➊-➏[Programm1 - 6] . . .vorgegebene Trainingsprogramme
d[Rückzählmodus] . . .Trainingswerte zählen abwärts
e[Hochzählmodus] . . .Trainingswerte zählen aufwärts
f [Grafikfeld] . . . . . . .Mehrbereichsanzeige für Grafik+Werte
g[Herzprogramm] . . .Pulsgesteuertes Programm
h[Schnittstelle] . . . . . .PC- Modus
i LO [Untere Pulsgrenze] .altersabhängige untere Pulsgrenze
j ❤[Pulsschlag] . . . . . . .blinkt im Takt des Pulsschlages
k HI [Obere Pulsgrenze]....alterabhängige obere Pulsgrenze,
Max. Puls (blinkt)
l % [Prozent] . . . . . . . . .% von Maximalpuls-Vorgabe
m ° [Raumtemperatur] . . .Grad Celsius (+/– 3°)
Tasten
8Recovery-Taste ...................Funktionstaste [Erholungspuls
und Fitnessnotenermittlung]
9Reset-Taste..........................Funktionstaste [Löschen der
Anzeigeinhalte]
10 Set-Taste .................. ..........Funktionstaste [Übernahme und
Bestätigung von Eingaben]
11 Programm-Taste ...............Auswahl von Programmen und
Anzeigeinhalten im Grafikfeld
12 Minus-Taste........................Werte vermindern
13 Plus-Taste...........................Werte erhöhen
Anschlüsse (vorn)
14 Buchse ..................... ..........für den Ohrclip und Einsteckempfänger
Anschlüsse (Platine)
15 Stecker (4 polig)....für die Handpulssensoren
16 Stecker (6 polig)....für Spannung, Impulse und Steuerung
17 Stecker (3 polig ....zur Schnittstelle
Anschlüsse (hinten)
18 Buchse Schnittstelle PC-Anschluss
Funktionen und Bedienung des Trainingscomputers
D
1
2
3
5
a
46
b
e
f
g
i
j
7
l
h
c
8
910
1112
1314
d
k
O
Î
Ï
Y
Y
Ê
Ë
Ì
Í
PULSERPM
LO
KM/H WATTKM
KILOJOULE
O
∅∅
∅∅
HI
%
TIME
Bild 1
Temperaturanzeige
Bild 2
Vollanzeige
KM
Y
PULSERPM
KM/H WATTKM
KILOJOULE
TIME
Bild 3
Gesamtkilometeranzeige Bild 4
Startanzeige Countup
c
m
❤

4
4.4 Puls-Vorgabemöglichkeiten
Das Schema zeigt den Ablauf bei der Pulsvorgabe
Im Einzelnen:
Vorgabe: Trainingspuls
Mit der Set-Taste rufen Sie nacheinander 3 Eingabebereiche auf.
1. Alter [Age] (Bild 13/14)
2. Maximalpuls [Max] (Bild 15/Bild 16)
3. Pulszonen:Trainingsziel ➠Fettverbrennung [Fat 65%] (Bild 17)
Trainingsziel ➠Herz-Kreislauf-Fitness [Fit 75%] /Bild 18)
Manuell [Man - - %] /Bild 19/20)
4.4.1 Alterseingabe
Die Alterseingabe dient zur Berechnung Ihres Maximalpulses.
Geben Sie Ihr Alter ein, erscheint in der PULSE- Anzeige (7) der alters-
abhängige Maximalpuls (Formel: 220 - Alter). (Bild 14) Bei Eingaben
bis 21 Jahren kann nur 199 als Maximalpuls angezeigt werden, es wird
aber mit dem richtigen Wert gerechnet.
Bemerkung
Haben Sie zuvor im HRC- Programm ein Alter eingegeben, wird dieser
Wert angezeigt.
4.4.2 Maximalpuls
Durch eine Alterseingabe erscheint bei der Maximalpulsanzeige der be-
rechnete Wert im Grafikfeld (Bild 16). Zusätzlich wird in der PULSE- An-
4.3 Vorgaben in den Programmen Countdown und HRC
Sie haben ein Programm ausgewählt, z. B. Countdown (Bild 6)
Drücken Sie die Set-Taste und der Vorgabemodus öffnet sich (Bild 9)
Keine Vorgaben werden mit “ Off ” im Grafikfeld dargestellt. (Bild 9 )
Mit den -/+ Tasten (12/13) stellen Sie die Vorgabewerte ein (Bild
10)
Drücken Sie länger auf die -/+Taste. erfolgt ein schneller Vor- oder
Rücklauf der Werte.
Drücken Sie die -/+Tasten zusammen, springt der Wert auf Null
zurück.
Mit der Set-Taste erreichen Sie die nächsten Vorgaben. (Bild 10-
12).
Î
Ï
Y
Y
Ê
Ë
Ì
Í
TIME
Î
Ï
Y
Y
Ê
Ë
Ì
Í
Bild 7
Programme ➊-➏Beispiel:➋Bild 8
Herzkontrollprogramm: HRC
Y
KM
Y
KM
Bild 9
Keine Vorgabe “Off ”Bild 10
Entfernungsvorgabe z.B. 16,5 km
Bild 13
Keine Eingabe “OFF”
Bild 14
Alterseingabe z.B.31mit Maximal-
pulsanzeige 189 und HI - Symbol
Y
TIME
Bild 11
Zeitvorgabe z.B. 34 Minuten Bild 12
Kilojoulevorgabe z.B 820 KJ
Î
Ï
Y
Y
Ê
Ë
Ì
Í
Î
Ï
Y
Y
Ê
Ë
Ì
Í
Bild 5 Bild 6
Bild 15
Keine Eingabe “OFF” Bild 16
Maximalpulsanzeige durch Eingabe
von 31 Jahre mit 100% - Symbol

5
zeige das % - Symbol und 100 gezeigt. Wurde kein Alter vorgegeben, so
kann ein Maximalpuls zwischen 80 und 199 eingegeben werden.
Soll der Maximalpuls niedriger als der errechnete Wert liegen, dücken Sie
die - Taste (12). Eine Erhöhung über den Maximalpuls ist nicht möglich.
Bemerkung
Ein vorher berechneter oder geänderter Maximalpuls im HRC-Programm,
wird übernommen..
Funktion
Durch die Alters-Eingabe und des übernommenen oder geänderten Maxi-
malpulses wird eine Pulsüberwachung aktiviert, die bei Überschreitung mit
blinkendem HI- Symbol aufmerksam macht. Der Wert, der mit dem %-
Symbol angezeigt wird, ist der Vergleich Aktueller Pulswert / Maxpulswert
Geben Sie keinen Maximalpulswert ein, werden die nachfolgend be-
schriebenen Pulszoneneingaben nicht möglich und Sie gelangen in die
Eingabe einer frei bestimmbaren Pulswertüberwachung (Punkt 4.4.3).
4.4.3 Pulszonen/Trainingsziele
Mit den +/- Tasten wählen Sie 3 Zonen an. Die Alterseingabe
und/oder der geänderte Maximalpuls dienen zur Berechnung dieser Puls-
zone. Dieser wird in der PULSE- Anzeige (7) sichtbar.
1. Trainingsziel ➠ Fettverbrennung [Fat 65%] (Bild 17)
Formel: (220 - Alter) x 0,65 oder Maximalpuls x 0,65
2. Trainingsziel ➠ Herz-Kreislauf-Fitness [Fit 75%] (Bild 18)
Formel: (220 - Alter) x 0,75 oder Maximalpuls x 0,75
3. Manuelle Zone [Man - - %] (Bild 19)
Sie bestimmen den Faktor im Bereich 40 - 90 % mit den +/- Tasten.
Formel: (220 - Alter) x (0,40 - 0,90) oder
Maximalpuls x (0,40 - 0,90)
Mit der Set-Taste übernehmen Sie die Pulszone und gelangen in Vorga-
benabschluss (Punkt 4.4.5.).
Funktion
Durch die Pulszonen-Eingabe und des übernommenen oder geänderten
Maximalpulses wird eine Pulszonenüberwachung aktiviert. Ist der vorge-
gebene Trainingspuls um 11 Schläge unterschritten, so erscheint
der Schriftzug "LO" , bei Überschreitung um 11 Schläge "HI". Die
"LO" Überwachung ist aktiv, wenn erstmals der vorgegebene Trai-
ningspuls bei Pedaltreten erreicht wird. Fällt die Pedaldrehzahl auf
Null, wird die "LO"-Funktion wieder durch Erreichen des vorgegebene
Trainingspuls aktiv. Die "HI" Überwachung ist immer aktiv.
Der Wert, der mit dem %- Symbol angezeigt wird, ist der Vergleich ak-
tueller Pulswert / Maxpulswert.
Geben Sie keinen Maximalpulswert ein, ist die prozentuale Pulsanzeige
nicht aktiv.
4.4.4 Pulswertüberwachung
Diese Eingabe ist mit den +/- Tasten im Bereich von 40 - 188 möglich.
Funktion
Die “HI” und”LO” Anzeige funktioniert wie unter 4.4.3. beschrieben.
Die prozentuale Pulsanzeige ist nicht verfügbar.
Schalten Sie die Pulswertüberwachung aus: “OFF”- Anzeige, sind alle
Pulsüberwachungen deaktiviert.
Bemerkung
Frühere Pulsvorgaben im HRC-Programm werden übernommen und er-
scheinen in der Anzeige.
Der Trainingspuls hat in diesem Modus keinen Einfluß auf die Leistung.
(Diese Funktion bietet das HRC-Programm )
4.4.5. Vorgabenabschluss
Drücken Sie nach der letzten Vorgabe die Set-Taste (ausser in den Pro-
grammen ➊-➏), werden alle Vorgabewerte (ausser Pulsvorgaben) ange-
zeigt. Im Grafikfeld erscheint der Schriftzug "Ready" (Bild 22)
Trainingsvorgabemöglichkeiten in den Programmarten:
Countup
Standardvorgabewerte:
•KM (Entfernung): 0.0 km
•Time (Trainingszeit): 0:00 min.
•Kilojoule (Energieverbrauch): 0 KJ
•Trainingspuls: - -
•Maximalpuls: - -
•Leistung: 25 Watt
Vorgabemöglichkeiten in der Reihenfolge:
•Alter
•Maximalpuls
• Pulszonen Fat 65%, Fit 75% und Man -- %
•Leistung
Countdown
Standardvorgabewerte:
•KM (Entfernung): 0 km
•Time (Trainingszeit): 0:00 min.
•Kilojoule (Energieverbrauch): 0 KJ
•Trainingspuls: - -
•Maximalpuls: - -
•Leistung: 25 Watt
Vorgabemöglichkeiten in der Reihenfolge:
•KM (Entfernung)
•Time (Trainingszeit)
•Kilojoule
•Alter
•Maximalpuls
• Pulszonen Fat 65%, Fit 75% und Man -- %
•Leistung
Bild 17
Pulszone: Fettverbrennung mit 65 %
Bild 18
Pulszone: Fitness mit 75 %
Bild 19
Manuelle Pulsanwahl Bild 20
Manuelle Pulseingabe z.B. 85 %
Y
PULSERPM
KM/H WATTKM
KILOJOULE
TIME
Bild 22
Anzeige mit Vorgaben vor
Trainingsbeginn
Bild 21
Pulswerteingabe z.B. 150

Î
Ï
Y
Y
Ê
Ë
Ì
Í
TIME
Bild 30
Programme ➊-➏Beispiel:➋
Bemerkung:
Geben Sie mindestens Trainingsstrecke oder Trainingszeit oder Energie-
verbrauch vor, sonst startet die Elektronik bei Trainingsbeginn im Countup
- Modus.
Sind Trainingszeit, Trainingsstrecke und Energieverbrauch auf Null zurück-
gezählt, wechselt die Anzeige in den Countup- Modus .Die Werte zählen
jetzt ab den Vorgabewerten wieder aufwärts.
Programme ➊-➏
Standardvorgabewerte:
•KM (Entfernung): 0 km
•Time (Trainingszeit): programmabhängig
•Kilojoule (Energieverbrauch): 0 KJ
•Trainingspuls: - -
•Maximalpuls: - -
•Leistung: programmabhängig
Vorgabemöglichkeiten in der Reihenfolge:
•Alter
•Maximalpuls
• Pulszonen Fat 65%, Fit 75% und Man -- %
•Leistung (nicht in Programmen, die einen Leistungsberteich von 25 -
400 Watt aufweisen) )
Die Verstellung bewirkt die Anhebung oder Absenkung des gespeicherten
Programmablaufes.
Bemerkung:
Ist die Trainigszeit auf Null zurückgezählt, wechselt die Anzeige in den
Countup- Modus. Auch der Zeitwert zählt jetzt hoch.
Pulsgesteuertes Programm (HRC)
Standardvorgabewerte:
•KM (Entfernung): 0 km
•Time (Trainingszeit): 0:00 min
•Kilojoule (Energieverbrauch): 0 KJ
•Trainingspuls: 60 bzw. der zuletzt im HRC-Programm eingegebene
Trainingspuls
•Leistung: 25 Watt bzw. die zuletzt im HRC-Programm eingegebene
Anfangsleistung
Vorgabemöglichkeiten in der Reihenfolge:
•KM (Entfernung)
•Time (Trainingszeit)
•Kilojoule
•Alter
•Maximalpuls
• Pulszonen Fat 65%, Fit 75% und Man -- %
•Leistung
Bemerkung:
KETTLER empfiehlt beim HRC-Programm die Pulsmessung mit dem Ohrclip
oder Cardio Puls Set.
Der Unterschied zwischen vorgegebenem Trainingspuls und aktuellem Puls
bestimmt die Leistungsverstellung. Zu Trainingsbeginn wird die Leistung ab
dem Vorgabewert solange erhöht, bis der Vorgabepuls erreicht ist. Wird
der Wert überschritten, wird die Leistung reduziert.
Die Anfangsleistung können Sie von 25 - 100 Watt festlegen.
Haben Sie eine Anfangsleistung über 25 Watt gewählt, geschieht die er-
ste Leistungsverstellung nach 1 Minute (Ausnahme: Vorgabepuls ist über-
schritten).
Eine Leistungsverstellung über die "–" und "+" Tasten ist nicht möglich.
Ihr Vorgabepuls sollte nach ca. 5 Minuten erreicht werden.
Das HRC-Programm kann nur durch Sie beendet werden. Wenn Vorga-
bewerte für Trainigszeit, Trainingsstrecke und Energieverbrauch auf Null
gezählt sind, findet kein Programmabbruch oder -wechsel statt. Die Lei-
stung wird weiterhin durch die Elektronik nach Ihrer Pulsfrequenz gere-
gelt.
Allgemeines
Drücken Sie während der Eingabe von Vorgaben die Program-Taste, springt
die Anzeige in die nächste Programmart, ohne Vorgaben zu speichern.
Trainingsvorgaben werden nur berücksichtigt, wenn Sie den Vorgabemo-
dus mit der „Ready“ Anzeige (Bild 22) abschliessen, sonst werden die
Standardvorgaben herangezogen.
Trainingsbeginn
Die ausgewählte Programmart startet, wenn Sie über 20 Pedalumdrehun-
gen/min treten.
5.0 Training
5.1 Trainingsanzeigen im Countup, Countdown und HRC-Programm
In diesen Programmarten wird das Grafikfeld (f) genutzt, um Werte
groß darzustellen. Zu Trainingsbeginn wird die Trainingszeit (Bild 23)
angezeigt. Mit der Program-Taste wechseln Sie im Training den Anzeig-
einhalt in der Reihenfolge: Time (Bild 23) ➠km/h (Bild 24) ➠km (Bild
25) ➠Leistung (Bild 26) ➠RPM (Bild 27) ➠Kjoule (Bild 28) ➠Pulse
(Bild 29) ➠Time (Bild 23) ➠...
5.2 Trainingsanzeigen im Pro-
gramm ➊-➏
In der Programmart ➊-➏wird der Programmverlauf im Grafikfeld ange-
zeigt (Bild 30). Die linke Spalte gibt die aktuelle Belastung an. Eine Spal-
te steht für 1 Minute Trainingszeit und läuft nach links durch.
Eine Segmentzeile ist immer eingeblendet und entspricht 25 Watt. Steigt
die Leistung über 375 Watt, wird die höchste (16.) Zeile gezeigt.
6.0 Anzeige bei Trainingsunterbrechung oder - ende
Y
PULSERPM
KM/H WATTKM
KILOJOULE
TIME
Y
PULSERPM
KM/H WATTKM
KILOJOULE
TIME
Bild 23
Anzeige der Trainingszeit
im Grafikfeld
Bild 24
Anzeige der Geschwindigkeit
im Grafikfeld
Y
PULSERPM
KM/H WATTKM
KILOJOULE
TIME
Y
PULSERPM
KM/H WATTKM
KILOJOULE
TIME
Y
PULSERPM
KM/H WATTKM
KILOJOULE
TIME
Y
PULSERPM
KM/H WATTKM
KILOJOULE
TIME
Y
PULSERPM
KM/H WATTKM
KILOJOULE
TIME
Bild 25
Anzeige der Entfernung
im Grafikfeld
Bild 26
Anzeige der Leistung
im Grafikfeld
Y
PULSERPM
KM/H WATTKM
KILOJOULE
TIME
Y
PULSERPM
KM/H WATTKM
KILOJOULE
TIME
Y
PULSERPM
KM/H WATTKM
KILOJOULE
TIME
Y
PULSERPM
KM/H WATTKM
KILOJOULE
TIME
Bild 27
Anzeige der Pedalumdrehungen
pro Minute im Grafikfeld
Bild 28
Anzeige des Energieverbrauchs
im Grafikfeld
Y
PULSERPM
KM/H WATTKM
KILOJOULE
TIME
Bild 29
Anzeige des Pulswertes
im Grafikfeld
6

tion , wird die vorher vorgegebene Leistung wieder eingestellt.
9 Allgemeines
Bremsverhalten
Die elektromagnetische Wirbelstrombremse erzeugt die Bremswirkung
drehzahlunabhängig, so dass die Bremsleistung in einem weiten Pedal-
umdrehungsbereich (RPM) konstant gehalten wird.
Pfeilanzeige ▲▼:
Ist die eingestellte Leistung durch die momentane Pedaldrehzahl nicht ein-
stellbar (z.B.: 400 W bei 50 RPM - außerhalb des grauen Bereichs), so
wird ein entsprechender Richtungspfeil (a) neben der aktuellen Pedald-
rehzahl (2) angezeigt.
Das oben abgebildete Diagramm dient nur zur Veranschaulichung eines
Leistungsbereichs. Kann eine Leistung mit der aktuellen Pedaldrehzahl
nicht ereicht werden, erscheint ein nach oben ▲oder unten ▼zeigender
Pfeil für Drehzahlsteigerung oder -minderung.
Geschwindigkeitsberechnung
60 Pedalumdrehungen ergeben eine Geschwindigkeit von 9,5 km/h.
Kilojouleberechnung
Die Leistung wird in Watt (momentane Leistung) und die Zeit wird in Se-
kunden eingetragen. Der Faktor 8 resultiert aus dem Wirkungsgrad des
Menschen von ca.12,5 % beim Training. Dabei handelt es sich um einen
Anhaltswert.
Fitnessnotenberechnung
Der Computer berechnet und bewertet die Differenz zwischen Bela-
stungspuls bei Trainingsende und Erholungspuls nach 60 s und Ihre hier-
aus resultierende "Fitnessnote" nach folgender Formel:
Note ( F ) = 6 — ( 10 x ( P1 — P2 ) )2
P1
P1 = Belastungspuls
P2 = Erholungspuls
Note 1 = sehr gut Note 6 = ungenügend
Der Vergleich von Belastungs- und Erholungspuls ist eine einfache und
schnelle Möglichkeit, die körperliche Fitness zu kontrollieren. Die Fitnes-
snote ist ein Orientierungswert für Ihre Erholungsfähigkeit nach körperli-
chen Belastungen. Bevor Sie die Recoverytaste (8) drücken und Ihre Fitn-
essnote ermitteln, sollten Sie über einen längeren Zeitraum, d,h. mind. 10
Minuten, in Ihrem Belastungsbereich trainieren. Bei regelmäßigem Herz-
Kreislauf-Training werden Sie feststellen, dass sich Ihre "Fitnessnote" ver-
bessert.
Durchschnittswertberechnung
Für die Durchschnittswertberechnung von Pedalumdrehungen, Geschwin-
digkeit, Leistung und Puls werden alle Trainingsintervalle berücksichtigt, bis
die „Temperatur“-Anzeige erscheint.
Hinweise zur Pulsmessung
Es ist gleichzeitig nur eine Art der Pulserfassung möglich (Ohrclip oder
Handpulssensoren oder Cardio Puls Set).
Die Pulsberechnung beginnt, wenn das Herz in der Anzeige im Takt Ihres
Pulsschlages blinkt.
Mit Ohrclip
Der Pulssensor arbeitet mit Infrarotlicht und mißt die Veränderungen der
Lichtdurchlässigkeit Ihrer Haut, die von Ihrem Pulsschlag hervorgerufen
werden. Bevor Sie den Pulssensor an Ihr Ohrläppchen klemmen, reiben
Sie es zur Durchblutungssteigerung 10 mal kräftig.
Vermeiden Sie Störimpulse.
Treten Sie unter 20 Pedalumdrehungen/min erkennt die Elektronik Trai-
ningsunterbrechung und die Trainingsdaten werden angezeigt, nicht die
rückgezählten Werte von Vorgaben. Bei Geschwindigkeit (km/h), Leistung
(Watt), Pedalumdrehungen (RPM) und Puls (Pulse) werden die Durch-
schnittswerte mit Ø -Symbol (b) dargestellt. (Bild 31).
Bleiben die Programmsymbole stehen, erkennen Sie, dass noch Vorgaben
vorhanden sind. Wechselt das Programmsymbol auf Countup erkennen
Sie, dass die Vorgaben rückgezählt bzw. keine gemacht wurden.
Nur beim HRC-Programm können die Werte hoch oder rückgezählt sein.
Im Grafikfeld wird "Pulse" und der aktuelle Pulswert (oder "P" bei nicht ak-
tiver Pulsmesung) eingeblendet.
Die Trainingsdaten werden für 4 Minuten angezeigt. Drücken Sie in die-
ser Zeit keine Tasten und treten nicht in die Pedalen, schaltet die Elektro-
nik in den Bereitschaftsmodus mit Raumtemperaturanzeige (Bild 1). Dabei
werden die Kilometer gespeichert. Alle anderen Werte nicht. Die SET-
oder +/–-Taste wechselt in Trainingswerte-Anzeige.
7.0 Anzeige bei Trainingsfortsetzung
Treten Sie in die Pedalen. Die Werte zählen weiter.
8.0 Erholungspulsmessung
Der Trainingscomputer ist mit einer Erholungspuls-Funktion ausgestattet. Diese
ermöglicht es Ihren Erholungspuls zu messen. Drücken Sie bei Trainingsende
die Recovery-Taste (8). Der aktuelle Pulswert wird unter KM/H (4) übernom-
men (Bild 32).
Die Elektronik misst 60 Sekunden rücklaufend Ihren Puls.
Danach wird der aktuelle Pulswert unter KM (5) übernommen und unterWATT
(6) wird die Differenz der Pulswerte innerhalb des Rücklaufs angegeben.
Unter Rec wird eine Fitnessnote mit (F) angezeigt. (Bild 33)
Die Berechnung wird unter Punkt 9 Fitnessnotenberechnung erklärt.
Wird die Pulsmessung unterbrochen oder gestört, wird statt eines Wertes
"Error"angezeigt (Bild 34). Liegt bei Recoverystart kein Pulssignal an,
startet die Erholungspulsmessung nicht.
Hinweis
Um die schwere Schwungmasse anzuhalten, wird in der Recovery-Funktion
die Bremswirkung bis zum Stillstand stetig gesteigert. Liegt kein Pulssignal an,
so wird die Bremsung trotzdem ausgeführt. Die Recovery-Anzeige erlischt au-
tomatisch nach 10 Sekunden. Danach erscheint die Anzeige der erreichten
Trainings- und Durchschnittswerte (Bild 31). Ebenso die “Error”-Anzeige je-
doch nur bei Stillstand des Schwungrades. Verlassen Sie die Recovery-Funk-
Bild 32
Anzeige während des Zeitrücklaufs
von 60 Sekunden
Bild 33
Anzeige nach Zeitrücklauf von 60
Sekunden
Bild 34
Anzeige bei Recovery
ohne Pulssignal
KJ = Leistung x Zeit x 8
1000
Y
PULSERPM
KM/H WATTKM
KILOJOULE
∅∅
∅∅
TIME
Bild 31
Anzeige der erreichten Trainings-
und Durchschnittswerte

8
•Befestigen Sie den Ohrclip sorgfältig an Ihrem Ohrläppchen und su-
chen Sie den günstigsten Punkt für die Abnahme (Herzsymbol blinkt
ohne Unterbrechnung auf).
•Trainieren Sie nicht direkt unter starkem Lichteinfall z.B. Neonlicht, Ha-
logenlicht, Spot - Strahler, Sonnenlicht.
•Schließen Sie Erschütterungen und Wackeln des Ohrsensors inclusive
Kabel vollkommen aus. Stecken Sie das Kabel immer mittels Klammer
an Ihrer Kleidung oder noch besser an einem Stirnband fest.
Mit Handpulssensoren
Eine durch die Kontraktion des Herzens erzeugte Kleinstspannung wird
durch die Handsensoren erfaßt und durch die Elektronik ausgewertet.
•Umfassen Sie die Kontaktflächen immer mit beiden Händen.
•Vermeiden Sie ruckartiges Umfassen
•Halten Sie die Hände ruhig und vermeiden Sie Kontraktionen und Rei-
ben auf den Kontaktflächen.
Mit Cardio Puls Set
Beachten Sie die dazugehörige Anleitung.
Störungen in der Pulsanzeige
Falls es doch einmal zu Pulserfassungsproblemen kommen sollte, überprü-
fen Sie nochmals obige Punkte.
Störungen beim Trainingscomputer
Verhält sich die Elektronik merkwürdig oder gestört drücken Sie die Reset-
Taste.
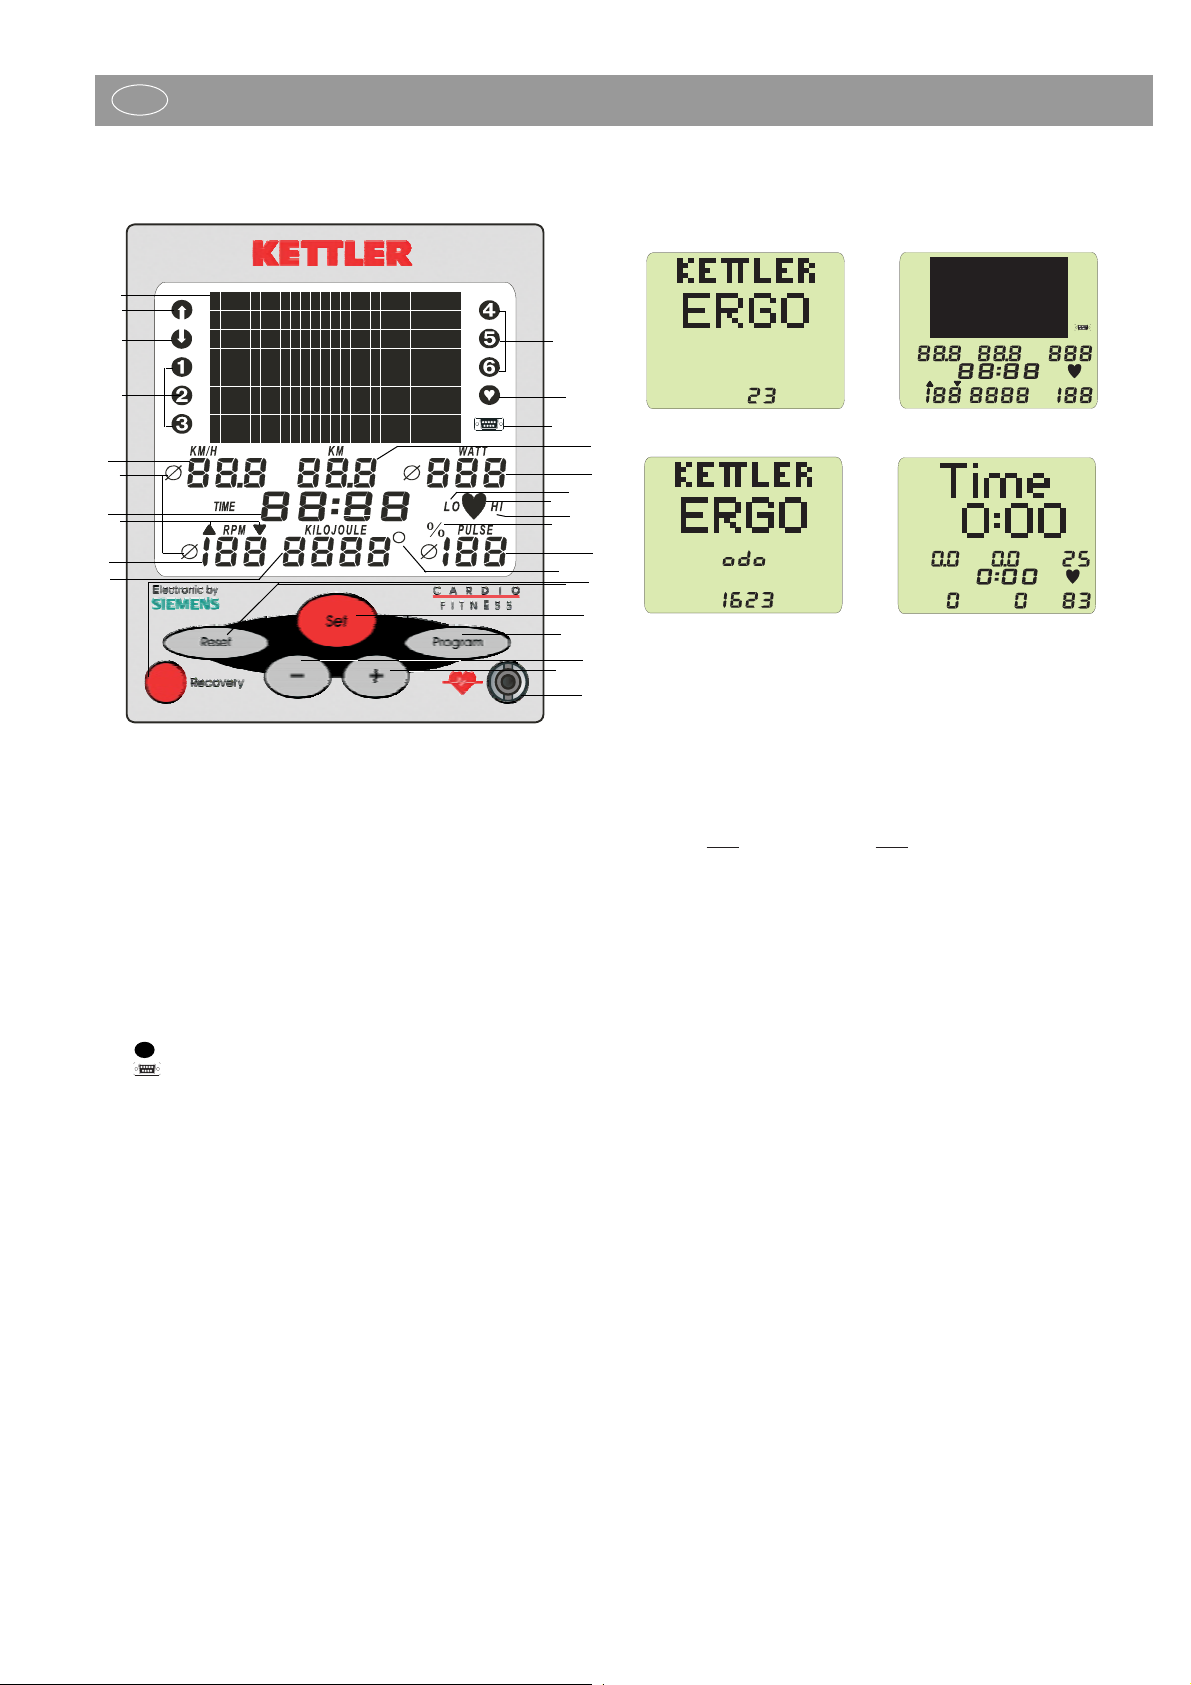
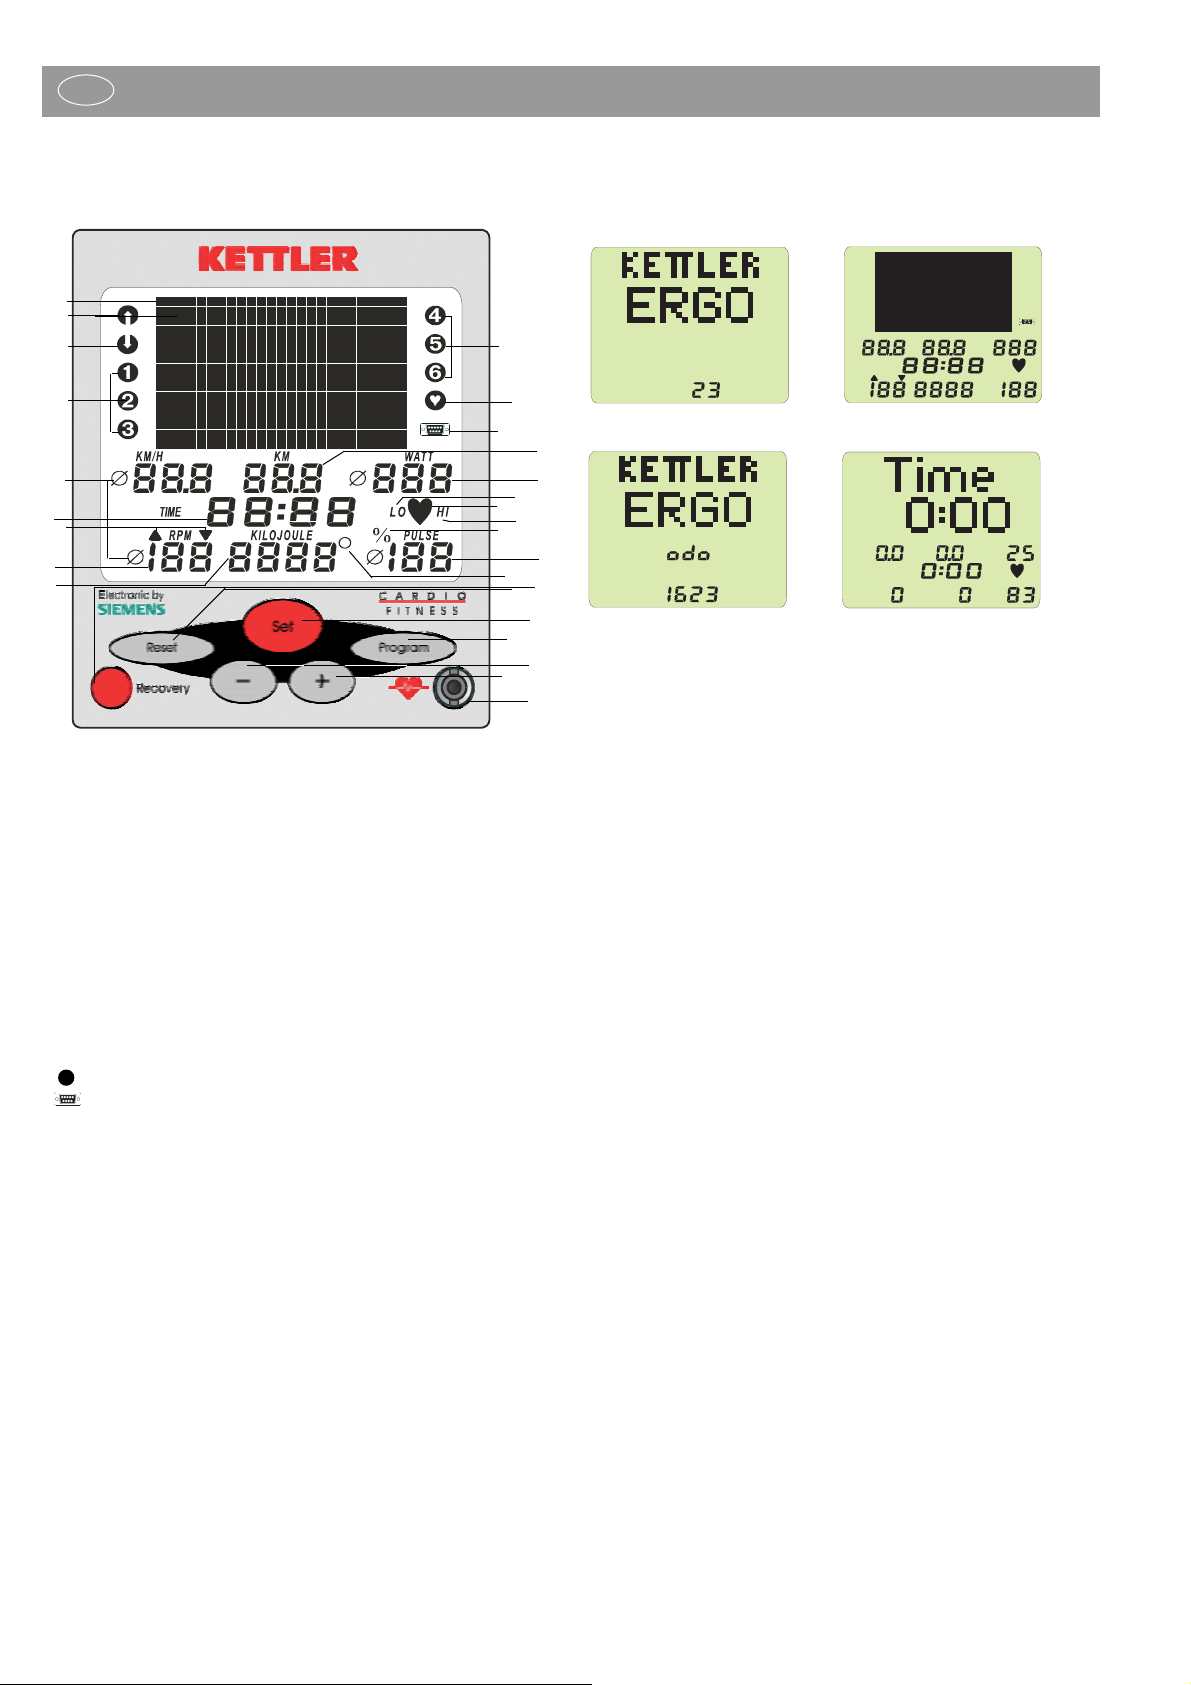
Hinweise zur Schnittstelle
Die bei Ihrem Fachhändler erhältliche Trainingssoftware „ERGO-Kon-
zept“, Art.-Nr. 7926-000, ermöglicht Ihnen die Steuerung mit einem
handelsüblichen PC über diese Schnittstelle.
Auf unserer Homepage www.kettler.net finden Sie demnächst Hin-
weise zu weiteren Möglichkeiten mit der Schnittstelle.
Unter dem Punkt F. A. Q. (häufig gestellte Fragen) finden Sie Informatio-
nen zum Themenbereich „Elektronik“ unserer Produkte.
10 Trainingsanleitung
Cross-Training ist ein sehr effektives Ganzkörpertraining, das alle
großen Muskelgruppen beansprucht und gleichzeitig auf ideale Weise
das Herz-Kreislauf-System trainiert und den Fettstoffwechsel fördert. Der
innovative elliptische Bewegungsablauf der Trittflächen kräftigt beson-
ders gelenkschonend die Bein- und Gesäßmuskulatur, das mit der Bein-
arbeit gekoppelte Oberkörpertraining beansprucht vornehmlich die Arm-
, Schulter-, Brust- und Rückenmuskulatur.
Bevor Sie mit dem Training beginnen, sollten Sie die folgenden Hinweise
sorgfältig lesen!
Wichtiger Hinweis:
Lassen Sie vor Aufnahme des Fitnesstrainings durch Ihren Hausarzt ab-
klären, ob Sie für das Training mit dem Cross-Trainer gesundheitlich ge-
eignet sind. Der ärztliche Befund sollte Grundlage für den Aufbau Ihres
Trainingsprogrammes sein.
Die o. g. und folgenden Trainingshinweise empfehlen sich nur für Herz-
Kreislauf-gesunde Personen.
Trainingshinweise
Das Training mit dem Cross-Trainer ist methodisch nach den Grundsätzen
des Ausdauertrainings zu gestalten. Durch das Ausdauertraining werden
vornehmlich Veränderungen und Anpassungen am Herz-Kreislaufsystem
hervorgerufen. Hierzu zählen das Absinken der Ruhepulsfrequenz und
des Belastungspulses. Damit steht für das Herz mehr Zeit für die Füllung
der Herzkammern und die Durchblutung der Herzmuskulatur (durch die
Herzkranzgefäße) zur Verfügung. Ferner nehmen Atemtiefe und Menge
der Luft zu, die eingeatmet werden kann (Vitalkapazität). Weitere positi-
ve Veränderungen finden im Stoffwechselsystem statt. Um diese positiven
Veränderungen zu erreichen, muß man das Training nach bestimmten
Richtlinien planen.
Planung und Steuerung Ihres Cross-Trainings
Die Grundlage für die Trainingsplanung ist Ihr aktueller körperlicher Lei-
stungszustand. Mit einem Belastungstest kann Ihr Hausarzt die persönli-
che Leistungsfähigkeit diagnostizieren, die die Basis für Ihre Trainings-
planung darstellt. Haben Sie keinen Belastungstest durchführen lassen,
sind in jedem Fall hohe Trainingsbelastungen bzw. Überlastungen zu ver-
meiden. Folgenden Grundsatz sollten Sie sich für die Planung merken:
Ausdauertraining wird sowohl über den Belastungsumfang als auch über
die Belastungshöhe /-intensität gesteuert.
Zur Belastungsintensität
Die Belastungsintensität wird beim Cross-Training bevorzugt über die Puls-
frequenz Ihres Herzens kontrolliert. Die maximale Herzfrequenz pro Mi-
nute - 220 minus Lebensalter - darf dabei nicht überschritten werden. Der
optimale Trainingspuls wird durch Alter und Trainingsziel bestimmt (vgl.
auch 4.4.3 Pulszonen/Trainingsziele).
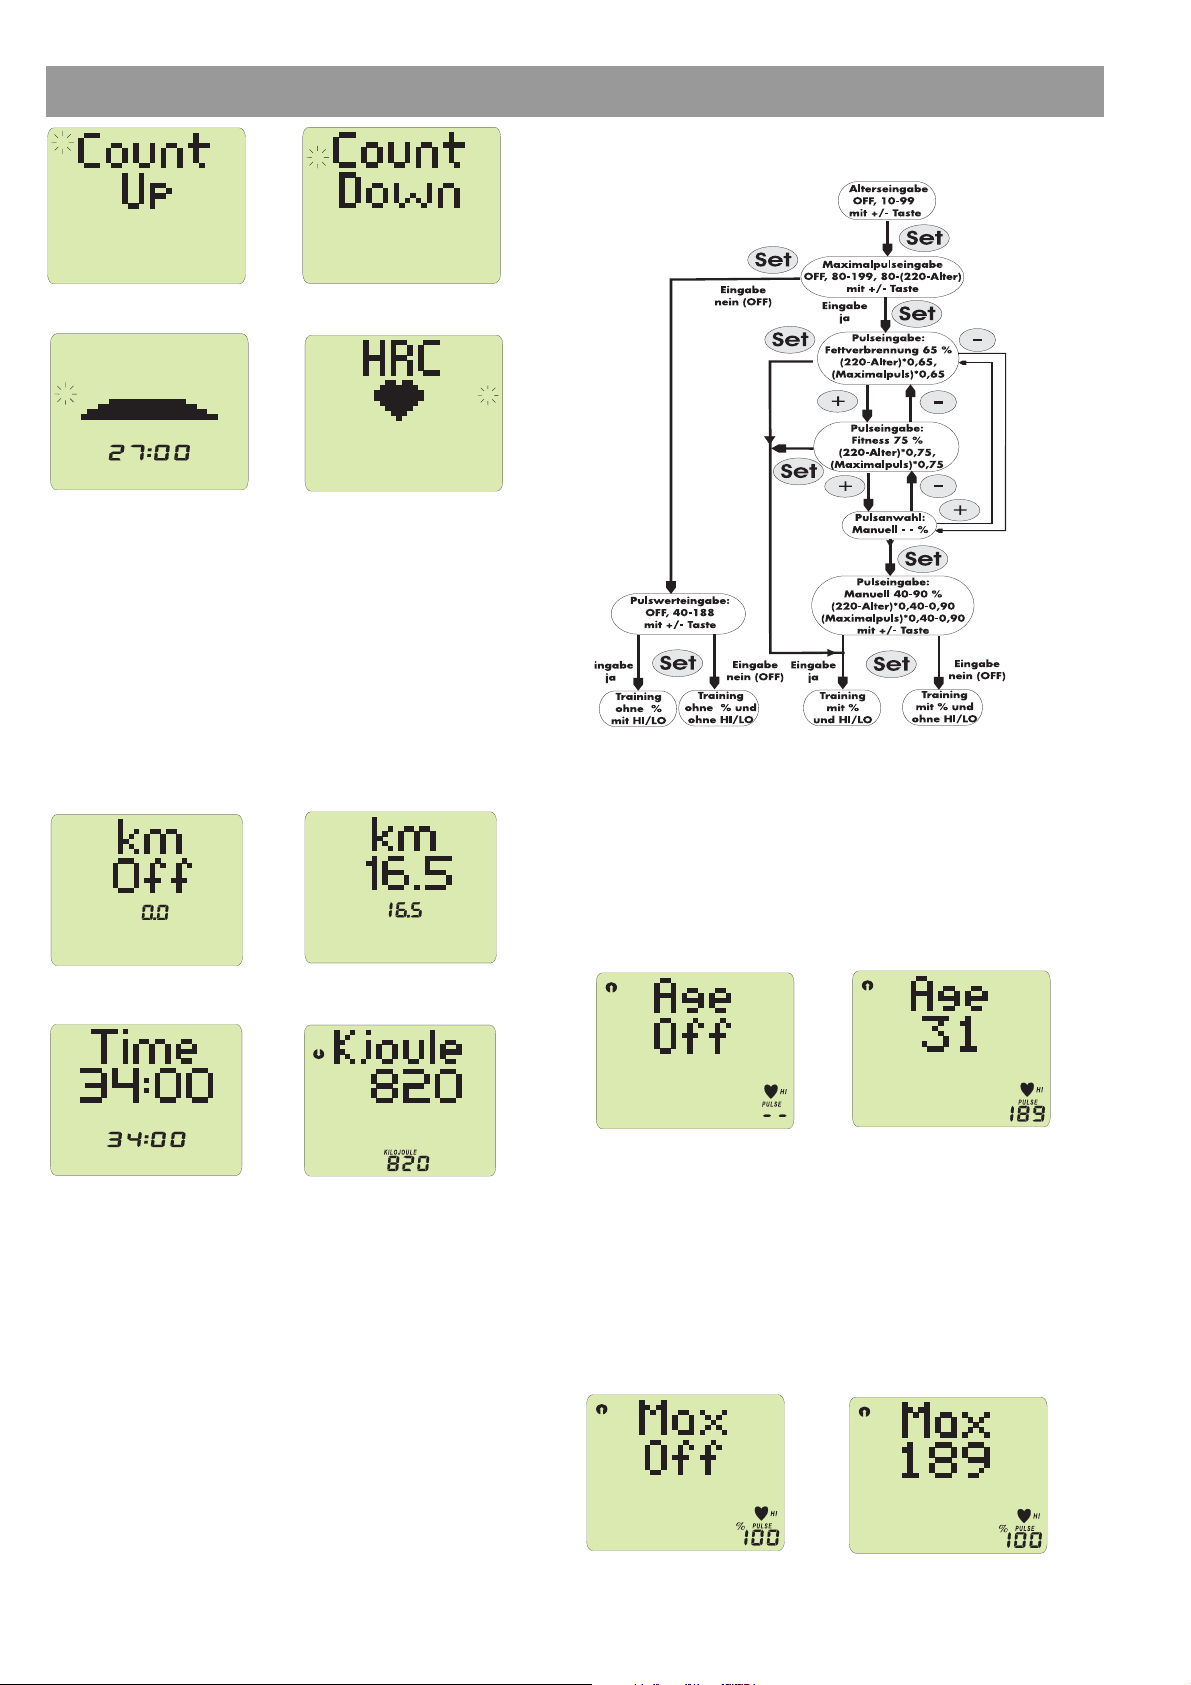
Trainingsziel: Fettverbrennung/Gewichtsreduktion
Die optimale Pulsfrequenz wird nach der Faustformel (220 – Alter) x 0,65
berechnet.
Hinweis: Die Fettverbrennung zur Energiebereitstellung gewinnt erst ab ei-
ner Trainingsdauer von min. 30 Minuten an Bedeutung.
Trainingsziel Herz-Kreislauf-Fitness:
Die optimale Pulsfrequenz wird nach der Faustformel (220 – Alter) x
0,75 berechnet.
Darüber hinaus besteht die Möglichkeit, die Faktoren im Bereich 0,40 -
0,90 manuell zu bestimmen.
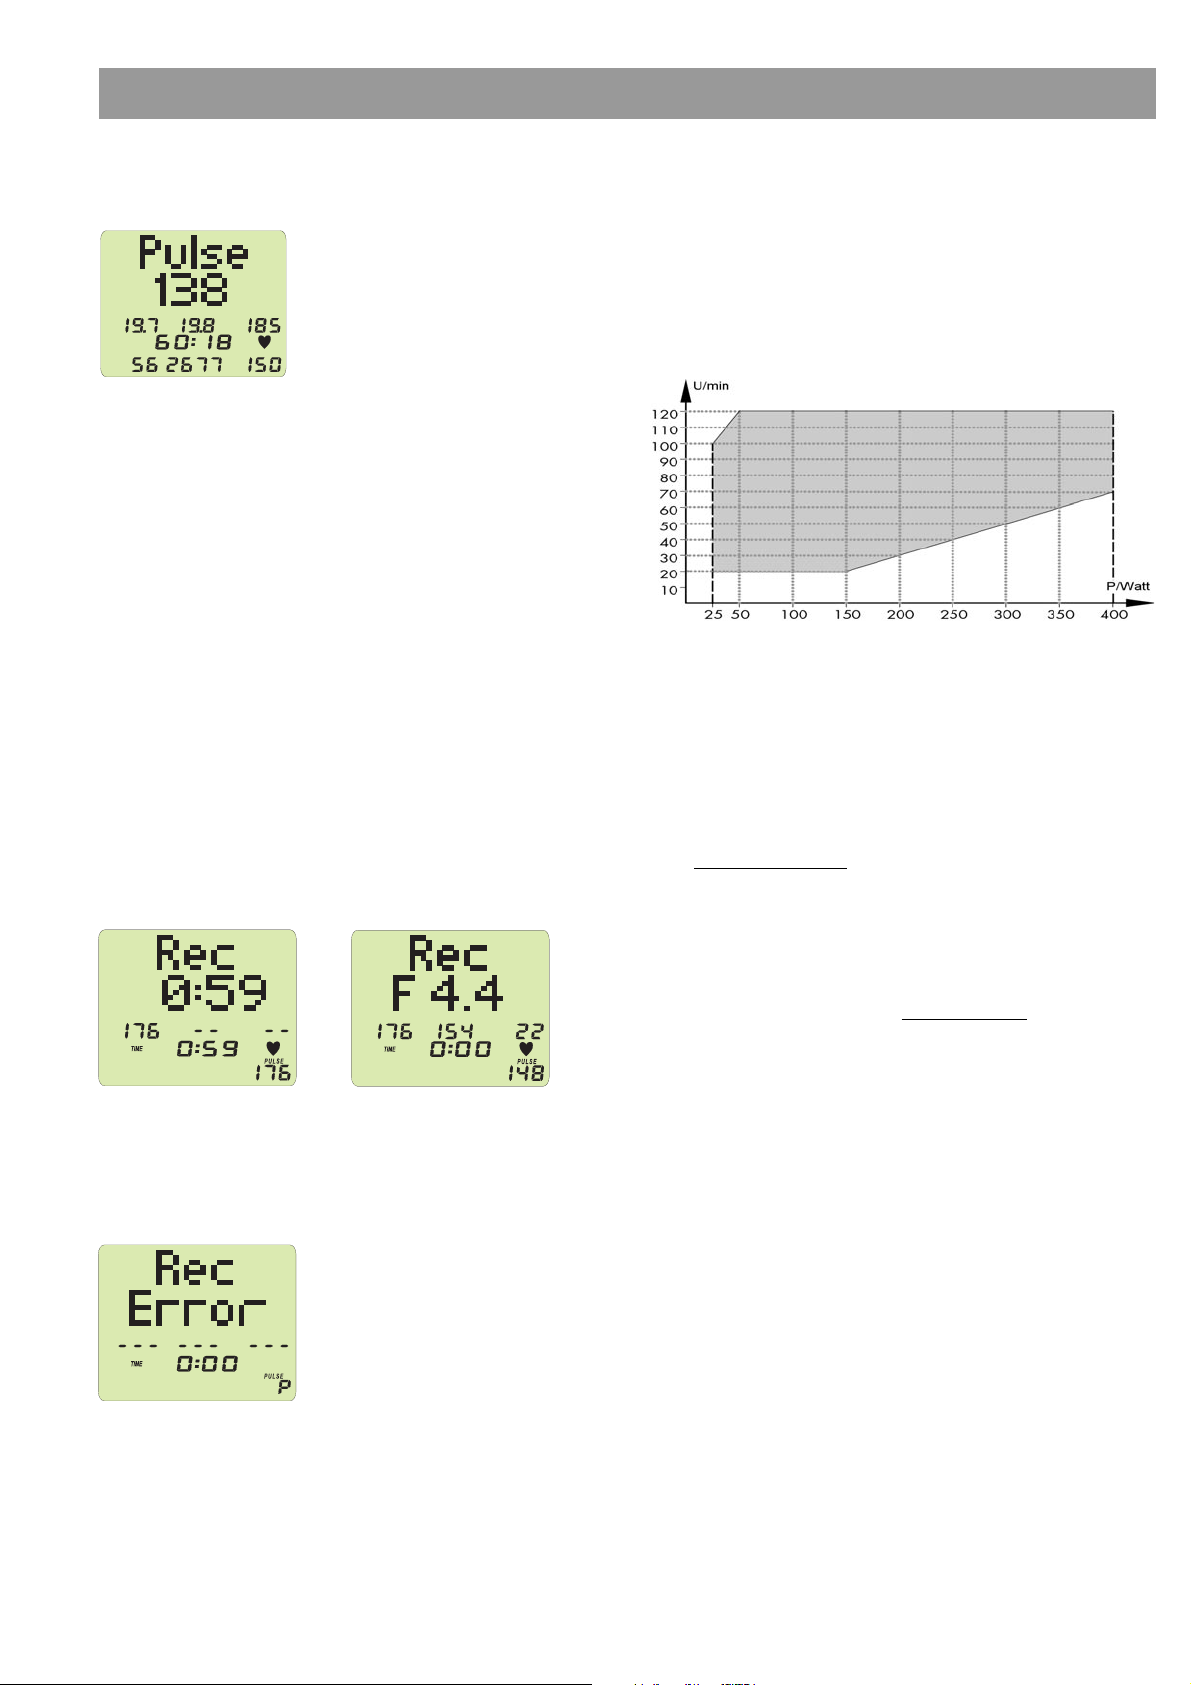
Die Intensität wird beim Training mit dem Cross-Trainer über die Lei-
stungsregelung von 25–400 Watt mit den +/– Tasten vorgegeben. Ver-
meiden Sie als Anfänger ein Training mit zu hoher Leistungseinstellung,
da hierbei schnell der empfohlene Pulsfrequenzbereich überschritten wer-
den kann. Beginnen Sie mit einer niedrigen Leistungseinstellung und ta-
sten Sie sich Schritt für Schritt an Ihren optimalen Trainingspuls heran.
Kontrollieren Sie während des Cross-Trainings regelmäßig, ob Sie in
Ihrem Intensitätsbereich gemäß den o. g. Empfehlungen trainieren.
Zum Belastungsumfang
Der Anfänger steigert den Belastungsumfang seines Trainings nur allmäh-
lich. Die ersten Trainingseinheiten sollten relativ kurz und intervallartig
aufgebaut werden. Als fitnesspositiv werden von seiten der Sportmedizin
folgende Belastungsfaktoren erachtet:
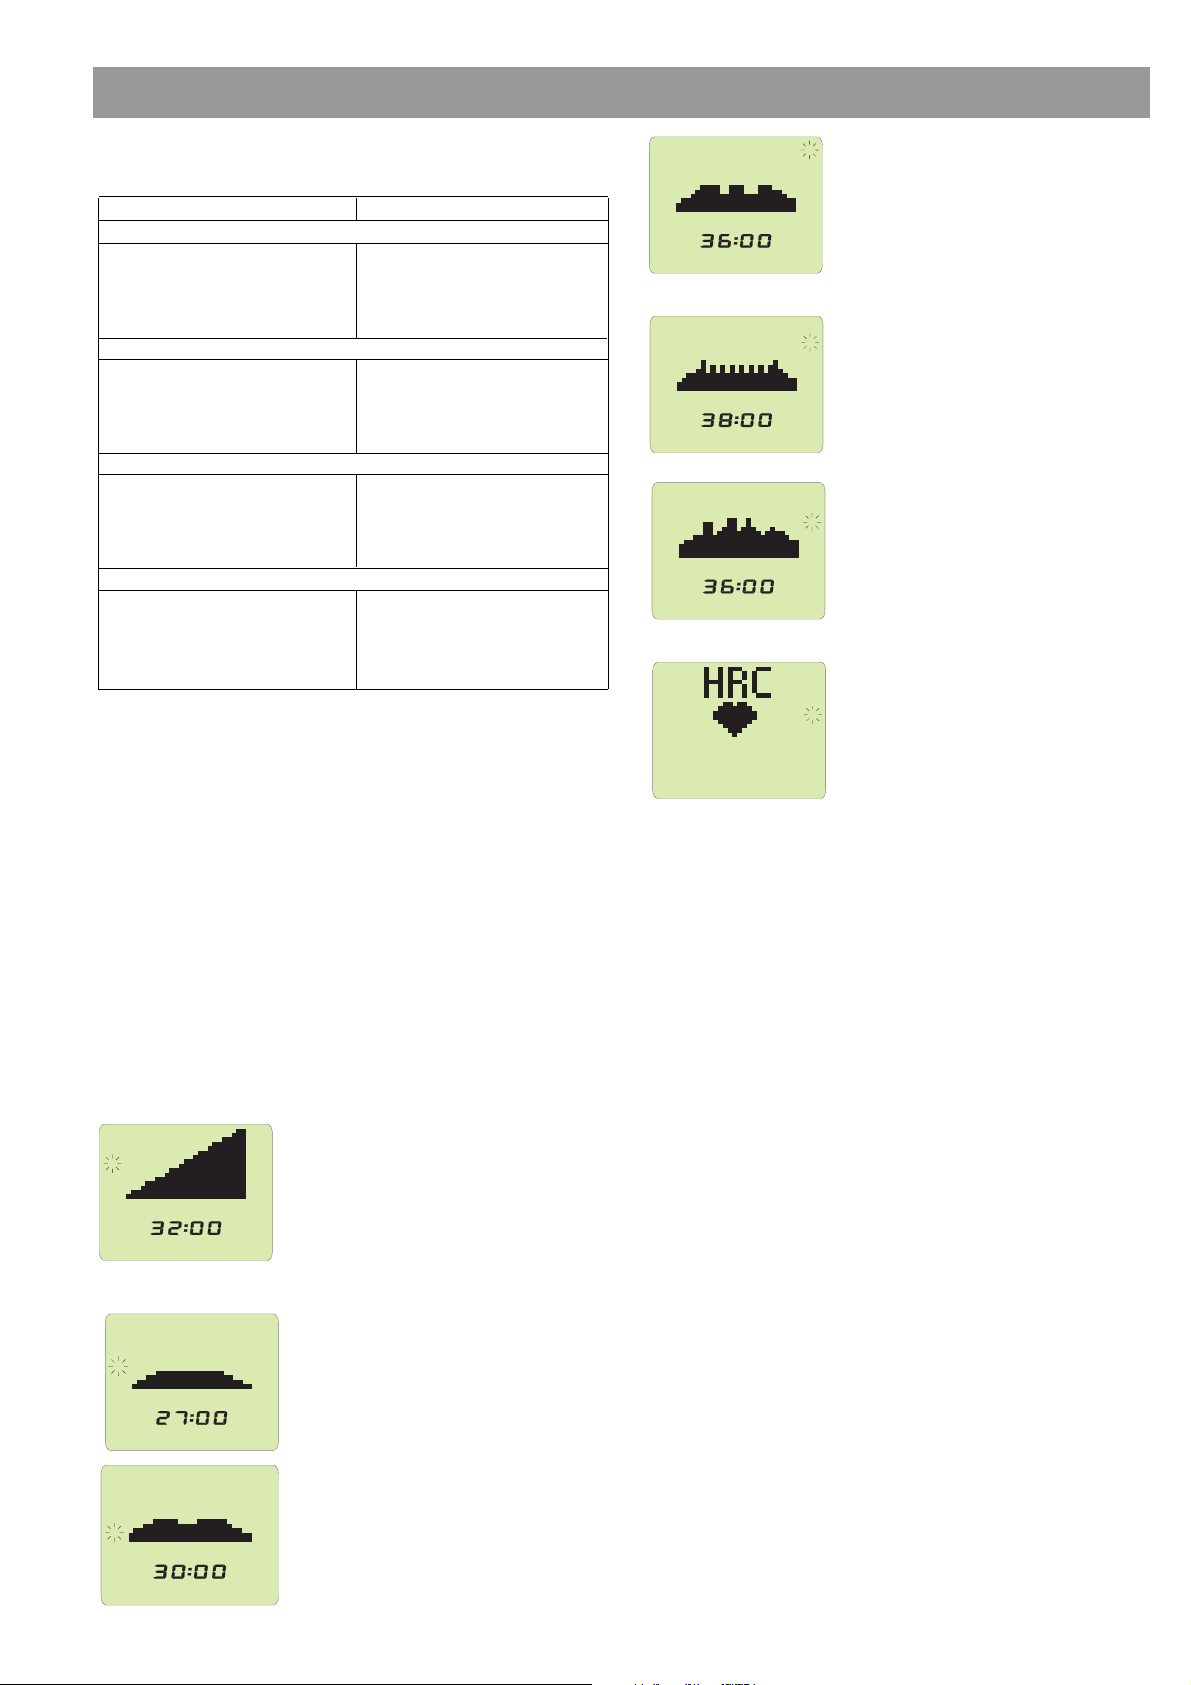
Trainingshäufigkeit
täglich
2-3 x wöchentlich
1-2 x wöchentlich
Trainingsdauer
ca. 10 Minuten
20-30 Minuten
30-60 Minuten

9
Anfänger sollten nicht mit Trainingseinheiten von 30-60 Minuten beginnen.
Das Anfängertraining kann in den ersten 4 Wochen folgendermaßen kon-
zipiert sein:
Vor und nach jeder Trainingseinheit dient eine ca 5-minütige Gymnastik dem
Aufwärmen bzw. dem Cool-down. Zwischen zwei Trainingseinheiten sollte
ein trainingsfreier Tag liegen, wenn Sie im späteren Verlauf das 3mal
wöchentliche Training von 20-30 Minuten bevorzugen. Ansonsten spricht
nichts gegen ein tägliches 10-minütiges Training mit dem Cross-Trainer.
Integrierte Trainingsprogramme
Neben der individuellen Planung Ihres Ausdauer–Fitnesstrainings können
Sie auf die im Trainingscomputer des Cross-Trainers integrierten Trainings-
programme zurückgreifen, die nachstehend beschrieben sind.
Der Computer des KETTLER–Cross-Trainers ist mit 6 gespeicherten Trainings-
programmen, einer manuellen Belastungsvorgabe sowie mit einem pulsfre-
quenzgesteuerten Trainingsprogramm ausgestattet. Sie können mit der Pro-
grammtaste abgerufen werden. Die Programme unterscheiden sich deutlich in
Belastungsintensität und –dauer.
Die 6 Trainingsprogramme sind für „Fitness–Einsteiger”, „Fortgeschrittene”
und „Fitness–Profis” konzipiert. Die folgende Beschreibung der Program-
me hilft Ihnen, das Ihrer Leistungsfähigkeit entsprechende Programm zu
wählen. So ist das Programm P6 nur für ausdauertrainierte und sehr bela-
stungsfähige Personen geeignet.
P 2: Fitness-Einsteiger I
Belastung: 25 - 100 Watt, 27 min
P 1: Fitness-Test nach WHO-Standard
Dieser Fitness-Test sieht eine automatisch gere-
gelte Leistungssteigerung um 25 Watt im 2-Mi-
nuten-Rhythmus vor, beginnend bei 25 Watt.
Brechen Sie den Test bei Erreichen der max. Pul-
sobergrenze (200-Lebensalter) ab und verglei-
chen Sie Ihre erreichten Leistungswerte im Ver-
lauf der Trainingsmonate. Nur Herz-Kreis-
lauf-Gesunde können diesen Test ohne
ärztliche Aufsicht absolvieren!
Pulsgesteuertes Programm: HRC
Nach Eingabe des gewünschten Trainingspulses
regelt die elektrische Wirbelstrombremse dreh-
zahlunabhängig den Tretwiderstand entspre-
chend der Vorgabe. Das bedeutet die automati-
sche Steigerung des Widerstandes bis der Trai-
ningspuls erreicht ist bzw. eine Rücknahme bei
Überschreitung. Das Programm gewährleistet ein
Herz-Kreislauf-Training bei annähernd konstantem optimalen Trainingspuls.
Daher eignet es sich hervorragend für das therapeutische Training.
P 5: Fortgeschrittene II
Belastung: 50 - 200 Watt, 38 min
P 6: Fitness-Profi l
Belastung: 75 - 300 Watt, 36 min
Î
Ï
Y
Y
Ê
Ë
Ì
Í
TIME
Î
Ï
Y
Y
Ê
Ë
Ì
Í
TIME
Î
Ï
Y
Y
Ê
Ë
Ì
Í
TIME
Î
Ï
Y
Y
Ê
Ë
Ì
Í
TIME
Î
Ï
Y
Y
Ê
Ë
Ì
Í
TIME
Î
Ï
Y
Y
Ê
Ë
Ì
Í
TIME
Î
Ï
Y
Y
Ê
Ë
Ì
Í
P 3: Fitness-Einsteiger II
Belastung: 50 - 125 Watt, 30 min
Trainingshäufigkeit Umfang einer Trainingseinheit
1. Woche
3 x wöchentlich 2 Minuten Cross-Training
1 Minute Pause für Gymnastik
2 Minuten Cross-Training
1 Minute Pause für Gymnastik
2 Minuten Cross-Training
2. Woche
3 x wöchentlich 3 Minuten Cross-Training
1 Minute Pause für Gymnastik
3 Minuten Cross-Training
1 Minute Pause für Gymnastik
2 Minuten Cross-Training
3. Woche
3 x wöchentlich 4 Minuten Cross-Training
1 Minute Pause für Gymnastik
3 Minuten Cross-Training
1 Minute Pause für Gymnastik
3 Minuten Cross-Training
4. Woche
3 x wöchentlich 5 Minuten Cross-Training
1 Minute Pause für Gymnastik
4 Minuten Cross-Training
1 Minute Pause für Gymnastik
4 Minuten Cross-Training
Bewegungsablauf
Der Bewegungsablauf des Cross-Trainings ist durch die elliptische Rotati-
on der Trittflächen und die Lagerung der Griffstangen bereits vorgegeben.
Trotzdem sollten einige Punkte beachtet werden:
■ Stets vor dem Training auf korrekten Aufbau und Stand des Gerätes
achten.
■ Beim Aufsteigen auf das Gerät muß sich eine Trittfläche in unterster,
eine in oberster Position befinden. Fassen Sie mit beiden Händen die
Griffstangen und steigen Sie zuerst auf die untere Trittfläche. Beim Ab-
steigen entlasten Sie zuerst die obere Trittfläche.
■ Stellen Sie sich die Trittflächen auf den für Sie optimalen Abstand zu den
Griffstangen ein; achten Sie dabei auf genügend Beinfreiheit zu den
Griffstangen.
■ Trainieren Sie mit entsprechenden Sportschuhen und achten Sie auf
einen sicheren Stand auf den Trittflächen.
■ Halten Sie sich am Griffbügel zwischen den beweglichen Griffstangen
fest, falls Sie nur das Unterkörpertraining durchführen möchten. (Nicht
freihändig trainieren.)
■ Achten Sie auf einen gleichmäßigen, runden Bewegungsablauf.
■ Variieren Sie während des Trainings zwischen Vorwärts- und Rück-
wärtsbewegungen der Trittflächen, um die Bein- und Gesäßmuskulatur
auf unterschiedliche Weise zu beanspruchen.
Bei regelmäßigem Training können Sie Ihre Ausdauer, Ihre Kraftfähigkeit
und damit auch Ihr Wohlbefinden steigern. Der Trainingserfolg wird
durch eine gesundheitsbewußte Lebensweise optimiert, die von einer
ausgewogenen, vollwertigen Ernährung bestimmt wird.
P 4: Fortgeschrittene l
Belastung: 50 - 150 Watt, 36 min

1.0 Displays before training
1. Room temperature Fig. 1 [before and after training]
2. Full display Fig. 2 [after pedalling or key actuation, 1 sec]
3. Total kilometres Fig. 3 [all kilometres covered, 8 sec]
4. Start display Fig. 4 [after key actuation or after 8 seconds]
2.0 Pulse measuring
This display offers three possibilities for pulse measuring:
1. with the hand pulse sensors
2. with the ear-clip
3. with the cardio pulse set, article No. 7937-000 (available as an
option from specialised dealers)
Information on pulse measuring
Only one kind of pulse measuring is possible at a time. (Ear-
clip or hand pulse sensors or cardio pulse set)
Select the start display (Fig. 4). Your current pulse is displayed at
position (7).
Pulse measuring with hand pulse sensors
Your hands grasp the hand pulse sensors.
Pulse measuring with the ear-clip
Plug the ear-clip into socket (14).
Rub one ear lob in order to achieve a better blood circulation.
Put the ear-clip at your ear lob.
Pulse measuring with the cardio pulse set
Please refer to the appropriate instructions.
Pulse display
The heart symbol (j) will flash according to your pulse beat.
The pulse beat is displayed as value (7).
3.0 Training without preset training data
Step into the pedals. All values will count up. Count-up mode.
4.0 Training with preset training data
4.1 Program types
The crosstrainer possesses nine different program types:
• Count-up (count-up mode)
• Count-down (count-down mode)
• 6 programs å-ë (preset training intervals in a given time)
• pulse controlled program (strain control based on your preset pulse value)
After switching on, count-up (Fig. 4) will be automatically activated.
4.2 Selection of programs (Fig. 5-8)
You set the start display (Fig. 8). Press the program key (11) several
times without pedalling. The programs are shown in the display by flas-
hing program symbols. In case of count-up, count-down and
HRC text is displayed in the graphics field (f). In the programs ➊-➏,
additionally the training profile is shown in graphics field (f) in a com-
pressed form. The training time given by the program will be shown in
the time display (3) (Fig. 7).
Operating instructions for the training computer with digi-
tal display
Values
1. KILOJOULE ..energy consumption 0-9999 [KJ]
room temperature 0-50 [°C]
odo total kilometres 0-9999 [km]
2. RPM pedal rotations 20-199 [rotations/min]
3. TIME 0:00-99:59 [min:sec]
4. KM/H velocity 0-99,9 [km/h]
5. KM distance 0-99,9 [km]
6. WATT performance 25-400 [Watt]
7. PULSE pulse beat 0-199 [pulse beats/min]
Symbols
a▲▼ arrows . . . . . . . . . .change pedal rotations
bØaverage . . . . . . . . .PPM + km/h + performance + pulse
c ➊-➏program 1-6 . . . . . .given training programs
dcount-down mode . . .training values count down
ecount-up mode . . . . .training values count up
f graphic display . . . .multiple display for graphics+values
gheart program . . . . .pulse controlled program
hinterface . . . . . . . . .PC mode
LO low pulse limit . . . . .age-depending low pulse limit
❤ pulse beat . . . . . . . .flashes in accordance with pulse beat
kHI high pulse limit . . . .age-depending high pulse limit,
. . . . . . .max. pulse (flashes)
% per cent . . . . . . . . .% of max. pulse setting
mroom temperature . . .degree Celsius
Keys
8Recovery key function key (recovery pulse and fitness
value calculation)
9 Reset key function key (delete the display contents)
10 Set key function key (acceptance and confirmati
on of inputs)
11 Program key selection of programs and display con
tents in graphics field
12 Minus key reduce values
13 Plus key increase values
Connections (front)
14 Socket for the ear-clip and the plug-in receiver
Connections (board)
15 Plug (4-pole) for the hand pulse sensors
16 Plug (6-pole) for voltage, impulses and control
17 Plug (3-pole) to interface
Connections (rear)
18 Socket interface PC connection
O
Î
Ï
Y
Y
Ê
Ë
Ì
Í
PULSERPM
LO
KM/H WATTKM
KILOJOULE
O
∅∅
∅∅
HI
%
TIME
Figure 1
Temperature display Figure 2
Full display
KM
Y
PULSERPM
KM/H WATTKM
KILOJOULE
TIME
Figure 3
Total kilometre display Figure 4
Start display Count up ›
❤
5
a
6
b
e
f
g
i
j
7
l
h
c
8
910
1112
1314
d
k
c
m
10
Function and operation of the training computer
GB

11
GB
Preset: Training pulse
With the set key you subsequently call 3 input ranges.
1. Age (Fig. 13/14)
2. Max. pulse (Fig. 15 / Fig. 16)
3. Pulse zones: Training target ➠fat consumption [fat 65%] (Fig. 17)
Training target ➠cardiovascular fitness [fit 75%] (Fig. 18)
Manual [man. - - %] (Fig. 19/20)
4.4.1 Age input
The age input is required for calculating the max. pulse.
If you enter your age, the age-depending max. pulse (formula: 220 -
age) will appear in the PULSE display (7). (Fig. 14) In case of inputs up
to 21 years, only 199 can be shown as the max. pulse, however, the cal-
culation is based upon the correct value.
Note
If you entered an age in the HRC program before, this value will be shown.
4.4.2 Max. pulse
After the entry of an age in the max. pulse display the calculated value
will appear in the graphics fields (Fig. 16). Additionally, the % symbol
and 100 appear in the PULSE display. If no age has been preset, a max.
pulse between 80 and 199 can be entered.
If the max. pulse is to be lower than the calculated value, press the - key
(12). An increase exceeding the max. value is not possible.
Note
A previously calculated or altered max. pulse in HRC program will be ad-
opted.
Function
Through the age input and the adopted or altered max. pulse a pulse mo-
nitoring is activated which will indicate an exceeding value by means of
a flashing HI symbol. The value shown with the % symbol is the compa-
rison between current pulse value and max. pulse value.
If you do not enter any max. pulse value, the subsequently described pul-
se zone inputs are not possible and you will get to the entry of a freely
selectable pulse value monitoring (item 4.4.3).
4.4.3 Pulse zones/training targets
With the +/- keys you select 3 zones. The age input and/or the altered
max. pulse are used for calculating this pulse zone which is visible in the
PULSE display (7).
1. Training target ➠fat consumption [Fat 65%] (Fig. 17)
Formula: (220 - age) x 0.65 or max. pulse x 0.65
2. Training target ➠ cardiovascular fitness [Fit 75%] (Fig. 18)
Formula: (220 - age) x 0.75 or max. pulse x 0.75
3. Manual zone [Man - - %] (Fig. 19)
You set the factor in the range of 40 - 90 % with the +/- keys.
Formula: (220 - age) x (0.40 - 0.90) or
max. pulse x (0.40 - 0,90)
With the set key you accept the pulse zone and get to completion of
preset data (item 4.4.5.).
4.3 Settings in the programs count-down and HRC
You have selected a program, e.g. count-down (Fig. 6).
If you press the set key, the setting mode will open (Fig. 9). No preset
data are represented by "Off" in the graphics field (Fig. 9). With the +/-
keys (12/13) you can adjust the setting values (Fig. 10). If you press
the -/+ key longer, forward or reverse run will be carried out faster.
If you press the -/+ keys together, the value will be reset to zero.
With the set key you will get to the next preset data. (Fig. 10-12)
4.4 Possibilities of preset pulse values
The schematic diagram shows the sequence for preset pulse values
In detail:
Î
Ï
Y
Y
Ê
Ë
Ì
Í
TIME
Î
Ï
Y
Y
Ê
Ë
Ì
Í
Figure 7
Programs ➊-➏Example:❷Figure 8
Heart rate control program: HRC
Y
KM
Y
KM
Figure 9
No setting "Off"Figure 10
Distance setting e.g. 16.5 km
Y
TIME
Figure 11
Time setting e.g. 34 minutes Figure 12
Kilojoule setting e.g. 820 kJ
Î
Ï
Y
Y
Ê
Ë
Ì
Í
Î
Ï
Y
Y
Ê
Ë
Ì
Í
Figure 5 Figure 6
❤
Age input OFF,
10-99 with +/-
Max. pulse input OFF, 80-199,
80-(220-age) with +/- key
Input no (OFF)
Input yes
Pulse input: Fat consump-
tion 65% (220-age)*0.65,
(max. pulse)*0.65
Pulse input: Fitness 75%
(220-age)*0.75, (max. pulse)*0.75
Pulse selection:
Manual - - %
Pulse input: Manual 40-90%
(220-age)*0.40-0.90 (max. pulse)*0.40-0.90
with +/- key
Input no (OFF)
Input no (OFF)
Input yes
Input yes
Pulse value input: OFF,
40-188 with +(- key
Training without
% with HI/LO
Training without %
and without HI/LO Training with %
and HI/LO
Training with %
and without HI/LO
Bild 13
No input “OFF”
Bild 14
Age z.B.31with max. pulse setting
189 and HI - symbol
Bild 15
No input “OFF” Bild 16
Max. pulse displayed with input 31
years with 100% - symbol

12
Function
Through the pulse zone input and the accepted or altered max. pulse a
pulse zone monitoring is activated. If you fall below the preset training pul-
se by 11 beats, the lettering "LO" appears; if you exceed it by 11 be-
ats, the display will show "HI". The "LO" monitoring is active, if the pre-
set training pulse is reached for the first time when pedalling. If the pe-
dal speed falls to zeros, the "LO" function will become active again
when reaching the preset training pulse. The "HI" monitoring is always
active.
The value which is displayed with the % symbol is the comparison bet-
ween current pulse value and max. pulse value.
If you do not enter any max. pulse value, the % pulse display is not active.
4.4.4 Pulse value monitoring
This input is possible with the +/- keys in the range of 40 - 188.
Function
The "HI" and "LO" display functions as described under 4.4.3. The %
pulse display is not available.
Switch the pulse value monitoring off: "OFF" display, all pulse monitoring
functions are de-activated.
Note
Previously set pulse values in the HRC program are accepted and appe-
ar in the display.
In this mode, the training pulse has no influence on the performance.
(Such a function is offered by the HRC program.)
4.4.5 Completion of preset data
If you press the set key after the last preset value (except in the programs
1-6), all preset values (except preset pulses) will be displayed. The gra-
phics field will read the lettering "Ready" (Fig. 22).
Possibilities of preset training values in the program types:
Count-up
Standard values:
• KM (distance): 0.0 km
• Time (training time): 0:00 min.
• Kilojoule (energy consumption): 0 kJ
• Training pulse: - -
• Max. pulse: - -
• Performance: 25 Watt
Possibilities of preset values in the sequence:
• Age
• Max. pulse
• Pulse zones Fat 65%, Fit 75% and Man. - - %
• Performance
Count-down
Standard values:
• KM (distance): 0 km
• Time (training time): 0:00 min.
• Kilojoule (energy consumption): 0 kJ
• Training pulse: - -
• Max. pulse: - -
• Performance: 25 Watt
Possibilities of preset values in the sequence:
• KM (distance)
• Time (training time)
• Kilojoule
• Age
• Max. pulse
• Pulse zones Fat 65%, Fit 75% and Man. - - %
• Performance
Note:
At least preset the training distance or training time or energy consumpti-
on, otherwise the electronic system will start in count-up mode when taking
up training.
If training time, training distance and energy consumption have been
counted down to zero, the display will change into count-up mode. Now,
the values will again count up from the preset values.
Programs 1-6
Standard values:
• KM (distance): 0.0 km
• Time (training time): depending on program
• Kilojoule (energy consumption): 0 kJ
• Training pulse: - -
• Max. pulse: - -
• Performance: depending on program
Possibilities of preset values in the sequence:
• Age
• Max. pulse
• Pulse zones Fat 65%, Fit 75% and Man. - - %
• Performance (not in programs that include a performance range from 25 -
400 Watt)
The adjustment will cause the increase or decrease of the stored program
flow.
Note:
If the training time has been set to zero, the display will change into count-
up mode. Even the time value will count up now.
Pulse controlled program (HRC)
Standard values:
• KM (distance): 0.0 km
• Time (training time): 0:00 min.
• Kilojoule (energy consumption): 0 kJ
• Training pulse: 60 or the training pulse indicated last in the HRC pro-
gram
• Performance: 25 Watt or the starting performance indicated last in the
HRC program
Possibilities of preset values in the sequence:
• KM (distance)
• Time (training time)
• Kilojoule
• Age
• Max. pulse
• Pulse zones Fat 65%, Fit 75% and Man. - - %
• Performance
Note:
For the HRC program KETTLER recommend pulse measuring with the ear-
clip or the cardio pulse set.
The difference between given training pulse and current pulse determines
the performance adjustment. At the beginning of training, the performan-
ce will be increased from the given value until the preset pulse is reached.
If the value is exceeded, the performance will be reduced.
Starting performance can be set from 25 - 100 Watt.
Fig. 17
Pulse zone: Fat consumption with
65%
Fig. 18
Pulse zone: Fitness with 75 %
Fig. 19
Manual pulse selection Fig. 20
Manual pulse input, e.g. 85%
Y
PULSERPM
KM/H WATTKM
KILOJOULE
TIME
Fig. 22 Display with preset value
prior to start of training
Fig. 21
Pulse value input, e.g. 150
GB

13
GB
One segment line is always faded in and corresponds with 25 Watt. If the
performance exceeds 375 Watt, the highest (16th) line will be displayed.
6.0 Display at interruption or end of training
If you achieve less than 20 pedal rotations/min., the electronic system will
recognise a training interruption and the training data are displayed and
not the counted down values of preset data. In case of velocity (km/h),
performance (Watt), pedal rotations (RPM) and pulse (pulse) the average
values are shown with a ∆symbol (b). (Fig. 31)
If the program symbols stay, you see that still preset values exist. If the pro-
gram symbol changes to count-up, you see that the preset values are coun-
ted down or have not been set.
Only in the HRC program can the value be counted up or down. In the
graphics field "pulse" and the current pulse value (or "P" in case of inac-
tive pulse measuring) is shown.
Training data are displayed for 4 minutes. If you do not press any keys or
step onto the pedals during this time, the electronic system will change
over into the standby mode with room temperature display (Fig. 1). The
kilometres are stored. All other values are not stored. The SET or +/- key
will change over to the training value display.
7.0 Display in case of continued training
Step onto the pedals. The values will count further.
8.0 Recovery pulse measuring
The training computer is equipped with a recovery pulse function which
permits to measure your recovery pulse. When finishing your training
press the recovery key (8). The current pulse value will be accepted under
KM/H (4) (Fig. 32).
For 60 seconds in count-down the electronic system measures your pulse
Afterwards, the current value is shown under KM (5) and the difference
between the pulse values under WATT (6) during count-down. Under Rec
a fitness value is displayed with (F). (Fig. 33)
The calculation is explained under item 9 Fitness note calculation. If pul-
se measuring is interrupted or interfered with, "Error" is displayed instead
of a value (Fig. 34). If no pulse signal is available at recovery start, reco-
very pulse measuring will not start.
Note
In order to stop the heavy centrifugal mass, the braking force in the reco-
very function is continuously increased until standstill. If no pulse signal is
available, the braking operation is performed as well. After 10 seconds,
the recovery display will automatically be extinguished. Afterwards, the
display of the achieved training and average values appears (Fig. 31).
If you selected a starting performance above 25 Watt, the first perfor-
mance adjustment will take place after 1 minute (Exception: The preset
pulse is exceeded).
A performance adjustment with the "-" and "+" keys is not possible.
Your preset pulse should be reached after approx. 5 minutes.
The HRC can only be terminated by you. If preset values for training time,
training distance and energy consumption have been counted down to
zero, there is no program stop or change. The performance is continued
to be controlled by the electronic system on the basis of your pulse fre-
quency.
General
If you press the program key when entering preset data, the display will
skip to the next program type without storing any preset data.
Preset training data will only be taken into account, if you terminate the
preset mode with the "Ready" display (Fig. 22). Otherwise the standard
preset data are taken.
Start of training
The selected program type will start after you have achieved more than
20 pedal rotations/min.
5.0 Training
5.1 Training displays in count-up, count-down and HRC pro-
gram
In these program types the graphics display (f) is used in order to repre-
sent the values in large. At the start of training the training time (Fig. 23)
is shown. With the program key you change the display contents during
training in the following sequence: Time (Fig. 23) ➠km/h (Fig. 24) ➠km
(Fig. 25) ➠performance (Fig. 26) ➠RPM (Fig. 27) ➠kilojoule (Fig. 28)
➠pulse (Fig. 29) ➠time (Fig. 23) ➠…
5.2 Training display in program 1-6
In program type 1-6 the program flow is shown in the graphics field (Fig.
30). The left column indicates current strain. One column represents 1 mi-
nute of training time and it runs through to the left.
Y
PULSERPM
KM/H WATTKM
KILOJOULE
TIME
Y
PULSERPM
KM/H WATTKM
KILOJOULE
TIME
Fig. 23 Display of training time in
graphics field Fig. 24 Display of velocity in gra-
phics field
Y
PULSERPM
KM/H WATTKM
KILOJOULE
TIME
Y
PULSERPM
KM/H WATTKM
KILOJOULE
TIME
Y
PULSERPM
KM/H WATTKM
KILOJOULE
TIME
Y
PULSERPM
KM/H WATTKM
KILOJOULE
TIME
Y
PULSERPM
KM/H WATTKM
KILOJOULE
TIME
Fig. 25 Display of distance in gra-
phics field Fig. 26 Display of performance in
graphics field
Y
PULSERPM
KM/H WATTKM
KILOJOULE
TIME
Y
PULSERPM
KM/H WATTKM
KILOJOULE
TIME
Y
PULSERPM
KM/H WATTKM
KILOJOULE
TIME
Y
PULSERPM
KM/H WATTKM
KILOJOULE
TIME
Fig. 27 Display of pedal rotations
per minute in graphics field Fig. 28 Display of energy consump-
tion in graphics field
Y
PULSERPM
KM/H WATTKM
KILOJOULE
TIME
Fig. 29 Display of pulse value in
graphics field
Î
Ï
Y
Y
Ê
Ë
Ì
Í
TIME
Fig. 30
Programs 1-6, example: 2.
Fig. 32
Display during count-down of 60 se-
conds
Fig. 33
Display after count-down of 60 se-
conds
Y
PULSERPM
KM/H WATTKM
KILOJOULE
∅∅
∅∅
TIME
Fig. 31
Display of achieved training and
average values

Also the "Error" display, however, only at standstill of the flywheel. If you lea-
ve the recovery function, the previously set performance is adjusted again.
9 General
Braking behaviour
The electromagnetic eddy current brake produces the braking effect inde-
pendent from the speed such that the braking power is kept constant in a
wide range of pedal rotations (RPM).
Arrow display:
Performance range of the ergometer.
If the adjusted performance cannot be achieved with the current pedal ro-
tation (e.g. 400 Watt at 50 RPM - outside the grey range), an appropriate
arrow of direction (a) is displayed next to the current pedal speed (2).
The above diagram is only used to illustrate a performance range. If a per-
formance cannot be achieved with the current pedal rotation, an arrow
pointing upwards or an arrow pointing downwards appears for an in-
crease or a reduction of speed.
Velocity calculation
60 pedal rotations result in a velocity of 9,5 km/h.
Kilojoule calculation
The performance is entered in Watt (current performance) and the time in se-
conds. Factor 8 results from the efficiency degree of a human being of ap-
prox. 12,5% when training with the trainer. However, this is only a clue.
kJ = performance x time x 8
1000
Fitness value calculation
The computer calculates and assesses the difference between the strain
pulse at training end and the recovery pulse after 60 s and the resulting
"fitness value" according to the following formula:
Value (F) = 6 - [10 x (P1 - P2)]2
P1
P1 = Strain pulse
P2 = Recovery pulse
Value 1 = very good Value 6 = insufficient
The comparison of strain and recovery pulse is a simple and fast possibi-
lity to control your physical fitness. The fitness value is an orientation va-
lue for your recoverability after physical strain. Before you press the reco-
very key (8) and establish your fitness value, you should train for a longer
period, i.e. for at least 10 minutes, in your strain range. With a regular
cardiovascular training you will note that your "fitness value" improves.
Average value calculation
For the average value calculation of pedal rotations, velocity, performan-
ce and pulse all training intervals are taken into account until the "Tem-
perature" display appears.
Information on pulse measuring
Only one kind of pulse measuring is possible at a time (ear-clip or hand
pulse sensors or cardio pulse set).
Pulse calculation starts when the heart in the display flashes in accordan-
ce with your pulse beat.
With ear-clip
The pulse sensor operates with infra-red light and measures the changes
in the light permeability of your skin which are caused by your pulse beat.
Before you fasten the ear-clip to your ear lob please rub it strongly 10 ti-
mes, in order to increase blood circulation.
Avoid interfering impulses.
• Fasten the ear-clip carefully at your ear lob and try to find the most fa-
vourable point for sensoring (heart symbol flashes without interruption).
• Do not train directly under strong incidence of light, e.g. neon light, ha-
logen light, spot light, sunlight.
• Completely avoid any vibrations and wobbling of the ear sensor inclu-
ding cable. Always fasten the cable with the clip at your clothes or - even
better - at a headband.
With hand pulse sensors
A very low voltage caused by the contraction of the heart is detected by
the hand sensors and assessed by the electronic system.
• Always grasp the contact surfaces with both hands.
• Avoid jerky grasping.
• Hold your hands calm and avoid contractions and rubbing on the
contact surfaces.
With cardio pulse set
Please refer to the appropriate instructions.
Malfunctions in pulse display
Should any pulse detecting problems occur, please once again check the
above items.
Malfunctions at training computer
If the electronic system behaves strange or disturbed, press the reset key.
Information on interface
The training software "ERGO concept", art. No. 7926-000, to be bought
from your specialised dealer, permits the control of your KETTLER cross
trainer with a customary PC through this interface.
Soon you will find information about further possibilities with the interfa-
ce on our homepage www.kettler.net.
Under the item FAQ (frequently asked questions) you will find information
about the "electronic system" of our products.
10 Training instructions
Cross training is a very effective training for the whole body straining all lar-
ge muscle groups and simultaneously training the cardiovascular system in
an ideal manner and supporting the fat metabolism. The innovative elliptical
motion of the stepping surfaces strengthens the leg and gluteal muscles par-
ticularly joint friendly. The upper body training coupled with leg training par-
ticularly trains arm, shoulder, chest and back muscles.
Before starting to train you should read the following information carefully!
Important note:
Before taking up training with the cross trainer, have your family doctor
check that you are fit for this kind of fitness training. The medical report
should be the basis for building up your training program.
The above and the following training information are only recommended
for persons with a healthy cardiovascular system.
Training information
Training with the cross trainer has to follow the principles of stamina trai-
ning. Stamina training predominantly causes changes and adjustments at
the cardiovascular system. These include a reduction of the resting pulse
rate and of the exercise pulse. This gives the heart more time for filling the
ventricles of the heart and for supplying the cardiac musculature with
blood (through coronary vessels). Furthermore, depth of respiration and
volume of air that can be inhaled (vital capacity) increase. Further positi-
ve changes take place in metabolic system. In order to achieve these po-
sitive changes, your training has to be planned according to certain prin-
ciples.
Planning and control of your cross training
Basis for training planning is your current physical capacity. With an
exercise test your family doctor can assess your personal capacity which
will for the basis for your training planning. If you have no exercise test
performed, high training strains and/or overloading are to be avoided
by all means. The following principle should be taken into account for
planning: Stamina training is controlled both over the volume of strain
and over the intensity of strain.
14
Fig. 34
Display at Revovery without pulse
signal

15
Intensity of strain
The intensity of strain during cross training is preferably controlled through the
pulse frequency of your heart. The max. heart frequency per minute - 220 mi-
nus age - must not be exceeded. The optimal training pulse is determined by
age and training target (also refer to 4.4.3 Pulse zones/training targets.
Training target: Fat consumption/weight reduction
The optimal pulse frequency is calculated according to the rule of thumb (220
- age) x 0.65.
Note: Fat consumption for energy supply will only gain importance from a trai-
ning duration of at least 30 minutes.
Training target: Cardiovascular fitness
The optimal pulse frequency is calculated according to the rule of thumb (220
- age) x 0.75.
Moreover there is the possibility to manually determine the factors in the range
of 0.40 - 0.90.
The intensity of training with the cross trainer is set through the performance re-
gulation of 25 - 400 Watt with the +/- keys. As a beginner you should avoid
a training with a too high performance adjustment since the recommended pul-
se frequency range may very soon be exceeded. Start with a low performance
adjustment and approach your optimal training pulse gradually. Regularly
check during cross training as to whether you still train within your intensity ran-
ge according to the above recommendations.
Amount of strain
A beginner will increase the amount of strain of his/her training only gradually.
The first training units should be relatively short and be organised in intervals.
Sports physicians regard the following strain factors as being positive for fitness:
Beginners should not start with training units of 30-60 minutes.
During the first 4 weeks, a beginner training could be organised as follows:
Prior to and after every training unit, 5 minutes of gymnastics should warm up
or cool down your body. Between two training units there should be one day
without training, if you prefer the training of 20-30 minutes 3 times a week later
on. Otherwise, there is nothing to be said against an everyday training with the
Cross-Trainer of 10 minutes.
The movements during Cross-Training are already predefined through the ellip-
tic rotation of the treads and the positioning of the grip bars. Nevertheless, you
should pay attention to some points:
■ Prior to taking up training, always pay attention to the correct assembly and
stability of the equipment.
■ When getting onto the equipment, one tread has to be in the lowest, and
one in the uppermost position. Grasp the grip bars with both hands and get
onto the lower tread first. When getting off the equipment, first leave the up-
permost tread.
■ Adjust the tread at the optimal distance for you with regard to the grip bars
; pay attention to sufficient leg-room towards the grip bars.
■ Use appropriate sports shoes for training and pay attention to a safe foothold
on the treads.
■ (Do not train without using your hands.) Hold tight at the grip bracket between
the movable grip bars, if you only want to train the lower part of your body.
■ Pay attention to a rhythmical, smooth sequence of motions.
■ Adjust the brake resistance at the rotary button below the cockpit according
to your individual requirements.
■ During training, vary between forward and return motions of treads in order
to stress leg and gluteal muscles differently.
With a regular training, you can increase your endurance, your power and,
thus, your well-being. The success of your training will be optimised by a healthy
way of living which is determined by a well-balanced, high-quality nourishment.
Integrated training programs
The 6 training programs are designed for "Fitness beginners", "Advanced exerci-
sers" and "Fitness pros". The following description of the programs helps you to sel-
ect the program suitable for your performance capacity. Program P6, for example,
is only suitable for endurance trained exercisers with a high exercise tolerance.
Frequency Duration
daily 10 min
2-3 times weekly 20-30 min
1-2 times weekly 30-60 min
Frequency of training Duration of a training unit
1st week
3 x a week 2 minutes Cross-Training
1 minute break for gymnastics
2 minutes Cross-Training
1 minute break for gymnastics
2 minutes Cross-Training
2nd week
3 x a week 3 minutes Cross-Training
1 minute break for gymnastics
3 minutes Cross-Training
1 minute break for gymnastics
2 minutes Cross-Training
3rd week
3 x a week 4 minutes Cross-Training
1 minute break for gymnastics
3 minutes Cross-Training
1 minute break for gymnastics
3 minutes Cross-Training
4th week
3 x a week 5 minutes Cross-Training
1 minute break for gymnastics
4 minutes Cross-Training
1 minute break for gymnastics
4 minutes Cross-Training
Heart Control Program
After setting the desired pulse rate during exercise,
the electric eddy current brake controls the pedal-
ling resistance independent of speed and in accor-
dance with the setting. This means that the resi-
stance will automatically be increased until the exer-
cising pulse rate has been reached or be decrea-
sed if the setting has been exceeded. The program
ensures cardiovascular training while the exercising pulse rate remains at an ap-
proximately constant optimum exercising pulse rate. For this reason it is ideally
suited for therapeutical training purposes.
P 4: Advanced exercisers l
Workload: 50 - 150 watts, 36 min
P 5: Advanced exercisers II
Workload: 50 - 200 watts, 38 min
P 6: Fitness pros l
Workload: 75 - 300 watts, 36 min
Î
Ï
Y
Y
Ê
Ë
Ì
Í
TIME
Î
Ï
Y
Y
Ê
Ë
Ì
Í
TIME
Î
Ï
Y
Y
Ê
Ë
Ì
Í
TIME
Î
Ï
Y
Y
Ê
Ë
Ì
Í
P 2: Fitness beginners I
Workload: 25 - 100 watts, 27 min
P1: Fitness test in accordance with WHO stan-
dard
This fitness test provides for an automatically con-
trolled increase in performance by 25 watts at an
interval of 2 minutes, starting from 25 watts. The
recommended number of pedal turns amounts to
60 - 80 turns/min. Only healthy persons
without cardiovascular problems may
carry out this test while without the pre-
sence of a doctor.
Î
Ï
Y
Y
Ê
Ë
Ì
Í
TIME
Î
Ï
Y
Y
Ê
Ë
Ì
Í
TIME
Î
Ï
Y
Y
Ê
Ë
Ì
Í
TIME
P 3: Fitness beginners II
Workload: 50 - 125 watts, 30 min

16
Instructions de service pour l'ordinateur d'entraînement
avec visualisation numérique
Valeurs
1KILOJOULE Energie............. 0 - 9999 [KJ]
Température ambiante......... 0 - 50 [°C]
odo Total des kilomètres...... 0 - 9999 [km]
2RPMTours de pédales..........20 - 199 [Tours/min]
3TIME Temps........................ 0:00 - 99:59 [min:sec]
4KM/H Vitesse..................... 0 - 99,9 [km/h]
5KM Distance....................... 0 - 99,9 [km]
6WATT Performance.............25 - 400 [watts]
7PULSE Pulsation.................. 50 - 199 [pulsations/min]
Symboles
a▲▼ [Flèches]......................Changer les tours de pédales
b∅[Moyenne].................. PPM + km/h + puissance + pouls
c➊-➏[Programm 1 - 6]..........Programme d'entraînement
d [Mode de CountDown]..Les valeurs d'entraînement baissent
e[Mode de CountUp]..... Les valeurs d'entraînement augmentent
f [Champ graphique]...... Visualisation multiple pour graphique et
valeurs
g[Programme du cœur]...Programme commandé par pulsations
h[Interface].... Mode - ordinateur
iLO [Limite inférieure de pulsations].. limite inférieure de pulsations
dépendant de l'â
j❤[Pulsation]....................Clignote au rythme des pulsations
kHI [Limite supérieure
de pulsations].............. limite supérieure de pulsations
dépendant de l'âge, pulsation max. (clig-
note)
l% [Pourcentage]...............% d'écart de la pulsation maximum
m° [Température am]..........Degré Celsius (+/– 3°)
Touches
8Touche de pulsation
de récupération...............Touche de fonction [Pulsation au repos
et détermination de la note de condition
physique]
9Touche de remise à zéro....Touche de fonction [Effacement des af-
fichages numériques]
10 Touche Set............................Touche de fonction [Reprise et confirmati-
on des données]
11 Touche de programme..... Sélection de programmes et indications
numériques dans le champ graphique
12 Touche moins- ....................Diminuer les valeurs
13 Touche plus .........................Augmenter les valeurs
Connexions (avant)
14Prise ................................... pour clip d'oreille et récepteur à utilisation
spécifique
Connexions (platine)
15 Prise (à 4 pôles)...............pour les détecteurs de pulsations manu-
els
16 Prise (à 6 pôles)...............pour la tension, les pulsations et la com-
mande
17 Prise (à 3 pôles)...... à l'interface
Connexions (arrière)
18 Prise interface..... Connexion ordinateur
1.0 Affichages avant l'entraînement
1.Température ambiante Ecran 1 [avant et après l'entraînement]
2.Affichage entier Ecran 2 [après appui sur la pédale ou appui
sur une touche, 1 sec]
3.Total des kilomètres Ecran 3 [tous les kilomètres parcourus, 8 sec]
4.Affichage de départ Ecran 4 [avec appui sur une touche ou
après 8 secondes
2.0 Enregistrement des pulsations
Cet affichage propose trois possibilités d'enregistrement des pulsati-
ons:
1.à l'aide des détecteurs de pulsations manuels
2.à l'aide du clip d'oreille
3.à l'aide d'un ensemble "Cardio Puls" n° d'art 7937-000 (acces-
soire disponible dans les magasins spécialisés)
Indications quant à la mesure des pulsations
Simultanément, une seule façon d'enregistrer les pulsations
est possible.
(Clip d'oreille ou détecteurs de pulsations manuels ou ensemble "Cardio
Puls")
Indication des pulsations
Vous avez réglé l'affichage de départ (écran 4). Votre pouls ac-
tuel est indiqué à la position (7).
Enregistrement des pulsations à l'aide des détecteurs de pulsations manu-
els
Les mains saisissent les détecteurs de pulsations manuels
Enregistrement des pulsations par le clip d'oreille
Enfichez le clip d'oreille dans la prise (14)
Frottez un de vos lobes d'oreille pour obtenir une meilleure circulati-
on du sang
Fixez le clip d'oreille à votre lobe
Enregistrement des pulsations à l'aide de l'ensemble "Cardio Puls"
Veillez à la notice d'instruction qui en fait partie
Indication des pulsations
Le symbole du cœur (j) clignote au rythme de votre pouls
Les pulsations sont indiquées comme valeur (7)
3.0 Entraînement sans indications d'entraînement
Appuyez sur les pédales. Toutes les valeurs croissent. CountUp
(mode de CountUp).
4.0 Entraînement avec indications d'entraînement
4.1 Les différents programmes
Le crosstrainer dispose de neuf différents programmes:
•Count up (mode de comptage croissant)
•Countdown (mode de comptage décroissant)
Fonctions et mode d’emploi de l’ordinateur d’entraînement
F
Recovery
Set
Set
+
+
-
-
Program
Reset
Î
Ï
Y
Y
Ê
Ë
Ì
Í
PULSERPM
LO
KM/H WATTKM
KILOJOULE
O∅∅
∅∅
HI
%
TIME
5
a
6
b
e
f
g
i
j
7
l
h
c
8
910
1112
1314
d
k
c
m
O
Î
Ï
Y
Y
Ê
Ë
Ì
Í
PULSERPM
LO
KM/H WATTKM
KILOJOULE
O
∅∅
∅∅
HI
%
TIME
Ecran 1
Affichage de la température Ecran 2
Plein affichage
KM
Y
PULSERPM
KM/H WATTKM
KILOJOULE
TIME
Ecran 3
Affichage du total de kilomètres Ecran 4
Affichage de départ: Count up ˙
❤

17
•6Programmes ➊-➏(intervalles d'entraînement prédéterminés en un
temps prédéterminé)
•Programme commandé par pulsations (commande des efforts à
partir de la prédétermination de votre pouls)
Après la mise en marche le CountUp (écran 4) est automatiquement ac-
tivé.
4.2 Sélection des programmes (Ecran 5-8)
Vous avez réglé l'affichage de départ (écran 4). Appuyez sans
pédaler la touche de programme (11). Les programmes sont repré-
sentés dans l'affichage par les symbôles des programmes corre-
spondants qui clignotent. En cas de CountUp, Countdown et HRC
le texte est indiqué dans le champ graphique (f). Dans les program-
mes ➊-➏le profil d'entraînement est en plus indiqué dans une for-
me comprimée dans le champ graphique (f). Le temps d'entraîne-
ment prédéterminé par le programme est indiqué à l'écran de visualisa-
tion du temps.
4.3 Prédétermination dans les programmes
Vous avez sélectionné un programme (écran 5-8). Par exemple Countdown
Si vous appuyez sur la touche Set, le mode de prédétermination s'affiche (écran 9).
Aucune prédétemination n’est représentée par “off” dans le champ graphique. (écran 9
). Avec les touches -/+ (12/13) vous réglez les valeurs prédéterminées (écran 10).
Si vous appuyez plus longuement sur les touches -/+, il en résulte une augmentation ou
une baisse plus rapide des valeurs.
Si vous appuyez sur les touches -/+ en même temps, la valeur retombe à zéro.
A l'aide de la touche Set vous obtenez les prédéterminations suivantes (écran
10-12).
4.4 Possibilités de présélection du pouls
Le schéma montre la procédure de présélection du pouls
En détail:
Présélection: pouls d'entraînement
Avec la touche Set, vous pouvez afficher successivement 3 zones d'en-
trée.
1. Age (Age) (Illustration 13/14)
2. Pouls max. (Max) (Illustration 15 / Illustration 16)
3. Zones du pouls: but d'entraînement ➠brûlure de graisses (Fat 65%)
(illustration 17)
but d'entraînement ➠condition cardio-vasculaire (Fit 75%) (illustration 18)
manuel (Man -- %) (illustrations 19/20)
4.4.1 Entrée de l'âge
L'entrée de l'âge sert à calculer votre pouls maximalmax.
Si vous entrez votre âge, le pouls max. en fonction de l'âge (formule:
220 - âge) apparaît dans l'affichage PULSE (7). (Illustration 14). En cas
d'entrée inférieure à 21 ans, le pouls max. affiché ne peut pas dépasser
199. Le calcul se fait cependant avec la valeur correcte.
Remarque
Si vous avez entré au préalable un âge dans le programme HRC, la va-
leur correspondante est affichée.
4.4.2 Pouls maximal
L'entrée d'un âge fait afficher le pouls maximal calculé dans le champ
graphique (illustration 16). Dans l'affichage PULSE apparaît en plus le
symbole % et 100. Lorsqu'aucun âge n'est présélectionné, il est possible
d'entrer un pouls maximal situé entre 80 et 199.
Î
Ï
Y
Y
Ê
Ë
Ì
Í
TIME
Î
Ï
Y
Y
Ê
Ë
Ì
Í
Ecran 7
Programmes ➊-➏exemple:❷Ecran 8
Progr. de contrôle de cœr: HRC
Î
Ï
Y
Y
Ê
Ë
Ì
Í
Î
Ï
Y
Y
Ê
Ë
Ì
Í
Ecran 5
Mode de comptage croissant:
Count up
Ecran 6
Mode de comptage décroissant:
Count Down
Y
KM
Y
KM
Ecran 9
Aucune prédétermination: "off"
Ecran 10
Prédétermination de la dist. par
ex.16,5 km
Y
TIME
Ecran 11
Prédétermination du temps, par ex.
34 minutes
Ecran 12
Prédétermination des kilojoules, par
ex. 820 kJ
Entrée de l'âge
OFF, 10-99
avec touche +/-
Entrée du pouls max.
OFF, 80-199, 80-(220 - âge)
avec touche +/-
Entrée non (OFF)
Entrée oui
Entrée du pouls:
Brûlure de graisses 65%
(220 - âge) *0,65,
(pouls max.) *0,65
Entrée du pouls:
condition physique 75%
(220 - âge) * 0,75,
(pouls max.) * 0,75
Sélection du pouls:
manuelle -- %
Entrée du pouls:
manuelle 40 - 90%
(220 - âge) + 0,40 - 0,90
(pouls max.) + 0,40 - 0,90
avec touche +/-
Entrée de la valeur du pouls:
OFF, 40-188
avec touche +/-
Entraînement
sans %
avec HI/LO
Entraînement
sans % et
sans HI/LO
Entraînement
avec &
et HI/LO
Entraînement
avec % et
sans HI/LO
Entrée oui
Entrée oui
Entrée non (OFF)
Entrée non
(OFF)
Illustration 13
Aucune entrée "Off"
Illustration 14
Entrée d'âge p. ex. 31 avec affich-
age du pouls
Illustration 15
Aucune entrée "Off" Illustration 16
Affichage du pouls maximal
de 31 ans avec symbole 100%
F

18
Si le pouls maximal doit être inférieur à la valeur calculée, appuyez sur
la touche - (12). Il n'est pas possible d'augmenter le pouls maximal.
Remarque
Un pouls maximal calculé ou modifié au préalable dans le programme
HRC est repris.
Fonctionnement
L'entrée de l'âge et le pouls maximal repris ou modifié activent la sur-
veillance du pouls qui signale tout dépassement au moyen du symbole
clignotant HI. La valeur affichée avec le symbole % est la comparaison
entre le pouls actuel et le pouls maximal.
Si vous n'entrez pas de pouls maximal, les entrées du pouls par zones
décrites ci-après ne seront pas possibles et vous accédez à l'entrée d'u-
ne surveillance du pouls à déterminer librement (point 4.4.3).
4.4.3 Zones de pouls / buts d'entraînement
Vous pouvez sélectionner 3 zones au moyen des touches -/+. L'entrée
de l'âge et / ou le pouls maximal modifié permettent le calcul de cette
zone du pouls affichée dans l'affichage PULSE (7).
1. But d'entraînement = brûlure de graisses (Fat 65%) (illustration 17)
Formule: (220 - âge) x 0,65 ou pouls maximal x 0,65
2. But d'entraînement = condition cardio-vasculaire (Fit 75%) (illustrati-
on 18)
Formule: (220 - âge) x 0,75 ou pouls maximal x 0,75
3. Zone manuelle (Man -- %) (illustration 19)
Vous déterminez le facteur dans la zone 40 - 90% avec les touches
+/-.
Formule: (220 - âge) x (0,40 - 0,90) ou
pouls maximal x (0,40 - 0,90)
Vous reprenez avec la touche Set la zone du pouls et accédez à la clô-
ture des présélections (point 4.4.5).
Fonctionnement
L'entrée de la zone du pouls et le pouls maximal repris ou modifié ac-
tivent une surveillance du pouls. Si le pouls actuel est inférieur au pouls
d'entraînement présélectionné de 11 battements, "LO" apparaît. En cas
de dépassement de 11 battements apparaît "HI". La surveillance "LO"
est activée au moment où le pouls d'entraînement présélectionné est at-
teint pour la première fois en pédalant. Si le nombre de tours pédales
descend à zéro, la fonction "LO" est de nouveau activée une fois atteint
le pouls d'entraînement présélectionné. La surveillance "HI" est activée
en permanence.
La valeur affichée au moyen du symbole % est la comparaison pouls
actuel / pouls maximal.
Si vous n'entrez pas de pouls maximal, l'affichage du pouls en pour
cent n'est pas actif.
4.4.4 Surveillance du pouls
Cette entrée est possible au moyen des touches +/- dans la zone 40 - 188.
Fonctionnement
Les affichages "HI" et "LO" fonctionnent comme décrit sous point 4.4.3.
L'affichage du pouls en pour cent n'est pas disponible.
Eteignez la surveillance du pouls: l'affichage "OFF" apparaît quand tou-
tes les surveillances du pouls sont éteintes.
Remarque
Des valeurs de pouls présélectionnées antérieurement dans le program-
me HRC sont reprises et apparaissent dans l'affichage.
Dans ce mode, le pouls d'entraînement n'a aucune influence sur la puis-
sance (le programme HRC propose cette fonction).
4.4.5 Fin des prédéterminations
Appuyez sur la touche Set après la dernière prédétermination et toutes les
valeurs prédéterminées s'affichent (hormis les pulsations prédéterminées).
Dans le champ graphique il apparaît “Ready”
Possibilités de prédétermination d'entraînement dans les différents pro-
grammes
Countup
Valeurs prédéterminées standards:
•KM (distance): 0 km
•Time (temps d'entraînement): 0:00 min.
•Kilojoule (consommation en énergie): 0 kJ
•Pouls d'entraînement: - -
•Pouls maximum: - -
•Performance: 25 watts
Possibilités de prédéterminations chronologiques:
•Age
•Pouls maximum
•Zone du pouls Fat 65%, Fit 75% et Man --%
•Performance
Countdown
Valeurs prédéterminées standards:
•KM ( distance): 0 km
•Time (temps d'entraînement): 0:00 min.
•Kilojoules (consommation en énergie): 0 kJ
•Pouls d'entraînement: - -
•Pouls maximum: - -
•Performance: 25 watts
Possibilités de prédéterminations chronologiques:
•KM ( distance)
•Time (temps d'entraînement)
•Kilojoule
•Pouls d'entraînement
•Pouls maximum
•Zone du pouls Fat 65%, Fit 75% et Man --%
•Performance
ll. 17
Zone du pouls: brûlure de graisses avec
65%
Ill. 18
Zone du pouls: condition physique avec
75%
ll. 19
Sélection du pouls manuelle Ill. 20
Sélection du pouls, p. ex. 85%
Y
PULSERPM
KM/H WATTKM
KILOJOULE
TIME
Ill. 22
Illustration 21
Entrée de la valeur du pouls, p. ex. 150
F

Début d'entraînement
Le type de programme démarre au moment où vous pédalez à une vites-
se supérieure à 20 tours/min.
5.0 Entraînement
5.1 Affichages d'entraînement en Countup, Countdown et
dans le programme HRC
Dans ces types de programme, le champ graphique (f) sert à présenter
les valeurs en grand. Le temps d'entraînement (illustration 23) est affiché
au début de l'entraînement. Au cours de l'entraînement, vous pouvez
changer le contenu d'affichage au moyen de la touche programmes
dans l'ordre suivant: Time (illustration 23) ➠km/h (illustration 24) ➠>
km (illustration 25) ➠puissance (illustration 26) ➠RPM (illustration 27)
➠kJoule (illustration 28)➠Pulse (illustration 29) ➠Time (illustration 23)
➠....
5.2 Visualisation de l'entraînement dans le programme ➊-➏
Dans le programme ➊-➏le déroulement est indiqué dans le champ graphique.
La colonne de gauche indique l'effort actuel. Une colonne équivaut à 1 minute
d'entraînement et défile vers la gauche. Une ligne de segments est toujours vi-
sualisée et correspond à 25 watts. Si la performance dépasse 375 watts, la li-
gne supérieure (16) est affichée.
Y
PULSERPM
KM/H WATTKM
KILOJOULE
TIME
Y
PULSERPM
KM/H WATTKM
KILOJOULE
TIME
Affichage du temps d'entraînement
dans le champ graphique Illustration 24
Affichage de la vitesse dans le
champ graphique
Y
PULSERPM
KM/H WATTKM
KILOJOULE
TIME
Y
PULSERPM
KM/H WATTKM
KILOJOULE
TIME
Y
PULSERPM
KM/H WATTKM
KILOJOULE
TIME
Y
PULSERPM
KM/H WATTKM
KILOJOULE
TIME
Y
PULSERPM
KM/H WATTKM
KILOJOULE
TIME
Illustration 25
Affichage de la distance dans le
champ graphique
Illustration 26
Affichage de la puissance dans le
champ graphique
Y
PULSERPM
KM/H WATTKM
KILOJOULE
TIME
Y
PULSERPM
KM/H WATTKM
KILOJOULE
TIME
Y
PULSERPM
KM/H WATTKM
KILOJOULE
TIME
Y
PULSERPM
KM/H WATTKM
KILOJOULE
TIME
Illustration 27
Affichage du nombre de tours pédales par
minute dans le champ graphique
Illustration 28
Affichage de la dépense énergétique
dans le champ graphique
Y
PULSERPM
KM/H WATTKM
KILOJOULE
TIME
Illustration 29
Affichage de la valeur du pouls dans le
champ graphique
Î
Ï
Y
Y
Ê
Ë
Ì
Í
TIME
Ecran 30
Programmes ➊-➏ exemple:❷
Remarque:
Indiquez au moins la distance d'entraînement, la durée d'entraînement ou
la consommation d'énergie, sinon le système électronique démarre en
mode CountUp en début d'entraînement.
Si la durée d'entraînement, la distance d'entraînement et la consommation
d'énergie sont remis à zéro, l'affichage change en mode CountUp: . A
partir des valeurs prédéterminées, les valeurs augmentent à nouveau.
Programmes ➊-➏
Valeurs prédéterminées standards:
•-KM (distance): 0 km
•-Time (temps d'entraînement): dépendant du programme
•-Kilojoules (consommation en énergie): 0 kJ
•-Pouls d'entraînement: - -
•-Pouls maximum: - -
•-Performance: dépendant du programme
Possibilités de prédéterminations chronologiques:
•-Age
•-Pouls maximum
•-Zone du pouls Fat 65%, Fit 75% et Man --%
Le réglage engendre un renforcement ou une réduction du déroulement du
programme mémorisé.
Remarque:
Si la durée d'entraînement est remise à zéro, l'affichage change en mode
CountUp. La valeur du temps augmente également.
Programme commandé par pulsations (HRC)
Valeurs prédéterminées standards:
•-KM (distance): 0 km
•-Time (temps d'entraînement): 0:00 min
•-Kilojoules (consommation en énergie): 0 kJ
•-Pouls d'entraînement: 60 ou le dernier pouls d'entraînement introduit
dans le programme
•-Performance: 25 watts ou la dernière performance de départ introdui-
te dans le programme
Possibilités de prédéterminations chronologiques:
•-KM (distance)
•-Time (temps d'entraînement)
•-Kilojoules
•-Age
•--Pouls maximum
•-Zone du pouls Fat 65%, Fit 75% et Man --%
•-Performance
Remarque:
Pour la mesure du pouls dans le programme HRC, KETTLER recommande
le clip oreille ou l'ensemble Cardio Puls.
Le réglage de la puissance détermine l'écart entre le pouls d'entraîne-
ment et le pouls actuel. Au début de l'entraînement, la puissance est aug-
mentée à partir de la valeur donnée jusqu'à ce que le pouls présélec-
tionné soit atteint. La puissance diminue en cas de dépassement de la va-
leur.
Vous pouvez régler la puissance de départ sur une valeur allant de 25 à
100 watt.
Si vous avez sélectionné une puissance de départ de 25 watt, le premier
réglage est effectué après 1 minute (exception: le pouls présélectionné
est dépassé).
Un réglage de la puissance au moyen des touches "-" et "+" n'est pas possible.
Le pouls présélectionné devrait être atteint après 5 minutes environ.
Le programme HRC ne peut être terminé que par vous. Une fois les va-
leurs pour le temps d'entraînement, la distance d'entraînement et la dé-
pense énergétique sont comptés jusqu'à zéro, il n'y a pas d'interruption
ou de changement de programme. L'électronique continue à se charger
du réglage de la puissance en fonction de votre pouls.
Généralités
Si vous appuyez sur la touche programmes pendant l'entrée de présélections,
l'affichage change dans le type de programme suivant sans mémoriser des
présélections.
Les présélections d'entraînement ne sont prises en compte qu'à condition que
vous terminerez le mode de présélection avec l'affichage "Ready" (illustration
22). Ce sont autrement les présélections standard qui sont prises en considérati-
on.
F
19

20
6.0 Visualisation en cas d'interruption ou de fin d'entraîne-
ment
Si vous faites moins de 20 tours de pédales, le système électronique re-
connaît l'interruption de l'entraînement et ce sont les données de l'entraî-
nement et non les valeurs du comptage décroissant des prédéterminations
qui sont indiquées. Pour la vitesse (km/h), les tours de pédale (RPM) et le
pouls (Pulse) les valeurs moyennes sont représentées par Øle symbole (b).
(écran 31)
Si les symboles restent, vous pouvez voir qu'il restent des prédéterminations.
Si le symbole de programme se transforme en Countup vous pouvez voir que
es prédéterminations sont comptées en mode décroissant ou qu'il n'y en a
pas. Dans le programme œ seulement, les valeurs peuvent être comptées en
mode croissant ou décroissant. Dans le champ graphique “pulse” et le pouls
actuel (ou “P” en cas de mesure du pouls non activée) sont visualisés.
Les données d'entraînement sont visualisées durant 4 minutes. Si pendant ce
emps vous n'appuyez sur aucune touche et si vous ne pédalez pas, le systè-
me électronique se met en mode d'attente avec affichage de la température
ambiante (écran 1). Ainsi les kilomètres sont enregistrés et non toutes les aut-
res valeurs.
7.0 Affichage en cas de poursuite de l'entraînement
Pédalez. Les valeurs continuent à compter.
8.0 Mesure de la récupération du pouls
L'ordinateur d'entraînement est équipé d'une fonction de récupération du
pouls qui vous permet de mesurer votre récupération de pouls. Appuyez
sur la touche Recovery (8) à la fin de l'entraînement. La valeur du pouls
actuel est reprise sous KM/H (4) (illustration 32).
L'électronique mesure votre pouls pendant 60 minutes qui sont comptées
à rebours. La valeur du pouls actuel est reprise ensuite sous KM (5). L'é-
cart entre les valeurs du pouls au cours du compte à rebours est indiqué
sous WATT (6). Sous Rec, une note "condition physique" est affichée
avec (F) (illustration 33).
Le calcul est expliqué sous point 9 "Calcul de la note condition physi-
que". En cas d'interruption ou de perturbation de la mesure du pouls,
"Error" apparaît à la place d'une valeur (illustration 34). Lorsqu'il n'y a
pas de signal de pouls au démarrage de Recovery, la mesure de la ré-
cupération du pouls ne commence pas.
l. 32
Affichage pendant le compte à re-
bours de 60 secondes
Ill. 33
Affichage après le compte à re-
bours de 60 secondes
ll. 34
Affichage lors de Recovery sans sig-
nal de pouls
Y
PULSERPM
KM/H WATTKM
KILOJOULE
∅∅
∅∅
TIME
Ecran 31
Affichage des valeurs d’entraînement
et des valeurs moyennes
Consigne
Afin d'arrêter la masse mobile lourde, l'effet de freinage pendant la fon-
ction Recovery augmente constamment jusqu'à l'arrêt. A défaut de sig-
nal de pouls, le freinage est tout de même effectué. L'affichage Reco-
very s'efface automatiquement après 10 secondes. L'affichage des va-
leurs d'entraînement et des valeurs moyennes atteintes apparaît ensuite
(illustration 31). Egalement l'affichage "Error", mais uniquement à
l'arrêt de la masse mobile. Si vous quittez la fonction Recovery, la puis-
sance présélectionnée au préalable est de nouveau réglée.
9 Généralités
Freinage
Le frein électromagnétique à courants parasites engendre un freinage in-
dépendant de la vitesse de rotation, de sorte à ce que la puissance de
freinage reste constante dans une large zone de rotation de la pédale
(RPM).
Indication par flèche ▲▼:
Gamme de performance
Si la performance réglée n'est pas réglable par le nombre de tours de
pédale momentané (par exemple: 400 W pour 50 RPM - en dehors de
la zone grise), une flèche directionnelle correspondante (a) est indiquée
à côté du tour de pédale actuel (2).
Le diagramme illustré ci dessus sert uniquement à concrétiser une gamme
de performances. Si une performance ne peut être atteinte avec le tour de
pédale actuel, une flèche directionnelle vers le haut ▼ou vers le bas ▲
apparaît pour augmenter ou baisser le nombre de tours.
Calcul de la vitesse
60 tours de pédale engendrent une vitesse de 9,5 km/h.
Calcul des kilojoules
La performance est enregistrée en watts (performance momentanée) et
le temps en secondes. Le facteur 8 résulte du degré d'efficacité de
l'homme d'environ 12,5 %.
Calcul de la note de condition physique
L'ordinateur calcule et évalue la différence entre le pouls d'effort et le
pouls de récupération et leur note de condition physique en résultant, se-
lon la formule suivante:
Note ( F ) = 6 — ( 10 x ( P1 — P2 ) )2
P1
P1 = pouls d'effort
P2 = pouls de récupération
Note 1 = très bien Note 6 = insuffisant
La comparaison entre pouls d'effort et pouls de récupération est une ma-
nière simple et rapide de contrôler la condition physique. La note de con-
dition physique est une valeur d'orientation de votre capacité de ré-
cupération après un effort physique. Avant d'appuyer sur la touche de ré-
cupération du pouls (8) et de déterminer votre note de condition physi-
que, vous devriez vous entraîner sur une durée assez longue, c'est-à-dire
au moins 10 minutes, dans votre domaine d'effort. Lors d'un entraînement
régulier du cœur et de la circulation, vous constaterez que votre “note de
condition physique” s'améliore.
KJ = Performance x Temps x 8
1000
F
Table of contents
Languages:
Other Kettler Heart Rate Monitor manuals

Kettler
Kettler Stratos GT 7969 000 User manual

Kettler
Kettler ST2701-68 User manual

Kettler
Kettler ST 2600-9 Kadett User manual

Kettler
Kettler SM 8820 - 83 User manual

Kettler
Kettler ST 2600-9 Kadett User manual

Kettler
Kettler SM 9145-75 User manual

Kettler
Kettler ST 7849 User manual

Kettler
Kettler SM 8820 - 83 User manual

Kettler
Kettler ST3005-8 User manual

Kettler
Kettler ST 2610-9 User manual