Klarstein 10008232 User manual

10008232 10008233 10008234 10005314 10005315 10005316
Bella Küchenmaschine
Bella Food Processor
Bella Procesador de alimentos
Bella robot de cuisine
Bella robot da cucina


3
DE
Sehr geehrter Kunde,
wir gratulieren Ihnen zum Erwerb Ihres Gerätes. Lesen Sie die folgenden Hinweise
sorgfältig durch und befolgen Sie diese, um möglichen Schäden vorzubeugen. Für
Schäden, die durch Missachtung der Hinweise und unsachgemäßen Gebrauch
entstehen, übernehmen wir keine Haftung.
INHALTSVERZEICHNIS
Technische Daten 3
Konformitätserklärung 3
Sicherheitshinweise4
Geräteübersicht5
Zusammenbau und Bedienung6
Beispielrezept 7
Hinweise zur Entsorgung8
TECHNISCHE DATEN
Artikelnummer 10008232, 10008233, 10008234
10005314, 10005315, 10005316
Stromversorgung 220-240 V ~ 50-60 Hz
Schüsselkapazität ≤ 5 L
KONFORMITÄTSERKLÄRUNG
Hersteller:
Chal-Tec GmbH, Wallstraße 16, 10179 Berlin, Deutschland.
Dieses Produkt entspricht den folgenden Europäischen
Richtlinien:
2014/30/EU (EMV)
2014/35/EU (LVD)
2011/65/EU (RoHS)
English 9
Español 15
Français 21
Italiano 27

4
DE
SICHERHEITSHINWEISE
• Lesen diese Hinweise sorgfältig.
• Lesen Sie sich alle Hinweise sorgfältig durch und bewahren Sie die
Bedienungsanleitung zum Nachschlagen gut auf.
• Um sich vor Stromschlägen zu schützen, tauchen Sie das Gerät, das Netzkabel und
den Stecker nicht in Wasser oder andere Flüssigkeiten.
• Lassen Sie das Gerät in der Gegenwart von Kindern nicht unbeaufsichtigt.
• Schalten Sie das Gerät aus und ziehen Sie den Stecker bevor sie es zusammen-/
auseinanderbauen, nachdem Sie es benutzt haben oder bevor Sie es reinigen.
• Achten Sie darauf, dass Körperteile, Schmuck oder weite Kleidung nicht mit den
beweglichen Teilen des Geräts in Berührung kommen.
• Stecken Ihre Finger während des Betriebs nicht ins Gerät.
• Falls das Netzkabel beschädigt ist, lassen Sie es vom Hersteller oder ausgebildetem
Fachpersonal reparieren.
• Vergewissern Sie sich, dass die Spannung des Gerätes mit Ihrem Hausstrom
übereinstimmt. Der Motor sollte immer ausgeschaltet sein, wenn Sie den Mixer mit
dem Stromnetz verbinden.
• Benutzen Sie nur Zubehör, das vom Hersteller zugelassen ist, andernfalls könnten
Sie sich ernsthaft verletzen oder das Gerät beschädigen. Verwenden Sie das Gerät
nur in Innenräumen.
• Lassen Sie das Gerät nicht unbeaufsichtigt.
• Lassen Sie das Netzkabel nicht über den Rand der Arbeitsäche hängen.
• Halten Sie Hände und andere Küchenutensilien während des Betriebs fern von
Messern und beweglichen Teilen, damit Sie sich nicht verletzen oder das Gerät
beschädigen.
• Passen Sie auf, dass Sie sich beim Reinigen nicht an den Messern verletzen.
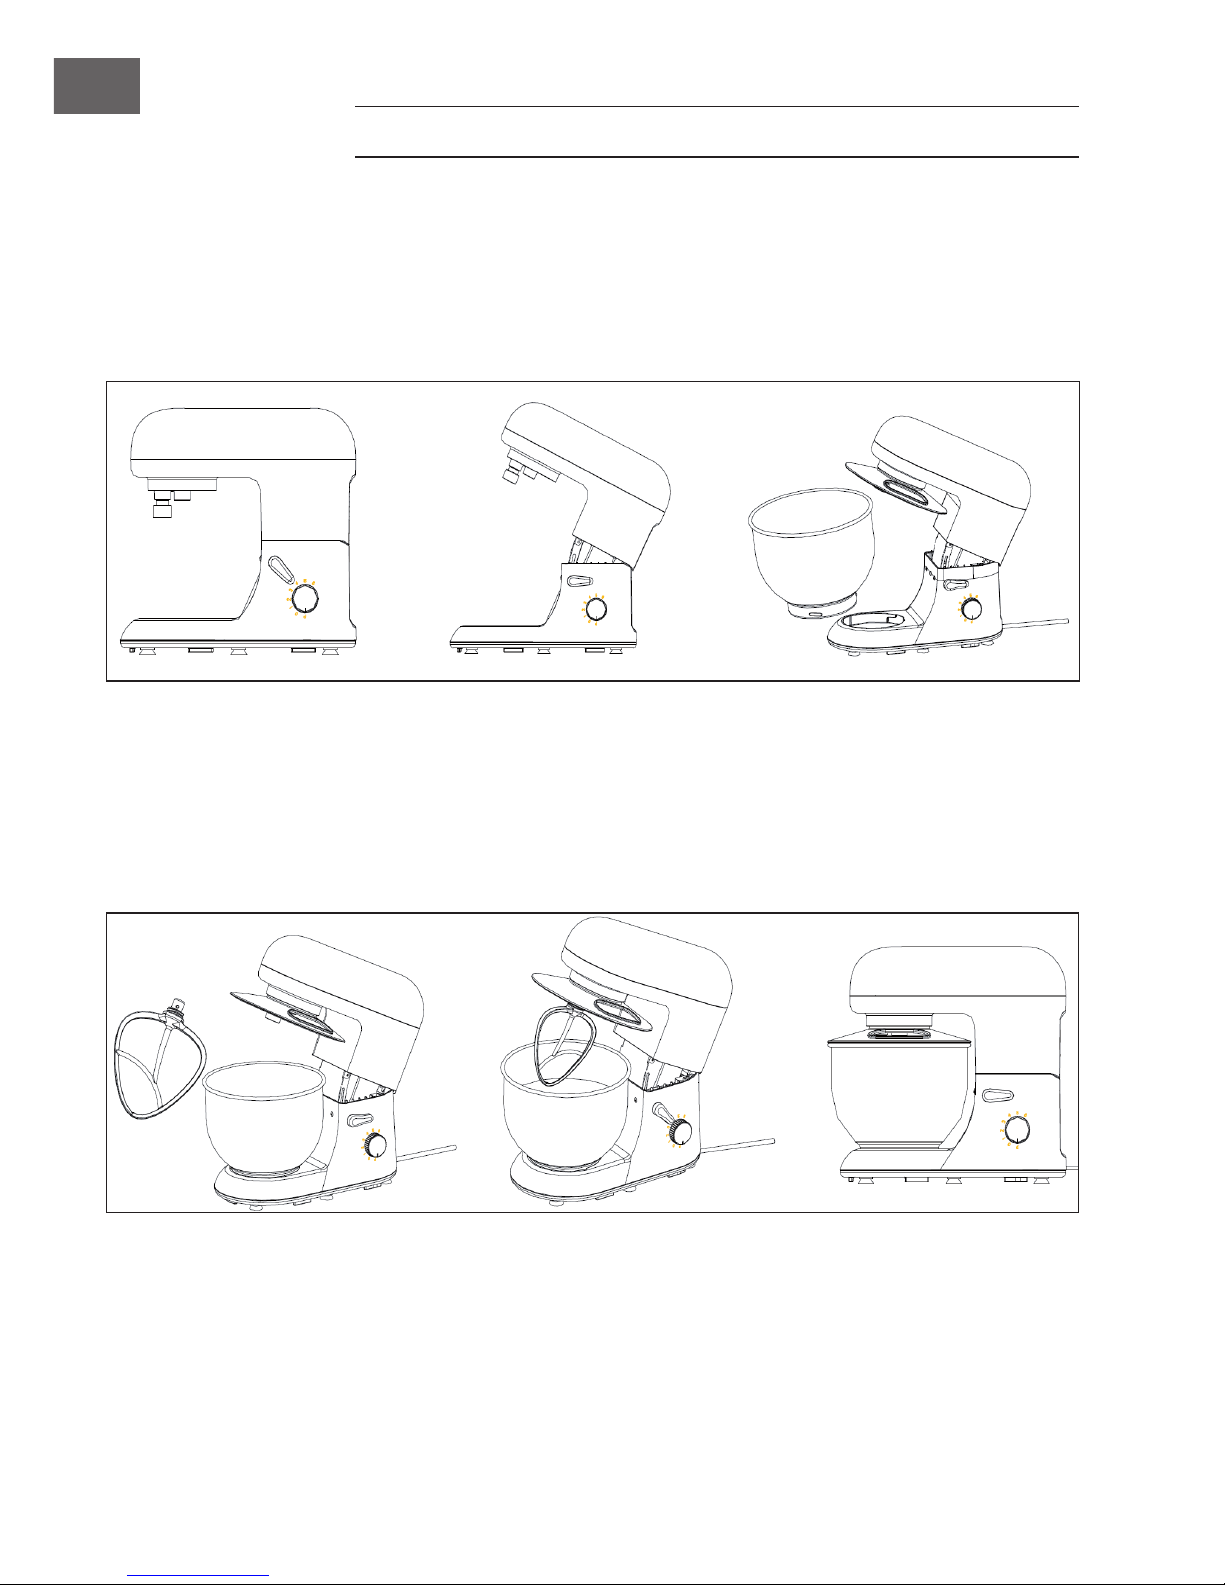
• Achten Sie darauf, dass alle Teile fest miteinander verbunden sind, bevor Sie das
Gerät in Betrieb nehmen.
• Benutzen Sie kein Zubehör, dass nicht vom Hersteller zugelassen ist.
• Seien Sie vorsichtig beim Anheben des Geräts - es ist sehr schwer. Versichern Sie
sich, dass der Mischwerkskopf verriegelt ist und alle Teile fest sind, wenn Sie das
Gerät anheben.
• Ziehen Sie den Stecker aus der Steckdose wenn Sie das Gerät unbeaufsichtigt
lassen oder es zusammen-/auseinanderbauen.
• Seien Sie vorsichtig, wenn Sie heißes Essen in den Mixer umfüllen, da unerwartet
heißer Dampf austreten kann. Verarbeiten Sie niemals kochende Lebensmittel mit
diesem Gerät.
• Kinder, physisch und körperlich eingeschränkte Menschen sollten das Gerät nur
benutzen, wenn sie vorher von einer Aufsichtsperson ausführlich mit den Funktionen
und den Sicherheitsvorkehrungen vertraut gemacht wurden.
• Das Gerät ist nicht für den kommerziellen Gebrauch, sondern nur für Gebrauch
im Haushalt und in ähnlichen Umgebungen vorgesehen, wie Mitarbeiterküchen,
Farmen, Hotels, Motels oder Bed & Breakfast Unterkünften.
• Bei Missbrauch erlischt die Gewährleistung.

5
DE
1 Mixeraufsatz
2 Rührschüssel
3 Standfüße
4 Obere Abdeckung
5 Gehäuse
6 Hebearm
7 Wahlschalter
8 Schwenkfuß
9 Quirl
10 Knethaken
Hinweise zur Reinigung
• Verwenden Sie zur Reinigung keine üchtigen oder ätzenden Flüssigkeiten, wie
Insektensprays. Durch zu starken Druck beim Abwischen können die Oberächen
beschädigt werden. Gummi- oder Plastikteile sollten nicht über einen längeren
Zeitraum mit dem Gerät in Kontakt sein.
• Verwenden Sie keine scheuernden oder ätzenden Reinigungsmittel, da diese die
Oberäche angreifen können.
• Reinigen Sie vor dem ersten Gebrauch alle Teile Einzelteile gründlich.
GERÄTEÜBERSICHT

6
DE
ZUSAMMENBAU UND BEDIENUNG
1 Mischen Sie die von Ihnen genutzten Zutaten in der Rührschüssel entsprechend des
Rezepts, dem Sie folgen.
2 Öffnen Sie dann den oberen Teil des Gehäuses, indem Sie den kleinen Hebel
umlegen.
3 Stellen Sie die Rührschüssel auf die Bodenplatte und drehen Sie sie im
Uhrzeigersinn, bis sie hör- und spürbar einrastet.
4 Fixieren Sie den Quirl, Knet- oder Rührhaken, indem Sie diesen im Uhrzeigersinn in
die Fassung drehen.
5 Drehen Sie den Hebelarm in Richtung des Pfeils und klappen Sie die Maschine
wieder zu.
6 Stecken Sie erst jetzt den Stecker in die Steckdose. Achten Sie darauf, dass der
Wahlschalter auf „0“ steht. Das Gerät ist nun einsatzfähig.

7
DE
BEISPIELREZEPT
Teig für Pandan-Waffeln
Zutaten:
• 125 g gebleichtes Mehl
• 60 g Zucker
• 2 TL Backpulver
• 1 Prise Salz
• 1 Ei
• Pandan-Paste
• 200 ml Kokosnussmilch
• 60 m Kokosnuss Öl
• 1 Prise Vanille Zucker
Zubereitung:
Mischen Sie Mehl, Zucker, Backpulver
und Salz in der Rührschüssel. Nutzen Sie
als Aufsatz den Mixer-Aufsatz (1) und
starten Sie die Maschine auf Stufe 1 (ca. 20
Sekunden), bevor Sie auf Stufe 2 (ebenfalls
ca. 20 Sekunden) erhöhen. Verwenden Sie
anschließend Stufe 3 und mischen Sie den
Teig weitere 2 bis 3 Minuten.
Im Anschluss geben Sie Ei, Pandan-Paste,
Kokosmilch, Kokosöl und Vanillezucker
hinzu.
Zum Schluss schlagen Sie den Teig zu einer
glatten, leuchtend-grünen Masse. Nutzen
Sie hierzu den Quirl und steigern Sie die
Geschwindigkeit von Stufe 1 aus sachte.
Achten Sie dabei darauf, dass das Gerät
nicht länger als ca. 4 Minuten am Stück
arbeitet und nicht überhitzt.
Das Ergebnis ist ein feiner, exotischer
Waffelteig. Dazu passt zum Beispiel eine
Kokoscreme. Wie Sie diese zubereiten und
viele weitere Rezept-Inspirationen nden
Sie auf www.urban-hunger.com
Verwenden Sie den Quirl-Aufsatz,
um Sahne oder Eiweiß steif zu
schlagen. Wählen Sie eine höhere
Geschwindigkeitsstufe und achten Sie
darauf, die Rührschüssel nicht zu hoch zu
füllen.

8
DE
HINWEISE ZUR ENTSORGUNG
Bendet sich die linke Abbildung (durchgestrichene Mülltonne
auf Rädern) auf dem Produkt, gilt die Europäische Richtlinie
2012/19/EU. Diese Produkte dürfen nicht mit dem normalen
Hausmüll entsorgt werden. Informieren Sie sich über die
örtlichen Regelungen zur getrennten Sammlung elektrischer
und elektronischer Gerätschaften. Richten Sie sich nach
den örtlichen Regelungen und entsorgen Sie Altgeräte nicht
über den Hausmüll. Durch die regelkonforme Entsorgung
der Altgeräte werden Umwelt und die Gesundheit ihrer
Mitmenschen vor möglichen negativen Konsequenzen
geschützt. Materialrecycling hilft, den Verbrauch von
Rohstoffen zu verringern.

9
EN
Dear Customer,
Congratulations on purchasing this equipment. Please read this manual carefully and
take care of the following hints to avoid damages. Any failure caused by ignoring the
mentioned items and cautions mentioned in the instruction manual are not covered by
our warranty and any liability.
CONTENT
Technical Data9
Declaration of Conformity9
Safety Instructions10
Product Description11
Assembly and Operation12
Recipe Example13
Hints on Disposal14
TECHNICAL DATA
Item number 10008232, 10008233, 10008234
10005314, 10005315, 10005316
Power supply 220-240 V ~ 50-60 Hz
Bowl capacity ≤ 5 L
DECLARATION OF CONFORMITY
Producer:
Chal-Tec GmbH, Wallstraße 16, 10179 Berlin, Germany.
This product is conform to the following European
Directives:
2014/30/EU (EMC)
2014/35/EU (LVD)
2011/65/EU (RoHS)

10
EN
SAFETY INSTRUCTIONS
• To protect against risk of electrical shock do not put the appliance unit cord or plug
in water or any other liquid.
• Close supervision is necessary when an appliance is used by or near children.
• Switch off and unplug the appliance before tting or removing tools/attachments,
after use and before cleaning.
• Keep body parts, jewellery and loose clothing away from moving parts and tted
attachments.
• Never put your ngers into the hinge mechanism.
• If the supply cord is damaged, it must be replaced by manufacturer or its service
agent or a similarly qualied person in order to avoid a hazard.
• The use of attachments not recommended or sold by the manufacturer may cause
re, electrical shock or injury.
• Do not use outdoors.
• Never leave the appliance unattended.
• Do let cord to hang over edge of table or counter.
• Care shall be taken when handling the sharp cutting blades, emptying the bowl
and during cleaning.
• Assure the ttings and the bowl are securely locked in place before operating the
appliance.
• Never use a damaged appliance. Get it checked or repaired.
• Take care when lifting this appliance as it is heavy. Ensure the bowl, tools, covers
and cord are secure before lifting.
• When using this appliance ensure it is positioned on a level surface away from the
edge. Make sure it is at least 10 cm from walls and ensure that no vents are not
blocked.
• This appliance is intended to be used in household and similar applications such
as: Staff kitchen areas in shops, ofces and other working environments; Farm
houses; By clients in hotels, motels and other residential type environments; Bed and
breakfast type environments.
• The device must be operated with the type of power specied on the rating plate. If
you are
• unsure about the details of the available power supply, ask your dealer or the local
power
• supply company.

11
EN
1 Mixing Blade
2 Mixing Bowl
3 Feet
4 Upper Cover
5 Housing
6 Lever
7 Switch
8 Bottom
9 Whisk
10 Dough Blade
Notes on Cleaning
• Use a soft damp cloth only for cleaning the machine‘s exterior.
• Wash the whisk and the blades by hand, using only warm water and conventional
houshold detergent.
• The bowl is dishwasher-safe.
PRODUCT DESCRIPTION

12
EN
ASSEMBLY AND OPERATION
1 Mix the food ingredients thoroughly in accordance with the recipe you are
following.
2 Then open the upper housing cover using the small lever (6).
3 Place the mixing bowl (2) on the device plate, and turn the mixing bowl
anticlockwise until it is xed.
4 Fix the dough blade (10), the whisk (9) or the mixer blade (1) on the blade
connector and rotate the blade connector clockwise until it engages rmly.
5 Turn the lever in the direction of the arrow (on the machine) and press the top of the
housing (5) downwards with one hand.
6 Ensure that the switch is set to „P“ or „0“ and connect the AC plug with a houshold
AC socket. The Bella is now ready to use.

13
EN
RECIPE EXAMPLE
Batter for pandan wafes
Ingredients:
• 125 g bleached our
• 60 g sugar
• 2 teaspoons baking soda
• 1 pinch of salt
• 1 egg
• Pandan paste
• 200 ml coconut milk
• 60 ml coconut oil
• 1 pinch of vanilla sugar
Preparation:
Mix our, sugar, baking powder and
salt in the mixing bowl. Use the mixer
attachment (1) as an attachment and start
the machine at level 1 (about 20 seconds)
before increasing to level 2 (also about 20
seconds).
Then set to step 3 and mix the batter for
another 2 to 3 minutes.
Next, add egg, pandan paste, coconut
milk, coconut oil and vanilla sugar.
Finally, beat the batter into a smooth light
green mass. Use the whisk and gently
increase the speed from level 1. Ensure
that the device does not work longer than
approx. 4 minutes at a time and does not
overheat. The result will be a ne exotic
wafe batter. This goes very well with a
coconut cream, for example.
How to prepare this and many more recipe
inspirations can be found at www.urban-
hunger.com. Use the whisk attachment to
whip cream or egg whites until stiff. Choose
a higher speed setting and be careful not to
overll the mixing bowl.

14
EN
HINTS ON DISPOSAL
According to the European waste regulation 2012/19/EU this
symbol on the product or on its packaging indicates that this
product may not be treated as household waste. Instead it should
be taken to the appropriate collection point for the recycling of
electrical and electronic equipment. By ensuring this product is
disposed of correctly, you will help prevent potential negative
consequences for the environment and human health, which
could otherwise be caused by inappropriate waste handling of
this product. For more detailled information about recycling of
this product, please contact your local council or your household
waste disposal service.

15
ES
Estimado cliente:
Le felicitamos por la adquisición de este producto. Lea atentamente el siguiente manual
y siga cuidadosamente las instrucciones de uso con el n de evitar posibles daños.
La empresa no se responsabiliza de los daños ocasionados por un uso indebido del
producto o por haber desatendido las indicaciones de seguridad.
ÍNDICE DE CONTENIDOS
Datos técnicos15
Declaración de conformidad15
Indicaciones de seguridad16
Vista general del aparato17
Montaje y operación18
Ejemplo de receta19
Retirada del aparato20
DATOS TÉCNICOS
número de artículo 10008232, 10008233, 10008234
10005314, 10005315, 10005316
Fuente de alimentación 220-240 V ~ 50-60 Hz
Capacidad del cuenco ≤ 5 L
DECLARACIÓN DE CONFORMIDAD
Fabricante:
Chal-Tec GmbH, Wallstraße 16, 10179 Berlín (Alemania).
Este producto cumple con las siguientes directivas
europeas:
2014/30/UE (EMC)
2014/35/UE (baja tensión)
2011/65/UE (refundición RoHS)

16
ES
INDICACIONES DE SEGURIDAD
• Lea con atención todas las indicaciones y conserve el manual de instrucciones
mientras mantenga el aparato.
• Para evitar descargas eléctricas, no sumerja el aparato, ni el cable de
alimentación, ni el enchufe en agua ni en cualquier otro líquido.
• No deje el aparato al alcance de los niños.
• Desconecte y desenchufe el aparato antes de montarlo o de desmontarlo.
Desconéctelo y retire el enchufe de la red depués de haberlo usado y también
cuando vaya a limpiarlo.
• Asegúrese de que no toca las partes móviles del aparato con ninguna parte del
cuerpo, ni con ningún adorno personal o con la ropa.
• No introduzca los dedos en el aparato mientras esté en funcionamiento.
• En caso de que el cable resulte dañado, encargue su reparación al fabricante o
llévelo a un taller con personal cualicado.
• Cerciórese de que la tensión de su red eléctrica es equivalente a la del aparato. El
motor debe estár siempre desconectado cuando enchufe el aparato a la red.
• Utilice exclusivamente los accesorios autorizados por el fabricante. En caso
contrario, podría resultar gravemente herido o dañar el aparato. Utilice el aparato
sólo en espacios cerrados.
• No deje el aparato sin vigilancia.
• No deje el cable colgando sobre el borde de la supercie en la que esté
funcionando.
• Mientras el aparato esté en funcionamiento, no acerque las manos ni ningún
utensilio de cocina a las partes móviles o a las cuchillas del aparato para no
resultar herido o causar daños en él.
• Cuando limpie el aparato, hágalo con cuidado para no cortarse con las cuchillas.
• Antes de encender el aparato, compruebe que todas las partes están bien
ensambladas.
• No utilice ningún accesorio que no haya sido autorizado por el fabricante.
• Tenga cuidado al levantar el aparato, es muy pesado. Cuando lo haga, asegúrese
de que el cabezal se encuentra bloqueado y que todas las partes están bien
sujetas.
• Desenchufe el aparato siempre después de usarlo y tambien cuando lo monte o lo
desmonte.
• Cuando añada comida caliente a la batidora, hágalo con mucha cautela, pues se
podría formar un vapor inesperado. No utilice nunca el aparato con alimentos o
líquidos en ebullición.
• Los niños y las personas con algún tipo de minusvalía física o psíquica sólo
deben usar el aparato después de haber sido instruidos detalladamente en su
utilización y en las medidas de seguridad correspondientes por una persona adulta
responsable y versada en el uso del aparato.
• Este aparato no está concebido para un uso comercial, sino para usos domésticos
o similares tales como: cocinas de empresa, hoteles, granjas, moteles o
alojamientos “Bed and Breakfast”.
• La garantía del aparato carece de valor en caso de un uso inadecuado del mismo.

17
ES
1 Batidor plano
2 Cuenco de mezcla
3 Patas de sujeción
4 Cubierta superior
5 Carcasa superior
6 Brazo de palanca
7 Selector de velocidad
8 Carcasa inferior
9 Molinillo
10 Gancho amasador
Instrucciones para limpiar
• Cuando limpie el aparato, no utilice sustancias inamables o corrosivas como por
ejemplo, insecticidas. Cuando frote el aparato, no lo haga con demasiada fuerza,
podría dañar la supercie. Las partes de goma o de plástico no deben estar en
contacto directo con el aparato durante mucho tiempo.
• No emplee sustancias disolventes o corrosivas, ya que podrían dañar la supercie
del aparato.
• Limpie a fondo cada parte del aparato antes de usarlo por primera vez.
VISTA GENERAL DEL APARATO

18
ES
MONTAJE Y OPERACIÓN
1 Mezcle en el cuenco los ingredientes que desea preparar de acuerdo con la receta
que ha elegido.
2 Levante la parte superior de la carcasa, utilizando para ello la pequeña palanca.
3 Coloque el cuenco en el hueco inferior del aparato y gírelo en el sentido de las
agujas del reloj hasta que quede perfectamente encajado.
4 Inserte el molinillo, el gancho amasador o el batidor plano, girándolos en el
sentido de las agujas del reloj.
5 Gire la palanca siguiendo la dirección de la echa y pliegue la máquina hasta que
quede cerrada del todo.
6 Enchufe el aparato a la red. Asegúrese de que el interruptor esta en la posición
“0”. Ahora ya puede utilizar el aparato.

19
ES
EJEMPLO DE RECETA
Masa para «Gofre - Pandan»
Ingredientes:
• 125 g de harina blanqueada
• 60 g azúcar
• 2 cucharaditas de levadura
• 1 pizca de sal
• 1 huevo
• Pasta «Pandan»
• 200 ml de leche de coco
• 60 ml de aceite de coco
• 1 pizca de azúcar de vainilla
Preparación:
Mezcle la harina, el azúcar, la levadura
y la sal en un cuenco. Para ello, utilice el
batidor plano (1) y ponga la máquina en
el nivel 1 (aprox. 20 segundos) antes de
aumentar la potencia al nivel 2 (también
aprox. 20 segundos). A continuación,
ponga la máquina en el nivel 3 y bata la
mezcla durante 2-3 minutos.
Añada a la masa el huevo, la pasta
«Pandan», la leche, el aceite de coco y el
azúcar de vainilla.
Para nalizar, bata la masa hasta que
se transforme en una masa verde, plana
y brillante. Use para ello el molinillo y
reduzca progresivamente la velocidad
de batida hasta el nivel 1. Preste atención
y no utilice el aparato más de 4 minutos
seguidos para evitar que se sobrecaliente.
Verá que el resultado es una masa de gofre
na y exótica. Como complemento ideal,
nada como la crema de coco. Encontrará
cómo prepararla y muchas más recetas en:
www.urban-hunger.com
Utilice el molinillo para montar la nata o
para batir la clara de huevo. Para ello,
debe accionar una potencia mayor. Tenga
cuidado de no llenar demasiado el cuenco.

20
ES
RETIRADA DEL APARATO
Si el aparato lleva adherida la ilustración de la izquierda (el
contenedor de basura tachado) entonces rige la normativa
europea, directiva 2012/19/UE. Este producto no debe
arrojarse a un contenedor de basura común. Infórmese
sobre las leyes territoriales que regulan la recogida separada
de aparatos eléctricos y electrónicos. Respete las leyes
territoriales y no arroje aparatos viejos al cubo de la basura
doméstica. Una retirada de aparatos conforme a las leyes
contribuye a proteger el medio ambiente y a las personas a
su alrededor frente a posibles consecuencias perjudiciales
para la salud. El reciclaje ayuda a reducir el consumo de
materias primas.
This manual suits for next models
5
Table of contents
Languages:
Other Klarstein Food Processor manuals

Klarstein
Klarstein 10021565 User manual

Klarstein
Klarstein 10028591 User manual

Klarstein
Klarstein ARIA GRANDE SMART User manual

Klarstein
Klarstein 10028591 User manual

Klarstein
Klarstein 10006255 User manual

Klarstein
Klarstein 10032089 User manual

Klarstein
Klarstein BELLA User manual

Klarstein
Klarstein BELLA User manual

Klarstein
Klarstein Delfino User manual

Klarstein
Klarstein Luca User manual