Klarstein 10028873 User manual

10028873 10028874
Eiscreme-Maschine

2
Sehr geehrter Kunde,
wir gratulieren Ihnen zum Erwerb Ihres Gerätes. Lesen Sie die folgenden Hinweise sorgfältig durch und befol-
gen Sie diese, um möglichen Schäden vorzubeugen. Für Schäden, die durch Missachtung der Hinweise und
unsachgemäßen Gebrauch entstehen, übernehmen wir keine Haftung.
Inhaltsverzeichnis
Technische Daten 2
Sicherheitshinweise 2
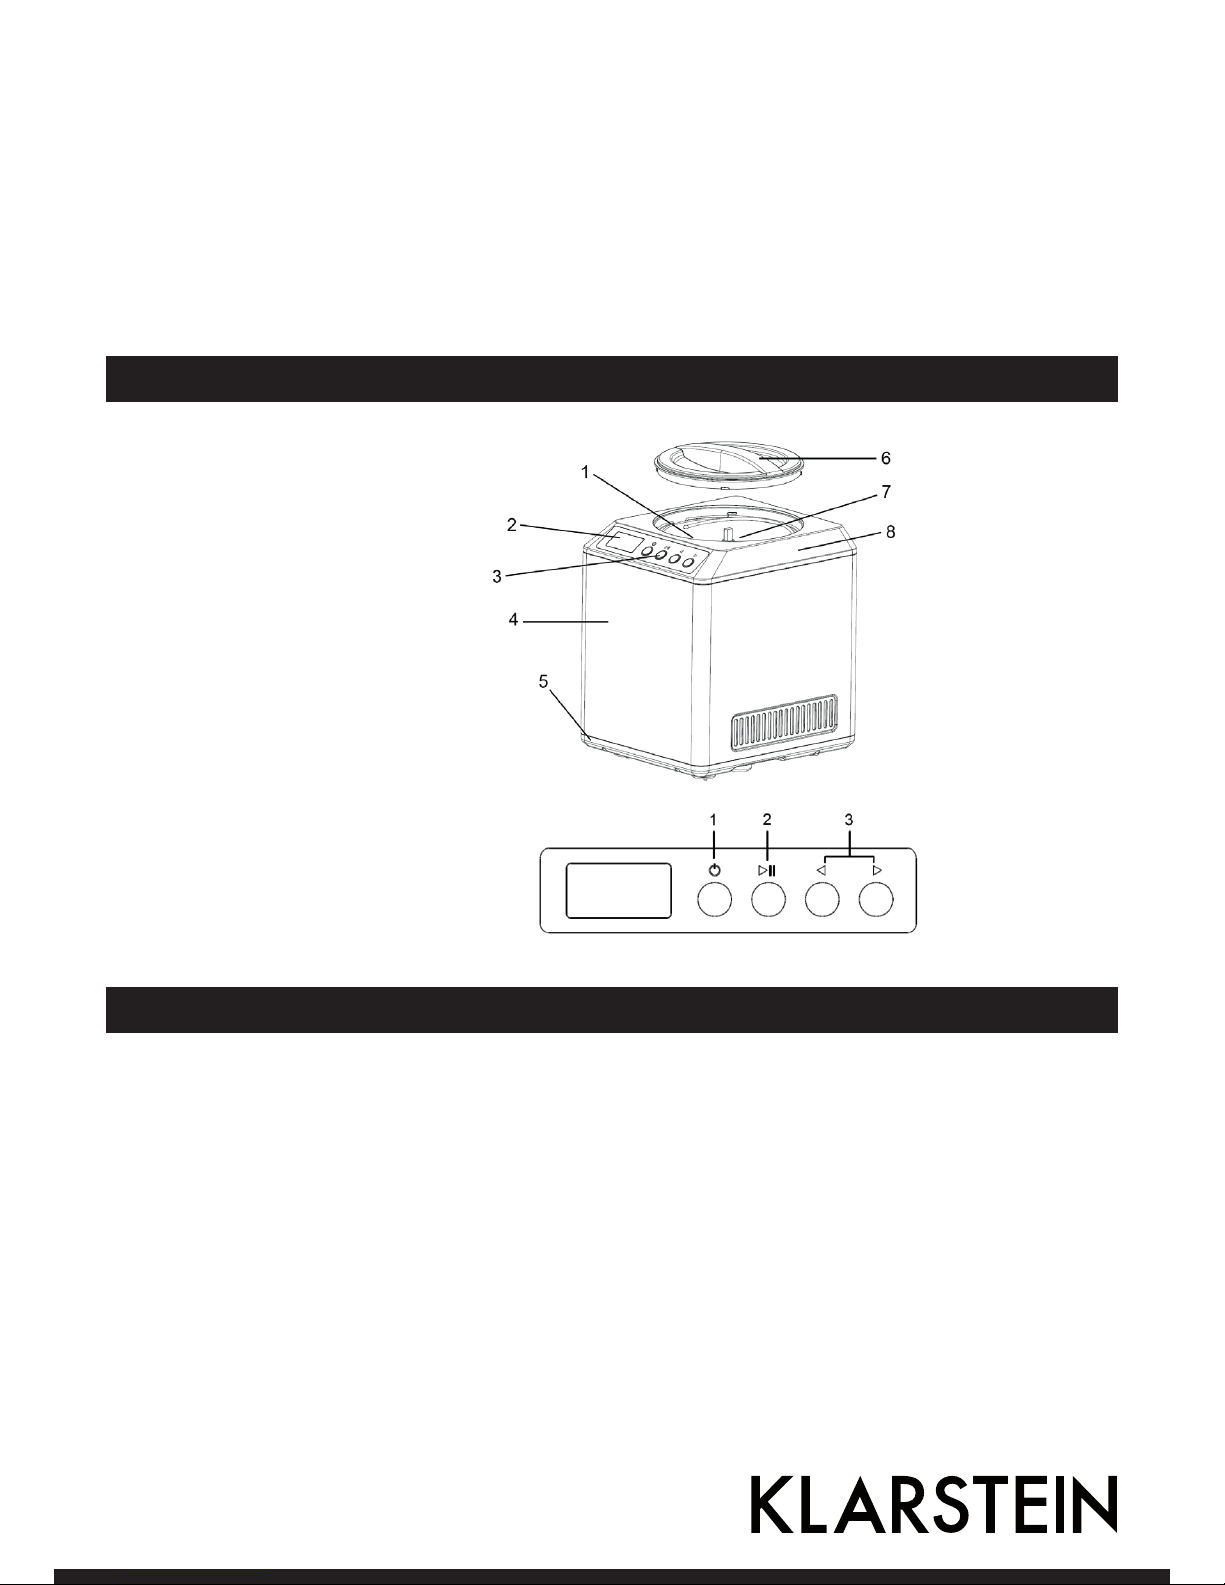
Geräteübersicht und Funktionstasten 3
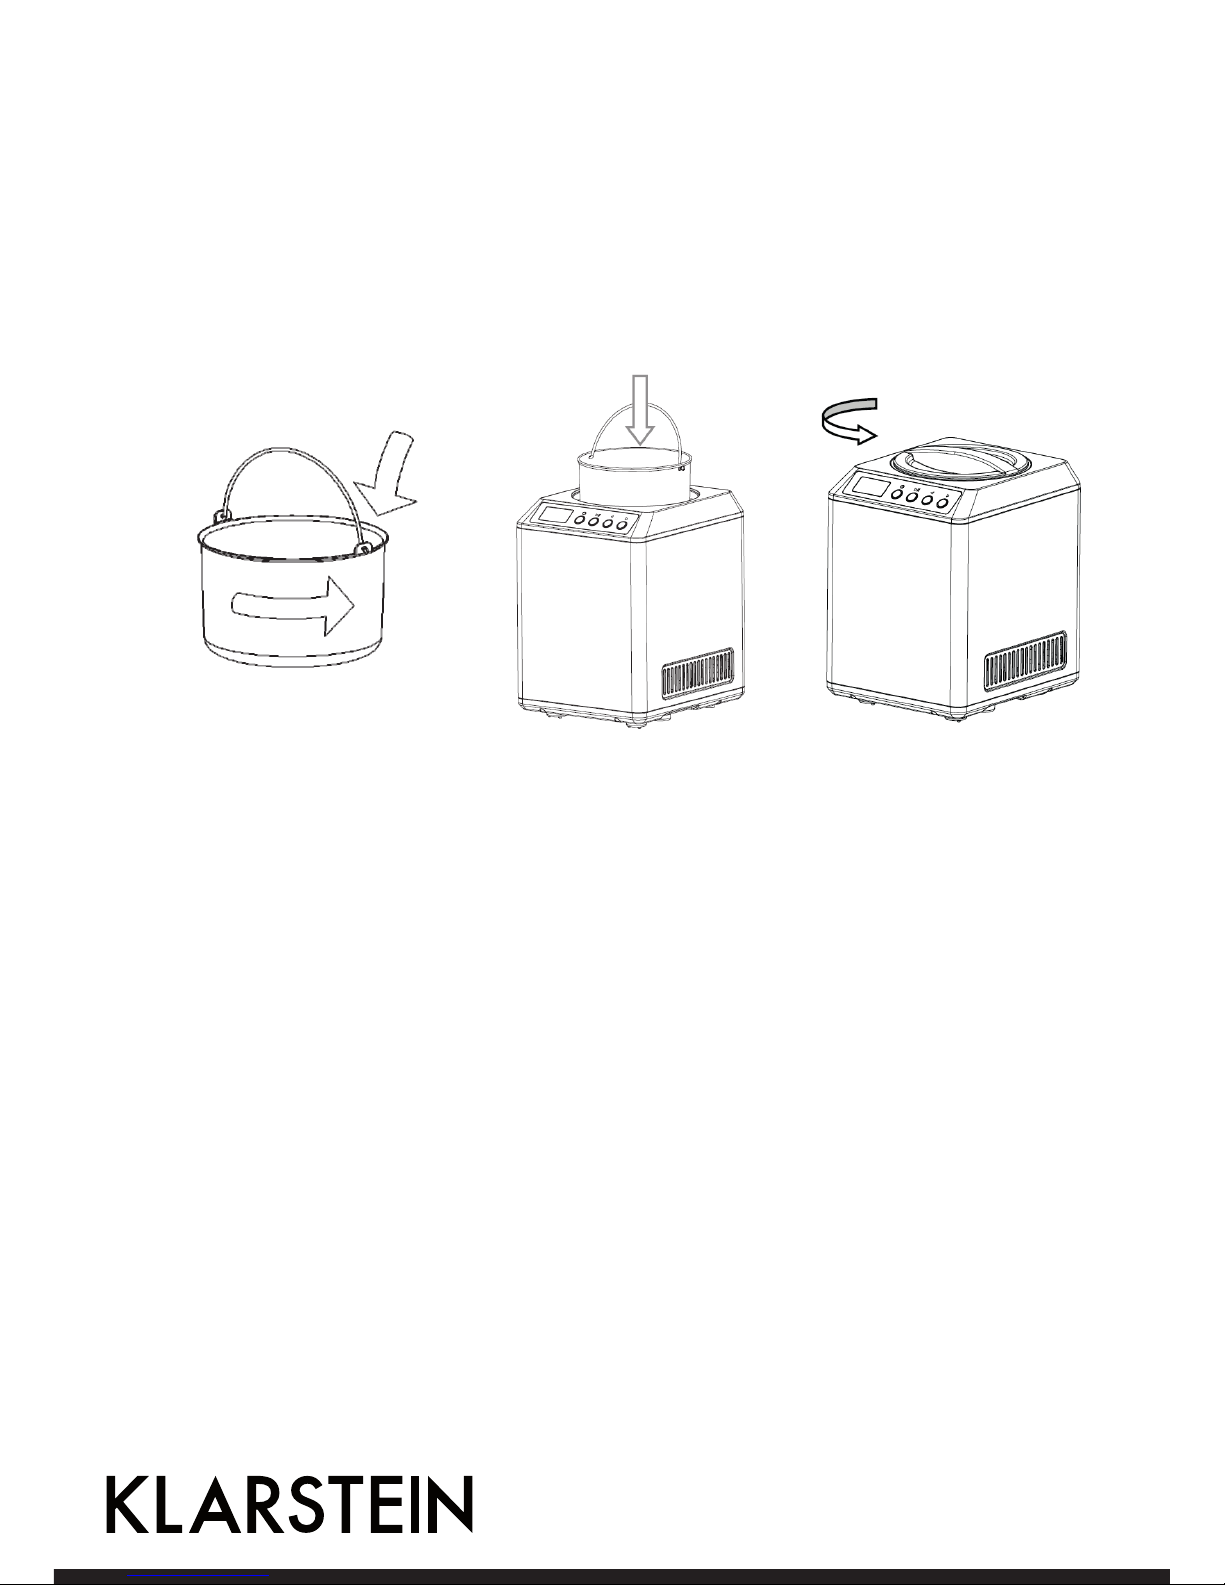
Inbetriebnahme und Bedienung 3
Reinigung und Pflege 5
Rezepte 6
Entsorgung und Konformitätserklärung 6
Technische Daten
Artikelnummer 10028873, 10028874
Stromversorgung 220-240 V ~ 50-60 Hz
Leistung 180 W
Füllvolumen 2 L
Abmessungen 31,5 cm x 27,2 cm x 36,0 cm
Sicherheitshinweise
• Lesen Sie sich alle Hinweise sorgfältig durch und bewahren Sie die Anleitung zum Nachschlagen gut auf.
• Schließen Sie das Gerät nur an geerdete Steckdosen an, die der angegebenen Spannung entsprechen.
• Falls das Netzkabel beschädigt ist, muss es vom Hersteller, einem autorisierten Fachbetrieb oder einer ähn-
lich qualifizierten Person ersetzt werden.
• Neigen Sie das Gerät nicht um mehr als 45°.
• Um sich vor Stromschlägen zu schützen, halten Sie Wasser fern vom Stecker, dem Kabel und den Lüftungs-
schlitzen und tauchen Sie das Gerät nicht in Wasser oder andere Flüssigkeiten.
• Ziehen Sie den Stecker aus der Steckdose, bevor Sie das Gerät reinigen.
• Halten Sie um das Gerät herum 8 cm Abstand zu wänden oder anderen Geräten, damit die Luft ausreichend
zirkulieren kann.
• Benutzen Sie nur Zubehör, das vom Hersteller ausdrücklich zugelassen ist.
• Kinder ab 8 Jahren, physisch und körperlich eingeschränkte Menschen sollten das Gerät nur benutzen, wenn
sie vorher von einer Aufsichtsperson ausführlich mit den Funktionen und den Sicherheitsvorkehrungen ver-
traut gemacht wurden. Achten Sie darauf, dass Kinder nicht mit dem Gerät spielen und das Gerät nur unter
Aufsicht reinigen.
• Stellen Sie das Gerät nicht in die Nähe von Feuer, Herden oder Öfen.
• Drücken Sie nicht mehrfach hintereinander auf den Ein-Schalter, um den Kompressor nicht zu beschädigen.
• Stecken Sie keine Metallgegenstände ins Gerät, um Kurzschluss zu vermieden.

3
• Wenn Sie die Eiscreme entfernen, schlagen Sie nicht auf den Behälters, um ihn nicht zu beschädigen.
• Schalten Sie das Gerät nicht ein, bevor Sie den Behälter und den Rührer befestigt haben.
• Die Temperatur der Zutaten sollte etwa 25 °C betragen. Legen Sie die Zutaten vor der Zubereitung nicht ins
Gefrierfach, damit der Rührer nicht durch harte Stücke behindert wird.
• Entfernen Sie den Rührer nicht während des Betriebs.
• Benutzen Sie das Gerät nicht in der Nähe leicht entzündlicher Sprays oder Flüssigkeiten.
• Das Gerät ist nicht für den kommerziellen Gebrauch, sondern nur für Gebrauch im Haushalt und in ähnlichen
Umgebungen vorgesehen.
Geräteübersicht und Funktionstasten
1 Herausnehmbarer Eisbehälter
2 Display
3 Bedienfeld
4 Gehäuse
5 Bodenplatte
6 Transparenter Nachfülldeckel
7 Rührer
8 Obere Abdeckung
1 Ein/Aus
2 Start/Pause
3 Zeiteinstellung
Inbetriebnahme und Bedienung
Tastenfunktionen
Ein/Aus
Nachdem Sie den Stecker eingesteckt haben befindet sich das Gerät im Standby-Modus. Drücken Sie auf die
Ein-Taste, um in die Einstellungen zu gelangen. Dort können Sie die Betriebszeit eingeben.
Start/Pause
Drücken Sie nach der Zeiteingabe auf die Start-Taste, um die Eiszubereitung zu starten. Wenn Sie während des
Betriebs auf die Taste drücken hält der Rührer an und der Countdown wird unterbrochen.
Zeiteinstellung
Benutzen Sie die Pfeiltasten, um die Betriebszeit zu verlängern oder zu verkürzen.

4
Vor dem ersten Betrieb
Bevor Sie das Gerät in Betrieb nehmen reinigen Sie zuerst alle Teile, die mit der Eiscreme in Berührung kom-
men. Dazu gehört der feste und der herausnehmbare Eisbehälter, der Rührer, der Deckel, der Nachfülldeckel,
der Messbecher und der Löffel. Versichern Sie sich, dass das Gerät ausgeschaltet und der Stecker gezogen ist,
bevor Sie die teile entnehmen. Stellen Sie das Gerät auf eine möglichst ebene Arbeitsfläche, damit der Kom-
pressor mit bestmöglicher Leistung arbeiten kann.
Eiszubereitung
1. Bereiten Sie die Eis-Zu-
taten laut Rezept (siehe
Rezepte)vor. Sie brauchen
den Eisbehälter vorher
nicht ins Gefrierfach stel-
len, da das Gerät über ei-
nen Kompressor verfügt,
der den Behälter und
die Zutaten während der
Eiszubereitung herunter-
kühlt.
2. Füllen Sie die Eis-Zutaten
in den herausnehmbaren
Behälter und geben Sie
etwas warmes Wasser
hinzu, um eine gleichmä-
ßige Mischung zu erhal-
ten.
3. Setzen Sie den Rührer in
den herausnehmbaren
Behälter ein und achten
Sie darauf, dass er rich-
tig auf dem Antrieb sitzt.
Setzen Sie dann den
Transparenten Deckel
aufs Gerät und drehen Sie
ihn gegen den Uhrzeiger-
sinn fest.
4. Stecken Sie den Stecker
in die Steckdose. Das Ge-
rät befindet sich nun im
Standby-Zustand.
5. Drücken Sie auf die Ein-
Taste, um in die Zeitein-
stellung zu gelangen und
geben Sie mit Hilfe der
Pfeiltasten die Betriebs-
zeit ein.
6. Drücken Sie auf die Start/
Pause-Taste, um mit der
Eiszubereitung zu begin-
nen.

5
7. Sie können jederzeit
Zutaten hinzufügen,
indem Sie während
des Betriebs den
transparenten De-
ckel abnehmen.
8. Nachdem das Eis zu-
bereitet ist, schalten
Sie das Gerät aus,
ziehen Sie den Ste-
cker aus der Steckdo-
se und entfernen Sie
den herausnehmba-
ren Behälter.
Kühlhalte-Funktion
Um zu verhindern, dass das Eis nach der Zubereitung schmilzt verfügt das Gerät über eine Kühlhalte-Funktion.
Nachdem zu Zeit abgelaufen ist geht das Gerät automatisch in den Kühl-Modus und hält das fertige Eis eine
Stunde lang kühl. Danach wechselt das Gerät in den Standby-Modus.
Motorschutz-Funktion
Wenn die Eiscreme härter wird kann es vorkommen, dass Sie den Rührer blockiert. Die Motorschutz-Funktion
sorgt dafür, dass der Motor anhält, damit er sich nicht überhitzt und die Lebensdauer des Geräts verringert.
Hinweise zum Füllvolumen
Damit die Eiscreme nicht überläuft, achten Sie darauf, dass sie den herausnehmbaren Behälter maximal zu
60% befüllen, da sich die Eiscreme während der Zubereitung ausdehnt.
Reinigung und Pflege
Ziehen Sie den Stecker aus der Steckdose, bevor Sie Teile entnehmen und das Gerät reinigen.
1. Entnehmen Sie den Rührer und wischen Sie ihn mit einem feuchten Lappen ab.
2. Entnehmen Sie den herausnehmbare Behälter und reinigen Sie ihn mit einem feuchten Lappen.
3. Wischen Sie den transparenten Deckel mit einem feuchten Lappen ab.
4. Befreien Sie die Gerätebasis mit einem feuchten Lappen von Spritzern und Verunreinigungen. Achten Sie
darauf, dass kein Wasser in die Lüftungsschlitze eindringt und tauchen Sie die Basis nicht in Wasser.
5. Trocknen Sie alle Teile mit einem Geschirrtuch ab und bauen Sie sie wieder zusammen.

6
Rezepte
Vanille-Eis
Zutaten:
1 Becher Vollmilch
½ Becher Zucker
1 ½ Becher Sahne
1-2 Teelöffel Vanilleextrakt
Zubereitung:
Vermischen Sie die Milch und den Zucker mit dem
Handmixer in einer mittelgroßen Schüssel 1-2 Minu-
ten lang, bis sich der Zucker aufgelöst hat. Rühren Sie
die Sahne und das Vanilleextrakt unter. Schalten Sie
das Gerät ein, geben Sie die Mischung in die Maschine
und lassen Sie sie 30-40 Minuten lang andicken.
Variation 1: Mint Chip
Ersetzen Sie das Vanilleextrakt durch 1 - 1 ½ Teelöffel
Pfefferminzextrakt. Zerkleinern Sie 110 g Zartbitter-
schokolade in kleine, ungleichmäßige Stücke. Geben Sie
die Schokolade während der letzen 5 Minuten hinzu
Variation 2: Cookies & Cream
Geben Sie während der letzen 5 Minuten einen ¾ Be-
cher zerkleinerte Cookies hinzu.
Hinweise zur Entsorgung
Befindet sich die linke Abbildung (durchgestrichene Mülltonne auf Rädern) auf dem Pro-
dukt, gilt die Europäische Richtlinie 2002/96/EG. Diese Produkte dürfen nicht mit dem
normalen Hausmüll entsorgt werden. Informieren Sie sich über die örtlichen Regelungen
zur getrennten Sammlung elektrischer und elektronischer Gerätschaften. Richten Sie sich
nach den örtlichen Regelungen und entsorgen Sie Altgeräte nicht über den Hausmüll.
Durch die regelkonforme Entsorgung der Altgeräte werden Umwelt und die Gesundheit
ihrer Mitmenschen vor möglichen negativen Konsequenzen geschützt. Materialrecycling
hilft, den Verbrauch von Rohstoffen zu verringern.
Konformitätserklärung
Hersteller: Chal-Tec GmbH, Wallstraße 16, 10179 Berlin, Deutschland.
Dieses Produkt entspricht den folgenden Europäischen Richtlinien:
2014/30/EU (EMV)
2014/35/EU (LVD)
2011/65/EU (RoHS)

7
Dear Customer,
Congratulations on purchasing this equipment. Please read this manual carefully and take care of the following
hints to avoid damages. Any failure caused by ignoring the mentioned items and cautions mentioned in the
instruction manual are not covered by our warranty and any liability.
Contents
Technical Data 7
Safety Instructions 7
Product Descriptions and Controls 8
Use and Operation 8
Cleaning and Care 10
Recipes 11
Disposal and Declaration of Conformity 11
Technical Data
Item number 10028873, 10028874
Power supply 220-240 V ~ 50-60 Hz
Power consumtion 180 W
Capacity 2 l
Dimensions 31,5 cm x 27,2 cm x 36,0 cm
Safety Instructions
• Read all the safety and operating instructions carefully and retain them for future reference.
• Ensure the voltage is compliant with the voltage range stated on the rating label, and ensure the earthing of
the socket is in good condition.
• If the supply cord is damaged, it must be replaced by the manufacturer or its service agent or a similarly
qualified person in order to avoid a hazard.
• Do not upend this product or incline it over a 45° angle.
• To protect against risk of electric shock, do not pour water on cord, plug and ventilation, immerse the appli-
ance in water or any other liquid.
• Unplug the appliance after using or before cleaning.
• Keep the appliance 8cm from other objects to ensure the good heat releasing.
• Do not use the accessories which are not recommended by Manufacturer.
• This appliance can be used by children aged from 8 years and above and persons with reduced physical,
sensory or mental capabilities or lack of experience and knowledge if they have been given supervision or
instruction concerning use of the appliance in a safe way and understand the hazards involved. Children
shall not play with the appliance. Cleaning and user maintenance shall not be made by children without
supervision. Children should be supervised to ensure that they do not play with the appliance.
• Do not use the appliance close by flames, hot plates or stoves.
• Do not switch on the power button frequently (ensure 5 min. interval at least) to avoid the damage of compressor.
• Metal sheet or other electric objects are not allowed to be inserted into the appliance to avoid fire and short circuit.

8
• When take out the ice cream, do not knock the barrel or edge of barrel to protect the barrel from damage.
• Do not switch on the power before install well the barrel or blender blade.
• The initial temperature of the ingredients is 25±5�.Do not put the ingredients into freezer for pre-freeze, as it
will easily make the blender blade blocked before the ice cream is in good condition.
• Do not remove the blender blade when the appliance is on working.
• Do not use outdoors. Never clean with scouring powders or hard implements.
• Do not store explosive substances such as aerosol cans with a flammable propellant in this appliance.
• This appliance is intended to be used in household and similar applications
Product Description and Controls
1 Removable bowl
2 Display
3 Control panel
4 Housing
5 Bottom plate
6 Transparent lid
7 Mixing blade
8 Top lid
1 Power
2 Start/Pause
3 Time setting
Use and Operation
Function of Controls
Power
After power up, the machine enters standby mode. Then press the [POWER] button to enter the setting mode,
prompting you to input the working time.
Start/Pause
After setting the working time, press this button to start the working mode. During operation, by pressing this
button, the mixing will pause and the time countdown will pause as well.
Time setting
Use the arrow buttons to increase and decrease the working time.

9
Before first Use
Cleanness: Before use, thoroughly wash all parts that will come into contact with the ice cream (including the
fixed bowl, removable bowl, mixing blade, transparent lid, refill lid, measuring cup and spoon). Warning: Please
be sure the power cord is unplugged. Important: Always place the Ice Cream Maker upright on a flat surface in
order that the build-in COMPRESSOR can provide best performance.
Making Ice Cream
1. Prepare recipe ingredients
from your own recipe or
from the recipe booklet
here. Note: You do not
need to freeze the bowl
for hours in a freezer in ad-
vance, as this machine has
a BUILT-IN COMPRESSOR
that freezes the recipe in-
gredients in operation thus
ensure the output of ice
cream
2. Pour the well prepared re-
cipe ingredients and warm
water into the removable
bowl, then have a uniform
mixing (See below pic-
ture).
3. Place the mixing blade
into the removable bowl
and keep the mixing bla-
de bottom hole fitted
well with the motor axis.
Then put the transparent
lid onto the machine and
lock it anticlockwise (See
below picture).
4. Plug in power, and press
the [POWER] button to
make the machine elect-
rified.
5. Press time setting button
to set the working time.
6. Touch [START/PAUSE]
button to start working.

10
7. You can add the fa-
vorite ingredients
by opening the refill
cover.
8. After the operation
is over, turn off the
machine first, and
then pull out the re-
movable bowl.
Keep cool function
To avoid melting when the ice cream is not placed well in time, the following design is supported: After the ice
cream is finished and without any other operation, the machine will start up the keep cool function automati-
cally, which can keep cool for one hour. One hour later, machine will enter standby state.
Motor self-protection function
When the ice cream becomes harder, the mixing motor might be blocked. Then the motor protection device
makes the mixing motor stop working by detecting its temperature to ensure the life of the motor.
Controlling the Volume of the Ingredients
To avoid overflow and waste, please make sure that the ingredients do not exceed 60% of capacity of the
removable bowl (Ice cream expands when being formed).
Cleaning and Care
Caution: The plug must be removed before cleaning to avoid electric shock.
1. Take out the mixing blade, wipe it with a dampened cloth.
2. Take out the removable bowl, clean it with a dampened soft cloth.
3. Wipe the transparent lid and refill lid with a dampened cloth.
4. Remove the dirty on the body or other places with a dampened cloth, and do not pour water on cord, plug
and ventilation, immerse the appliance in water or any other liquid.
5. Allow drying thoroughly with a dry cloth, then return the component to the home position.

11
Recipes
Vanilla Ice Cream
Ingredients:
1 cup whole milk
½ cup granulated sugar
1 ½ cups heavy cream, well chilled
1-2 teaspoons pure vanilla extract, to taste
Preparation:
In a medium bowl, use a hand mixer or a whisk to com-
bine the milk and granulated sugar until the sugar is
dissolved, about 1 – 2 minutes on low speed. Stir in the
heavy cream and vanilla to taste. Turn machine on, pour
mixture into freezer bowl through ingredient spout and
let mix until thickened, about 30 – 40 minutes.
Variation 1: Mint Chip
Replace the vanilla and with 1 to 1 - 1/2 teaspoons pure
peppermint extract (to taste). Chop your favorite 4-ounce
bittersweet chocolate into tiny uneven pieces. Add the
chopped chocolate during the last 5 minutes of mixing.
Variation 2: Cookies & Cream
Add 3/4 cup coarsely chopped cookies or your favorite
candy during the last 5 minutes of mixing.
Hints on Disposal
According to the European waste regulation 2002/96/EC this symbol on the product
or on its packaging indicates that this product may not be treated as household waste.
Instead it should be taken to the appropriate collection point for the recycling of electrical
and electronic equipment. By ensuring this product is disposed of correctly, you will help
prevent potential negative consequences for the environment and human health, which
could otherwise be caused by inappropriate waste handling of this product. For more de-
tailed information about recycling of this product, please contact your local council or your
household waste disposal service.
Declaration of Conformity
Producer: Chal-Tec GmbH, Wallstraße 16, 10179 Berlin, Germany.
This product is conform to the following European Directives:
2014/30/EU (EMC)
2014/35/EU (LVD)
2011/65/EU (RoHS)

12
Gentile cliente,
La ringraziamo per aver acquistato il nostro dispositivo. La preghiamo di leggere attentamente le seguenti istru-
zioni e di seguirle per evitare eventuali danni. Non ci assumiamo alcuna responsabilità per danni derivati da una
mancata osservazione delle avvertenze di sicurezza e da un uso improprio del dispositivo.
Indice
Dati tecnici 12
Avvertenze di sicurezza 12
Descrizione del prodotto e funzione dei tasti 13
Messa in funzione e utilizzo 13
Pulizia e manutenzione 15
Ricette 16
Smaltimento e dichiarazione di conformità 16
Dati tecnici
Numero articolo 10028873, 10028874
Alimentazione 220-240 V ~ 50-60 Hz
Potenza 180 W
Capacità 2 L
Misure 31,5 cm x 27,2 cm x 36,0 cm
Avvertenze di sicurezza
• Leggere attentamente tutte le avvertenze di sicurezza e conservare il manuale per consultazioni future.
• Collegare il dispositivo solo a prese dotate di messa a terra la cui tensione è conforme a quella indicata.
• Se il cavo di rete è danneggiato farlo sostituire dal produttore, da un centro assistenza specializzato o da una
persona qualificata.
• Non inclinare il dispositivo più di 45°C.
• Per evitare scosse elettriche, tenere lontano dall’acqua la spina, il cavo e le fessure di aereazione e non im-
mergere mai il dispositivo in acqua o in altri liquidi.
• Prima di effettuare la pulizia, staccare sempre la spina dalla presa.
• Lasciare almeno 8 cm di spazio libero intorno al dispositivo affinché l’aria possa circolare.
• Utilizzare solo gli accessori approvati dal produttore.
• I bambini sopra gli 8 anni, le persone con capacità fisiche e mentali ridotte non devono utilizzare il dispo-
sitivo, a meno che un supervisore ha prima spiegato loro le funzioni e le avvertenze di sicurezza. Prestare
attenzione che i bambini non giochino con il dispositivo.
• Non collocare il dispositivo nelle vicinanze di fiamme, fornelli o forni.
• Per evitare di danneggiare il compressore, non premere più volte consecutivamente il tasto di accensione/
spegnimento.

13
• Non infilare oggetti in metallo nel dispositivo per evitare il rischio di corto circuiti.
• Rimuovere con cautela il gelato dal contenitore.
• Prima di accendere il dispositivo, assicurarsi di aver inserito il contenitore e la pala mescolatrice.
• La temperatura degli ingredienti deve essere di circa 25 °C, non congelarli. Gli ingredienti congelati possono
bloccare la pala mescolatrice.
• Non rimuovere la pala mescolatrice mentre il dispositivo è in funzione.
• Il dispositivo è destinato esclusivamente ad un utilizzo domestico e non commerciale.
Descrizione del prodotto e funzione dei tasti
1 Contenitore estraibile
2 Display
3 Pannello di controllo
4 Alloggiamento
5 Base del dispositivo
6 Coperchio trasparente
7 Pala mescolatrice
8 Rivestimento superiore
1 Accensione/spegnimento
2 Start/Pausa
3 Impostazione del tempo
Messa in funzione e utilizzo
Funzione dei tasti
Accensione/spegnimento
Una volta inserita la spina nella presa, il dispositivo si trova automaticamente in modalità standby. Premere il
tasto di accensione per accedere alle impostazioni e inserire il tempo desiderato.
Start/Pausa
Dopo aver inserito il tempo desiderato, premere questo tasto per avviare il dispositivo. Se si preme il tasto
mentre il dispositivo è in funzione, la pala mescolatrice si arresta e il conteggio si interrompe.
Impostare il tempo
Utilizzare i tasti direzionali per aumentare o ridurre il tempo desiderato.

14
Avvertenze per il primo utilizzo
Prima di utilizzare il dispositivo per la prima volta, pulire con cura tutti i componenti a contatto con il gelato:
il contenitore fisso e quello estraibile, la pala mescolatrice, il coperchio trasparente, il misurino e il cucchiaio.
Prima di inserire i componenti, assicurarsi che il dispositivo sia spento e che la presa sia disinserita. Collocare il
dispositivo su una superficie stabile e piana per ottenere prestazioni ottimali.
Preparazione del gelato
1. Preparare gli ingredienti
in base alla ricetta (vede-
re il paragrafo “Ricette”).
Non è necessario mettere
prima il contenitore nel
congelatore, in quanto il
dispositivo dispone di un
compressore che raffred-
da gli ingredienti durante il
processo di preparazione
del gelato.
2. Introdurre gli ingredienti
nel contenitore estrai-
bile e aggiungere un po’
d’acqua per ottenere una
miscela uniforme.
3. Inserire la pala mescola-
trice nel contenitore es-
traibile e assicurarsi che
sia fissata correttamen-
te nell’albero della pala
mescolatrice. Inserire poi
il coperchio trasparente e
fissarlo ruotandolo in sen-
so antiorario.
4. Inserire la spina nella pre-
sa. Il dispositivo ora si tro-
va in modalità standby.
5. Premere il tasto di ac-
censione per impostare il
tempo.
6. Premere il tasto Start/
Pausa per iniziare il pro-
cesso di preparazione del
gelato.

15
7. E’ possibile aggiun-
gere gli ingredienti
tramite il coperchio
trasparente mentre il
dispositivo è in funzi-
one.
8. Quando il gelato è
pronto, spegnere il
dispositivo, staccare
la spina dalla presa e
rimuovere il conteni-
tore.
Funzione mantenimento in freddo
Per evitare che il gelato si sciolga al termine del processo, il dispositivo dispone di una funzione di manteni-
mento in freddo. Scaduto il tempo, il dispositivo passa automaticamente in questa modalità che mantiene il
gelato freddo per un’ora. Trascorsa un’ora, il dispositivo passa alla modalità standby.
Funzione protezione del motore
Se il gelato si indurisce, può accadere che la pala mescolatrice si blocchi. La funzione di protezione arresta
il motore impedendo che questo si surriscaldi. In questo modo si garantisce anche una maggiore durata del
dispositivo.
Capacità
Non riempire il contenitore estraibile oltre il 60% della sua capacità, poiché durante la preparazione il gelato
aumenta di volume e potrebbe traboccare.
Pulizia e manutenzione
Staccare sempre la spina dalla presa prima di rimuovere i componenti e di pulire il dispositivo.
1. Rimuovere la pala mescolatrice e pulirla con un panno umido.
2. Rimuovere il contenitore e pulirlo con un panno umido.
3. Lavare il coperchio trasparente con un panno umido.
4. Rimuovere eventuali residui di sporco dalla base utilizzando un panno umido. Assicurarsi che l’acqua non
penetri nelle fessure di aereazione e non immergere mai il dispositivo in acqua.
5. Asciugare i componenti e assemblare di nuovo il dispositivo.

16
Ricette
Gelato alla vaniglia
Ingredienti:
1 bicchiere di latte intero
½ bicchiere di zucchero
1 bicchiere e ½ di panna
1-2 cucchiaini di estratto di vaniglia
Preparazione:
Miscelare il latte e lo zucchero per 1-2 minuti utilizzando
un frullatore. Aggiungere la panna e l’estratto di vaniglia
e mescolare. Infine versare il composto nella macchina
del gelato e attendere 30-40 minuti.
Variante 1: Menta
Sostituire l’estratto di vaniglia con 1-cucchiaino e 1/2 di
estratto di menta. Spezzettare 110 g di cioccolato fon-
dente e aggiungerlo quando mancano 5 minuti al ter-
mine del processo.
Variante 2: Biscotti e crema
Aggiungere i biscotti spezzettati quando mancano 5 mi-
nuti al termine del processo.
Smaltimento
Se sul prodotto è presente la figura a sinistra (il cassonetto mobile sbarrato), si applica
la direttiva europea 2002/96/CE. Questi prodotti non possono essere smaltiti con i
rifiuti normali. Informarsi sulle disposizioni vigenti sulla raccolta separata di dispositivi
elettrici e elettronici. Non smaltire i vecchi dispositivi con i rifiuti domestici. Grazie al
corretto smaltimento dei vecchi dispositivi si proteggono il pianeta e la salute delle
persone da possibili conseguenze negative. Il riciclo di materiali aiuta a diminuire il con-
sumo di materie prime.
Dichiarazione di conformità
Produttore: Chal-Tec GmbH, Wallstraße 16, 10179 Berlino, Germania.
Questo prodotto è conforme alle seguenti direttive europee:
2014/30/UE (EMC)
2014/35/UE (LVD)
2011/65/UE (RoHS)

17
Estimado cliente:
Le felicitamos por la adquisición de este producto. Lea atentamente el siguiente manual y siga cuidadosamente
las instrucciones de uso con el fin de evitar posibles daños. La empresa no se responsabiliza de los daños
ocasionados por un uso indebido del producto o por haber desatendido las indicaciones de seguridad.
Índice
Datos técnicos 17
Indicaciones de seguridad 17
Descripción del aparato y botones de función 18
Puesta en marcha y uso 18
Limpieza y cuidado 20
Recetas 21
Retirada del aparato y declaración de conformidad 21
Datos técnicos
Número de artículo 10028873, 10028874
Suministro eléctrico 220-240 V ~ 50-60 Hz
Potencia 180 W
Capacidad máxima 2 L
Dimensiones 31,5 cm x 27,2 cm x 36,0 cm
Indicaciones de seguridad
• Lea todas las indicaciones y conserve este manual para consultas posteriores.
• Conecte el aparato a tomas de corriente con toma de tierra que se adecuen a la tensión requerida.
• Si el cable de alimentación está dañado, deberá ser sustituido por el fabricante o un servicio técnico autorizado.
• No incline el aparato más de 45°.
• Para protegerse de descargas eléctrica, mantenga el agua lejos del enchufe, del cable de alimentación y de
los orificios de ventilación y nunca sumerja el aparato en agua ni ningún otro líquido.
• Desenchufe el aparato antes de limpiarlo.
• Mantenga una distancia de 8 cm entre el aparato y otros objetos o paredes para asegurar una circulación de
aire suficiente.
• Utilice exclusivamente los accesorios recomendados por el fabricante.
• Los niños y las personas con discapacidades físicas y psíquicas podrán utilizar el aparato solamente si están
bajo supervisión y conocen su funcionamiento y las indicaciones de seguridad. Asegúrese de que los niños
no juegan con el aparato y de que solo realizan labores de limpieza bajo supervisión.
• No coloque el aparato cerca de llamas, hornos o cocinas.
• No pulse varias veces seguidas el interruptor de encendido para no dañar el compresor.
• No introduzca objetos de metal en el aparato para evitar cortocircuitos.

18
• Al retirar el helado, no golpee el recipiente para no dañarlo.
• No encienda el aparato antes de encajar el recipiente y las varillas.
• La temperatura de los ingredientes debe estar a una temperatura de 25 °C. No introduzca previamente los
alimentos en el frigorífico para que la varilla no se atasque debido a la dureza de los alimentos.
• No retire la varilla durante el funcionamiento de la heladera.
• No utilice el aparato cerca de sprays o líquidos altamente inflamables.
• El aparato no está indicado para fines comerciales, solamente para su uso en el hogar y espacios similares.
Descripción del aparato y controles
1 Recipiente extraíble
2 Display
3 Panel de control
4 Carcasa
5 Soporte
6 Tapa transparente de llenado
7 Varilla
8 Cubierta superior
1 On/Off
2 Start/Pause
3 Ajuste de tiempo
Puesta en marcha y uso
Botones
On/Off
Tras enchufar el aparato, este activará el modo standby. Pulse el botón On para acceder a los ajustes, en los que
podrá introducir el tiempo de funcionamiento.
Start/Pause
Pulse el botón Start cuando haya introducido el tiempo de funcionamiento deseado para comenzar con el
proceso de preparación. Si durante el funcionamiento de la heladera vuelve a pulsar el botón, la varilla se
detendrá y la cuenta atrás se interrumpirá.
Ajuste de tiempo
Utilice los botones de dirección para aumentar o reducir el tiempo de funcionamiento.

19
Antes del primer uso
Antes de poner en marcha el aparato, limpie todas las partes que van a entrar en contacto con el helado.
En esta relación se incluyen el recipiente extraíble, la varilla, la tapa, la tapa de llenado, el vaso medidos y la
cuchara. Asegúrese de que el aparato está apagado y desenchufado antes de desmontar las partes. Coloque el
aparato en una superficie plana para el compresor pueda funcionar a pleno rendimiento.
Preparación del helado
1. Prepare los ingredientes
para el helado siguiendo
la receta (consulte la
sección Recetario).
No necesita meter
el recipiente en el
congelador antes de la
preparación. Gracias al
compresor integrado,
el recipiente y los
ingredientes se enfriarán
durante la preparación del
helado.
2. Introduzca los
ingredientes para el
helado en el recipiente
extraíble junto con un
poco de agua tibia para
conseguir una mezcla
homogénea.
3. Coloque la varilla en el
recipiente extraíble y
asegúrese de que está
encajada en el motor.
Coloque a continuación
la tapa transparente y
enrósquela en el sentido
contrario de las agujas del
reloj.
4. Enchufe el aparato. El
aparato se activará en
modo standby.
5. Pulse el botón On para
acceder a los ajustes
de hora. Introduzca el
tiempo con ayuda de los
botones de dirección.
6. Pulse el botón Start/
Pause para comenzar con
la preparación del helado.

20
7. Puede añadir
ingredientes en
cualquier momento
retirando la tapa
transparente durante
el funcionamiento
de la heladera.
8. Cuando el helado
esté listo, apague
y desenchufe la
heladera y retire el
recipiente extraíble.
Función mantenimiento de frío
Para evitar que el helado se derrita, el aparato cuenta con una función de mantenimiento de frío. Cuando haya
transcurrido el tiempo seleccionado, el aparato activa automáticamente esta función y mantiene el helado frío
durante una hora. A continuación pasa al modo standby.
Función protección del motor
Cuando el helado se endurece demasiado, puede ocurrir que la varilla se bloquee. La función de protección del
motor garantiza que el este se detenga para evitar un sobrecalentamiento y preservar la vida útil del aparato.
Indicaciones para el volumen de llenado
Para que el helado no rebose, cerciórese de llenar el recipiente como máximo un 60 % de su capacidad, ya que
el helado aumentará su volumen durante el proceso.
Limpieza y cuidado
Desenchufe el aparato antes de limpiar o desmontar las piezas.
1. Retire la varilla y límpiela con un paño húmedo.
2. Retire el recipiente extraíble y límpielo con un paño húmedo.
3. Limpie la tapa transparente con un paño húmedo.
4. Limpie la base del aparato de posibles marcas y salpicaduras con un paño húmedo. Asegúrese de que el
agua no se filtra por las ranuras de ventilación. Nunca sumerja la base en agua.
5. Seque todas las piezas con un paño de cocina y móntelas.
This manual suits for next models
1
Table of contents
Languages:
Other Klarstein Ice Cream Maker manuals

Klarstein
Klarstein 10031663 User manual

Klarstein
Klarstein 100280843 User manual

Klarstein
Klarstein 10031508 User manual

Klarstein
Klarstein Dolce Bacio User manual

Klarstein
Klarstein FRUIT DESSERT MAKER User manual

Klarstein
Klarstein 10022113 User manual

Klarstein
Klarstein 10031663 User manual

Klarstein
Klarstein Yo & Yummy User manual

Klarstein
Klarstein Sweet Sundae User manual

Klarstein
Klarstein DOLCE BACIO SMART User manual