Klarstein 10031508 User manual

10031850
Eiscreme-Maschine
Ice Cream Machine
Heladera
Sorbetière
Macchina del gelato


3
DE
Sehr geehrter Kunde,
wir gratulieren Ihnen zum Erwerb Ihres Gerätes. Lesen Sie die folgenden Hinweise
sorgfältig durch und befolgen Sie diese, um möglichen Schäden vorzubeugen. Für
Schäden, die durch Missachtung der Hinweise und unsachgemäßen Gebrauch
entstehen, übernehmen wir keine Haftung.
INHALTSVERZEICHNIS
Technische Daten 3
Konformitätserklärung 3
Sicherheitshinweise4
Geräteübersicht6
Inbetriebnahme und Bedienung6
Zusammenbau7
Einstellungen und erweiterte Funktionen9
Hinweise zur Entsorgung10
TECHNISCHE DATEN
Artikelnummer 10031508
Stromversorgung 220-240 V ~ 50-60 Hz
Fassungsvermögen 1.5 L
Leistung 150 W
KONFORMITÄTSERKLÄRUNG
Hersteller:
Chal-Tec GmbH, Wallstraße 16, 10179 Berlin, Deutschland.
Dieses Produkt entspricht den folgenden Europäischen
Richtlinien:
2014/30/EU (EMV)
2014/35/EU (LVD)
2011/65/EU (RoHS)
643/2009/EG (ErP)
1060/2010/EU (ErP)

4
DE
SICHERHEITSHINWEISE
• Lesen Sie sich vor der Installation und Benutzung alle Hinweise sorgfältig durch, um
das Risiko von Feuer, Stromschlag und Verletzungen auszuschließen.
• Prüfen Sie vor der Benutzung die Spannung auf der Geräteplakette. Schließen Sie
das Gerät nur an Steckdosen an, die der Spannung des Geräts entsprechen. Wenn
Sie sich nicht sicher sind, ob Ihre Anschlüsse den Anforderungen genügen ziehen
Sie einen Elektriker oder Ihren Stromanbieter zu Rate.
• Falls das Netzkabel oder der Stecker beschädigt sind, müssen sie vom Hersteller,
einem autorisierten Fachbetrieb oder einer ähnlich quali zierten Person ersetzt
werden.
• Bauen Sie das Gerät nicht auseinander und neigen Sie es nicht mehr als 45°.
• Um Stromschläge zu vermeiden, achten Sie darauf, dass kein Wasser auf das
Kabel, den Stecker und das Bedienfeld kommt. Tauchen Sie die Gerätebasis, das
Kabel und den Stecker niemals in Wasser oder andere Flüssigkeiten.
• Ziehen Sie vor der Reinigung immer zuerst den Stecker aus der Steckdose.
• Lassen Sie rund um das Gerät 8 cm Platz, damit die Luft frei zirkulieren kann.
• Benutzen Sie kein Zubehör, dass nicht ausdrücklich vom Hersteller empfohlen wird.
• Benutzen Sie das Gerät nicht in der Nähe von offenem Feuer, Herden oder Öfen.
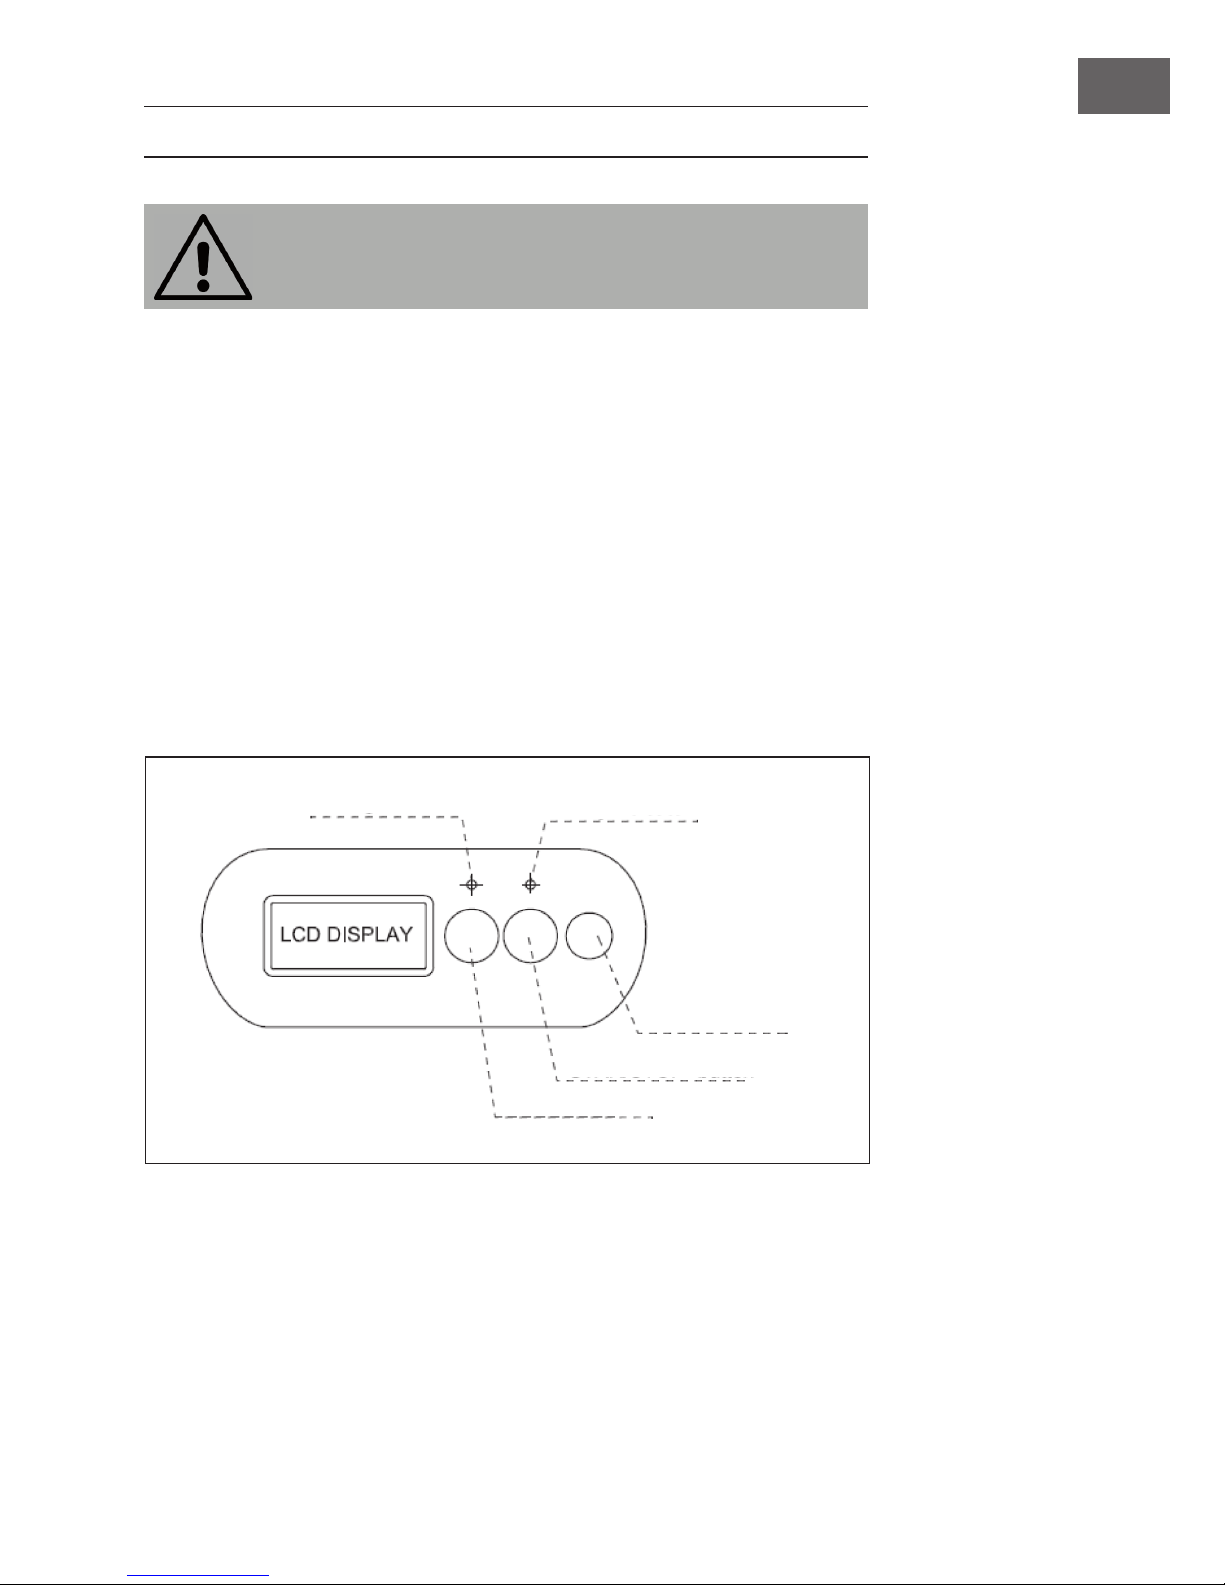
• Drücken Sie die Power-Taste nicht zu oft hintereinander. Wenn Sie das Gerät
ausschalten, warten Sie 5 Minuten, bevor Sie die Power-Taste erneut drücken. So
verhindern Sie, dass der Kompressor kaputt geht.
• Um einen Kurzschluss zu verhindern, stecken Sie keine Metallgegenstände durch
die Belüftungsöffnung.
• Wenn Sie das Eis herausnehmen, klopfen Sie nicht das Fass oder den Rand des
Fasses. Andernfalls kann es sein, dass Sie das Fass beschädigen.
• Schalten Sie das Gerät nicht ein, bevor alle Teile installiert wurden.
• Die Temperatur der Zutaten sollte 25 ± 5 °C betragen. Legen Sie nicht die Zutaten
vorher nicht in den Gefrierschrank oder in den Kühlschrank. Andernfalls kann es
sein, dass die Mixer-Klinge blockiert, bevor das Eis fertig ist.
VORSICHT
Verletzungsgefahr! Entfernen Sie nicht die Mixer-Klinge, während das
Gerät eingeschaltet ist.
• Verwenden Sie das Gerät nicht im Freien.
• Reinigen Sie das Gerät nicht mit Scheuermitteln oder Scheuerschwämmen.
• Bewahren Sie die Bedienungsanleitung gut auf.

5
DE
• Kinder ab 8 Jahren, physisch und körperlich eingeschränkte Menschen dürfen
das Gerät nur benutzen, wenn sie vorher von einer für Sie verantwortlichen
Aufsichtsperson ausführlich mit den Funktionen und den Sicherheitsvorkehrungen
vertraut gemacht wurden. Kinder dürfen das Gerät nur unte Aufsicht reinigen und
p egen.
• Achten Sie darauf, dass Kinder nicht mit dem Gerät spielen.
• Ziehen Sie den Stecker aus der Steckdose, bevor Sie das Gerät reinigen, p egen,
zusammenbauen, auseinanderbauen oder befüllen.
• Das Gerät ist nicht für den kommerziellen Gebrauch, sondern nur für Gebrauch im
Haushalt und in ähnlichen Umgebungen vorgesehen. Dazu zählen Küchen in Büros,
Bauernhöfen, Hotels, Motels und Einrichtungen, die Bed & Breakfast anbieten.
• Lagern Sie im Gerät keine explosiven Stoffe, wie beispielsweise Aerosoldosen mit
einem brennbaren Treibmittel.
• Achten Sie darauf, dass die Ventilationsöffnungen nicht blockiert werden und
bauen Sie das Gerät nicht in Schränke und Regale ein. Das Gerät muss frei stehen.
• Verwenden Sie keine mechanischen Geräte oder andere Gegenstände, um den
Abtauvorgang zu beschleunigen.
• Beschädigen Sie nicht den Kühlmittelkreislauf.
• Lagern Sie keine elektrischen Geräte in der Eismaschine.
VORSICHT
Brandgefahr! Falls der Kühlmittelkreislauf beschädigt wird, kann es zu
Bränden kommen. Vermeiden Sie in diesem Fall offenes Feuer oder
Funken und belüften Sie sorgfältig den Raum, in dem sich das Gerät
be ndet.
Dieses Gerät enthält das Kältemittel Isobutan (R600a), ein Naturgas mit hoher
Umweltverträglichkeit, aber brennbar. Obwohl es brennbar ist, schädigt es nicht die
Ozonschicht und verstärkt nicht den Treibhauseffekt. Die Verwendung dieses Kältemittels
führt zu einer etwas höheren Geräuschentwicklung des Gerätes. Zusätzlich zum
Kompressorgeräusch können Sie den Fluss des Kältemittels hören. Dies ist unvermeidlich
und hat keine negative Wirkung auf die Leistung des Gerätes. Seien Sie während
des Transports vorsichtig, so dass der Kältemittelkreislauf nicht beschädigt wird.
Kältemittellecks können die Augen reizen.

6
DE
GERÄTEÜBERSICHT
INBETRIEBNAHME UND BEDIENUNG
Vor der Benutzung
Waschen sie sorgfältig alle Teile ab, die mit dem Eis in Berührung kommen (inklusive
feste Schüssel, abnehmbare Schüssel, Mixer-Klinge, transparenter Deckel,
Nachfülldeckel, Messbecher und Löffel).
Zutaten vorbereiten
Bereiten Sie die Rezept-Zutaten wie in Ihrem Rezept angegeben, vor. Geben Sie die
vorbereiteten Zutaten in die abnehmbare Schüssel.
HINWEIS: Sie müssen die Schüssel vorher nicht im Gefrierschrank vorkühlen, da das
Gerät über einen Kompressor verfügt, der die Zutaten während der Eisproduktion
herunterkühlt.
Motor
Löffel
Mess-
becher
Nachfülldeckel
Transparenter Deckel
Mixer-Klinge
Entnehmbare Schüssel
Feste Schüssel
Display
Bedienfeld

7
DE
ZUSAMMENBAU
VORSICHT
Verletzungsgefahr! Ziehen Sie immer den Stecker aus der Steckdose,
bevor Sie das Gerät zusammenbauen.
• Stellen Sie das Gerät vor der Benutzung aufrecht auf einen ebenen, stabilen
Untergrund.
• Setzen Sie die abnehmbare Schüssel in das Gerät.
• Setzen Sie dann die Mixer-Klinge in die abnehmbare Schüssel ein.
• Setzen Sie den durchsichtigen Deckel auf die Schüssel und achten Sie darauf, dass
die Mixer-Klinge in der Mitte des Deckels xiert ist.
• Setzen Sie den Nachfülldeckel auf den transparenten Deckel.
• Befestigen Sie den Motor auf dem transparenten Deckel und achten Sie darauf,
dass der Motor fest im Loch sitzt, das sich über der Mixer-Klinge be ndet.
Bedienung
Prüfen Sie vor der Benutzung die Spannung auf der Geräteplakette. Schließen Sie das
Gerät nur an Steckdosen an, die der Spannung des Geräts entsprechen.
Mixanzeige
TIMER Taste
START/STOP Taste
POWER Taste
Kühlanzeige

8
DE
Taste Funktion
POWER Stecken Sie den Stecker in die Steckdose. Drücken Sie auf die POWER-
Taste, um das Gerät einzuschalten. Das Display zeigt [60:00] an, die
voreingestellte Zeit beträgt 60 Minuten.
TIMER Sie können den Timer in 10-Minuten-Schritten zwischen 10-60 Minuten
einstellen. Drücken Sie dazu mehrmals auf die TIMER-Taste und stellen
Sie den Timer auf die gewünschte Zeit. Die voreingestellte Zeit für den
Timer beträgt 60 Minuten.
START/
STOP
Stellen Sie zuerst den Timer. Drücken Sie dann auf START/STOP, um die
Eisproduktion zu starten. Während der Eisproduktion bleibt das Display
die ganze Zeit über beleuchtet. Drücken Sie während der Eisproduktion
auf START/STOP, um die Mixer-Klinge anzuhalten und wieder zu starten.
Der Kompressor kühlt auch wenn Sie die Mixer-Klinge anhalten.
HINWEIS: Drücken Sie nicht länger als 3 Sekunden auf die START/STOP-
Taste, andernfalls wird das Gerät in den Grundzustand zurückversetzt und alle
vorgenommenen Einstellungen werden gelöscht.
Wenn der Timer abgelaufen ist, stoppt der Motor automatisch und sie hören 10 Mal
hintereinander einen Piepton. Das Display zeigt [00:00] an und das Display blinkt im
Sekundentakt. Falls Sie das Gerät in den nächsten 10 Minuten nicht entleeren wechselt
es in den Kühl-Modus, damit die Eiscreme nicht wieder auftaut.
Erweiterte Kühlfunktion
Die Kühlfunktion wird maximal bis zu 1 Stunde aufrecht erhalten. Danach wechselt das
Gerät wieder in den Grundzustand. In diesem Fall ist das Display beleuchtet ist, es sind
aber keine Funktionen aktiv.
VORSICHT
Stromschlaggefahr! Ziehen Sie vor der Entnahme der Eiscreme immer
den Stecker aus der Steckdose, um Stromschläge zu vermeiden.

9
DE
EINSTELLUNGEN UND ERWEITERTE
FUNKTIONEN
Eisproduktion abbrechen
Um die Eisproduktion abzubrechen, halten Sie START/STOP während der Eisproduktion
3 Sekunden lang gedrückt oder drücken Sie auf die POWER-Taste.
Timer während der Eisproduktion einstellen
Sie können die eingestellte Zeit auch noch ändern, während das Gerät bereits läuft.
Drücken Sie dazu mehrmals hintereinander auf die TIMER-Taste. Mit jedem Tastendruck
werden 5 Minuten hinzugefügt, bis das Maximum von 60 Minuten erreicht ist. Die
eingestellte Zeit wird auf dem Display angezeigt. Die Zeit kann nur erhöht, aber nicht
verringert werden.
Zeit nach der Eisproduktion hinzufügen
Wenn die voreingestellte Zeit abgelaufen ist, stoppt das Gerät und wechselt in den Kühl-
Modus. Falls sie ihr Eis noch härter mögen, können Sie das Gerät neu starten und den
Timer erneut auf 10-60 Minuten einstellen. Drücken Sie dann auf START/STOP, um das
Gerät erneut zu starten. Wenn der Timer abgelaufen ist, stoppt das Gerät erneut und
wechselt in den Kühl-Modus, damit das Eis nicht auftaut.
Wichtiger Hinweis zur Zutatenmenge: Um Überlaufen und unnötigen Abfall zu
verhindern, achten Sie darauf, dass die abnehmbaren Schüssel maximal zu 60%
gefüllt ist. Die Eiscreme dehnt sich während der Eisproduktion aus.
So lagern Sie die fertige Eiscreme
Entnehmen Sie die innere Schüssel und füllen Sie das Eis mit einer Plastikschaufel
oder einem hölzernen Löffel in ein Gefäß um, das zum Einfrieren geeignet ist.
Benutzen Sie keine Metallschaufel oder Küchengeräte aus Metall, um Kratzer auf der
Schüsseloberäche zu vermeiden.

10
DE
HINWEISE ZUR ENTSORGUNG
Bendet sich die linke Abbildung (durchgestrichene Mülltonne
auf Rädern) auf dem Produkt, gilt die Europäische Richtlinie
2012/19/EU. Diese Produkte dürfen nicht mit dem normalen
Hausmüll entsorgt werden. Informieren Sie sich über die
örtlichen Regelungen zur getrennten Sammlung elektrischer
und elektronischer Gerätschaften. Richten Sie sich nach
den örtlichen Regelungen und entsorgen Sie Altgeräte nicht
über den Hausmüll. Durch die regelkonforme Entsorgung
der Altgeräte werden Umwelt und die Gesundheit ihrer
Mitmenschen vor möglichen negativen Konsequenzen
geschützt. Materialrecycling hilft, den Verbrauch von
Rohstoffen zu verringern.

11
EN
Dear Customer,
Congratulations on purchasing this equipment. Please read this manual carefully and
take care of the following hints to avoid damages. Any failure caused by ignoring the
mentioned items and cautions mentioned in the instruction manual are not covered by
our warranty and any liability.
CONTENT
Technical Data11
Declaration of Conformity11
Safety Instructions12
Product Description14
Setup and Operation14
Assembly15
Settings and Extended Functions17
Hints on Disposal18
TECHNICAL DATA
Item number 10031508
Power supply 220-240 V ~ 50-60 Hz
Capacity 1.5 L
Power consumtion 150 W
DECLARATION OF CONFORMITY
Producer:
Chal-Tec GmbH, Wallstraße 16, 10179 Berlin, Germany.
This product is conform to the following European
Directives:
2014/30/EU (EMC)
2014/35/EU (LVD)
2011/65/EU (RoHS)
643/2009/EC (ErP)
1060/2010/EU (ErP)

12
EN
SAFETY INSTRUCTIONS
• To avoid the risk of re, electric shock and injury, read all instructions carefully
before installation and use.
• Check the voltage on the equipment label before use. Only connect the device to
sockets which correspond to the voltage of the device. If you are not sure whether
your connections meet the requirements, consult an electrician or your electricity
supplier.
• If the power cable or the plug is damaged, it must be replaced by the manufacturer,
an authorized specialist company or a similarly quali ed person.
• Do not disassemble the device or tilt it at an angle of more than 45 degrees.
• To avoid electric shock, be careful not to allow water to come in contact with the
cable, plug, and control panel. Never immerse the device base, cable, or plug in
water or other liquids.
• Always unplug the device before cleaning.
• Allow around 8 cm of clearance for air to circulate freely.
• Do not use accessories that are not recommended by the manufacturer.
• Do not use the device near open re, stoves or ovens.
• Do not press the power button too often. When you turn the device off, wait 5
minutes before pressing the power button again. This prevents the compressor from
being broken.
• To prevent a short circuit, do not insert metal objects through the ventilation slots.
• When removing the ice cream, do not pat the barrel or the rim of the drum. Doing
so may damage the drum.
• Do not turn the device on until all parts have been installed.
• The temperature of the ingredients should be 25 ± 5 °C. Do not place the
ingredients in the vat or refrigerator. Otherwise, the mixer blade may be blocked
before the ice cream is ready.
WARNING
Risk of injury. Do not remove the mixer blade while the power is on.
Turn the unit off before you remove the blade.
• Do not use the device outdoors.
• Do not clean the device with abrasive cleaners or abrasive sponges.
• Keep the operating instructions in a safe place.

13
EN
• Children over 8 years of age and physically restricted persons are only allowed to
use the device if they have been thoroughly familiarized with the functions and the
safety precautions by a person responsible for them. Children may only clean and
care for the device under supervision.
• Be careful not to allow children to play with the device.
• Disconnect the plug from the socket before cleaning, maintaining, assembling,
disassembling or lling the device.
• The device is not intended for commercial use, but only for domestic use and in
similar environments. These include kitchens in of ces, farms, hotels, motels and bed
& breakfast facilities.
• Do not store explosive materials in the device, such as aerosol cans with a
combustible propellant.
• Make sure that the ventilation openings are not blocked, and do not install the
device in cabinets and shelves. The device must be freestanding.
• Do not use mechanical devices or other objects to accelerate defrosting.
• Do not damage the coolant circuit.
• Do not store any electrical devices in the ice cream machine.
WARNING
Risk of re. If the coolant circuit is damaged, res can occur. In this case,
avoid open re or sparks, and carefully ventilate the room in which the
device is located.
This appliance contains the coolant isobutane (R600a),a natural gas which is
environmentally friendly. Although it is ammable, it does not damage the ozone layer
and does not increase the greenhouse effect. The use of this coolant has,however,led
to a slight increase in the noise level of the appliance. In addition to the noise of the
compressor,you might be able to hear the coolant owing around the system. This
is unavoidable,and does not have any adverse effect on the performance of the
appliance. Care must be taken during the transportation and setting up of the appliance
that no parts of the cooling system are damaged. Leaking coolant can damage the eyes.

14
EN
PRODUCT DESCRIPTION
SETUP AND OPERATION
Before use
Wash all parts that come into contact with the ice cream carefully (including the solid
bowl, removable bowl, mixer blade, transparent lid, rell lid, measuring cup and
spoon).
Prepare recipe ingredients
Prepare the ingredients as specied in your recipe or in the recipe section of the
operating instructions. Put the prepared ingredients in the removable bowl.
NOTE: You do not have to pre-cool the bowl in the freezer in advance because the
device has a compressor that cools the ingredients during ice cream making.
Blender motor
Spoon
Measuring
cup
Rell lid
Transparent lid
Mixing blade
Removable bowl
Fixed bowl
LED Display
Control
panel

15
EN
ASSEMBLY
WARNING
Risk of injury. Always unplug the plug from the electrical outlet before
you asseble the unit.
• Before use, place the device upright on a level, stable surface.
• Insert the removable bowl in the device.
• Next insert the mixer blade in the removable bowl.
• Place the transparent lid on the bowl, and make sure that the mixer blade is xed in
the center of the lid.
• Place the re ll lid on the transparent lid.
• Fasten the motor on the transparent cover and make sure that the motor is rmly
seated in the hole above the mixer blade.
Operation
Check the voltage on the equipment label before use. Only connect the device to
sockets which correspond to the voltage of the device.
Mixing indicator
TIMER button
START/STOP button
POWER button
Cooling indicator

16
EN
Button Function
POWER Insert the plug into the socket. Press the POWER button to turn the device
on. The display shows [60:00], and the preset time is 60 minutes.
TIMER You can set the timer in 10-minute increments between 10–60 minutes.
To do so, press the TIMER button repeatedly to set the timer to the desired
time. The preset time for the timer is 60 minutes.
START/
STOP
Set the timer rst. Then press START / STOP to start the ice cream
production. During ice cream production, the display will remain
illuminated all the time. Press START / STOP during ice cream production
to stop and restart the mixer blade. The compressor will continue cooling
even when you stop the mixer blade.
NOTE: Do not hold down the START / STOP button for more than 3 seconds, otherwise
the device will be reset to the default settings and all settings will be cleared.
When the set time has elapsed, the motor will stop automatically and will beep 10 times
in a row. The display will show [00:00], and the display will ash in secondary mode. If
you do not empty the device in the next 10 minutes, it will enter the cooling mode so that
the ice cream does not thaw.
Extended cooling function
The cooling function is maintained for up to a maximum of 1 hour. Then the device will
return to the default state. In this case, the display will be illuminated, but no functions
will be active.
WARNING
Risk of electric shock. Always remove the plug from the socket before
you remove the ice cream to avoid electric shock.

17
EN
SETTINGS AND EXTENDED FUNCTIONS
Cancel ice cream production
To stop ice cream production, press and hold START / STOP during ice cream
production for 3 seconds, or press the POWER button.
Setting the timer during ice cream production
You can also change the set time while the device is already running. Press the TIMER
button repeatedly. Each push of the button adds 5 minutes to the running time until the
maximum of 60 minutes is reached. The set time is shown on the display. The running
time can only be increased but not decreased.
Adding time after ice cream production
When the preset time has elapsed, the device will stop and enter the cooling mode. If
you like your ice cream harder, you can restart the device and set the timer to 10–60
minutes again. Then, press START / STOP to restart the device. When the timer has
expired, the device will stop again and enter the cooling mode so that the ice cream
does not thaw.
Important information about the amount of ingredients: To prevent overow
and unnecessary waste, make sure that the removable bowl is lled to a maximum of
60%. Ice cream expands during ice production.
Storing the prepared ice cream
Remove the inner bowl, and use a plastic or wooden spoon to ll the ice cream into a
container suitable for freezing. To avoid scratching the surface of the bowl, do not use
metal scoops or kitchen utensils.

18
EN
HINTS ON DISPOSAL
According to the European waste regulation 2012/19/
EU this symbol on the product or on its packaging indicates
that this product may not be treated as household waste.
Instead it should be taken to the appropriate collection point
for the recycling of electrical and electronic equipment. By
ensuring this product is disposed of correctly, you will help
prevent potential negative consequences for the environment
and human health, which could otherwise be caused by
inappropriate waste handling of this product. For more
detailled information about recycling of this product, please
contact your local council or your household waste disposal
service.

19
ES
Estimado cliente:
Le felicitamos por la adquisición de este producto. Lea atentamente el siguiente manual
y siga cuidadosamente las instrucciones de uso con el n de evitar posibles daños.
La empresa no se responsabiliza de los daños ocasionados por un uso indebido del
producto o por haber desatendido las indicaciones de seguridad.
ÍNDICE
Datos técnicos19
Declaración de conformidad19
Recomendaciones de seguridad20
Vista general del aparato22
Puesta en marcha y manejo 22
Montaje23
Ajustes y otras funciones 25
Indicaciones sobre la retirada del aparato26
DATOS TÉCNICOS
Número de artículo 10031508
Alimentación 220-240 V ~ 50-60 Hz
Capacidad 1.5 L
Potencia 150 W
DECLARACIÓN DE CONFORMIDAD
Fabricante:
Chal-Tec GmbH, Wallstraße 16, 10179 Berlín, Alemania.
Este producto cumple con las siguientes directivas
europeas:
2014/30/UE (EMC)
2014/35/UE (baja tensión)
2011/65/UE (refundición RoHS)
643/2009/CE (ErP)
1060/2010/UE (ErP)

20
ES
RECOMENDACIONES DE SEGURIDAD
• Lea atentamente todas las recomendaciones de seguridad antes de instalar y
utilizar el aparato para excluir posibles riesgos de fuego, cortocircuito u otros
daños.
• Contraste la potencia indicada en el aparato antes de su utilización. Enchufe
únicamente el aparato en enchufes que correspondan con la potencia indicada.
En caso de no estar seguro de si los enchufes de su instalación corresponden
con la potencia necesaria, contacte con un electricista o con su proveedor de
electricidad.
• En caso de que el cable de alimentación esté dañado, el mismo deberá ser
reparado o reemplazado por personal autorizado o cuali cado.
• No desmonte el aparato y no lo incline más de 45º.
• Para evitar cortocircuitos, preste mucha atención de que el cable, enchufe y
panel de control no entren en contacto directo con agua. No sumerja la base del
aparato, el cable y el enchufe en agua o en cualquier otro tipo de líquido.
• Siempre desenchufe el aparato antes de limpiarlo.
• Deje un espacio de 8cm alrededor del aparato, para que pueda circular
libremente el aire.
• No utilice ningún tipo de accesorio que no sea el recomendado especí camente
por el fabricante.
• No utilice el aparato cerca de fuegos, fogones y hornos.
• No presione el botón de encendido repetidas veces. Si ha apagado el aparato,
espere un mínimo de 5 minutos para volver a encenderlo. Así se evita que se dañe
el compresor.
• Para evitar un cortocircuito, no introduzca ningún elemento metálico dentro de la
ventilación del aparato.
• No golpee el barril cuando retire el hielo. Esto puede producir un daño en el
mismo.
• No encienda el aparato antes de haber instalado todas las piezas del mismo.
• La temperatura de los ingredientes debe estar sobre los 25 ± 5 °C. No coloque
los ingredientes en la nevera o el congelador antes de su utilización. Esto puede
ocasionar que se bloquee la cuchilla del mixer.
ATENCIÓN
¡Riesgo de lesión! No extraiga la cuchilla del mixer mientras el mismo
está encendido.
• No utilice el aparato al aire libre.
• No limpie el aparato con productos o jabones abrasivos.
• Conserve las instrucciones de uso siempre a mano.
Table of contents
Languages:
Other Klarstein Ice Cream Maker manuals

Klarstein
Klarstein DOLCE BACIO SMART User manual

Klarstein
Klarstein Dolce Bacio User manual

Klarstein
Klarstein FRUIT DESSERT MAKER User manual

Klarstein
Klarstein 10028873 User manual

Klarstein
Klarstein 10022113 User manual

Klarstein
Klarstein 10031663 User manual

Klarstein
Klarstein Creamberry User manual

Klarstein
Klarstein Sweet Dreams User manual

Klarstein
Klarstein Vanilla Sky Series User manual

Klarstein
Klarstein Yo & Yummy User manual