manuals.online logo
Brands
  1. Home
  2. •
  3. Brands
  4. •
  5. Komet
  6. •
  7. Tools
  8. •
  9. Komet DIHART REAMAX TS Duo User manual

Komet DIHART REAMAX TS Duo User manual

Note: The application details shown depend on the environ-
mental and application conditions (e.g. machine, ambient
temperature, use of lubricant/coolant and the machining
result required). These are subject to correct operating con-
ditions, correct application and compliance with the spindle
speed limits given for the tools.
Patent applied
KOMET DIHART REAMAX®TS Duo
* nicht im Lieferumfang enthalten
* not included in supply
AMontageanleitung
•Kegelaufnahme/Plananlagesauberreinigen
fettfrei.
•Anzugsbolzen 5in Reibkopf einschrauben
und mit Gabelschlüssel 6festziehen.
•Spannbacken 2 mit Schlüssel 3öffnen,
aber nicht vollständig lösen und Reibkopf 1
einsetzen.
•Spannbacken 2 mit Schlüssel 3schließen,
empfohlenesAnzugsmomentbeachten.
•BeimEinsetzen des Reibkopfes 1wird dieser
durchdas SchließenderSpannbacken 2in
seineendgültigeLagegezogen.
•Beim Entfernen des Reibkopfes 1wird
dieserdurchdie Spannbacken 2aus seiner
Lage gedrückt und kann so leicht vom Halter
gelöstwerden:Spannbacken2mitSchlüssel
3öffnen, aber nicht vollständig lösen und
Reibkopf 1entfernen.
B
Nachstellen zur Verschleisskompensation
KleinsteBohrungstoleranzenbisIT4lassensich
durch das Nachstellen mit dem Innensechs-
kant-Schlüssel4erreichen.
AAssembly instructions
•Cleantaper/contactfacethoroughly grease
free.
•Screw pull stud 5into reaming head and
tighten with open-end wrench 6.
•Withoutfullyreleasingthem,openclamping
jaws 2with key 3.Insertreaminghead1.
•Close clamping jaws 2with key 3, using
recommended torque.
•
Wheninserting the reaming head 1it is drawn
into its final position by closing the clamping
jaws 2.
•Whenremoving the reaming head 1it is
pushed out of its position by the clamping
jaws 2which allows for easy removal from
theholder:Withoutfullyreleasingthem,open
clamping jaws 2with the key 3, remove the
reaming head 1.
BAdjusting to compensate for wear
BoretolerancesuptoIT4canbeachieved
by readjusting the reaming head using the
hexagonal key 4.
Deutsch
3
2
1
6
5
399 20 268 21-_T-05/15 Printed in Germany · © 2015 KOMET GROUP GmbH
Technische Änderungen, bedingt durch Weiterentwicklung, vorbehalten.
We reserve the right to make modifications.
KOMET GROUP GmbH · 74354 Besigheim · Zeppelinstr. 3 · GERMANY
Tel. +49 7143 3730 · Fax +49 7143 373233 · [email protected]
www.kometgroup.com
A
B
4
Kegelaufnahme/Plananlagesauber
reinigen fettfrei
Cleantaper/contactfacethoroughly
(grease free)
Hinweis:Die genannten Einsatzdaten stehen in Abhängigkeit
zu den Umgebungs- und Einsatzbedingungen (wie z. B. Ma-
schine,Umgebungstemperatur,Schmier-/Kühlmitteleinsatzund
angestrebtes Bearbeitungsergebnis): sie setzen sachgerechte
Einsatzbedingungen,sachgerechtenEinsatzundBeachtungder
angegebenenGrenzdrehzahlenderWerkzeugevoraus.
Patentanmeldungen
English
X42-51,999 52-70,000
3
Betätigungs-
schlüssel
Operating key
1805010040
SW4
10Nm
1805010050
SW5
13Nm
4*
Innensechs
kant-
schlüssel
Hexagonal key
SW8 SW10
5Anzugsbolzen
Pull struds
15E.30.10050 15E.30.10070
6Gabelschlüssel
Open-end wrench
1858910010
SW10
1858910013
SW13
399 20 268 21
A
D
C
Reibkopf – nachstellbar
Reaming head – expandable
4
3
1
2
CMontage Schneidplatten
Auf absolut saubere / fettfreie Plattensitze 3
und Schneidplatten achten, gegebenenfalls
mit Pressluft kleinste Staubpartikel entfernen!
•
Alle Schneidplatten und Plattensitze sind mit
Buchstaben markiert 1, dies gewährleistet die
richtige Zuordnung zum Plattensitz.
• Zahlenmarkierungen 2 stellen sicher, dass alle
Schneidplatten die korrekte Lage haben.
• Schraube 4 (Best.-Nr. N00 57710) mit 2,25
Nm anziehen. Drehmomentschlüssel Bestell-Nr.
L05 03311 + L05 00740.
DMessen des Durchmessers:
Achtung: Ungleiche Winkelteilung !
•
Es liegen jeweils 2 Schneiden 180° gegenüber
= Messzahn A.
• Durchmesser vorne an der Schneide messen
(aufgrund Konizität, siehe Abbildung).
• Beschädigung der Schneiden vermeiden.
• Beim Wenden der Schneidplatte muss erneut
der Durchmesser eingestellt werden.
• Auslieferungszustand:
REAMAX® TS Duo mit montierten Schneiden.
CAssembly instructions inserts
Make sure that the insert seats 3 and inserts
are absolutely clean/grease-free. If necessary,
remove tiny dust particles with compressed air!
•
All inserts and insert seats are marked with
letters 1. This ensures correct assignment to
the insert seat.
• The number markings 2 ensure that all inserts
are positioned correctly.
• Tighten the screw 4 (order no. N00 57710)
to
2.25 Nm. Torque wrench order no. L05 03311
+ L05 00740
DMeasuring the diameter:
Caution: Uneven angle division !
• Uneven angle division !
• Two cutting edges are at 180° from each other
= measuring tooth A.
• Measure the diameter at the front of the reaming
head (due to tapering, see illustration).
• Avoid damaging the cutting edges
• When indexing the insert, the diameter must
be readjusted.
• Delivery includes
:
REAMAX® TS Duo with mounted inserts.
Note: I dettagli applicativi riportati nel presente catalogo dipendono dal-
lecondizioniambientaliedapplicative(Adesempio:statodellamacchina,
temperatura dell’ambiente, tipo di refrigerazione usato, risultati richiesti
ecc.). Queste ultime sono soggette alla corretta applicazione degli uten-
sili e alla osservanza dei limiti di rotazione massima ammessi per ciascun
specifico utensile.
Brevettodepositato.
Conriservadimodichetecnichesenzapreaviso
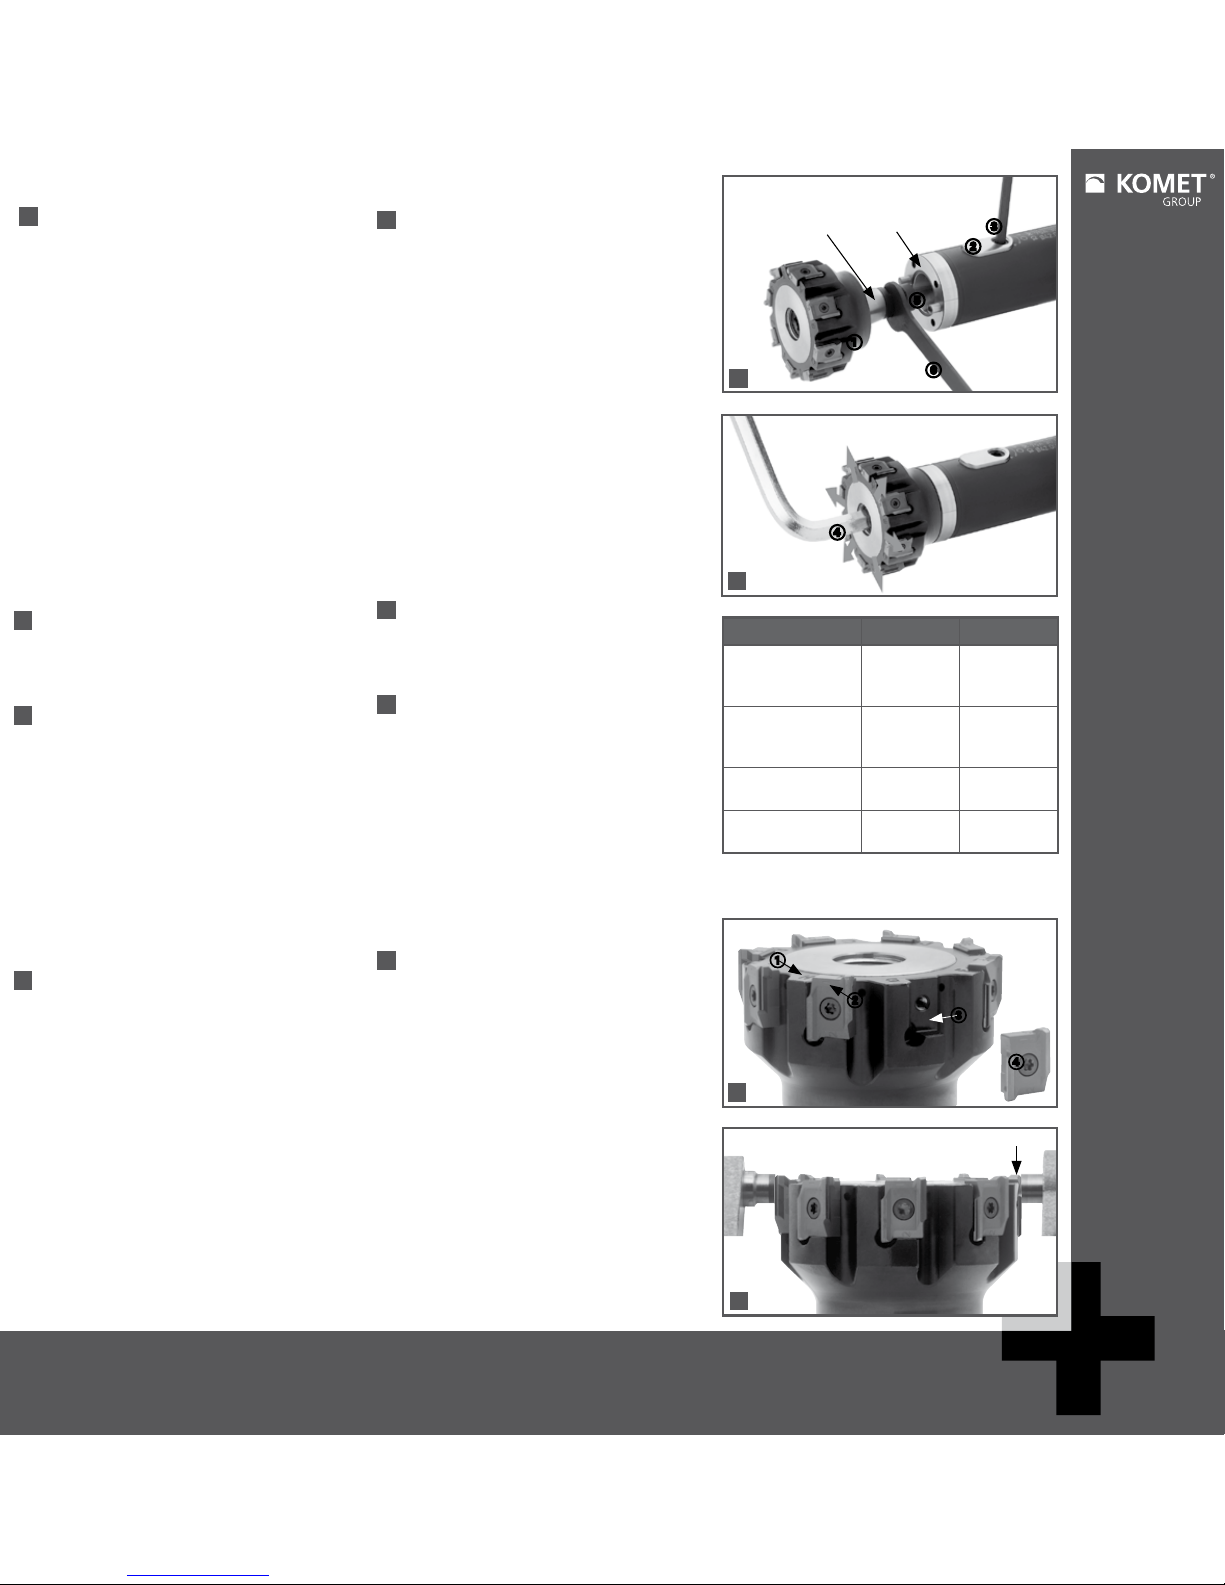
AInstructions de montage
• Attachementcône/facenettoyersoigneusementà
sec.
• Visser le tirant 5d
ans la tête d’alésage et le tirer en
positionxeaveclacléàfourche
6.
• Ouvrir les mors 2àl‘aidedelaclé3, mais sans
les desserrer complètement et positionner la tête
d’alésage 1.
•
Fermer les mors 2avec la clé 3,veilleràrespecter
le moment de serrage recommandé.
• Lors du positionnement de la tête d’alésage 1,
celle-ci est tirée dans son logement par le serrage
des mors 2.
• Lors du retrait de la tête d’alésage 1, celle-ci est
poussée hors de son logement par les mors 2et
peut ainsi être démontée facilement : Ouvrir les
mors 2àl’aidedelaclé3, mais sans les desserrer
complètement et retirer la tête d’alésage 1.
BRéglage de compensation d’usure
Leréglagedestolérancesd’alésagejusqu’àIT4sont
réaliséesaveclacléàsixpansintérieures4.
AIstruzioni per il montaggio
•Pulireilconoelafacciadicontatto.Nondeveessere
presente grasso sulla superficie.
•
Inserireiltirante5nella testina e bloccare con la chiave 6.
•Aprirelaganasciadiserraggio2con la chiave 3senza
tuttavia allentarla completamente e inserire la testa per
alesatura 1.
•Chiudereilsistemadibloccaggio2con la chiave 3,
con una coppia di serraggio come indicato dalla tabella.
•Dopo aver inserito la testina 1 questa andrà nella
correttaposizionechiudendoilsistemadibloccaggio2
.
• Per rimuovere la testa di alesatura 1premerla fuori
dallasuaposizionenellaganasciadiserraggio2per
sganciarlafacilmentedalsupporto:Aprirelaganasciadi
serraggio 2con la chiave 3,senzatuttaviaallentarla
completamente e rimuovere la testa di alesatura 1.
BRegistrazione del diametro per recuperare
l’usura del tagliente
Anche le tolleranze molto strette no alla classe IT4
possonoesseremantenutemediantelaregistrazionedel
diametro con la chiave esagonale 4.
Remarque : Les données d’utilisation indiquées sont fonction des
conditions d’environnement et d’utilisation (telles que machine, tem-
pérature ambiante, lubrifiant/produit de refroidissement et résultat
d’usinage recherché): elles supposent des conditions et une utilisation
correcte ainsi que le respect des vitesses limites indiquées des outils.
Demandes de brevets déposées.
Sousréservedechangementstechniquesdusaudéveloppement.
Français Italiano
* non comprise dans la livraison
* non incluso nella fornitura
3
2
1
6
5
A
B
4
Attachementcône/facenettoyer
soigneusementàsec.
Pulire il cono e la faccia di contatto. Non deve
essere presente grasso sulla superficie
X42-51,999 52-70,000
3Clédecommande
Chiavediservizio
1805010040
SW4
10Nm
1805010050
SW5
13Nm
4*Cléà6pans
Chiaveesagonale
SW8 SW10
5Tirant
Tirante
15E.30.10050 15E.30.10070
6
Cléàfourche
Chiavedi
bloccaggio tirante
1858910010
SW10
1858910013
SW13
A
D
C
Tête d’alésage – réglable
Testine di alesatura – espansibili
4
3
1
2
CInstructions de montage plaquettes
Assurez-vous que les emplacements de plaquette 3 et
les plaquettes sont absolument propres/sans graisse. Si
nécessaire, enlevez les petites particules de poussières
en soufflant de l’air!
•
Toutes les plaquettes et tous les emplacements de pla-
quette sont indiqués par des lettres 1 ce qui garantit
une bonne affectation à l’emplacement de chaque
plaquette.
•
Les marquages numériques 2 permettent de s’assurer
que toutes les plaquettes sont correctement positionnées.
• Serrez la vis 4 (référence N00 57710) à 2,25 Nm
(clé dynamométrique :
référence L05 03311 + L05 00740)
DComment mesurer le diamètre?
Attention à la création d’angle irrégulier !
•
Il y a deux dents s’opposant à 180° l’une et l’autre
= la dent d’étalonnage A
•
Mesurez le diamètre au devant de la dent (à cause
de la dépouille, voir illustration)
•
Evitez d’endommager la fraise.
•
Si la plaquette est retournée, le diamètre doit être
réajusté.
•
État à la livraison :
REAMAX® TS Duo
montée avec plaquettes.
CIstruzioni per il montaggio inserto
E’ necessario assicurarsi che le sedi inserto 3 e gli inserti
siano assolutamente puliti. Occorre rimuovere anche la
minima presenza di depositi di polvere con aria compressa!
• Tutte le sedi inserto e gli inserti sono marcati con una
lettera 1. Questo assicura il corretto posizionamento
degli inserti.
• La corrispondenza della stessa lettera 2 riportata
sull’inserto garantisce che l’inserto stesso sia posizionato
correttamente nella propria sede.
• Chiudere le viti di bloccaggio inserto 4 con chiave
dinamometrica a 2.25 Nm (Codice viti: N00 57710,
Codice chiave: L05 03311 + L05 00740)
D
Misurazione del diametro:
Attenzione: Il passo degli inserti è differenziato!
•
Esistono solo due inserto esattamente a 180° fra loro e
sono identificati con la lettera A.
• Rilevare la quota all’inizio del tagliente (il tagliente ha
una rastremazione sulla sua lunghezza che influisce
sulla lettura della quota).
• Evitare di danneggiare il corpo dell’alesatore e le sed
• Quando si gira l’inserto, occorre nuovamente regolare
il diametro.
• Stato al momento della consegna:
REAMAX® TS Duo con inserti montati.

Other Komet Tools manuals

Komet KomLoc HSK K User manual

Komet

Komet KomLoc HSK K User manual

Komet REAMAX TS User manual

Komet

Komet REAMAX TS User manual

Komet MicroKom hi.flex User manual

Komet

Komet MicroKom hi.flex User manual

Komet DIHART Duomax User manual

Komet

Komet DIHART Duomax User manual

Komet KUB Centron User manual

Komet

Komet KUB Centron User manual

Komet DIHART DAH 50 HS User manual

Komet

Komet DIHART DAH 50 HS User manual

Popular Tools manuals by other brands

JONARD TOOLS FC-500 instruction manual

JONARD TOOLS

JONARD TOOLS FC-500 instruction manual

THORLABS FW102C user guide

THORLABS

THORLABS FW102C user guide

Wen 61711 user manual

Wen

Wen 61711 user manual

Transpak H-22 Operation instructions, Spare parts list

Transpak

Transpak H-22 Operation instructions, Spare parts list

Yakima HangOver 8881340 manual

Yakima

Yakima HangOver 8881340 manual

BOMBARDIER LEARJET 45 Pilot's manual

BOMBARDIER

BOMBARDIER LEARJET 45 Pilot's manual

Westfalia 31 12 90 instruction manual

Westfalia

Westfalia 31 12 90 instruction manual

FAR KJ 17-A Translation of the original instructions

FAR

FAR KJ 17-A Translation of the original instructions

Evotools PP-R2000A user manual

Evotools

Evotools PP-R2000A user manual

Len Matec SERV & TWIST 1000 user manual

Len Matec

Len Matec SERV & TWIST 1000 user manual

DS Produkte OS220 instruction manual

DS Produkte

DS Produkte OS220 instruction manual

AGI GRAINMAXX 6300 Series Operator's manual

AGI

AGI GRAINMAXX 6300 Series Operator's manual

Hazet 4902/6 operating instructions

Hazet

Hazet 4902/6 operating instructions

Sealey VS640 manual

Sealey

Sealey VS640 manual

Sunex Tools 4910B owner's manual

Sunex Tools

Sunex Tools 4910B owner's manual

Kogan CERTA CTPTPHD58A user guide

Kogan

Kogan CERTA CTPTPHD58A user guide

Josef Kihlberg JK20T operating instructions

Josef Kihlberg

Josef Kihlberg JK20T operating instructions

Goodyear 27517152G instruction manual

Goodyear

Goodyear 27517152G instruction manual

manuals.online logo
manuals.online logoBrands
  • About & Mission
  • Contact us
  • Privacy Policy
  • Terms and Conditions

Copyright 2025 Manuals.Online. All Rights Reserved.