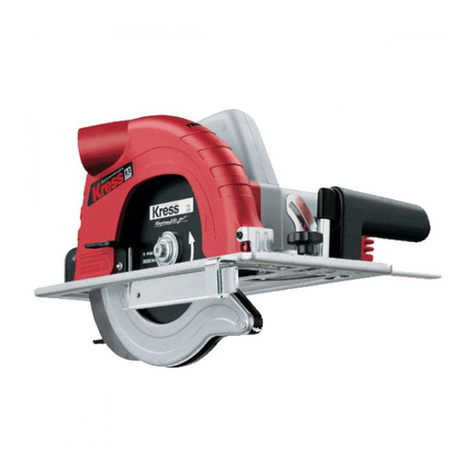
KRESS KU760 Installation manual

SAFETY AND OPERATING MANUAL
Cut off saw KU760


3
Cut off saw KU760
SAFETY INSTRUCTIONS
WARNING! When using electric tools
basic safety precautions should always
be followed to reduce the risk of fire, electric
shock and personal injury including the
following.
Read all these instructions before attempting
to operate this product and save these
instructions.
This appliance is not intended for use by
persons (including children) with reduced
physical, sensory or mental capabilities,
or lack of experience and knowledge,
unless they have been given supervision or
instruction concerning use of the appliance by
a person responsible for their safety.
Safe operation
1- Keep work area clear
- Cluttered areas and benches invite
injuries.
2 - Consider work area environment
- Do not expose tools to rain.
- Do not use tools in damp or wet locations.
- Keep work area well lit.
- Do not use tools in the presence of
flammable liquids or gases.
3 - Guard against electric shock
- Avoid body contact with earthed or
grounded surfaces {e.g. pipes, radiators,
ranges, refrigerators).
4 - Keep other persons away
- Do not let persons, especially children,
not involved in the work touch the tool or
the
extension cord and keep them away from the
work area
5 - Store idle tools
- When not in use, tools should be stored
in a dry locked-up place, out of reach of
children.
6 - Do not force the tool
- It will do the job better and safer at the
rate for which it was intended.
7 - Use the right tool
- Do not force small tools to do the job of a
heavy duty tool.
- Do not use tools for purposes not
intended; for example do not use circular
saws to cut tree limbs or logs.
8 - Dress properly
- Do not wear loose clothing or jewellery,
they can be caught in moving parts.
- Non-skid footwear is recommended when
working outdoors.
- Wear protective hair covering to contain
long hair.
9 - Use protective equipment
- Use safety glasses.
- Use face or dust mask if working
operations create dust.
10 - Connect dust extraction equipment
- If the tool is provided for the connection
of dust extraction and collecting
equipment, ensure these are connected
and properly used.
11 - Do not abuse the cord
- Never yank the cord to disconnect it from
the socket Keep the cord away from heat,
oil and sharp edges.
12 - Secure work
- Where possible use damps or a vice to
hold the work. It is safer than using your
hand.
13 - Do not overreach
- Keep proper footing and balance at all
times.
14 - Maintain tools with care
- Keep cutting tools sharp and clean for
better and safer performance.
- Follow instruction for lubricating and
changing accessories.
- Inspect tool cords periodically and if
damaged have them repaired by an
authorized service facility.
- Inspect extension cords periodically and
replace if damaged.
- Keep handles dry, clean and free from oil
and grease.
15 - Disconnect tools
- When not in use, before servicing and
when changing accessories such as
blades, bits and cutters, disconnect tools
from the power supply.
16 - Remove adjusting keys and wrenches
- Form the habit of checking to see that
keys and adjusting wrenches are removed
from the tool before turning it on.
17- Avoid unintentional starting
- Ensure switch is in "off” position when
plugging in
18 - Use outdoor extension leads
- When the tool is used outdoors, use only
extension cords intended for outdoor use
and so marked.
19 -Stay alert
- Watch what you are doing, use common
sense and do not operate the tool when
you are tired.
20 - Check damaged parts
- Before further use of tool, it should be
carefully checked to determine that it will
operate properly and perform its intended
function.
- Check for alignment of moving parts,
binding of moving parts, breakage of
parts, mounting and any other conditions
that may affect its operation.
- A guard or other part that is damaged
should be properly repaired or replaced
by an authorized service centre unless
otherwise indicated in this instruction
manual.
4
Cut off saw KU760
- Have defective switches replaced by an
authorized service centre.
- Do not use the tool if the switch does not
turn it on and off.
21 - Warning
- The use of any accessory or attachment
other than one recommended in this
instruction manual may present a risk of
personal injury.
22 - Have your tool repaired by a qualified
person
- This electric tool complies with the
relevant safety rules. Repairs should only
be carried out by qualified persons using
original spare parts, otherwise this may
result in considerable danger to the user.
23 - If the replacement of the supply cord
is necessary, this has to be done by the
manufacturer or his agent in order to
avoid a safety hazard.
24 - For tools intended to be connected to a
water supply:
– Replacement of the plug or the supply
cord shall always be carried out by the
manufacturer of the tool or his service
organisation,
– Keep water clear off the electrical parts
of the tool and away from persons in the
working area.
ADDITIONAL SAFETY
RULES
Safety precautions
- WARNING: Wear protective glasses.
Always use eye and ear protection when
cutting;
- Use other personal protective equipment
such as dust mask, gloves, helmet and
apron, when necessary;
- Inspect the cutting wheel by visual check
before use, and do not use chipped,
cracked or otherwise defective abrasive
cutting-off wheels;
- Use only abrasive wheels recommended
by the manufacturer which have marked
speed equal or greater to that marked on
the machine;
- connect circular saws to a dust-collecting
device when operating;
- Do not use the cutting-off grinders without
guards in position;
- Do not use damaged abrasive wheels;
- WARNING: Not to use saw blades.
SAFE OPERATION
- WARNING: Ensure that the abrasive
cutting-off wheel is correctly fitted and
tightened before use. Run the machine at
no-load for 30 s in a safe position, and to
stop immediately and replace the cutting-
wheel if there is considerable vibration or
if other defects are detected;
- WARNING: Ensure that ventilation
openings are kept clear when working
in dusty conditions. First disconnect the
machine from the mains supply and to
clean the openings by using a soft brush,
if it should become necessary to clear
dust.
- WARNING: Not to use the machine in
explosive atmospheres and environments
where sparks could cause fire, explosion
etc;
- WARNING: The wheel continues to rotate
after the machine is switched off;
- To prevent loss of control the cutting-
off grinder should always be fixed to a
bench with bolts of sufficient length and
strength.
- Read the operating instructions supplied
by the wheel manufacturer;
SPECIFIC SAFETY RULES
FOR CUT OFF SAWS
1. If the power cable is damaged or cut
through while working, do not touch
the cable, and pull the power plug out
immediately. Never use the machine with
a damaged cable.
2. Wear protective glasses and hearing
protection. Dust is generated while
working that can be detrimental to
health, inflammable or explosive. Suitable
protective measure are required.
3. For example: Some types of dust are
considered to be carcinogenic. Use
suitable dust vacuuming and wear a dust
protection mask.
4. Light metal dust can burn or explode.
Always keep the workplace clean since
mixed materials are especially dangerous.
5. Wear protective gloves and sturdy shoes.
When necessary, also wear protective
clothing.
6. Connect machines that are used outdoors
by means of a fault current circuit breaker
(FI) with a maximum triggering current of
30 mA. Use only an extension cable that is
approved for outdoor use.
7. Always lead the cable to the rear away
from the machine.
8. Use the machine only for dry cutting.

5
Cut off saw KU760
9. Take hold of the electric tool only by
the insulated handle when the cutting
tool could come in contact with hidden
wiring or its own power cable. Contact
with voltage carrying wiring can place the
metal parts of the machine also under
voltage and lead to an electrical shock.
10. Never stand on the machine. Serious
injury could occur if the tool is tipped or if
the cutting tool is accidentally started.
11. Use cutting discs whose allowable speed
is at least as high as the no load speed
of the machine. Check the cutting disc
before use.
12. Keep your body positioned to either side
of but not in line with the cutting disc. In
case of a burst disc, your body is better
protected from possible fragments.
13. The cutting disc must be flawlessly
mounted and be able to rotate freely.
Make a test run of at least one minute
without load. Do not use damaged, out of
round or vibrating cutting discs. Always
correctly adjust the depth stop. When
the depth stop is not properly adjusted,
the cutting disc can cut into the surface
underneath the base plate.
14. During operation, the cutting disc cover
must be attached and the protective
pendulum hood must be functioning
properly.
15. Do not work with magnesium or materials
containing asbestos.
16. Protect the cutting disc from impacts,
shocks and grease.
17. Apply the machine to the work piece only
when it is switched on.
18. Keep your hands away from the rotating
cutting disc.
19. When cutting metal, sparks are
generated. Take care that no persons are
endangered. Because of the danger of
fire, no combustible materials should be
located in the vicinity (spark flying zone).
20. Blocking of the cutting disc leads to a
jerking reaction of the machine. In this
case, switch off the machine immediately.
21. Do not ram the cutting disc with force into
the work piece or apply too much pressure
when using the machine. Avoid especially
the catching of the cutting disc when
working on corners, sharp edges, etc.
When the cutting disc is damaged due to
misuse, it may develop cracks that could
lead to bursting without warning.
22. Avoid overloading the motor especially
when working with large work pieces.
When cutting, apply only light pressure to
the handle.
23. Observe the dimensions of the cutting
disc. The hole diameter must fit on the
tool spindle or the adapter without play.
24. Do not apply sideways pressure to the
cutting disc.
25. Observe the instructions of the
manufacturer for the mounting and usage
of the cutting disc.
26. Actuate the spindle locking only when the
cutting disc is at a standstill.
27. The cutting disc becomes very hot while
working; never take hold of it before it has
cooled.
SYMBOL
To reduce the risk of injury, user must
read instruction manual
Wear ear protection
Wear eye protection
Wear dust mask
Double insulation

6
Cut off saw KU760
1
3
2
4
5
21
17
9
6
10
8
11
12
13
15
16
14
A
B
7
22
20
19
18

7
Cut off saw KU760
23
786
12
D
A1
C

8
Cut off saw KU760
COMPONENT LIST
1.
HANDLE
2.
SWITCH SELF-LOCKING KNOB
3.
SWITCH
4.
MOVABLE SHIELD
5.
SLICING
6.
UNLOCK KEY
7.
SCREW HANDLE
8.
FASTENING SCREW ROD
9.
SPANNER
10.
BASE
11.
FIXED BAFFLE PLATE FIXING BOLT A
12.
FIXED BAFFLE PLATE
13.
FIXED BAFFLE PLATE FIXING BOLT B
14.
CUTTING DEPTH ADJUSTMENT BOLT
15.
ARM RETAINING PIN
16.
ARM
17.
SPINDLE
18.
EXTERNAL PRESSING PLATE
19.
WASHER
20.
HEX BOLT
21.
SPARK BAFFLE
22.
SPINDLE LOCKING KNOB
Some of the accessories mentioned in
illustrations or texts are not included in the
scope of supply.
TECHNICAL DATA
Rated voltage 220-230V~50Hz
Rated input power 2200W
Rated no-load speed 3900r/min
Disc size 355mm
Disc bore 25.4mm
Machine weight 16kg
Protection class /II
ACCESSORIES
Spanner 1
355mm resin cutting slice 1
Recommend to choose your accessories from the store
where you purchased the power tool. Please select the
right accessory based on your work. Please refer to the
accessory package for more methods and assistance
of using the accessory.
OPERATING
INSTRUCTIONS
NOTE: Please read the instructions
carefully before using the machine.
In order to ensure the safety of operating, the machine
base must be placed on a rm and at surface (e.g.,
worktable, at ground, etc.).
1. Arm fixing
Be sure to pull out the plug before doing any
repairs to the machine.
Using the arm xing pin (15) to x the arm helps to carry
the machine, thereby alleviating the inconvenience of
handling the machine.
Fixing the Machine (Handling Position)
Put the handle (1) down to the lowest position, push the
arm retaining pin (15) inward, and let go.
Unlocking (Working position)
Push down the handle (1) slightly, pull out the arm
retaining pin (15) outward, and lift the arm slowly
upward.
Before operating the machine, check whether the arm
xing button has been pulled out, if not, the arm can
not be moved to the desired position.
2.Replacement of slices (see figure B)
Be sure to pull out the plug before doing any
repairs to the machine.
When choosing slices, be sure to refer to the
specications provided in this manual.
The allowable speed of the slice shall not be lower than
the idle speed of the machine.
The spindle locking function can only be used after the
slice is completely stopped.
Removal of slices
Adjust the machine to the highest point.
Push the movable shield (4) upward to the end.
Rotate the hex bolt (20) with the wrench (9) attached to
the machine, and push and press the spindle locking
button (22) at the same time until the spindle is locked.
Press the spindle locking switch, turn out the hex
bolt (20), take out the external pressure plate (18) and
washer (19).
Remove slices (5).
Installation of slices
If necessary, clean the relevant parts thoroughly before
installation.
Install the new slice on the spindle (17). The labeled

9
Cut off saw KU760
side of the cutter must be facing outward (back to arm
(16)). If the direction of rotation is marked on the slice,
make sure that the direction of rotation of the slice is
the same as that of the spindle.
Install the external pressure plate (18), washers (19) and
hex bolts (20). Press down the spindle locking button
(22) until it is secured and tighten the hex bolt (20).
Slowly lower the movable shield to its original position.
3.Adjust the angle of the diagonal saw.
Be sure to pull out the plug before doing any
repairs to the machine.
The angle of the diagonal saw can be adjusted from
0 to 45 degrees. The xing bafe (12) is marked with
commonly used angles. There are additional gears at 0
and 45 degrees.
Loosen the two xing bolts (11) and (13) with wrench(9)
attached to the machine, and tighten the screw after
adjusting the angle.
4.Fixing the workpiece (see figure C)
Be sure to pull out the plug before doing any
repairs to the machine.
In order to ensure the safety of work, it is necessary to
x the workpiece before using the machine.
Put the workpiece against the xing bafe (12), push
the fastening screw rod (8) to the workpiece, and rotate
the screw handle (7) to clamp the workpiece.
Release the workpiece
Loosen the screw handle (7). Lift the unlock key (6) and
pull out the fastening screw rod(8).
5.Formal operation
Start/shut off (see figure D)
Press the switch (3) and press the switch self-locking
button (2), then release the switch, and then release the
self-locking button. At this time, the switch is locked in
working state. Re-press and loosen the switch to stop
the machine.
Operation instructions
Maximum workpiece size [mm]
Angle of the diagonal saw
Workpiece
shape 0° 45°
115 x 115 95x95
110 x 120 95x120
125 x 125 95x95
The machine should not be blocked by overload.
If the machine is operated with too much force, it will
not only reduce the power of the machine, but also
shorten the service life of the slices.
During cutting, the slices become very hot; they are not
touchable until they are cooled down.
Choose the appropriate slice according to the
workpiece.
Cutting depth
The cutting depth has been adjusted when the
machine leaves the factory. Generally speaking, if a
new 355 mm slice is used, it should not exceed the
lower plane of the base when cutting. If the chip has
been heavily worn, reduce the depth scale to balance
the gap.
When using new slices, it is necessary to adjust the
depth scale back to the original position at the time of
leaving the factory.
Correctly adjust the depth scale so that the
slice can not exceed the bottom plane of the
base when cutting the workpiece.
Adjust the cutting depth
Be sure to pull out the plug before doing any
repairs to the machine.
Use the attached wrench to loosen the cutting depth
adjusting bolt (14). Push the handle to adjust the arm
(16) to the desired position.
Turn the adjusting bolt (14) clockwise or
counterclockwise until the bolt head contacts the arm
housing.
Slowly raise the arm (16) and tighten the adjusting bolt
(14).
MAINTENANCE
Be sure to unplug the power cord before any
repair work on the machine.
No additional lubrication or special maintenance
is needed for your power tool. Do not use water
or chemical detergent to clean your power tool.
Wipe it with a dry cloth. Tools should be kept in dry
environment and keep the motor vent clean. Try not to
use it in dusty environment.
If the power cord is damaged, it must be replaced
by the manufacturer, a special service center, or an
professional person with equivalent qualications to
avoid a hazard.


Copyright © 2019, Positec. All Rights Reserved.
Table of contents
Other KRESS Saw manuals

KRESS
KRESS KU436P User manual

KRESS
KRESS 1200 SPE User manual

KRESS
KRESS 1400 HKS User manual

KRESS
KRESS APS 132 User manual

KRESS
KRESS 6066 User manual

KRESS
KRESS KU420 User manual

KRESS
KRESS 1400 HKS User manual

KRESS
KRESS KU401 User manual

KRESS
KRESS Multi-Talent AMT 132 User manual

KRESS
KRESS KUV12P User manual
Popular Saw manuals by other brands

TYROLIT Hydrostress
TYROLIT Hydrostress WSE811P operating instructions

Makita
Makita 2107F instruction manual

EINHELL
EINHELL TC-SB 245 L operating instructions

Norton
Norton Clipper TR 232 S operating instructions

Altrad Lescha
Altrad Lescha BSL 250 Original instructions

Craftsman
Craftsman 152.221240 owner's manual