LABORIE NXT Evo User manual

FOR DIGNITY. FOR LIFE.
laborie.com
NXT Evo
Owner’s Manual
Operation, care, and maintenance
UROLOGY &
UROGYNECOLOGY

ii Laborie NXT Evo Owner’s Manual LBL-00179 [D]
Laborie Medical Technologies Corp.
180 International Drive
Portsmouth, NH 03801 USA
+1.800.522.6743
Medical Measurement Systems BV
Colosseum 25
7521 PV Enschede NETHERLANDS
Tel.: +31.53.4803700 Fax: +31.53.4803701
www.laborie.com
Trademarks
NXT Evo is a trademark of Laborie Medical Technologies Corp. Roam NXT, PIM NXT, Urocap NXT, T-DOC, and Unisensor are
trademarks of Laborie Medical Technologies Corp. Windows is a registered trademark of Microsoft Corp. Bluetooth is a registered
trademark of Bluetooth SIG Inc. LogiCal is a registered trademark of Smiths Medical. Other names may be trademarks of their
respective owners.
© Copyright 2023 Laborie Medical Technologies Corp.
Document Number: LBL-00179 (MAN2040)
Revision: D
Release Date: 2023-04
Laborie Medical Technologies Corp.
180 International Drive
Portsmouth, NH 03801 USA

Contents iii
Contents
1 Introduction 1
Intended Use 1
Indications for Use 1
Equipment Intended Use 2
Contraindications 2
Software and Equipment 2
Software Installation 2
Standard Equipment and Optional Accessories 3
Warnings and Precautions 4
To Report Product Complaints or Incidents 6
About This Manual 6
Symbols Used in This Manual 6
Feedback on the Manual 6
2 Quick Start 7
Setting Up the Equipment 7
Setting Up the NXT Go Pump Hub 8
Gathering Supplies and Equipment 8
Preparing the Urocap NXT 12
Preparing the NXT Go Pump Hub 12
Preparing the Roam NXT 12
Preparing the UPP Puller NXT (Optional) 13
Assembling the UPP Puller NXT 13
Assembling the UPP Puller NXT Stand 14
Assembling and Setting Up the NXT Evo System 15
Mounting the Roam NXT & PIM NXT Assembly to the Cart 16
Mounting the Urocap NXT to the Cart 17
Mounting the IV pole to the Cart—For Fluid Setup 18
Water Pressure Transducer Mount 19
Setting Up Consumables and Preparing the Patient 20
Consumable Traceability 20
Infusion Pump Tubing Setup 21
Replacing the Pump Tubing 22
Setting Up Catheters and Transducers 22
T-DOC G1 Air-Charged Catheters 24
Placing the EMG Patch Electrodes 28
Performing Roam NXT Patient Setup 28

iv Laborie NXT Evo Owner’s Manual LBL-00179 [D]
3 Performing a Study 29
Starting a Study 29
FreeFlow Study 30
Starting the FreeFlow Study 31
Performing a FreeFlow Study 31
Urology Urodynamic Study 33
Starting a Urology Urodynamic Study 33
Performing a Urology Urodynamic Study 34
Cystometry Study 36
Starting the Cystometry Study 36
Performing the Cystometry Study 36
Tests 37
Stress Test 37
Urethral Pressure Prole 38
Finishing the Studies 39
Printing the Study Result (Optional) 39
Troubleshooting 39
4 Synergy Software 40
User Access Control 40
Login 40
LDAP Setup 41
Creating User Accounts 42
Sections and Icons in the Main Window 45
Overview of Sections 46
Overview of the Icons on the Title Bar 46
Patient Management 47
Patients 47
Patient Details 50
Database Management 51
Study Management 53
Workows 53
Customizing Workows 54
Start Study Button 59
Workow Steps 59
Procedure—Preview Phase 60
Procedure—Recording Phases 62
Questionnaire 63
Reports 64
Review 69
UDS Intelligence 70
Quality Control (QC) 70
QC Score and QC Score Summary 72

Contents v
5 Maintenance and Service 75
Cleaning and Disinfection 75
General Cleaning and Disinfection 75
Cleaning and Disinfection Preparation 76
Cleaning 77
Disinfection 80
Completing Cleaning and Disinfection 81
Preventive Maintenance 81
General Maintenance 81
Caring for the Cart 82
Verifying Calibration 83
Urocap NXT—Verifying Calibration 83
Roam NXT—Verifying Calibration 85
NXT Go Pump Hub and Volume Transducer—Verifying Calibration 87
Conguration 88
NXT Evo Electrical Isolation Diagram 88
Roam NXT and Wall Charger Isolation Diagram 89
Urocap NXT and Wall Charger Isolation Diagram 90
UPP Puller NXT and Wall Charger Isolation Diagram 90
Computer Virus Protection 90
Disposing of Product After Use 91
Environmental Consideration of Waste Disposal 91
Backups 91
Troubleshooting Guide 91
Software Error Messages 94
6 Hardware 95
All-in-One Personal Computer 95
Bluetooth Dongle NXT 95
Remote Control NXT 95
Remote Control NXT LED Signals 96
Remote Control NXT Battery Replacement 96
NXT Go Pump Hub 97
Pairing a Version 2 (Wired Connection) NXT Go Pump Hub 97
Pairing a Version 3 (Wired/Wireless Connection) NXT Go Pump Hub 98
Information for All Pump Versions 98
Infusion Volume Transducer 99
Roam NXT 99
PIM NXT 99
Replacing the PIM NXT 101
Roam NXT—Charging the Battery and Pairing 102

vi Laborie NXT Evo Owner’s Manual LBL-00179 [D]
Urocap NXT 103
Urocap NXT—Charging the Battery and Pairing 104
UPP Puller NXT 105
UPP Puller NXT—Pairing 105
UPP Puller NXT—Charging the Battery 105
NXT Evo Cart 106
Mounting the NXT Go Pump Hub 106
T-DOC Air-Charged Catheters 107
EMG Electrodes 108
Commode 108
Appendix A: System Specications 109
Equipment Specications 109
Classication and Applicable Directives 113
Appendix B: Symbols Glossary 114
Medical Device Label Placement 115
Appendix C: Electromagnetic Compatibility (EMC) 116
Transmitter and Wireless Compliance Statements 119

LBL-00179 [D] Laborie NXT Evo Owner’s Manual 1
1 Introduction
The Laborie NXT Evo (NXT2400) system (Figure 1-1) is a partially-wireless-capable system providing mobility and
ease-of-use in the eld of urodynamics. It allows studies to be performed with mountable modules and is controlled
by the Laborie Synergy software. The wireless and battery-powered features allow for improved system setup and
use. For information on warranty and terms and conditions, visit http://www.laborie.com/terms-and-conditions/.
Figure 1-1: The NXT Evo System
Intended Use
NXT is a family of medical device systems used for urodynamics and pelvic oor assessment. These systems can
display, record, and store data such as vesical, urethral, and abdominal pressures, urine ow and volume, and pelvic
oor electromyography (EMG) from the patient for diagnostics purposes only.
Indications for Use
The NXT urodynamics system is indicated for urologic diagnostic testing to aid in the diagnosis of urine storage and
voiding disfunction diseases, including the following:
• Urinary incontinence and retention
• Bladder outlet obstructions
• Neurogenic bladder dysfunction
• Other complex voiding/urine storage problems
• This device is indicated for use under the direction of licensed and trained healthcare professionals.

2 Laborie NXT Evo Owner’s Manual LBL-00179 [D]
Equipment Intended Use
Refer to the following descriptions for a breakdown of intended use per module.
Standard Equipment
• NXT Go pump hub with NXT Go infusion hook: Peristaltic infusion pump used to ll a patient’s bladder with
saline solution and/or contrast.
■Version 2 NXT Go pump hub (wired connection): To enable communication between the All-in-One (AIO)
computer and the NXT Go pump hub, the two components must connected at all times via the supplied
USB cable.
■Version 3 NXT Go pump hub (wired/wireless connection): The pump must be connected at all times to
the AIO computer via the supplied USB cable.
NOTE
To determine which version pump you have, refer to lower-right corner of the label axed to the bottom of
the NXT Go pump hub. If the number printed there is V2.00, you have a Version 2 pump. If the number on
the label is V3.00 or higher, you have a Version 3 pump.
• Urocap NXT: Wired or wireless and battery-powered device that measures volume and ow rate of urine.
• Roam NXT: Wired or wireless and battery-powered detachable module that connects to the PIM NXT.
• PIM NXT: Device that is powered by the Roam NXT to measure pressure and electromyography.
• All-in-One (AIO) computer: Computer that controls the system activity and displays and stores data.
• Synergy: Application software that runs on the PC to control the system activity and display, and store data.
• Bluetooth Dongle NXT: Allows wireless communication between modules and the system.
• Remote Control NXT: Wireless and battery-powered device that allows control of the system from a distance.
• Printer: For printing hardcopy reports of studies. The printer is connected via USB cable to the NXT Evo
(NXT2400) system.
Optional Equipment
• Video card/adaptor: Allows information from an external image source to be recorded by the system.
• UPP Puller NXT: Wired or wireless and battery-powered device that controls and measures speed and distance
during a Urethral Pressure Prole.
Accessories
The accessories of the equipment are as follows:
• Catheters, electrodes, tubing, pressure transducers: Disposable or reusable items used for infusion and to
measure pressure from the patient.
• Commode, procedure chair: Supports patient and facilitates position changing throughout the procedure.
• Flow stand, IV pole, carts, stands, trolleys: provides mountable surfaces for standard equipment and
accessories.
Contraindications
None known.
Software and Equipment
Software Installation
Synergy software is installed prior to shipping. The supported operating system for Synergy Software is Microsoft
Windows 10.0. For the end-user software license agreement, visit http://www.laborie.com/terms-and-conditions/
end-user-software-license-agreement/

Chapter 1 Introduction 3
IMPORTANT
• Ensure that Windows automatic updates are always enabled.
• Laborie strongly recommends that BitLocker remain enabled on the NXT system to comply with the
HIPAA standard regarding data privacy and security.
• Ensure that an antivirus program is always enabled. For more information about the use of antivirus
programs, refer to the section “Computer Virus Protection” on page 90.
• Do not upgrade any Microsoft Windows 10.0 PC to any other version of Microsoft Windows. The UDS
Urodynamics system and software provided by Laborie are tested as a complete package and will not
work correctly after updating the operating system. Contact your Laborie support representative for
more information.
• Changes to the Windows Group Policies may prevent the NXT system from operating correctly. Before
making any Group Policy changes, contact your Laborie support representative for guidance to conrm
if changes can be safely made.
• To install any updates for the Synergy software, contact your Laborie support representative for
guidance.
• To access the Synergy Software Version, Serial Number, System Fingerprint, and GS1 information, click
the Settings icon ( ) and then open the System Settings dialog box. For instructions on accessing the
System Settings dialog box, refer to the section “Overview of the Icons on the Title Bar” on page 46.
Standard Equipment and Optional Accessories
Prior to use, verify that all ordered equipment and accessories have been received. Contact Laborie if there are any
discrepancies between ordered and received equipment. Inspect the equipment for any visible signs of damage or
mishandling. Notify the carrier immediately if damage is found.
NOTE
Laborie recommends keeping the carrying cases and cartons provided with the devices to use during
transport if the equipment must be sent in for service.
Table 1-1: NXT Evo—Standard and Add-On Equipment and Features
NXT Evo Standard Equipment Add-On Equipment and Features
Cart: Wheeled cart with an AIO PC mount, a pivot
arm for IV pole, and a bracket for NXT Go pump hub
Computer: All-in-One (AIO), including the Laborie
Synergy application
Printer: Inkjet
Pump Hub: NXT Go pump hub with NXT Go infusion
hook (wired Version 2 or wired/wireless Version 3)
Uroowmeter: Urocap NXT (1)
UDS: Roam NXT (1) with PIM NXT for T-DOC for
Fluid
Bluetooth Dongle: Enables wireless connection
using Bluetooth technology
Remote Control NXT: Wireless and battery-powered
device that allows control of the system from a
distance
Electronic Medical Records (EMR)
UPP Puller NXT
Video

4 Laborie NXT Evo Owner’s Manual LBL-00179 [D]
Warnings and Precautions
PRECAUTIONS
Prior to urodynamic testing, a urinalysis and urine culture should be considered to rule out the presence of
infection.
Care should be taken when performing a urodynamic study on patients with the following:
• The presence of a bladder infection
• Strictures in the urethra
Laborie is not responsible for loss of patient les or test data. Laborie recommends that you back up
patient data on a regular basis.
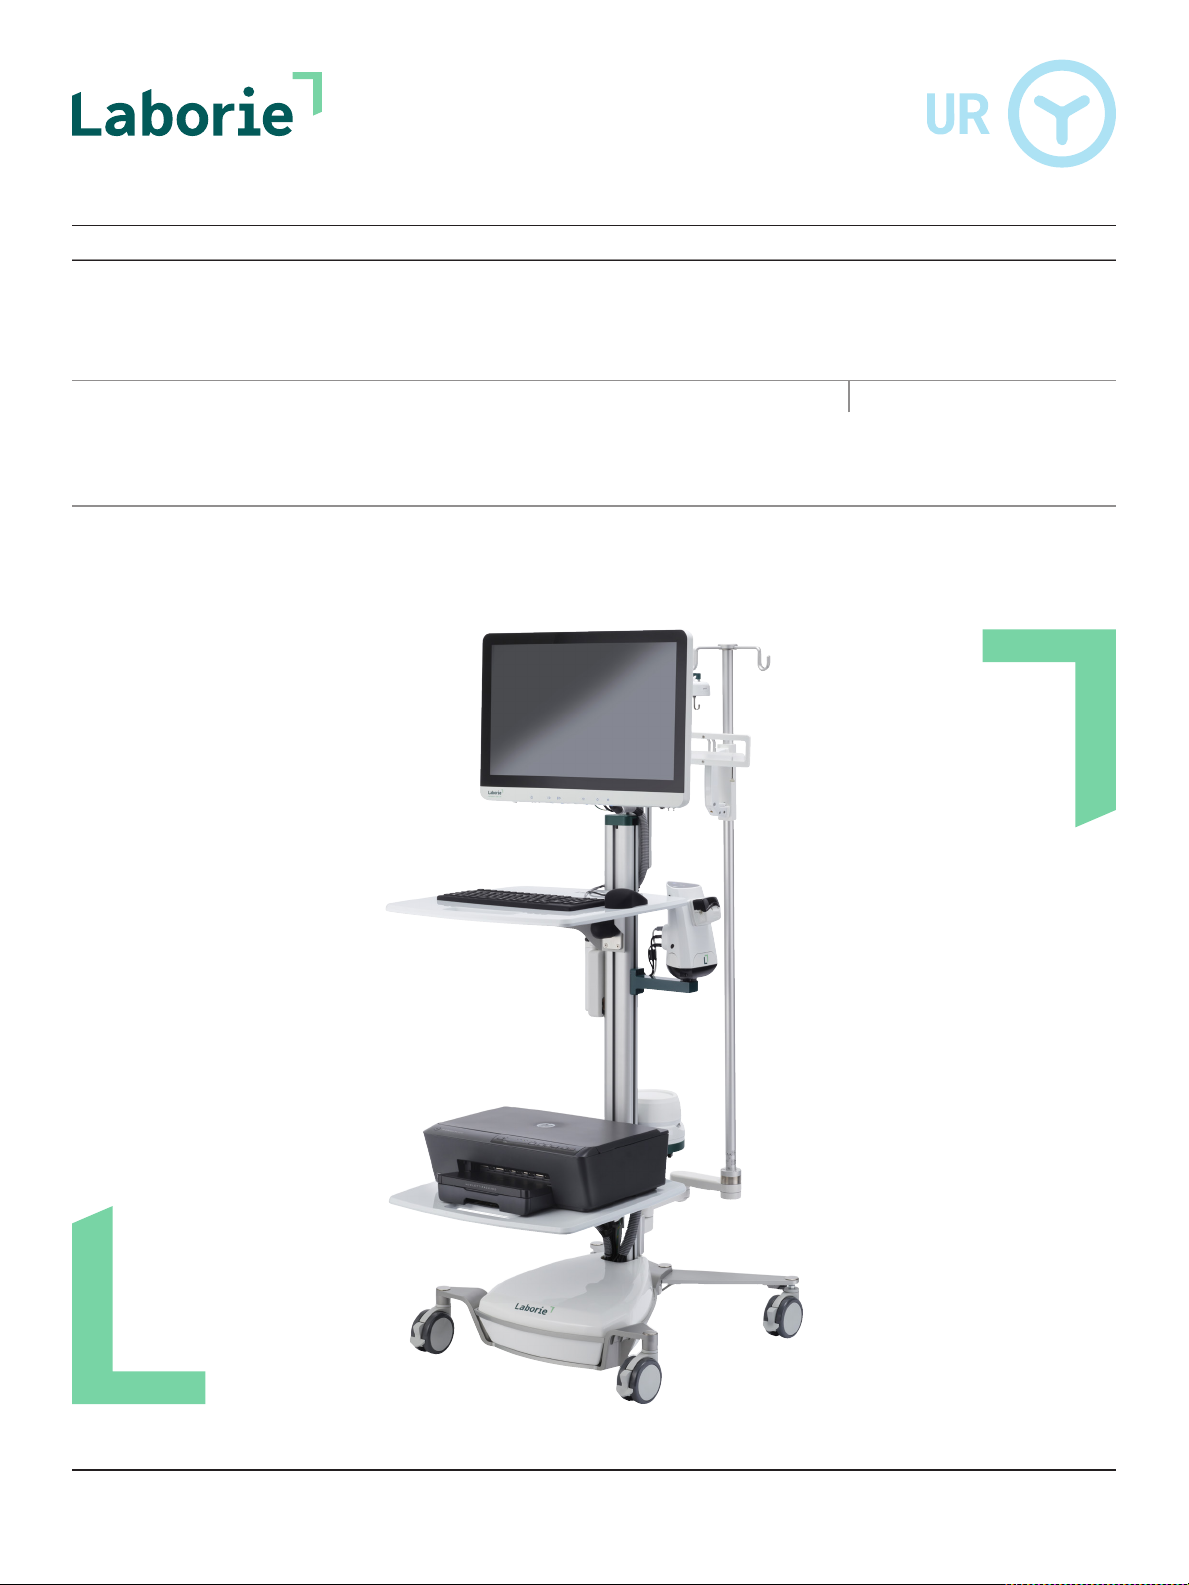
To prevent any risk of damage to the cart, do not exceed the marked maximum weight indications.
Laborie equipment and accessories are licensed by governments, approved by safety agencies, and
warranted to work only with one another.
The Roam NXT and the PIM NXT are not intended for long-term direct patient contact. If the devices must
be attached to a patient, place gauze or another material between the devices and the patient’s skin.
CAUTION
United States Federal Law restricts this device to sale or use by or on the order of a licensed physician.
WARNINGS
The NXT urodynamic system contains magnets which can interfere with control of a pacemaker or
implanted cardioverter-debrillator (ICD). Follow instructions from the manufacturer of such devices and
ensure that the Roam NXT, Urocap NXT, and charger cable connectors are always kept at a sucient
distance from any implanted device.
Only Laborie-trained technicians may service the unit.
Do not use the NXT system if the device packaging has been opened, damaged, or if it presents any fault
due to improper transport, storage, or handling that could in any way hamper its use. The NXT system is
intended for install by trained personnel ONLY.
Ensure that all wheels are locked during testing procedures to prevent injury to the patient. Do not lean
on the equipment or hang excessively weighted objects on the platform; only hang Laborie standard
accessories on the platform.
Do not immerse the NXT System or any of its modules in water or any other liquids.
Do not place your ngers or any body parts inside the pump when the pump rollers are moving.
Do not use in the presence of a ammable anesthetic mixture with air, oxygen, or nitrous oxide.
Do not use electromyography (EMG) simultaneously with high-frequency surgical equipment.
Do not operate the NXT system near shortwave or microwave therapy equipment, as proximity may
produce instability in the APPLIED PARTS.
Do not allow applied parts linked to a PATIENT CONNECTION, but not connected to the PATIENT, to contact
other conductive parts including those connected to protective earth. Preserve the patient connection
electrical isolation. Do not place the printer in the patient environment.
Do not reuse single-use accessories. After use, dispose of single-use accessories in accordance with local
regulations.
Reuse, reprocessing, or resterilization of disposables can lead to device failure and create a risk of cross-
infection and/or cross-transmission of infectious disease(s) from one patient to another.
NXT system accessories are not intended to be debrillation-proof.

Chapter 1 Introduction 5
Improper processing of reusable items prior to initial use or reuse can result in cross-infection and/or
cross-transmission of infectious disease from one patient to another.
Risks associated with catheterization increase immediately after urethral or bladder surgery. The
performance of urodynamic studies with post-operative patients is at the discretion of the physician.
Medical care professionals performing urodynamic studies should be prepared to recognize and treat
symptoms associated with ureteral catheterization, vasovagal syncope (fainting), and Autonomic
Dysreexia.
To avoid potential patient injury, never clean or service any module or component of the NXT System while
in use with a patient.
The use of the Medical Electrical (ME) equipment is restricted to one patient at a time.
Do not use the NXT system in the presence of a magnetic resonance imaging (MRI) system, as the NXT
system may contain ferromagnetic objects that pose a risk to the patient in the presence of a magnetic
core.
To avoid risk of electric shock, do not touch the Pogo Pins located inside the Urocap NXT charging hub or
the Urocap NXT wall charger.
To avoid the risk of electric shock, only connect this equipment to a mains power supply with protective
earth.
This device is intended for use in a clinical environment with controlled EMC standards to limit potential
interference. The NXT system may be adversely affected by Bluetooth, cellular, or EMC interference.
Minimize interference from other Bluetooth devices by setting up all modules of the system in proximity to
one another.
Electromagnetic Interference in the form of electrostatic discharge or radiated emissions can cause
the NXT system components to temporarily disconnect. Components may require a power cycle before
operation can resume after exposure to these electromagnetic interferences.
Only connect devices specied and approved by Laborie to the NXT system. Connecting any device not
approved by Laborie to the ME system alters the functional integrity of the product, creating a safety risk.
Only connect devices specied and approved by Laborie to the NXT system multiple-socket outlets.
Connecting other electrical equipment to the multiple-socket-outlets effectively leads to creating a ME
system and the result can be a reduced level of safety. Do not connect any additional multiple socket-
outlets or extension cords to the NXT system or any of its components.
Always position the NXT system to facilitate ease of access to all electrical connections and plugs. The
device operator must be able to disconnect the device quickly and safely in case of an emergency.
Avoid use of this equipment adjacent to or stacked with other equipment, as this could result in improper
operation. If such use is necessary, observe this equipment and the other equipment to verify that they are
operating normally.
Do not alter or add to the NXT ME system. Any alteration to the NXT system by an unauthorized party
transfers responsibility for meeting ME system requirements from Laborie to the altering party. Anyone
connecting supplementary equipment to ME equipment congures a medical system and is therefore
responsible for ensuring that the system complies with the requirements for ME systems, encompassed in
the IEC/EN 60601 series.
Do not make changes or modications to the PIM NXT for T-DOC and its radiators. Changes to intentional
or unintentional radiators not expressly approved by the party responsible for compliance could void the
user’s authority to operate the equipment.
Batteries are not operator replaceable (except for in the Remote Control NXT). Do not attempt to remove
the battery. All servicing of the NXT system, modules, or attachments must be completed by Laborie-
authorized personnel.

6 Laborie NXT Evo Owner’s Manual LBL-00179 [D]
NOTE
Local laws take priority over the aforementioned requirements and warnings; if in doubt, consult your local
Laborie representative or the technical service department.
To Report Product Complaints or Incidents
To register a complaint or report a serious incident related to this product, please contact the manufacturer and the
competent authority of the Member State where the incident occured
North American Technical Support:
Telephone: 1.800.333.1039 extension 1 or 1.800.522.6743 extension 1
Outside North America:
Telephone: +31 (0) 53.4803777
About This Manual
The NXT Evo Owner’s Manual is intended to provide important information and instruction regarding the use and care
of the NXT system.
Symbols Used in This Manual
This manual provides important information to help you understand the features and safe use of the NXT system
and its modules. This information is provided in boxed text elements that display one of three symbols, depending
on the information being presented. The table that follows shows these symbols and describes the associated text
elements.
CAUTION/WARNING
Caution/Warning boxes present information that the user needs to know to prevent patient injury, product
damage, or other serious adverse reactions associated with the use or misuse of the device.
IMPORTANT
These boxes offer important information about using the device.
NOTE
Notes present additional, helpful information about using the device.
Feedback on the Manual
Laborie welcomes your opinion and ideas to improve our manuals. Please send your questions and remarks via
emailto:

LBL-00179 [D] Laborie NXT Evo Owner’s Manual 7
2 Quick Start
To prepare for a typical study, follow the instructions provided in the sections listed here, in the sequence shown:
1. Setting Up the Equipment
2. Gathering Supplies and Equipment
3. Preparing the Urocap NXT
4. Preparing the NXT Go Pump Hub
5. Preparing the Roam NXT
6. Preparing the UPP Puller NXT (Optional)
7. Setting Up Consumables and Preparing the Patient
Setting Up the Equipment
1. Unpack the NXT Go pump hub, Roam NXT, Patient Interface Module NXT (PIM NXT), and Urocap NXT from their
shipping boxes. Unpack the UPP Puller NXT. For information on the NXT Go pump hub, Roam NXT, PIM NXT,
Urocap NXT, NXT infusion hook, Remote NXT, or UPP Puller NXT refer to Chapter 6, “Hardware,” on page95.
IMPORTANT
Lock all wheels of the pole, table, or cart used for equipment setup. Ensure that all wheels are locked
during testing procedures to prevent injury to the patient.
To lock the castor wheels, press down on the lever with the bottom of your foot, as shown in Figure 2-1. To
unlock, push the lever up from underneath with the top of your foot.
Figure 2-1: Lockable Wheels
2. Connect the NXT Evo power chord to mains power.
3. Turn on the AIO PC by pressing the power button( ). Double-click the Synergy icon to launch the Synergy
Login page.
4. Log in to Synergy by inputting the account User Name and Password, assigned during system installation,
into the Synergy Login window. The Synergy main window will load (refer to Figure 4-9). Be sure to update the
access information from the initial system installation. For more information on logging in to Synergy and
accessing controls, refer to the section “User Access Control” on page 40.

8 Laborie NXT Evo Owner’s Manual LBL-00179 [D]
5. Synergy supports the following languages: English, German, French, Spanish, Italian, Dutch, Polish, Swedish,
Danish, Norwegian, Finnish, Japanese, Chinese, Korean, and Russian. To change the language, click the Settings
icon ( ) and then click System Settings > System Conguration. On the menu that opens, select the language
to which you want to change. Synergy will immediately exit and reopen at the Login window in the language you
selected.
6. Connect the PIM NXT to the Roam NXT. For instructions on how to connect these devices, refer to the section
“Replacing the PIM NXT” on page 101.
7. Connect the Roam NXT and the Urocap NXT to the PC using the NXT Magnetic Pogo Pin cable and the USB-to-
binder cable adapter to pair the devices. When pairing is complete, unplug the devices for wireless use.
8. Mount the NXT Go pump hub using the spine bracket. Refer to the section “Mounting the NXT Go Pump Hub” on
page 106.
Setting Up the NXT Go Pump Hub
For instructions on how to set up NXT Go pump hub, refer to the section “Setting Up the NXT Go Pump Hub” on
page8. For instructions on pairing the NXT Go pump hub to the AIO computer, refer to the section “NXT Go Pump
Hub” on page 97.
1. Hang the NXT Go infusion hook on the NXT Evo cart IV pole. Connect the NXT Go infusion hook to the NXT Go
pump hub. For a visual of inputs on the NXT Go pump hub, refer to Figure 6-3.
2. Assemble the NXT Evo power supply with the NXT Evo power cord. Connect the power supply to the NXT Go
pump hub, and the power cord to the NXT Evo cart’s multiple socket outlet. Use the NXT Evo USB cable to
connect the NXT Go pump hub to the AIO PC. To view the inputs on the NXT Go pump hub, refer to Figure 6-3.
3. If you are utilizing the UPP Puller NXT, assemble and mount the UPP Puller NXT according to the instructions
provided in the section “Preparing the UPP Puller NXT (Optional)” on page 13. For information on charging
the UPP Puller NXT, refer to the section “UPP Puller NXT—Charging the Battery” on page 105.
4. If you are utilizing the video function for urodynamic study, prepare the connecting device. Synergy supports
HDMI and DVI connections provided by the AIO PC. BNC connection is supported with the use of the supplied
(where applicable) DVI-to-BNC adaptor.
CAUTION
Consult Laborie Service before connecting any video device to the NXT system. Anyone connecting
supplementary equipment to ME equipment is construed as conguring a medical system and is therefore
responsible for ensuring that the system complies with the requirements for medical electrical systems,
encompassed in the IEC/EN 60601 series.
For information on the NXT Evo cart, refer to the section “NXT Evo Cart” on page 106. For information on the NXT Go
pump hub, refer to the section “NXT Go Pump Hub” on page 97. For information on charging the Roam NXT, refer to
the section “Roam NXT—Charging the Battery and Pairing” on page 102. For information on charging the Urocap NXT,
refer to the section “Urocap NXT—Charging the Battery and Pairing” on page 104.
For information on cleaning and maintaining the modules, including all system check intervals and procedures for
verifying the integrity of the system, refer to Chapter 5, “Maintenance and Service,” on page 75.
Gathering Supplies and Equipment
Prior to starting a urodynamics study, ensure that the following supplies and equipment have been gathered and
prepared for use during the procedure.
IMPORTANT
Place the required supplies on a table or tray for easy access when preparing the patient for full
urodynamic testing.

Chapter 2 Quick Start 9
Procedure-Specic Items:
• Straight catheter
• Catheterization supplies such as cleansing swabs
andlubricant
• Saline bag
• Exam gloves
• Tape
• Preparation tray
System-Specic Items:
NXT Go pump hub (DCX2101) Remote Control NXT (RCX2001)
Roam NXT (ROX2001) & PIM NXT for T-DOC (PIX2211) Roam NXT (ROX2001) & PIM NXT for Fluid (PIX2231)
Urocap NXT (UCX2001) NXT Go infusion hook (MSM1185)
Commode chair (CHA181 or CHA171) and funnel (CHA102) UPP Puller NXT (UPX2001) and UPP Stand (UPP1006)
Urocap NXT stand with funnel (MSM1172& CHA1000) Beaker (UD575)
Continued on next page

10 Laborie NXT Evo Owner’s Manual LBL-00179 [D]
T-DOC NXT abdominal catheter (CATT3A17)
T-DOC NXT 7FR single- and dual-sensor bladder catheters
(CATT3BXXX part number series)
T-DOC abdominal catheter (CAT875)
T-DOC 7 Fr single- and dual-sensor bladder
catheters (single sen.: CAT878, CAT895, CAT905;
dual sen.: CAT880, CAT885)
TDOC on NXT Adapter Cable
(TRA7000, TRA7001, TRA7002, TRA7003)
Abdominal pressure, Fluid NXT catheters
(9021P4592-RFID,9021P4522-RFID)
Single-, dual-, and triple-lumen bladder Fluid NXT catheters
(DLC-6D-RFID, DLC-7D-RFID, CDLC-6D-RFID, CDLC-7D-RFID,
9021P5892-RFID) Disposable cartridge and Luer Lock (DIS130)
Pressure measurement tubing (TUB101) Pressure cuff for perfusion for uid UPP only (DIS302)
Medex LogiCal pressure transducers (Medex TRA60X) PIM NXT for Fluid–to–Medex transducer cables (CAB1093)
Infusion pump tubing for Laborie NXT systems (TUBPTNXT)
Snap-on electrodes (ELE428) and cable
(CAB1091,CAB1092,CAB1103, CAB1104)

Chapter 2 Quick Start 11
Water pressure transducer mount (MSM7004) Roam NXT–to–PIM NXT connector cable (CAB2111)
NXT Magnetic Pogo Pin cable, binder termination,
3 m length (CAB1081) Power supply, medical grade, class II wallplug (POW1033)
NXT Evo power cord (POW006) NXT Evo USB cable (CAB1056)
Cart (NXT-2400) NXT Go pump hub mount bracket (MSM7001)
Roam NXT mount (MSM7003) Inkjet printer supplied by Laborie
USB-to-binder cable adapter (CAB1117) NXT Evo power supply (POW1043)
Continued on next page

12 Laborie NXT Evo Owner’s Manual LBL-00179 [D]
UPP Puller NXT cable (CAB1109)
Preparing the Urocap NXT
To prepare the Urocap NXT for use (Figure 2-2), perform the following steps:
1. Ensure that the Urocap NXT is charged and ready to use.
2. Place the funnel on the plastic frame of the commode chair.
3. Carefully place the Urocap NXT transducer on the oor.
4. Place the graduated beaker on top of the transducer.
5. Place the commode chair and funnel over the Urocap NXT and beaker.
For Urocap NXT stand setup instructions, refer to MAN1000.
Figure 2-2: Urocap NXT Setup
IMPORTANT
Ensure that all preparation steps are completed before starting a study in Synergy.
Preparing the NXT Go Pump Hub
To prepare the NXT Go pump hub, perform the following steps:
1. Connect the NXT Go infusion hook to the NXT Go pump hub.
2. Connect the NXT Go pump hub to supply mains using the power cord and the power supply.
3. Connect the NXT Go pump hub to the AIO computer using the USB cable.
For connection points on the NXT Go pump hub, refer to the section “NXT Go Pump Hub” on page 97. For
instructions on how to set up the pump, refer to the section “Infusion Pump Tubing Setup” on page 21.
Preparing the Roam NXT
1. Ensure that the Roam NXT is charged. Laborie recommends charging the device overnight to ensure optimal
battery power for a full day of procedures.
2. Conrm that the Roam NXT and PIM NXT are securely connected. The PIM NXT and the Roam NXT must be
connected to function. For information on the Roam NXT and the PIM NXT, refer to the section “Roam NXT” on
page 99.

Chapter 2 Quick Start 13
Preparing the UPP Puller NXT (Optional)
Ensure that the UPP Puller NXT is charged. Laborie recommends charging the device overnight to ensure optimal
battery power for a full day of procedures. For instructions on how to charge the device, refer to the section “UPP
Puller NXT” on page 105. Conrm that the UPP Puller NXT is fully assembled and securely mounted.
Assembling the UPP Puller NXT
Identify removable parts to begin assembly of the UPP Puller NXT. The UPP Puller NXT nose separates from the motor
through a locking mechanism located at its base (Figure 2-3). Fit the nose onto the motor with the locking mechanism
in the unlocked position. When the couplers have self-aligned lock the mechanism (Figure 2-4). If disassembly is
required, unlock the mechanism and pull the nose away from the motor.
Figure 2-3: UPP Nose Locking Mechanism
(viewed from the underside)
Figure 2-4: Connect the UPP Motor and Nose
The UPP nose features the removable catheter guide and catheter clamp (Figure 2-5). Attach the catheter guide and
catheter clamp to the appropriate connection point. The catheter guide and catheter clamp use magnets to connect
and disconnect from the nose.
Catheter Guide Catheter Clamp
Carriage
Figure 2-5: Left Prole—Removable Parts
IMPORTANT
Removal of the catheter clamp may expose a sharp piece of metal protruding from the hinge. Exercise care
when handling.
To mount the UPP Puller NXT, slide the pole clamp onto the post of the UPP stand. Ensure that the yellow bushing is
facing upward. Lock it in position using the rubber knob screw located on the pole clamp. Loosen the thumb screw on
the pole clamp and place the UPP Puller NXT arm clamp insert into the clamp’s yellow bushing (Figure 2-6).
Yellow Bushing
UPP Puller NXT Arm Clamp Insert
Figure 2-6: Connect UPP Puller NXT Arm Clamp and the Pole Clamp
Tighten the thumbscrew to complete mounting. To adjust any of the joints on the UPP Puller NXT arm, loosen the
thumbscrews, adjust, and retighten. Refer to Figure 2-7.

14 Laborie NXT Evo Owner’s Manual LBL-00179 [D]
IMPORTANT
Loosen the thumbscrews only as much as is required to complete adjustments. Avoid removing the
thumbscrews from the UPP Puller NXT arm.
Thumb Screw
Pole Clamp
Knob Screw
UPP Puller Arm
Thumb Screw
Figure 2-7: Mounting the UPP Puller NXT
Assembling the UPP Puller NXT Stand
To assemble the puller stand (UPP1006), prepare one 6 mm and one 4 mm HEX L-KEY. Connect the pole assembly to
the H-Base assembly (Figure 2-8) using the provided Washer M8, split washer M8, and screw M8. Use the 6 mm HEX
L-Key to secure the screw.
Figure 2-8: Assembling the UPP Stand
This manual suits for next models
2
Table of contents
Other LABORIE Medical Equipment manuals

LABORIE
LABORIE ROM Plus User manual

LABORIE
LABORIE NXT Go User manual

LABORIE
LABORIE NXT Pro User manual

LABORIE
LABORIE Nexam Pro WPU-L4 User manual

LABORIE
LABORIE UROCAP IV User manual

LABORIE
LABORIE NXT Series User manual

LABORIE
LABORIE Urocap III User manual

LABORIE
LABORIE Solar Blue User manual

LABORIE
LABORIE MMS Solar Blue User manual

LABORIE
LABORIE NXT Go User manual