manuals.online logo
Brands
  1. Home
  2. •
  3. Brands
  4. •
  5. Lamp
  6. •
  7. Indoor Furnishing
  8. •
  9. Lamp HES3D-E160DN User manual

Lamp HES3D-E160DN User manual

1
Thank you for selecting our product. Before starting installation,
please read this manual thoroughly to ensure correct installation.
Please keep this manual at hand for future reference.
・Concealed hinge 2 pcs
・Screw cover 4 pcs x 2 bags
・Template 1 pc
・Countersunk head tapping screw
5×25             8 pcs x 2 bags
・Hex Key 4mm 1 pc
INSTALLATION MANUAL
FOR HES3D-E160 CONCEALED HINGE
This product is a concealed hinge for indoor use, that is
recessed into the cut out on door and doorjam.
Three dimentional adjustment function allows vertical,
horizontal, and depth adjustment.
Min. Door thickness 1-7/16" (36 mm)
Max. Door weight
121 lbs/2 hinges, 154 lbs/3 hinges
Max. Door size Width: 35-7/16", Height: 94-1/2"
ABOUT THE PRODUCT
DOOR SPECIFICATION
FOR YOUR SAFE WORK AND CORRECT INSTALLATION
INSTALLATION DRAWING (EXAMPLE)
COMPONENT PARTS (PER BOX)
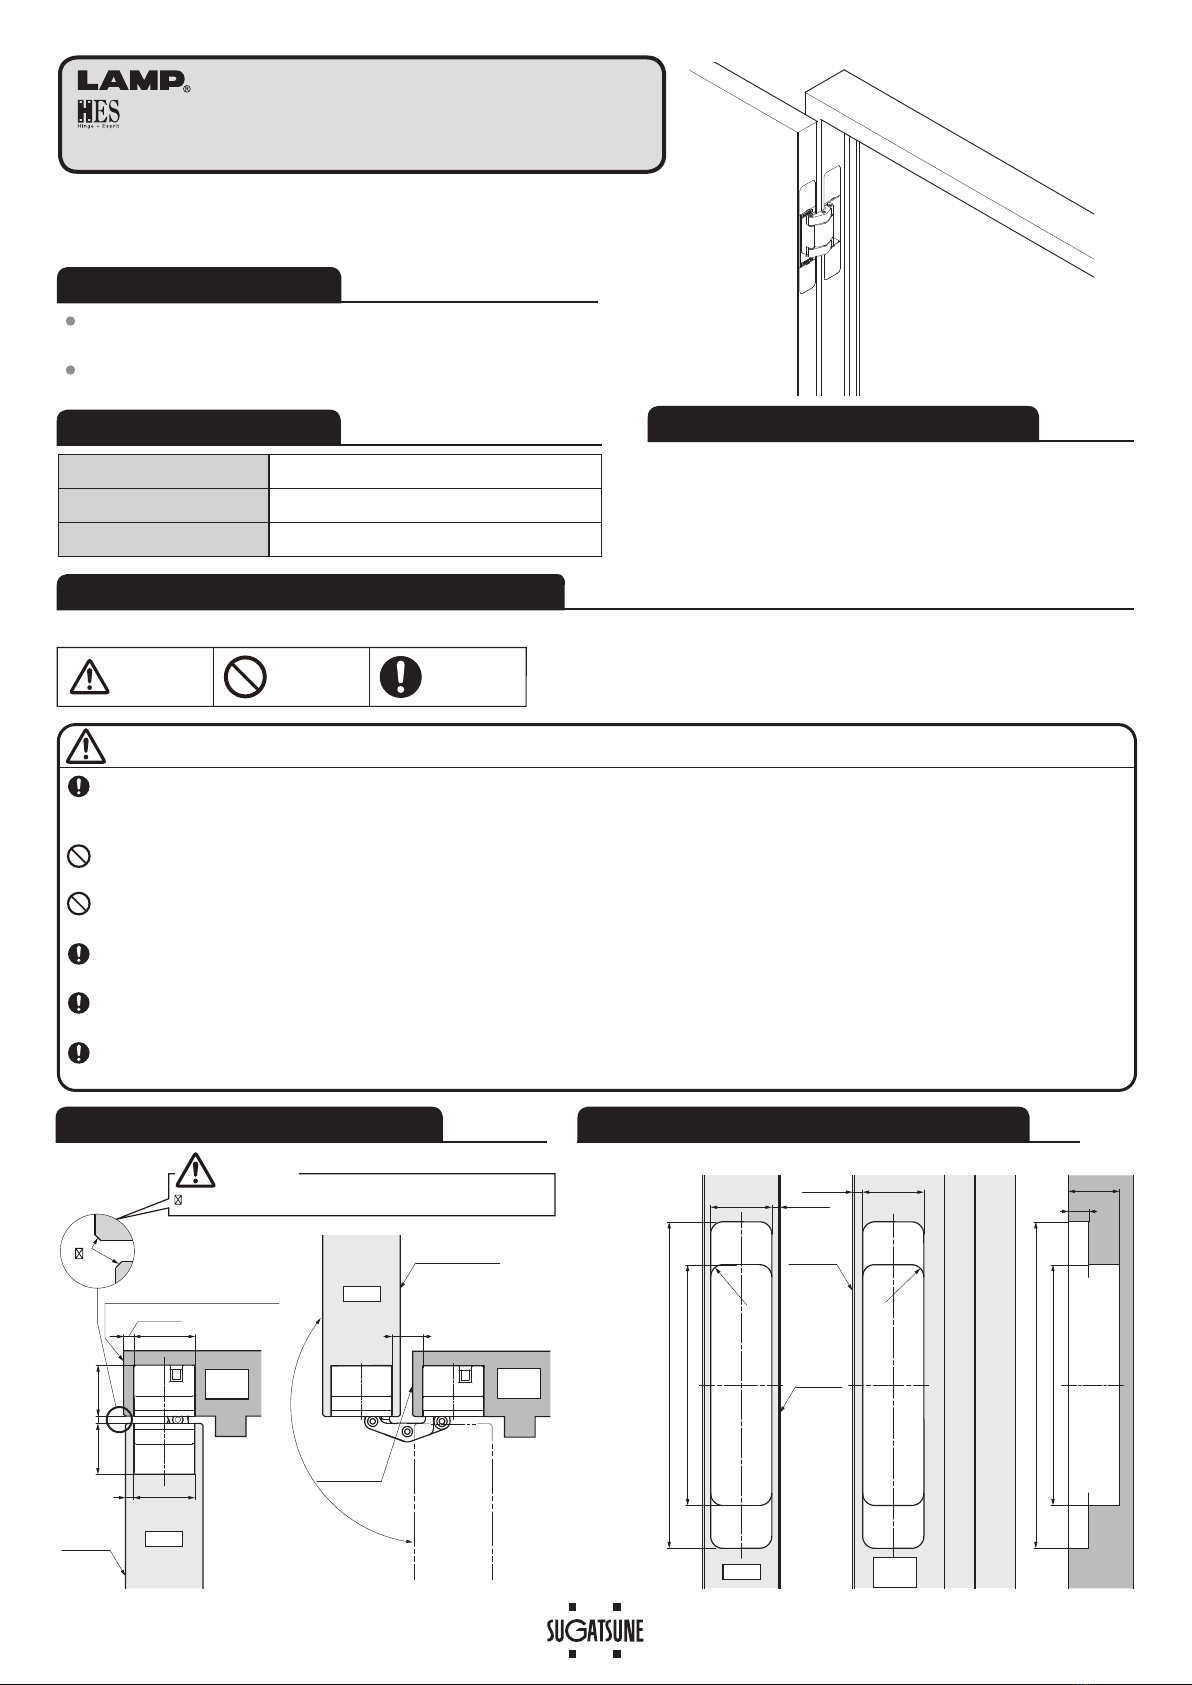
CUT OUT DRAWING FOR DOOR AND DOORJAM
30
30
8xR6
118
160
118
160
8xR6
25
10
Reference
surface of
door
Max. 4
30
Max. 4
2525
Max. 5
30
(3.5)
Reference surface of doorjam
Reference
surface of door
Reference
surface of
door frame
Reference
surface of
door
Max. 5
Reference
surface of
doorframe
Chamter the marked part with C1, R1,or a larger value.
Door
jam
Door
Door
jam
Door
Caution
Door
jam
Door
Prohibited
Warning
Caution Required
Meaning of symbols
Caution: If not followed, injury or damage may result.
It is necessary to manufacture the frame with sufficient strength so that it endures the weight of the door and any impact upon
opening/closing the door. Only use designated screws and ensure that they are fastened firmly. A frame with poor strength or
loose screws might result in the door falling and causing injury.
Do not try to use this product for anything other than its original purpose. Do not use any part for applications outside of its
specification.
Use in conjunction with a door closer is not recommended. For soft-close option, we recommend Sugatsune LDD-V or LDD-S door
damper.
Make sure to follow the designated dimensions, specifications, and horizontal/vertical angles. Make sure that the frame is not
warped, since it may affect the movement of the door.
This product is a part for architectural fittings. After installation, make sure to test the finished product thoroughly to ensure that it is
well-functioning and safe. Please inform the end user about general precautions and safety to prevent improper use.
Make sure to check the screws for slack at regular intervals (one month from first usage, half a year, and then one time every year
is recommended).
(15.2)
180°
2
Before installing base frame into the
Doorjam, cheak that it is oriented
correctly. If the orientation is incorrect,
the door cannot be installed.
Caution
・
When adjusting the vertical position or the depth, loosen the
screws 360-degree, then hold the door at the suitable position and
re-tighten the screws. Use wedges to support the door.
(Tightening torque is 4.9 N·m.)
・
When adjusting horizontal position, turn Horizontal adjustment screw.
(There are two screws per hinge.)
The gap between Door and Frame will be expanded by turning the
screw clockwise.
Disassembly of Hinge
1
Hanging Door
3Fastening Removable Screws
4
Installing Hinge to Door and Doorjam
2
Base frame
Vertical adjustment (fastening) screw
Screw cover
Screw cover
Hinge body
Vertical adjustment
(fastening) screw
Loosen this screw
to disassemble
Horizontal
adjustment
screw
Horizontal
adjustment
screw
Backward
Forward
Up
Down
Right
Left
Vertical adjustment
screw
Depth
adjustment screw
Vertical adjustment
screw
Depth
adjustment screw
Door
frame
Door
Door
jam
Door
INSTALLATION PROCEDURE
ADJUSTING DOOR POSITION
Do not remove the depth adjustment screw. The door may fall and
cause injury.
When adjusting the horizontal position, turn the two screws a little, by
the same amount. The hinge may be broken if you keep turning one
screw only.
Horizontal adjustment range is +3 mm/-2 mm. When turning the screw
to the right, if you move the part more than 2 mm, the cover cannot be
put on, since the part protrudes. If you still turn the screw, the door will
fall.
Caution
SUGATSUNE KOGYO CO.,LTD  
Tokyo, JAPAN
Phone: +81 (0)3 3866 2260 E-mail:[email protected]
SUGATSUNE KOGYO (UK) LTD  
Reading, UK
Phone: +44 118 9272 955
 
E-mail:[email protected]
SUGATSUNE EUROPE GmbH  
Dusseldorf, GERMANY
Phone: +49 211 53812900
 
E-mail:[email protected]
SUGATSUNE SHANGHAI Co., LTD  
Shanghai, CHINA
Phone: +86 21 3632 1858  E-mail:[email protected]
Guangzhou, CHINA  
Phone: +86 20 6639 3552  E-mail:[email protected]
SUGATSUNE KOGYO INDIA PRIVATE LIMITED  
Mumbai, INDIA
Phone: +91 22 28314490/91 E-mail:[email protected]
SUGATSUNE AMERICA, INC  
California, USA
Phone: +1 310 329 6373 E-mail:[email protected]
Chicago, USA  
Phone: +1 312 461 1081
E-mail:[email protected].
SUGATSUNE CANADA, INC.  
Phone: +1 514 312 5267
E-mail:[email protected]
2019.09 1317-2
While holding the door,
insert Hinge main body
into the Base frame
on Doorframe. Keep
holding the door and fix
the hinge with the fixing
screws at once.
Vertical adjustment
(fastening) screw
The arrows should point in the direction of adjustment when the door is closed.

Other Lamp Indoor Furnishing manuals

Lamp SH740 User manual

Lamp

Lamp SH740 User manual

Lamp SLU-ELAN User manual

Lamp

Lamp SLU-ELAN User manual

Lamp ALT-ST15-D10 User manual

Lamp

Lamp ALT-ST15-D10 User manual

Lamp SLUN-N User manual

Lamp

Lamp SLUN-N User manual

Lamp AZ-AT230-HL User manual

Lamp

Lamp AZ-AT230-HL User manual

Lamp FAD-44 User manual

Lamp

Lamp FAD-44 User manual

Lamp HDSN-30 User manual

Lamp

Lamp HDSN-30 User manual

Lamp ALT-F18LV2 User manual

Lamp

Lamp ALT-F18LV2 User manual

Lamp XL-US02K User manual

Lamp

Lamp XL-US02K User manual

Lamp FD30-F User manual

Lamp

Lamp FD30-F User manual

Lamp ALT-ST15-D360 User manual

Lamp

Lamp ALT-ST15-D360 User manual

Lamp FD30-F User manual

Lamp

Lamp FD30-F User manual

Lamp HES3D-E160 User manual

Lamp

Lamp HES3D-E160 User manual

Popular Indoor Furnishing manuals by other brands

Ameriwood HOME 1222012PCOM manual

Ameriwood HOME

Ameriwood HOME 1222012PCOM manual

Kvik O820T manual

Kvik

Kvik O820T manual

Global Industrial 695468 Assembly instructions

Global Industrial

Global Industrial 695468 Assembly instructions

Costway HW63971NA user manual

Costway

Costway HW63971NA user manual

Crate&Barrel Mid-Century manual

Crate&Barrel

Crate&Barrel Mid-Century manual

Coaster California 306128KW Assembly instructions

Coaster

Coaster California 306128KW Assembly instructions

Galipette P2R manual

Galipette

Galipette P2R manual

J.Burrows STILFORD 2M RECEPTION COUNTER 3CN Assembly instructions

J.Burrows

J.Burrows STILFORD 2M RECEPTION COUNTER 3CN Assembly instructions

Cooper Lighting Nuage 301-IW Specification sheet

Cooper Lighting

Cooper Lighting Nuage 301-IW Specification sheet

Furniture of America Rianna FOA-BT8343 Assembly instructions

Furniture of America

Furniture of America Rianna FOA-BT8343 Assembly instructions

OVE RACHEL 36 A instruction manual

OVE

OVE RACHEL 36 A instruction manual

Glacier bay DSDECWHT12 Use and care guide

Glacier bay

Glacier bay DSDECWHT12 Use and care guide

Ameriwood HOME mr.kate 8961905COM manual

Ameriwood HOME

Ameriwood HOME mr.kate 8961905COM manual

Frontgate Regency Bow quick start guide

Frontgate

Frontgate Regency Bow quick start guide

Advanced Kiosks Aegic Desk owner's manual

Advanced Kiosks

Advanced Kiosks Aegic Desk owner's manual

moovin BPI 101 Assembly instructions

moovin

moovin BPI 101 Assembly instructions

ACADIA LIVING Vintage L installation instructions

ACADIA LIVING

ACADIA LIVING Vintage L installation instructions

BDI Novia Assembly instructions

BDI

BDI Novia Assembly instructions

manuals.online logo
manuals.online logoBrands
  • About & Mission
  • Contact us
  • Privacy Policy
  • Terms and Conditions

Copyright 2025 Manuals.Online. All Rights Reserved.