manuals.online logo
Brands
  1. Home
  2. •
  3. Brands
  4. •
  5. Lean Cars
  6. •
  7. Motorized Toy Car
  8. •
  9. Lean Cars CH9939 User manual

Lean Cars CH9939 User manual

Baby Ride On Car
Install & Operation Manual
●
●
Assembly ByAdult Only
Please follow real product, Photo for reference only
CH9939
Simulation F1 car styling
Pedal forward, backward function
The picture in this manual is to show the product operation and structure, please
follow the real product only if any difference between picture and product happens.
There must be chance not to inform you on time to improve the product result from
appearance or structure, please be understood.
Please read this manual carefully before play the product, it tells you the
right way for operation and install to avoid any possible hurt to your kids.
Please keep this manual and put it in a place where is easy to get.
Double drive 12V 35W(drive)
high speed 5km/h low speed2.5km/h
Specification
Item Specification
Age 3-8 years
Max Weight
Dimension
Speed
Oouble drisve(12V7A,12V10A)Reversible fuse
Motor
Play Time 1-2 hours / recharger time 8-12hours
Charger Out Put DC 12V
Batteries and fuse
All the data above is for customer selection,
please follow the real product finally.
35KG
1260*593*603mm
Baby Ride On Car
Install & Operation Manual
●
●
●
Assembly By Adult Only
Please follow real product, Photo for reference only
CH9939
Executive standard: EN71 and EN62115 ;
GB6675-2003 and GB19865-2005
Simulation F1 car styling
Pedal forward, backward function
1
24
1
1
1
6
4
3
4
5
6
7
8
9
10
11
12
13
14
15
16
17
18
2
1
1
1
1
2
1
1
1
1
2
1
NO. QUE.
ACCESSORY
NAME NO. QUE.
ACCESSORY
NAME
NO. QUE.
ACCESSORY
NAME
Front wheel
Seat
Install & Operation
Part name
1
1. Install turning metal parts
Put on M8*55 rod ,nut as step
Tight it by M6 wrench as step M6 wrench
M4 wrench
M8*55 rod
2
2. Take out the protection foma in the front head, then use one hand to lift the head
as PIC use another hand to lift the metal tube to the top,fix the tube by PIC show,
finally tight it by M4 wrench tool
Axle bearing
Washer
M10 Anti-Slip nut
16
2
3
4
5
7
8
9
10
11
12
13
14 15 16 17
18
Front wheel hub cap
Rear wheel
Steer wheel
M5 Anti-slip nut
Mr rod
Rear defend
Rear axle
Manual
Charger
M10 Nut Wrench
M6 Wrench
M4 wrench
Rear axle hub cap
6
6. in the direction of the arrow installation hook
cushion, seat cushion alignment card slot on the
body, be forced to cushion a push backward
direction, and then put the seat down, installed,
and then M5*18 screw with pad lock. Charging
hole in the seat bottom left, [function] no charge
state of vehicle
Charging
hole
Charge
Install & Operation Install & Operation
3
5
4
4. Put on washer,axle bearing,wheel and nut as picture show, tight it by wrench tool,finally
put on the front wheel hub cap.
3. Install steer wheel cell battery
Put in 3*AAA cell battery (Customer buy themself) into steer wheel, and put on
the battery cover, then install the steer wheel as PIC finally tight by rod, nut
as PIC
5. Install the rear defend as arrow, Tight it by 4pcs M4*12 UmbrellA screw.
PIC
Connect the wire as show. PIC
1
2
3
1. power switch function: start the whole car
power supply.
2. foot switch function: start the whole vehicle
movement state.
3. forward, backward switch function: control
the vehicle forward, back.
4. high and low speed switch function:
control the speed of the vehicle.
When the current
is too large, it will
cut off the power
supply
automatically and
recover
automatically
within 5-10
seconds
Music horn button
foot switch
High and low
speed switch
Follow/back
swicht
Power
Instruction for use
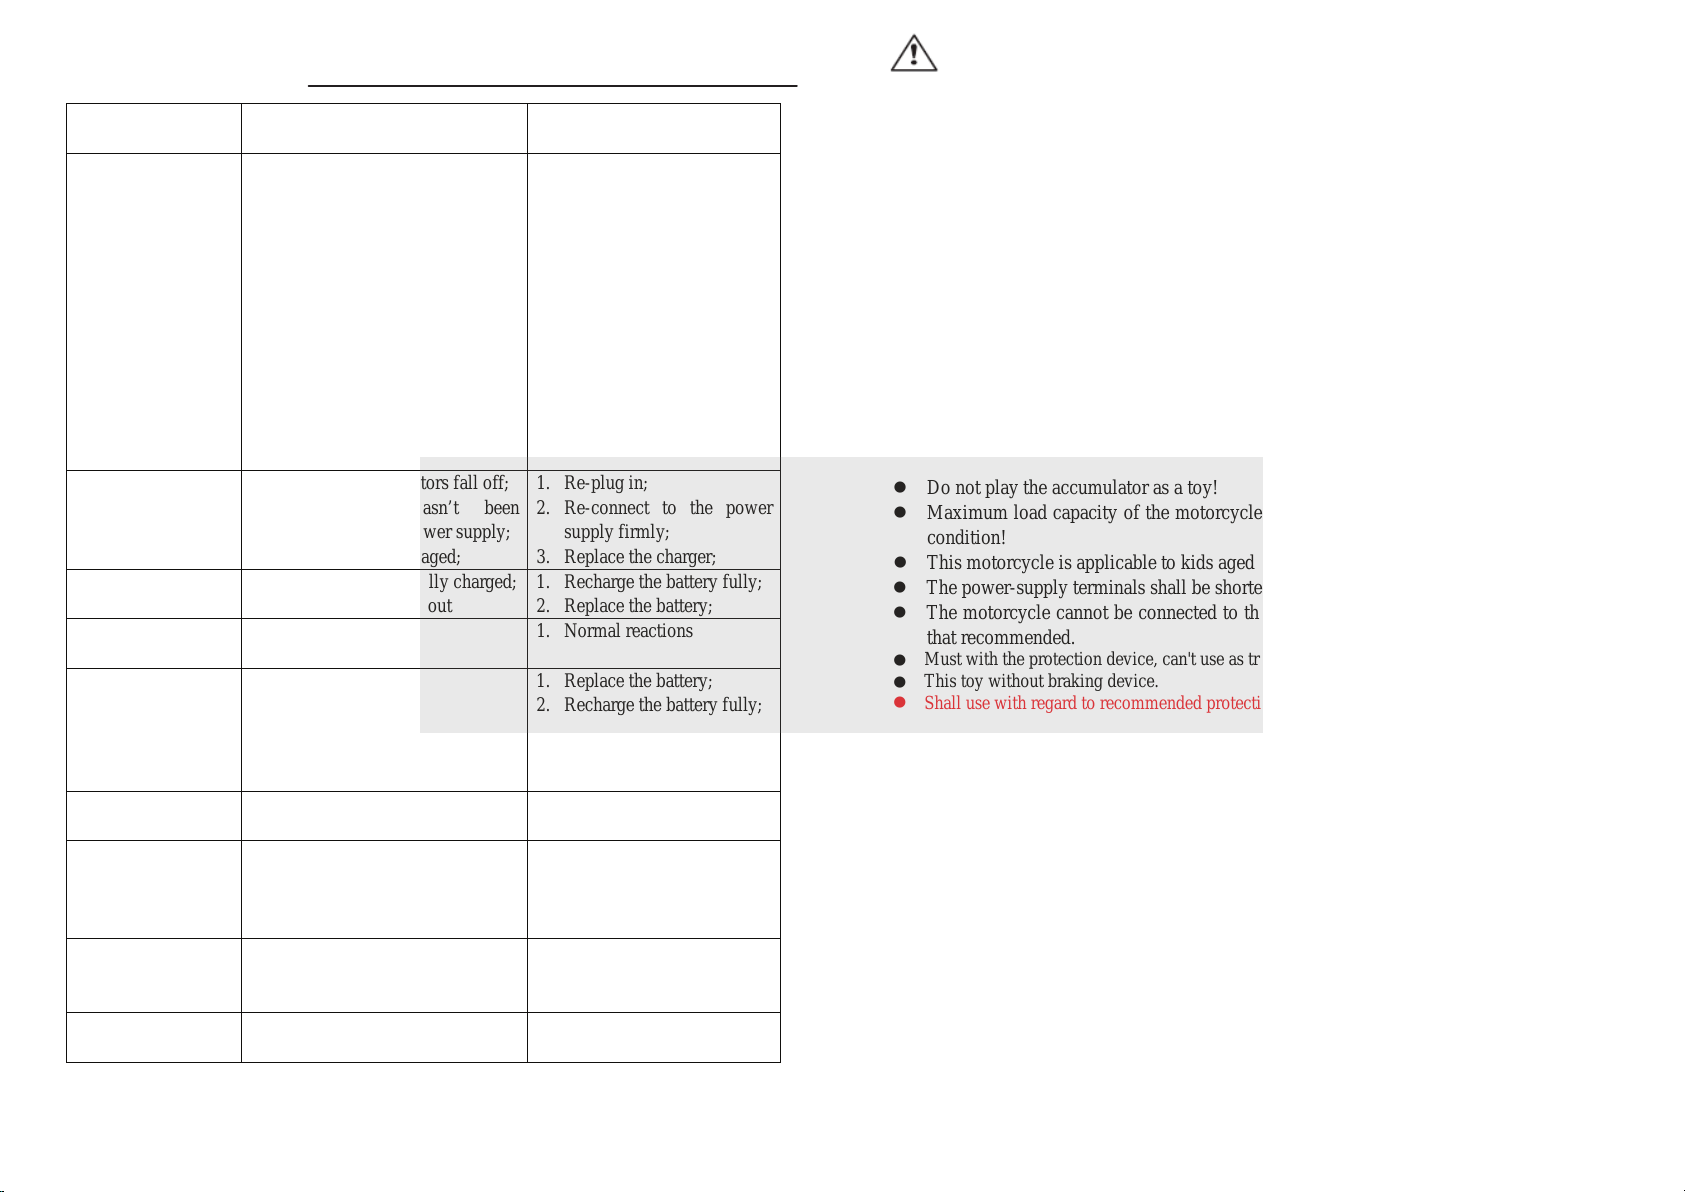
Failures Possible Reasons Solutions
The motorcycle
doesn’t work 1. The batter voltage is too low;
2. Electric protection;
3. The switch hasn’t been turned
to the right position;
4. The battery connectors go off;
5. The battery is damaged;
6. The electric equipments are is
damaged;
7. The motor is damaged
1. Fully charge the battery;
2. Stop for several minutes
and then re-start the
motorcycle;
3. Operate according to the
function explanation;
4. Re-plug in;
5. Replace it with a new
battery;
6. Repair it at the
maintenance service center;
7. Repair it at the
maintenance service center;
The battery cannot
be charged 1. The battery connectors fall off;
2. The charger hasn’t been
connected to the power supply;
3. The charger is damaged;
1. Re-plug in;
2. Re-connect to the power
supply firmly;
3. Replace the charger;
Short cruising
distance per charge 1. The battery is not fully charged;
2. The battery is worn out 1. Recharge the battery fully;
2. Replace the battery;
Slight noise and heat
during charging 1. Chemical reactions 1. Normal reactions
Slow speed 1. Worn battery;
2. Dead battery;
3. Overloading;
4. Uneven road surface;
1. Replace the battery;
2. Recharge the battery fully;
3. Reduce the load to be
under 35kg;
4. Drive on even road;
Big noise of the gear 1. The gear is damaged; 1. Repair at the maintenance
service center
The motorcycle
vibrate during its
moving process
1. Poor contact of motor
connection wires;
2. There are dead point(s) on the
motor;
1. Re-connect well;
2. Repair at the maintenance
service center
No sound rings
during the movement
of the motorcycle
1. Fail to plug in the connectors of
the steering wheel; 1. Please connect according to
the manual;
The motorcycle
cannot be stopped 1. The electrical equipment is
damaged; 1. Repair at the maintenance
service center
Failures and Solutions
Warning_________________________________________
Please do pay attention to following notices for the purpose of your baby’s safe
driving experience:
The motorcycle must be installed and adjusted by adults and make sure your kids are
kept from the moving components of the motorcycle.
This motorcycle is not applicable for kids of and younger than 3 years!
Kid’s application of this motorcycle must be under the instruction of adults and the
caregivers can never leave the kids unattended during the operation of this motorcycle!
Do not make or allow the kid stand or play on the foot rest (or the electrical
motorcycle)!
The accumulator must be charged by adults! Please do charge the battery before using
the motorcycle!
In order to prevent damages to the kid, please do keep the packing materials such as the
plastic bags away from the kid! Be careful of suffocation!
Any using of components provided by other suppliers than the manufacturer is
forbidden!
Do install all the batteries in correct electrodes!
Do not play the accumulator as a toy!
Maximum load capacity of the motorcycle is 35kg! Please do not use it under overload
condition!
This motorcycle is applicable to kids aged 3-8 years!
The power-supply terminals shall be shorted!
The motorcycle cannot be connected to the power supplies with quantity going beyond
that recommended.
Considerations for Charging:
Make sure the accumulator has been charged for 18 hours for the first time of
charging, or the accumulator will be impaired permanently and such impairment
cannot be recovered!
Plug the DC pin into the charging jack firstly when charge the accumulator and then
plug the accumulator into the power socket. The toy (the whole motorcycle) cannot
be operated under the condition of charging.
Please charge the battery timely after each one hour of application and the normal
charging duration shall be 8-12 hours and shall never go over 20 hours.
The charger and accumulator may feel some hot (under 600C) during the charging
process and it is the normal phenomenon.
The battery cannot be charged if any water is detected to be lying inside the
connectors, or a short circuit will appear.
Do use the charger and accumulator specially designed for the motorcycle in order
not to damage the charger and the accumulator or make the electric equipment
shorted.
Do charge the motorcycle at least once a month when it will be kept away from using
for long time.
Must with the protection device, can't use as traffic tools.
This toy without braking device.
Shall use with regard to recommended protective equipment(helmet,gloves,knee-pads,elbow-padsetc.)



Do not mix old and new batteries.
Do not mix alkaline,standard(carbon-zinc),or rechargeable batteries.


Consideration forApplication of the Motorcycle____________________
Make sure the accumulator has been charged for 18 hours for the first time of
application, or the accumulator will be impaired permanently and such impairment
cannot be recovered.
Make sure all the components have been well mounted and tightly connected before
using the motorcycle.
Do not operate the motorcycle at dangerous areas such as on the busy street, road,
slopes or ditches;
Do not operate the motorcycle at roads with smooth surface, such as marble or tilts.
Do not shift the Forward/Backward switch during the moving of the motorcycle. Do
not make or allow your kid stand on the seat.
Never change the wire circuit of the motorcycle or add any electrical equipment onto
it.
The motorcycle will stop moving when encounter any barrier, please do steer clear of
the barrier before driving again.
Do not use the motorcycle in door in order not to crack up furniture or make kids fall
over.
Please cut off the power supply if the motorcycle is not in service; please take off the
battery connectors if the motorcycle will not be used for long time.
Important: All the pictures, functions and introduction data here in the manual are
for reference only, please do take the physical product as the standard!
Repair and Maintenance_______________________________________
Please examine and maintain the motorcycle frequently in order to keep your kids
from suffering any unexpected hurt;
Make sure all the components are available before mounting and contact us
immediately if any component is missed.
Check whether any screw is loose or any component is damaged at regular intervals.
Do check and confirm all the components are in good work condition when you are
mounting or using such components.
Do clean the motorcycle at regular interval and be careful not to damage the electrical
equipment pieces.
Please closely refer to the operation manual when dismantling the motorcycle in
order to prevent any unnecessary damage.
Do check the product and its charger at regular intervals and make sure the wire,
socket, outer shell and other components are all in good work condition. Do stop
using the damaged component (if any) before such component is well repaired.
WARNING

must with the protection device, can’t use as traffic tools.

this toy without braking device.

Other Lean Cars Motorized Toy Car manuals

Lean Cars BBH-011 User manual

Lean Cars

Lean Cars BBH-011 User manual

Lean Cars A730-2 User manual

Lean Cars

Lean Cars A730-2 User manual

Lean Cars JH-101 User manual

Lean Cars

Lean Cars JH-101 User manual

Lean Cars A026 User manual

Lean Cars

Lean Cars A026 User manual

Lean Cars CH9935 User manual

Lean Cars

Lean Cars CH9935 User manual

Lean Cars JT5158 User manual

Lean Cars

Lean Cars JT5158 User manual

Lean Cars ABL-1602 User manual

Lean Cars

Lean Cars ABL-1602 User manual

Lean Cars HC-8988 Owner's manual

Lean Cars

Lean Cars HC-8988 Owner's manual

Lean Cars XMX623 User manual

Lean Cars

Lean Cars XMX623 User manual

Lean Cars A730-1 User manual

Lean Cars

Lean Cars A730-1 User manual

Lean Cars KP-6699 User manual

Lean Cars

Lean Cars KP-6699 User manual

Lean Cars HZB-118 User manual

Lean Cars

Lean Cars HZB-118 User manual

Lean Cars HL388 User manual

Lean Cars

Lean Cars HL388 User manual

Lean Cars BMW S1000 RR RIDE-ON Datasheet

Lean Cars

Lean Cars BMW S1000 RR RIDE-ON Datasheet

Lean Cars Mercedes-Benz Actros HL358 User manual

Lean Cars

Lean Cars Mercedes-Benz Actros HL358 User manual

Lean Cars UTV Datasheet

Lean Cars

Lean Cars UTV Datasheet

Lean Cars BDM0911 User manual

Lean Cars

Lean Cars BDM0911 User manual

Lean Cars YSA021A User manual

Lean Cars

Lean Cars YSA021A User manual

Popular Motorized Toy Car manuals by other brands

REVELL DODGE CHARGER SRT8 SUPER BEE CUSTOM manual

REVELL

REVELL DODGE CHARGER SRT8 SUPER BEE CUSTOM manual

Famosa DESERT TROPHY manual

Famosa

Famosa DESERT TROPHY manual

Jamara 405021 instructions

Jamara

Jamara 405021 instructions

Cen MG16 manual

Cen

Cen MG16 manual

REVELL 85-1285 manual

REVELL

REVELL 85-1285 manual

Team Losi Muggy Hybrid Monster Truck user manual

Team Losi

Team Losi Muggy Hybrid Monster Truck user manual

ninco4rc BLASTER XB-10 RTR 2,4Ghz User handbook

ninco4rc

ninco4rc BLASTER XB-10 RTR 2,4Ghz User handbook

Horizon Hobby Losi Desert Buggy XL 2.0 manual

Horizon Hobby

Horizon Hobby Losi Desert Buggy XL 2.0 manual

Kyosho MINI-Z Racer AWD MA-010 Type instruction sheet

Kyosho

Kyosho MINI-Z Racer AWD MA-010 Type instruction sheet

REVELL KIT 1193 Assembly manual

REVELL

REVELL KIT 1193 Assembly manual

Buddy Toys BEC 8211 instructions

Buddy Toys

Buddy Toys BEC 8211 instructions

Traxxas SLASH 4x4 68054-1 owner's manual

Traxxas

Traxxas SLASH 4x4 68054-1 owner's manual

Team Losi Micro SCT LOSB0242IT1 manual

Team Losi

Team Losi Micro SCT LOSB0242IT1 manual

Famosa CROSS NINJA manual

Famosa

Famosa CROSS NINJA manual

Stadlbauer Carrera EVOLUTION 2.4 GHz WIRELESS+ Assembly and operating instructions

Stadlbauer

Stadlbauer Carrera EVOLUTION 2.4 GHz WIRELESS+ Assembly and operating instructions

Toy State SHIELD SQUAD owner's manual

Toy State

Toy State SHIELD SQUAD owner's manual

World Tech Toys The Outlaw 35984 instruction manual

World Tech Toys

World Tech Toys The Outlaw 35984 instruction manual

Team Losi MICRO 4X4 Operation manual

Team Losi

Team Losi MICRO 4X4 Operation manual

manuals.online logo
manuals.online logoBrands
  • About & Mission
  • Contact us
  • Privacy Policy
  • Terms and Conditions

Copyright 2025 Manuals.Online. All Rights Reserved.