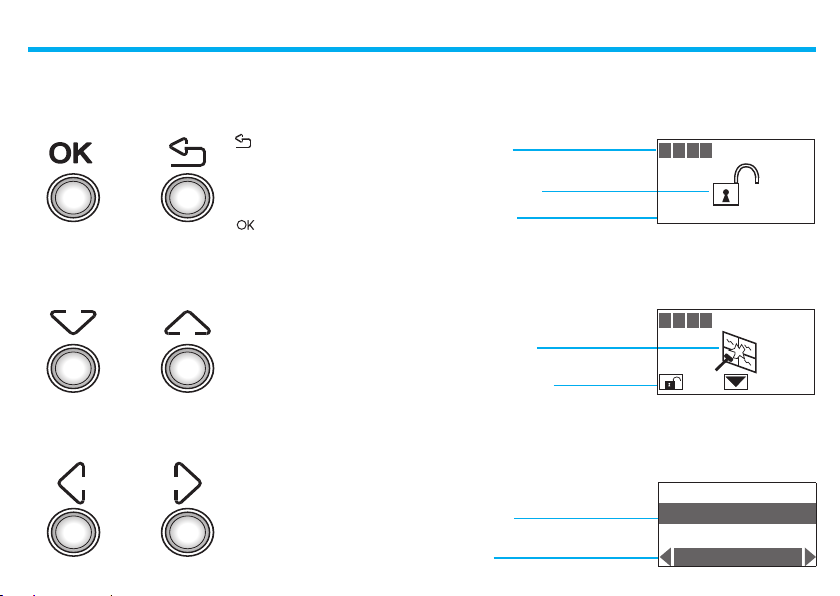
LEGRAND 5739 46 User manual

Part. U3289A - 11/08-01 PC
User manual
5739 46
5739 47
Keypad connector with display


Contents UK
Introduction1. 5
The Keypad connector with display■6
The keypad
■7
Navigation keys✔7
The display
■7
Main screen
✔7
In case of an alarm✔7
Settings menu✔7
What is the display showing?■8
Operation 12. 1
Accessing the functions with concealment enabled 1■2
Enabling - disabling the burglar alarm 1■2
With user code 1✔2
With transponder key 1✔3
Activation scenarios 1■3
Activating - deactivating the zones 1■4
With user code 1✔4
With transponder key 1✔5
Stopping the siren sound 1
■6
With user code 1✔6
With transponder key 1✔6
Activating the robbery alarm 1■7
What type of alarm occurred? 1■8
Editing 13. 9
The connector menu 2■0
Accessing the settings menu 2
■0
Setting the date and hour 2
■1
Adjusting the contrast 2
■2
Disabling the buzzer 2
■3
Activating concealment mode 2
■4


1
Introduction
The Keypad connector with displa■y
The keypa
■d
Navigation key✔s
The displa■y
Main scree✔n
In case of an alar✔m
Settings men✔u
What is the display showing■?

1 - Introduction
6
The Keypad connector with display■
123
56
987
0
4
OK
The keypad connector with display can be used to arm and disarm the
burglar alarm system, to activate the various zones based on the current
needs, or to activate one of the division scenarios programmed on
the burglar alarm control unit. It is also possible to obtain information
on the status of the system and to display the alarm events saved by
the Control unit.
1 - Graphic display
2 - Numeric keypad
3 - Transponder keys reader
4 - Numeric keypad
1
3
4
2

1 - Introduction
7
The keypad■
Navigation keys✔
Scroll keys
allow you to scroll the list of items
in the menu
Selection keys
allow you to select the functions,
which in some menus, may appe-
ar in the last line
- Key for cancelling the
selection and for returning to
the previous page – if it is held
down, you can escape from the
programming menu
- Tasto di conferma della
selezione o dei dati inseriti
The display■
System zones
Technical indications
Alarm signal zone
Functions
Selected item
Settings menu✔
In case of an alarm✔
Date and hour
ON/OFF indication
Main screen✔
Language
Address
Concealment
English
1 2 3 4
1 2 3 4

1 - Introduction
8
What is the display showing?■
System on, e.g.: zone activation as
in scenario 2
System o, general alarm signal,
tamptest with system switched
OFF or a dead radio device battery
System on, intrusion alarm signal
System o, Unit battery dead or
damaged
System o, no power
System o, e.g.: zones 1, 2, 4 active 1 2 34
15/11/08 14:23
1 2 3 4
scenario 2
15/11/08 14:23
1 2 3 4
1 2 3 4
1 2 3 4

1 - Introduction
9
System o, Burglar-alarm
(antitheft) battery dead or
damaged and technical alarm
signal
System o, one or more sensors
disabled (Important Unit functions
are disabled; disable only if
extremely necessary)
1 2 3 4
1 2 3 4
15/11/08 14:25

1 - Introduction
10

Operation
2
Accessing the functions with✔
concealment enabled
Enabling - disabling the burglar■
alarm
With user cod✔e
With transponder ke✔y
Activation scenario■s
Activating - deactivating the
■
zones
With user cod✔e
With transponder ke✔y
Stopping the siren soun■d
With user cod✔e
With transponder ke
✔y
Activating the robbery alar■m
What type of alarm occurred
■?

2 - Operation
12
When the burglar alarm (antitheft) is
disabled, an open lock appears in the
middle of the display
The display will show a closed lock;
if the sound system is enabled, you
will hear an “enabled”vocal message;
execute the same operation to disable
the burglar alarm
Press the key
Type in the user code (basic 00000) or
an enabled numeric code; typing an
incorrect code, after the third attempt the
keypad blocks for about 1 minute
Enabling - disabling the burglar alarm■
With user code✔
Accessing the functions with concealment■
enabled
The Concealment function can be used to prevent displaying of the sy-
stem status to anyone without a user code or an enabled transponder.
To access the connector menu
press
Enter the user code (default 00000), or
an enabled numeric code, or place an
enabled transponder near the reader
for four seconds
If the code is correct, it will be possible
to access the start page. If no keys
are pressed for 10 seconds, the
concealment screen will reappear
When the Concealment function is
active, the display shows the Logo
123
56
987
0
4
Code/Key
*
Code/Key
* * * * *
1 2 3 4 –– –– –– ––
15/11/08 15:01
1 2 3 4
15/11/08 15:02
1 2 3 4
15/11/08 15:02

2 - Operation
13
When the burglar alarm (antitheft) is
disabled, an open lock appears in the
middle of the display
To activate the alarm press or
on the connector, and place the key at
a distance of less than one centimetre
from the reader for two seconds
The display will show a closed lock;
if the sound system is enabled, you
will hear an “enabled”vocal message;
execute the same operation to disable
the burglar alarm
With transponder key✔
Use the keys to select the scenario
you want
After conrmation, only the zones
included in the selected scenario will
be activated
Activation scenarios■
It is possible to activate one of the zone division scenarios saved on the
Burglar Alarm Control Unit
123
56
987
0
4
Conrm the selection using the user
code, a transponder key or a numeric
code
123
56
987
0
4
1 2 3 4
15/11/08 15:03
1 2 3 4
15/11/08 15:04
Night
15/11/08 15:05
1 2 3 4
15/11/08 15:03

2 - Operation
14
You can deactivate (reactivate) one or more zones at any time. This
will allow you to personalise the burglar-alarm operation according to
your needs.
For instance, if you want to have protection even if you’re not at home,
you can deactivate the infrared detector zones, leaving the outer zones
(entrance door and windows) active. This will allow you to move around
freely inside your house without making any alarms go on and without
giving up safety.
The zones in which your burglar alarm is split into appear in the rst
line of the display.
The active zones are shown in a dark box.
The following example shows the system made up of 4 zones, all active;
zone 3 is deactivated.
Activating - deactivating the zones■
The zones (max. 4) of the system are all
active (e.g. 1-2-3-4)
Press the corresponding key on the Unit
keypad to deactivate zone 3
The display shows zone 3 without the
dark box (deactivated)
Press the key
Type in the user code (basic 00000) or
an enabled numeric code
With user code✔
3
123
56
987
0
4
1 2 3 4
15/11/08 15:05
1 2 34
15/11/08 15:05

2 - Operation
15
Press the corresponding key on the Unit
keypad to deactivate zone 3
The display shows zone 3 without the
dark box (deactivated)
Conrm the operation by bringing a
transponder near the reader within 5
seconds
The zones (max 4) of the system are all
active (e.g. 1-2-3-4)
With transponder key✔
3
123
56
987
0
4
1 2 3 4
15/11/08 15:06
1 2 34
15/11/08 15:06

2 - Operation
16
Stopping the siren sound■
If the alarm goes on while you’re there, you can stop the siren as
follows:
Make sure there are no trespassers in
the house
The siren stops; the Unit answers with
the vocal message “disabled”
Press the key
Type in the user code (basic 00000) or
an enabled numeric code
With user code✔With transponder key✔
Press the or key on the Unit
keypad and then bring the key (less
than one centimeter) near the reader
for 2 seconds
Make sure there are no trespassers in
the house
The siren stops and the burglar alarm
system is deactivated
123
56
987
0
4
123
56
987
0
4
1 2 3 4
1 2 3 4
1 2 3 4
1 2 3 4

2 - Operation
17
Activating the robbery alarm■
In case of robbery, it is possible to deactivate the burglar alarm system,
while at the same time sending the emergency calls to the numbers
saved in the Control Unit
The burglar alarm is disarmed, the
Control Unit starts making the
emergency calls in a totally silent way
Press followed by
Enter the user code (default 00000)
or another enabled numeric code
123
56
987
0
4
1 2 3 4
15/11/08 15:09
1 2 3 4
15/11/08 15:09

2 - Operation
18
By pressing the key, a page appe-
ars, which lets you reset a single alarm
or execute a total reset
To learn more, press the key
The display provides the following infor-
mation:
- detector and its name (living room win-
dow)
- type of alarm (intrusion)
- burglar-alarm (antitheft) status when
the alarm goes on (ON-inserted)
The alarm notication is cancelled from
the display when the burglar alarm
system is rearmed. It is however saved
in the “Event Memory” of the Burglar
Alarm Control Unit
The Unit has detected an alarm...
What type of alarm occurred?■
When an alarm signal is displayed, you can nd out what type it is (intru-
sion, technical, etc.) and which detector has detected it; a name has been
given to each detector (kitchen window, entrance, etc.) by the installer for
easier identication. Press just one key to get this information.
To learn more, press the
The display provides the following
information:
- device name (remote assistance)
- type of alarm (technical start)
- burglar-alarm (antitheft) status when
the alarm goes on (OFF-disconnected)
The Unit has detected a technical alarm
In case of a technical alarm (its symbol appears), you can nd out which
device has produced the alarm and reset it as well.
123
56
987
0
4
1 2 3 4 1 2 3 4
32: IR sensor
Living room window
Intrusion Alarm
Inserted
42: riceiver
Remote Assistance
Start Technical
Disconnected
Press:
reset single
reset total

Editing
3
The connector men■u
Accessing the settings men
■u
Setting the date and hou
■r
Adjusting the contras
■t
Disabling the buzze
■r
Activating concealment mode
■

3 - Editing
20
The connector menu■
In this manual we felt it would be appropriate to explain all the custo-
misation functions that may be useful when using the connector. These
functions can be easily accessed without any risks of compromising the
correct operation of the Control Unit, and therefore without jeopardising
home security.
We recommend that one always seeks advice from the system installer
before changing in any way the conguration of any of the functions of
the Control Unit not included in this manual.
Accessing the settings menu■
Press
Enter the user code, or use the
transponder key in the same way as if
arming the burglar alarm system
Ensure that the system is disarmed
It is now possible to start customising
the connector
This procedure is necessary to access the settings menu:
123
56
987
0
4
To exit the settings menu wait for 30 seconds without pressing
any keys or press .
Language
Address
Concealment
English
1 2 3 4
15/11/08 15:13
This manual suits for next models
1
Table of contents
Other LEGRAND Keypad manuals

LEGRAND
LEGRAND Soliroc 0 778 73 User manual

LEGRAND
LEGRAND AU5009WH User manual

LEGRAND
LEGRAND lyriQ AU5010 Series User manual

LEGRAND
LEGRAND 5 722 54 User manual

LEGRAND
LEGRAND 5 722 52 User manual

LEGRAND
LEGRAND Radiant AU7010 User manual

LEGRAND
LEGRAND 4 306 03 User manual

LEGRAND
LEGRAND AU7010 Series User manual

LEGRAND
LEGRAND On Q lyriQ User manual

LEGRAND
LEGRAND Nuvo NV-P20-LLN User manual