manuals.online logo
Brands
  1. Home
  2. •
  3. Brands
  4. •
  5. LEGRAND
  6. •
  7. Keypad
  8. •
  9. LEGRAND lyriQ AU5010 Series User manual

LEGRAND lyriQ AU5010 Series User manual

Oll·Q
Lllegrand
®
INSTRUCTION/INSTALLATION SHEET
lyriQ™ Studio High Performance
Keypad
301
Fulling Mill Road, Suite G
Middletown, PA 17057
Phone (800) 321-2343 I Fax (717) 702-2546
www.onqlegrand.com 15-0425 REV. A
1.
Introduction
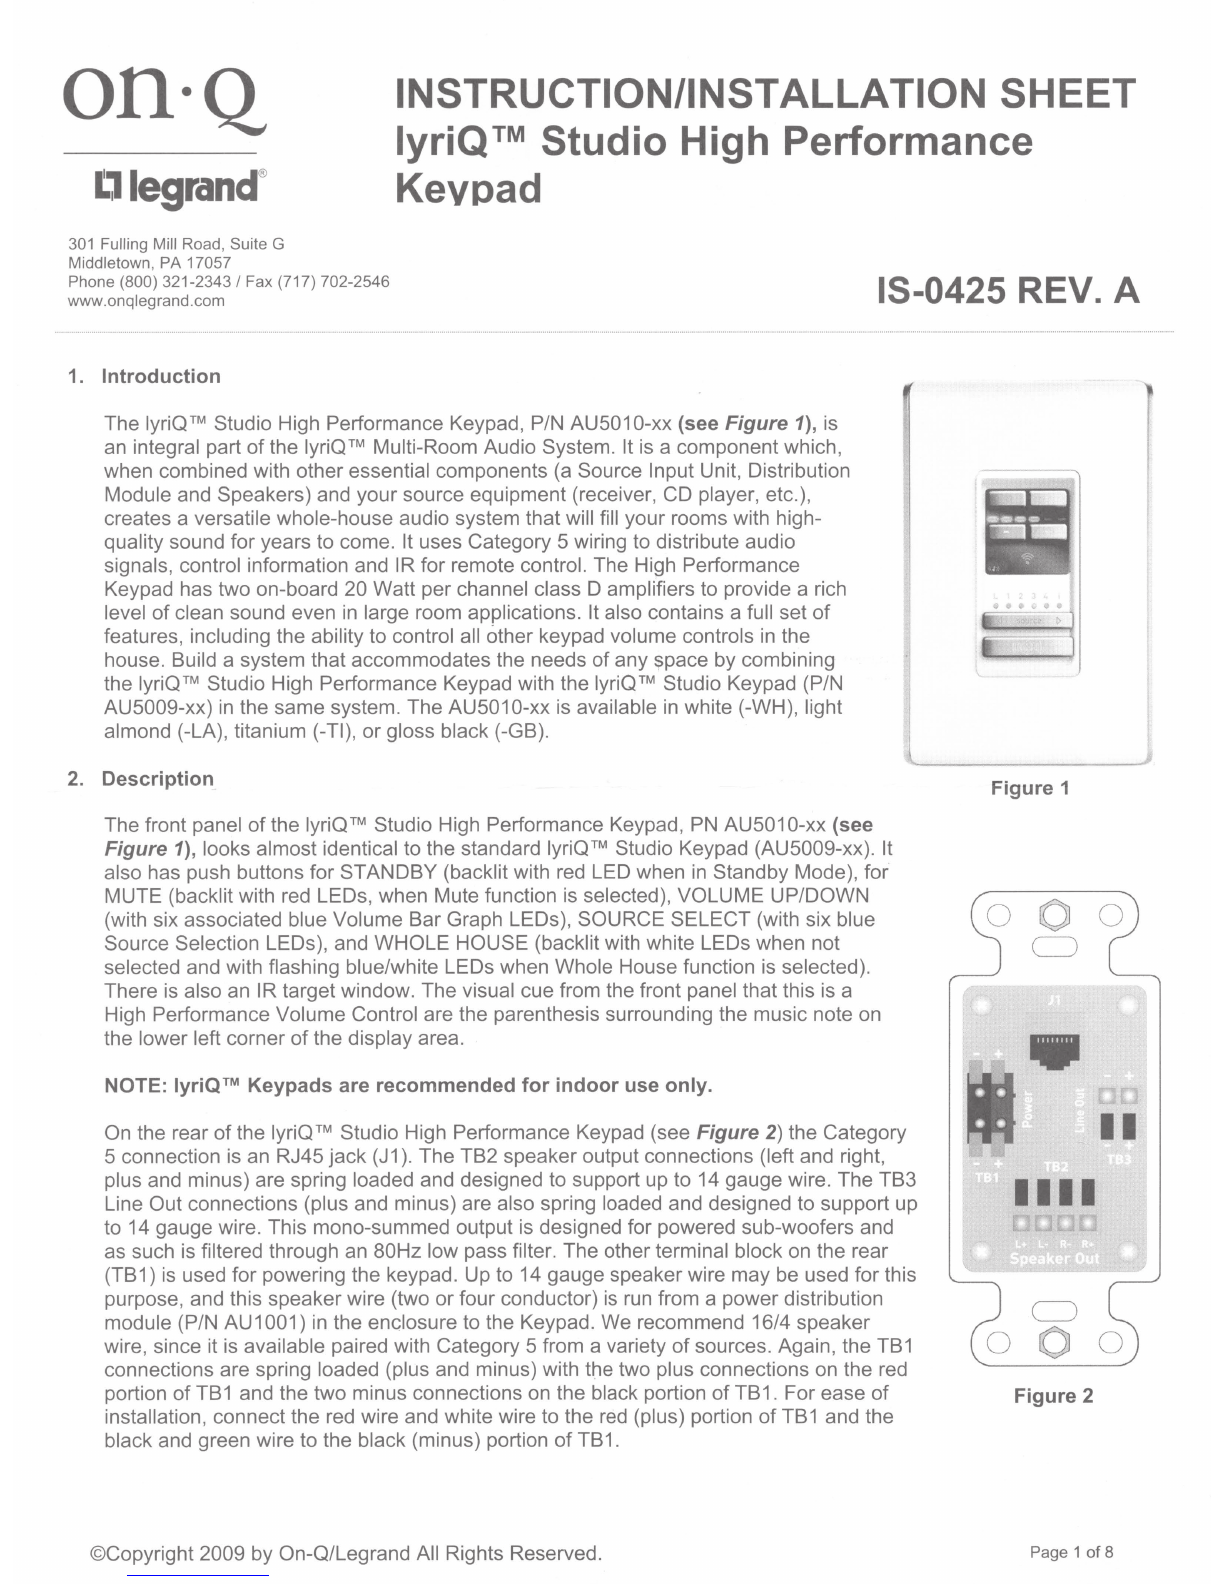
The lyriQ™ Studio High Performance Keypad, P/N AU501 0-xx (see
Figure
1), is
an integral part
of
the lyriQ™ Multi-Room Audio System. It is a component which,
when combined with other essential components (a Source Input Unit, Distribution
Module and Speakers) and your source equipment (receiver, CD player, etc.),
creates a versatile whole-house audio system that will fill your rooms with high-
quality sound for years to come. It uses Category 5 wiring to distribute audio
signals, control information and IR for remote control. The High Performance
Keypad has two on-board 20 Watt per channel class D amplifiers to provide a rich
level
of
clean sound even
in
large room applications. It also contains a full set
of
features, including the ability to control all other keypad volume controls
in
the
house. Build a system that accommodates the needs of any space by combining
the lyriQ™ Studio High Performance Keypad with the lyriQ™ Studio Keypad (P/N
AU5009-xx)
in
the same system. The AU5010-xx is available
in
white (-WH), light
almond (-LA), titanium (-TI), or gloss black (-GB).
2.
Description
The front panel
of
the lyriQ™ Studio High Performance Keypad,
PN
AU5010-xx (see
Figure
1), looks almost identical to the standard lyriQ™ Studio Keypad (AU5009-xx). It
also has push buttons for STANDBY (backlit with red LED when
in
Standby Mode),
for
MUTE (backlit with red LEOs, when Mute function is selected), VOLUME UP/DOWN
(with six associated blue Volume Bar Graph LEOs), SOURCE SELECT (with six blue
Source Selection LEOs), and WHOLE HOUSE (backlit with white LEOs when not
selected and with flashing blue/white LEOs when Whole House function is selected).
There is also an IR target window. The visual cue from the front panel that this is a
High Performance Volume Control are the parenthesis surrounding the music note on
the lower left corner
of
the display area.
NOTE: lyriQ™
Keypads
are
recommended
for
indoor
use
only.
On the rear
of
the lyriQ™ Studio High Performance Keypad (see
Figure
2) the Category
5 connection is an RJ45
jack
(J1
).
The TB2 speaker output connections (left and right,
plus and minus) are spring loaded and designed to support up to 14 gauge wire. The TB3
Line Out connections (plus and minus) are also spring loaded and designed to support up
to 14 gauge wire. This mono-summed output is designed for powered sub-woofers and
as such is filtered through an 80Hz low pass filter. The other terminal block on the rear
(TB1) is used for powering the keypad. Up to 14 gauge speaker wire may be used for this
purpose, and this speaker wire (two or four conductor)
is
run
from a power distribution
module (P/N
AU1
001)
in
the enclosure to the Keypad. We recommend 16/4 speaker
wire, since it is available paired with Category 5 from a variety
of
sources. Again, the TB1
connections are spring loaded (plus and minus) with the two plus connections on the red
portion
of
TB1 and the two minus connections on the black portion of TB
1.
For ease
of
installation, connect the red wire and white wire to the
red
(plus) portion
of
TB1
and the
black and green wire to the black (minus) portion
of
TB1.
©Copyright 2009 by On-Q/Legrand All Rights Reserved.
Figure
1
CJ
0 0
Figure
2
Page 1
of
8
Oll·Q
tllegrand
®
301
Fulling Mill Road, Suite G
Middletown, PA 17057
Phone (800) 321-2343 I Fax (717) 702-2546
www.onqlegrand.com
3.
Installation
INSTRUCTION/INSTALLATION SHEET
lyriQ™ Studio High Performance
Keypad
15-0425 REV. A
Installation
of
the lyriQ™ Studio High Performance Keypad is best accomplished at multiple times during new
construction, at "Rough-in" before the drywall is installed, and at "Trim-out" after the drywall is installed and
painted.
NOTE: Before
connecting
the
Keypad
volume
controls:
Make
sure
that
power
supplies
are
not
connected
to
the
lyriQ™
Audio
and
Power
Distribution
Modules.
For
instructions
on
pre-wiring
and
installing
other
components
of
the
lyriQ™
Audio
System, please see
the
Instruction
Sheets
included
with
those
components.
NOTE:
Always
follow
TIA-570-B and T568A
wiring
standards
for
installing
and
terminating
Category 5 cable.
Failure
to
follow
the
correct
wiring
standard
could
result
in damaged
equipment
and/or
electrical
interference issues.
Carefully
label each
wire
for
its
intended use
to
avoid
mis-wiring.
NOTE: Maintain a
minimum
12"
separation between Category 5 cable and
any
120VAC cabling.
A.
"Rough-in" steps:
1) A single Category 5 cable and 16/4 speakerwire should be run from the enclosure location to a single
gang outlet box at each Volume Control location (typically mounted
at
electrical light switch height).
B.
'Trim-out" steps:
1) Connect the volume control by terminating the pre-wired Category 5 cable from the enclosure with an
RJ45 plug, following the T568A wiring standard and insert this plug into jack
J1
(see
Figure
2).
2) Forthe power connection (TB1) strip 3/8"
of
insulation from each
of
the four conductors and insert the
red and white wires into the red (plus) portion
of
TB1. Insertthe stripped black and green wires into the
black (minus) portion
of
TB1
(see
Figure
2).
NOTE: The
two
red
connections
are
tied
together,
as
are the
two
black
connections.
They
are
provided
in
pairs
to
provide
flexibility
of
wiring.
NOTE:
Electricians
may
prefer
to
think
of
the
black
and
red
wires
as
plus
and
the
green and
white
wires
as
minus.
That
wiring
will
also
work,
as long
as
it
is
also
followed
at
the
other
end
of
the
cable
(at
the
Power
Distribution
Module
in
the
enclosure).
3) Speaker/Line OuUSub-Woofer connections (see
Figure
2):
NOTE:
Polarity
and
channels
are clearly marked (L+, L-, R-, R+)
for
proper
identification
during
installation.
a) Use TB2 to connect one pair (only)
of
8 ohm evo
Q™
audio speakers to the volume control.
b) Use TB3 to connect your evo
Q™
powered sub-woofer or an external amplifier to the volume control.
These connection terminals do not provide any amplification but the volume control on the keypad
©Copyright 2009 by On-Q/Legrand All Rights Reserved. Page 2 of 8
Oll·Q
tllegrand
®
INSTRUCTION/INSTALLATION SHEET
lyriQ™ Studio High Performance
Keypad
301
Fulling Mill Road, Suite G
Middletown, PA 17057
Phone (800) 321-2343 I Fax (717) 702-2546
www.onqlegrand.com
controls the output level ofthis connection.
4) Connections
in
the enclosure (see Figure 3
):
15-0425 REV. A
a) The Category 5 cable that was run to each volume control location should
be
terminated with
an
RJ45
plug according to the T568A wiring standard and inserted into one
of
the zone output jacks
of
the
associated lyriQ™ audio distribution module.
Figure 3
lyriQ""
St
udio Hi
gh
PPrf
ormance
Keypad (A
USO
10
XX)
Fr
ont
V
rew
Spec'lker
Cab
le(16-
2)
2R
uns
evoo••
3000
Se
ri
es
8"
In
Ce
iling Speakers
(364655
01)
Rear Vi
ew
l
yr
i
Q~
Four
Sourc;;o,
0 Eight Zone
Di~tr
i
bu
t
ion
Modu
le
(AlJ
1002)
b) For the 16/4 speaker wire power cable that was run to each volume control location, strip 3/8" of
insulation from each
of
the four conductors and insert the red and white wires into the red
(plus)
portion
ofTB1. Insert the stripped black and green wires into the black (minus) portion
of
TB1
NOTE: As noted before, Electricians may prefer to think
of
the black and red wires as plus and the
green and white wires as minus. That wiring will also work, as long as it
is
also followed at each
end of the cable.
c) To connect more than eight (8) Keypads to a 4 Source 8 Zone Module, cascade Single Source Modules.
To cascade a Single Source Module, simply
run
a Cat
Se
jumper from any Zone port RJ45 jack on the
front panel
of
the Multi-source Module to the "Source In" RJ45 jack on the front panel
of
a Single Source
Module (see Figure 4).
©Copyright 2009 by On-Q/Legrand All Rights Reserved. Page 3 of 8
Oll·Q
Lllegrand
®
INSTRUCTION/INSTALLATION SHEET
lyriQ™ Studio High Performance
Keypad
301
Fulling Mill Road, Suite G
Middletown, PA 17057
Phone (800) 321-2343 I Fax (717) 702-2546
www.onqlegrand.com
0 .
lltbJt'n«Aatlobulev.r '
"
01
8'
c::::)
Homeowner
Equipment
(Alternate
Room)
Homeowner
Equipment
(Entertainment
Room)
•
lyriQTH
Flush Mount
Single Source Input
(P/N AU1004-WHI
lyriQTH
Flush Mount
Triple Source Input
IP/N AU1011-WHI
evoQTM
3000
Series
6.s··
In
-Ceiling Speakers
(364654
·
02)
Figure 4
lyriQTM
Studio Keypad
IAU5009-xxl
Zone 5
15-0425 REV. A
Cat5e
Cable
0
0
0
0
Speaker
Cable
(16-4)
Zones 1 - 3
lyriQTM
Studio High
Performance
Keypad
(AU501
0-xx)
l
n-Q
Universal
emote Control
. .
evoQTM
3000
Series
Speaker Cable
(16-2) 2 Runs
8""
In-Ceiling
Speakers
(364655·02)
5) Keypad Mounting: check all connections and test the system's operation before installing the volume
controls into the wall. Use the included screws
to
install the volume control and wall plate into the single
gang box.
NOTE: A 20 cubic inch or larger single gang box
is
recommended.
©Copyright 2009 by On-Q/Legrand All Rights Reserved. Page 4
of
8
Oll·Q
Lllegrand
®
INSTRUCTION/INSTALLATION SHEET
lyriQ™ Studio High Performance
Kevoad
301
Fulling Mill Road, Suite G
Middletown, PA 17057
Phone (800) 321-2343 I Fax (717) 702-2546
www.onqlegrand.com 15-0425 REV. A
4.
Operation
A.
ON/OFF:
Keypad-
Press STANDBY button to toggle
ON
or OFF (see
Figure
5).
Standby
Butto
Remote -After pressing On-Q button, press On/Off button to
toggle
ON
or OFF (see
Figure
6).
B.
Power-Save Mode:
Keypad
only-
After 30 seconds
of
inactivity, the Keypad will go
into Power-Save or "sleep" mode. Pressing any button
on
the
Keypad will awaken it from this mode, performing the action
associated with the button push.
C.
SOURCE select:
Keypad-
Press SOURCE rocker switch
up
(right side) or down
(left side) to select desired source (see Figure
5).
Whole
House
Button
Remote-
Press SOURCE UP or DOWN button to select desired
source
(see
Figure
6).
NOTE: (Keypad
or
Remote)
For
Single
Source
Systems,
source
toggles
between
source
#1
and
any
connected
Studio
Local
Source/s.
For
Multi-Source
Systems,
source
toggles
between 1,
2,
3,
4 and
connected
Studio
Local
Sources.
If
more
than
one
Local
Source
is
connected,
they
are
indicated
by
"L"
and
"2".
NOTE:
Upon
source
change,
volume
mutes
and then ramps
back
up
to
prior
volume
setting
automatically.
On-Q
Universal
Remote
(PIN AU1060)
D.
VOLUME Steps: Keypad or
Remote-
Press VOLUME+ (Up) or
VOLUME-
(Down) button (36 steps).
E. MUTE: Keypad or
Remote-
Press MUTE button to toggle Mute
On
or Off.
NOTE: When
returning
from
MUTE,
volume
control
will
ramp
to
pre-
mute
or
adjusted
state (source,
volume
and
backlight
level).
F.
DO NOT DISTURB (see
Figure
5):
When the Keypad is off, pressing MUTE toggles
Do
Not Disturb (DND).
This mode
is
indicated by both the red POWER and MUTE LED on.
When Keypad
is
in
DND mode, it will Not respond to whole house
commands from other locations.
G.
WHOLE-HOUSE Mode (see
Figure
5):
NOTE: In
this
mode,
every
operation
performed
on
this
keypad
will
be
relayed
to
all
keypads
not
in
(DND)
mode
in
the
system.
Keypad or Remote -Press the WHOLE HOUSE button to toggle the
Whole House function
On
or Off (On the Keypad, the WHOLE HOUSE
©Copyright 2009 by On-Q/Legrand All Rights Reserved.
Local
Button
Whole
House
Button
Room
Button
Figure
5
Volume
Buttons/
1 LEOs
Source
Button
urce
uttons
Page 5
of
8
Oll·Q
t11egrand
®
INSTRUCTION/INSTALLATION SHEET
lyriQ™ Studio High Performance
Keypad
301 Fulling Mill Road, Suite G
Middletown, PA 17057
Phone (800)
321-2343/
Fax (717) 702-2546
www.onqlegrand.com
IS-0425 REV. A
button turns blue).
In
this mode, all functions performed on the local keypad such as Volume Up/Down, Mute/Un-Mute, Source
selection,
or
Power On/Offare relayed to and performed on all active keypads in the system.
NOTE: The Whole-House mode will be exited when the user fails to press a key within 10 seconds or by
pressing the WHOLE HOUSE button again.
H.
DIMMING set-up:
Press Volume+ and Volume- at the same time
to
enter mode. Backlights will flash.
Press+
or-
to adjust level
of
light.
I.
POWER UP SELF TEST (see Figure
5)
:
Keypad
only-
When power is applied
to
the Studio Keypad, the following start up test will occur:
1) The Keypad white backlight LEOs will illuminate to full intensity.
2) The MUTE button backlight will transition to red and back to white.
3) The WHOLE HOUSE button backlight will transition to blue and back to white.
4) The volume indicator LEOs and then source indicator LEOs will illuminate leftto right and then back to the left.
5) The Keypad white backlight LEOs will dim to offand the Standby button will be backlit red.
6) When done, the Keypad powers down,
NOTE: The first 5 power up self tests will take about 15 seconds, and about 2 seconds afterthat. Hitting any
button during the test will interrupt the test and the Keypad will operate as normal.
5.
Important Safety Precautions:
Read the instructions that are included with all associated lyriQ™ Audio products before installing any single component. If
you are unsure
of
any
of
the installation procedures contact On-Q/Legrand Technical
Support@
1-800-321-2343 option 1 or
contact an On-Q/Legrand installer.
• Do not attempt to service, move or change any component
of
the lyriQ™ Audio system unless you are qualified to do so.
• This system should be installed by a qualified installer and must conform to all local building and electrical codes.
• Do not apply power to the lyriQ™ Audio System until all components are installed and wiring is properly terminated.
• Do not attempt to terminate. change
or
un-install any wiring without first turning off power to the lyriQ™ Audio System
located in the Enclosure. Unplug the powerto the lyriQ™ Audio System from the poweroutlet before proceeding with
wiring terminations
or
changes.
• Install all system components away from heat sources such as HVAC ducts/registers, stoves
or
any other heat source.
• Do not expose any component that was designed for indoor use to moisture. Doing so can create electrical hazards
or
render the component unusable. Exposure to moisture will also void the warranty on the system.
• Do not use vacuum cleaners, liquid
or
aerosol cleaners to clean system cover plates. A damp cloth may be used.
6. Installer Set
Up
Mode (see Page 7 and 8)
©Copyright 2009
by
On-Q/Le
gr
and All Rights Reserved. Page 6
of
8
MTM-03/
15
/09
STUDIO
KVC-
Installer Setup Mode
Activate
by
pressing the following key sequence (while on):
• MUTE, VOLUME UP, VOLUME DOWN, VOLUME DOWN, MUTE, VOLUME UP, VOLUME
DOWN, VOLUME DOWN
• The KVC will indicate Installer Setup Mode by blinking its backlight LEDs.
SETTING FUNCTION OPTIONS
WHOLE
HOUSE
•
oo
o o o ENABLED: (DEFAULT) This KVC may
Enables
or
disables this be controlled by whole house commands from other KVC's.
ENABLE/DISABLE
KVC's
ability to respond to
CJ
•
('
,
0 0
,-
, whole-house commands from
-·
\
.
../
\,
_j
L I 2 3 4 i
other
KVC's
in the system o • o
ooo
DISABLED: This KVC will not respond to
whole house commands from other KVC's.
Sets the tum on volume for •
oooo
o SPECIFIED VOLUME: (DEFAULT) The
TURN
ON
VOLUME
this KVC. Alternatively, the displayed volume setting is the tum on volume.
r\
\
•
("'>,
,..-,
0
KVC can be set to remember
\__.)
'~./
·~·
'-..J
L I 2 3 4 i
its last volume when it is
DDDDD
•
LAST VOLUME: When this KVC is
turned on. turned on, it will be set to its last volume.
MAXIMUM
VOLUME
••••••
Sets the maximum allowed SPECIFIED VOLUME: (DEFAULT) The
("'\
•0
,--,
,_;
\_)
volume for this KVC. displayed volume setting is the maximum volume.
L I 2
3 4 i
•
ooo
oo
IR TARGET ENABLED I IR REPEAT
ENABLED: (DEFAULT) The KVC will process received
IR
commands and repeat any received
IR
throught the system.
o •
oooo
IR TARGET ENABLED I IR REPEAT
IR
TARGET
&
IR
DISABLED: The KVC will process received
IR
commands, but
REPEAT
ENABLED
I will NOT repeat any received IR throughout the system.
DISABLED Controls the setting
of
this
•
This setting may be used to prevent
IR
noise at this KVC
( "
-.
()
0
'" •
0
KVC's
IR functionality from effecting the rest
of
the system.
\ _)
v
L I
2 3 4 i
oo
•
oo
o
IR
TARGET DISABLED I IR REPEAT
DISABLED: The KVC will not process any received
IR
commands.
• This setting may be used in extremely noisy JR
environments to prevent audible noise.
oo
••
o o MIDPOIN
T:
(DEFAULT) Equal balance
between left and right.
BALANCE
•••
ooo
FULL LEFT: Audio is balanced completely
o
ee
o o 0 Adjusts the left/right balance to the left.
of this
KVC's
audio.
L I 2 3 4 i
ooo
•••
FULL RIGHT: Audio is balanced
completely to the right. NOTE that other settings are available
between the maximums.
©Copyright 2009 by On-Q/Legrand All Rights Reserved. Page 7
of
8
SETTING FUNCTION OPTIONS
•
ooo
oo
NO GROUPING: (DEFAULT) This KVC
is not part
of
a cascaded group. This is also the proper setting in
Allows the Integration Module a non-Integration Module system.
to properly control multiple o •
DDDD
GROUPMEMBER: This KVC
is
a member
KVC's that are cascaded from
GROUPING
of
a cascaded group, but is not the master. As such, it will not
/ ' "
'\
•
()
•
()
()
an 'AU1002 Four Source, respond to an Integration Module's status queries.
\.
J Eight Zone Distribution
L l 2 3 4 i Module' or an 'AU1014
Advanced Single Source D
D.
DDD GROUP MASTER: This KVC is a member
Module'.
of
a cascaded group -and is the group master. As such, it is the
only KVC in the group that will respond to an Integration
Module's status queries.
Sets the pattern that this KVC • o o
ooo
40kH
z FREQUENCY: This KVC will
will use whenrepeating IR repeat IR commands using a
40
kHz pattern.
commands to the rest
of
the
IRREPEATER
system. The KVC allows for D• D
DDD
MIXED40kHz
/56kHzFREQUENCY:
PATTERN
different patterns based on the (DEFAULT) This KVC will repeat IR commands using a mixed
()
•
()
,,
1\.. ) e o selected source (1-4). The 40 kHz I 56 kHz pattern.
L l 2 3 4 i pattern selected here will be
for the source that was DD. DDD
56kH
zF
REQUENCY: This KVC will
selected when Installer Setup repeat IRcommands using a 56 kHz pattern.
Mode was activated.
AUTOMATIC
POWER
•o
oooo
ENABLED: (DEFAULT) This KVC will
OFF
Determines whether this KVC automatically power
off
after 20 minutes
of
audio inactivity.
()
•
(J
()
o e will automatically power
off
after 20 minutes
of
audio loss. o •
oo
o o
L l 2 3 4 i DISABLED: This KVC will never
automatically power off.
WHOLE
HOUSE
•
ooooo
ENABLED: (DEFAULT) This KVC can
BUTTON ENABLED I Determines
if
the whole house control other KVC's in the system after pressing its whole house
DISABLED button on this KVC is button.
0 0 •1- ,
v o e operational. o •
oo
o o DISABLED: This KVC cannot activate
L l 2 3 4 i whole house mode through the use
of
its whole house button.
IRACTIVITY
•
ooo
o o ENABLED: This KVC will show IR
FEEDBACK
Allows the KVC to indicate activity
by
blinking its power led.
0 0 o e o e the presense
of
IR activity by
blinking its power led. o •
oooo
DISABLED: (DEFAULT) This KVC will
L l 2 3 4 i not show any indication
ofiR
activity.
RESTORE
DEFAULT
Allows the user to reset the
••••••
ACTIVATED: Pressing either volume
o
••••
o KVC's settings to their button on this setting resets the defaults and blinks the leds to
L I 2 3 4 i defaults. indicate.
©Copyright 2009 by On-Q/Legrand All Rights Reserved. Page 8
of
8
To
use this card simply
tear
out this
insert and place card between
wall plate and wall as shown below.
Pu$h
md
th~''
arty
ctht'r
Dutton
to
,e.nab!f'
mu~tc
thrcughcut
tMe
whotr
hou.,t!
FOR
COMPLETE
USER
DOCUMENTATION
PlEAS£
VISIT
www
~~ran
d
tom
QUICK
START
GUIDE
FOLLOW
THESE
SIMPLE
STEPS
TO
ENJOY
HIGH
QUALITY
MUSIC
THROUGHOUT
YOUR
WHOLE
HOME.
Press
<!>
to
turn keypad on and
off
.
Push -
Jl
a single zone.
to
control the volume
in
Scroll right and left
~
source
~
to select
a mus1c source.
Push
{(<~>))
and then any other
button
to
enable music throughout the
whole house.
FOR
COMPLETE
USER
DOCUMENTATION
PLEASE
VISIT
www.onqlegrand.com

Other LEGRAND Keypad manuals

LEGRAND Vantage Arteor KSS14AR Series User manual

LEGRAND

LEGRAND Vantage Arteor KSS14AR Series User manual

LEGRAND Soliroc 0 778 70 User manual

LEGRAND

LEGRAND Soliroc 0 778 70 User manual

LEGRAND Mosaic User manual

LEGRAND

LEGRAND Mosaic User manual

LEGRAND Nuvo NV-P20-LLN User manual

LEGRAND

LEGRAND Nuvo NV-P20-LLN User manual

LEGRAND AU5009WH User manual

LEGRAND

LEGRAND AU5009WH User manual

LEGRAND Vantage RK12E-A Series User manual

LEGRAND

LEGRAND Vantage RK12E-A Series User manual

LEGRAND On Q lyriQ User manual

LEGRAND

LEGRAND On Q lyriQ User manual

LEGRAND 4 306 03 User manual

LEGRAND

LEGRAND 4 306 03 User manual

LEGRAND Radiant AU7010 User manual

LEGRAND

LEGRAND Radiant AU7010 User manual

LEGRAND 0 767 17 User manual

LEGRAND

LEGRAND 0 767 17 User manual

LEGRAND 5 722 52 User manual

LEGRAND

LEGRAND 5 722 52 User manual

LEGRAND Soliroc 0 778 73 User manual

LEGRAND

LEGRAND Soliroc 0 778 73 User manual

LEGRAND AU7050 User manual

LEGRAND

LEGRAND AU7050 User manual

LEGRAND AU7010 Series User manual

LEGRAND

LEGRAND AU7010 Series User manual

LEGRAND lyriQ Assembly instructions

LEGRAND

LEGRAND lyriQ Assembly instructions

LEGRAND 5739 46 User manual

LEGRAND

LEGRAND 5739 46 User manual

LEGRAND 5 722 54 User manual

LEGRAND

LEGRAND 5 722 54 User manual

Popular Keypad manuals by other brands

BASETech BT-USB-NUMB1 operating instructions

BASETech

BASETech BT-USB-NUMB1 operating instructions

Satel INT-TSI Quick installation guide

Satel

Satel INT-TSI Quick installation guide

rako WCM-102 instruction manual

rako

rako WCM-102 instruction manual

Visionis VIS-8009 user manual

Visionis

Visionis VIS-8009 user manual

MLS SUPRA System guide

MLS

MLS SUPRA System guide

Texecom Premier Elite LCDLP-W installation manual

Texecom

Texecom Premier Elite LCDLP-W installation manual

Ksenia ergo Quick installation and programming guide

Ksenia

Ksenia ergo Quick installation and programming guide

Satel INT-TSG Installer manual

Satel

Satel INT-TSG Installer manual

Bosch D223TD installation instructions

Bosch

Bosch D223TD installation instructions

rako RNC instruction manual

rako

rako RNC instruction manual

Pirnar 6279 operating instructions

Pirnar

Pirnar 6279 operating instructions

RSI VIDEO TECHNOLOGIES videofied WMB Installation datasheet

RSI VIDEO TECHNOLOGIES

RSI VIDEO TECHNOLOGIES videofied WMB Installation datasheet

Blink Marine PKP-2300-SI-FR user manual

Blink Marine

Blink Marine PKP-2300-SI-FR user manual

MyQ VKP1-MYQ user manual

MyQ

MyQ VKP1-MYQ user manual

Arrowhead SK1L Installation & programming manual

Arrowhead

Arrowhead SK1L Installation & programming manual

urmet domus 1051/025 Installation, programming and functions manual

urmet domus

urmet domus 1051/025 Installation, programming and functions manual

Harman AMX Massio MCP-106 Custom Button Labeling Guide

Harman

Harman AMX Massio MCP-106 Custom Button Labeling Guide

KEEPAD ResponseCard RF Faq

KEEPAD

KEEPAD ResponseCard RF Faq

manuals.online logo
manuals.online logoBrands
  • About & Mission
  • Contact us
  • Privacy Policy
  • Terms and Conditions

Copyright 2025 Manuals.Online. All Rights Reserved.