LEM 1020 User manual

ATTENTION
If any components of this unit are broken,
do not operate properly, or for product returns,
please contact LEM Products at
1-877-536-7763
For the online catalog, log onto www.lemproducts.com
Revised 6/2012
10” MEAT SLICER
MODEL #1020
LEM Products
West Chester, OH 45011
Toll Free: 1-877-536-7763
Web: www.lemproducts.com

10” MEAT SLICER
MODEL #1020
Parts#
Description
Parts#
Description
A
1020-8
Food Holder Arm
F
1020-4
Blade Guard
B
1020-2
Movable Bulk
G
1020-3
Sliding Food
Tray
C
1020-5
Blade
H
1020-35
Knob
D
1020-15
Blade Guard Knob*
I
1020-23
Graduated
Knob
E
1020-61
Sharpener Group
J
1020-40
On/Off Switch
*NOT SHOWN
IMPORTANT WARRANTY INFORMATION:
PLEASE READ, FILL OUT AND RETURN ENCLOSED
WARRANTY CARD
THIS WARRANTY COVERS THE LEM PRODUCTS:
10” MEAT SLICER (MODEL 1020)
THE WARRANTY IS EXTENDED TO THE ORIGINAL PURCHASER ONLY.
WARRANTY DURATION: This product is warranted to the original purchaser for a period of one
(1) year from the original purchase date. EACH UNIT COMES WITH A WARRANTY CARD,
WHICH MUST BE FILLED OUT COMPLETELY AND RETURNED IMMEDIATELY
WITH A COPY OF THE PURCHASING RECEIPT. FAILURE TO RETURN YOUR
WARRANTY CARD WILL LIMIT WARRANTY TO 90 DAYS WITH PROOF OF
PURCHASE.
WARRANTY COVERAGE: This product is warranted against defective materials or
workmanship. The warranty is void if the product has been damaged by accident, misuse, neglect,
modification or improper service or repairs by unauthorized personnel. It is also void if damaged in
shipment or by other causes not arising out of defects in the materials or workmanship. This
warranty does not extend to any units which have been in violation of written instructions furnished,
or to units which have been altered or modified.
WARRANTY DISCLAIMERS: This warranty is in lieu of all warranties expressed or implied, and
no representative or person is authorized to assume any other liability in connection with the sale of
our products. There shall be no claims for defects or failure of performance under any theory of sort,
contract or commercial law including, but not limited to negligence, gross negligence, strict liability
or breach of contract.
The manufacturer declines all responsibility for damage to persons, things or animals arising from
the failure to comply with the norms contained in this manual. The manufacturer reserves the right
to make modifications at anytime to the models while maintaining the main characteristics described
herein. The manufacturer also declines all responsibility for any errors in compiling this manual.
WARRANTY PERFORMANCE: During the above one year warranty period, a product with a
defect will either be repaired or replaced after the product has been inspected by an LEM Service
Technician. NO PRODUCT WILL BE EVALUATED UNLESS THE ORIGINAL SALES
RECEIPT OR THE WARRANTY CARD IS ON FILE. The repaired product will be in warranty
for the balance of the one year warranty period. No charge will be made for such repair or
replacement.
IMPORTANT NOTICE: If any parts are missing or defective, please contact our Customer
Service Department for assistance at 877-536-7763. (M-F 8:30am to 4:30pm EST) DO NOT
RETURN TO THE STORE WHERE THE PRODUCT WAS PURCHASED.
LEM PRODUCTS MERCHANDISE RETURN POLICY WARRANTY SERVICE:
To obtain service under terms of this warranty, please contact us at 877-536-7763 to obtain
authorization prior to returning the merchandise. No merchandise will be accepted without prior
authorization. Please return the product pre-paid in the original packaging if possible, enclose a copy
of your receipt, (keep a copy of your proof-of purchase for your records.) and include a written
explanation of the issue. Ship to: LEM Products, 4440 Muhlhauser Rd., Suite 300, West Chester
45011. LEM Products is not responsible for damage incurred in shipping. Take care when packing
product. Return shipping charges are the responsibility of the purchaser. Packages returned to LEM
should be insured for the value of the product to cover any damages that may occur during shipping.
7

If the sharpener is not mounted proceed as follows:
1. Place the sharpener in its support
2. Tighten the safety screw
3. Block the knob
Should the Blade become blunt it will be necessary to sharpen it. This slicer
comes equipped with built in sharpener.
Note: The Blade is highly resistant to ware. With normal use it should only need
sharpening about once a year.
To sharpen the Blade:
1. Unplug the slicer from the electrical outlet.
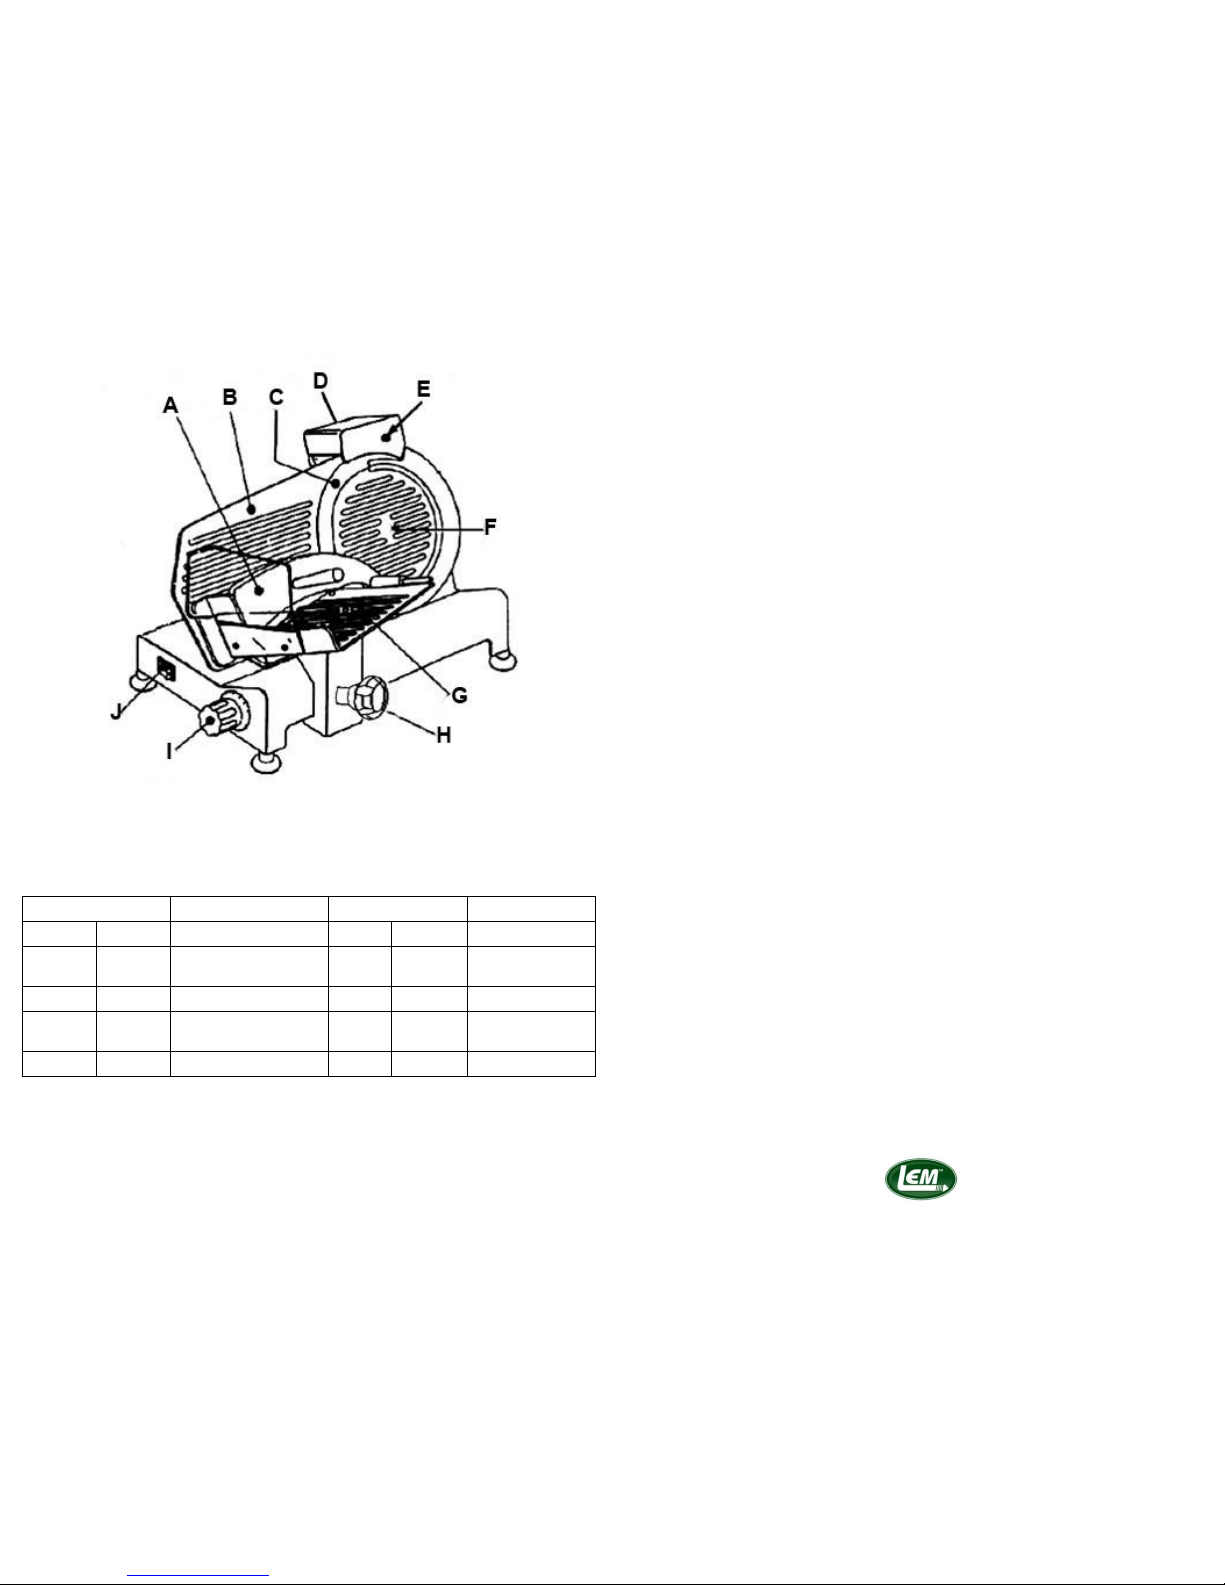
2. Put the Graduated Knob (I see page 2) in the “0” position.
3. Carefully clean the blade. (See Cleaning and Maintenance.)
4. Reinsert plug into electrical outlet.
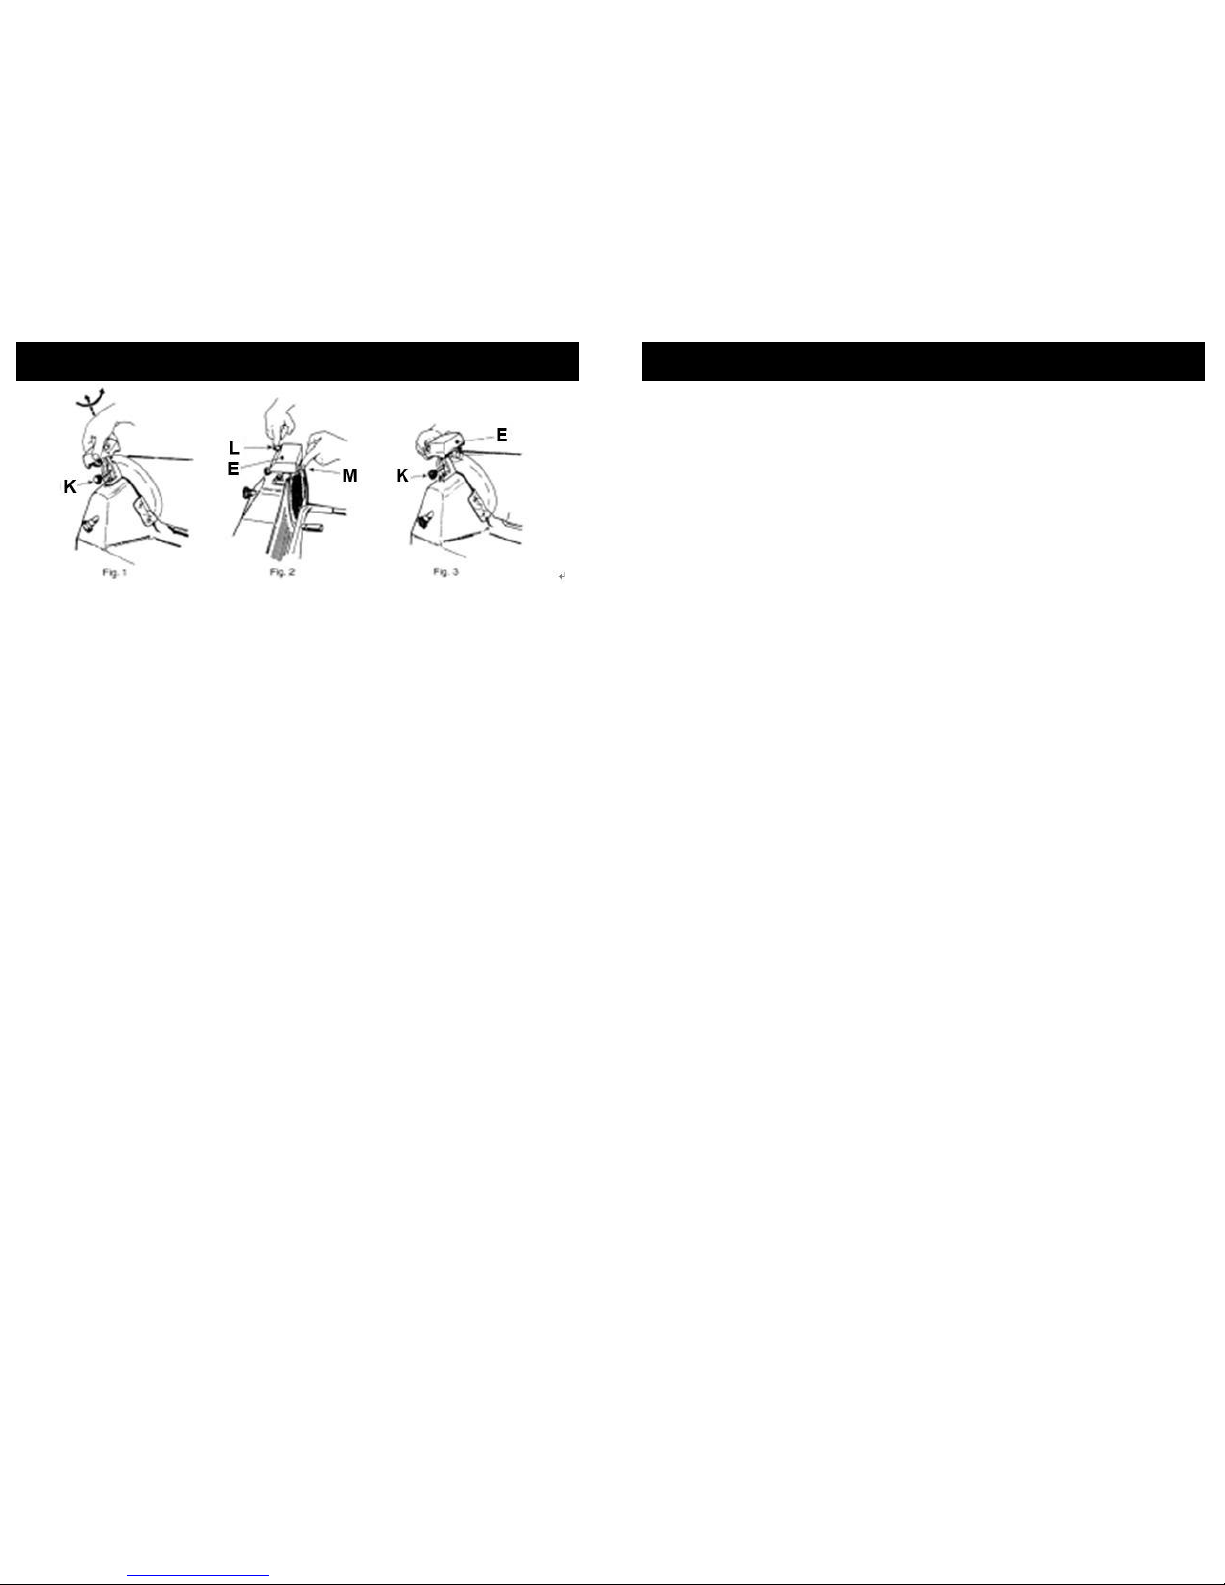
5. Loosen the Locking Knob (K) on the sharpener (E).
6. Raise the sharpener, turning in 180º so that both grinding wheels are in
working position. (See Fig. 2)
7. Lower the sharpener and secure by turning the Locking Knob (K).
8. Set Graduated Knob (I) to 2.
9. Press the On/Off Switch and press buttons (L and M) simultaneously.
10. Let the blade turn for about 1-2 minutes. When the blade has stopped, check
to see if any burrs have formed on the edge.
11. If a burr is present, switch on and gently press the buttons (L and M) to
remove the burr.
12. After sharpening, return the sharpener back to its original position. Clean the
edge of the blade and grinding wheels with alcohol.
13. After several sharpening operations, the grinding wheels should be cleaned
with a brush to remove any traces of alcohol.
Note: After many times sharpening, it may become necessary at some point
to replace the blade. Replace the blade when it becomes 10mm or thinner.
6
BEFORE FIRST USE CAREFULLY READ OPERATING
INSTRUCTIONS AND SAFETY ADVICE. Familiarize yourself with
the functions and operations of the slicer. Keep these instructions with
your slicer for future reference.
This slicer is intended exclusively for slicing normal household foods. The
food to be sliced must be thawed, unpacked and free from bones before it
can be sliced. Any other use or modification to the equipment shall be
considered as improper use and could cause injury and will void the
warranty.
1. The slicer must be connected to an 110V AC electric supply only.
2. Always unplug unit when not in use, when changing parts or cleaning.
Never unplug by pulling on the power cord, always pull directly on the
plug itself.
3. Indoor use only. Never immerse the device in water and do not expose the
device to rain or moisture. If slicer should fall into water, first unplug
from socket and only then, remove the slicer from water. Afterwards,
have the slicer examined by an authorized service center before you use it
again.
4. DO NOT use the slicer if your hands are wet or if you are standing on a
wet floor. DO NOT use the slicer if it is wet or moist.
5. Set up and store the slicer out of reach of children.
6. DO NOT leave the slicer unattended if it can be switched on and operated.
7. Always ensure that the slicer is safely set up or installed before using
it.
8. The slicer should always be used with the sliding feed table and the piece
holder in position. DO NOT use the slicer to slice through bones or deep-
frozen food.
9. DO NOT use the slicer if it is damaged in any way. Have the slicer
immediately repaired at an authorized service center.
10. Use the slicer with the supplied accessories only.
11. No claims under the guarantee or liability for damages will be accepted if
the result is from improper or incorrect use of the slicer.
12. If the electrical cord is damaged, it must be replaced by the manufacturer,
its service agent or similarly qualified persons in order to avoid a hazard.
13. This appliance has a polarized plug (one blade is wider than the other). To
reduce the risk of electric shock, this plug will fit into a polarized outlet
one way. If the plug doesn’t fit fully in the outlet, reverse the plug. If it
still does not fit, contact a qualified electrician. Do not modify the plug in
any way.
3
IMPORTANT SAFETY RULES
BLADE SHARPENING

Before first use
Carefully remove slicer from packaging and keep all packing material
together. Clean the slicer before use. (Refer to the section “Cleaning and
Maintenance”)
Setting up the slicer
1. Never set the slicer on a hot surface or near an open flame.
2. Make sure the power cord does not pass over hot or sharp-edged
objects.
3. Do not allow the power cord to become kinked or trapped and Do not
wind it around the slicer.
a. Set the slicer on a flat, non-slip surface close to an electrical
outlet.
b. Unwind the required length of power cord and plug into an
electrical outlet.
4. Never touch the Blade when the slicer is in operation!
5. Place slicer so the On/Off Switch (J) is in the front of the operator.
6. Regulate the thickness of the slice desired by turning the Graduated
Knob (I).
7. Switch on. This activates the blade.
8. Place the food to be sliced on the Sliding Food Tray (G). Use the Food
Holder Arm (A) to push food against the moveable bulk (B).
9. Using the Food Holder Arm, push the food to be sliced over the Blade
(C) in a back and forth motion until food is sliced.
10. After use, turn the Graduated Knob back to “0”.
11. The Food Holder Arm should not be removed unless the shape and size
of the food does not allow its use.
Warning: In the case of a prolonged use or a motor block, the thermal
safeguard in the motor is activated. The motor will stop automatically. At
this point the machine must be turned off. Check that the warning light is
not illuminated. (The warning light is located in the on/off switch. If the
light is on the unit is still getting electricity). Turn off. Wait a few minutes
to give the motor time to cool down before starting to use the machine
again.
4
1. Before cleaning the slicer, switch to the off position, unplug from
electrical outlet and set the Graduated Knob to the “0” setting.
2. DO NOT immerse the slicer in water.
3. Danger of injury: the cutting blade is very sharp!
a. It is highly recommended to wear cut resistant gloves when
handling the blade. Cut resistant gloves are available at
LEM Products.
It is necessary to clean the slicer at regular intervals as perishable food
scraps could accumulate on the slicer or behind the cutting blade. Remove
the Blade Guard (F) by turning the Blade Guard Knob (D) on the rear of
the slicer. Remove three screws that hold the blade using a Phillips
screwdriver. Be careful to handle the Blade (C) by the center. THE
BLADE IS SHARP! To remove the sliding food tray (G): remove the
knob (H) by unscrewing, and lift the sliding food tray in an upward motion
to completely remove. Wash by hand in warm soapy water, air dry. Clean
the housing, behind the blade, with a dry cloth or soft brush. Reassemble.
If the Sliding Food Tray (G) no longer moves smoothly, it is necessary to
lubricate the cylindrical sliding bar with Vaseline. To do this, switch the
slicer to off, remove plug from electrical outlet and place the food slicer on
its side. Take a cotton swab and generously lubricate the bar which the
Sliding Food Table moves on.
Should the Blade Transmission Belt slip (this can be seen when the rotation
of the blade can be stopped while cutting), the correct tension can be
achieved as follows:
Make sure machine is unplugged and graduated knob is set
to zero.
Turn the slicer on its side so the bottom of the unit is visible.
Remove the bottom cover by unscrewing the 5 screws.
Loosen the nuts on the tension belt bolt then turn the bolt in
a clockwise direction to achieve the correct tension on the
belt.
Tighten the nuts on the bolt.
5
SLICER USAGE AND OPERATION
CLEANING AND MAINTENANCE
Table of contents
Other LEM Kitchen Appliance manuals

LEM
LEM 517 User manual

LEM
LEM 602SS Parts list manual

LEM
LEM 829 Parts list manual

LEM
LEM 656 User manual

LEM
LEM BIG BITE 1020 User manual

LEM
LEM Roots & Harvest 1608 Parts list manual

LEM
LEM 662 Operation instructions

LEM
LEM 1216 Parts list manual

LEM
LEM Jerky Cannon Parts list manual

LEM
LEM Big Bite Auto Patty Maker Parts list manual

LEM
LEM 687 Parts list manual

LEM
LEM 587 Operation instructions

LEM
LEM 1129 Parts list manual

LEM
LEM Big Bite 1217 Parts list manual

LEM
LEM MIGHTY BITE 1606 Parts list manual

LEM
LEM ROOTS & HARVEST 956 Parts list manual

LEM
LEM 778A Parts list manual

LEM
LEM 586 User manual

LEM
LEM JERKY CANNON 468 Parts list manual

LEM
LEM Mighty Bite 1153 Parts list manual