LG LG-TM220 User manual

© 2001 PCTEST Lab
ATTACHMENT M – USER’S MANUAL

1 TM220 Ver. 1.0
7 LG-TM220 Operating Manual
(USER Manual)
(Ver. 1.0)

2 TM220 Ver. 1.0
CONTENTS
CHAPTER 1. THE NAME AND FUNCTIONS................................................................4
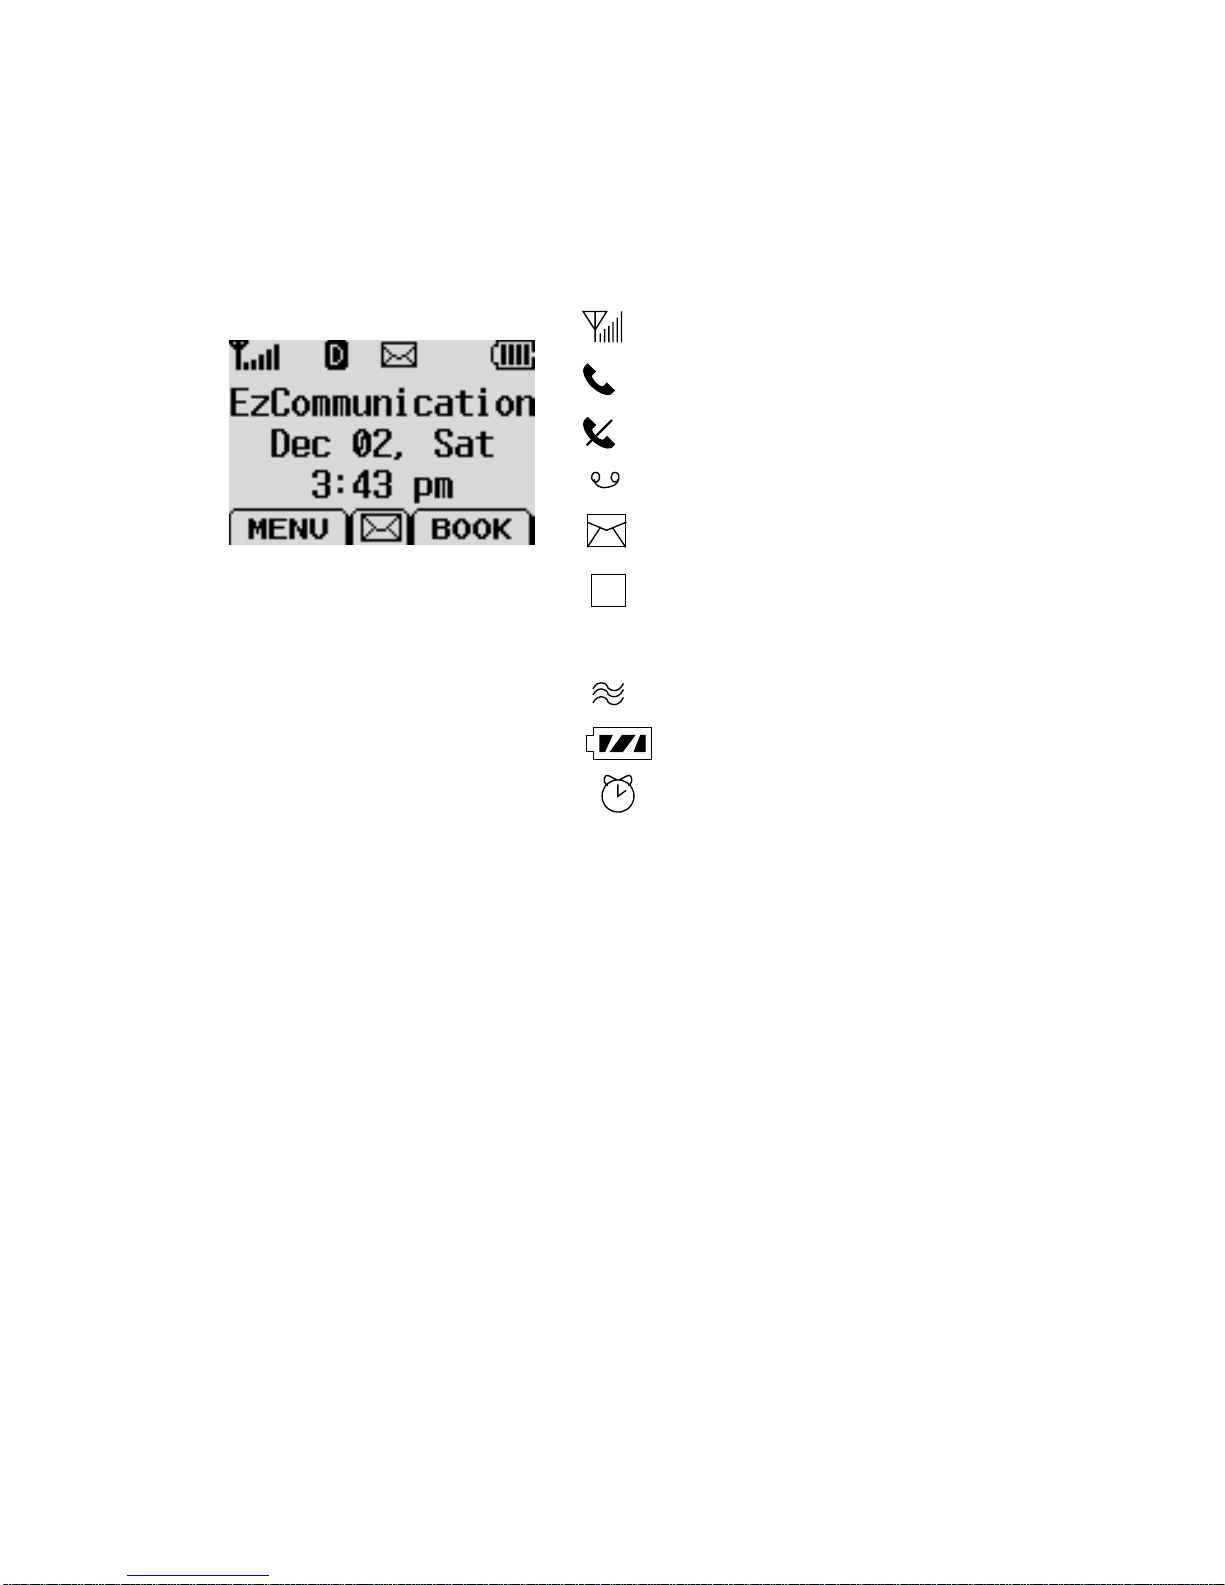
Soft Icon...........................................................................................................4
CHAPTER 2. BASIC FUNCTIONS...............................................................................5
Turning the Phone On and Off ............................................................................5
Making a Call .....................................................................................................5
Correcting Dialing Mistakes................................................................................7
Receiving Calls ...................................................................................................7
Mute ..................................................................................................................7
Redialing Last Outgoing Number.........................................................................7
Adjusting the Volume .........................................................................................8
CHAPTER 3. PHONE BOOK FEATURES.....................................................................9
Two types of Phone Books...................................................................................9
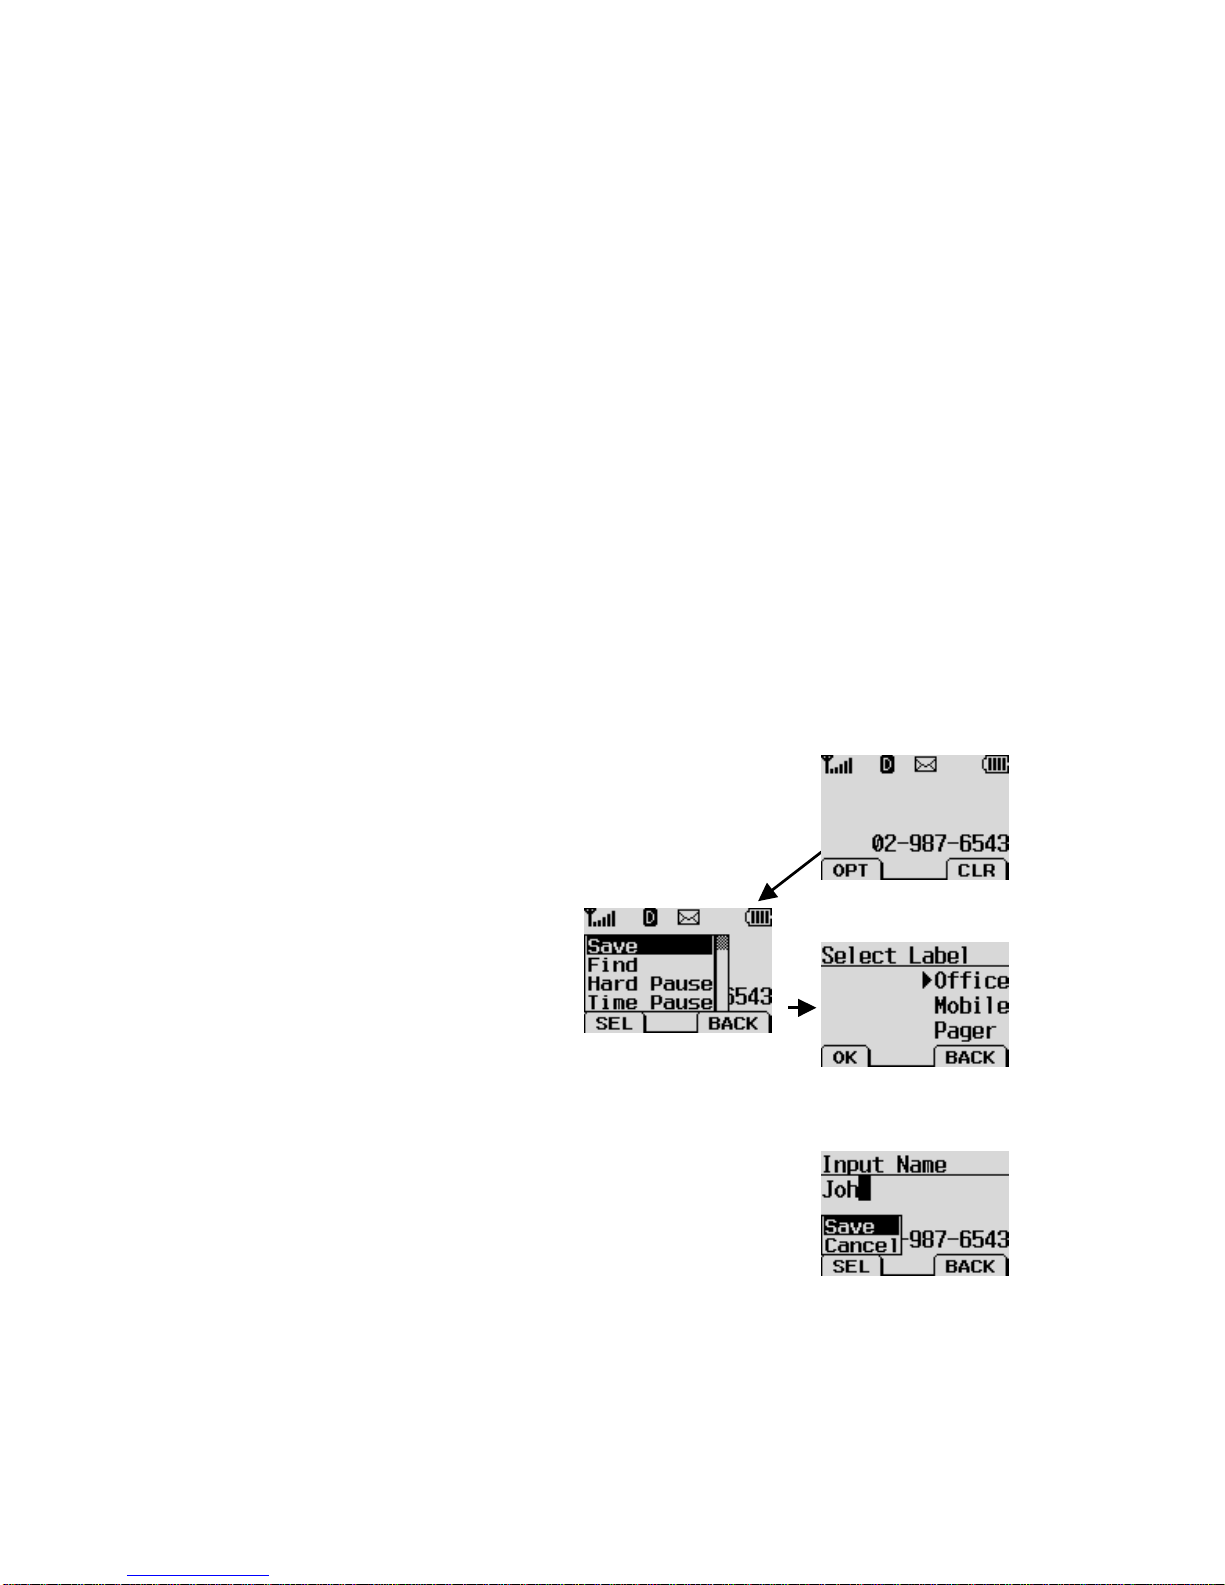
Personal Phone Book Memory.............................................................................9
Entering Characters .........................................................................................10
Recent Call History List ....................................................................................12
Retrieving Numbers..........................................................................................12
Dialing Numbers from Your Phone Book ...........................................................13
Advanced Phone Book Feature..........................................................................15
CHAPTER 4. MENU FEATURE.................................................................................16
Menu Item Descriptions....................................................................................16
CHAPTER 5. Massage..............................................................................................24
Massage Service ...............................................................................................24
TIA Safety Language................................................................................................27
EXPOSURE TO RADIO FREQUENCY SIGNALS..................................................27
ANTENNA CARE...............................................................................................27
PHONE OPERATION.........................................................................................27
DRIVING ..........................................................................................................27
ELECTRONIC DEVICES....................................................................................28
Hearing Aids.....................................................................................................28
Other Medical Devices ......................................................................................28
Posted Facilities................................................................................................28
AIRCRAFT........................................................................................................29
BLASTING AREAS ............................................................................................29
POTENTIALLY EXPLOSIVE ATMOSPHERES......................................................29
For Vehicles Equipped with an Air Bag..............................................................29
FDA Consumer Update............................................................................................30

3 TM220 Ver. 1.0
Version Notice
Ver 1.0 12/4/20
00 K.B.K TM220 CDG2 Initial Release

4 TM220 Ver. 1.0
CHAPTER 1. THE NAME AND FUNCTIONS
Soft Icon
O
zGzGOyzzpP
pG|
uGz
kGzGG
y
zGtGO}P
iGs
zGtGO{P
}G
D
hG

5 TM220 Ver. 1.0
CHAPTER 2. BASIC FUNCTIONS
Turning the Phone On and Off
<Turning the Terminal On>
1.Connect the terminal to the charged battery or the external power supply.
2.Press the [END/PWR] key for about 0.5 seconds until a red light appears on
the upper side of the terminal.
< Turning the Terminal Off >
1.Press the [END/PWR] key until the ending animation appears on the LCD,
and then stop pressing the key.
2.If an antenna is stretched, push it in for safety.
Making a Call
<Method1> Entering the Entire Phone Number
1.If the terminal is turned off, turn it on.
2.Enter the phone number.
(Enter the area code, if necessary.)
3.Press the [SEND] key.
- If the terminal is locked on, enter the password to unlock the terminal.
Then, attempt the call again.
- If the call is not connected, “Call Failed” signal will be indicated on the
LCD.
4. Press the [END] key.
<Method2> Using Phone Book Entry
1. Enter the phone entry number, and press the [SEND]
key or press the related phone entry number for some
time. Then, the call will be attempted.
e.g.) Press the [2] key for some time, then call will be
connected to the phone number stored in the Entry #2.

6 TM220 Ver. 1.0
2. If you are not sure of the phone entry number, select the Soft Key(BOOK)
with the Right Mouse Button.
3. Place the cursor on the Phone Book, and press the Soft Key(SEL) with the
Left Mouse Button.
4. Search the Phone Book Entry number or name requested in the Phone Book
to attempt a call to the phone number stored in it.
<Method3> Using the Recent Call History
1. Select the Soft Key(BOOK) with the Right Mouse Button..
2. If the screen changes, place the cursor on the Call History. Then, press the
Soft Key(SEL) with the Left Mouse Button.
3. If the “Outgoing”, “Incoming”, “Missed” and “Added” are indicated on the
screen, select the menu requested. Ten phone numbers of the recent calls
are stored in each menu. Place the cursor on the menu requested, and
press the Soft Key(SEL) with the Left Mouse Button.
4. The phone number list appears on the screen. Then, search and place the
cursor on the phone number or name requested, and press the [SEND] key.

7 TM220 Ver. 1.0
Correcting Dialing Mistakes
1.Press the Soft Key(CLR) with the Right Mouse Button of the screen to erase
the number or character of the last entry.
2.Press the Soft Key(CLR) with the Right Mouse Button for one second, then
all the number or character requested will be erased.
Receiving Calls
1.Press any key except for the [END/PWR] key to receive a call.
Press the Side key {UP/DOWN} Key once to stop the bell or vibration.
Press the END Key to end the incoming call and the incoming call was
forwarded
2.When the call completes, press the [END/PWR] key.
3.Or close the flip. But if using earjack, you can converse.
Mute
1.Press the Soft Key(MENU) with the Left Mouse Button during the call.
Redialing Last Outgoing Number
<Method 1>
1. Just press [SEND] key to redial the last outgoing number. Then, the call
will be attempted.
In voice dial Auto or Manual set state, First [SEND] key is voice dial,
Second [SEND] Key is redial
<Method 2> using the Call History
1. Press the Soft Key(BOOK) with the Right Mouse Button.
2. Place the cursor on the Call history menu on the screen, and press the Soft
Key(SEL) with the Left Mouse Button.
2. If a menu appears on the screen, place
the cursor on the Mute menu and press the
Soft Key(SEL) with the Left Mouse
Button to select the Mute state. (The
message”Mute” will be indicated on the
screen.)
3. Press the Soft Key(MENU) with the Lef
t
Mouse Button to clear the function. The
p
opup menu will appear. Select the Mut
e
menu.(Themessage“Mute”will bedisappear on th
e
screen

8 TM220 Ver. 1.0
3. Then, four menus will appear.
-
“Outgoing”: Ten last outgoing calls are stored in this menu.
-
“Incoming”: Ten last incoming calls are stored in this menu
.
-
“Missed”: Ten last missed calls are stored in this menu
.
- “Added”: The numbers that input at “Inuse Menu” are store in thi s menu
-
4. Place the cursor on the menu requested, and press the Soft Key(SEL) with
the Left Mouse Button.
e.g.) Place the cursor on the “Outgoing” menu and press the Soft
Key (SEL) with the Left Mouse Button.
5. The phone number list will appear. Place the cursor on the phone number
or name requested, and press the [SEND] key. Then, the call will be
attempted.
Adjusting the Volume
It is possible to adjust the speaker volume, ring volume, and the Ring Type
with the volume buttons on the upper left side of the terminal.
- It is possible to adjust the speaker volume during the call.
- It is possible to adjust the key tone volume in a idle state.
- In ringing state, If you up/down key press, the phone will be changed
ringer off.
Change Conversation mode
- It is possible to adjust the ring volume from the Sound item on the Menu
screen.
( [MENU] [Sound][Ring Vol] or [MENU]-1-3)
If you turn the ring volume down to the minimum, the message “-Ringer Off-
“ will be indicated on the LCD and no ringing sound will be sent out.
- Adjust the Ring Type on the Sound item on the Menu screen.
([MENU] [Sound][Ring Type] or [MENU]-1-2)

9 TM220 Ver. 1.0
CHAPTER 3. PHONE BOOK FEATURES
Two types of Phone Books
This service enables easier use of the outgoing or incoming phone numbers
because it is possible to store up to 990(198x5) phone numbers in the memory.
It is possible to store the phone numbers either in the Personal Phone Book
memory or in the Recent Call History List
Personal Phone Book Memory
It is possible to store up to 5 phone numbers of 30 digits including name up to
15 characters and a email address up to 45 digits in each entry of the Phone
Book.
<Storing the Phone Number in the Personal Phone Book >
1. Enter the number to be stored. (Up to 30 characters)
2. Press the Soft Key(OPT) with the Left Mouse Button
and then, a popup menu will appear. Place the
cursor on the [save] key on the Menu
and press the Soft Key(SEL)
with the Left Mouse Button.
3. Select a Label.
4. Enter the name up to 15 characters. (Verify the number of characters and
press the soft key [OPT] and place the cursor on the [Save] item on the
Menu and press Soft key [SEL]) If you do not want to
enter the name, press the soft key [OPT] and pace the
cursor on the [Save] item on the Menu and press Soft
key [SEL] without entering characters.

10 TM220 Ver. 1.0
5. Designate the Entry number. Then, an empty Entry
number will be designated automatically. If you do not
want this Entry number, designate another Entry
number. If an existing phone number occupies the
memory of the designated Entry number, a message will appear to verify if
you want to overlap the existing one with a new one. If you select the [ok]
Soft key, the existing phone number will be erased in the entry, and a new
one will be stored. If you want to maintain the existing phone number,
designate another entry number.
6. Messages will appear to set the Secret function in turn. If you set the Secret
function to the memory address, you will be unable to see the phone
number or to correct it.
Entering Characters
You will be provided with types of modes (English Lower, English Upper, Digit,
Symbol, T9 Lower, T9 Upper, T9 Shift) to enter the characters. Use the upside
() key to change among the modes while entering the characters. The present
mode is indicated on the lower center of the screen. Whenever you press the
upside () key, the modes will change in the order of “abc” -“ABC” - “wrd” -
“WRD” - “Wrd”-“HLP”-“SYM”-“123”```` . Select the mode before you enter the
characters, and enter the characters.
1. When the mode is ready for entry, the cursor (““) will
be indicated on the space for entry.
(If you enter one character, the cursor will move to the
following space automatically and wait for entry.)
2. Use the right side () key or the “0” key in the “ABC” - “abc” state to place a
space among the characters.
3.Verify if the cursor is placed where the character is to be entered, and
change the mode by using the upside/downside key.
4. Verify if the mode requested is indicated on the lower center of the screen,
and enter the character.

11 TM220 Ver. 1.0
5. Use 9 keys of [1]~[9] to enter the character in the
“abc” and “ABC” mode. One key is designated with
three or more than three characters. Therefore, press
each key repeatedly for a short period of time until the
character requested appears. For example, if you want to enter a character
“K”, set the “ABC” mode with the upside/downside keys and then press [5]
key twice for short time continuously.
6. When the mode is ready for entry , Repeatedly press “1” key will be changed
symbol character in the “ABC”-“abc” state. You don’t need changed “SYM”
mode
7. Enter the numbers of 0~9 with ten keys from [0] to [9] in a “123” mode.
(Reference: The “ABC”, “abc” and “123” modes remain in the same state
even after you enter a character, while the “SYM” mode automatically
change into an “ENG” mode after you enter one character.)
8. When you press [1]~[9] keypad, “WRD”-”wrd”-”Wrd”
mode automatically change to word. “WRD” mode
change all upper character word. “wrd” mode change
all lower character word. “Wrd” mode change word that
first character is upper character .
9. Enter a special code in the “SYM” mode. An special
code set is indicated in the order of 9 keypads. Press
the key corresponding to the symbol to be entered in
reference of them, and then the symbol will be entered
on the space where the cursor is placed. Press the Left or Right Key Button
when the symbol set is indicated on the screen, and then another set of
symbols will be indicated on the screen. The symbol set is composed of
three types of sets. Press Button repeatedly in a preset “SYM” mode to
change one type of symbol set into another one. If the symbol set requested
is indicated, use the keypad to enter the symbol .
10. Use the Soft Key(CLR) with the Right Mouse Button to erase the input
character. Press it for a short period of time to erase the last input character,
and press it for some time to erase all the input characters.
11. If you complete entry of the characters, use the Soft Key with the Left
Mouse Button to move to other items.

12 TM220 Ver. 1.0
Recent Call History List
This service enables easy and fast redialing with its function to store ten last
outgoing calls, incoming calls, missed calls and added
phone numbers (numbers stored by the scratch pad
function).
<Retrieving Recent Call History>
1. Press the Soft Key(BOOK) with the Right Mouse
Button of the screen.
2. Place the cursor on the Call history of the screen, and press the Soft
Key(SEL) key with the Left Mouse Button.
3. Then, four menus will appear on the screen.
- “Outgoing”: Ten last outgoing calls are stored in this service.
- “Incoming”: Ten last incoming calls are stored in it.
- “Missed”: Ten last missed calls are stored in it.
- “Added” Ten last Added numbers are stored in it.
Select one of the three menus.
4. Then the corresponding phone number list will appear. Place the cursor
on the number requested and press the [OK] key to attempt a call.
5. Then the time, duration, date will appear. Press the Key(SEL) with the Left Mouse
Button of the screen.
Retrieving Numbers
<Retrieving One Phone Numbers by Memory Location Number>
1. Enter the Phone Entry number (up to three digits) to
be retrieved in an initial state.
2. Press the Soft Key(OPT) with the Left Mouse Button,
and then a popup menu will appear.
3. Place the cursor on the “Entry” item on the popup
menu and press the Soft Key(SEL) with the Left
Mouse Button. And then, the information stored in
the input entry number will appear. Press the [SEND]
key to attempt a call to that number.

13 TM220 Ver. 1.0
4. In another method, press the Soft Key(BOOK) with the Right Mouse Button
in an initial state and select the items in the order of [Phone Book] and
[Find Entry] on the menu. And then, a message will appear to request the
entry number. Enter the number to be retrieved.
Enter a specific number in an initial state to retrieve a phone number with a
specific number, and press the Soft Key(OPT) with the Left Mouse Button. If
you select the “Find” item on the popup menu, a Phone Numbers List with the
number requested will be indicated. Select the phone number to be retrieved,
and then the information related to the entry all will appear.
<Retrieving by Name Search>
1. Press the Soft Key(BOOK) with the Right Mouse Button in an initial state.
2. Select the [Phone Book] item.
3. If you select the [Find Name] item, a message will appear to request the
name.
4. Then, a name list with the input characters will appear.
5. Place the cursor on the name to be searched and select the Soft Key(SEL)
with the Left Mouse Button. And then, the related information will appear.
Dialing Numbers from Your Phone Book
This function enables fast dialing with the entry number stored with the phone
number requested.
<One-Touch Dialing>
One-Touch Dialing enables the call with the touch of just one key by its
function to store the phone numbers requested in the Phone Book. This
service is available only for the phone number stored in the entry numbers
01~09.

14 TM220 Ver. 1.0
1. Press the Phone Book Entry
number for some time to connect
a call.
2. The Entry 9 is designated
for the number ‘911’.
<Two-Touch Dialing (Speed Dialing)>
Two-Touch Dialing function is available only for the phone numbers stored
in the Entry numbers 10~99.
1. Press the first number of the two digit Entry numbers for a short period of
time.
2. Press the second number for some time to attempt dialing.
<Three-Touch Dialing (Speed Dialing)>
The Three-Touch Dialing function is available only for phone numbers
stored in the Entry numbers 100~199.
1. Press the first two digit numbers among the three digit entry numbers for a
short period of time.
2. Press the last digit number for some time to attempt dialing.
<Dialing from a Memory list>
1. Press the Soft Key(BOOK) with the Right Mouse Button.
2. Select the “Phone Book” menu.
3. Select the “Find Entry” item.
4. Use the upside and downside key instead of the Entry
number, and then the contents of the Phone Book
Memory will appear in the order of the Entry numbers.
5. Place the cursor on the number requested, and
press the [SEND] key.
<Dialing from a Memory Location>
1. Press the Soft Key(BOOK) with the Right Mouse
Button of the screen.
2. Select the “Phone Book” menu.
3. Enter the entry number requested and press the
Soft Key(SEL) with the Left Mouse Button.

15 TM220 Ver. 1.0
4. Place the cursor on the number requested in the Entry, and press the
[SEND] key.
Advanced Phone Book Feature
Pause Feature
When you call the automated system such as sending the voice message, you
have to press a few numbers. This service enables storing the numbers by a
specific symbol of the Pauses to save instead of pressing the numbers by hand.
Pauses are two types as follows.
1.Hard Pause (H) – Press the Soft Key [OPT] with Left Mouse Button to send
the following numbers.
2.Time Pause (T) – Pause for about 2 seconds to send the following numbers.
Use the Time Pause in case longer Pause time is necessary.
3.Hyphen –Use the hyphen just to indicate the number, as the pause is not
available between two numbers.
Storing a Number with Pauses
1. Enter the number.
2. Press the Soft Key(OPT) on the left to use the Pause function.
3. Select the [Hard Pause] item on the popup menu, and then a character “H”
will be indicated on the screen.
4. Select the [Time Pause] item, and then the 2 Sec Pause will be indicated as
thecharacter“T”.
**Note – Press the items in the orders of the Soft
Key(MENU) on the left, the [Auto Hyphen] and [ON] items
on the screen in a call waiting state to select the Auto
Hyphen function. [MENU][DISPLAY][Auto Hyphen] or
[MENU]-5-5
[
Hard Pause
]
[
Time Pause
]

16 TM220 Ver. 1.0
CHAPTER 4. MENU FEATURE
Main Menu
It is possible to verify or change various functions or
setup the terminal status on the main menu.
General Guidelines to MENU Access and Settings
1. Press the Soft Key(MENU) on the left and the menu
items will appear.
2. Use the upside and downside keys () to move to
the menu items not indicated on the screen.
3. Place the cursor on the menu item requested with
the direction keys to select a menu item, and press the Soft Key(SEL) on the
left. And then, press the number corresponding to the menu item to be
selected.
4. Use the upside and downside keys () to change the setup values in the
menu items.
5. Press the Soft Key(SEL) on the left to store the setup values changed in the
menu item, or press the Soft Key(BACK) on the right to leave the setup
values not stored.
6.Press the Soft Key(BACK) on the right to move up to the upper level during
the value setup in the menu items.
Menu Item Descriptions
Menu 1. <Sound>
1. Ring Sound ( [MENU]-1-1 )
Select one of five bell Sound and fifteen melodies with
the direction keys.

17 TM220 Ver. 1.0
2. Ring Type ( [MENU]-1-2 )
Set one of three Ring Types (Ring, Vibrator,
Vibrator+Ring ,and LED) with the direction keys.
3. Ringer Vol ( [MENU]-1-3 )
- Ring type: Adjust the ring volume in 5 (High >
Medium + > Medium - > Low > Off) with the direction
keys. The ring volume is also adjustable with the side
keys while the bell is ringing or in a call waiting state.
4. Key Beep ([MENU]-1-4)
Set the tone length in two levels (normal, Long) with
the direction keys.
5. Key Volume ([MENU]-1-5)
Adjust the beep in five levels (High > Medium + >
Medium - > Low > Silent ) with the direction keys.
6.Ear Volume ([MENU]-1-6)
Adjust the earpiece volume in four levels (High >
Medium + > Medium - > Low) with the direction keys.
It is also adjustable with the side keys in a busy line
state.

18 TM220 Ver. 1.0
7. Alerts Sound ( [MENU]-1-7 )
An alert signal is activated according to each situation
by five submenus under the Alert menus.
- Call Connection : It is activated to notify that the call is connected. (Sond
On, Vib On, Off)
- Fade: It is activated if the call is disconnected in a busy line state. (On /
Off)
- Minute : This signal is activated when 1minute elapses from the call
connection. (On / Off)
- Service : This signal notifies whether a call is available or not between the
service and the no service areas. (On / Off)
-
Menu 4. <Call Info>
1.Last Call ( [MENU]-4-1 )
This service shows the last call time.
2.Home Calls ([MENU]-4-2 )
Total call time at the Home system (not roaming) from
initial setup to the present.
3.Roam Calls ( [MENU]-4-3 )
Shows the call time at the roaming system from initial
setup to the present

19 TM220 Ver. 1.0
4.All Calls ( [MENU]-4-4 )
It shows the total call time to the present either at the
Home system or the roaming system or both.
Menu 5. <Display>
1.Backlight ( [MENU]-5-1 )
It is possible to adjust the keypad and the backlight
time in 5 levels with the direction keys.
(Always off, 10 seconds, 30 seconds, Flip Open, Always
On )
2.Banner ( [MENU]-5-2 )
It is possible to store the characters to appear on the
standby state of the terminal.
3.Show Time ( [MENU]-5-3 )
It is possible to display digital time on the standby
state of the terminal (No/Yes)
4.Display CLI ([MENU]-5-4 )
It is possible to display caller ID on Incoming call state
of the terminal.(On/Off)
Table of contents
Other LG Telephone manuals