Quick
Installation
Guide
App
l
i
ca
ble
models: LKV-0480/LKV-0880/LKV-1680
F E
A
T
U R
IN
G
H O
T - P L
U G G
I
N G &
P L
U G
- A
N
D
- PL A
Y
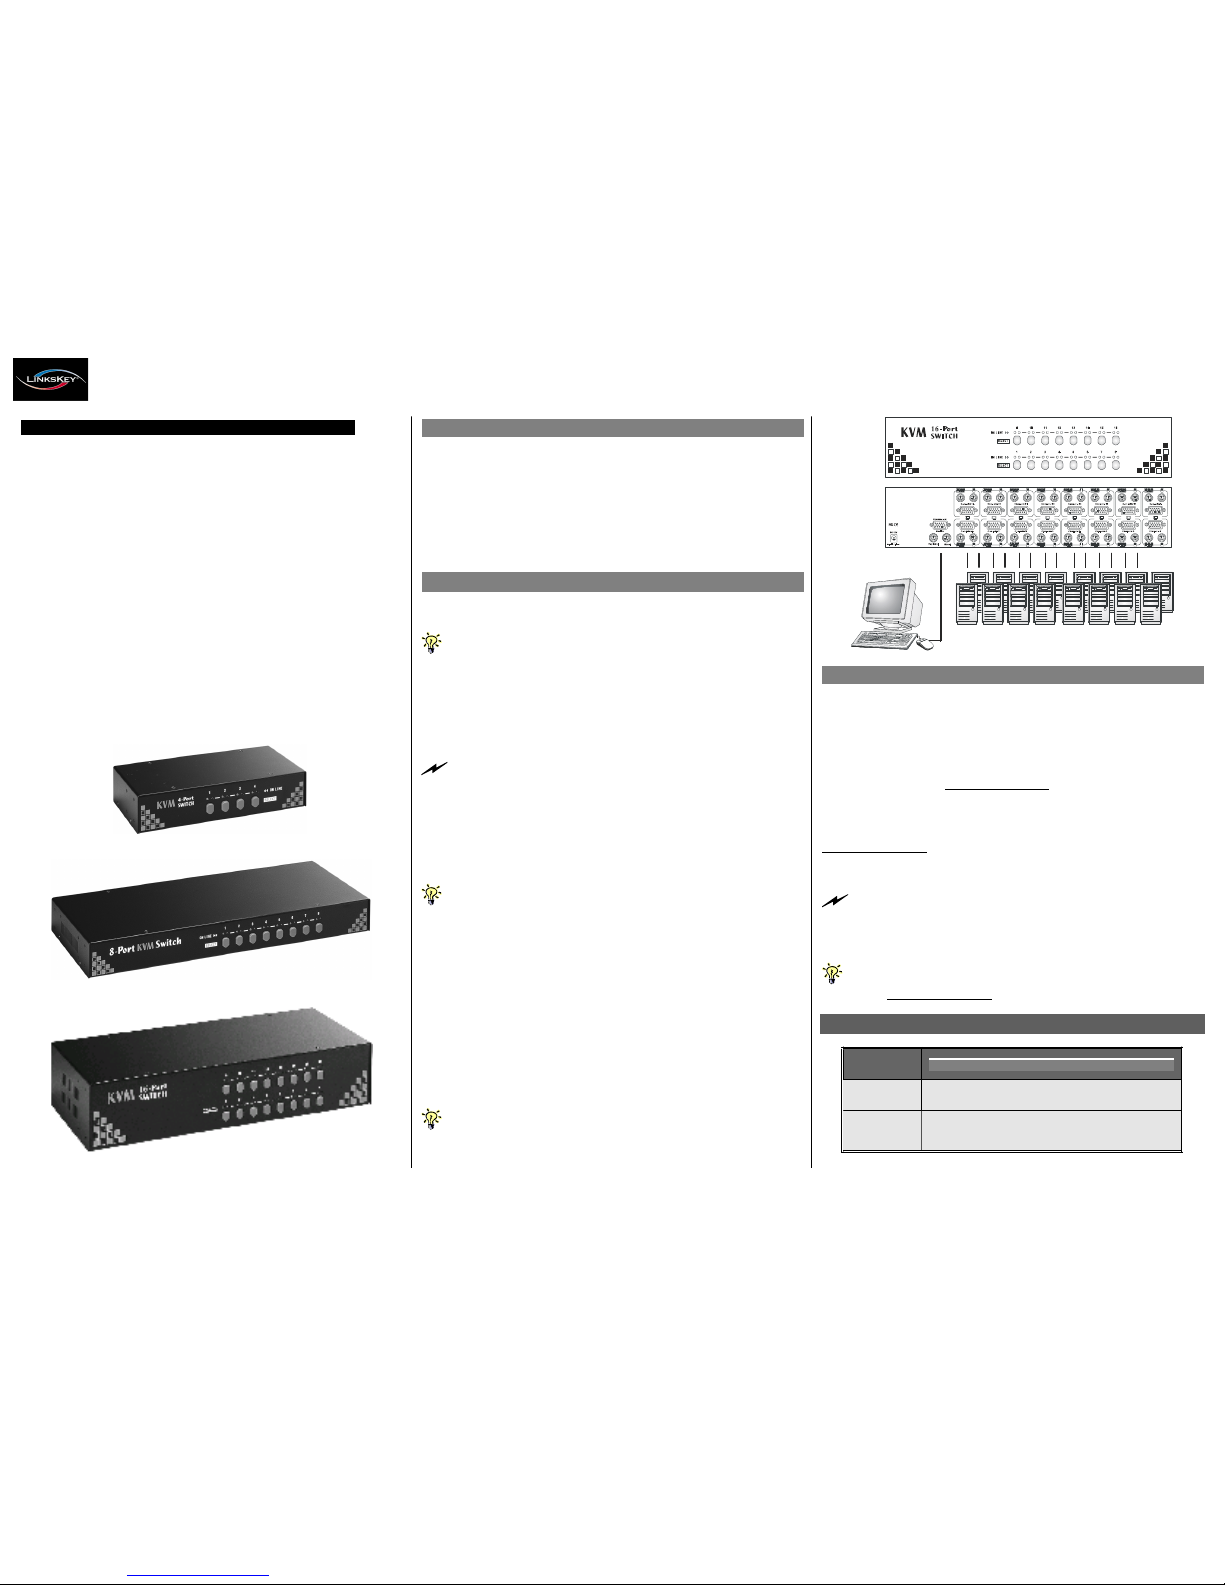
LKV-0480/0880/1680
4/8/16-port 19” Rackmount KVM Switch
Quick Installation Guide
Thank you for purchasing the
LKV -0480 /LKV -0880 /LKV -1680
Rack m o u nt K V M S w itc h
! This Rackmount KVM S w itch is desi gned for
computer/server management on a centralized single admin desk in
corporate, facto ry as w ell as in campus computing environ m ent. It
features a console port to co nnect your sh ared keyb oard, video a nd
mouse, and 4/8 /16 PC ports to connect to your computers/serve rs. You
can simply place it on desktop or mount it on a standard 19” rack for more
secured and cen tralized manage m ent.
This KVM S w itch feat ures a me tal enclosure fo r better shielding against
electromagnetic interference c ommon ly seen in lab or facto ry floor
environment. It also features a
hot -p lu g gi n g
capability that allo w s you to
plug off and on the KVM cablings w ithout p ow ering dow n a whole rack of
servers, especially convenient when you are w orking on a sever rack.
With our highly reliable and quality pr oduct, user can enj o y countless
benefits from using it.
L K V - 0 4 8 0
Before you install
The default setting of the
LKV -0480 /LKV -0880 /LKV -1680 R a c k mo u nt
KVM S w itch
is appro priate for most systems. In fact, you do no t have to
make any co nfiguration bef or e installation. It’s an out -o f-the -box
installation: Just connect and set up the cable connections for the KVM
sw itch and yo ur computers, boot them up in c orrect sequence a nd you
can start to ope rate immediate ly!
For a quick start on installation and ope ration, please follow th e
instructions bel ow .
Out-of-the-box Installation
Take t h e KV M S wi t ch ou t o f th e b ox an d b e g in in s t a ll a t ion...
If y ou ar e u si n g o n ly w in d o w P C s
:
f o r th e fi r s t - t i m e
in st al la tio n , yo u do n ’t e ve n n e ed t o p o w e r d o w n a ll th e
c om p u te r s t h a t ar e g oin g to b e c o nn e ct ed t o t h e K V M Sw i t c h… ..
T he h o t - p lu gg ab ility o f t h i s K V M S w i t c h a ll o w s “ h o t - p lu g gin g” of th e
K V M c a b l e s w h i l e th e c om p u t e r i s p o w e r e d o n, a n d y o u r m o u s e w i ll s t a y
aliv e th r o u g h o u t. It is e s p e c ia l ly c o nvenie nt w h e n y o u h a v e to c h a n ge o r
re a r r an ge th e K V M c a blings of y o u r com p u t e r s w h ile still w ant to k e ep t h e
co m p ut e r s w ork i n g.
If yo u a r e u s i n g a n y L in u x P C s
: you m ig h t po ss i b l y e xp e r ience a
loc k on m o u s e if h ot - pl u gging it t o t h e KVM s w i tc h ( s in c e Lin u x is n ot a
P nP O S s o m e h o w )… If y o ur m o u s e ge ts l o c k e d, y o u can t r y t o u s e th e
m o u s e r e s et h o t ke y s ( s ee th e
Qu ick R efere n ce Sheet
) to bring it b a ck
to norm a l. A noth e r alt e rnati v e is to turn the Linu x PC o ff bef o r e
c on ne ct in g it to K V M S w i t c h .
Step 1.
Connect the shared mouse, ke ybo a rd an d monitor to the console
port connectors on the backpanel of yo ur KVM S w itch.
N ote t h at since the K V M Swi t ch i s p o w e r e d th ro u gh t h e P S /2
inter f a c e, it i s p ow e r ed on i m m e d iate l y w h en co nnec t e d to t h e PS /2
ke y b o a r d /m o u s e p o r t of y our PC (n onethe l e s s ev e n w h en t h e P C b e in g in
p ow e r e d of f st a te , th e PS / 2 in t e r f a c e i s st ill l i v e w i t h e l e c t r i ci ty ).
Easy Operation
T here are tw o m ethods to select a specific computer, using a fron t-panel
push button or a hotkey sequence.
Fro n t- p anel pu s h b u ttons
The fron t-panel buttons let you have direct control over KVM sw itch
operation and channel sw itching. Simply press a button to sw itch to its
corresponding ch annel.
See Quick Reference Sheet
K e y b o ard h ot ke y s
A keyboard hot key sequence consists of at least three specific keystrokes:
See Quick Reference Sheet
Ho tk ey seq u ence = Scr L k + Scr L k +
C o m m a nd k e y (s)
T h e tw o c o n s e cu ti ve S c r L k k e ys t ro k e s s h o u ld b e p r e s s e d w i t h in 2
s e con ds an d t h e follow ing c o m m a nd k ey ( s ) s h o u ld also b e p r es s e d w ith i n
2 s econ d s in l ik e w ise m a n n e r. O t h e r w i s e, t h e h ot k ey s e q u en c e w ill no t be
valida t ed.
Step 2.
Just con nect your co m puters (no m at ter they are po w ered on or
off! ) to the P C ports at the back panel of the KVM S w itch using
the KVM com b o cables. Y ou can use individual standard
keyboar d, mou se and video cab les for connectio n, although the
3-in -1 combo cable is highly recomm e nded for yo ur
convenience.
F or d e t a i le d H o t ke y s e q u e n c e s a n d th e i r c o r r e s p o nd in g f u n ctio n al
co m m a n ds.
See Quick Reference Sheet
System Requirements
Step 3.
If your computer is still not powered up, then po w er th e m up.
Once the com p uters are p ow er ed up (or th ey are alrea dy
p ow ered o n b efore connecting to KVM S w itch), you can
manage all of th e m through the K VM S w itch.
If y ou exp e r ie n ce m o u s e lock o n any of y o ur c o m p ute r ,
Y o u c a n u se
the m o u s e r e s et hotk e y s e q u e n c e to re ga in t h e m o u s e con t rol
(see the
Q u ic k R e f er e n c e S h e e t
).
Model
Number
PC Side
Console
Side
LKV-0480/LKV-0880/LKV-1680
4/8/16 x KVM Combo Cable ( PS/2-PS/2-
HDB-15 interface, all-male)
1 x PS/2 Keyboard
1 x PS/2 Mouse
1 x Monitor
Rev. 1.5 Copyright© All rights reserved. July 2004


