manuals.online logo
Brands
  1. Home
  2. •
  3. Brands
  4. •
  5. Linkskey
  6. •
  7. Switch
  8. •
  9. Linkskey LKV-DM02SK User manual

Linkskey LKV-DM02SK User manual

Quick
Installation
Guide
Applicable
models:
LKV -DM02SK /LKV-DM04SK
LKV-DM02SK/LKV-DM04SK
2/4-port Dual Monitor KVM Switch
Quick Installation Guide
Thank you for purchasing the LKV-DM02SK/LKV-DM04SK
Dual Monitor KVM Switch! With our highly reliable and
quality product, user can enjoy countless benefits from using
it.
For a quick start on installation and operation, please follow
the instructions below.
T h e
c or re c t s e t u p se q u e n ce
is … …
(1 ) C on n e ct at le a st o n e c om p u t e r a n d t h e s h a r ed k e yb o a r d ,
d u al m on it or s/ fl at p a n el d i s p la y s a n d m o u s e to t he
K V M S w it ch f ir st
.
( 2 ) P o w e r u p y o u r c on n e c te d c om p u te rs
…
S in ce t h e K V M S w i t c h r e c e iv e s p o w e r f r o m t h e c o m p u te r ’s P S/ 2
in ter f a c e , it is p o w e re d u p w h en y o u c on n ec t t h e K V M c a b l e s t o a P C .
Out-of-the-box Installation
LKV -DM02SK LKV -DM04SK
Introduction
The LKV-DM02SK/LKV-DM04SK Dual Monitor KVM Switch
is a 2/4-port PS/2 KVM Switch that provides dual video
interfaces for your Dual Monitors. It enables user to access,
control, boot and reboot multiple Dual Monitor-enabled
computers using only one keyboard, mouse and dual
monitors. It is designed specifically for sharing dual monitors
between multiple dual- monitor PCs.
Since Dual Monitor-enabled computers are gaining more and
more popularity in the finance/banking as well as engineering
and graphics sectors, the Dual Monitor KVM Switch can be
your best solution for the management of two Dual Monitor-
enabled PCs.
The Dual Monitor KVM Switch is robust and durable in metal
enclosure, suitable for use in environments pervasive with
electromagnetic interference and wherever a sturdy protective
metal case is needed.
Before you install
The default setting of the LKV-DM02SK/LKV-DM04SK
Dual Monitor KVM Switch is appropriate for most systems.
In fact, you do not need to configure the KVM Switch
before installation. It’s a Plug-and-Play device: First,
connect the keyboard, monitors and mouse to the KVM
switch and then connect your computers to the KVM Switch,
and finally boot them up in correct sequence and you can
start to operate immediately!
Ta ke t h e Dual M on itor K V M Swi t ch o u t of t he b ox an d
b eg in in s t a lla tio n… .
Befo r e con necti n g any c ab l e to y o u r K V M S w it c h , ple a s e m a k e
s u r e all of yo u r c om p u te r s a n d t h eir pe rip h e r als h ave b e en p ow e r e d
off. O t h e rw i s e, t h e Swi tc h sy stem m ight n ot be s e t u p pro p e r l y .
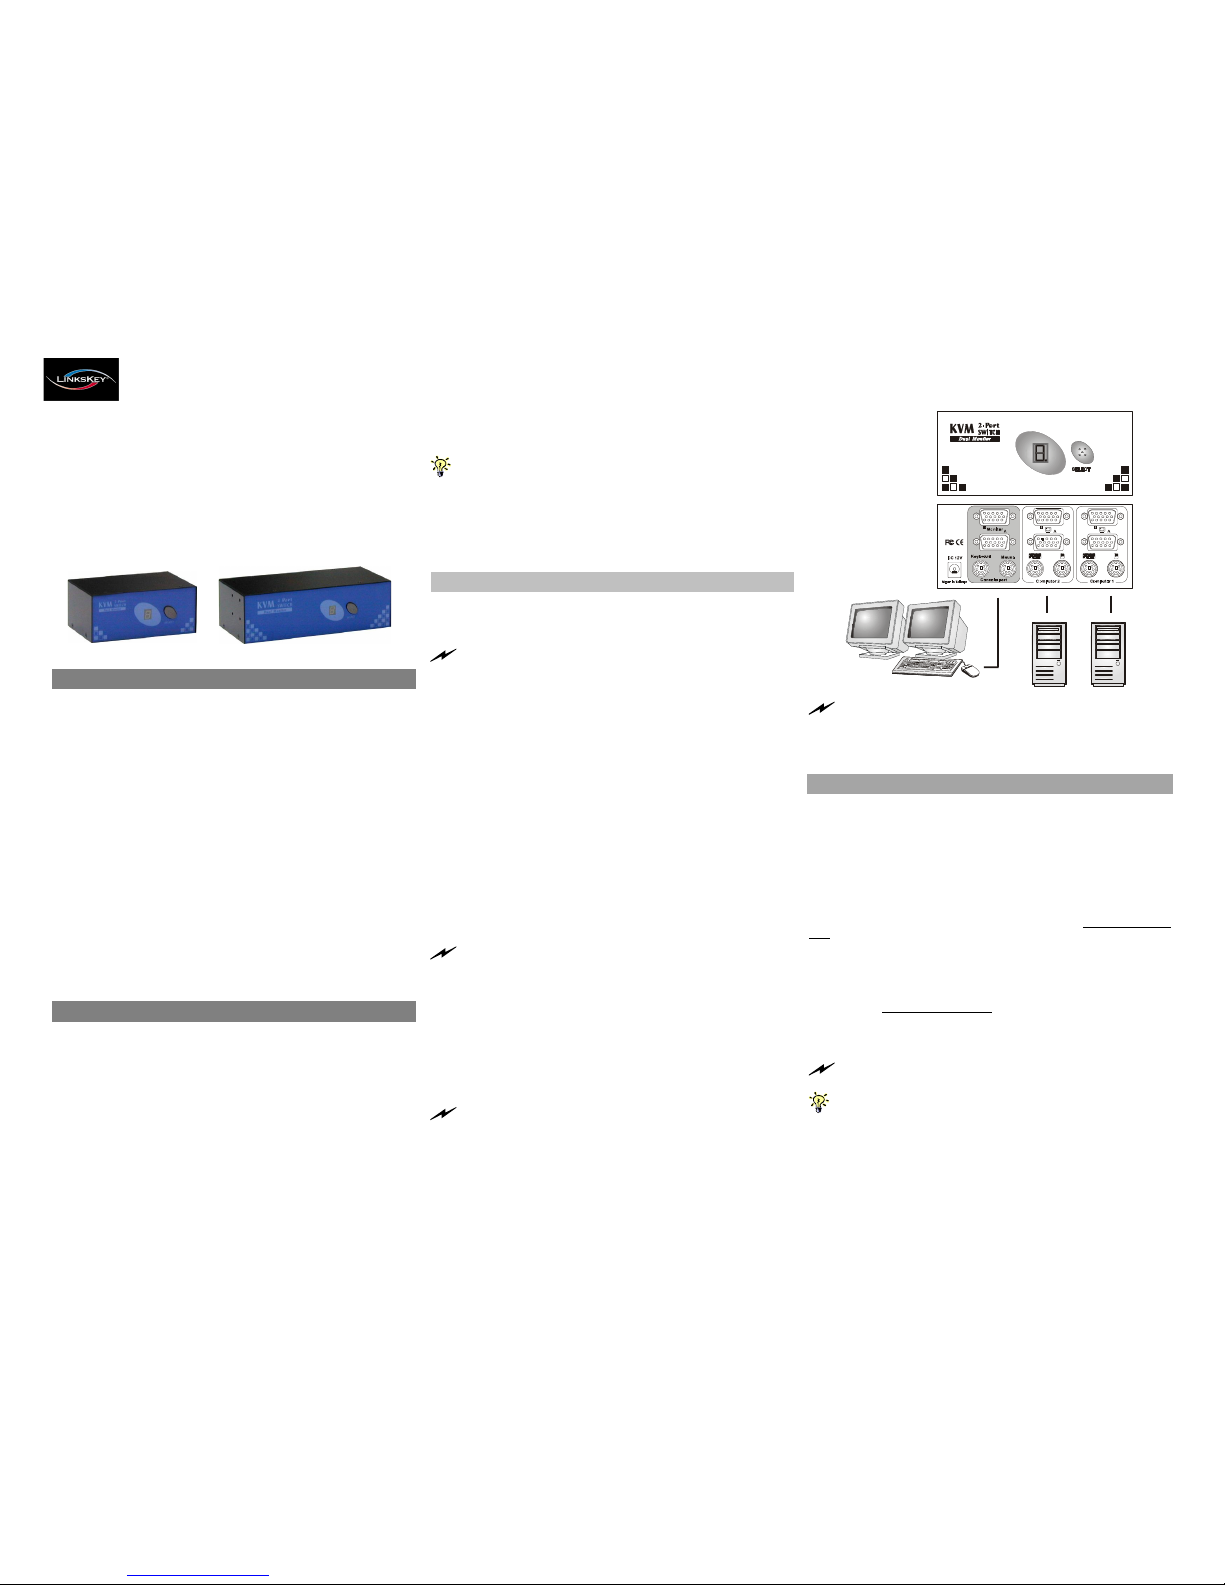
Step 1. Make sure all the computers that are to be connected
to the Dual Monitor KVM Switch and their peripherals
are in powered-off state. If not, power them off
before you proceed with the following steps.
Step 2. Connect the shared keyboard, dual monitors/Flat
Panel Displays and mouse to the console connectors
on the rear of your KVM switch.
Step 3. Connect each of your computers to a PC port on the
rear of the switch. You can use individual standard
keyboard, mouse and video cables or you can use
the KVM Combo Cable for connection. Depending on
the cable you use, the maximum cable distance is
limited to 5 ~ 7 meters (15.5 ~23 feet).
N ote th a t sinc e the K VM Swi t ch is p ow e r e d t h r o u g h the P S / 2
in ter f a c e, i t i s p o w e r e d o n i m m e d ia te l y w h e n c o n n ec t e d t o t h e P S / 2
key b o a r d / m o u s e po r t o f y o u r P C (n o net h eless eve n the P C b ein g in
p ow e r e d o ff s ta te ).
Step 4. (Now your KVM Switch should have been powered-
up….) Power up the connected computers. After your
computers are powered up the keyboard and mouse
will be recognized and now you can begin operating
the KVM switch.
D O N O T T R Y
t o pe r fo r m an y ch a nn el s wi tc h ing b ef o re t h e
O pe r atin g s ys te m o n yo u r P C h a s c o m ple t e l y bo o ted . O t h e rw i s e , t h e
in ter f a c e w i ll n o t b e p r o p e r l y in it i a liz e d .
D O N O T T R Y
t o c on nec t t h e K V M S w i t c h to t h e c o m p u te rs
w hi l e t h e co m p ut e r s a r e s till in p owe r e d - on s tat e s . O th e rw is e, t h e
co m put e r w i l l h a v e d i ff i culty r e c o gn izin g yo ur s h a r e d k eybo a r d a nd
m ouse.
Easy Operation
There are two methods to select a specific computer: using
the front-panel push button or ahotkey sequence.
Front-panel buttons
The front-panel button lets you have direct control over KVM
switch operation and channel switching. Simply press the
button to rotate through to a specific channel. See Quick Reference
Sheet
Keyboard hotkeys
A keyboard hotkey sequence consists of at least three specific
keystrokes: See Quick Reference Sheet
Hotkey seq u ence = S c r L k + S c rLk +
Com mand key(s)
The two consecutive ScrLk keystrokes should be pr essed within
2 seconds. O therwise, the hotkey sequence will not be validated.
For d etailed Ho tk ey sequences and their co rresp o nding functional
com m ands, ple ase refer to the Quick reference sheet.
Rev. 1.1 Copyright© All rights reserved. Feb 2004
Quick
Reference Sheet Applica
b
le
Models:
LKV-DM02SK /LKV-DM04SK
Quick Reference Sheet
QUICK REFERNCE SHEET for Dual Monitor KVM Switch Operation Commands
Hotkeys/ Front-Panel Button
Command Hotkeys Front-panel Button Description
ScrLk + ScrLk + (x)
1
Select PC
(x is a top-row number key)
x = 1 ~ 2 or x = 1 ~ 4 for PC channel no.
-- Select the active channel
Next lo w er channel
ScrLk + ScrLk + ↑(arrow up) -- Select the next lower connected channel
Next higher channel
ScrLk + ScrLk + ↓(arrow down) Press the push button to switch to the
next channel
Select the next higher connected channel
Autoscan Beep Sound
On/Off
ScrLk + ScrLk + B -- Toggle on/off the beep sound for switching
confirmation while autoscanning
Reset Con s ole Mouse
ScrLk + ScrLk +End -- Reset mouse on the console side
Autoscan
ScrLk + ScrLk + S -- Autoscan through every connected channel for
quick screen browsing of each channel.
Stop Auto s can
Any key on keyboard -- Terminate Autoscan activity
Notes:
1 Note that (x) denotes a number key for the selected port number (from 1 ~ 4).
Hotkey convention: The hotkey notation ScrLk + ScrLk + (key), denotes that you should hit the individual key consecutively one at a time, not simultaneously.
Rev. 1.1 Copyright© All rights reserved. Feb 2004
Technical Support
E-mail: btitech@linkskey.com
Website: www.linkskey.com

This manual suits for next models

1

Other Linkskey Switch manuals

Linkskey LKU -UA02 User manual

Linkskey

Linkskey LKU -UA02 User manual

Linkskey LKS-SG5P User manual

Linkskey

Linkskey LKS-SG5P User manual

Linkskey LDV-212ASK User manual

Linkskey

Linkskey LDV-212ASK User manual

Linkskey LDV-DM02ESK User manual

Linkskey

Linkskey LDV-DM02ESK User manual

Linkskey LKV-S02SK User manual

Linkskey

Linkskey LKV-S02SK User manual

Linkskey Prima LKV-9208IP User manual

Linkskey

Linkskey Prima LKV-9208IP User manual

Linkskey LDV-002ESK User manual

Linkskey

Linkskey LDV-002ESK User manual

Linkskey LKU-S02SK User manual

Linkskey

Linkskey LKU-S02SK User manual

Linkskey LKS-SR16 User manual

Linkskey

Linkskey LKS-SR16 User manual

Linkskey LKS-SH5P User manual

Linkskey

Linkskey LKS-SH5P User manual

Linkskey ioPower User manual

Linkskey

Linkskey ioPower User manual

Linkskey LKU-S02ASK User manual

Linkskey

Linkskey LKU-S02ASK User manual

Linkskey LDV-002EASK User manual

Linkskey

Linkskey LDV-002EASK User manual

Linkskey LDV-242AUSK User manual

Linkskey

Linkskey LDV-242AUSK User manual

Linkskey LKV-T02 User manual

Linkskey

Linkskey LKV-T02 User manual

Linkskey LKV-7308 User manual

Linkskey

Linkskey LKV-7308 User manual

Linkskey LKV-7304 User manual

Linkskey

Linkskey LKV-7304 User manual

Linkskey LDV-DM702AUSK User manual

Linkskey

Linkskey LDV-DM702AUSK User manual

Linkskey LKV-DM02SK User manual

Linkskey

Linkskey LKV-DM02SK User manual

Linkskey LDV-342ARC User manual

Linkskey

Linkskey LDV-342ARC User manual

Linkskey LKS-SG2419 User manual

Linkskey

Linkskey LKS-SG2419 User manual

Linkskey LDV-DM712AUSK User manual

Linkskey

Linkskey LDV-DM712AUSK User manual

Linkskey LKV-1680 User manual

Linkskey

Linkskey LKV-1680 User manual

Linkskey LKU-S02SK User manual

Linkskey

Linkskey LKU-S02SK User manual

Popular Switch manuals by other brands

JDS Uniphase SB Series user manual

JDS Uniphase

JDS Uniphase SB Series user manual

Huawei S5700 Series Hardware description

Huawei

Huawei S5700 Series Hardware description

Huawei Quidway S1700-8-AC Installation, quick start

Huawei

Huawei Quidway S1700-8-AC Installation, quick start

HP StorageWorks SN6000 Installation and reference guide

HP

HP StorageWorks SN6000 Installation and reference guide

Camos CMS-24 instruction manual

Camos

Camos CMS-24 instruction manual

Brocade Communications Systems ICX 6450 Hardware installation guide

Brocade Communications Systems

Brocade Communications Systems ICX 6450 Hardware installation guide

Panasonic Swtich-M48eG Series installation guide

Panasonic

Panasonic Swtich-M48eG Series installation guide

TRENDnet TEG-S2400I - DATA SHEETS datasheet

TRENDnet

TRENDnet TEG-S2400I - DATA SHEETS datasheet

Brocade Communications Systems G620 Hardware installation guide

Brocade Communications Systems

Brocade Communications Systems G620 Hardware installation guide

Cisco ESW 500 Series Administration guide

Cisco

Cisco ESW 500 Series Administration guide

Festo EduTrainer 576309 operating instructions

Festo

Festo EduTrainer 576309 operating instructions

LEGRAND In One Mosaic 916 19 manual

LEGRAND

LEGRAND In One Mosaic 916 19 manual

Techsis SL-216-36G-P150 user manual

Techsis

Techsis SL-216-36G-P150 user manual

Parker SCTSD operating manual

Parker

Parker SCTSD operating manual

Technical Solutions Sound Switch Pro Information sheet

Technical Solutions

Technical Solutions Sound Switch Pro Information sheet

Altusen MP0101 user manual

Altusen

Altusen MP0101 user manual

3Com SUPERSTACK 3 3226 Getting started guide

3Com

3Com SUPERSTACK 3 3226 Getting started guide

HP 316095-B21 - StorageWorks Edge Switch 2/24 user guide

HP

HP 316095-B21 - StorageWorks Edge Switch 2/24 user guide

manuals.online logo
manuals.online logoBrands
  • About & Mission
  • Contact us
  • Privacy Policy
  • Terms and Conditions

Copyright 2025 Manuals.Online. All Rights Reserved.