Lloyd 402 Flexion Elevation Application guide


CONTENTS
OPERATIONS PAGE
Safety and Maintenance.......................... 1 - 2
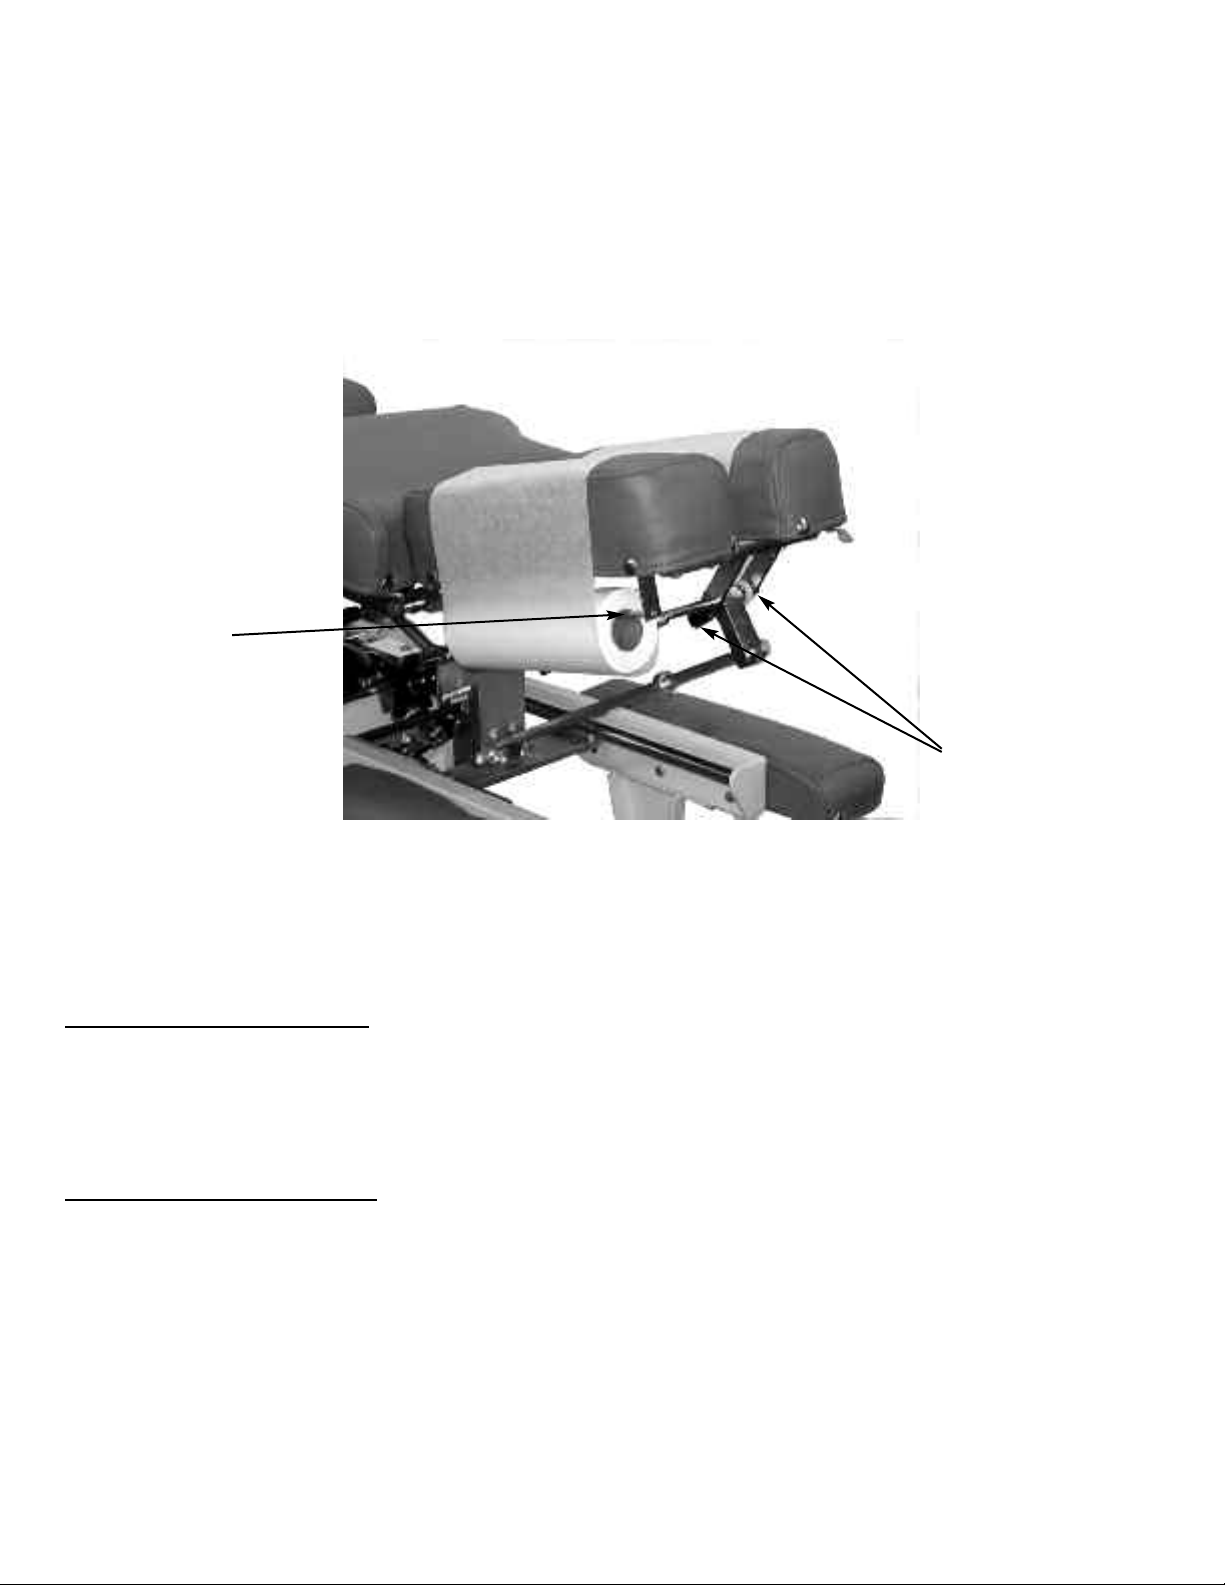
Head Rest Cushion................................. 3 - 6
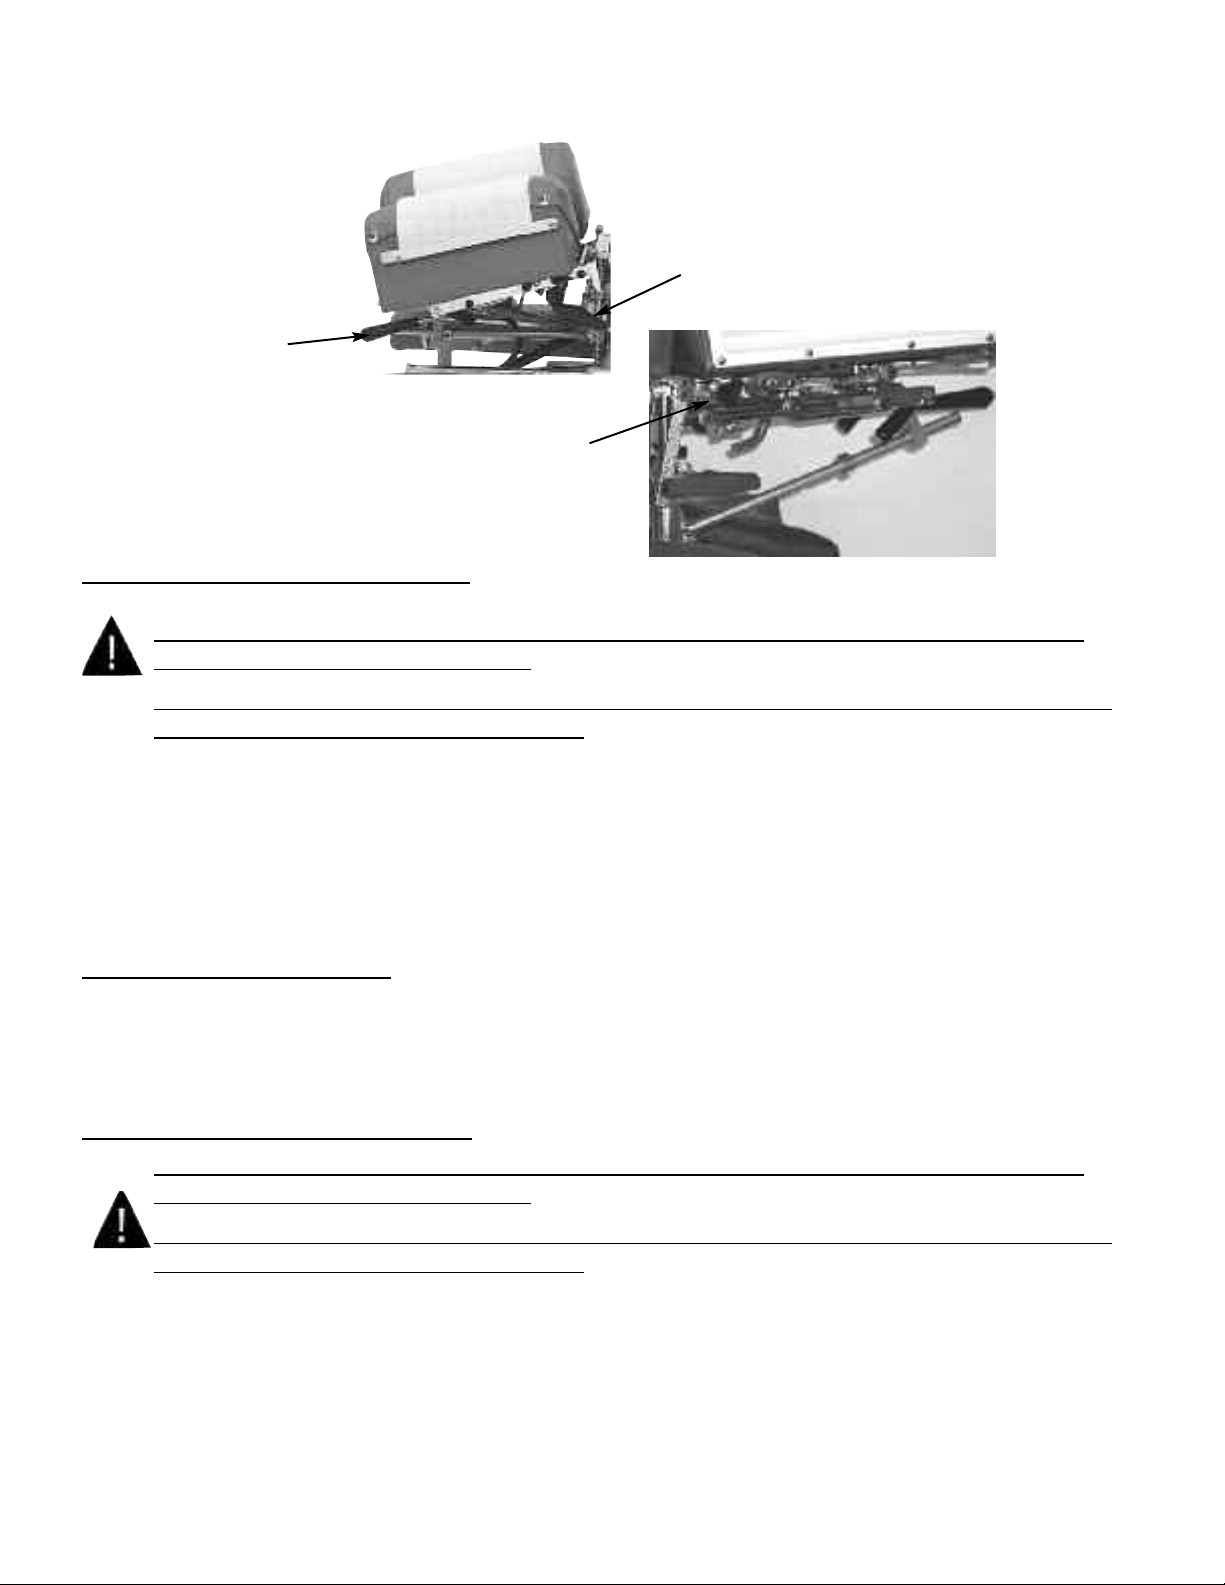
Head - Total Dimension Flexion............ 7 - 8
Chest Cushion......................................... 9
Manual & Auto Drop Cushions.............. 10 - 12
Pelvic Manual Drop & Rotation............. 13
Pelvic Manual Flexion Distraction......... 14 - 15
Pelvic Lateral Side Bending................... 15
Pelvic T-Bar............................................ 15
Pelvic Axial Ext. - Ret........................... 16
Ankle Rest.............................................. 16
Pelvic Auto Flexion............................... 17 - 19
Pelvic Auto Axial Distraction................ 20
Electronic Height Adjustment (EHA).... 21 - 22
PARTS / ASSEMBLY PAGE
Base Frame Assembly................................... 23
Lateral Side Bending Assembly.................... 24-25
Tilt Head Cushions.................................. 26
Deluxe Head Cushions........................... 27
Head Shuttle Assembly.......................... 28
Deluxe Tilt Chest.................................... 29
Deluxe Chest Spring Breakaway............ 30 - 31
T - Pelvic Assembly................................ 32
PARTS / ASSEMBLY PAGE
Ankle Rest .............................................. 33
Adjustable Height Ankle Rest.................. 34
Electrical.................................................. 35
Electrica AAD Pelvic............................... 36
Electrical - EHA & Auto Drops................. 37
Electrical Auto Flexion.............................. 38
Hydraulics Auto Flexion............................ 39
Hydraulics Assembly............................... 40 - 41
Hydraulics Auto Drops............................ 42 - 43
Hydraulics AAD Pelvic............................ 44 - 45
Straight Drop Head................................. 46 - 47
Forward Motion Drop Head..................... 48 - 49
Flexion Head Assembly............................ 50 - 51
Flexion Head Slide Assembly.................. 52 - 53
Flexion Head Shuttle Assembly............... 54 - 55
Flexion Head Rotation Frame Assembly.. 56 - 57
Drop Chest - Full Cushion........................ 58 - 59
Drop Chest - D & L .................................. 60 - 61
Drop Chest Adj. Blocks............................. 62
CBP Tilt Chest........................................... 63
CBP Drop Chest......................................... 64 - 65
T - Drop Pelvic Non-Rotation.................... 66 - 67
T - Drop Pelvic Rotation............................ 68 - 69
T - Handle Assembly.................................. 70
T-Handle, AAD Pelvic Assembly............... 71
Table Serial Number
Date: 4-15

WELCOME!!
Lloyd Table Company, a proud supporter of today’s chiropractors, has established the finest line of chiroprac-
tic tables in the world. Table products unique in versatility and function, designed to meet your needs.
Out of Concerned for a safe working and treatment environment, Lloyd Table Company asks that you follow the
safety tips below.
*Be aware of Caution and Warning labels posted throughout the table before operating any functions.
*Everyone operating the table needs to read the manual and familiarize themselves with all its
functions before operating the table with patient on it.
*A patient should never be unattended, when lying on the table. NEVER LEAVE A PATIENT ON
THE TABLE UNATTENDED!
*The patient should be positioned at or near the center of the table with arms on the armrest cushions.
*There should be no more than one operator at the controls.
*Check the tension on all drops before adjusting the patient. (See Page 7)
SAFETY
Page 1

MAINTENANCE
The following steps should be performed on a regular basis to maintain your Lloyd table in a smooth operating
condition and to assure its long life and top quality appearance.
*An initial inspection and periodic future inspections should be made to insure that nuts
and bolts have not loosened in shipping or during daily operations.
*Your Lloyd table should be lubricated every six months. Parts to be lubricated are all
pivot points, and metal to metal sliding mechanisms.
(DO NOT LUBRICATE FRICTION LOC S)
*The cushions should be cleaned daily with a mild soap & warm water solution to
remove body oils. Rinsed & dried
*Chrome parts should be cleaned on a weekly basis for appearance.
*The hydraulic fluid recommended for the pump, is a lubriplate HO1 hydraulic oil, and
*Perform periodic inspections for oil leaks or drips.
Page 2

The following sections provide explanations on the operation of your Lloyd table. All references to right and
left, will be in relationship to your view, as you face table from the foot end. All references to the front will
refer to the head end of the table. Those to the rear will refer to the foot end.
Head Cushion
The head cushion is designed to provide a multitude of positions & operations through our Add On Paper
(AOP), Deluxe Headpiece and optional Total Dimension FlexionTMHeadpieces.
Paper Hanger #2
Lock Handle #1
To raise the tilting headpiece:
1 Lift on the bottom front edges of the cushion.
2 Release when desired height is obtained, the cushion will automatically lock into position.
To lower the tilting headpiece:
1 Support the corner edge of the cushion.
2 Lift the Locking Handle (#1) to release.
3 Gently lower the cushion to the desired height.
4 Release the Lock Handle (#1) and then the cushion to lock.
Tilting Head Adjustment
Page 3

#5 Center Bar
#4 Paper Hanger
#2 Elevation nob
#3 Face Opening
Lever
#1 Tilting Lock Handle
#6 Paper Cutting Bar
To Raise the tilting feature on the Deluxe Headpiece:
1. Lift on the bottom front edges of the cushion
2. Release at the desired height, the cushion will
automatically lock into position.
To Lower the tilting feature on the Deluxe Headpiece:
1. Support the front corner edge of the cushion.
2. Lift the Locking Handle (No. 1) to release
.
3. Gently lower the cushion to the desired height.
4. Release the lock handle first and then the cushion to lock.
WARNING: TO AVOID INJURIES WHEN RAISING OR LOWERING HEAD
CUSHIONS, BE SURE TO HAVE A PROPER HOLD ON THE CUSHION BEFORE
RELEASING THE ELEVATING HANDLE (NO. 2).
Page 4
Optional Deluxe Headpiece

Deluxe Headpiece
To Elevate the Head Cushion
1. The head cushion is assisted by a gas shock in raising the cushion. With a hand supporting the head cush
ion, turn the Elevation Knob (No. 2) on either side of the table upward to unlock.
When the desired height is determined simply release the Elevation Knob (No. 2) to lock.
To Lower the Head Cushion
1. Turn the Elevation Knob upward to unlock. While unlocked push down on the cushion to lower.
When the desired height is determined simply rotate the Elevation Knob (No. 2) down to lock.
Face Opening Adjustment
1. The Head Cushion’s face opening can be opened or closed to adjust for comfort with the Face
Opening Lever (No. 3). By Pushing slightly down on the Face Opening Lever, slide cushions to adjust
opening. The Face Opening Lever must be released in one of eight positions to lock the cushions in place.
Paper Roll
The paper roll mounts conveniently inside the right-hand cushion.
Replacing the Paper Roll
1. Remove the paper hanger tension rod (No. 4) by compressing ends of the rod horizontally.
This will allow you to slide one end out, to remove the paper roll tube.
2. Slide a new paper roll on the tension rod so that it rolls off the bottom side. Compress the rod
ends horizontally and set inside the head cushion.
3. Swing the Center Bar (No. 5, Page 4) and Outside Cutting Bar (No. 6, Page 4) up. Route paper over the
cushions and down between the two outside cutting bars. Return both bars to their original position.
4. Trim the paper by supporting the paper cutting bar with one hand and pulling the paper up
along the bar’s edge.
Page 5

Deluxe Head with Drops
#7 Cocking Handle
#8 Tension nob
#9 Selector nob
(Right Side of Table)
Operating the Straight / Toggle Drop:
CAUTION: THE DROP CUSHION TENSION SHOULD BE CHEC ED AND TESTED
BEFORE ADJUSTING A PATIENT.
NOTE - DROP SHOULD BE IN DOWN / DEACTIVATED POSITION BEFORE MOVING
SELECTOR NOB (NO. 9) IN OR OUT.
1. To engage the Straight / Toggle Drop head, pull the selector knob (No. 9) out about
half an inch.
2. Push down on the Cocking Handle (No. 7) until the head cushion toggle drop is activated .
3. Once cocked, test the drop by pushing down on the cushion. f the cushion drops easily or too hard,
adjust the tension with the Tension Knob (No. 8).
Operating The Tension nob:
1. The tension is adjusted by turning the tension knob (No. 8) in a clockwise and counterclock-wise direction.
A. Clockwise - ncreases tension
B. Counterclockwise - Decreases tension
Operating the Forward Motion Drop:
CAUTION: THE DROP CUSHION TENSION SHOULD BE CHEC ED AND TESTED
BEFORE ADJUSTING A PATIENT.
NOTE - DROP SHOULD BE IN DOWN / DEACTIVATED POSITION BEFORE MOVING
SELECTOR NOB (NO. 9) IN OR OUT.
1. The Selector Knob (No. 9) is to be pushed in, to engage the forward motion drop.
2. Push down on the Cocking Handle (No. 7) until the head cushion forward motion drop is
activated.
3. Once cocked, test the drop by pushing down on the cushion, and adjust the tension.
Page 6

Forward & Straight / Toggle Drop Operation Instructions
CAUTION: THE DROP CUSHION TENSION SHOULD BE CHEC ED AND TESTED BEFORE
ADJUSTING A PATIENT.
NOTE - DROP SHOULD BE IN DOWN / DEACTIVATED POSITION BEFORE MOVING
SELECTOR NOB (NO. 1) IN OR OUT.
1. To engage the Straight / Toggle Drop head, pull the selector knob (No. 1) out about
half an inch.
2. Push down on the Cocking Handle (No. 2) until the head cushion is cocked into its top
position.
3. Once cocked, test the drop by pushing down on the cushion. f the cushion drops too easily or too hard,
adjust the tension with the Tension Knob (No. 9).
Operating The Tension nob:
1. The tension is adjusted by turning the tension knob (No. 9)
in a clockwise and counterclockwise direction.
A. Clockwise - ncreases tension
B. Counterclockwise - Decreases tension
Operating the Forward Motion Drop:
1. The Selector Knob (No. 1) is to be pushed in, to engage the forward motion drop.
2. Push down on the Cocking Handle (No. 2) to raise the drop cushion to its cocked position.
3. Once cocked, test the drop by pushing down on the cushion. f the cushion drops too easily or too hard,
adjust the tension with the Tension Knob (No. 9).
Optional - Total Dimension Flexion HeadTM
Left Side
#1 Selector nob
#2 Cocking Handle
#4 Traction Release
nob
#3 Lateral Side Bending
Release nob
#8 Flexion Assist
Handle
#6 Rotation
Release nob
#5 Flexion / Tilt
nob
Page 7
#9 Tension
nob
Right Side
#7 Face Opening
Lever

Optional - Total Dimension Flexion HeadTM
Page 8
Lateral Side Bending
1. To unlock the Lateral Side Bending Feature rotate the Lateral Side Bending Release Knob
(No. 3) clockwise (from left side of table).
2. Turn the Lateral Side Bending Release Knob (No. 3) counterclockwise to lock headpiece in
desired position (from left side of table).
CAUTION: MA E SURE THE HEADPIECE IS LOC ED BEFORE ALLOWING A PATIENT
ON OR OFF THE TABLE.
Manual Traction
1. To unlock the manual traction feature simply pull and twist the Traction Release Knob (No. 4)
1/4 of a turn clockwise or counterclockwise.
2. When unlocked the headpiece will glide forward and backward.
3. To lock the manual traction twist the Traction Release Knob (No. 4) 1/4 turn counterclockwise or clockwise.
Manual Flexion Distraction
1. To unlock the manual flexion distraction locate the Flexion / Tilt Knob (No. 5) pull forward and twist 1/4 turn
counterclockwise.
2. Gently apply pressure down using the Flexion Assist Handle (No. 8).
3. To lock the manual flexion distraction twist the Flexion / Tilt Knob (No. 5) 1/4 turn clockwise and release to
engage lock.
Tilting Feature
1. To unlock the Tilting feature locate the Flexion / Tilt Knob (No. 5) while supporting the head cushion pull
forward and twist counterclockwise.
2. Once the desired angle is obtained, lock the headpiece simply by twisting the Flexion / Tilt Knob (No. 5)
clockwise and release.
Rotation Feature
1. To unlock the Rotation feature locate the Rotation Release Knob (No. 6) Pull toward the head of the table and
twist 1/4 turn clockwise.
2. Gently move the headpiece with the Flexion Assist Handle (No. 8)
3. To lock the Rotation feature locate the Rotation Release Knob (No. 6) twist 1/4 turn counter clockwise and
release.
Face Opening Adjustment
1. The Head Cushion’s Face Opening can be opened or closed to adjust for the comfort with the Face Opening
Lever (No. 7). By pushing slightly down on the Face Opening Lever, slide side to side adjusting the face
opening. The Face Opening Lever must be released in one of the eight positions to lock cushions in place.
Flexion Assist Handle
1. The Flexion Assist Handle (No. 8) has many functions including aiding with manual Cervical Flexion
Distraction, rotation, lateral side bending, and tilting the headpiece.
2. To adjust the Flexion Assist Handle to desired comfort twist the Flexion Assist Handle locking Knobs on both
sides of table. This will unlock the handle for adjustment. Twist in opposite direction to lock.
WARNING: THE FOLLOWING CERVICAL OPERATIONS ARE ONLY TO BE
OPERATED BY A PROFESSIONAL PRACTITIONER, EDUCATED IN THE
PROCEDURE OF FLEXION-DISTRACTION AND TRACTION, ON THE SPINE.

Chest Cushion
The chest cushion is designed to accommodate patients with large or small abdomen and has the versatility of being a
stationary or floating cushion.
Standard - Adjustable Tilting Chest
Height Adjustment of Chest Cushion
1. Lift the rear corners of the cushion.
2. Release the cushion when the desired angle is reached and the cushion will automatically lock into place.
Tilting Chest Cushion Down
1. Support the cushion at the rear corners.
2. Lift on the Adjustable Chest Handle (No. 1) to release the cushion.
3. Slide the cushion to desired angle.
4. Release the Adjustable Chest Handle (No. 1) first and then the cushion to lock into desired height.
Page 9
#1 Adjustable Chest Handle

FULL DROP CHEST CUSHION
W/OPTIONAL SPRING BREA AWAY
# 1 Cocking Handle
#2 Tension Control nob
Optional Spring Breakaway Chest
To Engage Spring Breakaway Chest Cushion
1. Pull on Spring Breakaway Knob (No. 2) (facing the right side of the table) to unlock.
2. The resulting floating effect will allow the cushion to gently drop under pressure and spring back when
released.
To Lock the Spring Breakaway Cushion
1. Gently pull up on chest cushion to full horizontal position, then Push on Spring Breakaway Knob (No. 2)
(facing the right side of the table) to lock.
Spring Breakaway Tension
1. Turning the tension control (No. 3) clockwise or counter clockwise will increase or decrease the spring breakaway tension.
Right side: Clockwise - Decreases Tension Counterclockwise - ncrease Tension
Left Side: Clockwise - ncrease Tension Counterclockwise - Decrease Tension
Full Drop Chest - Manual Drop
Cocking the Drop Chest (Dorsal or Lumbar)
1. Pull up on the Cocking Handle (No. 1) to cock the desired drop cushion.
2. Adjust the tension on drop by turning the Tension Control Knob (No. 2)
Right side: Clockwise - Decreases Tension Counterclockwise - ncrease Tension
Left Side: Clockwise - ncrease Tension Counterclockwise - Decrease Tension
CAUTION: THE DROP CUSHION TENSION SHOULD BE CHEC ED AND TESTED BEFORE
ADJUSTING PATIENT. EEP FINGERS AWAY FROM BOTTOM OF CUSHION TO AVOID PINCHING
Page 10
#2 Spring Breakaway Control nob
#2 Tension Control nob
#3 Spring Breakaway Tension Control
#4 ADJUSTABLE HEIGHT HANDLE
Height Adjustment of Chest Cushion
1. Lift the rear corners of the cushion.
2. Release the cushion when the desired angle is reached and the cushion will automatically lock into place.
Tilting Chest Cushion Down
1. Support the cushion at the rear corners.
2. Lift the Adjustable Chest Handle (No. 4) toward the ankle cushion to release the cushion.
3. Slide the cushion to desired angle.
4. Release the Adjustable Chest Handle (No. 1) first and then the cushion to lock into desired height.

Automatic Cocking Drops
Page 11
Chest & Lumbar Drop - Manual
To cock the Drop Chest or Lumbar Cushion:
CAUTION: The drop cushion tension should be checked and tested before adjusting patient. EEP FINGERS
AWAY FROM BOTTOM OF CUSHION TO AVOID PINCHING.
1) Pull up on the Cocking Handle (No. 1) to cock the desired cushion
2) Adjust the tension on either cushion by turning the Tension Control Knob (No. 2)
a. Right Side: Clockwise - Decrease Tension Counterclockwise - ncrease Tension
b. Left Side: Clockwise - ncrease Tension Counterclockwise - Decrease Tension
Drop Chest
Dorsal & Lumbar
#1 Cocking Handle
#2 Tension Control nob
#3 Auto Drop Selector nob
Cervical (Head Cushion) Drop - Automatic
To cock the Cervical (Head Cushion) Drop :
1) Rotate the Selector Knob (No. 3) to “C” to Select the cervical (Head Cushion) drop
2) Step on white strip to activate the auto cocking drop
CAUTION: The drop cushion tension should be checked and tested before adjusting patient. EEP FINGERS
AWAY FROM BOTTOM OF CUSHION TO AVOID PINCHING.
3) Adjust the tension on the drop by turning the Tension Control Knob (Refer to Page 5 for Tension Adjustment nstructions).

To Cock the Dorsal (Chest Cushion) Drop - Automatic
1) Rotate the Selector Knob (No. 1) to “D” to Select the Dorsal (Chest Cushion) drop
2) Step on white strip to activate the auto cocking drop
CAUTION: The drop cushion tension should be checked and tested before adjusting patient. EEP FINGERS
AWAY FROM BOTTOM OF CUSHION TO AVOID PINCHING.
3) Adjust the tension on the drop by turning the Tension Control Knob (Refer to Page 7 for Tension Adjustment nstructions).
To Cock the Lumbar Cushion Drop - Automatic
1) Rotate the Selector Knob (No. 1) to “L” to Select the Lumbar (Lumbar Cushion) drop
2) Step on white str`ip to activate the auto cocking drop
CAUTION: The drop cushion tension should be checked and tested before adjusting patient. EEP FINGERS
AWAY FROM BOTTOM OF CUSHION TO AVOID PINCHING.
3) Adjust the tension on the drop by turning the Tension Control Knob (Refer to Page 7 for Tension Adjustment nstructions).
Page 12
Pelvic Drop - Automatic
To cock the Pelvic Drop:
1) Rotate the Selector Knob (Pg. 8, No. 1) to “P” to Select the Pelvic drop
2) Step on white strip to activate the auto cocking drop
CAUTION: The drop cushion tension should be checked and tested before adjusting patient.
EEP FINGERS AWAY FROM BOTTOM OF CUSHION TO AVOID PINCHING.
3) Adjust the tension on the drop by turning the Tension Control Knob (Refer to Page 7 for Tension Adjustment nstructions).
Note- Table is capable of performing a combination of drops - see Selector Knob Letter Reference Chart below.
C - Cervical Drop DC - Dorsal & Cervical Drops
D - Dorsal Drop LD - Lumbar & Dorsal Drops
L - Lumbar Drop PL - Pelvic & Lumbar Drops
P - Pelvic Drop CP - Cervical & Pelvic Drops
Selector nob Letter Reference Chart
Automatic Cocking Drops

To cock the Drop Pelvic Cushion:
CAUTION: The drop cushion tension should be checked and tested before adjusting
patient. EEP FINGERS AWAY FROM BOTTOM OF CUSHION TO AVOID PINCHING.
1) Pull up on the Cocking Handle (No. 1) to cock cushion
2) Adjust the tension on cushion by turning the Tension Control Knob (No. 2)
a. Right Side: Clockwise - Decrease Tension Counterclockwise - ncrease Tension
b. Left Side: Clockwise - ncrease Tension Counterclockwise - Decrease Tension
Pelvic Manual Drop
#2 Tension Control nob
#1 Cocking Handle
Page 13
Pelvic Rotation (Optional)
To Unlock the Pelvic Rotation
1) Support the edge of the Pelvic Cushion
2) Slide the Rotation Lock Handle (No. 1) towards the rear to unlock.
To Lock the Pelvic Cushion from Rotating
1) Place the Pelvic cushion into it’s horizontal position.
2) Slide the Lock Handle (No. 1) forward to lock.
# 1 Rotation Lock Handle
PELVIC ROTATION

Page 14
# 2 Pressure
Decrease Valve
# 3 Flexion
Pressure
Guage
# 4 Flexion
Lock/Unlock
Handle
# 5 Lateral Side Bending
Lock/Unlock Handle # 1 Pressure Increase Button
Manual Pelvic Flexion Distraction
To Increase the Flexion Pressure:
1) Push in on the Pressure ncrease Button (No. 1)
2) Observe the Flexion Pressure Gauge (No. 3) CAUTION: DO NOT EXCEED 800 PSI
3) Simply release Pressure ncrease Button (No. 1) when desired pressure is obtained.
To Decrease the Flexion Pressure:
1) Turn the Pressure Decrease Valve (No. 2) in a counter clockwise direction
CAUTION: Release slowly, to avoid any drastic flexion to the patient.
2) Pressure Drop can be observed on the pressure gauge
CAUTION: DO NOT REDUCE BELOW 300 PSI
3) Turn the Pressure Decrease Valve (No. 2) in clockwise direction to shut - off when desired pressure is reached.
WARNING: THE FOLLOWING PELVIC OPERATIONS ARE ONLY TO BE OPERATED
BY A PROFFESSIONAL PRACTITIONER, EDUCATED IN THE PROCEDURE OF
FLEXION - DISTRACTION AND TRACTION, ON THE LOWER BACK AND SPINE.
To Operate the Manual Pelvic Flexion
1) CAUTION: TO AVOID ANY DISCOMFORT OR INJURY TO THE PATIENT, MA E SURE THE FLEXION
PRESSURE IS PROPERLY ADJUSTED TO SUPPORT THE PATIENT (SEE PRECEEDING PARARAPHS)
2) Supporting the Pelvic Cushion, turn the Flexion Lock Handle (Page 10, No. 4) down to unlock
3) Gently apply pressure down on the Ankle Cushion, or the T-Handle (see below for T-Handle).
4) Supporting the cushion; gently allow the pelvic cushion to float back up to the horizontal position.
5) CAUTION: LOC THE CUSHION INTO IT’S HORIZONTAL POSITION BEFORE ALLOWING THE
PATIENT ON OR OFF THE TABLE
Pelvic Cushion
Manual Flexion Distraction

To Release the Cushion from the Flexion Position
1) Support the Pelvic Cushion to avoid springing of cushion.
2) Turn the Flexion Lock Handle (Page 10, No. 4) down to unlock.
3) Pressure increase may be needed to elevate the cushion
4) CAUTION: LOC THE CUSHION INTO IT’S HORIZONTAL POSITION BEFORE ALLOWING
PATIENT ON OR OFF TABLE.
To Lock the Pelvic Cushion into a Flexion Position:
1) Turn the Pelvic’s Flexion Handle (Page 10, No. 4) down to unlock.
2) The Flexion Pressure may need to be reduced, to ease the process.
3) Push the cushion down to desired angle.
4) Turn the Flexion Handle up, to lock into position.
Pelvic Cushion
Manual Flexion Distraction
Telescoping T-Bar (No. 1) (Optional)
To Change the height of the T-Bar
1) While T-Bar is revealed and locked into position simply pinch the red lever against the T-handle to
elevate or lower. Release red lever when desired height is obtained.
To RevealTelescoping T-Bar
1) Simply pivot the handle up until it locks into place. (Fig. 1)
To Hide Telescoping T-Bar
1) Pivot the T-bar down until it is in a full horizontal position.(Fig. 2)
#1 T-Bar
Fig. 1 Fig. 2
PELVIC LATERAL SIDE BENDING
Side Bending
To Operate Lateral Side Bending Feature:
1) Turn the Lateral Side Bending Lock/Unlock Handle (No. 5, Page 10) up, to allow the pelvic cushion to lateral side
bend.
2) The cushion can be locked at various angles of side bending, by laterally moving the cushion in position and
locking the handle down.
CAUTION: LOC THE CUSHION FROM SIDE BENDING BEFORE ALLOWING A PATIENT ON OR
OFF THE TABLE
Page 15

Axial Extension - Retraction (Powered)
To Extend the Pelvic Cushion
1) Move the ExtensionRetraction Switch (No. 1) to the right until desired length is obtained.
To Retract the Pelvic Cushion
1) Move the Extension Retraction Switch (No. 1) to the left until desired length is obtained.
Pelvic Axial Extension - Retraction
# 1 Extension Retraction Switch
Page 16
Ankle Rest
#1 Horizontal
Lock nob #2 Vertical
Lock Lever
Ankle Rest Horizontal Adjustment
To Extend or Retract the Ankle Rest
1. Loosen the Horizontal Lock Knob (No. 1) and slide the cushion to the desired length.
2. Once the cushion is adjusted, tighten the lock knob.
Optional Vertical Ankle Rest
To Raise the Ankle Rest
1. Simply lift on the sides of the Ankle Rest Cushion.
2. Once the desired height is obtained the cushion will automatically lock into position when released.
To Lower the Ankle Rest
1. From the back end of the table, support the center of the Ankle Rest Cushion with the right hand.
2. With left hand, slide the Vertical Lock Lever (No. 2) towards the left side to release lock.
3. Lower the cushion to desired height, and release the Vertical Lock Lever to lock into place.

Automatic Mode
The automatic mode is indicated by the (#2) “ ndicator Light” emitting a green light.
A) To activate the Automatic mode press the Run Button (#2) so that the indicator light is on.
B) The pelvic cushion will continue to flex up and down until the desired time set, indicated by the timer knob (#4), expires.
C) To stop pelvic flexion simply push the red stop button (#3)
Auto Flexion Timer
The auto flexion timer (#4) is used when setting the time desired for auto flexion. The range of time is @ 1 to 20 minutes.
The imer, even when urned comple ely coun erclockwise will resul in he able au o flexing for abou 1.5 minu es.
Extension / Retraction Switch (#1)
The Extension / Retraction switch is used for directional control of the Pelvic cushion in the axial plane.
To extend the pelvic cushion:
1) Activate the toggle (#1) switch towards the rear of the table.
To retract the pelvic cushion
1) Activate the toggle switch (#1) towards the front of the table.
CAUTION!! Check he pelvic up speed and down speed before adjus ing pa ien on he able.
Auto Pelvic Flexion
# 6 Pressure Control Switch # 1 Ext. - Ret . Switch
# 2 Flexion Run Button
Indicator Light
# 3 Flexion Stop Button
Indicator Light
#5 Down Delay Control # 4 Timer Control
# 8 Stop Indicator Light
# 7 Reset Button
# 9 Stop Indicator Light
Page 17

Flexion Height Adjustment
The two Flexion control collars operate the distance of travel in the up (#1) and down (#2) motion on the pelvic cushion. The limit
switch (#3) senses the location of the collars.
To increase the upward motion slide collar (#1) down.
To decrease the upward motion slide collar (#1) up.
To increase the downward motion slide collar (#2) up.
To decrease the downward motion slide collar (#2) down.
f you are performing manual flexion the limit switch (#3) may end up outside of the slide collars. f this happens you will be unable to
use the auto flexion feature until the limit switch (#3) is in between the slide collars.
CAUTION!! Excessive speed may cause discomfor or injury o he pa ien , make sure o check he flexion speed before adjus ing any
pa ien s on he able.
Down Delay
The down delay adjustment knob (#5) controls the amount of time the pelvic cushion stays in the lowest set position from 0 to 30 seconds.
Simply turn the knob clockwise to increase the delay.
Manual Flexion – Pressure Adjustment
To increase the pressure in manual flexion push the pressure build button (#6). To release pressure see page 12.
Auto Pelvic Flexion
# 3 Limit Switch
# 1 Slide Collar
Up Motion
# 2 Slide Collar
Down Motion
- If the auto flexion is stopped by the Patient Stop Switch, the red stop light (#8) will illuminate.
To reset the auto flexion press the reset switch (#7) and the auto flexion will resume.
Page 18
Other manuals for 402 Flexion Elevation
1
Table of contents
Other Lloyd Medical Equipment manuals
Popular Medical Equipment manuals by other brands

bpr
bpr ultraflow Instructions for use

Patterson
Patterson SAMMONS PRESTON R-FLEX Service manual

Direct Supply
Direct Supply Panacea Air Overlay owner's manual

Orliman
Orliman CC2700 INSTRUCTIONS FOR USE AND PRESERVATION

OSCILLA
OSCILLA SM960-C Instructions for use

WY'EAST MEDICAL
WY'EAST MEDICAL DENALI 600 52300 Instructions for use