•The stopwatch can measure up to 12 hours
in 1/20 second increments.
•The measured time is indicated by the four
stopwatch hands that move independently
of the hands for time display.
•When the measurement reaches 12 hours,
the stopwatch automatically stops counting.
■STOPWATCH
Movement of the stopwatch 1/20-second
hand
•After the stopwatch is started, the stopwatch
1/20-second hand moves for about 10 minutes
and automatically stops at the “0” position.
•When the measurement is stopped or split
time is measured, it moves to indicate the
elapsed 1/20 seconds.
•After the measurement is restarted or split
time is released, the stopwatch 1/20-second
hand moves for about 10 minutes and stops
automatically.
•In the same manner, if the stopwatch is
stopped and restarted repeatedly or split
time is measured and released repeatedly,
the stopwatch 1/20-second hand moves for
about 10 minutes and stops automatically.
A: Start /
Stop
B: Split /
Split
release /
Reset
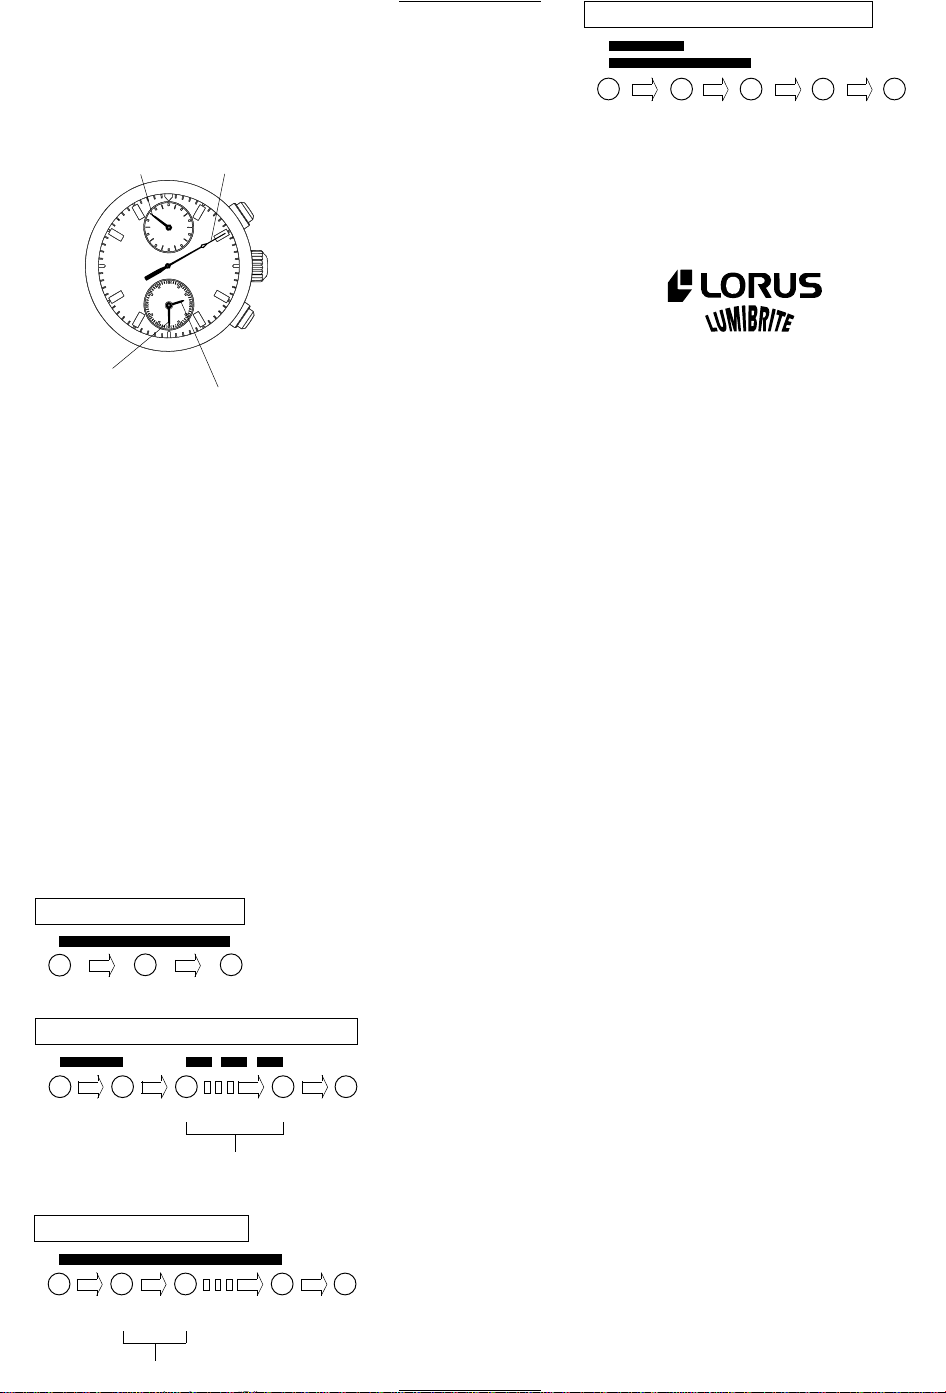
Stopwatch
1/20-second hand Stopwatch
second hand
Stopwatch hour hand
Stopwatch
minute hand
[ Ex.: 2 hours, 30 minutes and 10.85 seconds ]
Standard measurement
A
Start Stop Reset
AB
Accumulated elapsed time measurement
A
Start Stop Restart Stop Reset
A A B
A
* Restart and stop of stopwatch
can be repeated by pressing
button “A”.
Stopwatch operation
✩Before using the stopwatch, be sure to
check that the crown is set at the normal
position and that the stopwatch hands are
reset to the “0” position.
* If the hands do not return to the “0” position,
follow the procedure in “■SETTING THE TIME
AND ADJUSTING THE STOPWATCH HAND
POSITION”.
A
Start Split Split Stop Reset
release
A
Split time measurement
BB B
* Measurement and release of
split time can be repeated by
pressing button “B”.
Measurement of two competitors
A
Start Finish 2nd Finish Reset
time competitor time
of 1st finishes of 2nd
competitor competiror
B
B A B
■LUMIBRITE WATCH
(dial, hands, buttons, case, bezel,
strap, etc.)
✩If your watch is a LORUS LUMIBRITE watch,
it has following features.
LORUS LUMIBRITE watches absorb and store
light energy from natural and artificial light
sources and emit light in the dark. They are
made of environmentally friendly material,
and therefore, are harmless to human beings
and the environment.
• With a full charge, LORUS LUMIBRITE
watches glow in the dark hours longer than
conventional luminous watches of this type.
If exposed to a light of more than 500 lux
(i.e., the brightness of a typical office) for
approximately 10 minutes, or direct sunlight
for 2 minutes, they will glow for hours.
• Since LORUS LUMIBRITE watches emit
the light they store, the brightness will
decrease gradually over time. The length
of time they will glow may also differ slightly
depending on such factors as the brightness
of and distance from the light source used
to charge the watch.
■BATTERY CHANGE
The miniature battery SEIKO SR927SW, Maxell
SR927SW, SONY SR927SW or EVEREADY 395,
which powers your watch should last approximately
3 years. However, because it is inserted at
the factory, the actual life of the battery once
in your possession may be less than the specified
period.
Be sure to replace the battery to prevent any
possible malfunction as soon as it runs down.
To replace the battery, we recommend taking
the watch to a local watch repair shop.
Notes:
1. If the stopwatch is used for more than 3
hours a day, the battery life may be less
than the specified period.
2. After the battery is replaced with a new
one, set the time/calendar and adjust
the stopwatch hand position.
Battery life indicator
•When the battery nears its end, the small
second hand moves at two-second intervals
instead of normal one-second intervals. In
that case, have the battery replaced with a
new one as soon as possible.
•The watch remains accurate, however, while
the small second hand is moving at two-
second intervals.


