LSL 138-NO132.v Technical manual

138-NO132A_Rev00_2020-11 Seite 1 von 3
w
ww.LSL.eu
Anbauanleitung/Sicherheit hinwei e
Lenkergriffe „NOVA-RS“ für Lenkerdurchme er 7/8in (22,2mm)
Vielen Dank für den Kauf eine LSL Produkte . Un ere Leiden chaft zum Motorradfahren finden Sie in jedem un erer LSL Produkte wieder. Wir wün chen Ihnen allzeit eine gute und ichere Fahrt mit Ihrem neuen LSL Produkt au dem
Hau e Paa chburg & Wunderlich GmbH.
Le en Sie die e Anbauanleitung vor der Montage orgfältig durch.
Nur bei fachgerechter Montage und An chlu i t die ge etzliche Gewährlei tung erfüllt. Bitte halten Sie ich mit Vorgehen wei e der Montage an die Vorgaben de Fahrzeugher teller . Nichtbeachten der Montageanwei ung kann
Schäden an Ihrem Fahrzeug verur achen und zum Erlö chen der Gewährlei tung an prüche führen. Für Folge chäden wird keine Haftung übernommen. Eine nicht achgemäße Verwendung die e Produkte kann die Fahr icherheit
beeinträchtigen. Da eigenmächtige Nachbearbeiten und/oder Verändern de Produkte kann zum Ver agen der Funktion führen und i t nicht ge tattet. E i t kein Eintrag in die Fahrzeugpapiere oder mitführen etwaiger Dokumente
notwendig. Bitte bewahren Sie die e Anleitung für einen päteren Gebrauch auf!
Lieferumfang:
•1 Paar Lenkergriffe
Montage der Lenkergriffe:
1. Vor der Montage tellen Sie icher, da Ihr Fahrzeug icher teht.
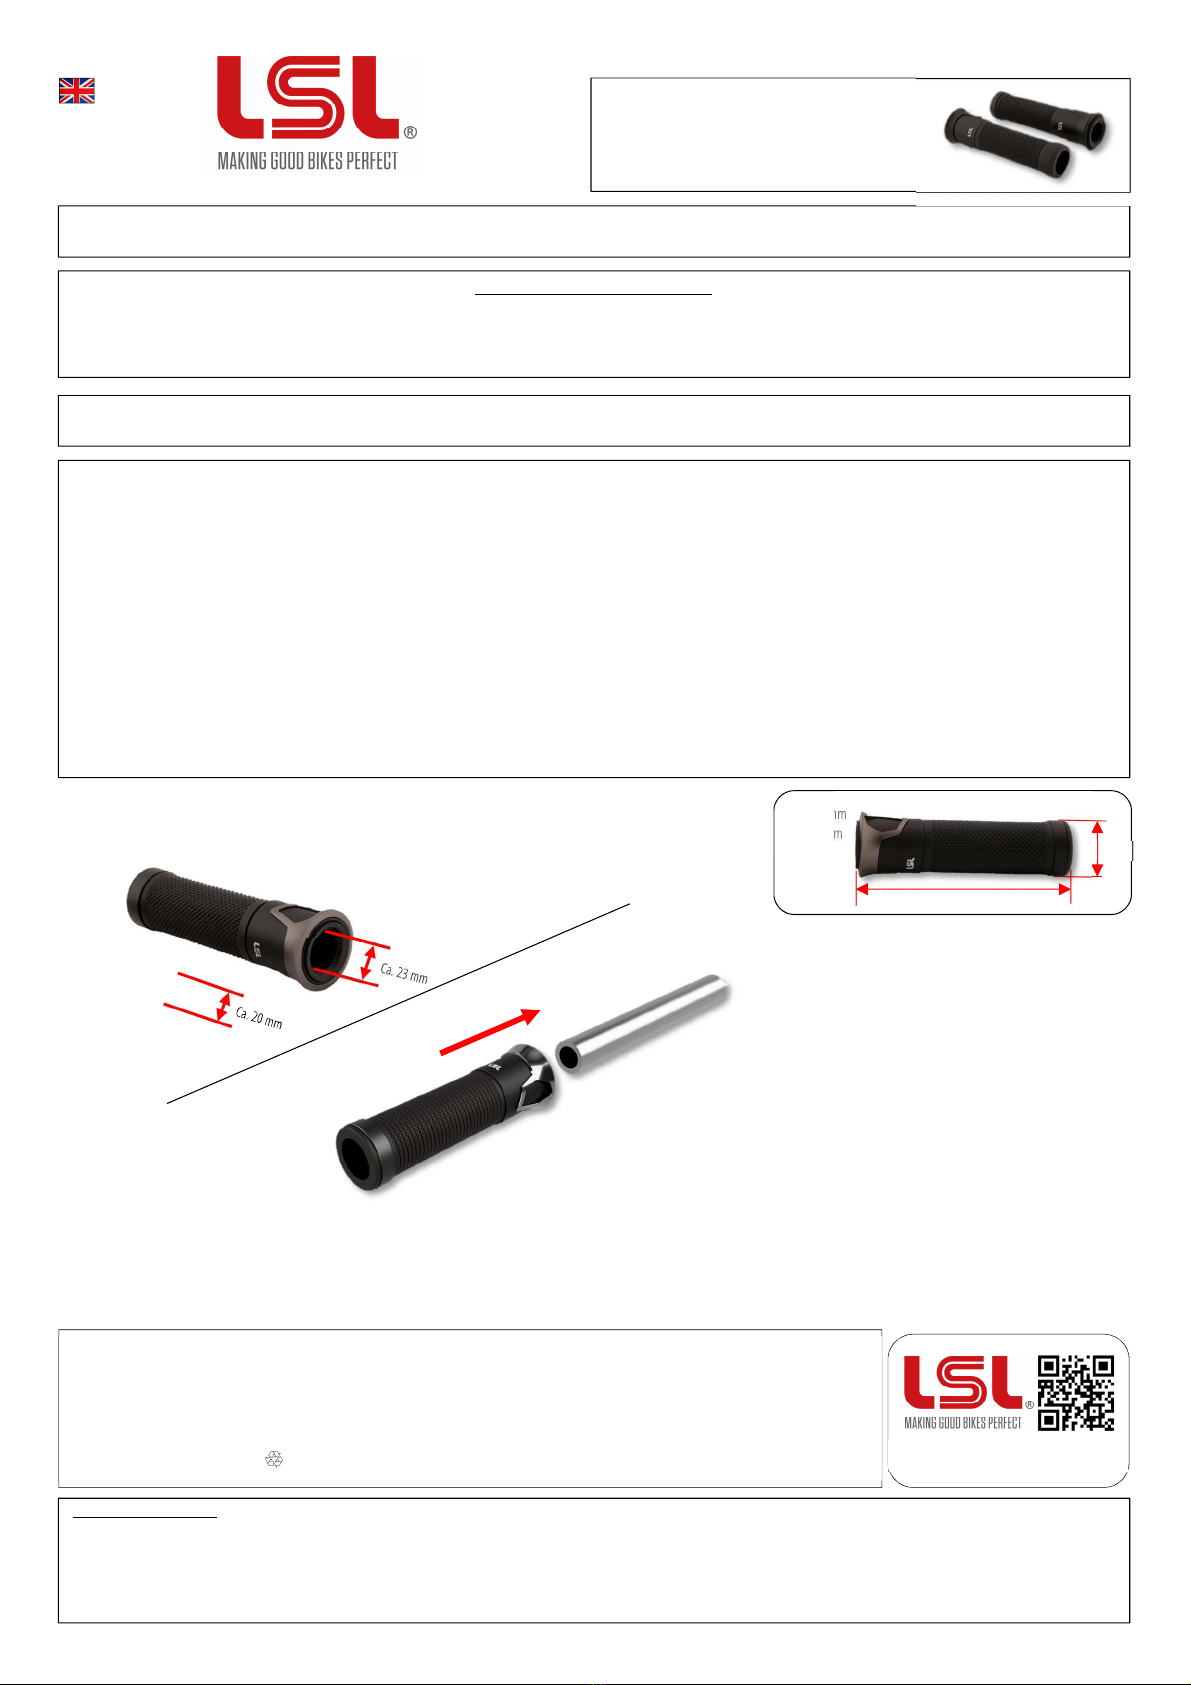
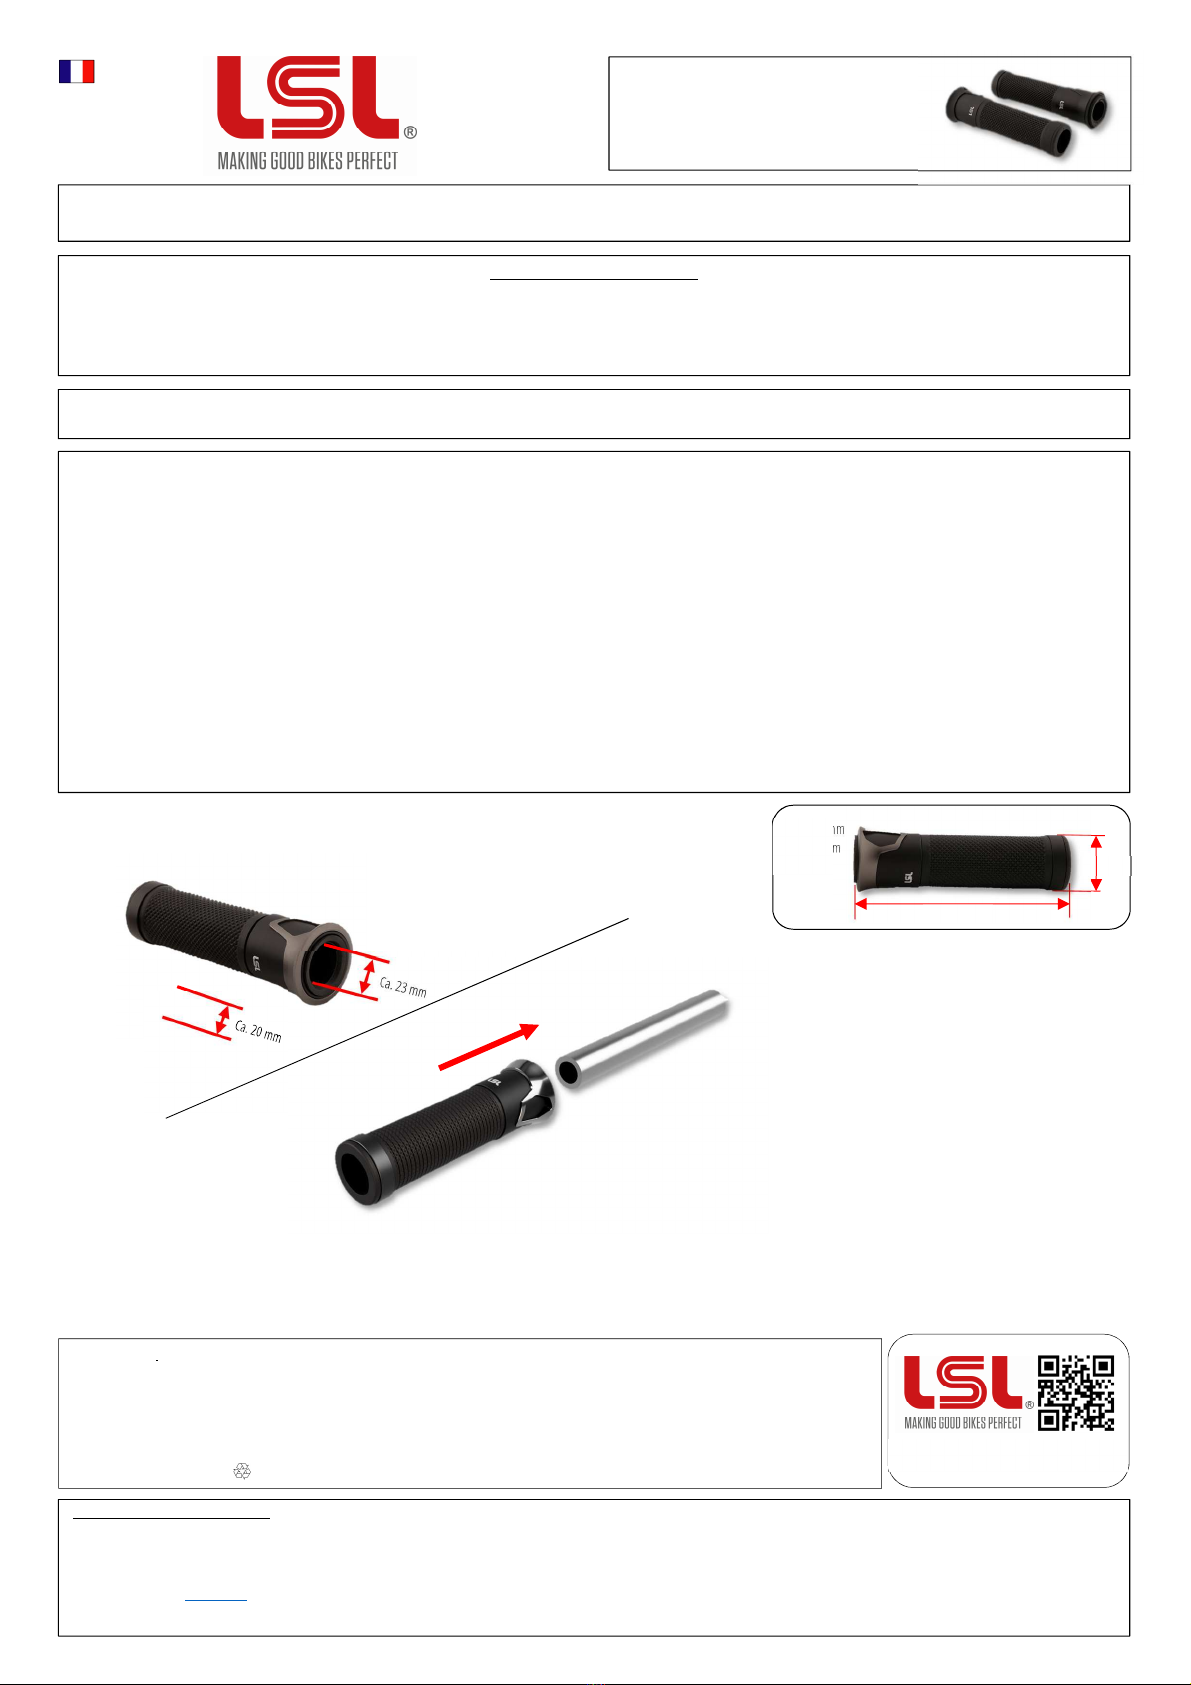
Vor der Montage überprüfen Sie mit einer Schieblehre den pa enden Au endurchme er de Lenker bzw. Innendurchme er der Griffe.
2. Demontieren Sie eventuell vorhandene Lenkerenden und ggf. die Armaturen, um ein Zerkratzen während der Montage vorzubeugen.
3. Die alten Griffe werden folgendermaßen abmontiert:
3.1 Heben Sie mit einem Schraubendreher da Griffende an und pritzen Sie etwa Spülmittellö ung unter die Griffe. Bei Gummigriffen kann alternativ Brem enreiniger verwendet werden (nur Gummigriff). Wenn Sie die alten
Griffe nicht mehr verwenden möchten, können Sie die e auch mit einem Me er auf chneiden. Dabei i t unbedingt darauf zu achten, da die Ga drehhül e nicht be chädigt wird, da die e in der Regel au dünnem Kun t toff
gefertigt i t.
3.2 Schieben Sie vor ichtig den Griff vom Lenker.
4. Die Montage ge chieht am einfach ten mit aufgewärmten Griffen. Legen Sie die Griffe einige Minuten in eine handwarme Wa er/Spülmittel Lö ung. ACHTUNG: Da die Lö ung nur ehr lang am verdun tet, i t die volle Haftung
der Griffe auf dem Lenker frühe ten nach 24 Std. erreicht. Alternativ kann auch Brem enreiniger zum leichteren auf chieben verwendet werden. Die Aluminium Drehteile bleiben zur Montage auf dem Griff (Fig 2)!
5. Beachten Sie den unter chiedlichen Innendurchme er der Griffe (Fig. 1).
6. Montieren Sie ggf. abgenommene Armaturen bzw. Lenkerenden.
7. ACHTUNG: Überprüfen Sie unbedingt den fe ten Sitz der Griffe auf dem Lenker und der Ga drehhül e!
Die Ga drehhül e lä t ich frei drehen und mu beim lo la en de Griffe ofort und eigen tändig in die Leerlauf tellung zurückkehren. Weder die Armaturen oder die Lenkerenden brem en da Drehvermögen de Griffe !
8. ACHTUNG: Ein klemmender Ga griff beeinträchtigt die Fahr icherheit
Haftung au chlu und Garantiebe timmungen:
Bei un achgemäßer Handhabung, Montage oder Verwendung de Geräte können Garantie- und Gewährlei tung an prüche erlö chen. Aufgrund der
Nicht-Überprüfbarkeit der achgemäßen Anwendung übernimmt die Firma Paa chburg und Wunderlich GmbH keine Haftung für direkte oder indirekte Schäden bzw. Folge chäden, die au dem Betrieb de Geräte ent tehen. Die gilt nicht, wenn der Schaden auf Vor atz oder grober Fahrlä igkeit von Paa chburg &Wunderlich
GmbH beruht oder der Schaden in der Verletzung de Leben , de Körper oder der Ge undheit be teht oder Paa chburg &Wunderlich GmbH chuldhaft eine we entliche vertragliche Pflicht (Kardinalpflicht) verletzt hat.
Paa chburg & Wunderlich GmbH, Am Alten Lok chuppen 10a, D-21509 Glinde
Tel.: +49 (0) 40 248 277-0; E-Mail: ale @pwonline.de
Alle Rechte, Änderungen und Irrtümer bleiben vorbehalten.
138-NO132A_Rev00_2020-11
Vor jedem Fahrtantritt:
E i t die Aufgabe und Verantwortung de Fahrer die icherheit relevanten Fahrzeugteile regelmäßig zu überprüfen und in Stand zu halten. Kontrollieren Sie de halb regelmäßig die einwandfreie Ein tellung und Funktion Ihre LSL-Produkte und den fe ten Sitz aller Ver chraubungen.
Gewährlei tung:
Nehmen Sie ich die Zeit, um eine hundertprozentige, fachgemäße Arbeit bei der Montage der LSL Produkte zu lei ten. Berück ichtigen Sie alle un ere Montage-Vorgaben und Sicherheit hinwei e. Eine fehlerhafte, un achgemäße Montage oder Umgang mit dem LSL Produkt führen zum Erlö chen der Gewährlei tung an prüche.
Pflege:
Verwenden Sie für die Pflege der LSL Pordukte keine aggre iven Reinigung mittel. Die LSL Produkte können mit einer einfachen, lauwarmen Spülmittel-Lö ung hervorragend gereinigt werden. Kontakt mit Brem flü igkeit, Brem enreiniger, Kraft toff, etc. i t zu vermeiden. Unab ichtlich aufgebrachte Verunreinigungen
umgehend mit einem weichen Tuch aufnehmen und die Oberfläche mit Spülmittel-Lö ung äubern.
Umweltinformation:
Die er Artikel darf nicht am Ende einer Leben dauer mit dem Hau müll ent orgt werden.
Die Ent orgung kann über den Paa chburg u. Wunderlich Kundendien t oder lokal verfügbare Rückgabe- und Sammel yteme erfolgen.
Finden Sie nützliche Zubehör wie z.B. Spiegel-, oder Blinkerarm Verlängerungen, Lei tung wider tände, Blinkrelai , Adapterkabel etc. in un erem Web hop!
A = Ø 34 mm
B = 132 mm
A
B
Fig. 1
Fig. 2

138-NO132A_Rev00_2020-11 Seite 2 von 3
w
ww.LSL.eu
Mounting and afety in truction
LSL handlebar grip „NOVA-RS“ for handlebar diameter
7/8in (22,2mm)
Thank you for buying a LSL product. Becau e of our pa ion for motorcycle all our product are de igned to meet your need a a motorcycli t. We wi h you alway a afe and plea ant ride with your new LSL product from Paa chburg
& Wunderlich GmbH.
Plea e read thi manual carefully prior to in tallation
Only when profe ionally in talled i the tatutory warranty and driving afety fulfilled. Pay attention to the information in the operating in truction of the vehicle or pecification of the vehicle manufacturer. Failure to follow the
a embly in truction can damage your vehicle and void the warranty. Thi i nece ary to not affect the riding afety. No liability i accepted for con equential damage.
The unauthorized reworking and / or modification of the product can lead to the failure of the function and i not permitted. No entry in the vehicle document or the carrying of any document i nece ary.
Plea e keep the e in truction for later u e!
Scope of delivery:
•1 Pair of handlebar grip
In tallation of the handlebar grip :
1. Before the in tallation, make ure that your vehicle i tanding afe. Before the in tallation, check the appropriate outer diameter of the handlebar or the inner diameter of the grip with a calliper.
2. Di mantle any exi ting handlebar end and, if nece ary, in trument to prevent cratching during the a embly.
3. The old handlebar grip are removed a follow :
3.1 U e a crewdriver to lift up the end of the grip and quirt ome detergent olution under the grip . Alternatively, brake cleaner can be u ed for rubber grip (rubber grip only). If you no longer want to u e the old grip , you
can cut them open with a knife. It i e ential to en ure that the rotary ga leeve i not damaged, a it i u ually made of thin pla tic.
3.2 Carefully lide the grip off the handlebar .
4. It i ea ie t to a emble with the grip warmed up. Soak the grip in a lukewarm water / detergent olution for a few minute . CAUTION: Since the detergent olution i evaporating very lowly, the full grip of the grip on the
handlebar i reached after 24 hour at the earlie t. Alternatively, brake cleaner can be u ed to make it ea ier to lide the grip onto the handlebar . The turned aluminium part remain on the grip during the in tallation (Fig.2)!
5. Note the different in ide diameter of the grip (Fig.1).
6. Fit any previou ly removed in trument or handlebar end .
7. CAUTION: It i e ential to check that the grip on the handlebar and the throttle leeve are ecurely attached! The throttle tube can be rotated freely and mu t immediately and independently return to the idle po ition when the
grip i relea ed. Neither the in trument nor the handlebar end low down the rotation of the grip!
8. CAUTION: A jammed throttle affect driving afety!
Find uitable hou ing , turn ignal , taillight , power re i tor , electronic fla her relay , adapter cable and other acce orie in our Web hop!
Exclu ion of liability and
warranty
regulation:
Improper handling, in tallation or u e of the device may invalidate warranty and warranty claim . Due to the non-verifiability of the proper application, the company Paa chburg and Wunderlich GmbH a ume no liability for direct or indirect damage or con equential damage re ulting from the operation of the device. Thi
doe not apply if the damage i due to intent or gro negligence of Paa chburg & Wunderlich GmbH or the damage con i t of injury to life, limb or health or Paa chburg & Wunderlich GmbH ha culpably violated an e ential contractual obligation (cardinal obligation).
Paa chburg & Wunderlich GmbH, Am Alten Lok chuppen 10a, D-21509 Glinde
Tel.: +49 (0) 40 248 277-0; E-Mail: ale @pwonline.de
All right re erved. Change and error are excepted.
138-NO132A_Rev00_2020-11
Before each ride: It i the duty and re pon ibility of the rider to regularly check and maintain the afety-related vehicle part . Before tarting your journey, check the correct adju tment and function of the LSL
product and the tightne of all crewed connection .
Warranty: Take the time to do a 100% profe ional job of in talling the LSL product . Take into account all our in tallation and afety in truction .
A faulty, improper in tallation or handling of the product will void the warranty.
Maintenance/Care: Do not u e aggre ive detergent to care for the LSL product . The LSL product can be perfectly cleaned with a imple, lukewarm detergent olution. Contact with brake fluid, brake cleaner,
fuel, etc. hould be avoided. Immediately pick up any unintentionally applied impuritie with a oft cloth and clean the urface with detergent olution
Enviromental Information: Thi LSL product may not be di po ed in the normal hou ehold rubbi h at the end of it lifetime. The di po al can be done through the Paa chburg u. Wunderlich cu tomer ervice
or a local return and wa te collection in titution.
A = Ø 34 mm
B = 132 mm
A
B
Fig. 2
Fig. 1

138-NO132A_Rev00_2020-11 Seite 3 von 3
w
ww.LSL.eu
In truction de montage et de écurité
Poignée de guidon "NOVA-RS" pour diamètre de guidon
7 / 8in (22.2mm)
Merci d'avoir acheté un produit LSL. Vou trouverez notre pa ion pour le motocycli me dan chacun de no produit LSL. Nou vou ouhaiton bonne route avec votre nouveau produit LSL de Paa chburg & Wunderlich GmbH.
Mention importante à lire avant le montage!
ATTENTION: Information de écurité importante . Si vou n'ête pa un mécanicien qualifié, contactez un atelier péciali é pour in taller le produit LSL. Le non-re pect de in truction d'in tallation peut endommager votre véhicule
et annuler la garantie. Aucune re pon abilité n'e t acceptée pour le dommage indirect . Le fabricant décline toute re pon abilité pour le dommage du à une mauvai e in tallation de produit LSL. Une mauvai e utili ation de ce
produit peut nuire à la écurité de la conduite. Une repri e et / ou un changement non autori é du produit LSL peut entraîner une défaillance de la fonction et n'e t pa autori é. Le modification tructurelle de pièce ont interdite
et entraînent une perte de re pon abilité et de demande de garantie. Veuillez con erver ce in truction pour référence future.
Contenu de la livrai on:
•1 paire de poignée de guidon
Montage de poignée de guidon:
1. Avant l'a emblage, a urez-vou que votre véhicule e t en po ition table.
Avant le montage, vérifiez le diamètre extérieur approprié du guidon ou le diamètre intérieur de poignée avec un un pied à couli e.
2. Démontez le embout de guidon exi tant et, i néce aire, le commande pour éviter le rayure lor de l'a emblage.
3. Le ancienne poignée eront démontée comme uit:
3.1 Utili ez un tournevi pour oulever l'extrémité de la poignée et ver ez une olution détergente ou le poignée . Un nettoyant pour frein peut être utili é pour le poignée en caoutchouc (poignée en caoutchouc uniquement).
Si vou ne ouhaitez plu utili er le ancienne poignée , vou pouvez le ouvrir avec un couteau. Il e t e entiel de 'a urer que le manchon de gaz rotatif n'e t pa endommagé, car il e t généralement en pla tique mince.
3.2 Faite gli er avec précaution la poignée hor du guidon.
4. Le montage Il e t plu facile avec le poignée chauffée . Faite tremper le poignée dan une olution eau / détergent tiède pendant quelque minute . ATTENTION: La olution 'évaporant trè lentement, la pri e totale de
poignée ur le guidon e t atteinte au plu tôt aprè 24 heure . L’utili ation d’un nettoyant pour frein facilitera l'enfilage. Le pièce tournée en aluminium re tent ur la poignée pour l'a emblage (Fig 2)!
5. Notez le différent diamètre intérieur de poignée (Fig. 1).
6. Montez tou le commande et embout de guidon préalablement retiré .
7. ATTENTION: vérifiez que le poignée ont olidement fixée au guidon et au tube d'accélérateur!
Le tube d'accélérateur doit pouvoir tourner librement et doit immédiatement revenir en po ition de ralenti lor que la poignée e t relâchée. Ni le commande ni le embout du guidon ne ralenti eront la rotation de la poignée!
8. ATTENTION: un accélérateur coincé affecte la écurité de conduite
Trouvez le poignée , embout de guidon, protecteur de levier , rétrovi eur Bar End et autre acce oire adapté dan notre boutique en ligne!
Exclu ion de re pon abilité et réglementation de la garantie :
En ca d'utili ation ou d'in tallation inappropriée du produit, toute le demande de garantie peuvent être annulée . En rai on de l’impo ibilité de contrôler l’utili ation appropriée du produit Paa chburg & Wunderlich GmbH exclu la re pon abilité de dommage direct ou indirect re pectivement dommage con écutif
ré ultant de l’utili ation du produit. Ceci n’e t pa valable i le dommage ré ulte de préméditation ou de négligence grave de la part de Paa chburg &Wunderlich GmbH ou en ca de dommage affectant la vie, le corp et/ou la anté ou une violation fautive d’une obligation contractuelle (obligation majeure) par Paa chburg
&Wunderlich GmbH.
Paa chburg & Wunderlich GmbH, Am Alten Lok chuppen 10a, D-21509 Glinde
Tel.: +49 (0) 40 248 277-0; E-Mail: ale @pwonline.de
Tou le droit ont ré ervé . Le modification et le erreur ont exceptée .
138
-
NO132A_Rev00_2020
-
11
Avant chaque voyage: Le conducteur a le devoir et la re pon abilité de contrôler et d'entretenir régulièrement le pièce du véhicule relative à la écurité. Avant de commencer votre voyage, vérifiez le réglage
et le fonctionnement correct de votre produit LSL ain i que le errage de tou le a emblage vi é .
Garantie: Prenez le temp de faire un travail 100% profe ionnel du montage de de votre produit LSL. Tenez compte de toute no in truction d’in tallation et de écurité.
Une in tallation incorrecte ou une manipulation inappropriée du produit annulera la garantie.
Maintien: Le produit LSL e nettoient parfaitement avec de l’eau tiède et quelque goutte de produit vai elle imple. Évitez le contact avec
le
liquide de frein
,
le produit de nettoyage pour frein, l’e ence
etc. E uyez le ouillure avec un chiffon doux et nettoyez la urface avec un peu de produit à vai elle dilué.
Information environnementale: Cet article ne doit pa être débarra é avec le déchet ménager . L’Élimination peut e faire par le ervice client de Paa chburg u. Wunderlich ou à traver le y tème de
re titution et de collecte locaux exi tant .
A = Ø 34 mm
B = 132 mm
A
B
Fig. 2
Fig. 1
Table of contents
Languages:
Other LSL Motorcycle Accessories manuals

LSL
LSL 130Y108 Install guide

LSL
LSL CLASSIC 555T109-Gv Technical manual

LSL
LSL 712D047 Series Install guide

LSL
LSL 377-500SW User manual

LSL
LSL 377-665SW User manual

LSL
LSL 460Y129 User manual

LSL
LSL 150T064 Install guide

LSL
LSL 153T055R Install guide

LSL
LSL 377-525SW User manual

LSL
LSL 150S127 Install guide