LW Scientific BioVID User manual

P. 770.270.1394 F. 770.270.2389 865 Marathon Parkway Lawrenceville GA 30046
Instruction Manual
BioVID HD 1080+ CameraBioVID HD 1080+ Camera
The BioVID HD 1080+ microscope camera does it all! Connect the camera to any trinocular microscope via
C-mount threading, and plug the HDMI cable into any large screen HDTV for amazing resolution and fast-action
video (60fps). Use the included USB cable and advanced imaging software to save and edit images and videos
on your computer. Or save images and videos to the included SD card for portability and future use. The BioVID
1080+ has 1920x1080 resolution, increased sensitivity, low-noise, and great color rendition – creating stunning,
high-resolution images with smooth live-image display. Whether in a large lecture hall, a classroom, the laborato-
ry, or the clinic, the BioVID HD 1080+ will ensure clients and students see microscope images clearly.
Unpacking and Setup
The BioVID HD 1080+ comes delivered in a box with the following parts. If any parts are missing, please contact
your distributor or LW Scientific promptly.
• HDMI cable
• 8G SD card
• Power adapter
• USB Mouse with 1.3m cable
• USB220-ATA l USB2.0 A cable - 2 meter
• CD with Camera Driver and Software
Please read and complete the warranty form online at LWScientific.com/warranty_form. The warranty form doc-
uments your purchase. Failure to fill out the warranty form may void any warranty claims on the unit.

P. 770.270.1394 F. 770.270.2389 865 Marathon Parkway Lawrenceville GA 30046
Setting Up Your Camera
Mounting camera to microscope:
Remove all camera components and set them on a secure, clean surface.
Next, take the camera out of the packaging. If your microscope or stereoscope has a trinocular head, simply
screw the camera onto the C-Mount. If you have a binocular scope, you will need the optional eye tube adapter
(part number MVP-ADAO-ETCM) to allow you to insert the camera into one of the binocular eye tubes....
Insert included SD card straight down into the SD card slot.
For HDMI output:
Once the camera is firmly mounted and secured onto the microscope, plug one end of the included HDMI cable
into the top of the camera and the other into your HD TV.
Connect the USB mouse to the USB port on the top of the camera.
Plug the included power cord into the DC12V port on the top of the camera.* The LED light on the top of the
camera will glow red. Next, press the ON/OFF button once to power on the camera. The LED light will change to
blue. Your camera is ready to use.
*DO NOT LEAVE POWER JACK PLUGGED IN FOR EXTENDED PERIODS OF TIME. Unplug jack when camera is not in use.
For USB output:
Install included software per instructions in the Software Installation section of this manual.
Remove the HDMI Cable and USB mouse and store in a safe place.
Plug one end of the included USB cable into the USB port on the top of the camera and the other into the USB 2
port of your computer.
Plug the included power cord into the DC12V port on the top of the camera.* The LED light on the top of the
camera will glow red. Next, press the ON/OFF button once to power on the camera. The LED light will change to
blue. Your camera is ready to use.
For Simultaneous HDMI and USB output:
Attach the HDMI cable to your HD TV and the USB cable to your computer.

P. 770.270.1394 F. 770.270.2389 865 Marathon Parkway Lawrenceville GA 30046
Remove the monitor from its packaging and mount the monitor to the camera’s front mounting bracket using the
included thumbscrew. Do not overtighten the thumbscrew but ensure you securely tighten it to prevent the moni-
tor from falling off of the camera.
Plug the power supply into the camera and monitor.
Note: The BioView Monitor includes a double-ended power cord. You can plug both the monitor and camera
into the two connectors, using only one power adapter for both devices.
If you wish to adjust the viewing angle of the monitor, loosen the thumbscrew on the back of the unit and then
adjust the screen to the desired angle. Note that the hinge point has teeth to allow the angle to be locked firmly
into position. After selecting the desired angle, retighten the thumbscrew to ensure the monitor does not move.
Failure to loosen the thumbscrew while adjusting the viewing angle can break the hinge.
BioVIEW Camera Monitor Instructions:
If you purchased the BioView Monitor for your camera, please follow the below steps to install the unit. If you did
not purchase the BioView Monitor, you can skip this section.
Before installing the monitor to your BioVID camera, install camera on your microscope’s trinocular C mount
threading.

Operation - HDMI Output
Place a slide on your microscope and bring the specimen into focus.
Make certain your BioVID HD 1080+ is installed according to the HDMI directions
above and that both the camera and TV are powered on. Toggle through the
“INPUT” settings on your TV to ensure that the correct HDMI port is selected. An
image will appear on the TV screen.
NOTE: If the edges of the image are cut off, make certain that your HDMI TV
supports 1920x1080 resolution.
Camera Control Panel: Move the USB mouse to the left side of the screen to
reveal the Camera Control Panel. (See the image.)
Plug the USB cable into the camera and into a 2.0-speed USB port on the com-
puter.
Start the ToupView software. The START PAGE may appear:
1
2
3
Click the Snap button to save the displayed image to the SD card.
Click the Record Button to save the displayed video to the SD card.
Exposure: Check the box labeled Auto Exposure to let the camera do the work. (You will still be able to adjust the
brightness of your image by moving the slider marked Exposure Target.) Uncheck the box to make the other
sliders active for manual adjustment of exposure.
White Balance Settings:
Global Auto WB: When this setting is chosen, the camera white balances automatically and continuously rejusts
as needed.
Manual WB: When this setting is chosen, the R and B sliders are available for adjustment.
ROI WB: When this setting is chosen, a blue rectangle will appear on the screen. (See image below.) Use the USB
mouse to drag the rectangle to an area on the image that is white. Turn the wheel on the mouse to adjust the
size of the rect angle. The camera will consider the area inside the rectangle as white for white balancing purpos-
es.
P. 770.270.1394 F. 770.270.2389 865 Marathon Parkway Lawrenceville GA 30046

Other settings such as Sharpness, Denoise, Saturation, Gamma, and Contrast can be adjusted by moving the
sliders.
Tool Bar: Move the USB mouse to the bottom of the TV Screen to reveal the icons below on the Tool Bar.
Digital zoom in function Digital zoom out function
Horizontally flip image Vertically flip the image
Freeze and resume
Side-by Side Comparison: When this button is selected, the right side of the screen will display the live
image and the left side of the screen will display the images saved to the SD card. Click on the saved image you
want to compare and the screen will display both images for Side-by-Side Comparison.
Cancel the comparison
Click the Browser function to view contents saved to the SD card and then select those for display.
Choose between red and green cross markings.
Insert CD into CD-ROM drive. Go to “My Computer” and view the files on the CD:
1
P. 770.270.1394 F. 770.270.2389 865 Marathon Parkway Lawrenceville GA 30046
Click “autorun” and the following screen will appear:
2
Software Installation

Select the location in which you want the software installed. Click “Install.”
3
4
Next, click “Install Application.” Follow the prompts in the Setup Wizard.
Not required, but for easy image organization, create a new folder named “BioVID Images” on your desktop next
to your ToupView icon. As images are saved, they will be easy to find in the image folder on the desktop. Other-
wise, images can be saved into any folder or client file on the computer or network.
Select “Toupview” icon.
Connect the camera to the computer using the included USB cable. Your computer should bring up a window
which reads, “Device driver software installed successfully.”
The software is now loaded, and the camera is ready to use.
Operation - USB Output
The Software should automatically install a short cut on either your desktop or on the start menu. If it does not, look
under “All Programs” in the START Menu, and find the LW Scientific folder. Open the software from there, or right
click on the icon, and send a shortcut to the desktop for easy access.
6
7
8
9
5When installation is completed, the following window will appear. Click “Finish.”
1
Install your camera per the instructions in Setting Up Your Camera Section:
Start the ToupView software.

P. 770.270.1394 F. 770.270.2389 865 Marathon Parkway Lawrenceville GA 30046
White Balance: Empty the microscope stage and turn on the light so the camera is viewing an empty illuminated
field. Then go to White Balance and click the “White Balance” button.
Most other settings are set to “auto” or to the best setting. Settings for Frame Speed Level or Flip Horizontal/Verti-
cal can be adjusted if needed.
Capture the image or several images by clicking on the “Snap” button. Capture videos by clicking on the Record
button once to begin records and then a second time to end recording.
Tabs for the captured images will appear across the top of the live view window. You can then rename and save
these to the appropriate folder on your computer. The images will appear behind the live view screen. Click on
the first tab, labeled “Video” and then the camera number, to return to the live view screen.
4
5
3
6
At this point, the screen should be showing a live image from the microscope. If not, look at the microscope head
and check if there is a pull knob that directs light up to the trinocular head.
Capture and Resolution: Use the drop-down boxes to select your resolution. Using maximum resolution will slow
down the capture rate but will produce larger images, while smaller resolution will allow faster motion while view-
ing specimens. See image under Step 5.
To begin capturing images, click on device (XCAM1080PHA) under “Camera List.”
2

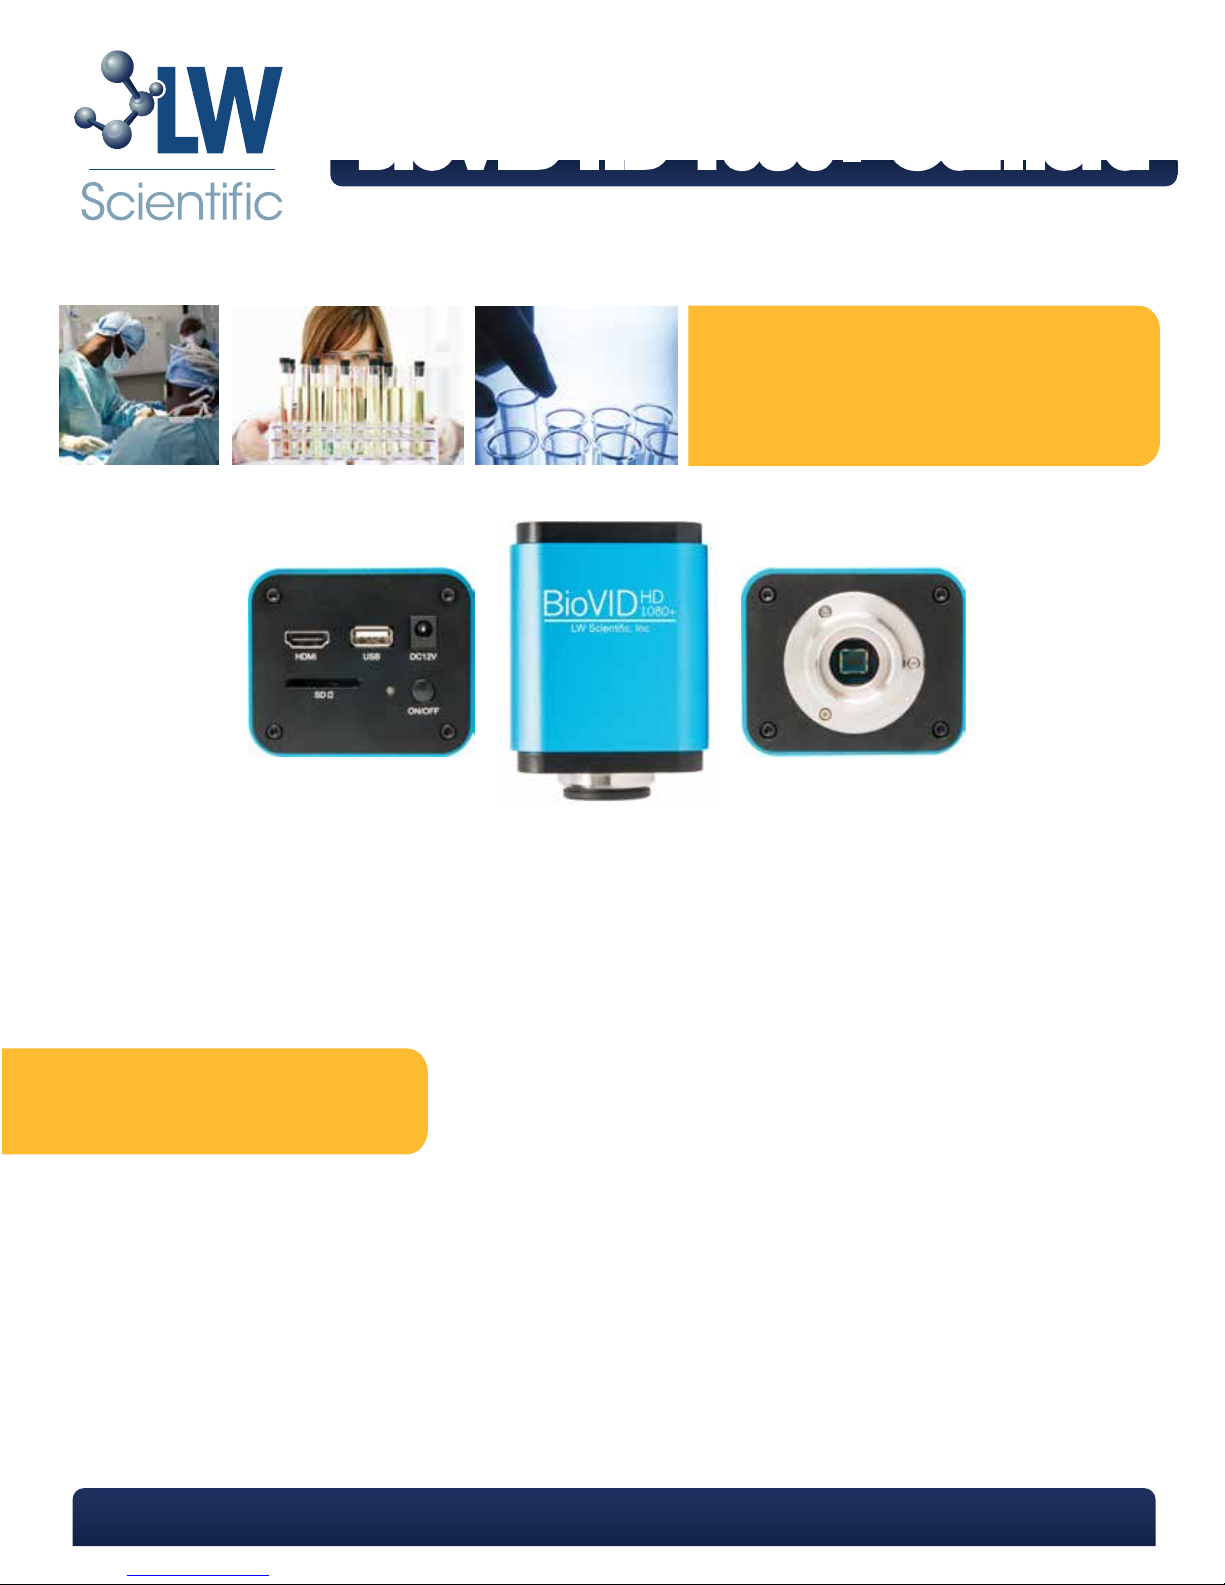
Resolution: 1920x1080
Image Sensor: 1 / 2.8” (5.5x3.4mm) Sony Imx236(C) CMOS Color
Pixel Size: 2.8um x 2.8um
Video Output: HDMI:
- User Interface: USB Mouse (Included)
- Image/Video Capture: SD Card
- Video: 60 Frames Per Second @ 1920x1080 (HDMI)
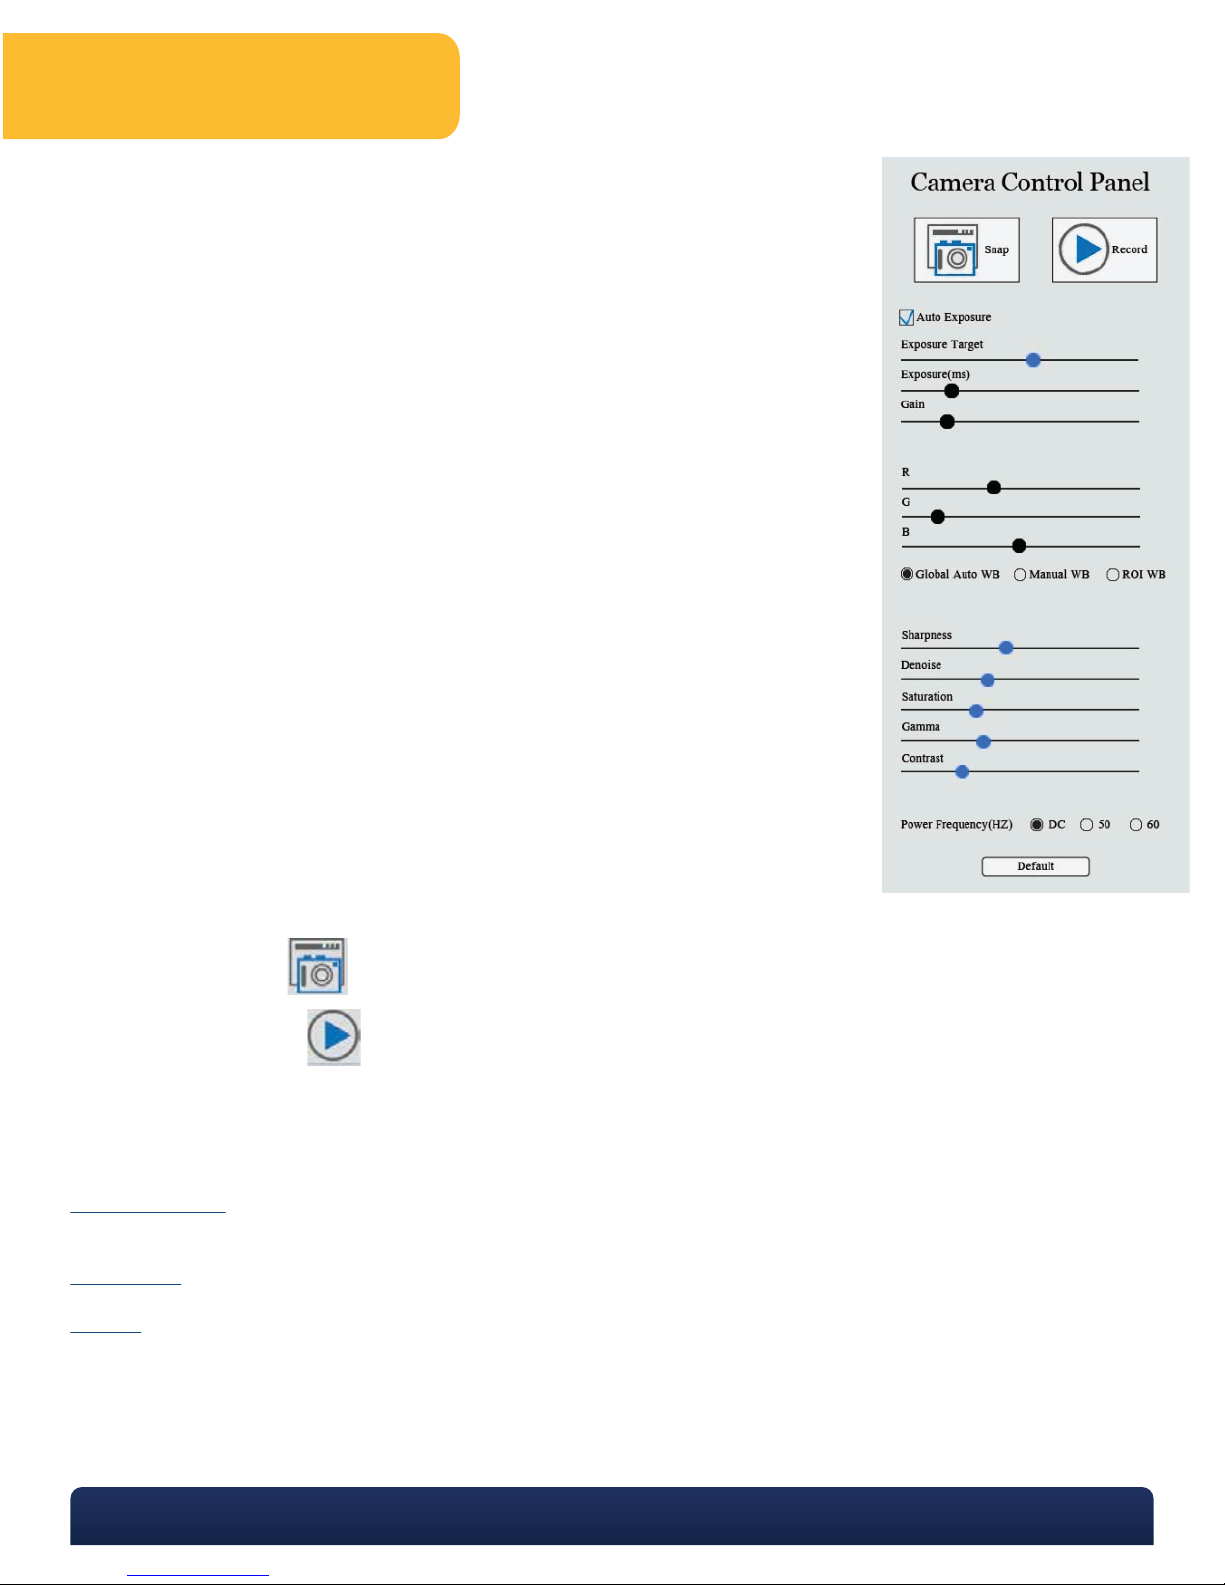
- On Screen-camera Control Panel And Toolbar
USB:
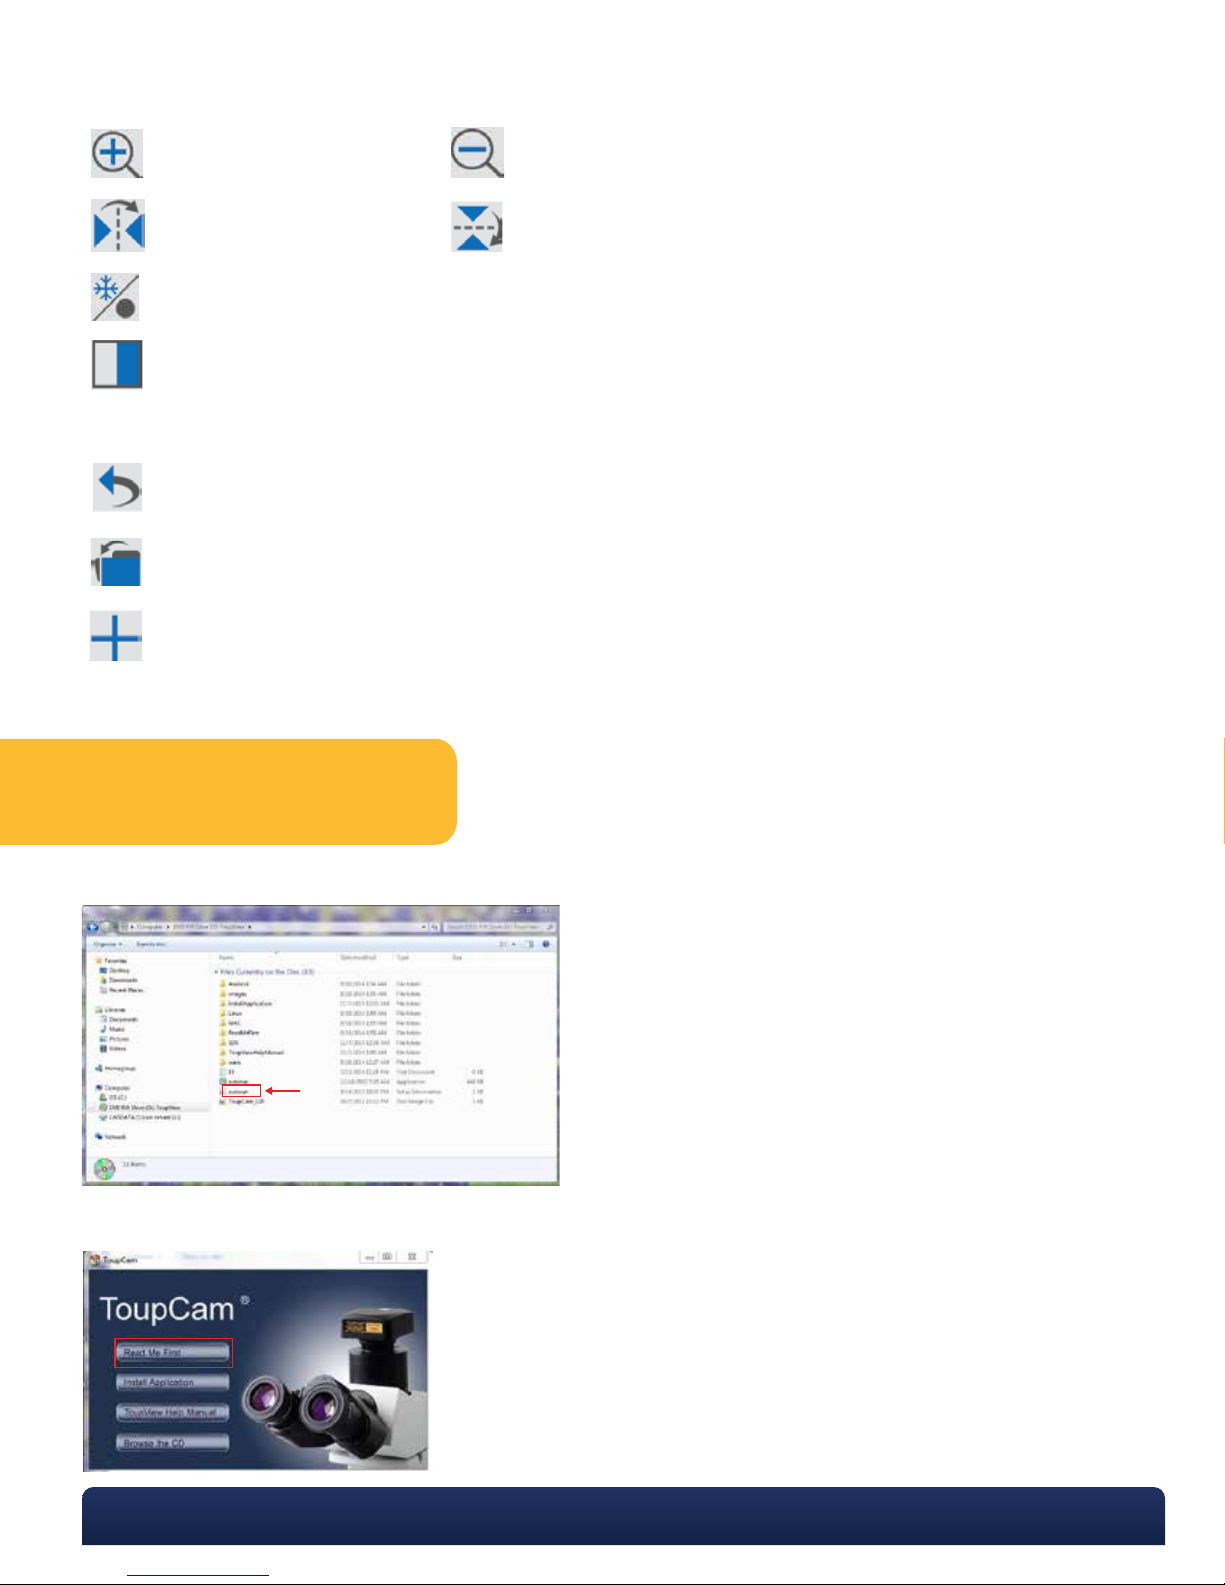
- Includes Software For Capturing, Rotating, Measuring, Etc.
- Image/Video Capture Into PC
- Image Capture Into Mac
- Video: 30 Frames Per Second @ 1920x1080 (USB)
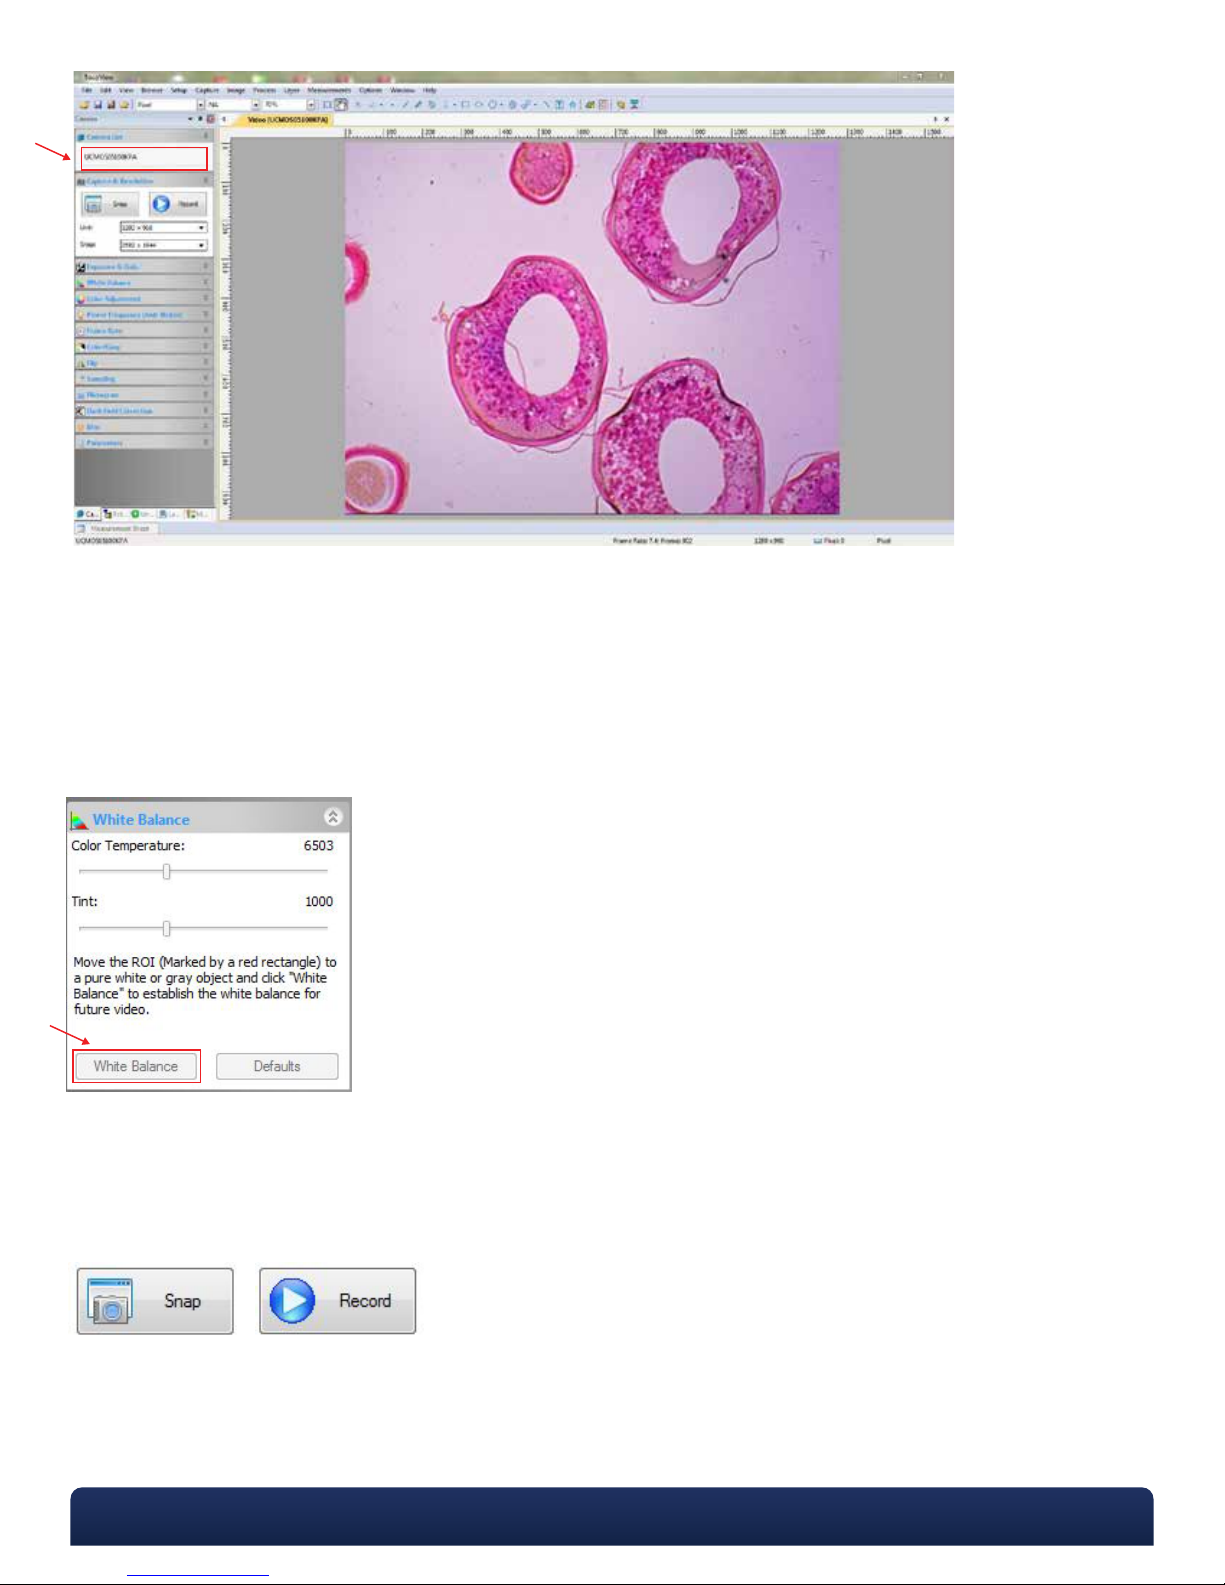
- White Balance And Standard Color Controls
Power: Cul / CE Approved Power Adapter
AC Input: 100-240Vac 50/60Hz, 0.31A (Auto-switching Power Adapter)
DC Output: 12v, 1.0 Amp
Operating Condition: Temperature: -10°C ~ 50°C (14°F To 122°F)
Humidity: 30-80%RH
Output: HDMI Connector
SD Card Slot
USB Connector
Weight and Dimensions: Height: 3.6” (92mm)
Length: 2.8” (70mm)
Width: 3.1” (78mm)
Weight: 1.03lbs. (0.47kg)
P. 770.270.1394 F. 770.270.2389 865 Marathon Parkway Lawrenceville GA 30046
MKT-7.5.3-L-188 | Rev 1
Treat your BioVID as you would any high-quality electronic device. Handle it with care, and do not expose it to
moisture or extreme temperatures.
Do not touch the chip inside the camera. If you see spots on the screen, there is likely dust on the chip. This can
be cleaned by blowing canned air into the camera.
Please do not attempt to open camera case. There are no user serviceable parts inside.
USB Conflicts: When there are a number of devices installed at the same time, unexpected errors can arise. The
cause can be insufficient USB bandwidth or too much combined current being drawn by USB devices. To test
these conditions you should uninstall and unplug as many other USB devices as possible.
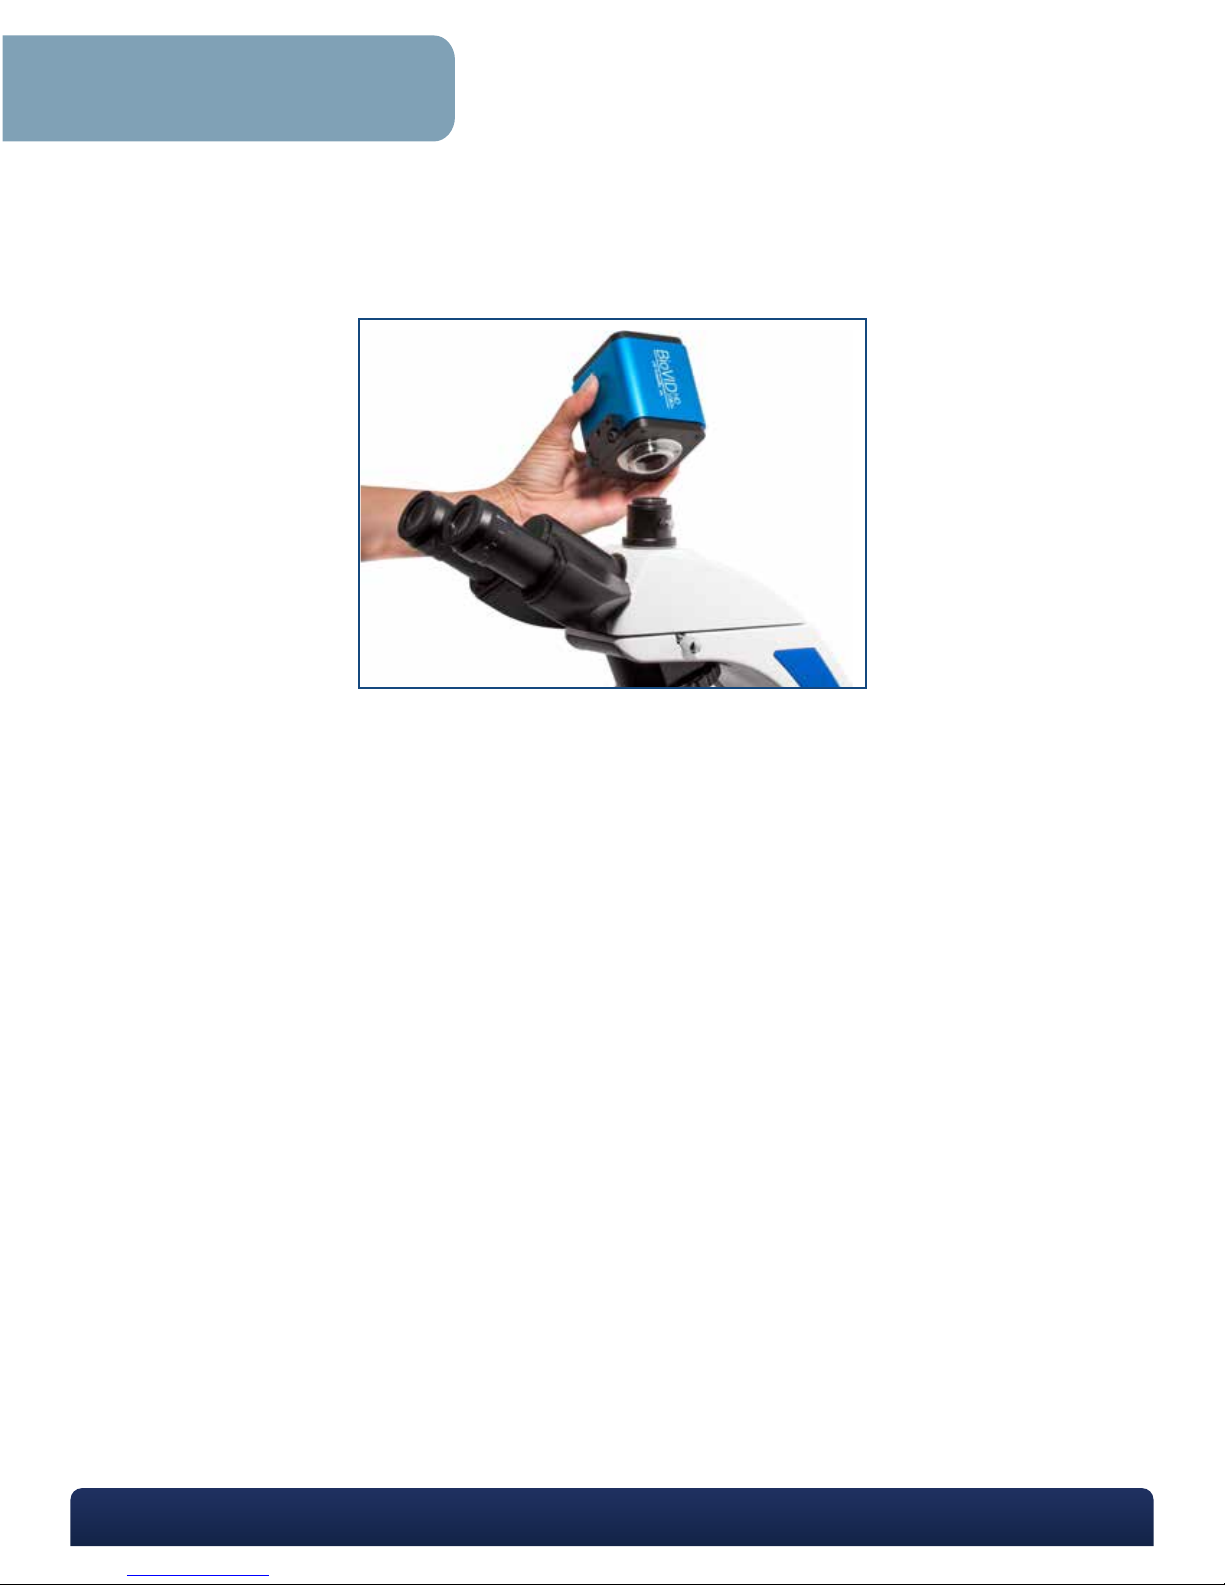
Image viewing problems: If you see only a black screen, ensure that the trinocular port is opened on the micro-
scope. Point the camera towards a window to confirm that the camera is functioning – light should appear on
the screen (though it will not focus when not installed on a microscope).
Computer does not recognize device: Make sure you have plugged into a USB 2.0 port. Always try to use the
same port each time; otherwise the computer will see the camera as a new device when plugged into a new
port. If this happens, just follow the wizard again and the camera will work on the new port as well.
Slow frame rate or frozen screen: Select smaller resolution settings. Depending on the age of the computer, the
video driver may not support the maximum resolution and speed performance capable by the BioVID camera.
General Precautions and Maintenance
Specifications
Table of contents
Other LW Scientific Laboratory Equipment manuals

LW Scientific
LW Scientific Digital Rotator User manual

LW Scientific
LW Scientific Digital Rotator User manual

LW Scientific
LW Scientific Zip-IQ TT User manual

LW Scientific
LW Scientific Combo V24T User manual

LW Scientific
LW Scientific MiniVID USB User manual

LW Scientific
LW Scientific BVC-4k16-CMT3 User manual

LW Scientific
LW Scientific ComboXL Centrifuge User manual

LW Scientific
LW Scientific ZIPocrit User manual

LW Scientific
LW Scientific CxR User manual

LW Scientific
LW Scientific ZIPspin User manual