manuals.online logo
Brands
  1. Home
  2. •
  3. Brands
  4. •
  5. M-system
  6. •
  7. Transmitter
  8. •
  9. M-system M5CT User manual

M-system M5CT User manual

5-2-55, Minamitsumori, Nishinari-ku, Osaka 557-0063 JAPAN
Phone: +81(6)6659-8201 Fax: +81(6)6659-8510 E-mail: info@m-system.co.jp
EM-2487 Rev.5 P. 1 / 2
INSTRUCTION MANUAL
BEFORE USE ....
Thank you for choosing M-System. Before use, please check
contents of the package you received as outlined below.
If you have any problems or questions with the product,
please contact M-System’s Sales Office or representatives.
■PACKAGE INCLUDES:
Signal conditioner ...............................................................(1)
■MODEL NO.
Confirm Model No. marking on the product to be exactly
what you ordered.
■INSTRUCTION MANUAL
This manual describes necessary points of caution when
you use this product, including installation, connection and
basic maintenance procedures.
POINTS OF CAUTION
■CONFORMITY WITH EU DIRECTIVES
• The equipment must be mounted inside a panel.
• Insert a noise filter for the power source connected to the
unit. TDK-Lambda Noise Filter Model RSAN-2006 or
equivalent is recommended.
• The actual installation environments such as panel con-
figurations, connected devices, connected wires, may af-
fect the protection level of this unit when it is integrated
in a panel system. The user may have to review the CE
requirements in regard to the whole system and employ
additional protective measures to ensure the CE conform-
ity.
■POWER INPUT RATING & OPERATIONAL RANGE
• Locate the power input rating marked on the product and
confirm its operational range as indicated below:
85 – 264V AC rating: 85 – 264V, 47 – 66 Hz, approx. 2 – 3VA
24V DC rating: 24V ±10%, approx. 2W
■GENERAL PRECAUTIONS
• Before you remove the unit or mount it, turn off the power
supply and input signal for safety.
■ENVIRONMENT
• Indoor use.
• When heavy dust or metal particles are present in the
air, install the unit inside proper housing with sufficient
ventilation.
• Do not install the unit where it is subjected to continuous
vibration. Do not subject the unit to physical impact.
• Environmental temperature must be within -5 to +55°C
(23 to 131°F) with relative humidity within 0 to 90% RH
in order to ensure adequate life span and operation.
■WIRING
• Do not install cables close to noise sources (relay drive
cable, high frequency line, etc.).
• Do not bind these cables together with those in which
noises are present. Do not install them in the same duct.
• Install lightning surge protectors for those wires connect-
ed to remote locations. For 24V DC power supply line,
choose a surge protector with its maximum surge voltage
40V or less between lines. Recommended M-System mod-
el: MDP-D24.
■AND ....
• The unit is designed to function as soon as power is sup-
plied, however, a warm up for 10 minutes is required for
satisfying complete performance described in the data
sheet.
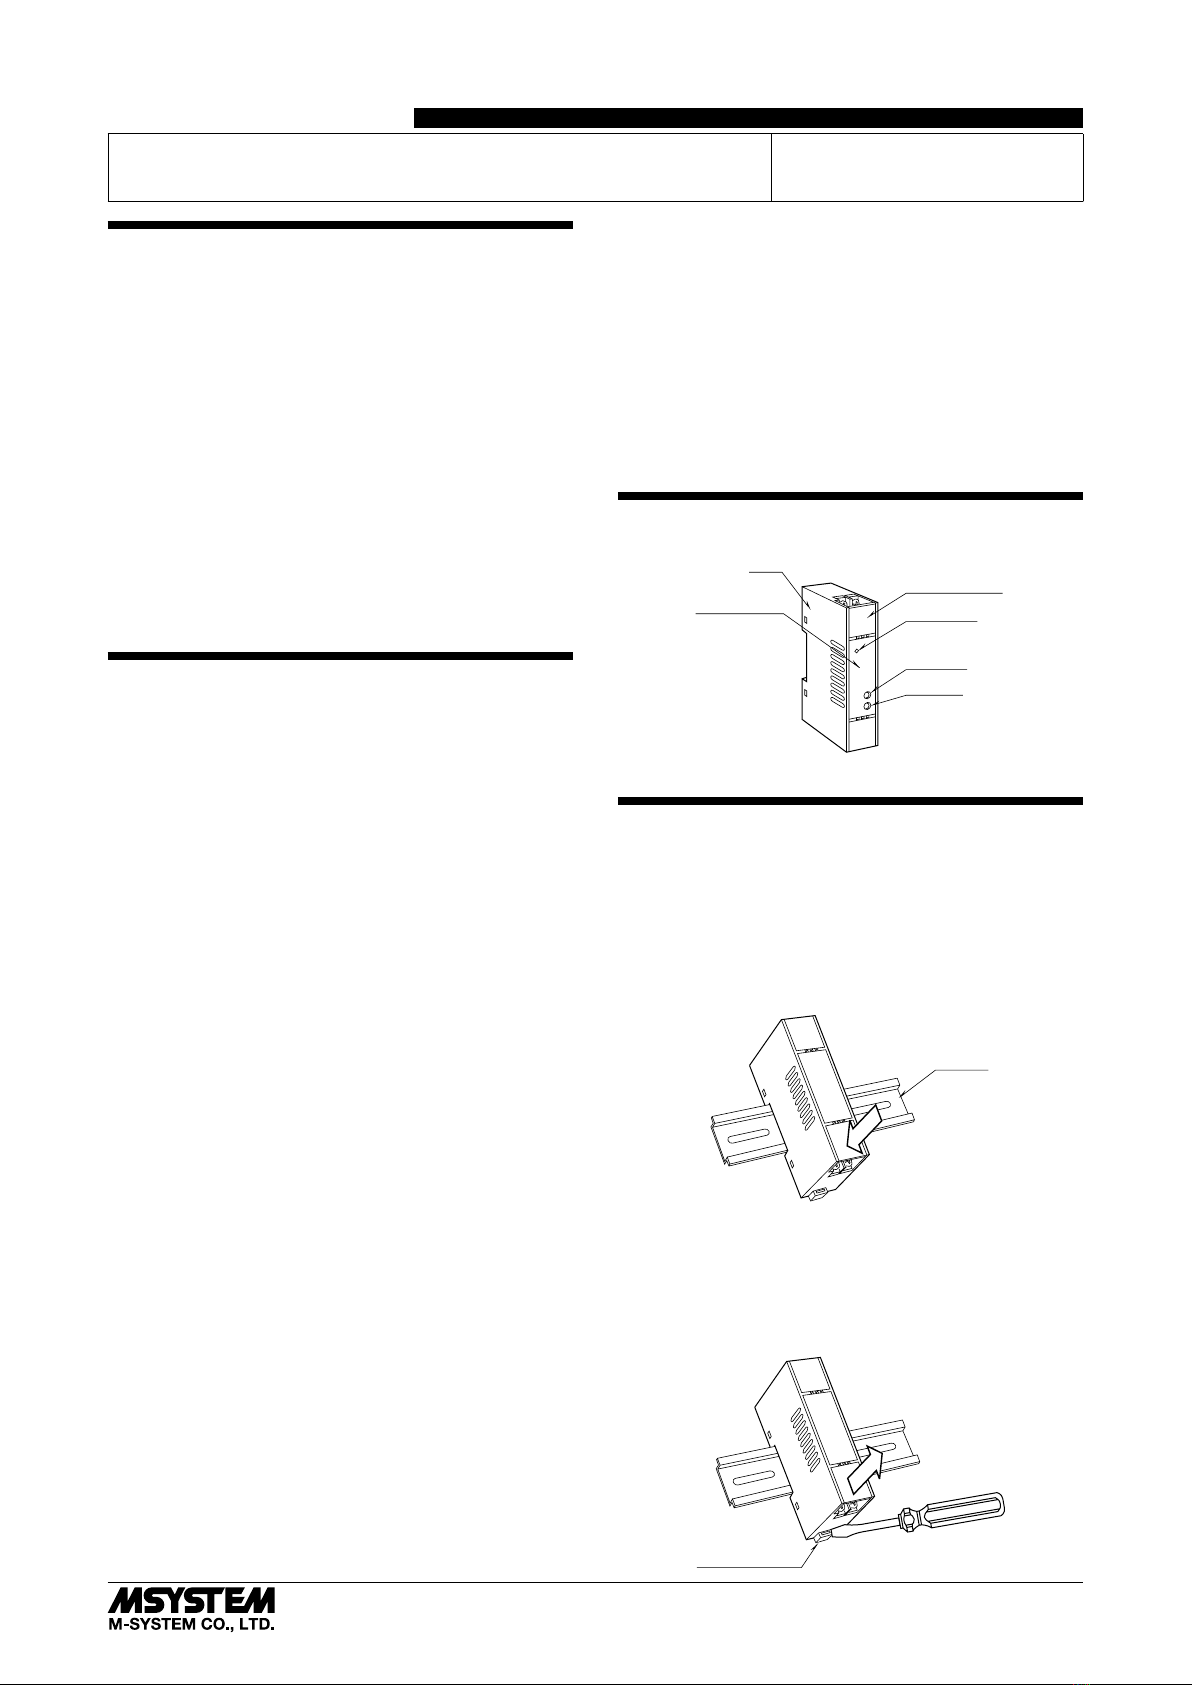
COMPONENT IDENTIFICATION
Specifications Power LED
Terminal Cover
Zero Adj.
Span Adj.
Body
INSTALLATION
Set the unit so that its DIN rail adapter is at the bottom.
■MOUNTING THE UNIT ON A DIN RAIL
A)Hang the upper hook at the rear side of unit on the DIN
rail.
B)Push in the lower in keeping pressing the unit to the DIN
rail.
A
B
DIN Rail
■REMOVING THE UNIT
A)Push down the DIN rail adaptor using a minus screw-
driver.
B)Pull out the lower part of the unit.
C)Remove the upper part from the DIN rail.
A
C
B
Spring Loaded
DIN Rail Adaptor
CT TRANSMITTER MODEL M5CT
M5CT
5-2-55, Minamitsumori, Nishinari-ku, Osaka 557-0063 JAPAN
Phone: +81(6)6659-8201 Fax: +81(6)6659-8510 E-mail: info@m-system.co.jp
EM-2487 Rev.5 P. 2 / 2
TERMINAL CONNECTIONS
Connect the unit as in the diagram below or refer to the
connection diagram on the front of the unit.
■EXTERNAL DIMENSIONS unit: mm (inch)
94 (3.70)3 (.12)
25 (.98) 41 (1.61) [3.3 (.13)]
• When mounting, no extra space is needed between units.
DIN RAIL
35mm wide
8–M3.5 SCREW
7.3 (.29)
12
34
56
78
■CONNECTION DIAGRAM
+
–
OUTPUT
5
6
LOAD
SOURCE
k
l
CT
L
K
3
4
8
7U(+)
V(–)
POWER
(A)
(±)
WIRING INSTRUCTIONS
■SCREW TERMINAL
Torque: 0.8 N·m
CHECKING
1) Terminal wiring: Check that all cables are correctly con-
nected according to the connection diagram.
2) Power input voltage: Check voltage across the terminal
7 – 8 with a multimeter.
3) Input: Check that the input signal is within 5 – 120% of
the full-scale.
Be sure to short the secondary side of CT or turn off the
current at its primary side for preventing the CT from
burning when the cables are to be disconnected from in-
put terminals.
4) Output: Check that the load resistance meets the de-
scribed specifications.
ADJUSTMENT PROCEDURE
This unit is calibrated at the factory to meet the ordered
specifications, therefore you usually do not need any cali-
bration.
For matching the signal to a receiving instrument or in case
of regular calibration, adjust the output as explained in the
following.
■HOW TO CALIBRATE THE OUTPUT SIGNAL
Use a signal source and measuring instruments of sufficient
accuracy level. Turn the power supply on and warm up for
more than 10 minutes.
1) ZERO: Apply 10% input and adjust output to 10%.
2) SPAN: Apply 100% input and adjust output to 100%.
3) Check ZERO adjustment again with 10% input.
4) When ZERO value is changed, repeat the above proce-
dure 1) – 3).
MAINTENANCE
Regular calibration procedure is explained below:
■CALIBRATION
Warm up the unit for at least 10 minutes. Apply 10%, 25%,
50%, 75% and 100% input signal. Check that the output
signal for the respective input signal remains within accu-
racy described in the data sheet. When the output is out of
tolerance, recalibrate the unit according to the “ADJUST-
MENT PROCEDURE” explained earlier.
LIGHTNING SURGE PROTECTION
M-System offers a series of lightning surge protector for
protection against induced lightning surges. Please contact
M-System to choose appropriate models.

Other M-system Transmitter manuals

M-system W5-UNIT User manual

M-system

M-system W5-UNIT User manual

M-system M2EXS User manual

M-system

M-system M2EXS User manual

M-system F2MS User manual

M-system

M-system F2MS User manual

M-system Mini-M M2EXT User manual

M-system

M-system Mini-M M2EXT User manual

M-system 10VF2 User manual

M-system

M-system 10VF2 User manual

M-system W2CFG User manual

M-system

M-system W2CFG User manual

M-system Mini-M M2RS User manual

M-system

M-system Mini-M M2RS User manual

M-system RB User manual

M-system

M-system RB User manual

M-system M3SMS User manual

M-system

M-system M3SMS User manual

M-system Mini-M M2VS User manual

M-system

M-system Mini-M M2VS User manual

M-system 10VS User manual

M-system

M-system 10VS User manual

M-system M5PA User manual

M-system

M-system M5PA User manual

M-system M5VS Series User manual

M-system

M-system M5VS Series User manual

M-system B5RS User manual

M-system

M-system B5RS User manual

M-system 6AC User manual

M-system

M-system 6AC User manual

M-system Mini-MW Series User manual

M-system

M-system Mini-MW Series User manual

M-system 6PA User manual

M-system

M-system 6PA User manual

M-system Mini-M M2CA User manual

M-system

M-system Mini-M M2CA User manual

M-system Mini-M M2REB User manual

M-system

M-system Mini-M M2REB User manual

M-system Mini-M M2TT User manual

M-system

M-system Mini-M M2TT User manual

M-system B5VS User manual

M-system

M-system B5VS User manual

M-system 10JPA User manual

M-system

M-system 10JPA User manual

M-system VOS2T User manual

M-system

M-system VOS2T User manual

M-system M5PA-CA-R User manual

M-system

M-system M5PA-CA-R User manual

Popular Transmitter manuals by other brands

Tele Radio SUPRATEQ TW78 User instruction

Tele Radio

Tele Radio SUPRATEQ TW78 User instruction

Burkert 8022 Series operating instructions

Burkert

Burkert 8022 Series operating instructions

CloviTek CloviFi installation guide

CloviTek

CloviTek CloviFi installation guide

Omega Engineering HX94 user guide

Omega Engineering

Omega Engineering HX94 user guide

PEHA 450 FU-SP 2 Installation and operating instructions

PEHA

PEHA 450 FU-SP 2 Installation and operating instructions

Honeywell PEHA 450 FU-HS128 manual

Honeywell

Honeywell PEHA 450 FU-HS128 manual

Honeywell STT700 SmartLine Safety manual

Honeywell

Honeywell STT700 SmartLine Safety manual

Monarch 295SEPC2K manual

Monarch

Monarch 295SEPC2K manual

Minicom 1VS22031 Quick installation guide

Minicom

Minicom 1VS22031 Quick installation guide

Audiovox ADDP1 Install & transmitter programming guide

Audiovox

Audiovox ADDP1 Install & transmitter programming guide

SenseAir aSENSE installation manual

SenseAir

SenseAir aSENSE installation manual

Denon Professional DN-202WT user guide

Denon

Denon Professional DN-202WT user guide

Crestron DM-TX-201-C Supplemental guide

Crestron

Crestron DM-TX-201-C Supplemental guide

Sony DWT-P01 operating instructions

Sony

Sony DWT-P01 operating instructions

Becker Centronic EC548 Plus Assembly and operating instructions

Becker

Becker Centronic EC548 Plus Assembly and operating instructions

TE-Group mr Handsfree FM301 Quick reference guide

TE-Group

TE-Group mr Handsfree FM301 Quick reference guide

Usl Ultra-Phonic UPC-1 instruction manual

Usl

Usl Ultra-Phonic UPC-1 instruction manual

Rockville DMX-WTR owner's manual

Rockville

Rockville DMX-WTR owner's manual

manuals.online logo
manuals.online logoBrands
  • About & Mission
  • Contact us
  • Privacy Policy
  • Terms and Conditions

Copyright 2025 Manuals.Online. All Rights Reserved.