manuals.online logo
Brands
  1. Home
  2. •
  3. Brands
  4. •
  5. M-system
  6. •
  7. Transmitter
  8. •
  9. M-system 10TG User manual

M-system 10TG User manual

Other M-system Transmitter manuals

M-system FSP User manual

M-system

M-system FSP User manual

M-system Mini-M M2XUM User manual

M-system

M-system Mini-M M2XUM User manual

M-system 10JPA User manual

M-system

M-system 10JPA User manual

M-system M3SXV User manual

M-system

M-system M3SXV User manual

M-system M3SXT User manual

M-system

M-system M3SXT User manual

M-system Mini-M M2XT2 User manual

M-system

M-system Mini-M M2XT2 User manual

M-system F2VS User manual

M-system

M-system F2VS User manual

M-system M3LV User manual

M-system

M-system M3LV User manual

M-system Mini-M M2DY User manual

M-system

M-system Mini-M M2DY User manual

M-system W2RS1 User manual

M-system

M-system W2RS1 User manual

M-system M5XCRS User manual

M-system

M-system M5XCRS User manual

M-system M2EXS User manual

M-system

M-system M2EXS User manual

M-system B3FV User manual

M-system

M-system B3FV User manual

M-system M5XPA User manual

M-system

M-system M5XPA User manual

M-system 10VS4 User manual

M-system

M-system 10VS4 User manual

M-system W2VABS User manual

M-system

M-system W2VABS User manual

M-system M1EXS-2 User manual

M-system

M-system M1EXS-2 User manual

M-system F2VF User manual

M-system

M-system F2VF User manual

M-system JPA2 User manual

M-system

M-system JPA2 User manual

M-system Mini-MW Series User manual

M-system

M-system Mini-MW Series User manual

M-system B5MS User manual

M-system

M-system B5MS User manual

M-system M5PA-CA-R User manual

M-system

M-system M5PA-CA-R User manual

M-system M2EXV User manual

M-system

M-system M2EXV User manual

M-system M6SCTC User manual

M-system

M-system M6SCTC User manual

Popular Transmitter manuals by other brands

Seneca K120RTD installation manual

Seneca

Seneca K120RTD installation manual

Nautel GV40 installation manual

Nautel

Nautel GV40 installation manual

HumanTechnik cm-light operating instructions

HumanTechnik

HumanTechnik cm-light operating instructions

INOR APAQ C130 TC User instructions

INOR

INOR APAQ C130 TC User instructions

Linear DXS-64 operating instructions

Linear

Linear DXS-64 operating instructions

FeinTech ABT00102 instruction manual

FeinTech

FeinTech ABT00102 instruction manual

Geo Web Pack quick start guide

Geo

Geo Web Pack quick start guide

Inovonics EchoStream EN1210W installation instructions

Inovonics

Inovonics EchoStream EN1210W installation instructions

IKONNIK KA-6 quick start guide

IKONNIK

IKONNIK KA-6 quick start guide

Rohde & Schwarz SR8000 Series System manual

Rohde & Schwarz

Rohde & Schwarz SR8000 Series System manual

Audio Technica UniPak ATW-T93 Installation and operation

Audio Technica

Audio Technica UniPak ATW-T93 Installation and operation

NIVELCO EasyTREK SCA-300 Series Programming manual

NIVELCO

NIVELCO EasyTREK SCA-300 Series Programming manual

Honeywell 5816WMBR installation instructions

Honeywell

Honeywell 5816WMBR installation instructions

Kamstrup READy MTU Installation and operation guide

Kamstrup

Kamstrup READy MTU Installation and operation guide

Omega ZW Series user guide

Omega

Omega ZW Series user guide

ABB Field 264H Instructions for installation

ABB

ABB Field 264H Instructions for installation

Dejero EnGo 3x manual

Dejero

Dejero EnGo 3x manual

Rosemount 4600 Reference manual

Rosemount

Rosemount 4600 Reference manual

manuals.online logo
manuals.online logoBrands
  • About & Mission
  • Contact us
  • Privacy Policy
  • Terms and Conditions

Copyright 2025 Manuals.Online. All Rights Reserved.

10TG
P. 1 / 2 EM-0839 Rev.6
INSTRUCTION MANUAL
MODEL 10TG
TACHOGENERATORTRANSMITTER
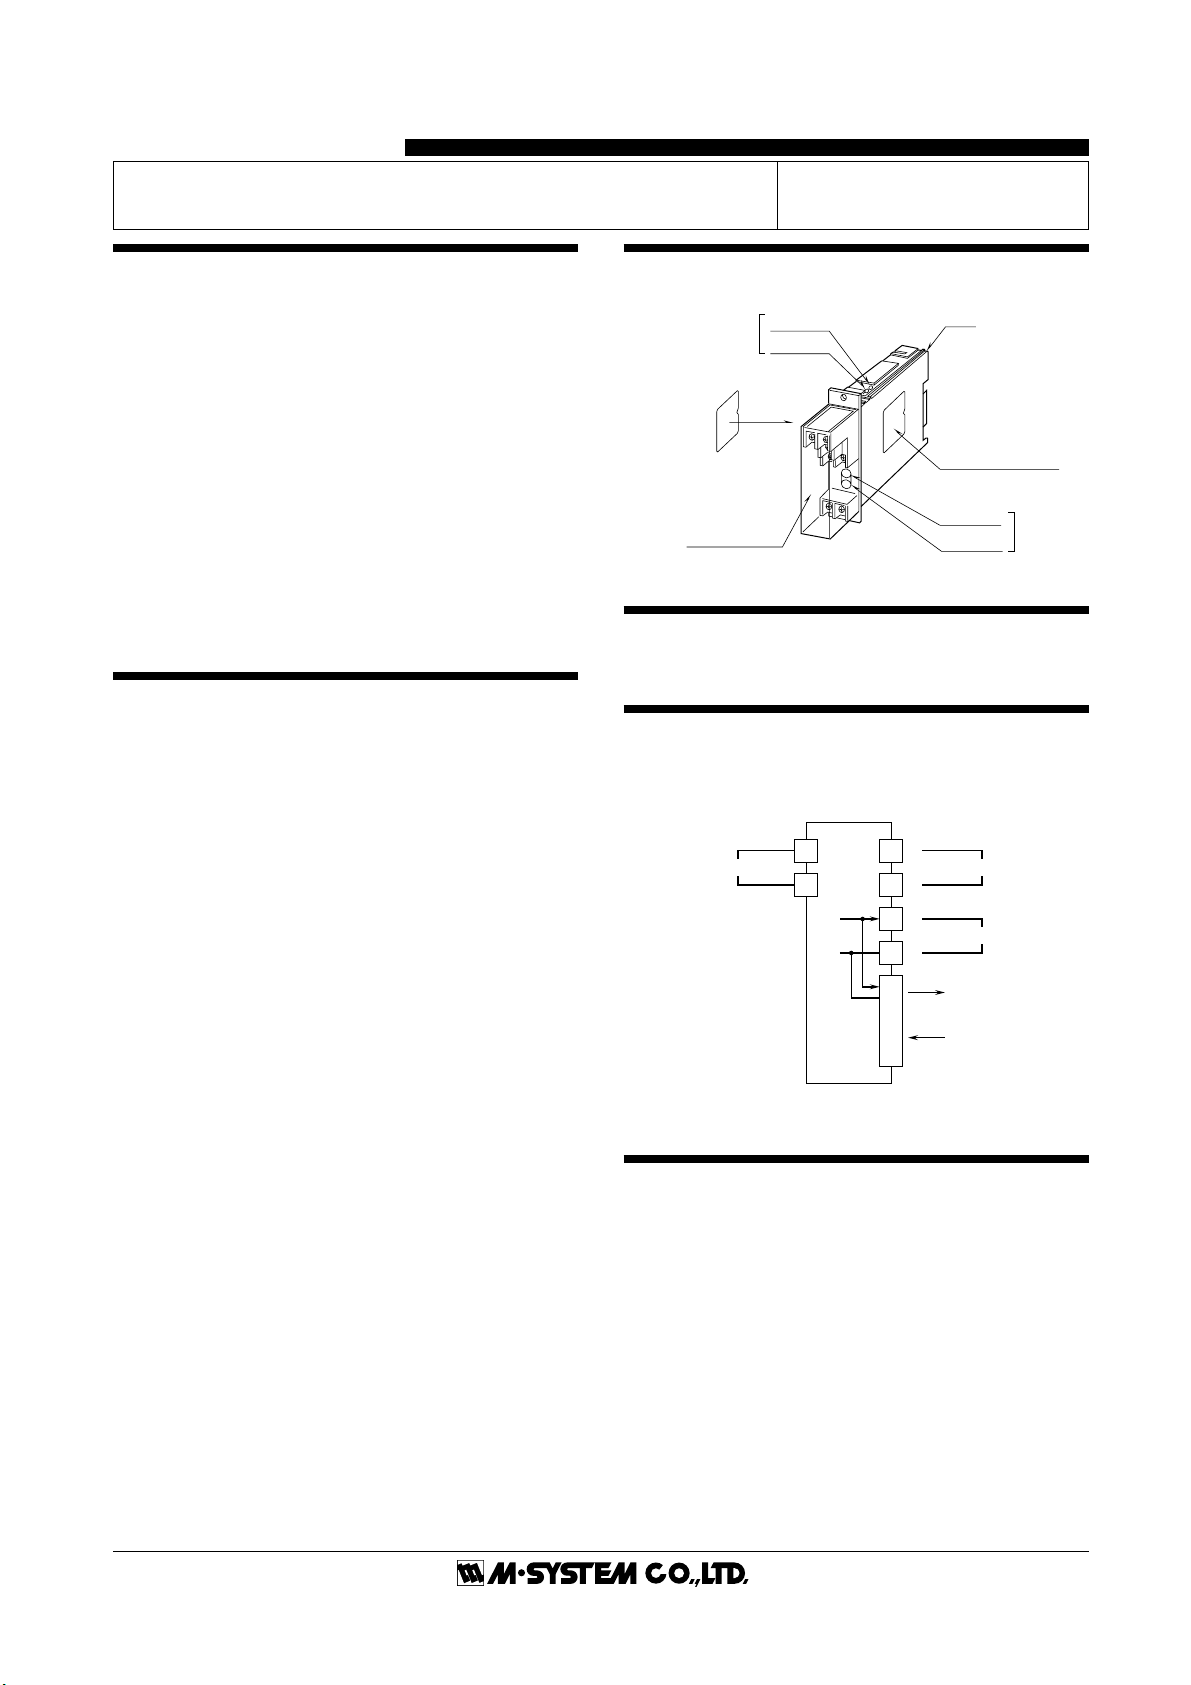
COMPONENT IDENTIFICATION
INSTALLATION
Use Standard Rack (model: 10BX❑).
TERMINAL CONNECTIONS
Connect the unit as in the diagram below or refer to the
connection diagram label on the unit side.
CHECKING
1) Terminal wiring: Check that all cables are correctly
connected according to the connection diagram.
2) Power input voltage: Check voltage supplied to the rack
(model: 10BX❑). For the DC power source, be sure that
the ripple level is within 10% p-p.
3) Input: Check that the input signal is within 0 – 100% of
the full-scale.
4) Output: Check that the load resistance meets the de-
scribed specifications.
Zero Adj.
Span Adj. Output 1
Body
Specification Label
Connection Diagram
Label
(side)
Zero Adj.
Output 2*Span Adj.
Terminal Cover
*Provided only when the second output is selected.
BEFORE USE ....
Thank you for choosing M-System. Before use, check the
package you received as below.
If you have any problems or questions with the product,
please contact M-System's Sales Office or representatives.
■ PACKAGE INCLUDES:
Signal conditioner ................................................... (1)
■ MODEL NO.
Check that model No. described on specification label is
exactly what you ordered.
■ INSTRUCTION MANUAL
This manual describes necessary points of caution when you
use this product, installation, connection and basic mainte-
nance procedures.
POINTS OF CAUTION
■ POWER INPUT RATINGS
• Power input ratings are specified by the model number
suffix code. Check the power input voltage for the unit on the
specification label.
24V DC ±10%, approx. 35mA with Voltage Output 1
approx. 55mA with Current Output 1
■ GENERAL
• Before you remove the unit or mount it, turn off the power
supply and input signal for safety.
■ ENVIRONMENT
• Indoor use
• When heavy dust or metal particles are present in the air,
install the unit inside proper housing and ventilate it.
• Do not install the unit where it is subjected to continuous
vibration. Do not apply physical impact to the unit.
• Environmental temperature must be within -5 to +55°C (23
to131°F)withrelativehumiditywithin30to90%RHinorder
to ensure adequate life span and operation.
■ WIRING
• Do not install cables (power supply, input and output) close
to noise sources (relay drive cable, high frequency line, etc.).
• Do not bind these cables together with those in which noises
are present. Do not install them in the same duct.
■ AND ....
• The unit is designed to function as soon as power is
supplied, however, a warm up for 10 minutes is required for
satisfying complete performance described in the data sheet.
INPUT
+
–
1
OUTPUT 1
2
7
8
+
–
OUTPUT 2
5
6
CONNECTOR
*1 output type has the output 1 connected to the
card-edge connector in parallel.
OUTPUT 2*
POWER
10TG
P. 2 / 2 EM-0839 Rev.6
ADJUSTMENT PROCEDURE
This unit is calibrated at the factory to meet the ordered
specifications, therefore you usually do not need any calibra-
tion.
For matching the signal to a receiving instrument or in case
of regular calibration, adjust the output as explained in the
following.
■ HOW TO CALIBRATE THE OUTPUT SIGNAL
Use a signal source and measuring instruments of sufficient
accuracy level. Turn the power supply on and warm up for
more than 10 minutes.
1) ZERO: Apply 0% input and adjust output to 0%.
2) SPAN: Apply 100% input and adjust output to 100%.
3) Check ZERO adjustment again with 0% input.
4) When ZERO value is changed, repeat the above procedure
1) – 3).
5) Go through the same procedure for Output 2. Extender
Card (model: 10EC) is required to access the Output 2
Adjustments on top of the unit maintaining electrical
connection at the rear connector.
EXTERNAL DIMENSIONS mm (inch)
130 (5.12)
3 (.12)
50 (1.97)
82 (3.23)
2–4.3 (.17) dia.
MTG HOLE TERMINAL COVER
7–M3.5 SCREW
8 (.31)
91 (3.58)
99 (3.90 )
25 (.98)
12
3
56
78
MAINTENANCE
Regular calibration procedure is explained below:
■ CALIBRATION
Warm up the unit for at least 10 minutes. Apply 0%, 25%,
50%, 75% and 100% input signal. Check that the output
signal for the respective input signal remains within accu-
racy described in the data sheet. When the output is out of
tolerance, recalibrate the unit according to the "ADJUST-
MENT PROCEDURE" explained earlier.
M-SYSTEM WARRANTY
M-System warrants such new M-System product which it manufactures to be free from defects in materials and workmanship during the 36-month period following the date that such
productwasoriginallypurchasedifsuchproducthasbeenusedundernormaloperatingconditionsandproperlymaintained,M-System'ssoleliability,andpurchaser'sexclusiveremedies,
under this warranty are, at M-System's option, the repair, replacement or refund of the purchase price of any M-System product which is defective under the terms of this warranty. To
submit a claim under this warranty, the purchaser must return, at its expense, the defective M-System product to the below address together with a copy of its original sales invoice.
THIS IS THE ONLY WARRANTY APPLICABLE TO M-SYSTEM PRODUCT AND IS IN LIEU OF ALL OTHER WARRANTIES, EXPRESS OR IMPLIED, INCLUDING ANY IMPLIED
WARRANTIES OF MERCHANTABILITY OR FITNESS FOR A PARTICULAR PURPOSE. M-SYSTEM SHALL HAVE NO LIABILITY FOR CONSEQUENTIAL, INCIDENTAL OR
SPECIAL DAMAGES OF ANY KIND WHATSOEVER.
M-System Co., Ltd., 5-2-55, Minamitsumori, Nishinari-ku, Osaka 557-0063 JAPAN, Phone: (06) 6659-8201, Fax: (06) 6659-8510, E-mail: [email protected]