MA grandMA3 mode2 User manual

Version 3.9 | 2022-05-10 English
1 of 2

© 2022 MA Lighting Technology GmbH - Dachdeckerstr. 16 - 97297 Waldbüttelbrunn - Germany
Phone +49 5251 688865-30 - support@malighting.com - www.malighting.com
1
1. 3
2. 4
2.1. 5
2.2. 9
2.3. 12
2.4. 13
2.5. 15
2.6. 18
3. 21
4. 23
5. 24
6. 26
Table of contents
What is Mode2?
Screen Layout
Screen 1
Screen 2
Screen 3
External Screens
Command Screens
Letterbox Screens
grandMA3 Settings
Version Specification
Change Modes
Index
2 of 26
grandMA2 User Manual
Version 3.9 – 2022-05-10
English

© 2022 MA Lighting Technology GmbH - Dachdeckerstr. 16 - 97297 Waldbüttelbrunn - Germany
Phone +49 5251 688865-30 - support@malighting.com - www.malighting.com
1
1. What is Mode2?
The grandMA3 Mode2 is used to run the grandMA2 software on a grandMA3 console.
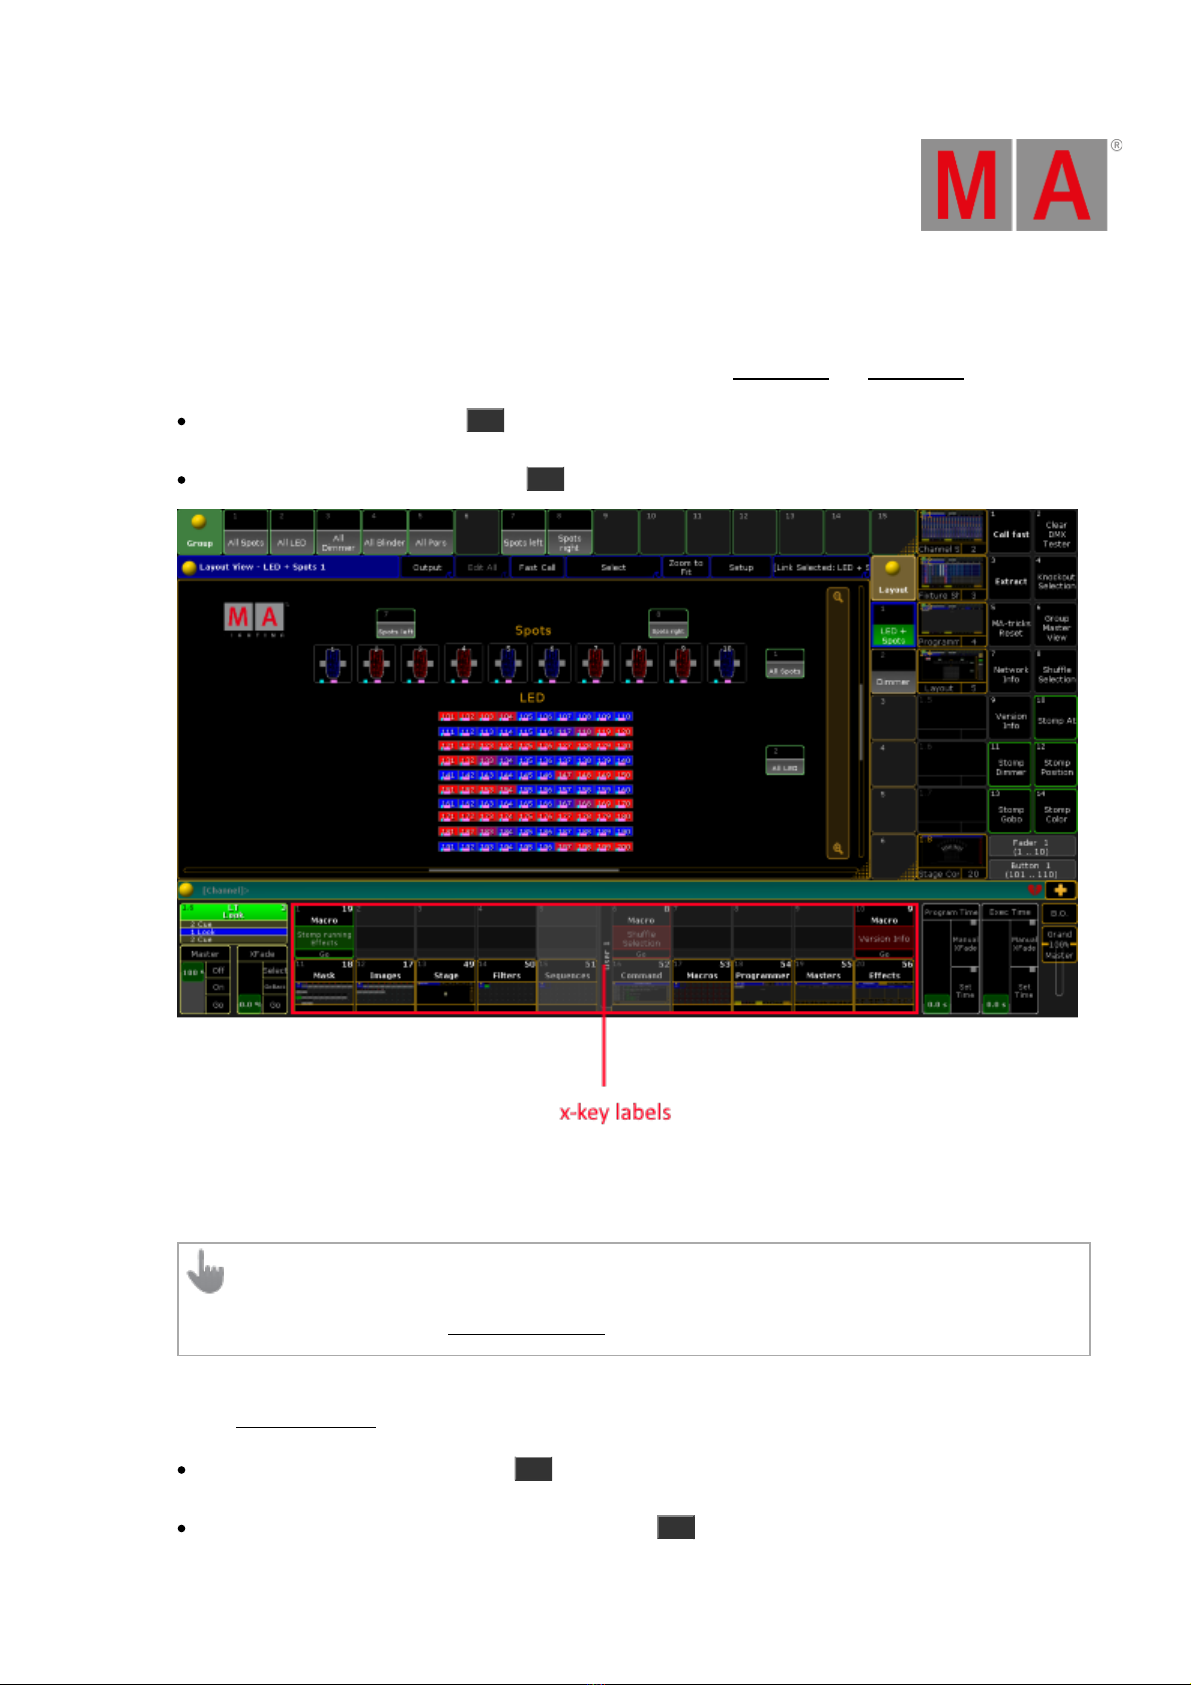
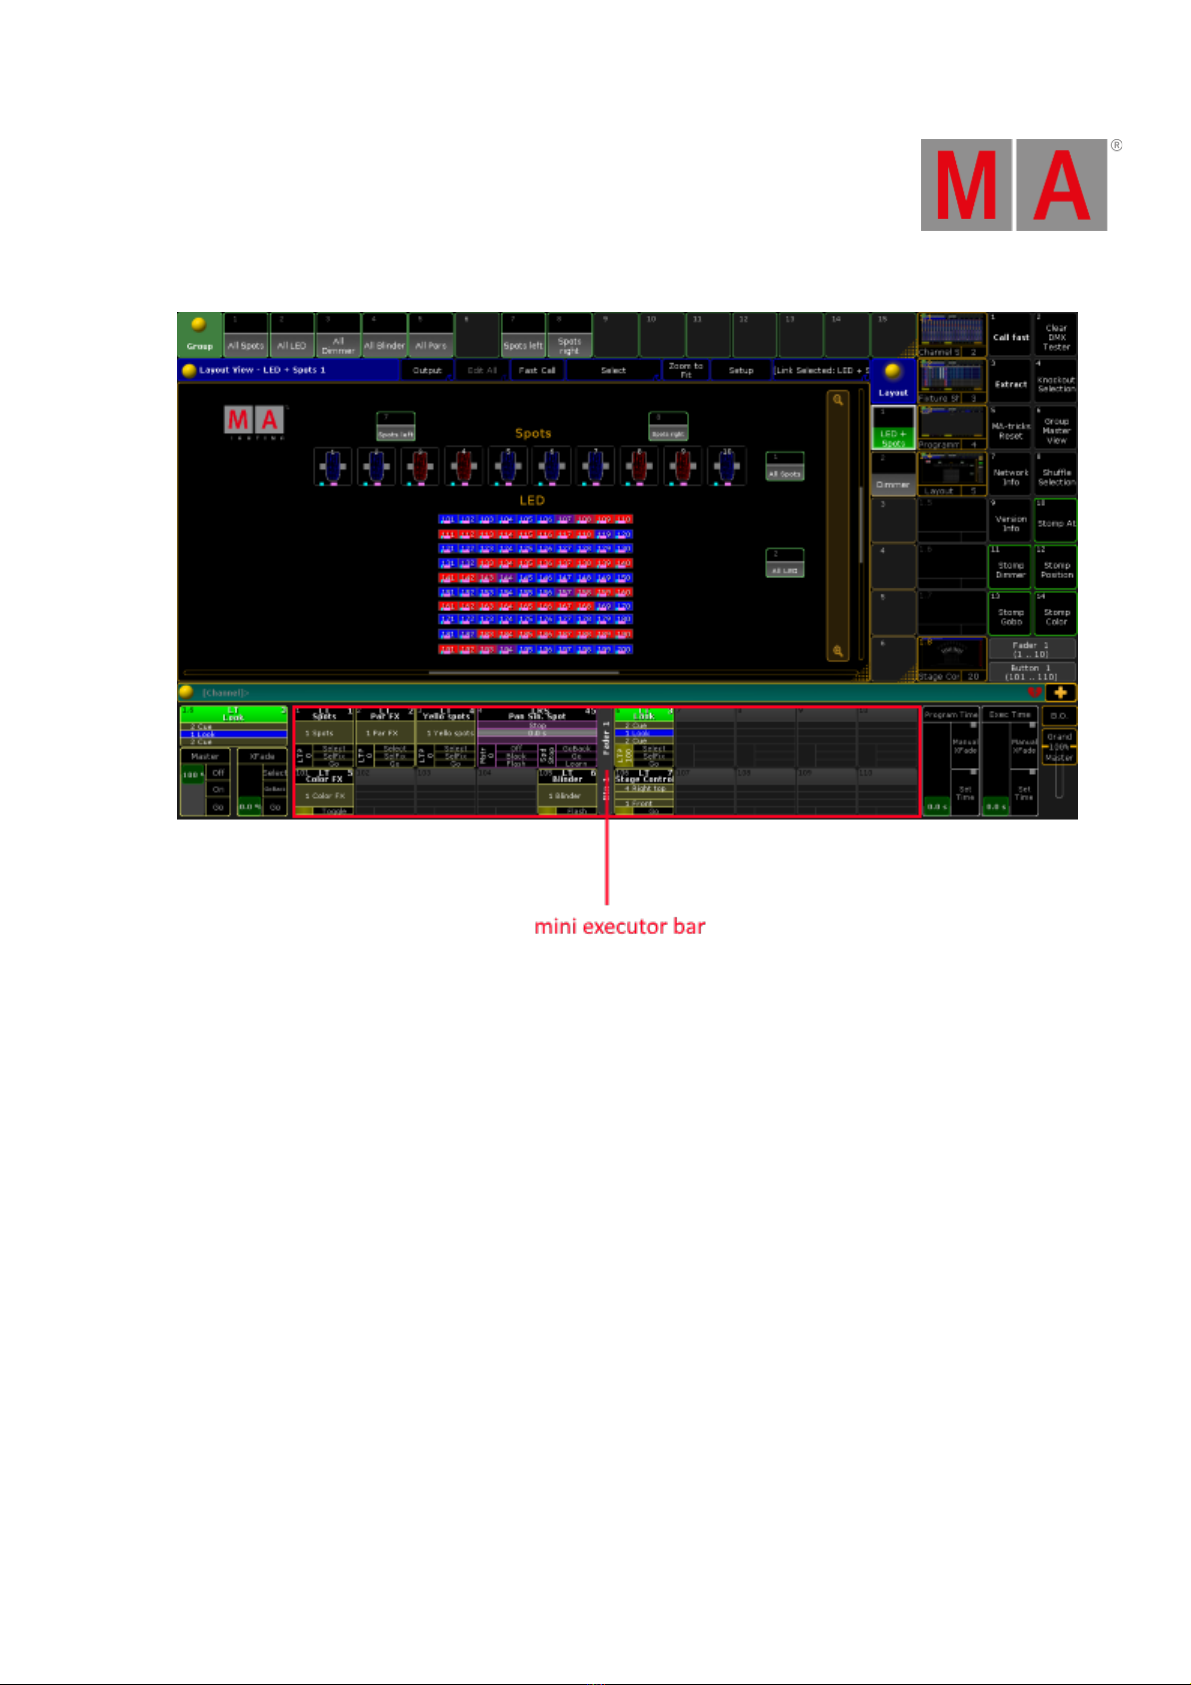
As the grandMA3 console has a different physical layout compared to the grandMA2, the display of windows
and bars, and pool objects also differs in Mode2.
The grandMA3 full-size (CRV), the light (CRV), the compact XT, the compact, the replay unit, and the xPort nodes
feature Mode2, which runs the native grandMA2 software version 3.4 and later.
Restriction:
Some of the sections and buttons of the grandMA3 console are not assigned in Mode2.
These are:
- Executor knobs in the executor section.
- Upper and lower encoders along with the upper and lower encoder buttons 1 to 3 in the custom
section.
-Master knobs 1 to 2 and master buttons 1 to 2 in the master section.
-In grandMA3 CRV versions always connect the screens subsequently starting with DisplayPort 1.
-In grandMA3 CRV versions use at least one Full HD display and a touch display or a mouse.
-All displays have to have a Full HD resolution of 1 920 x 1 080.
3 of 26
grandMA2 User Manual - What is Mode2?
Version 3.9 – 2022-05-10
English

© 2022 MA Lighting Technology GmbH - Dachdeckerstr. 16 - 97297 Waldbüttelbrunn - Germany
Phone +49 5251 688865-30 - support@malighting.com - www.malighting.com
1
2. Screen Layout
If you run Mode2 on a grandMA3 full-size, compact, or a compact XT, the screen layout differs from the layout in
a grandMA2 full-size.
For more information on the differences in the screen layout see:
4 of 26
grandMA2 User Manual - Screen Layout
Version 3.9 – 2022-05-10
English

© 2022 MA Lighting Technology GmbH - Dachdeckerstr. 16 - 97297 Waldbüttelbrunn - Germany
Phone +49 5251 688865-30 - support@malighting.com - www.malighting.com
1
2.1. Screen 1
grandMA3 full-size
In a grandMA3 full-size screen 1 corresponds to screen 2 on a grandMA2 full-size console.
Screen layout of screen 1
1. Command line feedback – displays the history of commands at a glance.
2. Tools, Setup, Backup – allow fast access on the grandMA3 console.
The upper section – user-defined area and the command line – of screen 2 and the view buttons stay the
same.
Tools, Setup and Backup are also displayed in the Setup Menu. To access the Setup Menu on
the grandMA3 console, press Menu .
For more information on the upper screen see Screen Layout – Screen 2.
5 of 26
grandMA2 User Manual - Screen Layout
Version 3.9 – 2022-05-10
English

© 2022 MA Lighting Technology GmbH - Dachdeckerstr. 16 - 97297 Waldbüttelbrunn - Germany
Phone +49 5251 688865-30 - support@malighting.com - www.malighting.com
1
grandMA3 compact and compact XT
Important:
The grandMA3 compact only has screen 1 in the monitor wing.
Screen 1 in grandMA3 compact and compact TX
1. Macro Buttons – allow fast access on the grandMA3 compact and compact XT.
2. Fader and Button Pages – display current fader and button pages.
The upper section of the screen stays the same.
For more information on the upper screen see Screen Layout – Screen 2.
6 of 26
grandMA2 User Manual - Screen Layout
Version 3.9 – 2022-05-10
English

© 2022 MA Lighting Technology GmbH - Dachdeckerstr. 16 - 97297 Waldbüttelbrunn - Germany
Phone +49 5251 688865-30 - support@malighting.com - www.malighting.com
1
Various Bars in grandMA3 compact and compact XT
1. In grandMA3 compact XT, it is possible to toggle between the encoder bar and x-key labels:
To display the x-key labels, press U1 .
The key lits up.
To toggle back to the encoder bar, press U1 again.
Toggle x-key labels in grandMA3 compact XT
Important:
As default the x-keys X5, X6, X15 and X16 are grayed out as they do not exist on a grandMA3 console.
For more information see grandMA3 Settings.
2. In grandMA3 compact it is also possible to toggle between the encoder bar (or the x-key labels) and the
mini executor bar.
To display the mini executor bar, press U2 .
The key lits up.
To toggle back to the encoder bar (or x-key labels), press U2 .
7 of 26
grandMA2 User Manual - Screen Layout
Version 3.9 – 2022-05-10
English

© 2022 MA Lighting Technology GmbH - Dachdeckerstr. 16 - 97297 Waldbüttelbrunn - Germany
Phone +49 5251 688865-30 - support@malighting.com - www.malighting.com
1
Toggle mini executor bar in grandMA3 compact
8 of 26
grandMA2 User Manual - Screen Layout
Version 3.9 – 2022-05-10
English

© 2022 MA Lighting Technology GmbH - Dachdeckerstr. 16 - 97297 Waldbüttelbrunn - Germany
Phone +49 5251 688865-30 - support@malighting.com - www.malighting.com
1
2.2. Screen 2
grandMA3 full-size
Screen 2 corresponds to screen 3 on a grandMA2 console.
Screen layout of screen 2
1. Macro Buttons – allow fast access on the grandMA3 console.
2. Channel Page (+/-) – tap to execute the ChannelPage Keyword.
Fader Page (+/-) – tap to execute the FaderPage Keyword.
Button Page (+/-) – tap to execute the ButtonPage Keyword.
Hint:
It is possible to disable the macro buttons on screen 2 and 3. For more information see Setup.
9 of 26
grandMA2 User Manual - Screen Layout
Version 3.9 – 2022-05-10
English

© 2022 MA Lighting Technology GmbH - Dachdeckerstr. 16 - 97297 Waldbüttelbrunn - Germany
Phone +49 5251 688865-30 - support@malighting.com - www.malighting.com
1
Hint:
It is possible to execute FaderPage and ButtonPage in Mode2 using buttons of the grandMA3 console:
-To execute the FaderPage keyword, press Pg+ or Pg- .
-To execute the ButtonPage keyword, press and hold and press Pg+ or Pg- .
The upper section of the screen stays the same.
- User-Defined Area
- View Buttons
For more information on the upper screen see Screen Layout – Screen 3.
10 of 26
grandMA2 User Manual - Screen Layout
Version 3.9 – 2022-05-10
English

© 2022 MA Lighting Technology GmbH - Dachdeckerstr. 16 - 97297 Waldbüttelbrunn - Germany
Phone +49 5251 688865-30 - support@malighting.com - www.malighting.com
1
grandMA3 compact XT
In comparison with a grandMA3 full-size, some buttons and bars are relocated on screen 2 of a grandMA3
compact XT.
Screen 2 of grandMA3 compact XT
1. Macro Buttons
2. Channel Page (+/-)
Fader Page (+/-)
Button Page (+/-)
3. Mini Executor Bar
The fields 1 to 3 have the same functions as described in screen layout of a grandMA3 full-size.
For more information on the upper section of the screen see Screen Layout – Screen 3.
11 of 26
grandMA2 User Manual - Screen Layout
Version 3.9 – 2022-05-10
English

© 2022 MA Lighting Technology GmbH - Dachdeckerstr. 16 - 97297 Waldbüttelbrunn - Germany
Phone +49 5251 688865-30 - support@malighting.com - www.malighting.com
1
2.3. Screen 3
grandMA3 full-size
Screen 3 corresponds to screen 4 on a gandMA2 console.
Screen layout of screen 3
Macro Buttons – for more information see the macro buttons in screen 2.
The upper section stays the same as in screen 2.
12 of 26
grandMA2 User Manual - Screen Layout
Version 3.9 – 2022-05-10
English

© 2022 MA Lighting Technology GmbH - Dachdeckerstr. 16 - 97297 Waldbüttelbrunn - Germany
Phone +49 5251 688865-30 - support@malighting.com - www.malighting.com
1
2.4. External Screens
grandMA3 full-size
Screen 4 and screen 5 (external screens)
Important:
External screens must have a minimum resolution of 1920 x 1080.
Screens 4 and 5 are screens 5 and 6 on a grandMA2 console.
Screen layout of screens 4 and 5
13 of 26
grandMA2 User Manual - Screen Layout
Version 3.9 – 2022-05-10
English

© 2022 MA Lighting Technology GmbH - Dachdeckerstr. 16 - 97297 Waldbüttelbrunn - Germany
Phone +49 5251 688865-30 - support@malighting.com - www.malighting.com
1
Screen 4 and 5 stay the same as in the grandMA2 console.
For more information on theses screens see Screen Layout – Screen 5 and Screen 6.
14 of 26
grandMA2 User Manual - Screen Layout
Version 3.9 – 2022-05-10
English

© 2022 MA Lighting Technology GmbH - Dachdeckerstr. 16 - 97297 Waldbüttelbrunn - Germany
Phone +49 5251 688865-30 - support@malighting.com - www.malighting.com
1
2.5. Command Screens
grandMA3 full-size
Screen 6 – Right Command Screen
The Right Command Screen displays the familiar command section of a grandMA2 console.
Screen layout of screen 6
To toggle the screen to the trackpad, tap Trackpad .
The trackpad opens.
15 of 26
grandMA2 User Manual - Screen Layout
Version 3.9 – 2022-05-10
English

© 2022 MA Lighting Technology GmbH - Dachdeckerstr. 16 - 97297 Waldbüttelbrunn - Germany
Phone +49 5251 688865-30 - support@malighting.com - www.malighting.com
1
Toggle screen to trackpad
The trackpad has the same functions as the trackball on a grandMA2 console.
For more information on the usage of a trackball see Single User and Multi User Systems – User Settings.
Screen 7 – Left Command Screen
Screen 6 corresponds to screen 1 on a grandMA2 console.
16 of 26
grandMA2 User Manual - Screen Layout
Version 3.9 – 2022-05-10
English

© 2022 MA Lighting Technology GmbH - Dachdeckerstr. 16 - 97297 Waldbüttelbrunn - Germany
Phone +49 5251 688865-30 - support@malighting.com - www.malighting.com
1
Screen layout of screen 7
For more information on the areas of the left command screen follow the links below:
1. X-Key Labels
2. Command Line
3. User Defined Area
Important:
The grandMA3 console has 16 X-Keys compared to a grandMA2 console that has 20 X-Keys. The 4
grayed out X-Keys can still be operated via screen (see the screenshot of screen 7).
17 of 26
grandMA2 User Manual - Screen Layout
Version 3.9 – 2022-05-10
English

© 2022 MA Lighting Technology GmbH - Dachdeckerstr. 16 - 97297 Waldbüttelbrunn - Germany
Phone +49 5251 688865-30 - support@malighting.com - www.malighting.com
1
2.6. Letterbox Screens
grandMA3 full-size
Screen 8 (Letterbox Encoder Screen)
Important:
All letterbox screens are static and are only located on grandMA3 consoles.
Screen 8 or letterbox encoder screen is located below screen 1 and functions as its extension.
Screen layout of screen 8
1. Network – displays the devices that are currently in a session at a glance.
2. Encoder Bar – displays the preset control bar and the encoder toolbar.
3. Time Control – displays program time and exec time.
4. Grand Master – is displayed as a virtual fader.
5. B.O. – executes the Blackout keyword.
Screen 9 (Right Letterbox Executor Screen)
Screen 9 or right letterbox executor screen is located below screen 2 and functions as its extension.
Screen layout of screen 9
18 of 26
grandMA2 User Manual - Screen Layout
Version 3.9 – 2022-05-10
English

© 2022 MA Lighting Technology GmbH - Dachdeckerstr. 16 - 97297 Waldbüttelbrunn - Germany
Phone +49 5251 688865-30 - support@malighting.com - www.malighting.com
1
1. Executors on screen – screen 9 displays executors 16 to 30.
2. Master Section – is displayed on the right of the screen 9.
Screen 10 (Left Letterbox Executor Screen)
Screen 10 or left letterbox executor screen is located below screen 3 and functions as its extension.
Screen layout of screen 10
1. Executors on screen – screen 10 displays executors 1 to 15.
2. Time Control – controls Program Time and Exec Time.
Important:
On a grandMA3 full-size it is also possible to operate the Time Control in Mode2 using the Custom
Section.
Requirement:
grandMA3 full-size
Program Time:
1. To operate the on-screen fader of the Program Time, move Wheel 1.
2. To activate Manual X-Fade, press Wheel 1 Upper Button.
3. To activate Set Time, press Wheel 1 Lower Button.
Exec Time:
1. To operate the on-screen fader of the Exec Time, move Wheel 2.
2. To activate Manual X-Fade, press Wheel 2 Upper Button
3. To activate Set Time, press Wheel 2 Lower Button.
For more information on the Custom Section see Device Overview in the grandMA3 manual.
19 of 26
grandMA2 User Manual - Screen Layout
Version 3.9 – 2022-05-10
English

© 2022 MA Lighting Technology GmbH - Dachdeckerstr. 16 - 97297 Waldbüttelbrunn - Germany
Phone +49 5251 688865-30 - support@malighting.com - www.malighting.com
1
20 of 26
grandMA2 User Manual - Screen Layout
Version 3.9 – 2022-05-10
English
Table of contents
Other MA Lighting Equipment manuals
Popular Lighting Equipment manuals by other brands

Cooper Lighting
Cooper Lighting HALO Series installation instructions

Aihomestyle
Aihomestyle QS-PLT595X595 Installation and instruction manual

PATIOJOY
PATIOJOY HW70304 Assembly instructions

Hayward
Hayward Control Station owner's manual

SKYDANCE
SKYDANCE CXR-21A installation instructions

Smart Solar
Smart Solar 2150PKD-G quick start guide