MABIS 40-369-000 Manual

Guidebook
Model 40-369-000
lease read this guidebook
completely before operating this unit.
Your Nebulizer is intended for use in the treatment of asthma, COPD and other respiratory
ailments in which an aerosolized medication is required during therapy. Please consult with
your physician and/or pharmacist to determine if your prescription medication is approved for
use with this Nebulizer. This Nebulizer is intended for single patient use.
Federal (U.S.A.) law restricts this device to sale by, or on the order of, a licensed physician.
Eng ish • Spanish
TOLL-FREE CUSTOMER CARE HEL LINE:
1-800-622-4714
Monday - Friday 8:00 am - 4:30 pm CST
Digger Dog
Compressor Nebulizer
Digger DogTM
Digger Dog
Compressor Nebulizer
Digger DogTM

Index
Introduction...................... 2
Product Identification . . . . . . . . . . . . . . 3
Cautions ........................ 3-4
Cleaning Procedures . . . . . . . . . . . . . . 4
Changing the Air Filter . . . . . . . . . . . . . 4
Assembling Your Nebulizer. . . . . . . . . . 4-5
Operating Your Nebulizer . . . . . . . . . . . 5
Troubleshooting . . . . . . . . . . . . . . . . . . 6
Product Specifications . . . . . . . . . . . . . 7
Limited Five-Year Warranty
Your Digger Dog Nebulizer is guaranteed to be free of manufacturing defects for a period of five years
from the date of purchase under normal use, certain exclusions apply. All non-durable parts are
covered under a 1-year limited warranty. These parts include, but are not limited to: nebulizer, air tube,
angled mouthpiece, and childʼs mask. Air filters are not covered under this warranty. This limited
warranty does not apply to use in any clinical or commercial applications. If the unit fails to operate
during the five year period of the original registered purchaser, please call our Customer Care Help
Line at 800-622-4714 and we will try to resolve the issue as soon as possible. If MABIS Healthcare
determines that the unit failed to operate due to a manufacturing defect, the unit will be repaired or
replaced at the option of MABIS Healthcare. Repair or replacement of the unit is the sole remedy under
this limited warranty. This warranty gives you specific legal rights, which vary from state to state. As a
condition of this warranty, the enclosed warranty registration card must be completed and sent to us
within 10 days of the purchase date.
This Limited Warranty constitutes MABIS Healthcareʼs only responsibility and obligation to repair and/or
replace materials or components. We make no other express or implied warranties, arising by
operation of law or otherwise, or any warranty of merchantability or fitness for a particular use or
purpose whether or not the use or purpose has been disclosed to MABIS Healthcare in specifications,
drawings or otherwise, and whether or not MABIS Healthcareʼs products are specifically designed
and/or manufactured by MABIS Healthcare for the buyerʼs use or purposes, except for the limited
warranty stated above. MABIS will not be responsible for any indirect, incidental, special,
consequential, or punitive damages or other loss, including, but not limited to, damage to or loss of
other property or equipment and personal injuries, whether to purchaser or others. MABIS shall in no
event be liable to the purchaser for any amount in excess of the cost of repair and/or replacement of
the unit.
Toll-Free Information Line:
1-800-622-4714
Monday - Friday 8:00 am - 4:30 pm CST
2
Introduction
Your Compressor Nebu izer shou d be used
under the supervision of a icensed physi-
cian and/or a respiratory therapist.
Thank you for purchasing a Digger Dog
Compressor Nebulizer. With proper care
and use, your compressor will provide you
with many years of reliable treatments.
This unit operates on standard AC power.
Treatments are delivered quickly, safely
and conveniently making this unit ideal for
all ages.
We encourage you to thoroughly read this
guidebook to learn about the features of
your Nebulizer. Together with your
physician and/or respiratory therapist, you
can feel comfortable and confident knowing
that you are obtaining the most effective
inhalation treatments for your respiratory
condition.
IM ORTANT SAFEGUARDS
Note: Read all instructions carefully before use.
The following basic precautions are needed when using an electrical product:
Caution: Failure to read and observe all precautions could result in personal injury or
equipment damage.

roduct Identification
Cautions
roduct Cautions
Please use general safety precautions when
operating your Nebulizer.
This unit should be used only for (1) its
intended purpose as described in this
guidebook, and (2) with medications only
under the supervision and instruction of your
physician.
READ THE FOLLOWING BEFORE USING
• To avoid electrical shock: Keep unit away
from water • Do not handle the unit or
power cord with wet hands • Do not
immerse the unit in liquid • Do not use
while bathing • Do not reach for a unit that
has fallen into water – immediately unplug
the unit.
• Do not use the unit if it has any damaged
parts (including power cord or plug), if it
has been submersed in water or dropped.
Promptly call Customer Care for repair
information.
• The unit should not be used where
flammable gas, oxygen or aerosol spray
products are being used.
• Keep the air vents open. Do not place the
unit on a soft surface where the openings
can be blocked.
• If the medicine cup is empty, do not
attempt to operate the unit.
• If any abnormality occurs, discontinue use
until the unit has been examined and
repaired.
• The unit should not be left unattended
while plugged in.
• Do not tilt or shake the unit when in
operation.
• Disconnect the unit from the electrical
outlet before cleaning and after
each use.
• Do not use attachments unless
recommended by the manufacturer.
Operating Cautions
• Close adult supervision is highly
recommended when this unit is used by
children or invalids.
• Keep your eyes away from the output of
medication mist.
• The maximum capacity of the medicine
cup is 13cc and should not be overfilled.
• Do not use this unit while operating a
vehicle.
• If any discomfort or abnormality occurs,
stop using the unit immediately.
Storage Cautions
• Do not store the unit in direct sunlight,
high temperature or humidity.
• Keep the unit out of reach of small
children.
• Always keep the unit unplugged while not
in use.
3
Nebulizer
a) Cover
b) urple Jet
c) Medicine Cup
Angled Mouthpiece
Air Tube
Childʼs
Mask
Air Filter
& Cover
ower Cord
Air
Vents
Compressor
OWER
Switch
Nebulizer
Holder
Tube
Connector

Cleaning Cautions
• Check the air filter, Nebulizer, mouthpiece,
and any other optional components before
each use.
Dirty or worn parts should be replaced.
• Do not immerse the unit in water. It will
damage the unit.
• Disconnect the unit from the electrical
outlet before cleaning.
• Clean all necessary parts after each use
as instructed in this guidebook.
Cleaning rocedures
lease consult with your physician or
therapist prior to cleaning regarding the
use of commercial disinfectants and
appropriate cleaning methods.
Rinsing Technique
(Performed after each treatment):
1) Make sure that the POWER switch has
been turned to the “off” position and the
unit has been disconnected from the
power source.
2) Disconnect the air tube from
the base of the Nebulizer.
3) Gently twist and pull up on the
cover of the Nebulizer to open
and separate, Fig. 1.
4) Rinse the Nebulizer and com-
ponents with hot tap water.
5) Dry with clean towels or allow
to completely air dry.
6) Reassemble the Nebulizer and store the
parts in the Compressorʼs storage case.
Cleaning Technique
(Performed after the last treatment of the day
or before first time use):
1) Follow steps 1-4 under “Rinsing
Technique”.
2) Wash all Nebulizer parts, mouthpiece and
other optional components in warm water
and a mild detergent. Rinse in hot tap
water.
Note: For first time cleaning or after the unit
has been stored for an extended period of
time, thoroughly clean all components.
3) Prepare a vinegar/distilled water solution
of one part white vinegar to three parts
distilled water.
4) Submerge the rinsed parts in the vine-
gar/distilled water solution for 30 minutes.
5) Follow steps 4-6 under “Rinsing
Technique”.
Cleaning the Compressor
Unplug the unit from the power source
Wipe the compressor daily using a soft,
slightly water-moistened cloth.
Note: Any other form of cleaning or cleaning
agents may damage the finish on the unit.
Changing the Air Filter
It is important to change the air filter
approximately every 30 days or when the air
filter turns gray.
1) Lift up the air filter cover
by gently pulling forward,
Fig. 2.
2) Discard the gray air filter.
3) Replace with a new,
clean air filter.
4) Securely reattach the air
filter cover to the unit by
pressing down firmly.
Note: Air filters cannot be cleaned or
washed. Only Digger Dog air
filters can be used. Do not substitute
alternate material such as cotton. Do not
operate without an air filter.
Assembling Your Nebulizer
Follow the cleaning instructions in this
guidebook under “Cleaning Technique” prior
to using your nebulizer for the first time or
after it has been stored for an extended
period of time.
Remember: Always unplug the Compressor
and make sure the POWER switch is turned
to the “off” position before
cleaning, assembling and
before or after each use.
1) Place the Compressor
on a flat, stable surface
within reach, Fig. 3.
4
Fig. 1
Fig. 2
Fig. 3

2) Remove the contents (Nebulizer, mouth-
piece and air tube) from the tote carrying
bag.
3) Gently twist and pull straight up on the lid
of the Nebulizer to separate into two parts
(medicine cup and cover).
4) Make sure that the purple jet
is properly installed inside the
medicine cup. (The stem
inside the medicine cup
inserts into the tube of the
purple jet), Fig. 4.
5) Add the prescribed
amount of medication to
the medication cup, Fig. 5.
6) Reassemble the Nebulizer
by carefully twisting the
medicine cup and cover
together. Make sure that
the two parts fit securely.
Operating Your Nebulizer
Note: The
Nebulizer is
operable at up to a
45oangle.
1) Attach one end
of the air tube
connector to the
air stem, Fig. 6.
2) Carefully attach
the opposite end
of the air tubing
connector to the
stem at the base
of the Nebulizer,
Fig. 7.
3) Attach the
angled
mouthpiece or
mask to the top of the
Nebulizer, Fig. 8.
If using the optional tee adapter set,
a) Attach the tee adapter to the top
of the Nebulizer,
b) Connect one end of the tee
adapter to the straight mouthpiece
and the other to the extension
tube.
Note: The tee adapter is not needed
when using a mask.
4) Check that the POWER switch is in the
“off” position. Plug the power cord into a
main outlet.
5) Press the POWER switch to the “on”
position.
6) Start your treatment according to your
physicianʼs or therapistʼs instructions.
Note: The
nebulizer holder on
the side of the
compressor can be
used to support the
nebulizer during
treatments, Fig. 9.
7) Once the treatment is complete, press the
POWER switch to the “off” position and
unplug the power cord from the
outlet.
IM ORTANT!
The Compressor will automatically shut off if
it becomes overheated. If/when this
happens, immediately:
1) Press the POWER switch to the “off”
position.
2) Unplug the power cord from the outlet.
3) Allow the motor to cool for 30 minutes.
Before restarting the unit, make sure that the
air vents are not obstructed.
After Every Use
1) Unplug the unit from the power source.
2) Allow the unit to completely cool.
3) Carefully detach the air tubing from the
Nebulizer and pour out any remaining
medication.
4) Follow the cleaning procedures provided
in this guidebook.
5
Fig. 4
Fig. 5
Fig. 9
Fig. 6
Fig. 7
Fig. 8

6
Troubleshooting
If any abnormality occurs during use, please
check and correct the following:
Condition Correction
Unit does not Check the AC connection
operate when to the outlet.
POWER switch
is pressed.
No misting Check that there is
or low rate medication in the Nebulizer
of misting cup.
Check the Nebulizer for
damage.
Check the position of the
purple jet inside the
Nebulizer.
Make sure that air tube
and other components are
properly attached.
Check the air filter and
replace if necessary.
Check the air tube and
replace if necessary.
Replacement arts
Replacement parts are available through
your local retailer or they can be ordered by
mail. See separate replacement part list for
details.
Save These Instructions

Name and Model Number Digger Dog Compressor
Nebulizer, #40-369-000
Power AC 120VAC, 60Hz
Power Consumption 1.5A
Medicine Capacity 13cc
Particle Size 0.5 to 10 µm
MMAD 4 µm
Sound Level Less than 60 dBA at 1 meter
Motor Type Piston pump
Average Nebulization Rate 0.2ml/min
Compressor Pressure Range 29 to 43 Psi (200 to 300 Kpa/2.0 to 3 bar)
Operating Pressure Range 10 to 16 Psi (70 to 110 Kpa/0.7 to 1.1 bar)
Liter Flow Range 6 - 8 lpm
Operating Temperature Range 50.0°F to 104.0°F (10.0°C to 40.0°C)
Operating Humidity Range 10 to 95% RH
Storage Temperature Range -4.0oF to 158.0oF (-20.0°C to 70.0°C)
Storage Humidity Range 10 to 95% RH
Dimensions 8-3/4” x 5-3/8” x 9”
Weight 3.5 lbs. (1.6kg)
Standard Accessories Nebulizer, Air Tube, Angled Mouthpiece, Childʼs Mask
Air Filters (5)
Optional Accessories Angled mouthpiece kit, Tee adapter kit,
Baby pacifier inhaler kit, Child mask,
Childʼs dog mask, Childʼs elephant mask kit,
Air filters, Nebulizer, Air tubing
Specifications are subject to change without notice.
Protection against electric shock
Class II Equipment
Type BF applied parts:
- Mouthpiece, baby pacifier inhaler & mask.
Protection against harmful ingress of water
- IPX0 (Ordinary)
Degree of safety in the presence of flammable anesthetics or oxygen
- No AP/APG (Not suitable for use in the presence of flammable anesthetics or oxygen)
Mode of operation - continuous.
roduct Specifications
#91-032-369 06/10
©2010 Briggs Medical Service Company
7
1931 Norman Drive South • Waukegan, IL 60085
847-680-6811 • FAX 847-680-9646 • www.mabisdmi.com
Toll-Free Information Line:
1-800-622-4714
Monday - Friday 8:00 am - 4:30 pm CST

8
NOTES

Guía Detallada del
Nebulizador con Compresor
Modelo 40-369-000
Sírvase leer completamente esta guía
detallada antes de operar la unidad.
El Nebulizador tiene por finalidad usarse en el tratamiento de asma, EPOC (enfermedad pulmonar
obstructiva crónica) y otra afecciones repiratorias en las cuales se requiere un medicamento en aerosol
durante la terapia. Consulte con su médico y/o farmacéutico para determinar si el medicamento recetado ha
sido aprobado para usarse con este Nebulizador. Este Nebulizador es para uso de un paciente solo.
La ley federal (EE.UU.) restringe la venta de este dispositivo a médicos
matriculados o por orden de éstos.
Ing és • Españo
LÍNEA DE ASISTENCIA GRATUITA AL CLIENTE:
1-800-622-4714
El lunes - el viernes 8:00 es - 4:30 p.m. CST
Digger Dog
Compressor Nebulizer
Digger DogTM
Digger Dog
Compressor Nebulizer
Digger DogTM

10
Índice
Introducción.................... 10
Identificación del Producto. . . . . . . . . 11
Precauciones . . . . . . . . . . . . . . . . . . . 11-12
Procedimientos de Limpieza . . . . . . . 12
Cambio del Filtro de Aire . . . . . . . . . . 12
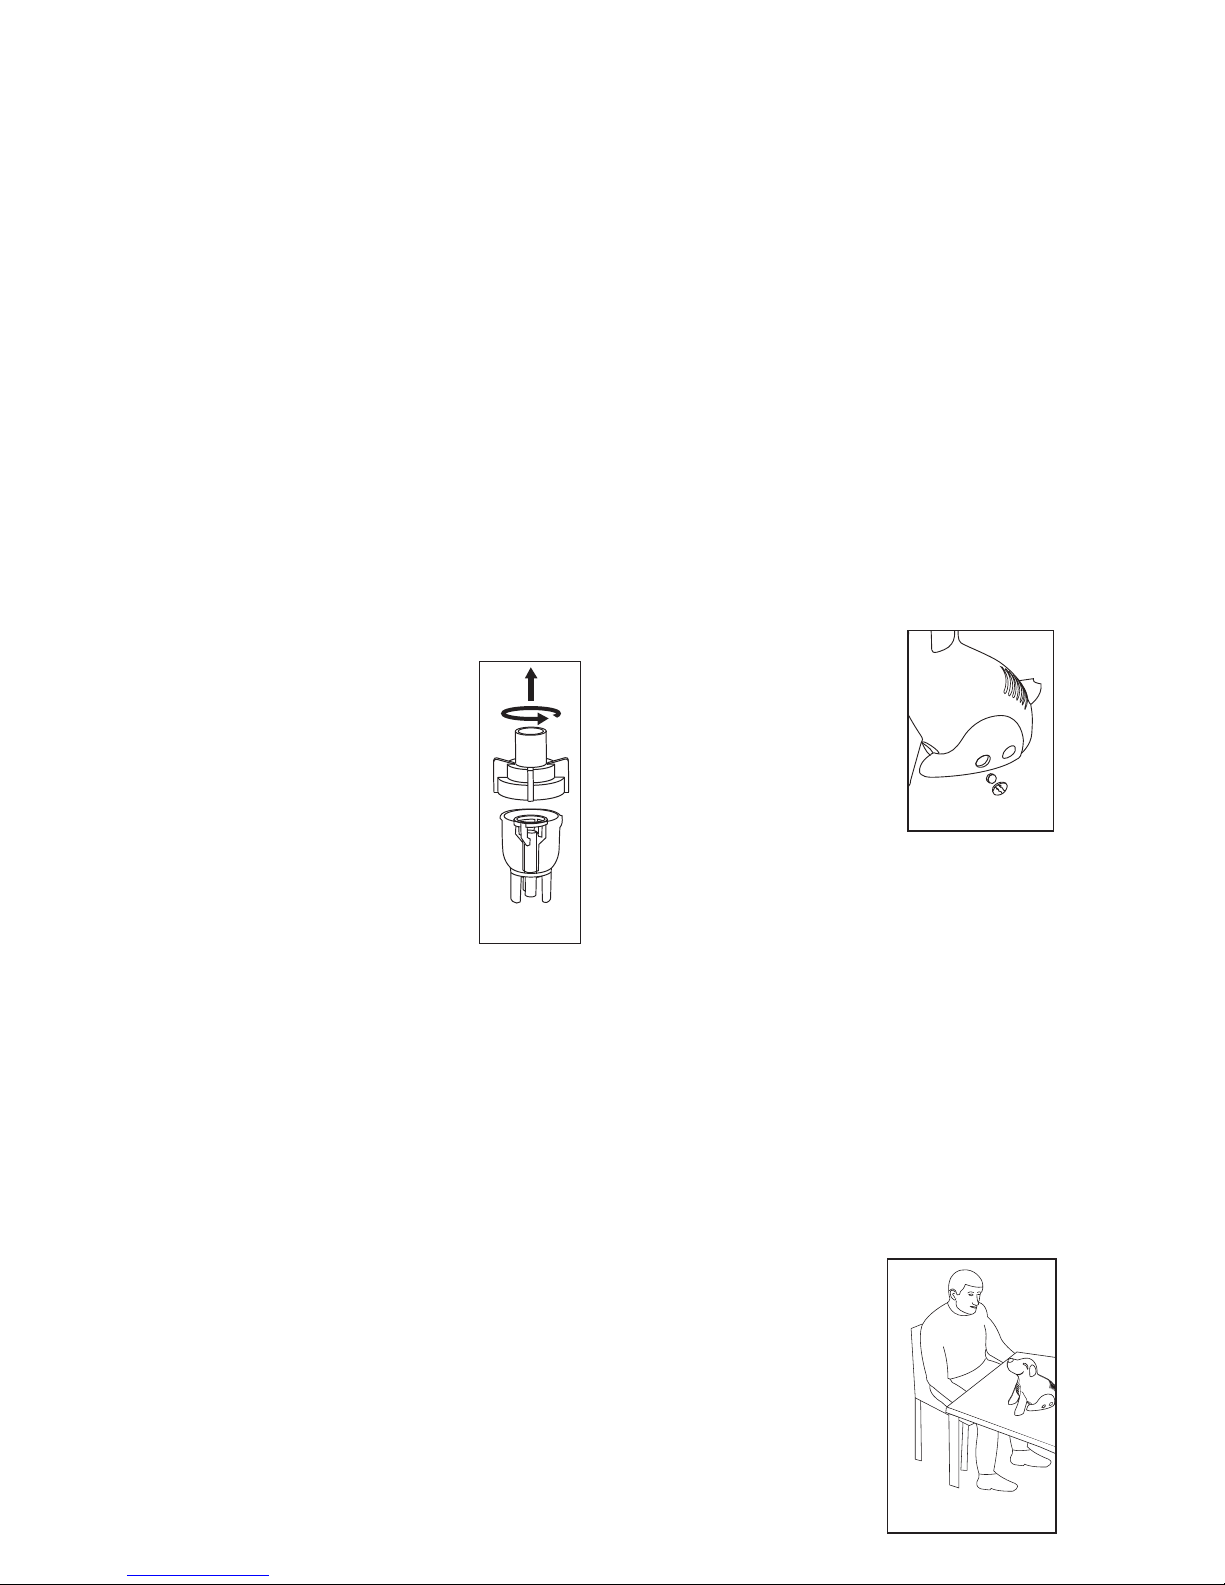
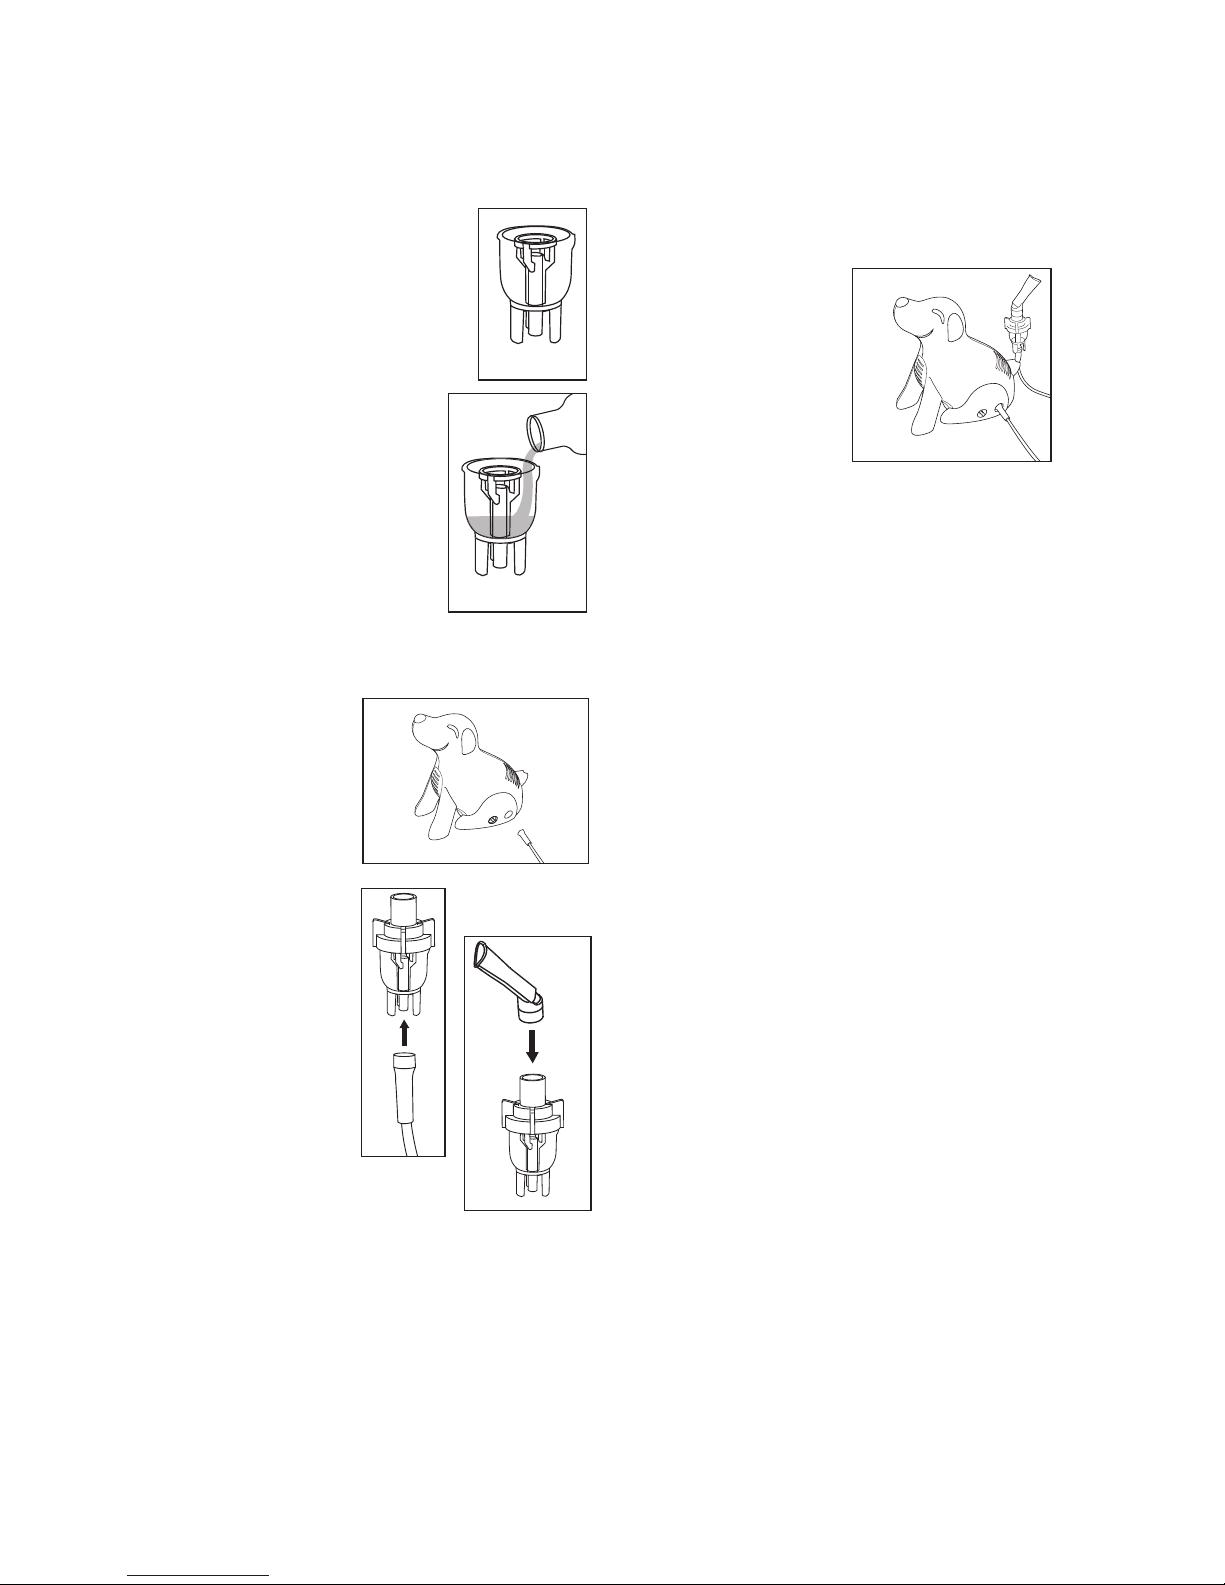
Cómo Armar el Nebulizador. . . . . . . . 12-13
Cómo Funciona el Nebulizador . . . . . 13
Solución de Problemas . . . . . . . . . . . 14
Especificaciones del Producto . . . . . . 15
Introducción
Use su Nebu izador con Compresor bajo
a supervisión de un médico matricu ado y/o
terapeuta en vías respiratorias.
Gracias por comprar un Nebulizador con
Compresor Digger Dog. Con el debido
cuidado y uso, su Compresor le permitirá
administrar tratamientos confiables durante
muchos años.
Esta unidad opera con alimentación de CA
estándar. La administración de los
tratamientos es rápida, segura y
conveniente haciendo de esta unidad el
equipo ideal para cualquier edad.
Le recomendamos que lea con suma
atención esta guía detallada para saber
más acerca de las funciones de su
Nebulizador. unto con su médico y/o
terapeuta en vías respiratorias, se sentirá
cómodo y confiado sabiendo que obtendrá
los tratamientos por inhalación más
efectivos para su cuadro respiratorio.
Garantía Limitada de Cinco Años
Garantizamos que su nebulizador Digger Dog no presenta defectos de fábrica y ésta garantía tiene validez
por un período de cinco años desde la fecha de compra bajo uso normal; se aplican ciertas exclusiones.
Todas las piezas de consumo están cubiertas por una garantía limitada de 1 año de duración. Estas
piezas incluyen, sin limitarse a: el nebulizador, el tubo de aire, la boquilla angular y la mascarilla infantil. La
presente garantía no brinda cobertura para los filtros de aire. Esta garantía limitada no tiene validez cuan-
do el dispositivo se utiliza en alguna aplicación comercial o clínica. Si la unidad no funciona durante los
años de cinco del comprador original que registró el producto, comuníquese con nuestra línea de asisten-
cia al cliente al 800-622-4714, e intentaremos solucionar el problema a la mayor brevedad posible. Si
MABIS Healthcare considera que la unidad no funcionó debido a un defecto de fábrica, MABIS Healthcare,
a su discreción, reparará o reemplazará el dispositivo. La reparación o el reemplazo de la unidad serán la
única solución según esta garantía limitada. La presente garantía le otorga derechos legales específicos,
lo cuales varían según el estado donde resida. Como condición para la aplicación de esta garantía, usted
deberá completar la tarjeta de registración de garantía que se adjunta y enviárnosla dentro de los 10 días
desde la fecha de compra.
Esta Garantía Limitada constituye la única responsabilidad y obligación de MABIS Healthcare para la
reparación y/o el reemplazo de materiales o componentes. No otorgamos ninguna otra garantía, expresa o
implícita, por ministerio de la ley o de otro modo ni ninguna garantía de comerciabilidad o uso adecuado
para un uso o propósito en particular, hubiera o no sido dicho uso o propósito revelado a MABIS
Healthcare en especificaciones, planos o de otro modo y hubiera n o no sido los productos de MABIS
Healthcare específicamente diseñados y/o fabricados por ésta para el uso o propósito del comprador, con
excepción de la garantía limitada antes mencionada. MABIS no será tenida como responsable por todo
daño indirecto, incidental, especial, emergente o punitorio u otra pérdida, incluido aunque no limitado a,
daño o pérdida de otros bienes o equipos y lesiones personales, al comprador o a terceros. Bajo ningún
concepto será tenida MABIS como responsable ante el comprador por cualquier monto en exceso del
costo de reparación y/o reemplazo de la unidad.
Línea de Asisencia Gratuita al Cliente:
1-800-622-4714
El lunes - el viernes 8:00 es - 4:30 p.m. CST
MEDIDAS DE SEGURIDAD
IM ORTANTES
Nota: Lea cuidadosamente todas las instrucciones antes de usar. Las siguientes precauciones
básicas son necesarias cuando se utiliza un producto eléctrico:
Atención: El no leer y observar todas las precauciones puede ocasionar daño personal o al
quipo.

Identificación del roducto
recauciones
recauciones del producto
Observe las precauciones generales de
seguridad cuando use su Nebulizador.
Esta unidad sólo deberá utilizarse para
(1) el propósito para el cual fue diseñada,
según lo descrito en esta guía detallada; y
(2) con medicamentos administrados
exclusivamente bajo la supervisión y
prescripción de su médico.
11
LEA ANTES DE USAR
• Evite el shock eléctrico: Mantenga la
unidad alejada del agua • No manipule la
unidad o el cable de alimentación con las
manos mojadas • No sumerja la unidad en
líquidos • No la use mientras se baña • No
recoja una unidad que se ha caído en el
agua – Desenchúfela de inmediato.
• Evite utilizar la unidad si alguna de sus
piezas está dañada (incluidos el enchufe o
el cable de alimentación), la han sumergi-
do en agua o se ha caído. En ese caso,
comuníquese con el servicio de asistencia
al cliente de inmediato para obtener infor-
mación sobre la reparación.
• No use la unidad donde haya gas inflam-
able, oxígeno o productos de pulverización
con aerosol.
• Mantenga abiertos los venteos. No
coloque la unidad sobre una superficie
blanda donde puedan bloquearse las
aberturas.
• Si el reservorio de agua o el vaso para
medicamento está vacío, no intente operar
la unidad.
• Si nota alguna anormalidad, deje de usar
la unidad hasta que haya sido revisada o
reparada.
• No deje la unidad desatendida mientras
está enchufada.
• No incline ni sacuda la unidad mientras
esté en funcionamiento.
• La apertura de la tapa durante la
operación puede causar lesiones graves.
• Desconecte la unidad del enchufe
eléctrico antes de líempíeza y después de
cada uso.
• No use accesorios de fijación, a menos
que lo hubiera recomendado el fabricante.
recauciones Operativas
• Se recomienda enérgicamente la
supervisión estricta por un adulto cuando
la unidad sea usada por niños o personas
incapacitadas.
• Mantenga los ojos alejados de la salida de
la niebla del medicamento.
• El vaso para medicamento tiene una
capacidad máxima de 13 c.c. No lo llene
en exceso.
• No use esta unidad mientras conduce un
vehículo.
• En caso de incomodidad o anormalidad,
deje de usar la unidad inmediatamente.
recauciones de Almacenamiento
• No guarde la unidad bajo luz solar directa,
alta temperatura o humedad.
• Mantenga la unidad fuera del alcance de
niños pequeños.
• Mantenga siempre la unidad
desenchufada cuando no la use.
Nebulizador
a) Tapa
b) Tubo de
succión
del líquido por
nebulizar
c) Vaso para
medicamento
ipeta curva
Manguera de
conexión
Compresor
Interruptor de
ENCENDIDO
Conector
del Tubo
Filtro de
Aire y Tapa
Soporte del
nebulizador
Cable de
alimentación
Venteos
Máscara
para Niños

3) Prepare una solución con tres partes de
agua destilada y una parte de vinagre
blanco.
4) Sumerja las partes enjuagadas en la
solución de agua destilada y vinagre
durante 30 minutos.
5) Siga los pasos 4 al 6 indicados en la
sección “Técnica de Enjuagado”.
Limpieza del Compresor
Desenchufe la unidad de la fuente de
alimentación. Limpie el compresor
diariamente con un paño suave y levemente
humedecido en agua.
Nota: Cualquier otra forma de limpieza o
agentes de limpieza podría dañar el
acabado de la unidad.
Cambio del Filtro de Aire
Es importante cambiar el filtro de aire aprox-
imadamente cada 30 días o cuando el filtro
de aire adquiera un color gris.
1) Levante para arriba la
cubíerta del filtro de aire
suavemente tirando asi
para el frente, Fig. 2.
2) Deshágase del filtro de
aire gris.
3) Cámbielo por un filtro de
aire nuevo y limpio.
4) Con seguridad reate la
cubíerta del filtro de aire a la unidad
presionando firmemente.
Nota: Los filtros de aire no pueden limpiarse
ni lavarse. Sólo pueden usarse filtros de aire
Digger Dog. No reemplace material
alternativo, como por ejemplo algodón. No
opere la unidad sin filtro de aire.
Cómo Armar el Nebulizador
Siga las instrucciones de limpieza que se
indican en la sección “Técnica de
Limpieza” de en esta guía detallada antes
de usar su nebulizador por primera
vez o después de no haberlo usado durante
un período de tiempo prolongado.
Recuerde: Siempre desenchufe el
Compresor y asegúrese
de que el interruptorde
ENCENDIDO esté en la
posición de apagado
(“off”) antes de limpiar,
armar y antes o después
de cada uso.
1) Coloque el Compresor
dentro de aleance en
una superficie plana y
estable, Fig. 3.
12
recauciones de Limpieza
• Controle el filtro de aire, el Nebulizador, la
pipeta y cualquier otro componente
opcional antes de cada uso. Cambie las
partes sucias o gastadas.
• No sumerja la unidad en agua. Podría
dañarse.
• Desconecte la unidad del tomacorriente
eléctrico previo a la limpieza.
• Limpie todas las partes necesarias
después de cada uso, según lo indicado
en la guía detallada.
rocedimientos de
Limpieza
revio a la limpieza, consulte con su
médico o terapeuta acerca del uso de
desinfectantes comerciales y métodos
de limpieza adecuados.
Técnica de Enjuagado
(Después de cada tratamiento)
1) Asegúrese de que el interruptor de
ENCENDIDO esté en posición de
apagado (“off”) y de haber
desconectado la unidad de
la fuente de alimentación.
2) Desconecte la manguera de
conexión de la base del
Nebulizador.
3) Gire suavemente la tapa y
tire ésta hacia arriba para
abrir y separarla del
Nebulizador, Fig. 1.
4) Enjuague el Nebulizador y
los componentes con agua
caliente del grifo.
5) Seque con toallas limpias o permita que
la unidad se seque totalmente al aire.
6) Vuelva a armar el Nebulizador y guarde
las partes en el estuche de
almacenamiento del Compresor.
Técnica de Limpieza
(Después del último tratamiento del día o
antes de usarlo por primera vez):
1) Siga los pagos 1 al 4 indicados en
“Técnica de Enjuagado”.
2) Lave todas las partes del Nebulizador,
pipeta y demás componentes opcionales
en agua tibia y detergente suave.
Enjuague con agua caliente del grifo.
Advertencia: cuando limpie la unidad por
primera vez o después de que ha estado
guardada durante un período prolongado,
lave todas las piezas en profundidad.
Fig. 1
Fig. 2
Fig. 3

b) Conecte un extremo del adaptador en
T a la pipeta recta y el otro al tubo de
extensión.
Nota: El adaptador en T no es necesario si
usa una máscara.
4) Verifique que el interruptor de
ENCENDIDO esté en posición de
apagado (ʻoffʼ). Enchufe el cable de ali-
mentación en un tomacorriente principal.
5) Lleve el interruptor de
ENCENDIDO a la
posición de
encendido (ʻonʼ).
6) Inicie el tratamiento
de acuerdo con las
instrucciones de su
médico o terapeuta.
Advertencia: el soporte del nebulizador
ubicado al costado del compresor se puede
utilizar para sostener el nebulizador durante
las sesiones. Ver fig. 9
7) Una vez finalizado el tratamiento, lleve el
interruptor de ENCENDIDO a la posición
de apagado (“off”) y desenchufe el cable
de alimentación del tomacorriente.
¡IM ORTANTE!
El Compresor se apagará automáticamente
en caso de sobrecalentamiento.
Cuando, y si, esto sucediera, inmediata-
mente:
1) Lleve el interruptor de ENCENDIDO a la
posición de apagado (ʻoffʼ).
2) Desenchufe el cable de alimentación del
tomacorriente.
3) Deje enfriar el motor durante 30 minutos.
Antes de reiniciar la unidad, asegúrese de
que no estén obstruidos los
venteos.
Después de cada uso
1) Desenchufe la unidad de la fuente de
alimentación.
2) Permita que la unidad se haya enfriado
completamente.
3) Desprenda las mangueras de conexión
del Nebulizador y extraiga todo resto de
medicamento.
4) Siga los procedimientos de limpieza
indicados en esta guía detallada.
2) Retire el contenido (Nebulizador, pipeta y
manguera de conexión) del estuche.
3) Gire suavemente la cubierta del
Nebulizador y tire de ésta hacia arriba
para separar en dos partes (vaso para
medicamento y tapa).
4) Asegúrese de que el tubo de succión del
líquido por
nebulizar esté bien colocado
dentro del vaso para
medicamento. (El vástago
dentro del vaso para
medicamento se inserta en el
tubo de succión), Fig. 4.
5) Agregue la cantidad de
medicamento recetado en
el vaso correspondiente,
Fig. 5.
6) Vuelva a armar el
Nebulizador girando con
cuidado el vaso para
medicamento junto con la
tapa. Asegúrese de que
ambas partes encajen
bien.
Cómo Funciona el
Nebulizador
Nota: El Nebulizador funciona a un ángulo
máximo de 45°.
1) Conecte un
extremo de la
manguera de
conexión al
vástago de aire,
Fig. 6.
2) Conecte con
cuidado el
extremo
opuesto del
conector de la
manguera de
aire al vástago
que se
encuentra en la
base del
Nebulizador,
Fig. 7.
3) Conecte la
pipeta
curva o máscara
opcional a la parte
superior del Nebulizador,
Fig. 8. Si usa un juego de
adaptador en T opcional:
a) Conecte el adaptador en T a la
parte superior del Nebulizador,
13
Fig. 4
Fig. 5
Fig. 6
Fig. 7
Fig. 8
Fig. 9

14
Solución de roblemas
Si detecta alguna anormalidad durante el
uso, revise y corrija lo siguiente.
Condición Corrección
La unidad no Revise la conexión de CA
opera cuando se al tomacorriente.
acciona el
interruptor de
ENCENDIDO.
No se produce Verifique que haya
o se forma medicamento en el vaso
poca niebla del Nebulizador.
Verifique que el
Nebulizador no esté
dañado.
Verifique la posición del
tubo de succión que se
encuentra dentro del
Nebulizador.
Asegúrese de que la
manguera de conexión y
demás componentes
estén bien colocados.
Revise el filtro de aire y,
de ser necesario,
cámbielo.
Revise la manguera de
conexión y, de ser
necesario, cámbiela.
iezas de Reemplazo
Puede obtener piezas de reemplazo a
través de su minorista local u ordenarlas por
correo. Para más detalles, consulte la lista
de piezas de reemplazo que se indica por
separado.
Guarde estas instrucciones

Nombre y Número de Modelo Nebulizador con Compresor Digger Dog,
No40-369-000
Corriente CA 120 VCA, 60 Hz
Consumo de Energía 1.5A
Capacidad de Medicamento 13cc
Tamaño de las Partículas De 0,5 a 10 µm
MMAD 4 µm
Nivel Sonoro Menos de 60 dBA a 1 metro de distancia
Tipo de Motor Bomba de pistón
Velocidad Promedio de Nebulización 0,2 ml por minuto
Rango de Presión del Compresor De 29 a 43 psi (de 200 a 300 Kpa/De 2,0 a
3,0 bar)
Rango de Presión Operativa De 10 a 16 psi (de 70 a 110 Kpa/De 0,7 a
1,1 bar)
Rango de Caudal por Litro De 6 a 8 lpm
Rango de Temperatura Operativa De 50,0oF a 104,0oF (de 10,0oC a 40,0oC)
Rango de Humedad Operativa De 10 a 90 % de humedad relativa
Rango de Temperatura de Almacenamiento De -4,0oF a 158,0oF (de -20,0oC a 70,0 oC)
Rango de humedad para guardar
el dispositivo de 10 a 95% de HR
Dimensiones 8-3/4” x 5-3/8” x 9”
Peso 3.5 libras (1,6kg)
Accesorios Estándar Nebulizador, Manguera de conexión, Pipeta
curva, Máscara para niños, Filtros de aire (5)
Accesorios Opcionales uego de boquillas angulares, juego de
adaptadores en forma de T, juego de inhaladores
con chupete, mascarilla infantil, mascarilla infantil
con forma de perro, uego de mascarillas infan
tiles con forma de elefante, filtros de aire,
nebulizador, tubería de aire
Las especificaciones están sujetas a cambio sin previo aviso.
Protección contra shock eléctrico
Equipo Clase II
Partes aplicadas Tipo BF:
-Pipeta, inhalador con chupete para bebés y máscara.
Protección contra el ingreso perjudicial de agua
- IPX0 (Común)
Grado de seguridad en presencia de anestesia inflamable u oxígeno
- No AP/APG (No adecuado para uso en presencia de anestesia inflamable u
oxígeno)
Modo de operación – Continuo
Especificaciones del roducto
#91-032-369 06/10
©2010 Briggs Medical Service Company
15
Línea de Asisencia Gratuita al Cliente:
1-800-622-4714
El lunes - el viernes 8:00 es - 4:30 p.m. CST
1931 Norman Drive South • Waukegan, IL 60085
847-680-6811 • FAX 847-680-9646 • www.mabisdmi.com

16
NOTAS:

Table of contents
Languages:
Other MABIS Respiratory Product manuals