MABIS CompXP 40-136-000 Manual

CompXPTM
Compressor Nebulizer
Guidebook
Item 40-136-000
Please read this guidebook
completely before operating this unit.
SAVE HESE INS RUC IONS
Your Nebulizer is intended for use in the treatment of asthma, COPD and other respiratory
ailments in which an aerosolized medication is required during therapy. Please consult with your
physician and/or pharmacist to determine if your prescription medication is approved for use with
this Nebulizer. This Nebulizer is intended for single patient use.
Federal (U.S.A.) law restricts this device to sale by, or on the order of, a licensed physician.
English • Spanish
OLL-FREE CUS OMER CARE HELP LINE:
1-800-622-4714

Index
Introduction ........................... 2
Product Identification . . . . . . . . . . . . . . . . . . 3
Cautions............................... 3
Cleaning Procedures . . . . . . . . . . . . . . . . . . . 3-4
Changing the Air Filter . . . . . . . . . . . . . . . . . 4
Using the AC Adapter, DC Adapter or
Rechargeable Battery Pack . . . . . . . . . . . . . 4-5
Assembling Your Nebulizer . . . . . . . . . . . . . 5-6
Operating Your Nebulizer . . . . . . . . . . . . . . 6
Troubleshooting....................... 7
Product Specifications. . . . . . . . . . . . . . . . . . 8
Limited Five-Year Warranty
Your CompXP Compressor Nebulizer is guaranteed to be free of manufacturing defects for a period of five
years from the date of purchase under normal use. This limited warranty does not apply to use in any clinical
or commercial applications. If the unit fails to operate during the warranty period, return it postage prepaid
along with $5.00 for return shipping and insurance to: MABIS ealthcare, Attn: Return Department, 1931
Norman Drive, Waukegan, IL 60085. When returning a product, please also include a letter with your name,
address, phone number and brief description of the specific problem. Please carefully package the product to
avoid any damage that may occur while in the transit. Packaging insurance with returned receipt is
recommended. If MABIS ealthcare determines that the unit failed to operate due to a manufacturing defect,
the unit will be replaced at the option of MABIS ealthcare. Repair or replacement of the unit is the sole
remedy under this limited warranty. This warranty gives you specific legal rights, which vary from state to
state. As a condition of this warranty, the enclosed warranty registration card must be completed and sent to
us within 10 days of the purchase date.
This Limited Warranty constitutes MABIS ealthcare’s only responsibility and obligation to repair and/or
replace materials or components. We make no other express or implied warranties, arising by operation of
law or otherwise, or any warranty of merchantability or fitness for a particular use or purpose whether or not
the use or purpose has been disclosed to MABIS ealthcare in specifications, drawings or otherwise, and
whether or not MABIS ealthcare’s products are specifically designed and/or manufactured by MABIS
ealthcare for the buyer’s use or purposes, except for the limited warranty stated above. MABIS will not be
responsible for any indirect, incidental, special, consequential, or punitive damages or other loss, including,
but not limited to, damage to or loss of other property or equipment and personal injuries, whether to
purchaser or others. MABIS shall in no event be liable to the purchaser for any amount in excess of the cost of
replacement of the unit.
Toll-Free Information Line:
1-800-622-4714
Monday – Friday 8:00 am – 4:30 pm CST
2
Introduction
Your Compressor Ne ulizer should e used under
the supervision of a licensed physician and/or a
respiratory therapist.
Thank you for purchasing a CompXP
Compressor Nebulizer. With proper care and
use, your Nebulizer will provide you with many
years of reliable treatments.
Treatments are delivered quickly, safely and
conveniently making this unit ideal for all ages.
We encourage you to thoroughly read this
guidebook to learn about the features of your
Nebulizer. Together with your physician and/or
respiratory therapist, you can feel comfortable
and confident knowing that you are receiving
the most effective inhalation treatments for
your respiratory condition.
IMPORTANT SAFEGUARDS
No e: Read all instructions carefully before use. The following basic precautions are needed when
using an electrical product.
Cau ion: Failure to read and observe all precautions could result in personal injury or
equipment damage.

Product Identification
Cautions
Product Cautions
Please use general safety precautions when
operating your Compressor and Nebulizer.
This unit should be used only for (1) its
intended purpose as described in this
guidebook, and (2) with medications only
under the supervision and instruction of your
physician.
READ HE FOLLOWING BEFORE USING
• To avoid electrical shock: Keep unit away
from water • Do not handle the unit or
power cord with wet hands • Do not
immerse the unit in liquid • Do not use
while bathing . • Do not reach for a unit that
has fallen into water – immediately unplug
the unit.
• Do not use the unit if it has any damaged
parts (including power cord or plug), if it
has been submersed in water or dropped.
Promptly send the unit for examination.
• The unit should not be used where
flammable gas, oxygen or aerosol spray
products are being used.
• Keep the air vents open. Do not place the
unit on a soft surface where the openings
can be blocked.
• If the medicine cup is empty, do not
attempt to operate the unit.
• If any abnormality occurs, discontinue use
until the unit has been examined and
repaired.
• The unit should not be left unattended
while plugged in.
• Do not tilt or shake the unit when in
operation.
• Disconnect the unit from the electrical
outlet before cleaning, filling and after
each use.
• Do not use attachments unless
recommended by the manufacturer.
Operating Cautions
• Close adult supervision is highly
recommended when this unit is used by
children or invalids.
• Keep your eyes away from the output of
medication mist.
• The maximum capacity of the medicine
cup is 13cc and should not be overfilled.
• Do not use this unit while operating a
vehicle.
• If any discomfort or abnormality occurs,
stop using the unit immediately.
Storage Cautions
• Do not store the unit in direct sunlight,
high temperature or humidity.
• Keep the unit out of reach of small
children.
• Always keep the unit unplugged while not
in use.
Cleaning Cautions
• Check the air filter, Nebulizer, mouthpiece,
and any other optional components before
each use. Dirty or worn parts should be
replaced.
• Do not immerse the compressor in water.
It may damage the unit.
• Disconnect the unit from the electrical
outlet before cleaning.
• Clean all necessary parts after each use
as instructed in this guidebook.
Cleaning Procedures
Please consult with your physician or
therapist prior to cleaning regarding the use
of commercial disinfectants and appropriate
cleaning methods.
3
Clear Cover
Filter Cover
Rechargable
Battery Pack
Nebulizer
POWER
Switch
Nebulizer
Battery
erminal
AC port
Air Filter
Compressor Rubber
Stem
Indicator
Light
Rubber Base

It is important to clean your Nebulizer before
the first time it is used and after each use.
Remem er: Disconnect the unit from the electrical
outlet and never immerse the unit in water.
Cleaning the Parts
The Nebulizer, mouthpiece, masks, clear cover
and other optional accessories should be
cleaned with a mild detergent or commercially
available disinfectant.
Thoroughly rinse each part and allow to
completely air dry before using or storing.
Rinsing echnique
(Performed after each treatment):
1) Make sure that the POWER switch has been
pressed “off” and the unit has been
disconnected from the power source.
2) Disconnect the nebulizer, air tube,
mouthpiece and/or mask.
NO E: If removing the Nebulizer
from the stem of the
Compressor, twist the entire
Nebulizer, then lift to remove.
3) Gently twist and pull up on the
cover of the Nebulizer to open
and separate, Fig. 1.
4) Rinse the Nebulizer and
components with hot tap water.
5) Dry with clean towels or allow
to completely air dry.
6) Reassemble the Nebulizer and store the
parts in a cool, dry place.
Cleaning echnique
(Performed after the last treatment of the day
or before first time use):
1) Follow steps 1-4 under “Rinsing Technique”.
2) Wash all Nebulizer parts, mouthpiece and
other optional components in warm water
and a mild detergent. Rinse in hot tap water.
NO E: For first time cleaning or after the unit
has been stored for an extended period of
time, thoroughly clean all components. The
Nebulizer is dishwasher safe.
3) Prepare a vinegar/distilled water solution of
one part white vinegar to three parts
distilled water.
4) Submerge the rinsed parts in the
vinegar/distilled water solution for
30 minutes.
5) Follow steps 4-6 under “Rinsing Technique”.
Cleaning the Main Body (Compressor)
The compressor should be cleaned with a soft
cloth moistened with water and dried with a
soft cloth.
NO E: Any other form of cleaning or
cleaning agents may damage the finish on the
unit.
Changing the Air Filters
It is important to change the air filter
approximately every 30 days or when the air
filter turns gray.
1) Remove the air filter cover by gently
peeling back the rubber cover.
2) Discard the gray air filter.
3) Replace with a new, clean air filter.
4) Securely reattach the air filter cover to the
unit.
NO E: Air filters cannot be cleaned or washed.
Only CompXP air filters can be used. Do not
substitute alternate material such as cotton. Do
not operate without an air filter.
Using the AC Adapter,
DC Adapter or Rechargeable
Battery Pack
Your Nebulizer operates by use of an AC
adapter, DC adapter or battery pack, all
included with your Nebulizer.
NO E: The battery pack must not be connected
to the compressor when using AC or DC
voltage.
Using the AC Adapter,
1) Insert the AC adapter plug into the
dreceptacle of the compressor, located on
the bottom of the compressor, Fig 2.
2) Following general safety precautions, plug
the adapter into a standard AC outlet.
3) Proceed to “Assembling and Operating Your
Nebulizer”
instructions.
Using the DC
Adapter,
1) Insert the DC adapter
plug into the
receptacle of the
compressor, located
on the bottom of the
compressor, Fig. 2.
4
Fig. 1
Fig. 2

o unlock the battery,
1) While holding both the compressor and bat-
tery pack, press the rectangular-shaped but-
ton located on the front of the battery pack.
The components should release, Fig. 6.
2) Reattach the rubber
base to the bottom of
the compressor.
NO E: When the battery
pack is not in use it is
important to keep the
rubber base attached at all
times. The rubber base will
help stabilize the unit on a
flat surface and protect the
battery terminal.
Assembling Your Nebulizer
Follow the cleaning instructions in this
guidebook under “Cleaning Technique” prior to
using your nebulizer for the first time or after it
has been stored for an extended period of time.
REMEMBER: Always disconnect the unit from
the electrical outlet and make sure the POWER
switch has been pressed to “off” before
leaning, assembling and before or after each
use.
1) Gently twist and pull straight
up on the lid of the
Nebulizer to separate into
two parts (medicine cup and
cover).
2) Make sure that the purple
jet is properly installed
inside the medicine cup.
(The stem inside the
medicine cup inserts into
the tube of the purple jet),
Fig. 7.
3) Add the prescribed amount
of medication to the
medication cup, Fig. 8.
4) Reassemble the Nebulizer by carefully
wisting the medicine cup and cover
together. Make sure that the two parts fit
securely.
5) Place the compressor on a solid, flat dry
surface. Insert the nebulizer into the unit
making sure that the stem of the medicine
cup inserts securely into the rubber stem.
2) Following general safety precautions, plug
the adapter into an automobile DC outlet.
3) Proceed to “Assembling and Operating Your
Nebulizer” instructions.
Using the Rechargeable Battery Pack,
Your Compressor Nebulizer can operate with
the use of a rechargeable battery when AC
power is not available. The life of the battery is
approximately two years; however, battery life
will vary depending on usage, storage and
charging conditions.
o charge the battery,
1) Insert the AC adapter plug into the
receptacle of the battery pack, located on
the top of the battery
pack, see Fig 3.
2) Following general safe-
ty precautions, plug
the adapter into a
standard AC outlet.
Approximate charging
times:
1st time use: 24 hours
Thereafter: 4-12 hours
o use the battery,
1) Expose the battery
terminal on the
bottom of the
compressor by
removing the rubber
base, Fig. 4.
2) Attach the
compressor and
battery pack making
sure that the battery
terminals meet,
Fig. 5. The two
components should
snap together into
place. Check that the
compressor and
battery pack are securely connected.
NO E: Press the POWER button. A green
light will illuminate above the POWER
button to indicate a charged battery. A red
light indicates that the battery needs to be
charged.
3) Proceed to “Assembling and Operating Your
Nebulizer” instructions.
5
Fig. 7
Fig. 3
Fig. 4
Fig. 5
Fig. 6
Fig. 8

If using the air tubing,
a) Attach one end of the air tube
to the rubber stem.
b) Carefully attach the opposite
end of the air tube to the
stem at the base of the
Nebulizer, Fig. 9.
Make sure that the mouthpiece or
other attachments are properly
connected to the
nebulizer cover.
Operating Your
Nebulizer
NO E: The Nebulizer that is provided with your
kit is operable at up to a 45°angle.
1) Attach the angled
mouthpiece or optional mask to the top of
the Nebulizer, Fig. 10.
If using the optional tee adapter set,
a) Attach the tee adapter to
the top of the Nebulizer,
b)Connect one end of the
tee adapter to the straight
straight mouthpiece and
the other to the extension
tube.
NO E: The tee adapter is not needed when
using a mask.
2) Check that the POWER switch
has been pressed to “off.”
Plug the power cord into a
main outlet.
3) Press the POWER switch to
the “on” position.
4) Start your treatment
according to your physician’s
or therapist’s instructions.
5) Once the treatment is
complete, press the POWER
switch to “off” and unplug the
power cord from the outlet.
Remem er:
• Keep your eyes away from the output of
medication mist.
• If any discomfort or a normality occurs, stop
using the unit immediately.
• Do not tilt or shake the unit when in
operation.
Fig. 10
o end a treatment,
1) When the treatment has ended, press the
POWER button.
2) Unplug the adapter from the outlet and
detach the adapter plug from the unit’s
AC port.
3) Dispose excess medication and water before
disconnecting the battery.
4) Allow the unit to cool — approximately
20-30 minutes.
Remem er:
• The unit should not e used for more than
30 minutes at a time.
• Wait 30 minutes efore reusing the unit.
After Every Use
1) Unplug the unit from the power source.
2) Allow the unit to completely cool.
3) Carefully remove the Nebulizer and pour
out any remaining medication.
4) Follow the cleaning procedures provided in
this guidebook.
Replacement Parts
Replacement parts are available through your
local retailer or they can be ordered by mail.
See separate replacement part list for details.
Fig. 9
6

7
roubleshooting
If any abnormality occurs during use, please
check and correct the following:
Condition Correction
Unit does not Check the AC connection
operate when to the outlet.
POWER switch
is pressed.
No misting Check that there is
or low rate medication in the Nebulizer
of misting cup.
Check the Nebulizer for
damage.
Check the position of the
purple jet inside the
Nebulizer.
Make sure that air tube
and other components are
properly attached.
Check the air filter and
replace if necessary.
Check the air tube and
replace if necessary.

8
Name and Item Number CompXPTM Portable andheld Compressor Nebulizer,
40-136-000
Power NiM battery, 12-volt AC, 12-volt DC
NiMH Battery Capacity 1600 mA
NiMH Battery Use ime Approximately 45 minutes
Medicine Capacity 13 cc
Particle Size 0.5 to 10 µm
Sound Level 60 dBA
Motor ype Piston pump
Average Nebulization Rate 0.2 ml/min
Compressor Pressure Range 30 to 36 Psi (210 to 250 Kpa/2.1 to 2.5 bar)
Operating Pressure Range 8 to 10 Psi (50 to 70 Kpa/0.5 to 0.7 bar)
Liter Flow Range 4 – 8 lpm
Operating emperature Range 50.0°F to 104.0°F (10.0°C to 40.0°C)
Operating Humidity Range 10 to 90% R
Storage emperature Range -13.0°F to 158.0°F (-25.0°C to 70.0°C)
Storage Humidity Range 10 to 90% R
Dimensions 5-1/8” x 4-1/4” x 2-1/2” with cover/without battery pack
6-3/4” x 4-1/4” x 2-1/2” with cover and battery pack
Approximate Weight 12.3 oz. without battery pack
1 lbs. 7.6 oz. with battery pack
Standard Accessories Portable handheld compressor, clear cover, nebulizer,
7’ tubing, tubing connector, angled mouthpiece, five (5)
air filters, AC adapter, rubber base, rechargable battery pack,
DC auto adapter, carrying case
Specifications are subject to change without notice.
Protection against electric shock
Class II Equipment
Type BF applied parts:
– Mouthpiece, baby pacifier inhaler & mask
Protection against harmful ingress of water
– IPX0 (Ordinary)
Degree of safety in the presence of flammable anesthetics or oxygen
– No AP/APG (Not suitable for use in the presence of flammable anesthetics or oxygen)
Mode of operation – continuous.
UL 1950 (AC adapter only)
Product Specifications
1931 Norman Drive South
Waukegan, IL 60085 USA
Toll-Free Customer Care elpline:
800-622-4714
www.mabisdmi.com
#91-032-136 09/10
©2010 Briggs Medical Service Company

CompXPTM
Manual de
nebulizador compresor
Artículo n.º 40-136-000
Su nebulizador está diseñado para ser utilizado en el tratamiento del asma, EPOC (enfermedad pulmonar obstructi-
va crónica) y otras dolencias respiratorias donde el tratamiento requiera una medicación para
nebulizar. Consulte con su médico o con su farmacéutico para determinar si la medicación que le han
recetado está aprobada para ser utilizada con este nebulizador. Este nebulizador está destinado al uso
de un solo paciente.
La ley federal (de EE.UU.) prohíbe la venta de este equipo por parte de un médico
matriculado o por su cuenta y orden.
Inglés • Español
LÍNEA GRA UI A DE ASIS ENCIA AL CLIEN E:
1-800-622-4714
Sírvase leer oda es a guía
an es de operar la unidad
CONSERVE ESTAS INSTRUCCIONES
MANUAL
DE ALLADO

10
Índice
Introducción ...............................10
Identificación del producto . . . . . . . . . . . . . . . . .11
Precauciones ..............................11
Procedimientos de limpieza . . . . . . . . . . . . . . . .12
Cambio del filtro de aire . . . . . . . . . . . . . . . . . . . .12
Utilización del adaptador de CA o
delabatería ..........................12-13
AdaptadordeCA.........................13
Batería ................................12-13
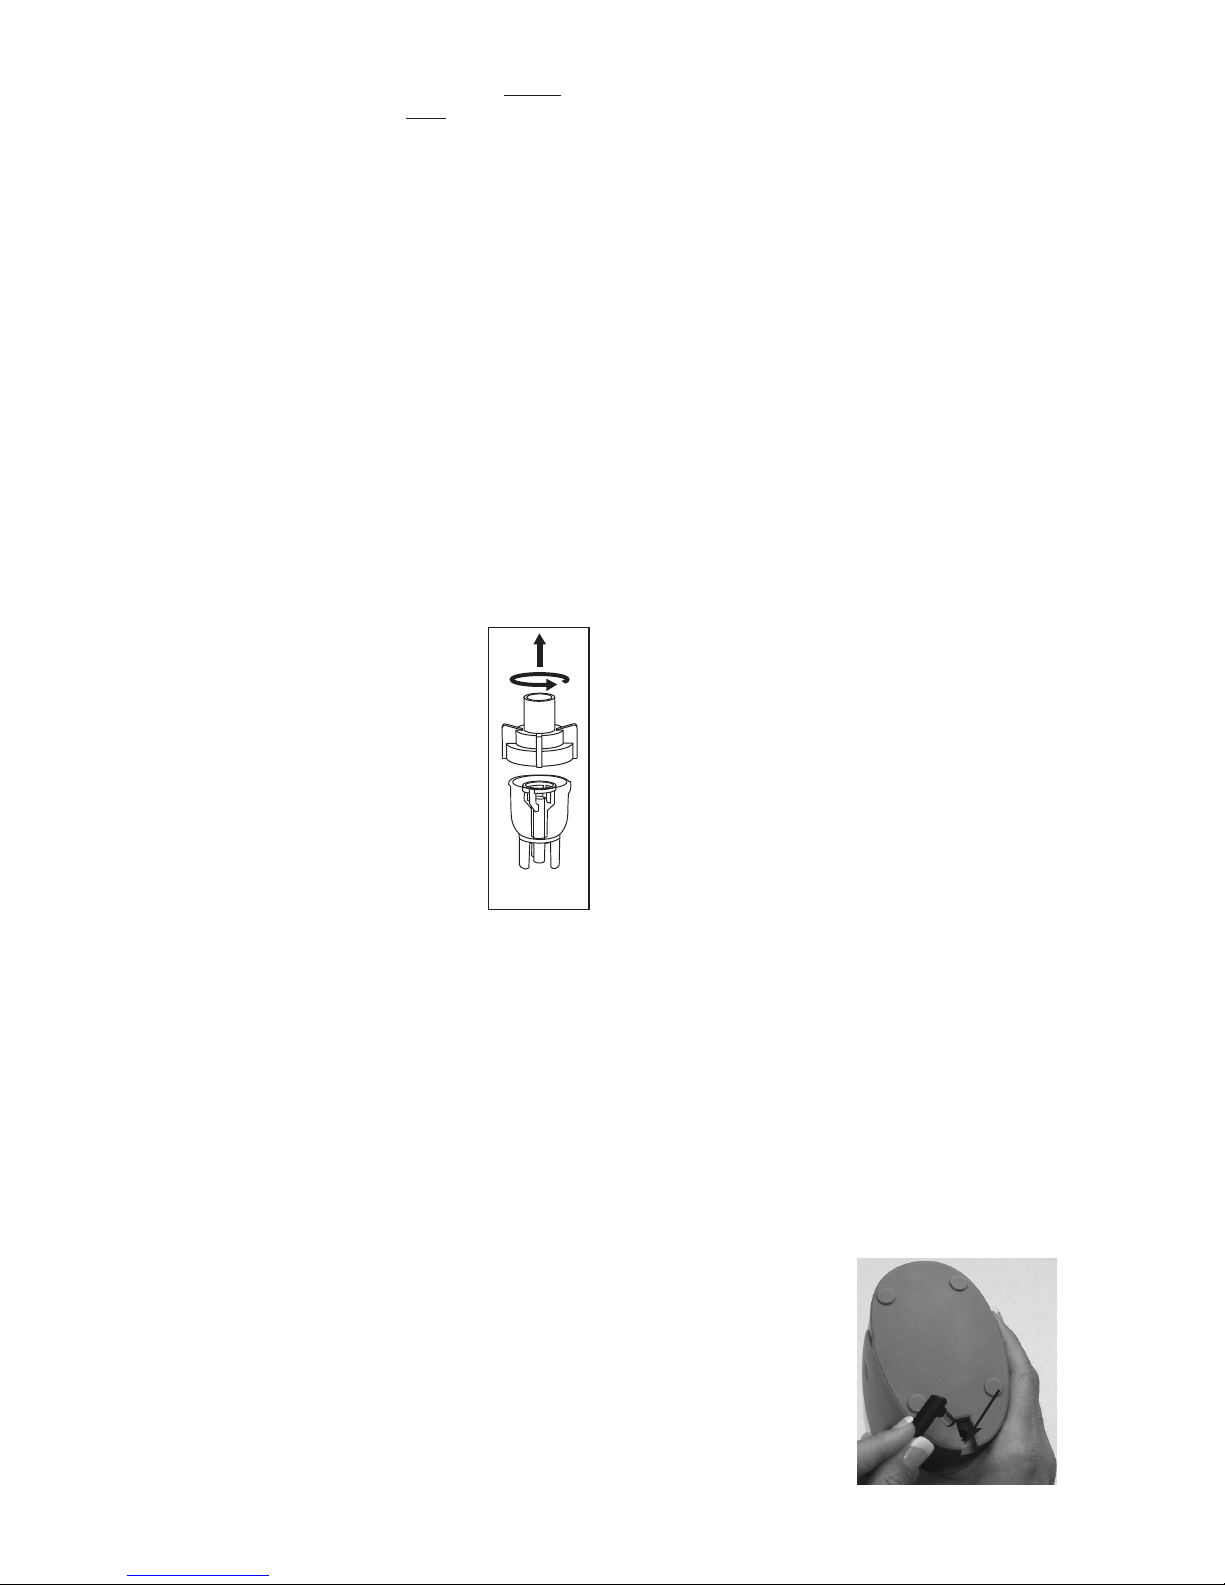
Armado del nebulizador . . . . . . . . . . . . . . . .13-14
Funcionamiento del nebulizador . . . . . . . . . . .14
Solución de problemas . . . . . . . . . . . . . . . . . . . . .15
Especificaciones del producto . . . . . . . . . . . . . .16
Introducción
Su ne ulizador compresor de ería ser
utilizado ajo la supervisión de un médico matric-
ulado o de un terapista respiratorio.
Gracias por adquirir un compresor
nebulizador CompXP. Si recibe un cuidado
y un uso adecuados, su nebulizador le brindará
muchos años de tratamiento
confiable.
Los tratamientos se administran en forma
rápida, segura y conveniente, lo que hace que
esta unidad sea ideal para todas las edades.
Le pedimos que lea este manual en forma
exhaustiva a fin de conocer las características
de su nebulizador. Siempre bajo la supervisión
de su médico o terapista respiratorio, usted
sentirá la comodidad y tranquilidad de estar
recibiendo los tratamientos por inhalación más
efectivos para su dolencia respiratoria.
Garantía Limitada de Cinco Años
Se garantiza que su nebulizador CompXP está libre de defectos de fabricación durante un período de cinco años a
partir de la fecha de compra con un uso normal. Esta garantía limitada no se aplica al uso de ninguna aplicación
clínica o comercial. Si la unidad no funciona durante el período de garantía, devuélvala con el franqueo pago junto
con $5.00 para el envío de vuelta y seguro a: MABIS ealthcare, Attn: Return Department, 1931
Norman Drive, Waukegan, IL 60085. Cuando devuelva un producto, también incluya una carta con su nombre,
dirección, número de teléfono y una breve descripción del problema específico. Empaque el producto con cuidado
para evitar cualquier daño que pueda ocurrir mientras se traslada. Se recomienda un seguro de empaque con reci-
bo de devolución. Si MABIS ealthcare determina que la unidad tuvo una falla en su funcionamiento debido a un
defecto de fabricación, la unidad será reemplazada a opción de MABIS ealthcare. La reparación o reemplazo de la
unidad es el único recurso cubierto por esta garantía limitada. Esta garantía le da derechos legales específicos, los
cuales varían de un estado a otro. Como condición de esta garantía, debe completarse la tarjeta de registro de
garantía adjunta y debe enviarse dentro de los 10 días de la fecha de compra.
Esta garantía limitada constituye la única responsabilidad y obligación de MABIS ealthcare de reparar y/o r
eemplazar los materiales o componentes. No realizamos ninguna otra garantía expresa o implícita, surgida por la
aplicación de la ley o de otra forma, ni garantía alguna de la comercialización o aptitud para un uso o propósito en
particular ya sea que el uso o propósito haya sido informado o no a MABIS ealthcare en especificaciones, dibujos o
de otra forma y si los productos de MABIS ealthcare están o no diseñados específicamente y/o fabricados por
MABIS ealthcare para el uso o los fines del comprador, excepto para la garantía limitada declarada arriba. MABIS no
será responsable de ningún daño indirecto, incidental, especial, consecuente o punitivo u otra pérdida, incluyendo,
entre otros, daño o pérdida de otros bienes o equipos y lesiones personales, ya sea para el comprador u otros.
MABIS no será responsable ante el comprador en ningún caso por ningún monto que exceda el costo del reemplazo
de la unidad.
Línea de Asisencia Gratuita al Cliente:
1-800-622-4714
El lunes - el viernes 8:00 es - 4:30 p.m. CST
PRECAUCIONES IMPORTANTES
No a: lea todas las instrucciones atentamente antes del uso. Son necesarias las siguientes precau-
ciones básicas cuando se usa un producto eléctrico.
Precaución: No leer ni respetar todas las precauciones podría dar como resultado una lesión personal
o daño del equipo.

Identificación del Producto
Precauciones
Precauciones sobre el producto
Tenga en cuenta las precauciones gene-rales
de seguridad cuando opere su nebulizador
compresor.
Esta unidad debería ser utilizada (1) sólo para la
finalidad descripta en este manual y (2) con
medicaciones únicamente bajo la supervisión y
según las instrucciones de su médico.
LEA LO SIGUIENTE ANTES DE UTILIZAR LA
UNIDAD
• Para evitar el choque eléctrico, mantenga la
unidad alejada del agua • No manipule la
unidad o el cable de alimentación con las
manos húmedas • No sumerja la unidad en
líquido • No utilice mientras se baña • No
trate de recuperar un equipo que ha caído al
agua sin antes desconectar la unidad.
• No utilice la unidad si tiene cualquier parte
dañada (incluido el cable de alimentación o
el enchufe), si ha estado sumergida en el
agua o se ha caído. Envíe la unidad para su
11
apa transparente
apa de filtro
Batería recargable
Llave
interruptora
Nebulizador
erminal de
batería
Entrada
de CA
Filtro de aire
Compresor Vástago
de goma
Luz
indicadora
revisión y reparación inmediata.
• No se debería utilizar la unidad cuando se
usen gases inflamables, oxígeno o productos
en aerosol.
• Mantenga los orificios de ventilación libres.
No coloque la unidad sobre una superficie
blanda donde se puedan obstruir las aber-
turas.
• Si el vaso recipiente de medicación está
vacío, no intente operar la unidad.
• Si ocurre cualquier hecho anormal, inter-
rumpa el uso hasta que la unidad haya sido
revisada y reparada.
• No se debería dejar la unidad sola mientras
esté enchufada.
• No incline ni sacuda la unidad mientras esté
en funcionamiento.
• Desconecte la unidad del tomacorriente
antes de limpiarla o de llenarla y después de
cada uso.
• No utilice accesorios excepto los recomenda-
dos por el fabricante.
Precauciones sobre el
funcionamiento
• Se recomienda especialmente la supervisión
permanente de un adulto cuando se utilice
esta unidad con niños o minusválidos.
• Mantenga los ojos alejados de la salida de la
niebla con la medicación.
• La capacidad máxima del vaso recipiente de
medicamento es 13 cm3 y no debería ser
excedida.
• No utilice el equipo mientras opere un
vehículo.
• Si se produce cualquier inconveniente o
anormalidad, deje de utilizar el equipo de
inmediato.
Precauciones sobre el
almacenamiento
• No deje la unidad bajo la luz directa del sol,
en condiciones de alta temperatura o
humedad.
• Mantenga la unidad alejada de niños
pequeños.
• Mantenga siempre la unidad desenchufada
cuando no la utilice.
Precauciones sobre la limpieza
• Verifique el filtro de aire, el nebulizador, la
boquilla y cualquier otro componente
opcional antes de utilizar la unidad. Las
partes sucias o desgastadas deberían reem-
plazarse.
• No sumerja el compresor en el agua. Puede
dañar la unidad.
• Desconecte la unidad del tomacorriente
antes de limpiarla.
• Limpie todas las partes que correspondan
después de cada uso tal como se indica en
este manual.
Base de goma

12
Procedimientos de limpieza
Antes de limpiar la unidad, consulte con su
médico o terapista sobre la utilización de
desinfectantes de uso comercial y métodos de
limpieza adecuados.
Es importante limpiar su nebulizador antes de
utilizarlo por primera vez y después de cada
uso. Recuerde desconectar la unidad del toma-
corriente y de no sumergirla nunca en agua.
Limpieza de componentes
El nebulizador, la boquilla, las máscaras, la tapa
transparente y otros accesorios opcionales
deberían limpiarse con un detergente suave o
con un desinfectante de uso comercial.
Enjuague con cuidado cada componente y
déjelo airear hasta que quede completamente
seco antes de utilizarlo o guardarlo.
écnica de enjuague
(para ser aplicada después de cada
tratamiento)
1) Asegúrese de que la llave interruptora esté
en posición de apagado y la unidad
desconectada de la fuente de alimentación.
2) Desconecte el nebulizador, el tubo de aire,
la boquilla y/o la máscara.
NO A: A fin de separar el nebulizador del
vástago del compresor, gire todo el nebu-
lizador y luego levante para retirar.
3) Gire con suavidad y levante la tapa del neb-
ulizador para abrir y separar. Fig. 1.
4) Enjuague el nebulizador y los
componentes con agua
caliente del grifo.
5) Séquelos con toallas secas y
deje que se aireen hasta
quedar totalmente secos.
6) Rearme el nebulizador y
guarde los componentes en un
lugar fresco y seco.
écnica de limpieza
(para ser aplicada después del
último tratamiento del día o antes
del primer uso)
1) Siga los pasos 1-4 de la “Técnica de
enjuague”.
2) Lave todas las partes del nebulizador, la
boquilla y otros componentes opcionales
con agua tibia y detergente suave. Enjuague
con agua caliente del grifo.
NO A: Cuando limpie por primera vez o
después de haber tenido la unidad guarda-
da por un período prolongado, limpie con
cuidado todos los componentes. El
nebulizador puede colocarse en el
lavaplatos.
3) Prepare una solución de una parte de
vinagre y tres partes de agua destilada.
4) Sumerja las partes enjuagadas en la
solución de vinagre/agua destilada durante
30 minutos.
5) Siga los pasos 4-6 de la “Técnica de
enjuague”.
Limpieza de la estructura principal
(compresor)
El compresor debería limpiarse con un trapo
suave humedecido con agua y secarse con un
trapo seco.
NO A: Cualquier otro método de limpieza o el
uso de otros agentes de limpieza pueden dañar
la terminación de la unidad.
Cambio del filtro de aire
Es importante cambiar el filtro de aire
apro-ximadamente cada 30 días o cuando el
filtro de aire se vuelva gris.
1) Quite la tapa del filtro retirando con
suavidad la cubierta de goma.
2) Deseche el filtro de aire gris.
3) Reemplace por un filtro de aire nuevo y
limpio.
4) Vuelva a colocar correctamente la tapa del
filtro de aire de la unidad.
NO A: Los filtros de aire no pueden limpiarse ni
lavarse. Sólo se pueden utilizar filtros de aire
CompXP. No utilice materiales alternativos
como el algodón. No opere sin un filtro de aire.
Utilización del adaptador de
CA, adaptador de CC, o el
paquete recargable de la
bateria
Su nebulizador funciona con el uso de un
adaptador de CA, adaptador de CC o baterías,
todos incluidos con su nebulizador.
NO A: No deben conectarse la batería al
compresor cuando se utilice tensión de CA o
CC.
Utilización del adaptador de CA
1) Introduzca el enchufe del adaptador de CA
en la toma del compresor ubicada en la
parte inferior del compresor. Fig. 2.
2) Siguiendo las precauciones generales de
seguridad, enchufe el adaptador en un
tomacorriente de CA estándar.
Fig. 1

13
3) Siga con las instrucciones de armado y
funcionamiento del nebulizador.
Utilización del adaptador de CC
1) Introduzca el enchufe del adaptador de CC
en la toma del compresor ubicada en la
parte inferior del compresor. Fig. 2.
2) Siguiendo las precauciones generales de
seguridad, enchufe el adaptador en un
tomacorriente de CC
estándar del
automóvil.
3) Siga con las instruc-
ciones de armado y
funcionamiento del
nebulizador.
Utilización de la
batería recargable
Su nebulizador
compresor puede
funcionar utilizando una batería recargable
cuando no se disponga de corriente alterna. La
vida útil de la batería es de aproximadamente
dos años; no obstante, la vida útil dependerá
de las condiciones de uso, almacenamiento y
carga.
Carga de la batería
1) Introduzca el enchufe del adaptador de CA
en la toma de la batería ubicada en la parte
superior de la batería. Ver Fig. 3.
2) Siguiendo las
precauciones
gene-rales de
seguridad, enchufe el
adaptador en un
tomacorriente de CA
estándar.
Tiempo aproximado de
carga:
Primera carga: 24 horas
Cargas posteriores: 4-12
horas
Utilización de la batería
1) Deje a la vista el terminal de la batería en el
fondo del compresor quitando el base de
goma. Fig. 4.
2) Conecte el
compresor y la
batería,
asegurándose de
que estén en
contacto las
terminales de batería. Fig. 5. Los dos
componentes deberían encastrar entre sí.
Verifique que el compresor y la batería estén
bien conectados.
NO A: Oprima el
botón de
encendido. Se
iluminará una luz
verde encima del
botón de encendido
para indicar que la
batería está cargada.
La luz roja indica que la batería necesita
carga.
3) Siga con las instrucciones de armado y
funcionamiento del nebulizador.
Desenganche de la batería
1) Mientras sostiene el compresor y la batería,
oprima el botón rectangular ubicado en la
parte delantera de la batería. Los
componentes deberían libe-rarse. Fig. 6.
2) Vuelva a colocar el base de goma al fondo
del compresor.
NO A: Cuando el paquete
del la bateria no esta en
uso es importante
manterner el base de
goma unido todo el
tiempo. El base de goma,
ayudara a estabilizar la
unidad en un superficie
plana y a proteger el
terminal de la bateria.
Armado del nebulizador
Siga las instrucciones de limpieza de este
manual que figuran en “Técnica de limpieza”
antes de utilizar su nebulizador por primera vez
o después de haberlo tenido guardado por un
período de tiempo prolongado.
RECUERDE desconectar siempre la unidad del
tomacorriente y asegurarse de que la llave
interruptora esté en posición de apagado antes
de la limpieza o el armado y antes y después de
cada uso.
1) Gire levemente y levante en línea recta la
tapa del nebulizador de modo que se separe
en dos partes (vaso recipiente de
medicamento y tapa).
2) Asegúrese de que el propulsor violeta esté
bien instalado dentro del vaso recipiente de
medicamento. (El vástago dentro del vaso
recipiente de medicamento encaja en el
Fig. 2
Fig. 3
Fig. 4
Fig. 5
Fig. 6

14
tubo del propulsor violeta). Fig. 7.
3) Vierta la cantidad de medicamento
prescripta en el vaso recipiente. Fig. 8.
4) Rearme el nebulizador enroscando entre sí
el vaso recipiente de
medicamento y la tapa con
cuidado. Asegúrese de que
las dos partes encajen
correctamente.
5) Coloque el compresor sobre
una superficie sólida, plana
y seca. Introduzca el
nebulizador en la unidad
verificando que el vástago
del vaso recipiente de
medicamento entre
correctamente en el
vástago de goma.
Si utiliza el tubo de aire
a) Conecte un extremo del
tubo de aire con el vástago
de goma.
b) Conecte con cuidado el otro
extremo del tubo de aire con
el vástago en la base del
nebulizador. Fig. 9.
Asegúrese de que la boquilla u otros
accesorios estén correctamente
conectados con la tapa del
nebulizador.
Funcionamiento
del nebulizador
Nota: El nebulizador que viene con su equipo
funciona con una inclinación de hasta 45°.
1) Conecte la boquilla en ángulo o la máscara
opcional con la parte superior del
nebulizador. Fig. 10.
Si utiliza el adaptador en T
opcional:
a) Conecte el adaptador en
T con la parte superior del
nebulizador.
b) Conecte un extremo del
adaptador en T con la
boquilla recta y el otro
con el tubo de
prolongación.
NO A: No es necesario el
adaptador en T cuando se utiliza
una máscara.
2) Verifique que la llave interruptora se
encuentre en la posición de apagado.
Enchufe el cable de alimentación en un
tomacorriente de la red.
3) Coloque la llave interruptora en la posición
de encendido.
4) Comience su tratamiento de acuerdo con
las instrucciones de su médico o tera-pista.
5) Una vez completo el tratamiento, coloque la
llave interruptora en la posición de apagado
y desenchufe del cable de alimentación del
tomacorriente.
Recuerde:
• Mantener los ojos alejados de la salida de la
nie la con la medicación.
• Detener la unidad de inmediato si perci e
cualquier incomodidad o anormalidad.
• No inclinar ni sacudir la unidad cuando está en
funcionamiento.
Finalización del tratamiento
1) Cuando haya concluido el tratamiento,
oprima la llave interruptora.
2) Desenchufe el adaptador del tomacorriente
y desconecte el enchufe adaptador del
orificio de alimentación de CA de la unidad.
3) Deseche el agua y la medicación que haya
sobrado antes de desconectar la batería.
4) Deje que la unidad se enfríe durante
aproximadamente 20-30 minutos.
Recuerde:
• Que la unidad no de ería utilizarse más de 30
minutos por vez.
• Esperar 30 minutos antes de volverla a utilizar.
Después de cada uso
1) Desenchufe la unidad de la fuente de
alimentación.
2) Deje que la unidad se enfríe por completo.
3) Retire con cuidado el nebulizador y deseche
cualquier resto de medicación.
4) Siga los procedimientos de limpieza
contenidos en este manual.
Repuestos
Los repuestos están disponibles a través de su
vendedor local o pueden comprarse por correo.
Vea los detalles en la lista de repuestos adjunta.
Fig. 7
Fig. 8
Fig. 9
Fig. 10

15
Solución de problemas
Ante cualquier problema durante el uso,
verifique y corrija las situaciones descriptas a
continuación:
Problema Solución
La unidad no Verifique la conexión
funciona de CA con el
cuando tomacorriente.
se acciona
la llave
interruptora.
Falta de niebla Verifique que haya
o flujo de niebla medicamento en el
reducido. vaso recipiente del
nebulizador.
Verifique que el
nebulizador no esté
dañado.
Verifique la posición del
propulsor violeta dentro del
nebulizador.
Verifique que el tubo de
aire y otros componentes
estén correctamente
conectados.
Verifique el filtro de aire y
cámbielo si es necesario.
Verifique el tubo de aire y
cámbielo si es necesario.

Denominación y Artículo n.º Nebulizador compresor manual portátil CompXPTM,
40-136-000
Alimentación Batería NiM , 12 V CA, 12 V CC
Capacidad de batería NiMH 1600 mA
Duración de carga de batería NiMH Aproximadamente 45 minutos
Capacidad del vaso recipiente de 13 cm3
medicamento
amaño de gotas 0,5 a 10 µm
Nivel de ruido 60 dBA
ipo de motor Bomba a pistón
Caudal promedio de nebulización 0,2 ml/min
Rango de presión del compresor 30 a 36 Psi (210 a 250 Kpa/2,1 a 2,5 bar)
Rango de presión de trabajo 8 a 10 Psi (50 a 70 Kpa/0,5 a 0,7 bar)
Caudal en litros 4 - 8 l/min
Rango de temperatura de trabajo 50°F a 104°F (10°C a 40°C)
Rango de humedad de trabajo 10 a 90% R
Rango de temperatura de 13°F a 158°F (-25°C a 70°C)
almacenamiento
Rango de humedad de 10 a 90% R
almacenamiento
Dimensiones 5-1/8” x 4-1/4” x 2-1/2” con tapa/sin batería
6-3/4” x 4-1/4” x 2-1/2” con tapa y batería
Peso aproximado 12,3 oz sin batería
1 lb 7,6 oz con batería
Accesorios Compresor manual portátil, tapa transparente,
nebulizador, manguera de 7’, conector de manguera,
boquilla en ángulo, cinco (5) filtros de aire, adaptador
de CA y base de goma, Batería recargable, adaptador de CC
para automóvil, caja para traslado
Especificaciones sujetas a modificación sin previo aviso
Protección contra choque eléctrico
Equipo clase II
Accesorios aplicados de tipo BF:
- Boquilla, inhalador de chupete para bebé y máscara
Protección contra el ingreso perjudicial de agua
- IPX0 (común)
Grado de seguridad en presencia de anestésicos inflamables o de oxígeno
- No AP/APG (no apto para ser utilizado en presencia de anestésicos inflamables o de oxígeno)
Modalidad de operación: continua.
UL 1950 (AC Adaptador solamente)
Especificaciones del Producto
16
1931 Norman Drive South
Waukegan, IL 60085 USA
Toll-Free Customer Care elpline:
800-622-4714
www.mabisdmi.com
#91-032-136 09/10
©2010 Briggs Medical Service Company
Table of contents
Languages:
Other MABIS Respiratory Product manuals