MacDon 625 User manual

MacDon
625 Spray System
OPERATOR’S
MANUAL
Release Date 02/06/2000
MacDon Industries Ltd.
680 Moray Street,
Winnipeg, Manitoba, Canada
R3J 3S3
(204) 885-5590, Fax 832-7749

1
INTRODUCTION
Your new MacDon 625 Field Sprayer, teamed with the MacDon Turbo Windrower tractor is designed to be
used to apply a wide variety of chemicals to a wide variety of crops and crop conditions. The proper use of
agricultural chemicals will enhance your profitability and reduce the risks.
This sprayer attachment has been developed in response to numerous requests for additional usage of the
MacDon Self-Propelled Windrower.
NOTE: This Manual contains information on the MacDon sprayer attachment. It is to be used in
conjunction with the Operator’s Manual for the Self-Propelled Windrower which provides information on the
tractor.
CAREFULLY READ BOTH MANUALS TO BECOME FAMILIAR WITH ALL RECOMMENDED PROCEDURES
BEFORE ATTEMPTING TO UNLOAD, ASSEMBLE OR USE THE WINDROWER/SPRAYER ATTACHMENT.
Use this manual as your first source of information about the sprayer attachment. If you follow the instructions
given in this manual, your sprayer attachment will work well for many years.
The manual contains instruction for “Safety”, “Operation”, and “Maintenance/Service”. Additional instructions
for unloading and assembly are shipped with the machine from the factory.
Use the Table of Contents to guide you to specific areas. Study the Table of Contents to familiarize yourself
with how the material is organized.
Keep this manual handy for frequent reference and to pass on to new operators or owners. Call your dealer if
you need assistance, information, or additional copies of the manual.
NOTE: Right hand (R/H) and left hand (L/H) designations are determined from the operator’s position,
facing forward.
NOTE: All measurements are in US or metric units unless otherwise stated.

2
TABLE OF CONTENTS
INTRODUCTION..................................................................................................................................................1
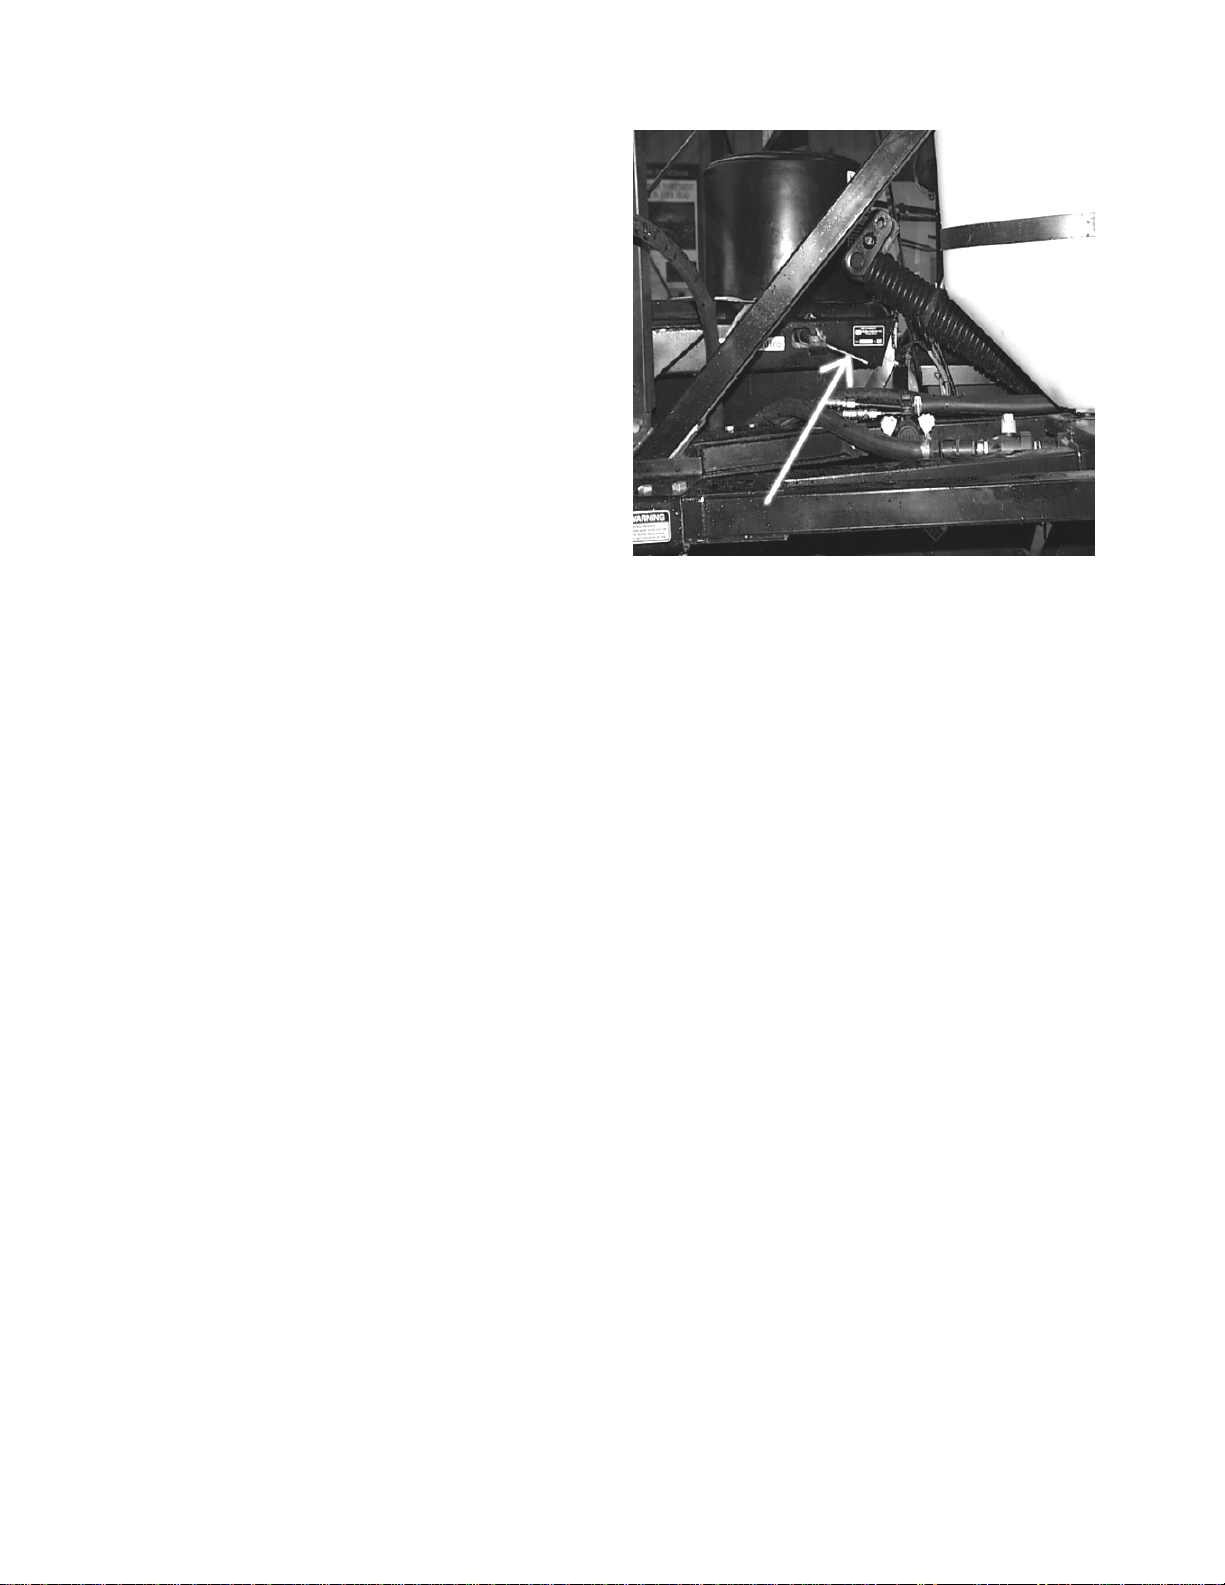
SERIAL NUMBER LOCATION ............................................................................................................................4
SAFETY ...............................................................................................................................................................5
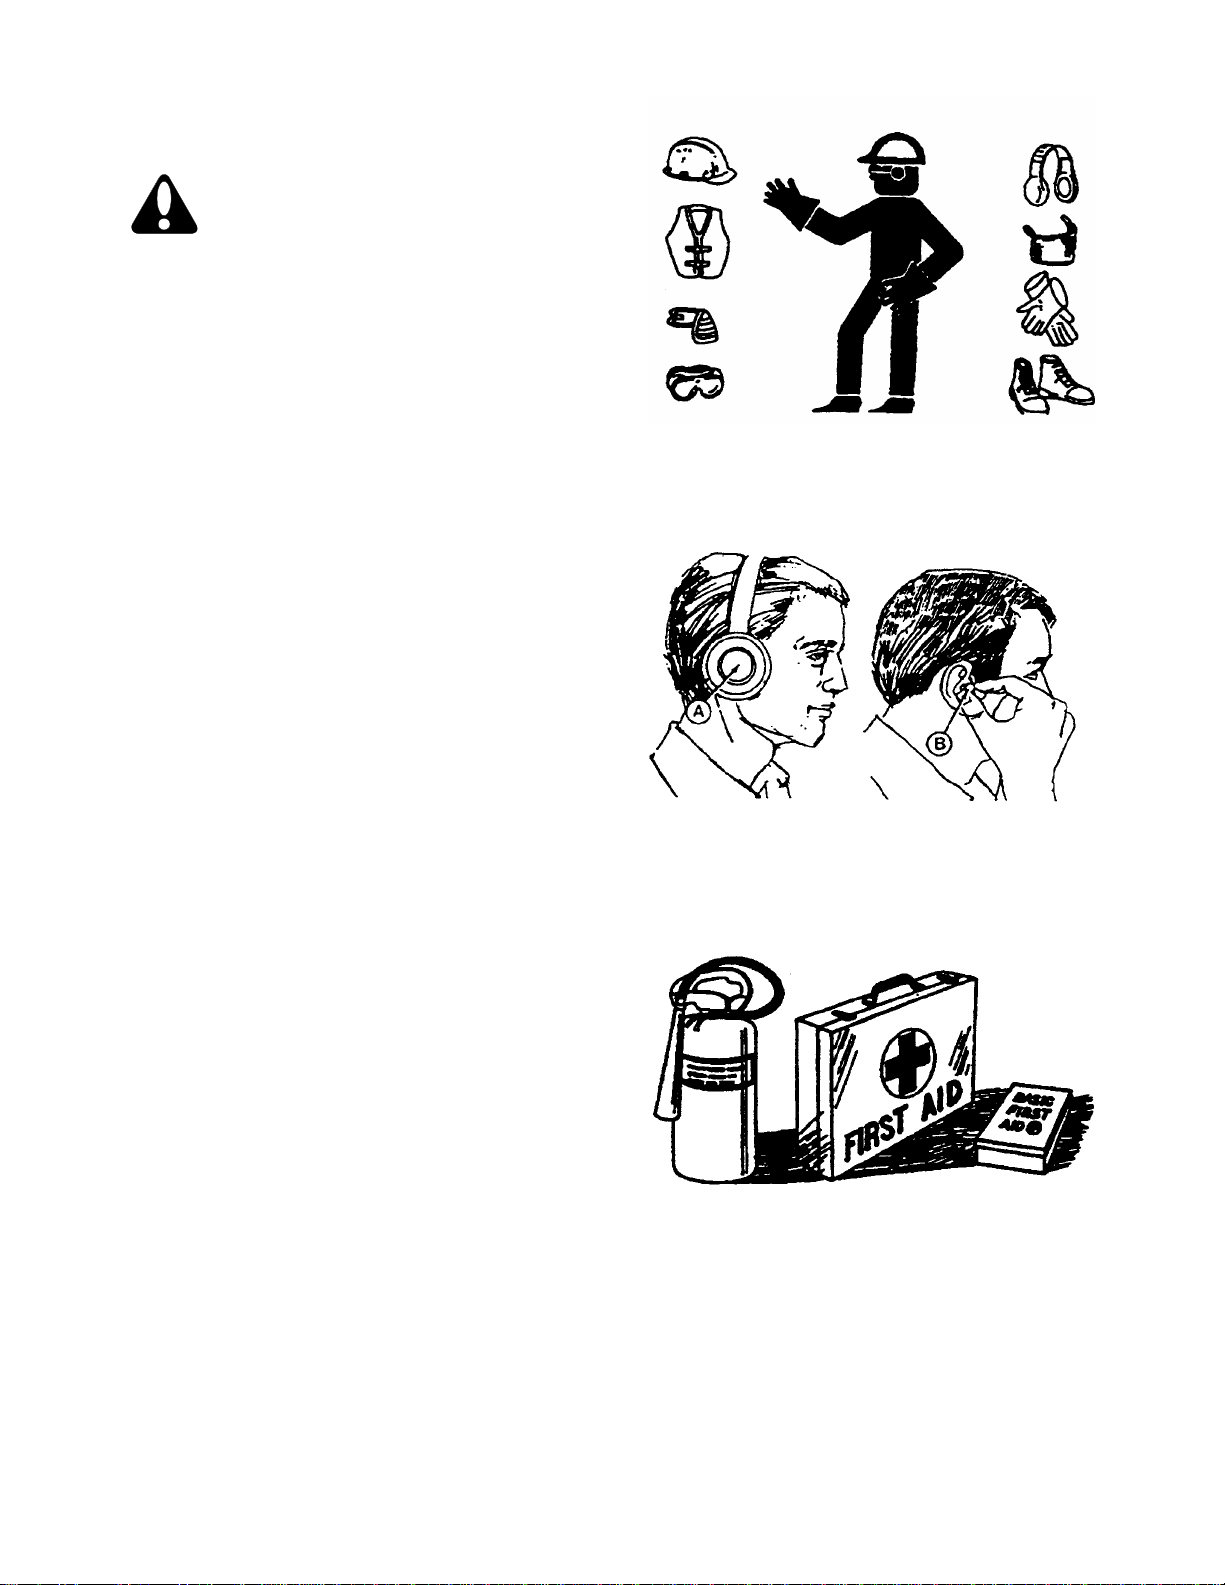
SAFETY ALERT SYMBOL........................................................................................................................5
SIGNAL WORDS.......................................................................................................................................5
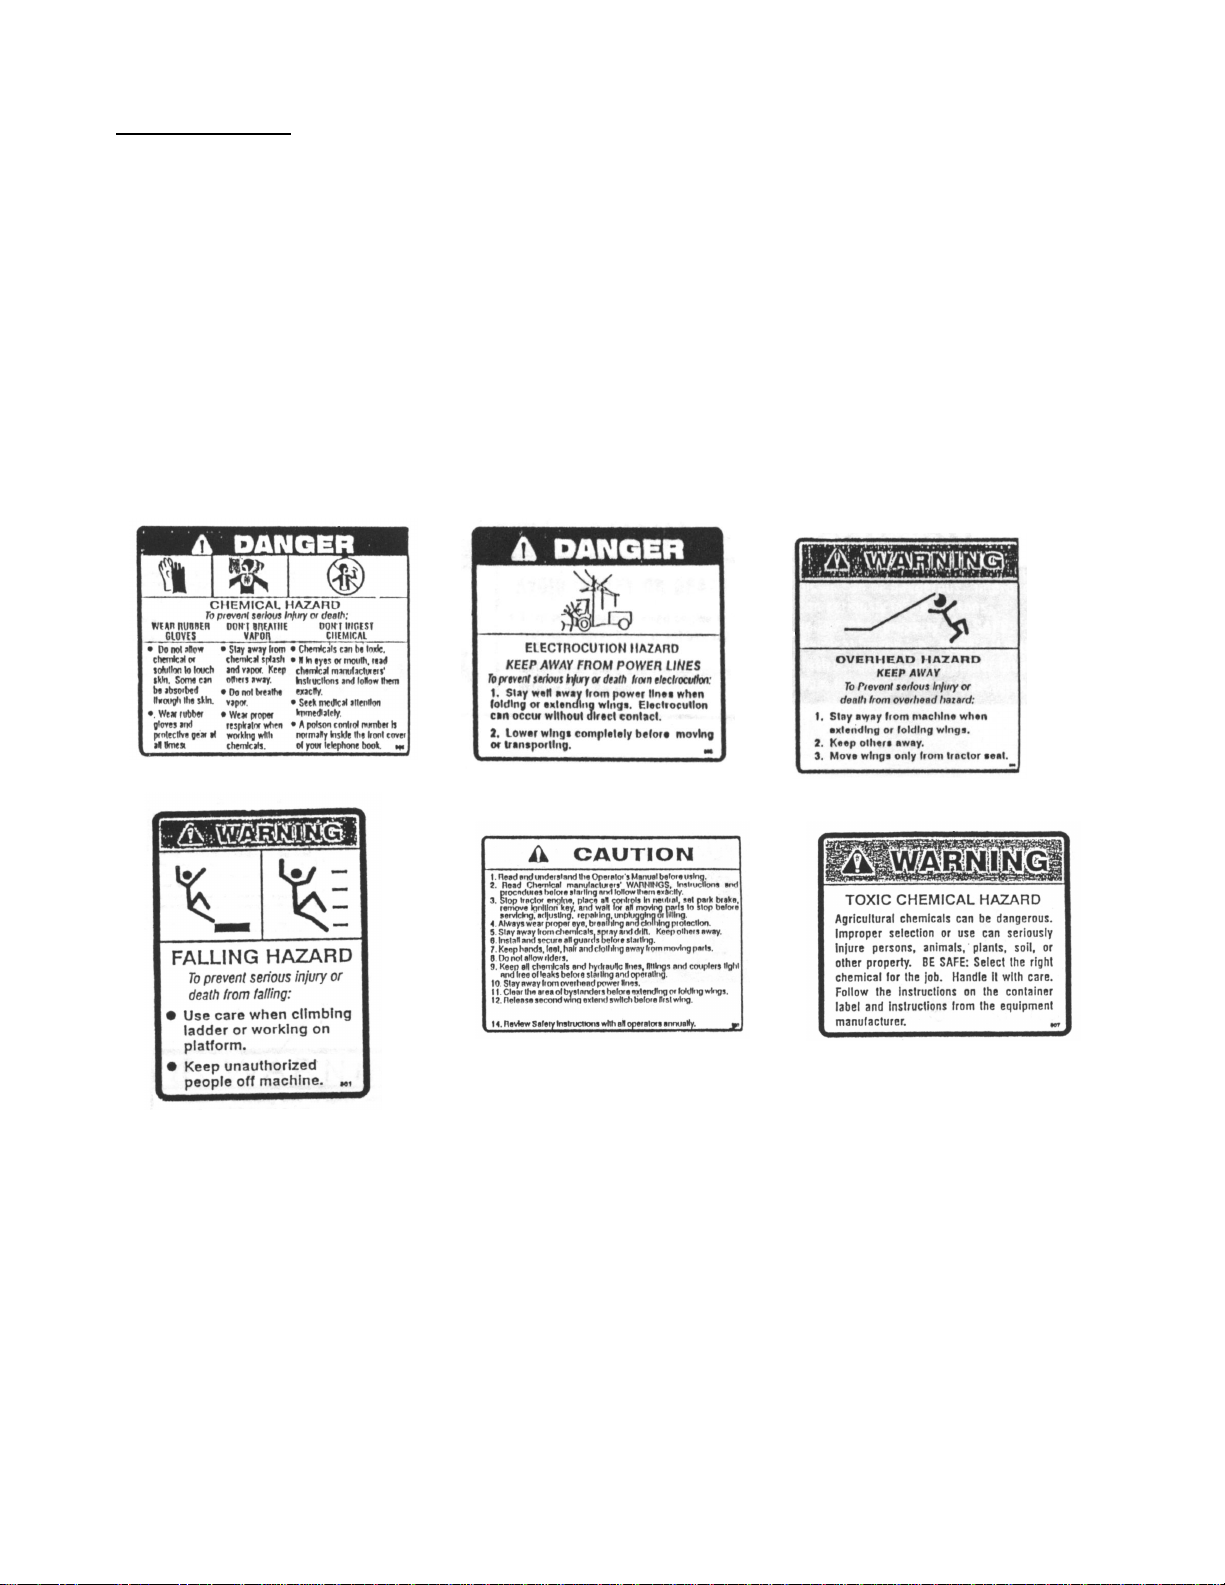
SAFETY SIGNS.........................................................................................................................................6
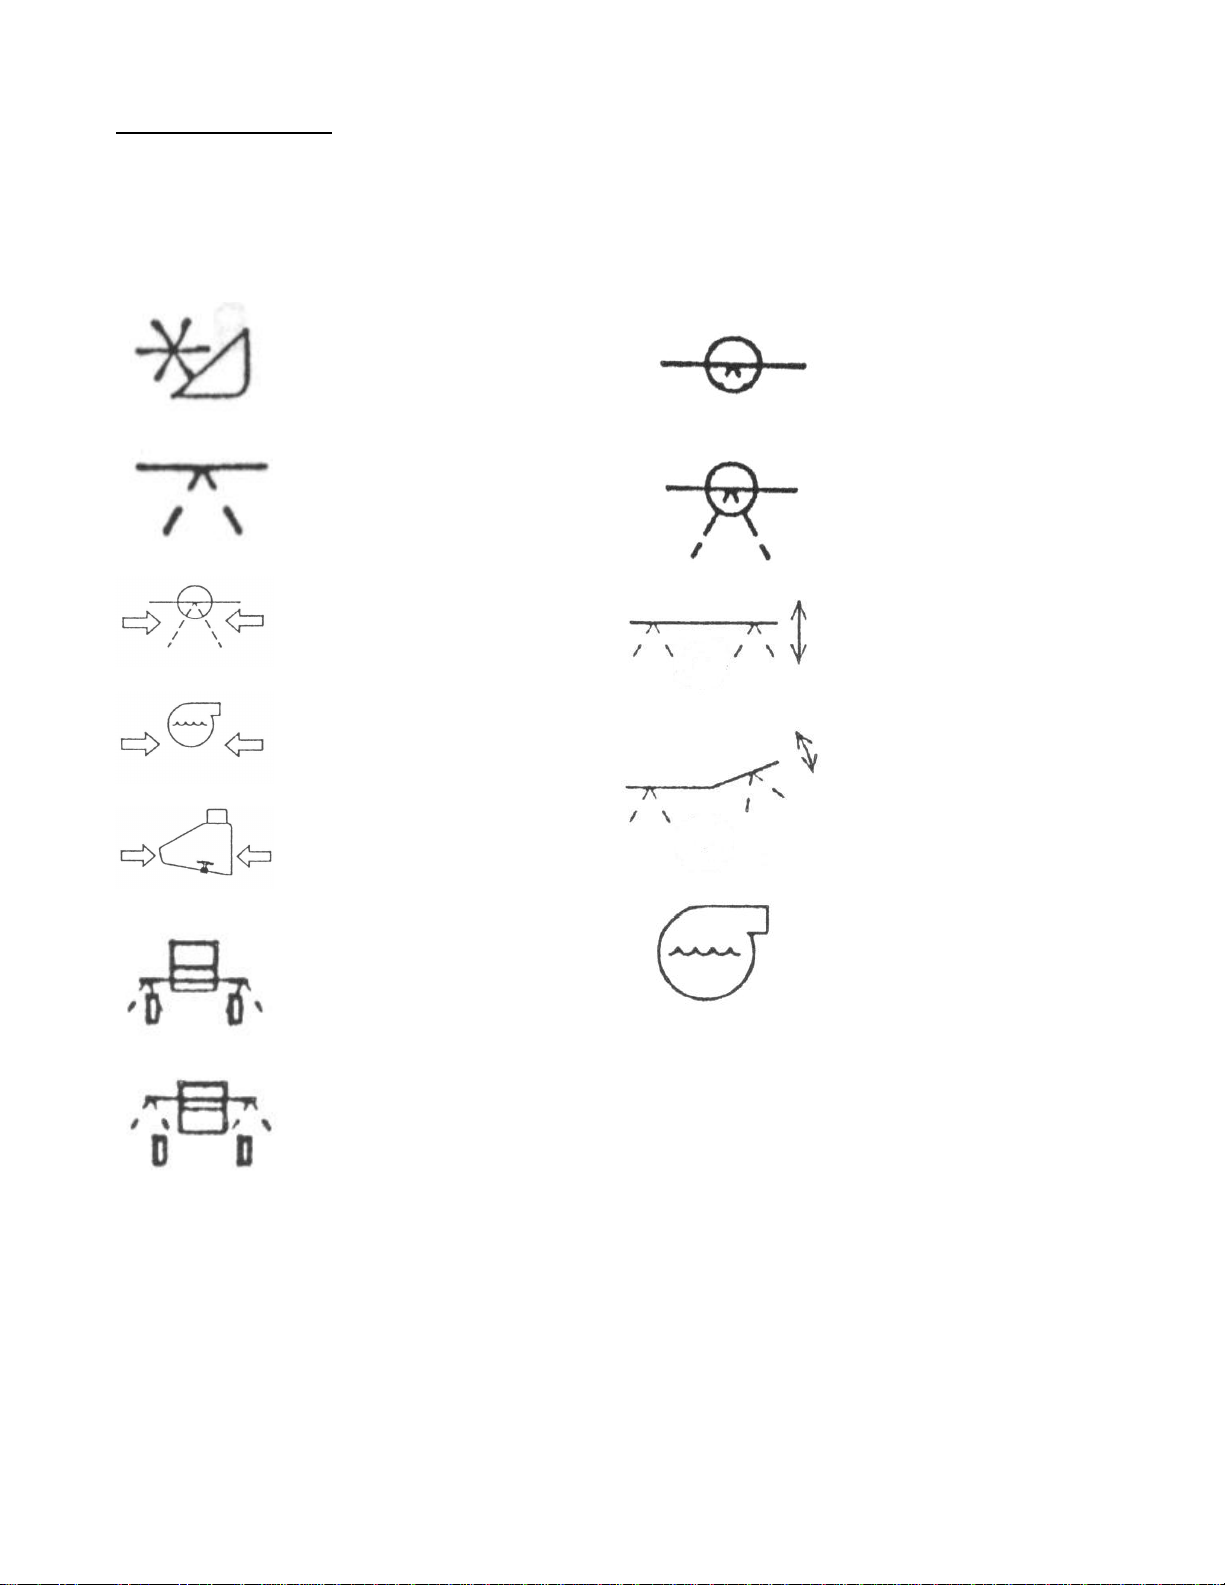
Symbol Definitions.....................................................................................................................................7
CHEMICAL SAFETY..........................................................................................................................................10
Pesticide Hazards and Toxicity Levels....................................................................................................12
Protective Clothing...................................................................................................................................12
Cleaning Contaminated Clothing.............................................................................................................13
Clean Water Personal Wash and Emergency Rinse Tank......................................................................14
Emergency First Aid for Pesticide Poisoning...........................................................................................15
SPECIFICATIONS .............................................................................................................................................16
TORQUE SPECIFICATIONS.............................................................................................................................17
OPERATION......................................................................................................................................................19
Your Responsibilities as an Owner/Operator ..........................................................................................19
To the New Operator ...............................................................................................................................19
Driving the Sprayer..................................................................................................................................20
Pre-Starting Checks: Annual ..................................................................................................................21
Pre-Starting Checks: Daily......................................................................................................................22
Break-in Period........................................................................................................................................24
Boom Controls.........................................................................................................................................25
Rear Center Boom..............................................................................................................................26
Attaching the Sprayer to the Windrower.............................................................................................27
Boom Props........................................................................................................................................28
Spray System ..........................................................................................................................................29
Operating the Sprayer Pump..............................................................................................................29
Starting the Sprayer Pump.................................................................................................................30
Checking for Pump Operation............................................................................................................30
Bottom Filling the Tank.......................................................................................................................31
Top Filling the Tank............................................................................................................................32
Triple Rinsing Chemical Containers...................................................................................................32
Flushing the Spray System and Tank Cleaning.................................................................................33
Daily Cleaning...............................................................................................................................33
Cleaning the Tank when Changing Chemicals or Storing the Sprayer Attachment.....................34
Agitation..............................................................................................................................................35
Sprayer Calibration.............................................................................................................................36
Sprayer Calibration (metric) ...............................................................................................................39
Crop Dividers......................................................................................................................................42
Rate Controller ...................................................................................................................................43
The MT-3405 Automatic Rate Controller ......................................................................................43
Boom Spray Selection...................................................................................................................43
Boom Control Valves.....................................................................................................................44
Calibration Values For The MT-3405 Rate Controller........................................................................44
Boom Width Calibration Values ....................................................................................................44
Flow Meter Calibration Number ....................................................................................................44
DICKEY-john Radar Velocity Sensor............................................................................................45
Transporting the Sprayer.........................................................................................................................46
Detaching the Sprayer.............................................................................................................................49
Storage Procedure...................................................................................................................................52
Winterizing the Spray System ............................................................................................................52

TABLE OF CONTENTS
3
CHEMICAL APPLICATION AND OPERATING VARIABLES FOR THE MACDON FIELD SPRAYER............53
1. Preparing for Spray Application..........................................................................................................53
2. Ground Speed ....................................................................................................................................54
3. Selecting the Nozzle Tip.....................................................................................................................55
4. Flow Rate and Application Chart........................................................................................................56
5. Boom Height.......................................................................................................................................57
6. Spraying Solutions other than Water..................................................................................................58
MAINTENANCE/SERVICE................................................................................................................................59
Service Procedures .................................................................................................................................59
THE MACDON SELF-PROPELLED WINDROWER...............................................................................60
Access to the Engine Compartment...................................................................................................60
Cab Air Filter.......................................................................................................................................60
Tire Pressures....................................................................................................................................60
THE MACDON FIELD SPRAYER...........................................................................................................61
RECOMMENDED LUBRICANTS............................................................................................................61
Greasing the Field Sprayer Attachment Structure...................................................................................61
Spray System Maintenance................................................................................................................64
Adjusting the Output Pressure of the Spray Pump ............................................................................66
Adjusting the Height of the Nozzle Tips .............................................................................................67
Suspension Adjustments....................................................................................................................68
Leveling the Outside Booms ..............................................................................................................69
Adjusting the Height of the Outside Booms ..................................................................................70
Center Boom Positioning....................................................................................................................71
Front Location ...............................................................................................................................71
Rear Location................................................................................................................................72
Upstop Adjustment.............................................................................................................................73
Break Away Boom Tip Adjustments...................................................................................................74
Adjusting the Boom Tip to Fold for Transport Properly.................................................................74
Adjusting the Wire Cable on the Break Away Boom Tip...............................................................75
Changing the Locking Plate ..........................................................................................................75
Electrical Wiring Diagram...................................................................................................................76
Hydraulic Circuit Diagram...................................................................................................................77
MAINTENANCE CHECKLIST .................................................................................................................78
MAINTENANCE RECORD ................................................................................................................................79
TROUBLE SHOOTING GUIDE..........................................................................................................................80
OPTIONS AND ATTACHMENTS ......................................................................................................................84
Rear Tank................................................................................................................................................84
TeeJet Tank Rinsing Nozzle....................................................................................................................85
Econo-Mark Foam Marker.......................................................................................................................86
Boom Touch Down Wheels.....................................................................................................................87
Narrow Tire..............................................................................................................................................87
Windscreen Kit.........................................................................................................................................87
Nozzle Tips..............................................................................................................................................87
CONVERSION FACTORS.................................................................................................................................88
NOTES...............................................................................................................................................................89

4
SERIAL NUMBER LOCATION
Record the sprayer attachment serial number
below:
_____________________________________
The serial number is located on the left side
of the sprayer attachment below the tank fill
opening.
Sprayer Attachment Serial Plate Location

5
SAFETY
SAFETY ALERT SYMBOL
This safety alert symbol indicates important safety messages in
this manual and on safety signs on the sprayer attachment.
This symbol means: ATTENTION!
BECOME ALERT!
YOUR SAFETY IS INVOLVED!
Carefully read and follow the safety message accompanying this
symbol.
Why is SAFETY important to you?
3 BIG REASONS - ACCIDENTS DISABLE AND KILL
- ACCIDENTS COST
- ACCIDENTS CAN BE AVOIDED
SIGNAL WORDS
Note the use of the signal words DANGER, WARNING and CAUTION with safety messages. The
appropriate signal word for each message has been selected using the following guidelines:
Indicates an imminently hazardous situation that, if not avoided, could
result in death or serious injury.
Indicates a potentially hazardous situation that, if not avoided, could
result in death or serious injury. It is also used to alert against unsafe
practices.
Indicates a potentially hazardous situation that, if not avoided, may
result in minor or moderate injury. It is also used as a reminder of good
safety practices.

SAFETY
6
SAFETY SIGNS
•The safety signs reproduced below appear on the sprayer.
•Keep safety signs clean and legible at all times.
•Replace safety signs that are missing or become illegible.
•If original parts on which a safety sign was installed are replaced, be sure the repair part also bears
the current safety sign.
•Safety signs are available from your Dealer Parts Department.
To install safety signs:
1. Be sure the installation area is clean and dry.
2. Decide on the exact position before you remove the decal backing paper.
3. Remove the smaller portion of the split backing paper.
4. Place the sign in position and slowly peel back the remaining paper, smooth the sign as it is applied.
5. Small air pockets can be smoothed out or pricked with a pin.

SAFETY
7
Symbol Definitions
The following symbols are used to depict functions
or reactions at the various instruments and
controls. Learn the meaning of these symbols
before operating the windrower.
- windrower mode
- sprayer mode
- nozzle pressure
- pump pressure
- agitation pressure
- rear boom down
- rear boom up
- HOLD control for
sprayer boom
- RUN control for
sprayer boom
- boom lift
- boom tip lift and
boom swing
- spray system pump

SAFETY
8
GENERAL SAFETY
The following are general farm
safety precautions that should be
part of your operating procedure for
all types of machinery.
1. Protect Yourself
When assembling, operating and servicing
machinery wear all the protective clothing and
personal safety devices that COULD be
necessary for the job at hand. Don’t take
chances. Refer to the MacDon Self-Propelled
Windrower Operator’s Manual for precautions
during servicing.
You may need:
- a hard hat
- protective shoes with slip resistant soles
- protective glasses or goggles
- unlined gloves made of rubber,
polyethylene, or neoprene
- wet weather gear
- respirator or filter mask
- hearing protection. Be aware that prolonged
exposure to loud noise can cause impairment
or loss of hearing. Wearing a suitable hearing
protective device such as ear muffs (A) or
earplugs (B) protects against objectionable or
loud noises.
Refer to the pesticide label for recommended
protective clothing to wear.
2. Provide a first-aid kit for use in case of
emergencies.
3. Keep a fire extinguisher on the machine.
Be sure the extinguisher is properly
maintained and be familiar with its proper
use.
4. Keep young children away from machinery
at all times.
PROTECT YOURSELF
PROTECT AGAINST NOISE
BE PREPARED FOR EMERGENCIES

SAFETY
9
GENERAL SAFETY (continued)
5. Wear close-fitting clothing and cover long
hair. Never wear dangling items such as
scarves or bracelets.
6. Keep hands, feet, clothing and hair away
from moving parts. Never attempt to clear
obstructions or objects from a machine
while the engine is running.
7. Use only service and repair parts made or
approved by the equipment manufacturer.
Substituted parts may not meet strength,
design, or safety requirements.
8. Do not modify the machine. Unauthorized
modifications may impair the function
and/or safety and affect machine life.
9. An operator must always be seated in the
operator’s cab when the engine is running.
A child or even a pet could engage an
idling machine.
10. Keep the area used for servicing machinery
clean and dry. Wet or oily floors are
slippery. Wet spots can be dangerous
when working with electrical equipment.
Be sure all electrical outlets and tools are
properly grounded.
11. Use adequate light for the job at hand.
12. Keep machinery clean. Straw and chaff on
a hot engine are a fire hazard. Do not allow
oil or grease to accumulate on service
platforms, ladders or controls. Clean
machines before storage.
13. Never use gasoline, naphtha or any volatile
material for cleaning purposes. These
materials may be toxic and/or flammable.
14. When storing machinery, cover sharp or
extended components to prevent injury
from accidental contact.
NEVER WEAR LOOSE OR
DANGLING CLOTHES
KEEP SERVICE AREA CLEAN AND DRY

10
CHEMICAL SAFETY
DANGER:
Mishandling Agriculture chemicals can be deadly. Always follow the chemical manufacturer’s
instructions exactly. Minimize the risk of contaminating clothing, machinery, and the environment:
ensure you and other personnel are aware and follow the safe handling procedures described on the
pesticide label. DO NOT work alone. DO NOT allow children or unprotected workers on a contaminated
sprayer.
Transporting chemicals
1. Never transport pesticides in the passenger
space of an automobile. Never allow
passengers or pets to ride with the
pesticides.
2. Never leave pesticides unattended in an
unsecured vehicle.
3. Always transport containers in the original
container with the proper label attached.
Ensure the container is properly sealed and
the outside of the container is not
contaminated with pesticide.
4. Do not transport pesticides with fertilizer,
seed, feed, drugs, clothing, and food.
5. Secure the chemical containers to prevent
the load from shifting. Protect containers
from objects that could puncture, tear, or
ruin the packaging of the chemical.
6. If the pesticides are not to be used
immediately, transfer the containers to a
storage facility when you reach your
destination.
Handling
1. Rinse containers immediately after
emptying. Thoroughly wash clothing and
equipment contaminated by chemicals. Do
not smoke or eat in the field while applying
pesticides.
2. Do not breathe, touch or ingest chemicals.
Always wear the protective clothing outlined
by the chemical manufacturers’label and
follow safe handling procedures.
3. Fill the sprayer with chemical outside, in a
well-ventilated area, away from areas
frequently traveled by family and other
people.
4. Wash thoroughly before eating or using the
washroom. Use a detergent to remove all
chemical residue. Rinse carefully and dry
with disposable towels.
Pesticide Application
1. Read and follow all label instructions.
2. Select the least toxic pesticide for the
application. Chemicals that display
CAUTION or WARNING on the label are less
harmful than chemicals that display
DANGER on the label. Avoid using
chemicals that are designated RESTRICTED
if possible.
3. Wear the appropriate protective clothing and
equipment when working with chemicals.
Remove protective clothing and equipment
before entering the cab to prevent
contaminating the cab.
4. If possible, DO NOT leave the operator’s cab
while in the treated area. If it becomes
necessary to leave the cab in the treated
area, immediately put on the protective
clothing and equipment required by the
pesticide label upon exiting the cab.
5. Misuse, including excessive rates, uneven
application, wind drift, and label violations
can cause injury to crops, livestock, persons
and the environment.
6. Eliminate the need to dispose of excess
pesticides by purchasing only what is
required to do the application.
7. Ensure there is fresh water in the fresh water
wash tank; know where it is and how to use
it. Consult a physician should you contact
the chemical and subsequently experience
physical difficulties. Do not use the sprayer
to transport drinking water.
Storing Chemicals
1. Follow the manufacturers’instructions for
chemical storage. Avoid unnecessary
storage by purchasing only the quantity
needed for the crop year. Never reuse
pesticide containers.
2. Store chemicals only in their original
containers and in a locked area. Never use
unmarked containers or containers used for
food to store pesticides.
3. Keep all chemicals out of reach of children
and away from livestock and animals.

CHEMICAL SAFETY
11
Disposal
1. Do not burn the containers or leave them
lying in the field or ditches. Dispose of
them by triple rinsing and leaving at a
pesticide container disposal site.
2. Rinse sprayer while still in the field. Spray
the rinse thinly over the field sprayed.
Never contaminate the farmyard or drainage
systems with sprayer rinse.
3. Remember that pesticide waste is as
hazardous as the pesticide in the unopened
container.
Washing the Application Equipment
1. Wash down the sprayer immediately after
fieldwork. Dispose of the wash water in an
environmentally safe manner.
2. DO NOT clean the equipment upslope of
ditches or water bodies, cropland, or
shelterbelts. Wash water can contaminate
the soil or a clean water supply and be very
toxic to fish, other wild life and people.
In Case of an Emergency or a Spill
1. In case of chemical poisoning, get
immediate medical attention. Have a
container label handy when seeking medical
attention.
2. Post Emergency telephone numbers for
your area on the sprayer before using
agricultural chemicals.
3. Keep absorbent material available in case of
a minor spill and dispose of any
contaminated materials according to the
pesticide label.

CHEMICAL SAFETY
12
Pesticide Hazards and Toxicity Levels
Extreme care must be taken when working around
chemicals. Be familiar with the toxicity levels of
the chemicals you are using and recommended
protective gear that each operator should use
before starting.
Every pesticide container has a label on it that
designates its level of toxicity. This toxicity level
then requires the operator to use specific
protective gear whenever working with this
chemical.
Toxicity Level Protective Gear
DANGER POISON
High Risk
Goggles, Respirator,
Avoid Fumes, Gloves
and Skin Protection
WARNING POISON
Medium Risk
Goggles, Avoid Fumes,
Gloves and Skin
Protection
CAUTION POISON
Low Risk
Avoid Fumes, Gloves
and Skin Protection
Protective Clothing
It is necessary to wear adequate protective
clothing, respirators, boots, goggles and gloves to
reduce the risk of contact with chemicals. CHECK
THE PESTICIDE LABELS FOR DIRECTIONS ON
PROTECTIVE CLOTHING TO BE WORN WHILE
HANDLING A PESTICIDE.
1. Respirators –Only use NIOSH-approved
respirators. Do not use different parts from
different respirator manufacturers.
Change filters each day during handling of
chemicals. Always replace the cartridge with a
new cartridge at the beginning of the spray
season. Replace the cartridge when a
chemical odor becomes apparent or it
becomes difficult to breathe.
Check the seal of the respirator before working
with chemicals. The respirator will not function
properly if the operator has a beard, mustache,
sideburns or they are unshaven.
2. Goggles or Face Shields –To protect your
eyes from chemical splashing and chemical
dust, wear goggles that fit snugly on your face.
Eye glasses and shop safety glasses DO NOT
provide adequate protection. Goggles that
protect the sides of your face with indirect
ventilation to prevent fogging should be used.
Never wear contact lenses when working with
chemicals. Use a rubber or plastic strap to
secure the goggles to your face. Cloth or
elastic headbands will absorb chemicals.
Full-face protection may be required when
handling some pesticides. Full-face shields will
offer more protection to exposed skin than
goggles.
3. Gloves –Never use lined gloves, gloves with
wristbands, or leather gloves as these
materials will absorb pesticides. Chemical
resistant Neoprene or natural rubber gloves will
provide the best protection. The edge of the
glove should be folded over at the cuff to
prevent liquid from dripping down your sleeve
when you raise your arms. Sleeves should be
secured tightly around the gloves.

CHEMICAL SAFETY
13
4. Footwear –Boots should be unlined and
made of chemical resistant materials such as
Neoprene or rubber. DO NOT wear leather or
clothe footwear because these will absorb
pesticides. Wear pant legs outside the boot to
prevent splashes and spills from running down
your leg. Knee-length boots will extend above
an apron offering greater protection.
5. Coveralls, Aprons, and Hats –Disposable or
reusable coveralls should fit tightly around the
neck, ankles, and wrists.
Reusable coveralls can be made of tightly
woven cotton but will provide only minimal
protection when handling slightly toxic
chemicals. Reusable waterproof suits are
made of unlined rubber, neoprene, or
polyethylene and will provide the most
protection. DO NOT use coveralls made of
polyester material because liquids easily
penetrate them.
Disposable coveralls are made of polyethylene
material, which is lightweight and more
comfortable on warm days. Be careful to
choose a disposable coverall that is chemically
resistant. Disposable coveralls often have an
attached hood that protects the head, neck
and ears.
Aprons protect the front of your body when
pouring and handling concentrated pesticides.
The apron should be made of rubber or
neoprene material. The apron should cover
the front of the body from the chest to the
knees.
If the coveralls do not have a hood, a hard hat
and waterproof neck covering should be worn.
The sweatband in the hard hat should be
made of plastic material and not cotton or
leather because they cannot be cleaned
properly. DO NOT wear a baseball cap with a
cloth sweatband.
Cleaning Contaminated Clothing
Wash contaminated clothing after each day of use.
WEAR GLOVES WHEN HANDLING PESTICIDE
CONTAMINATED CLOTHING. Discard clothing
that has been saturated with highly toxic and
concentrated pesticides and clothing that has been
ripped or torn.
Do not wash protective clothing with other family
garments at the same time. Rinse clothing in a
wash tub.
Protective clothing used to handle small amounts
of slightly toxic pesticides can be laundered in ONE
wash. Otherwise, protective clothing should be
laundered at least TWICE.
Wash the protective clothing separately, one or two
garments at a time, and wash clothing that has
been used to handle the same pesticide together.
Wash the protective clothing with detergent in hot
water (60oC), the highest water level and longest
wash cycle with two rinses.
Rinse the washing machine after laundering
protective clothing by running the machine through
a full wash and rinse cycle with hot water and
detergent.
Dry the clothing outside on a line to avoid buildup
of residue in the dryer. Most pesticides are readily
broken down in sunlight. Store protective clothing
away from pesticides.
Disposable coveralls should be rinsed after each
day of use. Gently hand wash the coveralls in hot
soapy water if necessary and hang them to dry.
Do not scrub or wring them out to prevent damage
to the material and discard the coveralls if there are
tears or holes in them.
Hand wash gloves, boots and hard hats in hot
soapy water after each day of use and air dry.
Discard boots and gloves damaged with holes or
tears.

CHEMICAL SAFETY
14
Clean Water Personal Wash and Emergency Rinse Tank
There is a square, yellow tank located on the left
boom near the plumbing tree. The tank has a
hose that will gravity feed or an auxiliary tap that
can be used in the case of emergency and to
protect against pesticide contamination.
Fill the tank with clean water every day and check
regularly to ensure there is adequate water in the
event of an emergency and for the day’s use.
Remove the fill cap on top to fill the tank with
water.
To operate the gravity feed hose on the rinse tank:
1. Pull down on the hose until it breaks free from
the upper fitting.
2. Water will begin flowing from the opening in
the hose when the hose is below the water
level in the tank. Hold the hose and opening
below the tank to ensure the water is allowed
to drain completely from the tank. Avoid
covering the opening and/or squeezing the
hose which would reduce the flow of water
from the tank.
3. Position the contaminated area of the body
under the opening of the hose and flush the
affliction with running water from the hose.
To operate the tap:
1. Turn the valve on the tap until water begins to
flow from the tank.
2. Position the contaminated area of the body
under the opening of the tap and flush the
affliction with running water from the tap.
There is storage compartment molded in the tank
that can be used to store detergent, soap and
shampoo, face cloth, and towels. To access the
compartment, pull down on the metal locking latch
and lift the black lid to the upright position. After
using stored items close the lid and return the
metal latch to lock it shut.
Emergency Rinse Tank Gravity Feed Hose and
Manual Tap
Emergency Rinse Tank
Tap
Hose
Fill Cap
Storage

CHEMICAL SAFETY
15
Emergency First Aid for Pesticide Poisoning
While awaiting medical attention, several steps
can be taken to alleviate pain and/or discomfort
from pesticide poisoning. DO NOT
CONTAMINATE YOURSELF when assisting
someone else. CHECK THE PESTICIDE
LABELS FOR THE FIRST AID PROCEDURES IN
THE CASE OF AN EMERGENCY.
1. Remove yourself or the victim from the source
of contamination immediately and remove
clothing if necessary. Wash with plenty of
water.
2. If someone else has been poisoned, check his
or her breathing. Give artificial respiration if
breathing has stopped but ensure the victim’s
mouth is not contaminated with pesticide. DO
NOT contaminate yourself. Clean the victims
mouth and use alternative method to give
mouth to mouth resuscitation.
3. Call 911, a medical facility or a local doctor
and seek medical attention.
4. Decontaminate yourself or the victim with
water unless the pesticide label recommends
different procedures.
5. Keep yourself or the victim warm and
comfortable.
6. Carry a label from the pesticide container to
inform the doctor of the type of poisoning.
Keep the pesticide label in a sealed plastic
bag to avoid contaminating other people.
If a chemical has come in contact with the skin,
IMMEDIATELY REMOVE THE CONTAMINATED
CLOTHING AND WASH THE SKIN WITH CLEAN
WATER. Avoid contaminating other areas of the
body when removing clothes. Clean the skin with
detergent and/or gently shampoo hair; clean under
the fingernails. Avoid scratching the skin and/or
scalp. Dry off, keep warm by wrapping yourself in
a blanket or with clean clothes and seek medical
attention.
In the case of a chemical burn, IMMEDIATELY
REMOVE THE CONTAMINATED CLOTHING
AND WASH THE SKIN WITH CLEAN WATER.
Avoid contaminating other areas of the body when
removing clothes. Cover the burned area with a
loose, clean, soft cloth. DO NOT apply ointments,
greases, powders or other drugs when treating a
burn. Seek medical attention.
If a chemical has come in contact with the eye,
WASH THE EYE IMMEDIATELY. Hold the eyelid
open under the gravity feed hose. Wash the eye
with clean running water for 15 minutes and seek
medical attention.
If chemical dust, vapor or fumes have been
inhaled, IMMEDIATELY MOVE TO A
VENTILATED AREA WITH FRESH AIR. If
someone else has been exposed to chemicals in
an enclosed area, DO NOT ENTER the enclosed
area without sufficient protective equipment.
Ventilate the enclosed area so that no one else will
be poisoned. If no protective equipment is
available, DO NOT ENTER an enclosed area to
retrieve a victim but call for assistance from a fire
department. Apply artificial respiration if breathing
has stopped but DO NOT contaminate yourself.
DO NOT give the victim alcohol to drink. Seek
medical attention.
If a chemical has been swallowed, NEVER
INDUCE VOMITTING UNLESS IT IS
RECOMMENDED ON THE CHEMICAL LABEL.
Drink plenty of water if an unknown poison has
been swallowed to dilute and slow absorption.
Seek medical attention.
A victim that has been in contact or ingested a
chemical may go into shock or experience
respiratory failure. Someone may be in shock if
their skin is cool, moist and pale, eyes have dilated
pupils, breathing is shallow and irregular, pulse is
weak, rapid and irregular. If a victim goes into
shock, KEEP HIM OR HER WARM. If the victim
is not breathing, IMMEDIATELY BEGIN
ARTIFICIAL RESPIRATION BUT DO NOT
CONTAMINATE YOURSELF.

16
SPECIFICATIONS
MacDon Field Sprayer
AVAILABLE SIZES
SPRAY SYSTEM
WEIGHT
FEATURES
OPTIONS
90 feet (27.5 meters) width - 12 feet 7 inches (3.8 meters) width
when sprayer is in transport position
400 US Gallon (1500 liters) spray capacity
Spraying height from 24”(60 cm) to 76”(190 cm)
Standard nozzle spacing of 20”(50 cm)
Dry boom design allows adjustable nozzle spacing
Micro-Trak MT-3405 rate control system
Individual boom controls
Polyethylene tank
80-02 Extended Range TeeJet stainless steel nozzles standard
TeeJet triple nozzle bodies installed from the factory
Centrifugal hydraulic motor driven Hypro pump - maximum flow is
150 USgpm (580 LPM), maximum pressure is 150 psi (1030 kPa).
DICKEY-john Radar Velocity Sensor
Line strainer
4800 lbs. (1500 kg) with tank empty
Innovative and gentle boom tip break away
Independent boom lift/fold/tip
Charcoal cab air filter
Rugged, revolutionary boom design
Outstanding operator visibility with front boom design
Rubber based vertical and horizontal boom suspension
Optional 150 US Gallon (580 liters) Rear tank kit
Rear center boom location and kit
Foam marker kit
Windscreen kit
Rinse nozzle installed inside the tank
Boom touch down wheel
REQUIRED MOUNT TRACTOR SPECIFICATIONS:
Turbo Engine Required
Tail Wheel Tires 16.5L X 16.1 to be 80% filled with Calcium Chloride for
ballast and at 20 psi (140 kPa) pressure REQUIRED when the rear tank
kit has not been installed.
16.5L X 16.1 Drive Tire Option Recommended
No. 7 Power Wheel Option Recommended when the sprayer attachment is
installed on a 9300 or 9350 SP Windrower with 21.5L x 16.1drive tires.
No. 8 Power Wheel REQUIRED when SP Windrower has 19.5L x 24 drive
tires or the 14.6L x 24 drive tires.
SPECIFICATIONS AND DESIGN ARE SUBJECT TO CHANGE WITHOUT NOTICE OR OBLIGATION TO
REVISE UNITS PREVIOUSLY SOLD.

17
TORQUE SPECIFICATIONS
CHECKING BOLT TORQUE
The tables shown below give correct torque values for various bolts and capscrews. Tighten all bolts to the
torques specified in chart unless otherwise noted. Check tightness of bolts periodically using bolt torque chart
as a guide. Replace hardware with the same strength of bolt.
Torque figures indicated above are valid for non-greased or non-oiled threads and heads unless otherwise
specified. Therefore, do not grease or oil bolts or capscrews unless otherwise specified in this manual. When
using locking elements, increase torque values by 5%.
Torque value for bolts and capscrews are identified by their head markings.
ENGLISH TORQUE SPECIFICATIONS
N.m (lb-ft) N.m (lb-ft) N.m (lb-ft)
1/4 ’’ 8 (6) 12 (9) 17 (12)
5/16 ’’ 13 (10) 25 (19) 36 (27)
3/8 ’’ 27 (20) 45 (33) 63 (45)
7/16 ’’ 41 (30) 72 (53) 100 (75)
1/2 ’’ 61 (45) 110 (80) 155 (115)
9/16 ’’ 95 (70) 155 (115) 220 (165)
5/8 ’’ 128 (95) 215 (160) 305 (220)
3/4 ’’ 225 (165) 390 (290) 540 (400)
7/8 ’’ 230 (170) 570 (420) 880 (650)
1 ’’ 345 (225) 850 (630) 1320 (970)
Bolt
Diameter
"A" SAE2 Bolt Torque *
SAE5 SAE8
METRIC TORQUE SPECIFICATIONS
N.m(lb-ft)N.m(lb-ft)
M3 .5 (.4) 1.8 (1.3)
M4 3 (2.2) 4.5 (3.3)
M5 6(4)9(7)
M6 10 (7) 15 (11)
M8 25 (18) 35 (26)
M10 50 (37) 70 (52)
M12 90 (66) 125 (92)
M14 140 (103) 200 (148)
M16 225 (166) 310 (229)
M20 435 (321) 610 (450)
M24 750 (553) 1050 (774)
M30 1495 (1103) 2100 (1550)
M36 2600 (1917) 3675 (2710)
Bolt
Diameter
"A"
Bolt Torque
8.8 10.9

TORQUE SPECIFICATIONS
18
TIGHTENING O-RING FITTINGS*
1. Inspect O-ring and seat for dirt or obvious
defects.
2. On angle fittings back the lock nut off until
washer bottoms out at top of groove.
3. Hand tighten fitting until back-up washer or
washer face (if straight fitting) bottoms on face
and O-ring is seated.
4. Position angle fittings by unscrewing no more
than one turn.
5. Tighten straight fittings to torque shown.
6. Tighten angle fittings to torque shown while
holding body of fitting with a wrench.
* The torque values shown are based on
lubricated connections as in reassembly.
Torque
Value
Recommended
Turn to Tighten
(After Finger
Tightening)
Thread
Size
(in.)
Nut
Size
Across
Flats
(in.) (N.m) (lb-ft) (Flats) (Turns)
3/8
7/16
1/2
9/16
3/4
7/8
1-1/16
1-3/16
1-5/16
1-5/8
1-7/8
1/2
9/16
5/8
11/16
7/8
1
1-1/4
1-3/8
1-1/2
1-7/8
2-1/8
8
12
16
24
46
62
102
122
142
190
217
6
9
12
18
34
46
75
90
105
140
160
2
2
2
2
2
1-1/2
1
1
3/4
3/4
1/2
1/3
1/3
1/3
1/3
1/3
1/4
1/6
1/6
1/8
1/8
1/12
TIGHTENING FLARE TYPE TUBE FITTINGS*
1. Check flare and flare seat for defects that might
cause leakage.
2. Align tube with fitting before tightening.
3. Lubricate connection and hand tighten swivel
nut until snug.
4. To prevent twisting the tube(s), use two
wrenches. Place one wrench on the connector
body and with the second tighten the swivel nut
to the torque shown.
* The torque values are based on lubricated
connections in reassembly.
Torque
Value
Recommended
Turn to Tighten
(After Finger
Tightening)
Thread
Size
OD
(in.)
Nut
Size
Across
Flats
(in.) (N.m) (lb-ft) (Flats) (Turns)
3/16
1/4
5/16
3/8
1/2
5/8
3/4
7/8
7/16
9/16
5/8
11/16
7/8
1
1-1/4
1-3/8
8
12
16
24
46
62
102
122
6
9
12
18
34
46
75
90
1
1
1
1
1
1
3/4
3/4
1/6
1/6
1/6
1/6
1/6
1/6
1/8
1/8

19
OPERATION
Your Responsibilities as an Owner/Operator
CAUTION:
1. It is your responsibility to read and
understand this manual and the Self-
Propelled Windrower Operator’s Manual
completely before operating the sprayer.
Contact your dealer if an instruction is not
clear to you.
2. Follow all safety messages in the manual
and on safety signs on the machine.
3. Remember that YOU are the key to safety.
Good safety practices protect you and the
people around you.
4. Before allowing anyone to operate the
machine, for however short a time or
distance, make sure they have been
instructed in its safe and proper use.
5. Review the manual and all safety related
items with all operators annually.
6. Be alert for other operators not using
recommended procedures or not following
safety precautions. Correct these mistakes
immediately, before an accident occurs.
7. Do not modify the machine. Unauthorized
modifications may impair the function
and/or safety and affect machine life.
8. The safety information given in this manual
does not replace safety codes, insurance
needs, or laws governing your area. Be
sure your machine meets the standards set
by these regulations.
To the New Operator
It’s natural for an operator to be anxious to get
started with a new machine. Please take the time
to familiarize yourself with the sprayer by reading
the Operator’s Manuals and safety signs before
attempting operation. Study the Starting, Driving
and Stopping procedures so you will know what to
expect.
READ THE OPERATOR’S MANUAL
FOLLOW SAFETY RULES
Table of contents
Other MacDon Farm Equipment manuals

MacDon
MacDon PW8 User manual

MacDon
MacDon A40-D User manual

MacDon
MacDon D65 User manual

MacDon
MacDon M1170 Parts list manual

MacDon
MacDon FlexDraper FD2 Series User manual

MacDon
MacDon D50 User manual

MacDon
MacDon FD75 User manual

MacDon
MacDon D65 User manual

MacDon
MacDon R85 User manual

MacDon
MacDon 5020 User manual