manuals.online logo
Brands
  1. Home
  2. •
  3. Brands
  4. •
  5. Magnescale
  6. •
  7. Cash Counter
  8. •
  9. Magnescale LH72 User manual

Magnescale LH72 User manual

1/3
LH72 Change of display resolution (polarity)
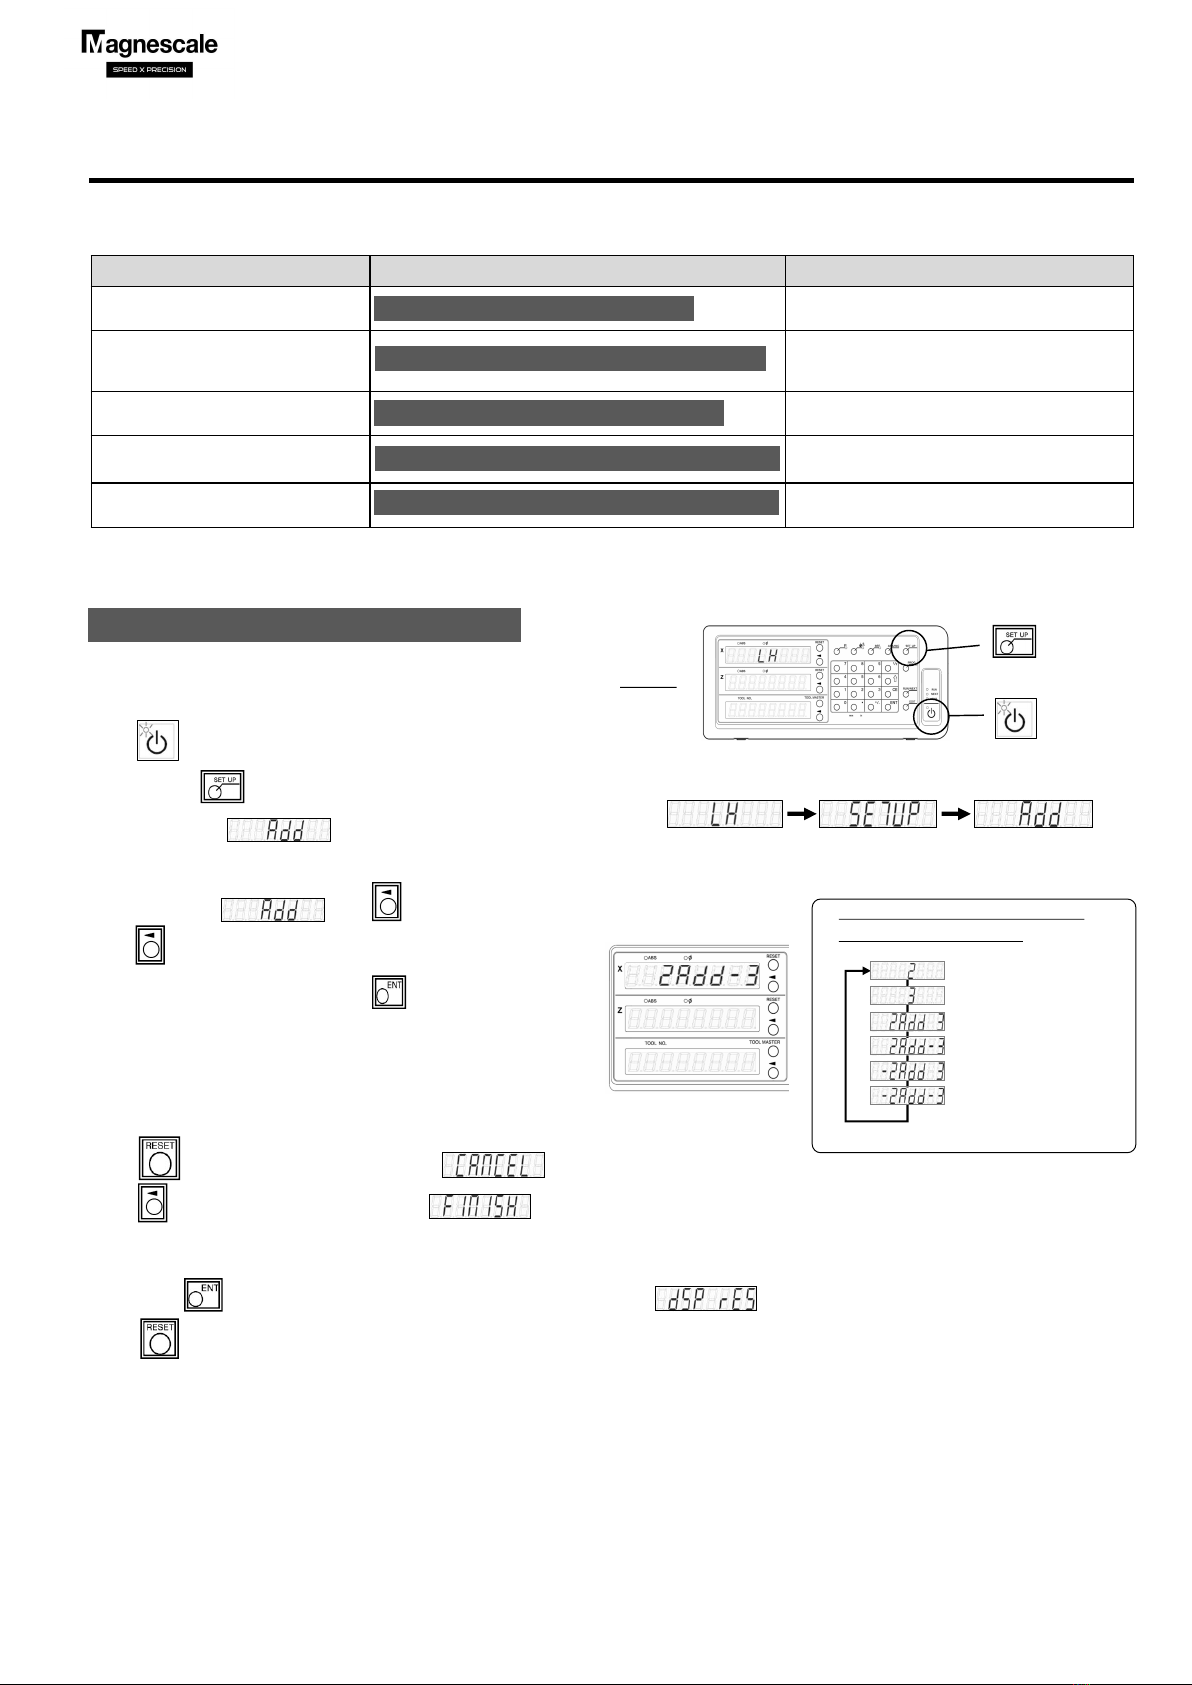
When the display is , press key to select the addition display.
Press key to select a condition.
When you have made your selection, press key to save your settings.
To finish the basic settings, follow steps ③and ④below.
Set to basic setting mode.
Turn key "ON" while the AC adapter is energized.
Press and hold key for 3 seconds after the lamp changes from blinking to off.
The display will be . (additional display).
LH72 Change of display resolution (polarity)
Ver.3 (2021.1) CS&S
LH72-3
* If you do not know the output resolution of the measurement unit, refer to the separate "Initial setup manual".
Purpose of change Operation Explanation
Change the polarity for each input axis
while using the addition function
Change the selection of addition display in the basic
settings
Change the measurement unit resolution Change the length measurement unit resolution in
the basic settings. And check the display resolution
in the detailed settings.
Change the display resolution Change the display resolution in the detailed
settings
Change the display polarity
(Counting direction is reversed)
Change the display resolution in the detailed
settings
Diameter display (double count value) Change to diameter display with display resolution
in the detailed settings
Detailed settings ⇒Display resolution ⇒Change
Detailed settings ⇒Display resolution ⇒Diameter display
The operation method for changing the display resolution differs depending on the purpose and conditions of the change.
Select the purpose and conditions to be changed from the table below and perform the operation.
Basic setting ⇒Measurement unit resolution ⇒Change
Basic settings ⇒Addition display ⇒Change
Detailed settings ⇒Display resolution ⇒Change polarity
Basic settings ⇒Addition display ⇒Change
Input 3 - Input 2
Input 2
Input 3
Input 2 + Input 3
Input 2 - Input 3
- (input 2 + Input 3)
Addition display (input conditions to
be displayed on the Z axis)
①
②
If you press key once, it will automatically enter the advanced setting mode and display.
Press key to enter normal count mode.
③
④
Switch from basic settings to normal count mode.
Press key once and the display will change to .
About 2 sec
Power ON
2/3
LH72 Change of display resolution (polarity)
Press key twice.
The display will be (measurement unit resolution).
Press key to check the current measurement unit resolution.
Set to basic setting mode.
Turn key “ON” while the AC adapter is energized.
Press and hold key for 3 seconds after the lamp changes from blinking to off.
The display will be . (additional display).
LH72-3
Basic setting ⇒Measurement unit resolution ⇒Change
About 2 sec
①
②
Press key of the axis you want to change and select
the measurement unit resolution.
When you have made your selection, press key to save your settings.
③
Display of measurement unit resolution
(LH72-3)
Input 1
Input 2
Input 3
Standard Expansion
Extended key
Selection of measurement
unit resolution
Press key once to automatically switch to advanced settings mode. The display will be .
Press key, the display becomes the normal display.
④
⑤
Switch from basic settings to normal count mode.
Press key once and the display will change to .
Diameter display
Angle display
Length display
NOTE 1: Selection of a value smaller than the basic setting measurement unit
resolution is not displayed.
NOTE 2: The angle display can be set when the angle resolution is selected in
the basic settings.
NOTE 1 NOTE 2
Selection of display resolution
Expansion
Extended key
Detailed settings ⇒Display resolution ⇒Change
Press key once to display the display resolution of each axis.
Press key of the axis you want to change and select the resolution.
Please note that the lamp lights up once every two times and the diameter display is set.
When you have made your selection, press key to save your settings.
Press key to return to the normal counting state.
Set to the detailed settings mode.
Press key while the normal count mode is energized.
The display will be . (Detailed setting mode)
①
②
3/3
LH72 Change of display resolution (polarity)
Set to advanced mode.
Press key in normal count mode
The display will be .
Press key once to get the display resolution of each axis.
Press key of the axis you want to change to the diameter display and turn on the lamp.
If the resolution changes, press key again.
When you have made your selection, press key to save your settings.
Press key to return to the normal counting state.
Detailed settings ⇒Display resolution ⇒Diameter display
①
②
Press key once to get the display resolution of each axis.
Press key for the axis for which you want to change the polarity,
and then press key.
When you have made your selection, press key to save your settings.
Press key to return to the normal counting state.
Detailed settings ⇒Display resolution ⇒Change polarity
②
Set to advanced mode.
Press key in normal count mode
The display will be .
①
Diameter display
Before After
Change polarity
Example of changing the polarity of the display in the middle row

Other manuals for LH72

1

Other Magnescale Cash Counter manuals

Magnescale LG20 User manual

Magnescale

Magnescale LG20 User manual

Magnescale LG20 Manual

Magnescale

Magnescale LG20 Manual

Magnescale LH70 User manual

Magnescale

Magnescale LH70 User manual

Magnescale LG20 User manual

Magnescale

Magnescale LG20 User manual

Magnescale LT10A-105 User manual

Magnescale

Magnescale LT10A-105 User manual

Magnescale LH71 Series User manual

Magnescale

Magnescale LH71 Series User manual

Magnescale LH71 Series Manual

Magnescale

Magnescale LH71 Series Manual

Magnescale LH71A User manual

Magnescale

Magnescale LH71A User manual

Magnescale LH70 Manual

Magnescale

Magnescale LH70 Manual

Magnescale LT20A Series User manual

Magnescale

Magnescale LT20A Series User manual

Magnescale LY72 User manual

Magnescale

Magnescale LY72 User manual

Magnescale LH71 Series User manual

Magnescale

Magnescale LH71 Series User manual

Magnescale LH70 User manual

Magnescale

Magnescale LH70 User manual

Popular Cash Counter manuals by other brands

Skov DOL 192 Technical user guide

Skov

Skov DOL 192 Technical user guide

Trotec PC200 operating manual

Trotec

Trotec PC200 operating manual

BEKA BA367NE manual

BEKA

BEKA BA367NE manual

Lighthouse solair 3100 operating manual

Lighthouse

Lighthouse solair 3100 operating manual

Baumer FLDK 110G1003/S14 user manual

Baumer

Baumer FLDK 110G1003/S14 user manual

MegaCount OMEGA-USB user manual

MegaCount

MegaCount OMEGA-USB user manual

AccuBANKER AB1050 user guide

AccuBANKER

AccuBANKER AB1050 user guide

Cashmaster Sigma 105 user manual

Cashmaster

Cashmaster Sigma 105 user manual

TSI Instruments AEROTRAK+ 7201 Operation manual

TSI Instruments

TSI Instruments AEROTRAK+ 7201 Operation manual

Kolibri Domino user manual

Kolibri

Kolibri Domino user manual

Royal Sovereign RBC-1003 owner's manual

Royal Sovereign

Royal Sovereign RBC-1003 owner's manual

Sentinel SB-1200 user manual

Sentinel

Sentinel SB-1200 user manual

TSI Instruments 3022A instruction manual

TSI Instruments

TSI Instruments 3022A instruction manual

Fraud Fighter FF-3000 operating manual

Fraud Fighter

Fraud Fighter FF-3000 operating manual

Hameg HM8021-4 manual

Hameg

Hameg HM8021-4 manual

Cashmaster Sigma 170 quick start guide

Cashmaster

Cashmaster Sigma 170 quick start guide

PASCO PS-3214 Operation manual

PASCO

PASCO PS-3214 Operation manual

DoCash DC-45V user manual

DoCash

DoCash DC-45V user manual

manuals.online logo
manuals.online logoBrands
  • About & Mission
  • Contact us
  • Privacy Policy
  • Terms and Conditions

Copyright 2025 Manuals.Online. All Rights Reserved.