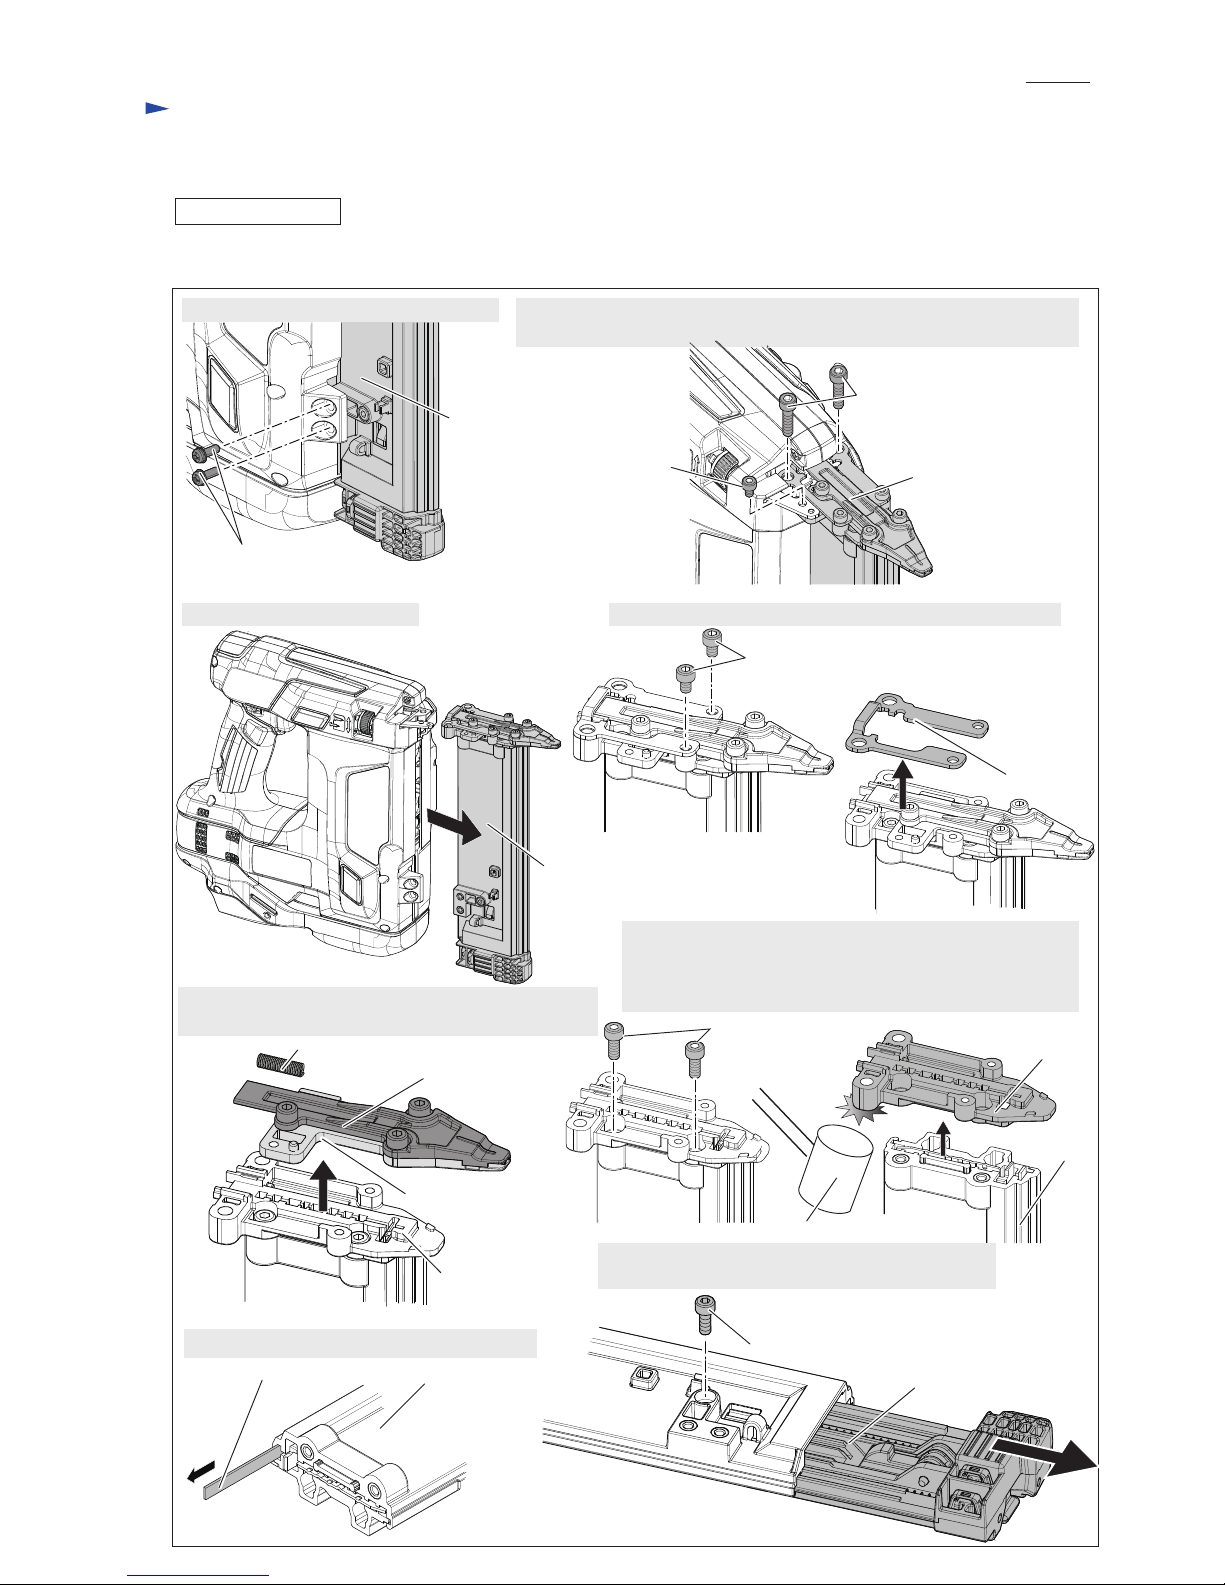
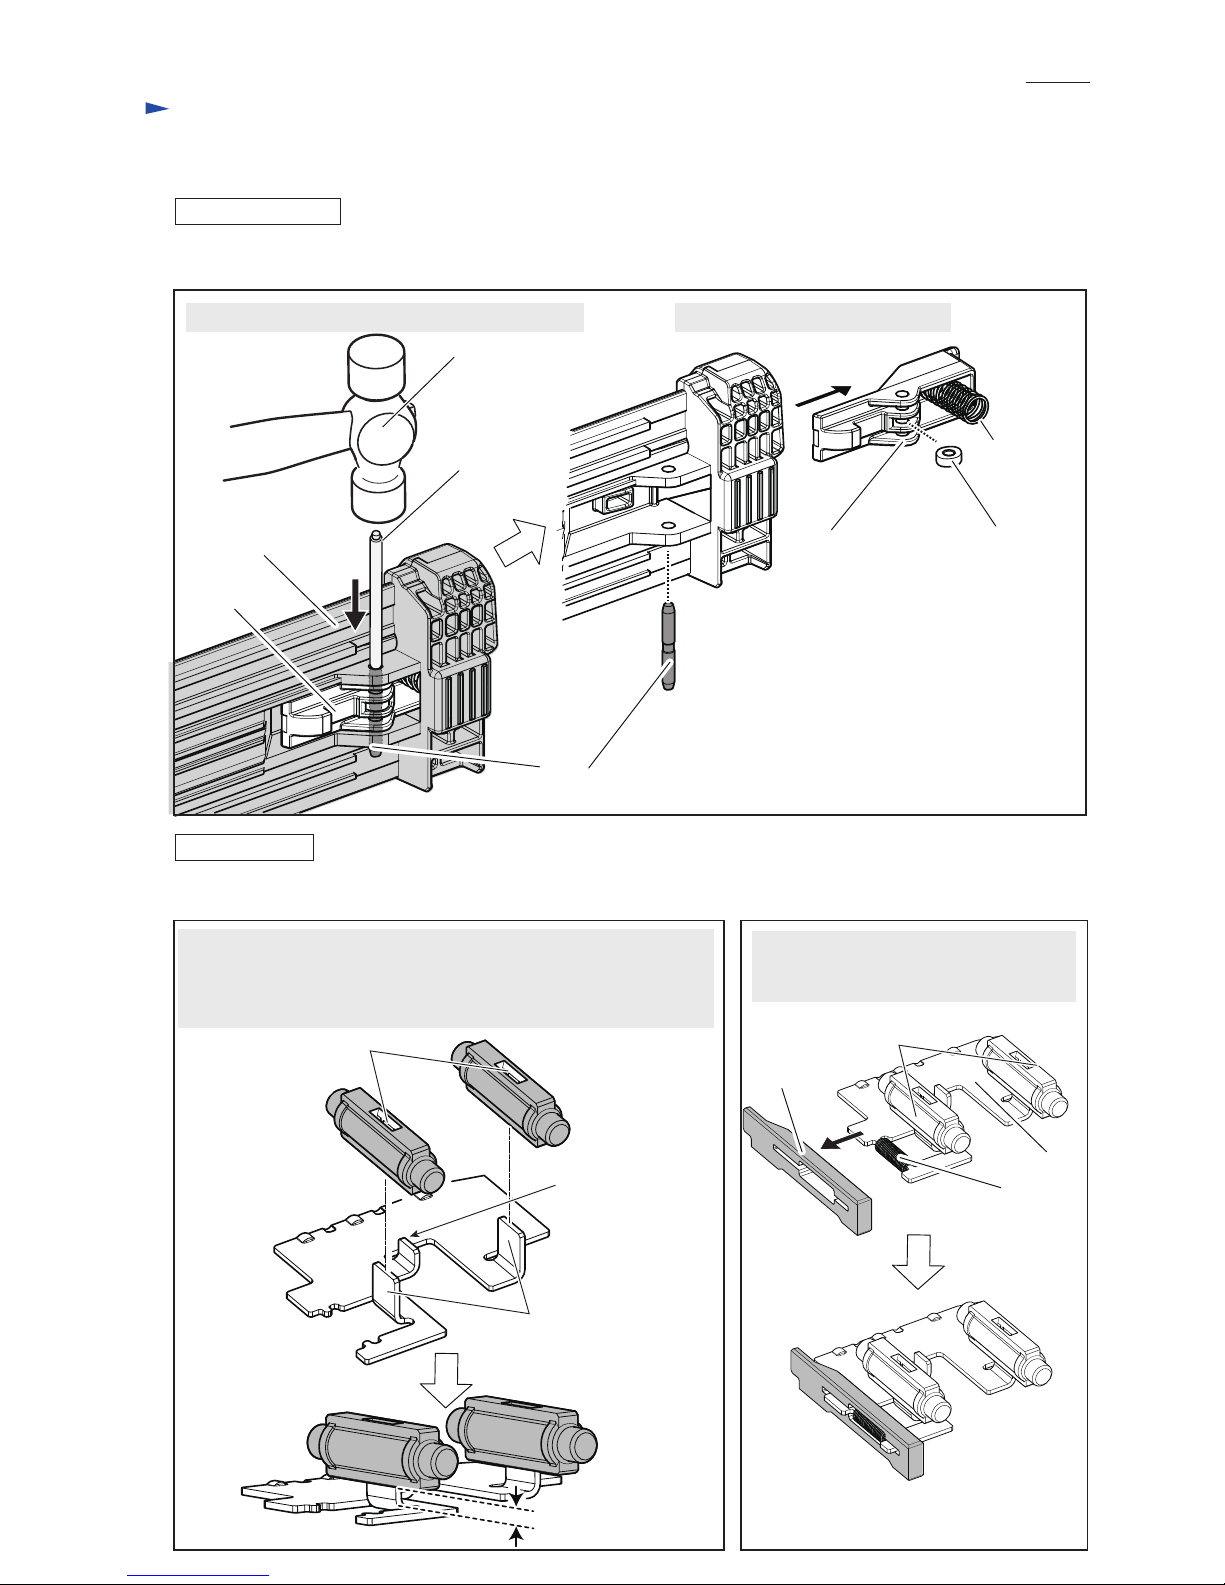
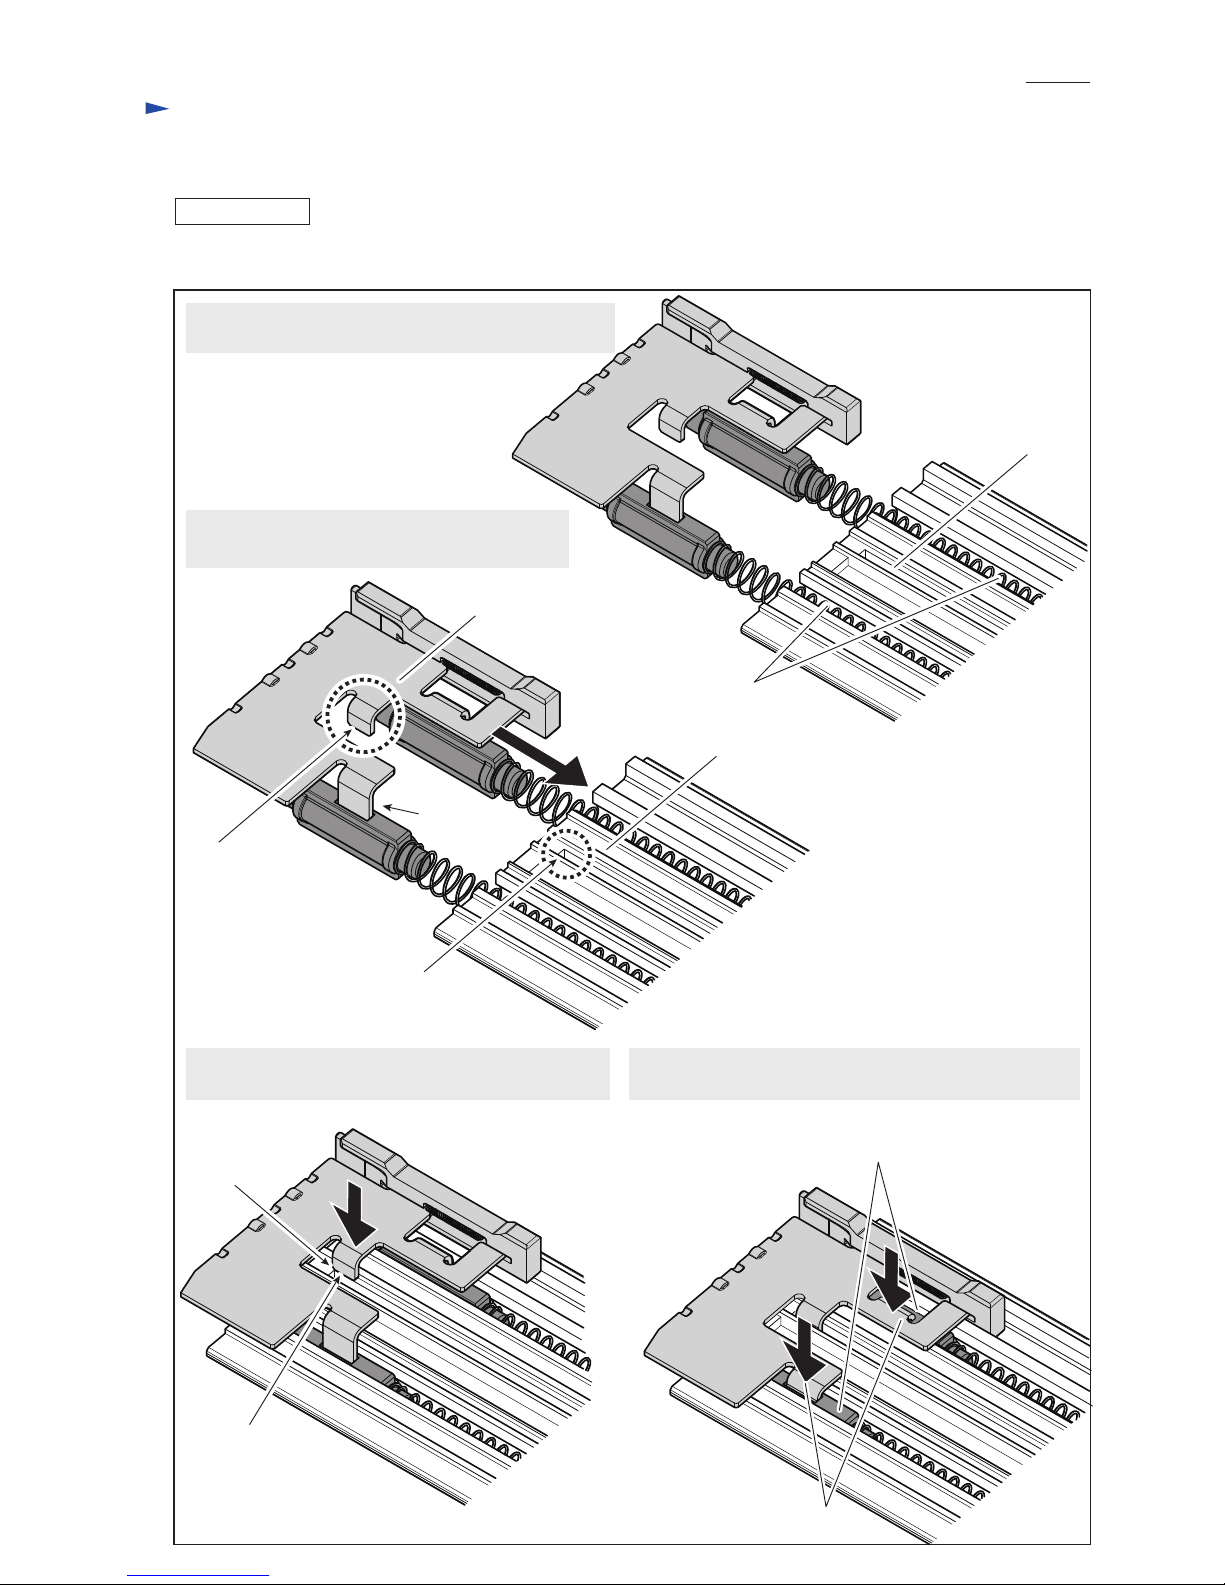
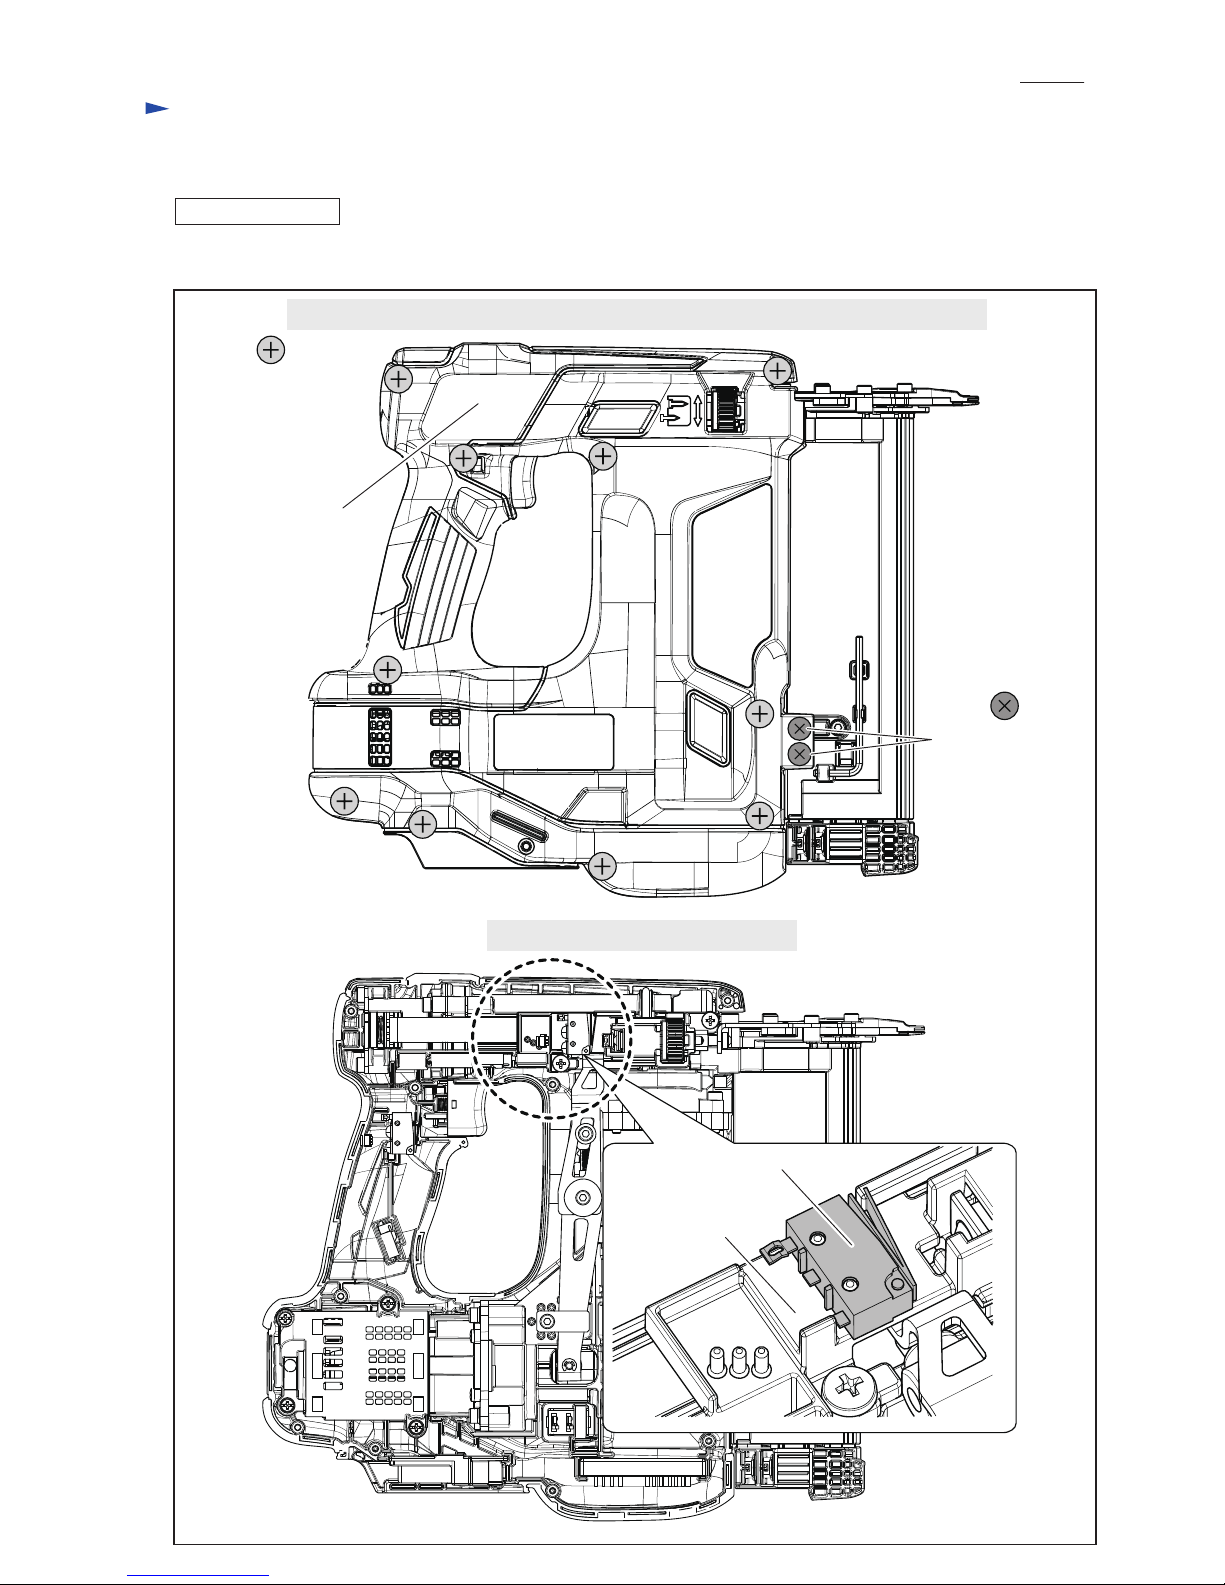
Makita DBN500 Manual

PRODUCT
P 1/ 24
Optional accessories
Finish nails
Battery BL1815
Battery BL1815N
Battery BL1820
Battery BL1830
Battery BL1840
Battery BL1850
Fast charger DC18RC
Charger DC18SD
Charger DC24SC
Four port multi charger DC18SF
Automotive charger DC18SE
Standard equipment
Nose adapter ................. 1
Hex wrench 3 ................ 1
Plastic carrying case ...... 1
(for some countries only)
Models No.
Description
CONCEPT AND MAIN APPLICATIONS
DBN500
Cordless brad nailer 50mm (2")
DBN500 is cordless brad nailer powered by 18V Li-ion battery.
Compressed air generated by piston work with DC motor pushes down Driver to
shoot Brad nails. The mechanism provides less reaction force and “air nailer like”
shot feeling to the operator.
Other features are as follows:
• Higher durability than competitors’ models
• Easy-to-see slim nose tip
• Rocker switch to select Sequential mode / Bump fire mode
Specification
W
L
H
Length: mm (")
Type
Nail
Battery
Finish
15, 20, 25, 30, 32, 35, 38, 40, 45, 50
(5/8, 3/4, 1, 1-3/16, 1-1/4, 1-3/8, 1-1/2, 1-5/8, 1-3/4, 2)
Magazine capacity (pcs)
Shot quantity on a single full battery charge
Quick response (pcs/sec.) 2
Weight according to EPTA-Procedure 01/2003: kg (lbs) 3.3 (7.3), 3.3 (7.3), 3.5 (7.7), 3.5 (7.7), 3.5 (7.7) *6
*3 One nail is fired first by pushing Contact arm against workpiece, then by pulling Trigger with the Contact arm
kept pushed; nail cannot be fired when the steps are reversed. Another one can be fired by releasing Trigger,
then by repeating the steps; however, cannot be fired if Trigger is not released before repetition of the steps.
*4 Nail is fired first by pulling Trigger then by bumping Contact arm against workpiece with Trigger kept pulled.
As long as Trigger is kept pulled, nails can be fired one after the other continuously every time when Contact arm
is bumped against workpiece.
*5 Nail is fired first by pushing Contact arm against workpiece then by pulling Trigger with Contact arm kept pushed.
Another nail can be fired by releasing then re-pulling Trigger even if Contact arm is kept pushed;
another nail cannot be fired if Trigger is not released.
*6 2.9kg (5.5lbs) without Battery
Nail gauge 18Ga
Nails per strip 100
110
1,000*1
LED job light Yes
1.5, 2.0, 3.0, 4.0, 5.0
24, 27, 54, 72, 90
18
Li-ion
15, 24, 22, 36, 45 with DC18RC
Voltage: V
Capacity: Ah
Cell
Charging time (approx.): min.
Energy capacity: Wh
Yes
Yes (Tool-less)
Rocker switch
Driving depth adjustment
Anti-dry-fire mechanism
Change of Bump fire mode and sequential mode
2 mode pattern
Operation
mode Auto change mode between
Bump fire*4and single fire*5
Sequential*3
97 (3-13/16)*2
Dimensions: mm (")
Width (W)
Height (H)
Length (L) 294 (11-5/8)*1
318 (12-1/2)
*1 With Battery BL1830
*2 103mm (4-16") when using Hook
Note: The standard equipment may vary by country
or model variation.
TECHNICAL INFORMATION
460Max output (W)
Battery .................. 1 or 2*8
Charger ................. 1*8
Battery cover......... 1*9
Safety goggles ...... 1
*8 Battery and charger are not supplied with “Z” model
*9 Supplied with the same quantity of extra Battery
OFFICIAL USE
for ASC & Sales Shop

P 2/ 24
Repair
[1] NECESSARY REPAIRING TOOLS
Code No. Description Use for
1R014 1/4” Hex shank bit for M4 disassembling / assembling M4 Hex socket head bolt
1R015 1/4” Hex shank bit for M5 disassembling / assembling M5 Hex socket head bolt
1R268 Spring pin extractor M3 removing Lock lever
1R291 Retaining ring S and R pliers disassembling / assembling Retaining rings S-12 and S-19
1R269
Apply lubricant to the portions designated with gray triangles to protect parts and product from unusual abrasion.
See Fig. 1 for the item Nos and descriptions.
Bearing extractor removing Ball bearings 6001ZZ and 6002ZZ
Lubricant: Isoflex NB52
[2] LUBRICANT APPLICATION
Fig. 1
CAUTION: Repair the machine in accordance with “Instruction manual” or “Safety instructions”.
21
O ring 24
Inner periphery of 17
to contact 21
Inner periphery of 81 to touch 86 and 87
Driver ass’y
Piston A
Valve stem
Crank Main cylinder with
Cylinder end
Cylinder end with Driver cylinder
Driver cylinder portionCylinder head, Valve
17
Driver cylinder
12
Cylinder head
17
Driver cylinder
87
O ring 3
80
O ring 50
84
O ring 14
75
O ring 63
Inner periphery of
74 Main cylinder
76
Pipe 12
55
Crank
(Pin portion to touch Connecting rod)
19
O ring 34
81
Cylinder end
86
O ring 3
10
O ring 21
Inner periphery of 12
to touch 10 and 14
14
O ring 24

P 3/ 24
Repair
Apply adhesive to the bolts designated with black arrows.
See Fig. 2 for the item Nos. and descriptions that should be glued.
Note: Their bolts are thread-locker type. First, use L-shaped hex wrench to unscrew them for repair. After that, remove
them using Cordless impact driver with 1R014/ 1R015.
See Fig. 2 and the next page for the tightening toruqe of some bolts.
Adhesive: Loctite 243 or ThreeBond 1342H
(Cylinder end: inside)
[3] ADHESIVE APPLICATION AND TIGHTENING TORQUE
Fig. 2
48 M4x12 Hex socket
head bolt (4 pcs.)
[0.88-1.8 N·m]
111 M5x20 Hex socket
head bolt (2 pcs.)
[7.5-9.0 N·m]
108 M4x6 Hex socket
head bolt (2 pcs.)
[2.7-4.2 N·m]
102 M4x8 Hex socket
head bolt (2 pcs.)
[2.7-4.2 N·m]
110 M4x6 Hex socket
head bolt (2 pcs.)
[2.7-4.2 N·m]
106 M4x6 Hex socket
head bolt
[2.7-4.2 N·m]
3 M4x10 Hex socket
head bolt (2 pcs.)
[2.7-4.2 N·m]
9 M4x30 Hex socket
head bolt (3 pcs.)
[2.0-3.0 N·m]
68 M4x6 Hex socket
head bolt [2.7-4.2 N·m]
18 M4x16 Hex socket
head bolt
[2.7-4.2 N·m]
59 M4x16 Hex
socket head bolt
(4 pcs.)
[2.7-4.2 N·m]
83 M4x16 Hex socket
head bolt (4 pcs.)
[2.7-4.2 N·m]
65 M4x16 Hex socket
head bolt
[2.7-4.2 N·m]
63 M4x10 Hex socket
head bolt
[2.7-4.2 N·m]

Fastening for
Driver cylinder and Cylinder end M4x16 Hex socket head bolt
Description Adhesive to be applied
Loctite 243 or
ThreeBond 1342H
Loctite 243 or
ThreeBond 1342H
Tightening torque
(N.m.)
2.7 to 4.2
Plate A and Set plate M4x6 Hex socket head bolt 2.7 to 4.2
Set plate and Cylinder end M5x20 Hex socket head bolt 7.5 to 9.0
Set plate and Magazine M4x8 Hex socket head bolt 2.7 to 4.2
2.7 to 4.2
Arm and Center plate
Main cylinder and Crank case
M4x6 Hex socket head bolt 2.7 to 4.2
M4x16 Hex socket head bolt 2.7 to 4.2
Cylinder end and Main cylinder M4x16 Hex socket head bolt 2.7 to 4.2
M4x16 Hex socket head bolt 2.7 to 4.2
Plate B and Crank case
Sub arm complete and Crank case, Link arm A
M4x10 Hex socket head bolt 2.7 to 4.2
Top cap and Cylinder head M4x10 Hex socket head bolt 2.7 to 4.2
Sub arm complete and Slider, Link arm A M4x6 Hex socket head bolt 2.7 to 4.2
Driver guide and Center plate M4x6 Hex socket head bolt
Cylinder head and Driver cylinder M4x30 Hex socket head bolt 2.0 to 3.0
0.88 to 1.8Gear assembly and Crank case M4x12 Hex socket head bolt
P 4/ 24
Repair
[3] ADHESIVE APPLICATION AND TIGHTENING TORQUE (cont.)

P 5/ 24
Repair
[4] DISASSEMBLY/ ASSEMBLY
[4]-1. Magazine section
DISASSEMBLING
(1) Remove Magazine section, and then separate Slide door from Magazine. (Fig. 3)
Fig. 3
Fig. 3
Fig. 3
M4x12 Pan head screw
(2 pcs.)
Magazine
section
Driver guide section
Magazine
section
Magazine
M5x20 Hex socket head bolt
(2 pcs./ Thread-locker type)
[7.5-9.0 N·m]
M4x8 Hex socket
head bolt (2 pcs.)
[2.7-4.2 N·m]
M4x6 Hex socket
head bolt
M4x6 Hex socket head bolt (2 pcs.)
[2.7-4.2 N·m]
Plate A
Nail plate Magazine
Center plate complete
Set plate
Set plate
Plastic hammer
Compression spring 4
Driver guide
M4x10 Hex socket head bolt
Slide door
Slide door
1. Remove two M4x12 Pan head screws.
3. Remove Magazine section.
5. Remove an module (Driver guide, Center plate
complete and Compression spring 4) from Set plate.
2. Remove M4x6 Hex socket head bolt and two M5x20 Hex socket head
bolts (Thread-locker type). Then, disassemble Driver guide section.
4. Remove two M4x6 Hex socket head bolts and Plate A.
6. Remove two M4x8 Hex socket head bolts and separate
Set plate from Magazine.
Note: The fitting between Set plate and Magazine is tight,
and therefore, tap Set plate with a plastic hammer.
7. Remove Nail plate from Magazine section.
8. Remove M4x10 Hex socket head bolt, and then
pull out Slide door from Magazine.

P 6/ 24
Repair
[4] DISASSEMBLY/ ASSEMBLY
[4]-1. Magazine section (cont.)
DISASSEMBLING
Side hooks of PusherCenter hook of Pusher Pusher
Pusher
Groove end of
Magazine
Sleeve (2 pcs.)
Sleeve (2 pcs.)
Set plate
installation
side
Pusher Sleeve
Compression
spring 3
Stopper Slide door
Compression spring 6 (2 pcs.)
Compression spring 6
(2 pcs.)
Side hooks of Pusher
1. Pull Pusher toward Set plate installation side fully, and lift up the center hook of Pusher slightly and carefully
without detaching the side hooks of Pusher from Sleeves.
(2) Remove Pusher from Slide door. (Fig. 4)
2. While keep the fitting of Sleeves and the side hooks of Pushers
by hand, release the reaction force of two Compression springs 6
carefully.
Note: If the side hooks of Pusher are detached completely
from Sleeves in the grooves of Slide door,
Sleeves and Compression springs 6 will pop out
as drawn right. Therefore, keep the fitting of
Sleeves and the side hooks of pushers by hand.
3. Stopper, Compression spring 3, Sleeves and Compression springs 6
can be removed from Pusher.
Fig. 4

P 7/ 24
Repair
[4] DISASSEMBLY/ ASSEMBLY
[4]-1. Magazine section (cont.)
DISASSEMBLING
ASSEMBLING
Fig. 17
1. Push out Pin 3 with 1R268 and a metal hammer.
Note: Leave 4mm height between the angle of the side hook of
Pusher and the bottom of each Sleeve. If the bottom of Sleeve
is attached to the angle of the side hook by inserting completely,
the center hook would be bumped against Slide door.
Note: Stopper is directional, and therefore,
it must be assembled to Pusher as
drawn below.
2. Disassemble Lock lever section.
(3) Remove Lock lever from Slide door. (Fig. 5)
Assemble the components by reversing the disassembly procedure. See Figs. 6 and 7 for the assembly of Pusher section.
Fig. 6 Fig. 7
Fig. 5
1R268
Slide door
Lock lever
Metal hammer
Pin 3
Lock lever Urethane ring 3
Compression
spring 7
4mm
Side hooks
of Pusher
Center hook of
Pusher Compression spring 4
Pusher
Slots of Sleeves Sleeves
Stopper

P 8/ 24
Repair
[4] DISASSEMBLY/ ASSEMBLY
[4]-1. Magazine section (cont.)
ASSEMBLING
1. Insert two Compression springs 6 into the grooves of
Slide door.
2. Move Pusher so that the center hook of Pusher
comes over the groove end of Slide door.
3. Insert the center hook of Pusher into the groove end
of Slide door.
4. Insert the side hooks of Pusher into the slots of Sleeves
completely until the hooks stop.
Assemble Pusher section to Slide door. (Fig. 8)
Fig. 8
Compression spring 6
(2 pcs.)
Slide door
Slide door
Pusher
4mm height
(Re: Fig. 6)
Center hook of
Pusher
Center hook of
Pusher
Groove end
Groove end
Sleeve (2 pcs.)
Side hooks

P 9/ 24
Repair
[4] DISASSEMBLY/ ASSEMBLY
[4]-2. Armature
DISASSEMBLING
Remove Housing R, and then separate Switch unit. (Fig. 9)
1. Remove two M4x12 Pan head screws, ten Bind PT3x36 Tapping screws and Housing R.
2. Remove Switch unit on Switch base.
Fig. 9
M4x12 Pan head
screw (2 pcs.)
Bind PT3x16 Tapping
screw (10 pcs.)
Housing R
Switch base
Switch unit

P 10/ 24
Repair
[4] DISASSEMBLY/ ASSEMBLY
[4]-2. Armature (cont.)
1. Remove an module (Motor housing, Main cylinder, etc.)
from Housing L
2. Pull out Motor housing set from Gear assembly.
3. Remove four Bind PT3x16 Tapping screws and
Motor housing R from Motor housing L.
4. Remove Armature section from Motor housing L.
See Fig. 10 for removing Armature section.
Fig. 10
Motor housing
Motor housing set
Gear assembly
Main cylinder
Bind PT3x16 Tapping
screw (4 pcs.)
Motor housing L
Motor housing L
Motor housing R
Armature section
DISASSEMBLING

P 11/ 24
Repair
[4] DISASSEMBLY/ ASSEMBLY
[4]-2. Armature (cont.)
1. Remove the end of Torsion springs of Brush holder complete from Carbon brushes and hook them in the notches of
metal brush holders, then disconnect Carbon brushes from Commutator by pulling them in the direction of the black
arrows.
Note: Hold the coils of Torsion springs (designated by the white arrows) so as not to remove them from Brush
holder complete.
2. Pull out Armature together with Yoke unit from Brush holder complete.
See Fig. 11 for the disassembly of Armature section.
Fig. 11
Carbon brush
Carbon brush
Brush holder complete
Armature
Notch of metal brush holder
1
Yoke unit
DISASSEMBLING
2
2
3

P 12/ 24
Repair
[4] DISASSEMBLY/ ASSEMBLY
[4]-2. Armature (cont.)
ASSEMBLING
1. Face the notch of Yoke unit toward Armature gear end side
and assemble Armature to Yoke unit.
Note • Do not hold Armature body nor Fan by your fingers,
or the fingers will be pinched between Yoke unit and the fan
of Armature which is strongly pulled toward Yoke unit.
• Do not scratch copper wires of Armature.
2. Return Carbon brushes and the ends of Torsion springs back
to the original position to set Brush holder complete in place.
(Refer to Fig. 11 of the previous page.)
4. When you assemble Armature section to Gear assembly;
• protrude Armature gear into the internal gears in
Gear assembly first.
• The next, check their gears are engaged each other.
• Finally, push Armature to Gear assembly while
keeping gear engagement firmly.
5. Move Connecting rod and Crank to lower dead point, and fit an module
(Motor housing, Gear assembly and Main cylinder, etc.) into Housing L
as drawn right.
3. Fit the notch of Yoke unit with the protrusion of Motor housing L
as drawn right.
Note • Do not scratch copper wires of Armature.
• The flat portion of Brush holder complete must be at 90° to
the edge surface of Motor housing L as drawn below left.
• Place Yoke unit to the inside between Ribs and Corners of
Motor housing as drawn below right.
See Fig. 12 for the assembly of Armature, Yoke unit and Motor housing set.
Notch of Yoke unit Armature gear
end
Edge of Motor
housing L Ribs of Motor housing L
Projection of
Motor housing L
Crank
Main cylinderGear assembly
Motor housing
Connecting rod
Corners of Motor housing L
Fan (the component
of Armature)
Fig. 12
90°

P 13/ 24
Repair
[4] DISASSEMBLY/ ASSEMBLY
[4]-3. Gear assembly
DISASSEMBLING
ASSEMBLING
(1) Move Connecting rod in advance until the hex end of Crank is aligned with
the hex hole in Gear assembly. (Fig. 14)
(2) Assemble Gear assembly to Crank case with four M4x12 Hex socket head bolt
so that the hex end of Crank fits into the hex hole in Gear assembly. (Figs. 14
and 13)
(3) Assemble Motor section to Gear assembly. Refer to Fig. 12 of page 11.
(4) Move the crank portion to the lower dead point, and install the module of
Motor housing and Main cylinder into Housing L. (Fig. 15)
After removing Motor housing set from Gear assembly as mentioned in page 9,
remove four M4x12 Hex socket head bolts and Gear assembly from Crank case.
(Fig. 13)
Fig. 13
Fig. 14 Fig. 15
M4x12 Hex socket
head bolt (4 pcs.)
[0.88-1.8 N·m] Gear assembly
Crank case
Hex end of Crank
Hex hole of
Gear assembly
Crank case
Connecting rod
Crank portion at
the lower dead point
Main cylinderGear assemblyMotor housing
Connecting rod
Housing L

P 14/ 24
Repair
[4] DISASSEMBLY/ ASSEMBLY
[4]-4. Switch base, Crank, Main cylinder, Cylinder end
DISASSEMBLING
(1) Remove the module of Driver guide and Magazine, and then remove Motor section and Gear assembly from the module.
(Refer to Pages 9, 10 and 13.)
(2) Remove Switch base section. (Fig. 16)
Fig. 16
(Adjuster side)
Compression spring 4
Valve stem
Opposite on Adjuster side of Switch base section
1. Remove two Bind PT4x12 tapping screws.
2. Lift up the opposite on Adjuster side of Switch base section.
3. Slide the tilted Switch base section in direction of the black arrow to remove it from Driver cylinder.
Note: Be careful not to pop out Valve stem from Cylinder end.
4. Compression spring 4 and Valve stem with two O rings 3 are removed from Switch base section.
Note: As for the disassembly/ assembly
of Adjuster, refer to page 18.
Switch base section
Adjuster
O ring 3 O ring 3
Bind PT4x12 tapping screw (2 pcs.)
Compression spring 4 Valve stem with two O rings 3

P 15/ 24
Repair
[4] DISASSEMBLY/ ASSEMBLY
[4]-4. Switch base, Crank, Main cylinder, Cylinder end (cont.)
DISASSEMBLING
Remove an module of Sub arm and Link arm A, and then separate Driver cylinder section, Crank section, Main cylinder
section and Cylinder end section. (Fig. 17)
Fig. 17
1. Remove M4x10 Hex socket head bolt and Plate B, and then separate M4x16 Hex socket head bolt on Flat washer 4.
M4x16 Hex socket
head bolt [2.7-4.2 N·m]
M4x10 Hex socket
head bolt [2.7-4.2 N·m]
Flat washer 4
Plate B
Sleeve 8
Slider
Link arm A
Stop ring E-3
Pin 4
Top cap
Note:
Be careful about
popping of
Compression
spring 11.
Top cap
Compression spring 11M4x10
Hex socket
head bolt
(2 pcs.)
[2.7-4.2 N·m]
Rear cushion
Cushion
Cylinder driver
Ball bearing 604ZZ
2. Remove an module of Sub arm and Link arm A.
(Refer to page 18 for the disassembly.)
3. While holding Top cap by a finger, remove two M4x10 Hex socket head bolts,
and then relieve the holding force carefully to prevent Top cap from popping out.
Top cap, Rear cushion and Compression spring 11 are removed from Cylinder driver.
Compression spring 3
Sub arm
Flat washer 4 M4x6 Hex socket head bolt
4. Remove three M4x16 Hex socket head bolts, and then
separate Driver cylinder section from Cylinder end.
Note: Bend Link arm B slightly to access M4x16 Hex
socket head bolt.
Cushion and Driver complete can be removed at this time.
5. Remove four M4x16 Hex socket head bolts, and then
separate Main cylinder section and Cylinder end section
from Crank section.
M4x16 Hex socket
head bolt (3 pcs.)
[2.7-4.2 N·m]
M4x16 Hex socket head bolt (4 pcs.)
[2.7-4.2 N·m]
Cylinder
end
Link arm B
Driver
cylinder
section Crank section Main cylinder section
Cylinder end section

P 16/ 24
Repair
[4] DISASSEMBLY/ ASSEMBLY
[4]-4. Switch base, Crank, Main cylinder, Cylinder end (cont.)
DISASSEMBLING
(4) Remove Housing R, and then separate Switch unit. (Fig. 18)
ASSEMBLING
Assemble the components by reversing the disassembling procedure.
Note: • Be careful to the direction of Edge cam. Refer to Fig. 18.
• As for the assembly of Sub arm complete and Link arm A, refer to page 19.
• Move Crank to the lower dead point, and install the module of Motor housing and Main cylinder into Housing L.
(Fig. 15 of Page 13)
1. Remove four M4x16 Hex socket head screws,
and then separate Main cylinder section from
Cylinder end section.
3. Remove thin type O ring 50 that holds Pipe 12 in Piston A,
and then separate Pipe 12 from Piston A.
Connecting rod and thick size O ring 50 can be removed
from Piston A. 4. Give impacts to Crank case with a plastic hammer.
Crank portion is removed from Crank case.
5. After removing Retaining ring S-12 with 1R291, the following
components can be removed from Crank case with 1R269.
2. Remove M4x8 Pan head screw and Magnet base complete
from Crank, and then separate Connecting rod with Piston A
from Crank.
Fig. 18
M4x16 Hex socket
head screw (4 pcs.)
[2.7-4.2 N·m]
Cylinder end section
Crank
Magnet base complete
Connecting rod with Piston A
O ring 14
O ring 63
Main cylinder
section
M4x8 Pan
head screw
O ring 50 (thin)
to hold Pipe 12
O ring 50 (thick)
Pipe 12
Crank
section
Crank
Ball bearing 6002ZZ
Woodruff key 3 Edge cam
1R269
Ball bearing 6001ZZ
Retaining ring S-12
Plastic
hammer
Crank
case
Connecting rod
Piston A
1R291

P 17/ 24
Repair
[4] DISASSEMBLY/ ASSEMBLY
[4]-5. Valve, Crank, Driver complete, Cushion
DISASSEMBLING
ASSEMBLING
(1) Remove Motor housing set from Gear assembly. Refer to pages 10 and 11.
(2) Remove Driver complete as drawn in Fig. 19.
Fig. 19
1. Remove M4x6 Hex socket head bolt,
and then separate Arm from Center plate.
5. Remove Retaining ring (EXT) S-19 with 1R291,
and then separate Link arm B.
6. Remove four M4x30 Hex socket head bolts,
and then separate Cylinder head and Separator
from Driver cylinder.
2. Following the steps mentioned in page 14, remove
Switch base section.
3. Following the steps mentioned in page 15, remove an module
of Sub arm and Link arm A, etc.
4. Following the steps mentioned in page 15, remove Top cap.
And then remove Rear cushion and Compression spring 11.
M4x6 Hex socket head bolt [2.7-4.2 N·m]
Arm Center plate
Link arm B
Cylinder head
Valve Gasket A
Driver cylinder
Gasket BO ring 24 Separator
O ring 21
M4x30 Hex socket head
bolt [2.0-3.0 N·m]
1R291
(Refer to Fig. 15
for the shape of
1R291.)
Retaining ring
(EXT) S-19
7. Remove three M4x16 Hex socket head bolts, and then separate Driver cylinder section from Cylinder end.
Cushion and Driver complete can be removed at this time.
Assemble the components by reversing the disassembly procedure.
Note: • Following to the steps mentioned in pages 19 and 20, assemble and adjust Sub arm and Link arm A.
• Move the crank portion to the lower dead point, and install the module of Motor housing and Main cylinder into
Housing L. (Fig. 16 of Page 13)
M4x16 Hex socket
head bolt (3 pcs.)
[2.7-4.2 N·m]
M4x16 Hex socket
head bolt (3 pcs.)
*Cushion “P”
*The components of Driver assembly
Driver assembly
Driver cylinder Cylinder end
*O ring 24
Cushion

P 18/ 24
Repair
[4] DISASSEMBLY/ ASSEMBLY
[4]-6. Adjuster
DISASSEMBLING
ASSEMBLING
Following the steps mentioned in Fig. 16 of page 14, remove Switch base.
And then, remove Adjuster as drawn in Fig. 20.
1. Remove Urethane ring 4, and then
separate Arm from Adjuster rod.
2. Turn Adjuster in direction of the black arrow to the full by a finger.
In this condition, turn the flats of Adjuster rod in direction of
the gray arrow with Wrench 8.
3. Adjuster and the relative parts are removed as drawn below.
Fig. 20
Refer to Figs. 21.
Fig. 21
Adjuster rod
Wrench 8
Adjuster
Flats of Adjuster rod
Adjuster rod
Urethane
ring 4
Arm
Urethane ring 4
Adjuster
The module of Adjuster,
Compression spring 2,
Steel ball 2.3 and
Adjuster guide (See Fig. 20.)
Adjuster
Adjuster block
Switch base
Compression spring 2 Steel ball 2.3
Adjuster guide
Adjuster rod
Adjuster guide
1. Insert Urethane ring 4
into Adjuster block.
2. Insert the above module
diagonally into Switch
base.
4. Assemble Adjuster section to Switch base.
5. Insert Adjuster rod into Urethane ring 4 in Adjuster block by
pushing the Adjuster rod end by a finger in direction of gray arrow
while turning Adjuster in direction of black arrow.
3. Assemble Adjuster block to Switch base
by turning the Adjuster block.
Urethane
ring 4

P 19/ 24
Repair
[4] DISASSEMBLY/ ASSEMBLY
[4]-7. Sub arm, Link arm A
DISASSEMBLING
ASSEMBLING
Remove M4x10 Hex socket head bolt and Plate B, and then separate
M4x16 Hex socket head bolt on Flat washer 4.
(Refer to the step 1 in Fig. 17 of page 15.)
The module of Sub arm and Link arm A can be disassembled as
drawn in Fig. 22.
(1) Move Connecting rod and Crank to lower dead point. (Fig. 15 of
page 13)
(2) Fit Retaining ring (EXT) S-19 into the groove of Valve with
1R291. (Fig. 23)
(3) Assemble the module of Link arm A and Sub arm, etc. (Fig. 24)
(4) Use Flat washers 4 (large and Small), M4x16 Hex socket head
screw and M4x6 Hex socket head screw to set the above module
in place. (Fig. 25)
Stop ring E-3
Sub arm
Sleeve 8Flat washer 4
(large)
M4x16 Hex
socket head
bolt
[2.7-4.2 N·m]
M4x6 Hex socket head bolt
[2.7-4.2 N·m]
Flat washer 4
(small)
Compression
spring 3
Link arm A
Ball bearing 604ZZ
Fig. 22
Fig. 23
Fig. 25
Fig. 24
Pin 4
Slider
Groove of Valve
Retaining ring
(EXT) S-19
Stop ring E-3
Pin 4
Ball bearing 604ZZLink arm ACompression spring 3
Slider
Sub arm
1R291
(Refer to
Fig. 15 for
the shape
of 1R291.)
1. Put Sleeve 8 on the hole of Crank case, and fit the pin of Sub arm
complete into the oval hole of Link arm B while aligning the Sleeve 8
with the threaded hole of Crank case.
2. assemble M4x10 Hex socket head bolt and Plate B to Crank case to
limit the motion range of Link plate A.
3. Assemble M4x16 Hex socket head bolt with Flat washer 4
(large) to Crank case through Sleeve 8.
Hole of Crank case
Sleeve 8
M4x10 Hex socket head bolt [2.7-4.2 N·m]
Plate B
Link plate A
Slider Flat washer 4 (large) Slider
Flat washer 4 (large)
Sleeve 8
M4x16 Hex socket head bolt
[2.7-4.2 N·m]
Pin of Sub arm complete
Oval hole of
Link arm B
4. Move Slider to the closest position to Flat washer 4 (large), and pretighten M4x6 Hex socket head bolt with
Flat washer 4 (small) to Slider.
Flat washer 4
(small)
M4x6 Hex socket
head bolt
[2.7-4.2 N·m]

P 20/ 24
Repair
[4] DISASSEMBLY/ ASSEMBLY
[4]-7. Sub arm, Link arm A (cont.)
ASSEMBLING
(5) Assemble Switch base section and then set Compression spring 11, Rear cushion, Top cap and two M4x10 Hex socket
head bolts as drawn in Fig. 26.
(6) Loosen the pretightened M4x6 Hex socket head screw.
Adjust the linkage of Link arm B, Sub arm complete, Link arm A and Slider, and then tighten M4x6 Hex socket head
screw. (Fig. 27)
To obtain the proper fitting between Link arm B and Sub arm complete,
do the following steps 1, 2 , 3 and 4.
Note: • The tight fitting would cause dull behavior in back and forth
stroke of Link arm B. (Refer to arrow V drawn right.)
• The loose fitting would cause the backlash of Link arm B.
1. While pushing Link arm B as arrow W, loosen
M4x6 Hex socket head bolt.
Make sure that the reaction force of Compression
spring 3 moves Slider toward arrow X. 2. Push Slider toward arrow Y a little by a finger
and then release the finger carefully so that the only
spring reaction force is effective to Slider.
3. When Compression spring 3 is not compressed,
Slider stops at the proper position to be secured.
Tighten M4x6 Hex socket head bolt without
moving Slider.
4. Make sure that Link arm B can be
moved slightly right and left as
arrow Z.
If not, do the steps 1, 2, 3 and 4
again to adjust the position of Slider.
1. Assemble Compression spring 4 and Valve stem with two
O rings 3 to Cylinder end.
2. While pushing Valve stem in gray arrow by the lever portion of
Adjuster block, turn Switch base section in direction of black arrow.
Fig. 26
Fig. 27
Top cap
M4x10 Hex socket
head bolt (2 pcs.)
[2.7-4.2 N·m]
Compression spring 11
Rear cushion
Cylinder driver
3. Put Compression spring 11 into Valve, and then
place Rear cushion into Cylinder head.
Assemble Top cap and two M4x10 Hex socket
head bolts to Cylinder head.
O ring 3 Lever portion of
Adjuster block
Switch base section
(Refer to page 13.)
Compression
spring 4
Valve stem
O ring 3
Valve
Sub arm complete
Link arm B
M4x6 Hex socket head bolt (loosened)
[2.7-4.2 N·m]
Link arm B
Link arm B
Slider Compression spring 3
Slider
Compression spring 3
Slider
M4x6 Hex socket
head bolt
V
W
Z
Y
X
Other manuals for DBN500
7
Table of contents
Other Makita Nail Gun manuals

Makita
Makita GN420C User manual

Makita
Makita FN001G User manual

Makita
Makita AN911H User manual

Makita
Makita GF600 User manual

Makita
Makita AF353 User manual

Makita
Makita AG125 User manual

Makita
Makita AF506 User manual

Makita
Makita PT001GZ User manual

Makita
Makita BPT350 User manual

Makita
Makita AN611 User manual

Makita
Makita LXTP01 User manual

Makita
Makita PT354D User manual

Makita
Makita DBN600 User manual

Makita
Makita AN935H User manual

Makita
Makita PT354D User manual

Makita
Makita DBN600 User manual

Makita
Makita DBN500 User manual

Makita
Makita DFN350ZJ User manual

Makita
Makita AF353 User manual

Makita
Makita GN420C User manual