Makita KP312 User manual

Continuous Rating (W)
Voltage (V) Cycle (Hz) Input Output Max. Output(W)
KP312, KP312S
Planers 312mm (12-9/32")
Models No.
Description
PRODUCT
Current (A)
TECHNICAL INFORMATION
CONCEPTION AND MAIN APPLICATIONS
Specification
Standard equipment
Optional accessories
< Note > The standard equipment for the tool shown may differ from country to country.
P 1 / 8
Dimensions : mm ( " )
Width ( W )
Height ( H )
Length ( L )
50 / 60
551 (21-3/4)
425 (16-3/4)
219 (8-5/8)
W
L
H
These new Power Planers have been developed as sister tools
to the existing Makita models KP301 or KP311, excelling
predecessors both in power and convenience.
Model KPS312S features soft start circuit
and overload protector.
120 15 1,700 690 2,450
KP312
Continuous Rating (W)
Voltage (V) Cycle (Hz) Input Output Max. Output(W)
220
Current (A)
50 / 60
50 / 60
230 10
11 2,200
2,200 1,040
820 3,000
3,850
KP312S
Model No.
Planing width : mm [in]
For Model KP312
* Socket wrench 9 ................ 1 pc.
* Triangular rule .................... 1 pc.
For Model KP312S
* Hex wrench ........................ 1 pc.
* Nozzle assembly ............... 1 pc.
* Triangular rule .................... 1 pc.
* Joint 70 .............................. 1 pc.
* Nozzle set
* Joint assembly
* Planer blade 312mm
Planing depth : mm [in]
Planer Blade (mm [in])
Soft Start
Overload Protector
No load speed (min -1= rpm)
Protection from Electric Shock
Net Weight :Kg (lbs )
Cord Length : m ( ft )
KP312 KP312S
12,000
312 [12-1/4]
No Yes
No Yes
Double Insulation
18 [39.7]
10 [32.8]
Capacity
0 - 150 [0 - 5-7/8]
150 - 240 [5-7/8 - 9-1/2]
240 - 312 [9-1/2 - 12-9/32]
3.5 [1/8]
2.0 [1/16]
1.5 [1/16]
<Note>
Supply of Model KP312 is restricted to low voltage
(110V - 120V) area.

Repair P 2 / 8
< 1 > Lubrication
Apply MAKITA grease N. No.1 to the following portions marked with black triangle to protect
parts and product from unusual abrasion.
< 2 > Removing poly V belt
( 1 ) Remove belt cover by unscrewing one pc. of pan head screw M5x65.
( 2 ) Lifting up poly V belt with screwdriver, turn V pulley with your hand.
Then, V pulley can be removed as illustrated in Fig. 1.
Fig. 1
hex socket head
bolt M10x40
(86)
(67)
(46)
(74)
(68)
(69)
Item No. Descriptions Portions to be lubricated Amount to be applied
Approx. 4g (0.14 oz)
Approx. 1g (0.04 oz)
67
46
Flat washer 8
Coupling
Whole portion
Inner hole (spline portion) which accepts
armature shaft and spindle
68 Flat washer 8 The portion where knob (69) contacts.
69 Knob
74 Front base The portion where flat washer 8 (68) contacts.
The portion where main base contacts.
86 Leaf spring The portion where front base contacts.
Armature
Spindle
complete
Pan head screw
M5x65
Belt cover
Poly V belt

Repair P 3 / 8
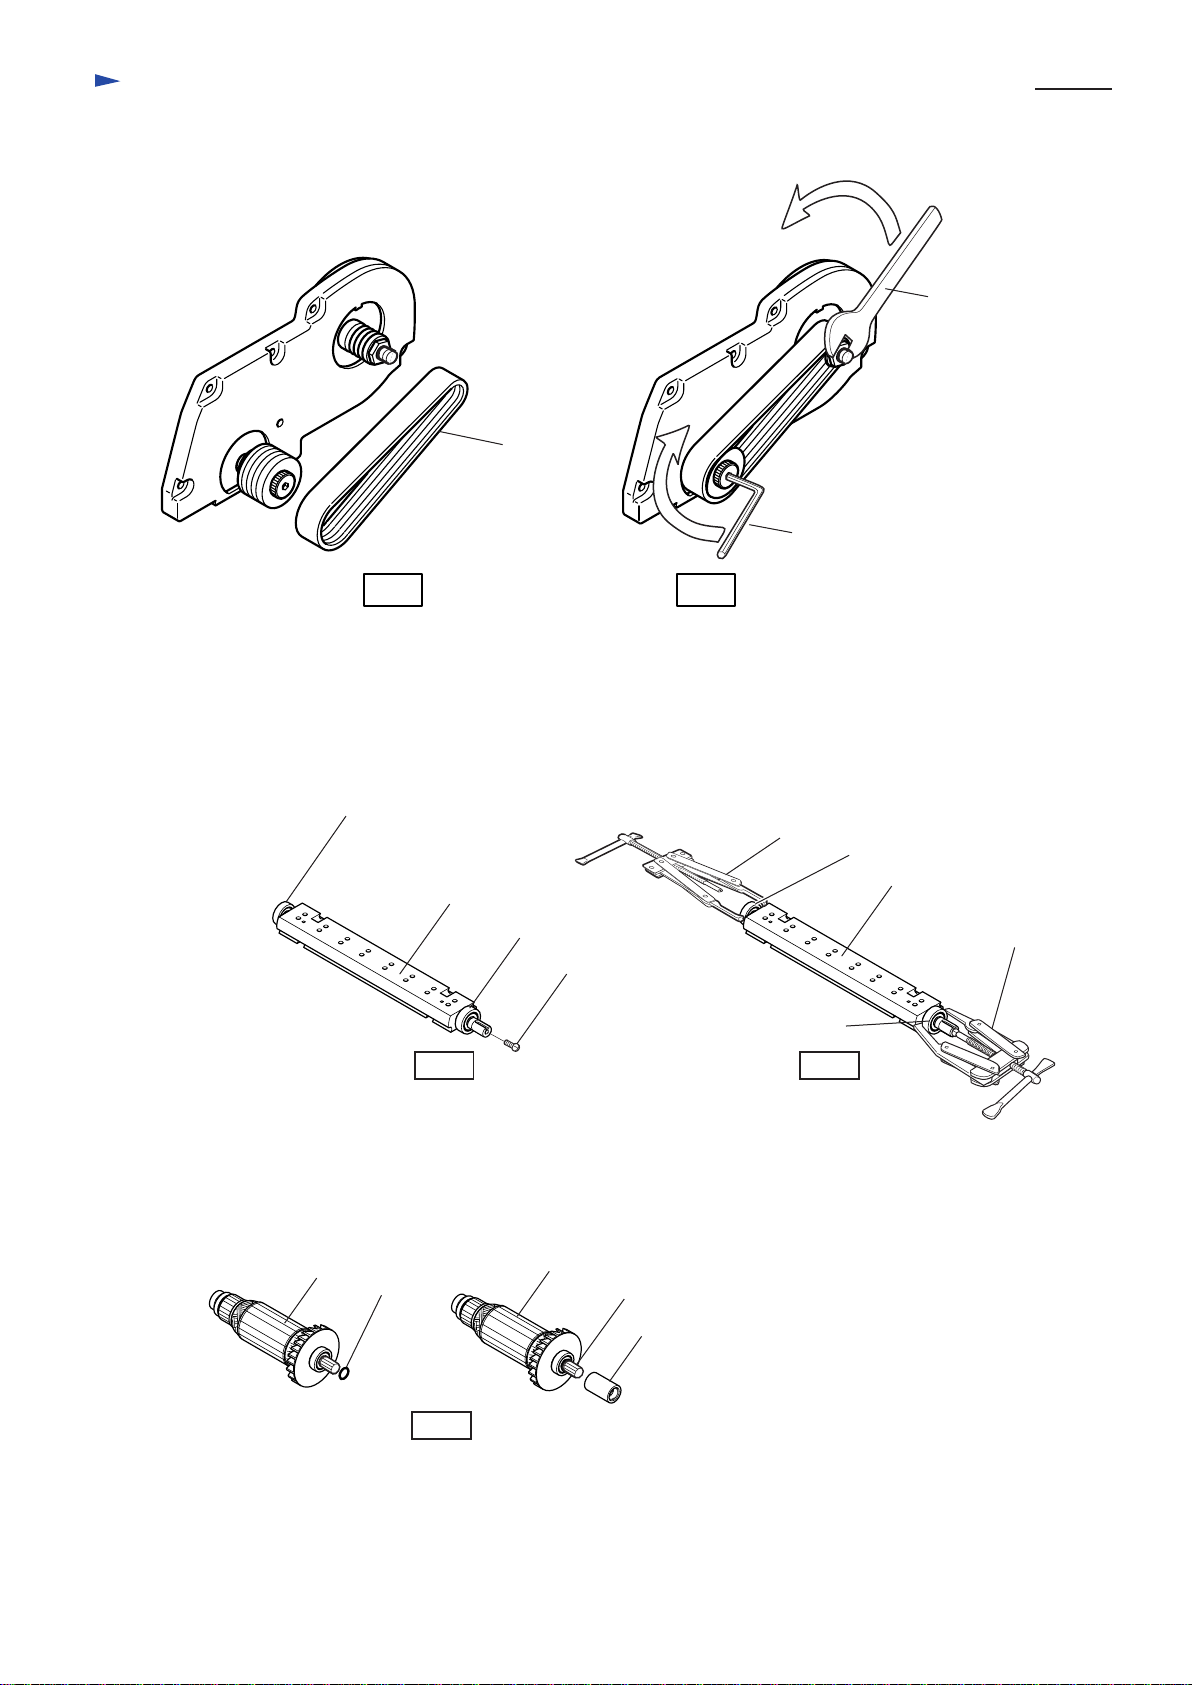
< 3 > Removing V- Pulleys
(1) Attach the following bit to the impact driver.
* 1R230 Multi-purpose M6 for hex socket head bolt M6x12
* Socket bit 17 for hex nut M10x17.
And remove hex nut M10x17 and hex socket head bolt M6x12
with the impact driver.
(2) Remove V-pulley 9-39.7. And by turning clockwise, removeV-pulley 9-23L. See Fig. 3.
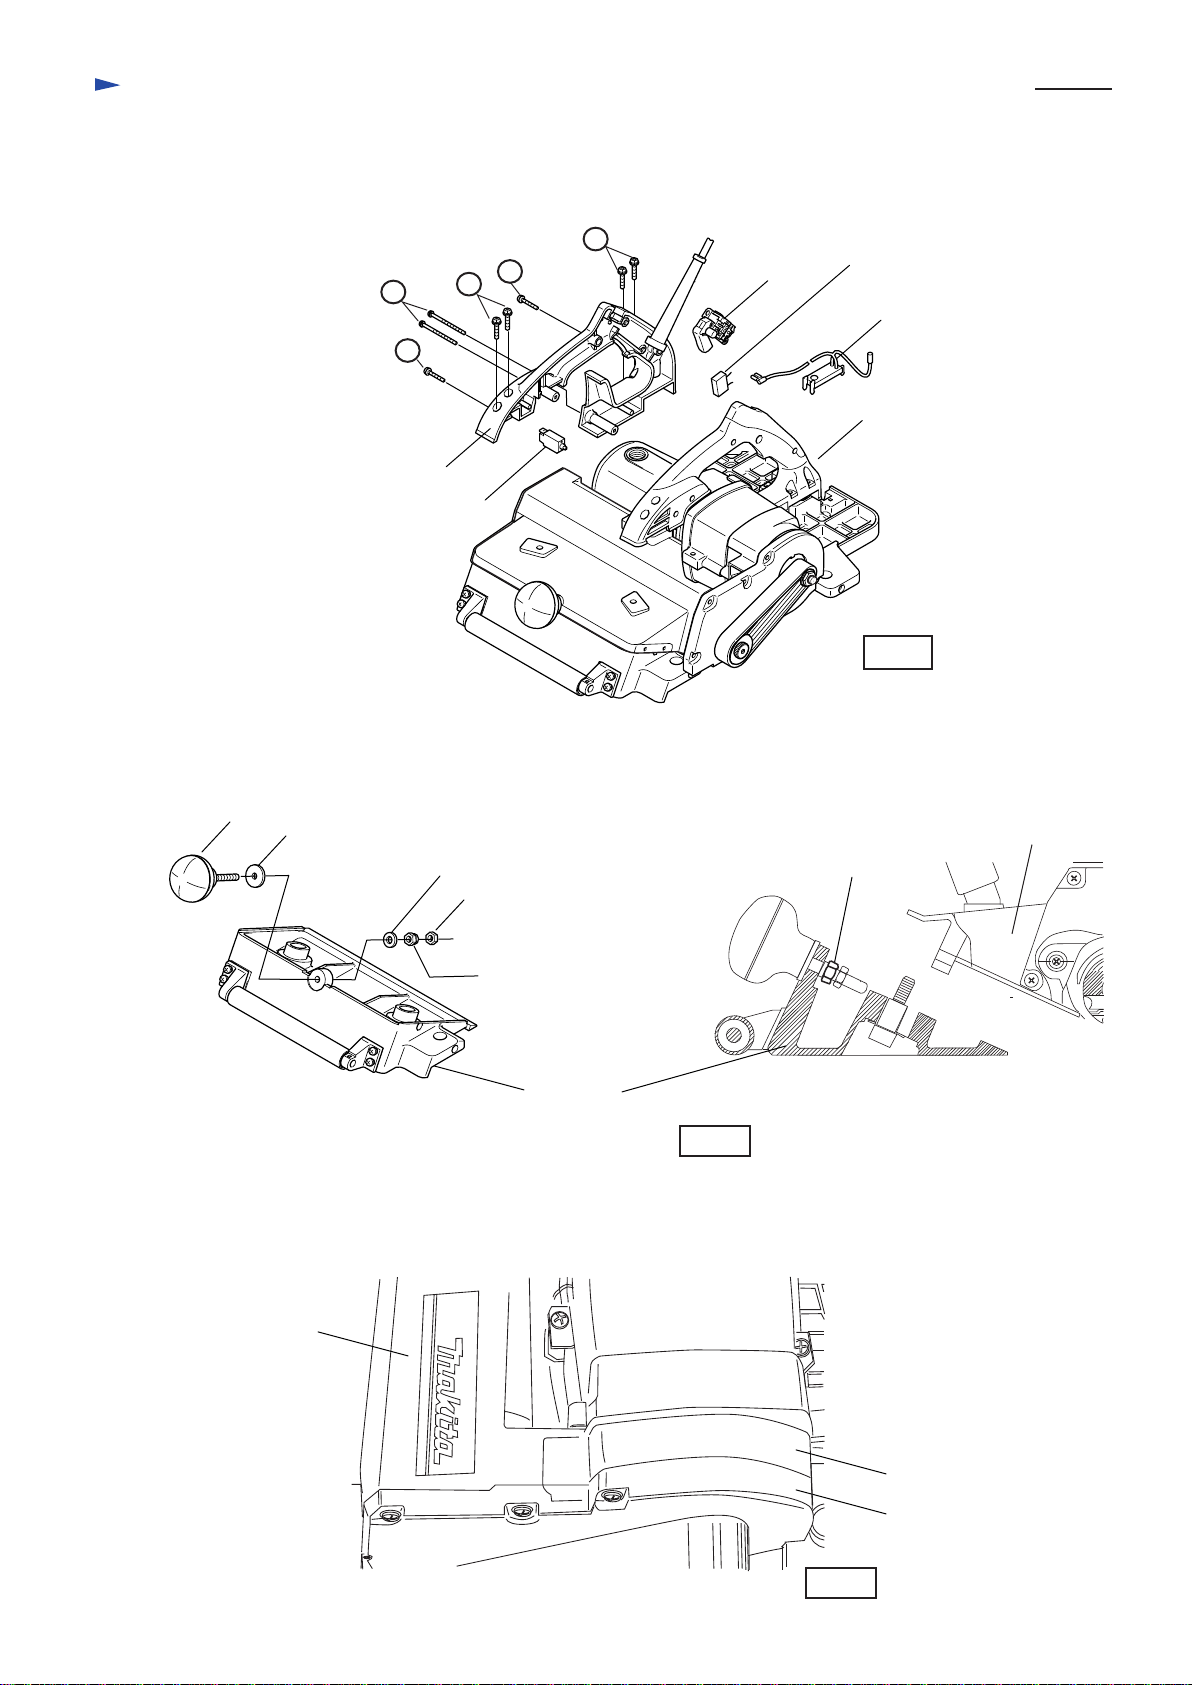
(1) Mount V-pulley 9-23L to the threaded portion of spindle by turning anti-clockwise with your hand.
But be careful, not to tight it too strong. And then, fix the V-pulley 9-23L with hex nut M10x17.
The hex nut M10x17 has to be turned anti-clockwise for fastening. But fasten the hex nut not strong
in this stage. See Fig. 4.
(2) After inserting key 4 to the grove of drum shaft, mount V-pulley 9-39.7 to the drum shaft aligning its cut portion
to the key 4. And then, fix theV-pulley 9-39.7 with hex socket head bolt M6x12.
The hex socket head bolt M6x12 has to be turned clockwise for fastening. But fasten the hex socket head bolt
not strong in this stage. See Fig. 4.
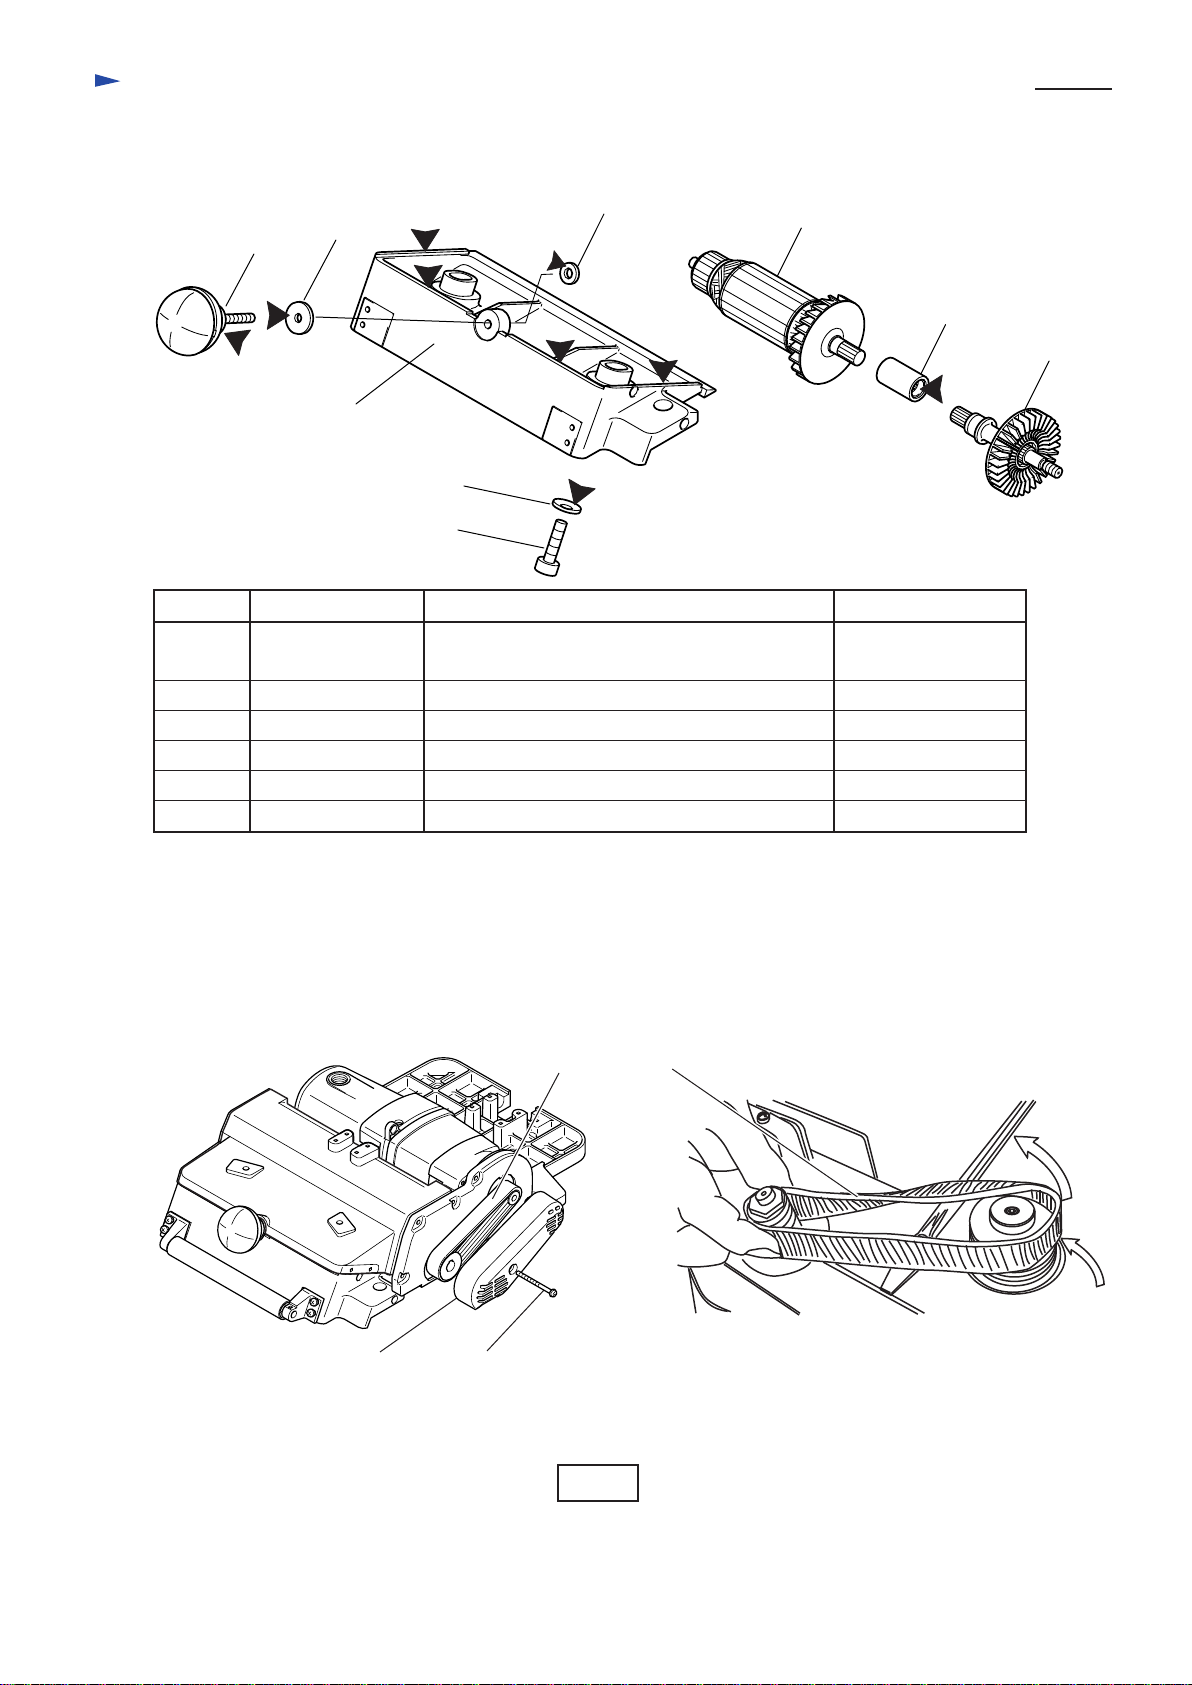
< 4 > Mounting V-pulleys and polyV-belt
Fig. 2
Fig. 3
Fig. 4
Hex nut M10x17
Hex socket head
bolt M6x12
< Note in Removing >
* Turn hex nut M10x17 clockwise for loosening.
* Adhesive has been applied on hex socket head
bolt M6x12.
< Note in Removing >
* Pay attention, not to lose key which is mounted to
drum shaft.
D=5mm 110mm
D13mm
1R230 Multi-purpose M6
V-pulley 9-39.7
V-pulley
9-23L
Key 4 Turn clockwise for
loosening.
Hex nut M10x17
Hex socket head
bolt M6x12
Key 4
V-pulley 9-39.7
V-pulley 9-23L
<Note>
If you use the used hex socket head bolt M6x12,
apply the adhesive to the threaded portion of the bolt,
or use the fresh one.

Repair P 4 / 8
< 5 > Removing ball bearing 6002DDW and ball bearing 6202LLB on drum
< 6 > Mounting armature
Fig. 5 Fig. 6
Fig. 7 Fig. 8
Fig. 9
(2) Mount poly V-belt. See Fig. 5.
(3) Fasten hex socket head bolt M6x12 and hex nut M10-17 firmly until both V-pulleys turn as illustrated in Fig. 6.
(1) To protect the screw hole for hex socket head bolt M6x12, insert a screw of size M6 as illustrated in Fig. 7.
(1) Make sure that O ring 14 has been mounted to armature. If not, mount it. And then, mount coupling with
aligning its spline with the armature's spline. See Fig. 9.
(2) Remove ball bearing 6202LLB with No.1R269 "Bearing extractor". See Fig. 8.
(3) Remove ball bearing 6002DDW with No.1R269 "Bearing extractor". See Fig. 8.
Poly V-belt
Hex wrench
Turn the hex wrench clockwise
for fastening.
Turn the wrench
anti-clockwise
for fastening.
Wrench 17
Ball bearing 6202LLB
Screw of size M6
1R269 "Bearing extractor"
Ball bearing 6002DDW
Drum Drum
O ring 14
Armature Armature equipped with O ring 14
Coupling
carved Spline

Repair P 5 / 8
< 7 > Mounting handle R and L to main base.
Joining handle R and L closely, fix them
ton main base with 8 pcs. of pan head screws M5x28.
See Fig. 12.
Fig. 11
Fig. 12
(2) Mount the armature to motor bracket. When mounting armature to motor bracket, align the coupling's spline with
the spline of spindle, by slowly turning V-pulley 9-23L.
(3) Make sure that baffle plate has been assembled to motor housing. And mount motor housing to motor bracket
with lifting up the armature body as illustrated in Fig. 11.
Fig. 10
Motor bracket
Slowly turnV-pulley 9-23L to
align the spline of spindle with
the couplings spline.
Coupling
Motor housing
Baffle plate
Lift up the armature body to avoid that the armature body
contacts field in motor housing.
8 pcs. of
Pan head screw M5x28
Handle R
Handle L
Main base

Repair P 6 / 8
< 8 > Replacement of the electrical parts in handle
< 9 > Mounting and adjustment of knob
Before mounting knob to front base, adjust it with hex lock nut M8-13, so that the knob can be turned smoothly, but
without wobbling. See Fig. 14.
( 1 ) Remove the following screws.
1. Pan head screw M5x28 : 4 pcs.
2. Pan head screw M4x28 : 2 pcs.
3. Pan head screw M4x60 : 2 pcs.
See Fig. 13.
( 2 ) Removed handle R. The electrical parts can be replaced.
See Fig.13.
< 10 > Mounting bracket cove and main bracket
Main bracket has to be closely mounted to bracket cover. And both of them has to be mounted to main base firmly
and closely. See Fig. 15.
< 11 >
< 12 >
< 13 >
< 14 >
< 15 >
< 16 >
< 17 >
< 18 >
< 19 >
< 20 >
< 21 >
< 22 >
< 23 >
< 24 >
< 25 >
< 26 >
Fig. 13
Fig. 14
Fig. 15
Fig. 16
Fig. 17
Fig. 18
Fig. 19
Fig. 20
Fig. 21
Fig. 22
Fig. 23
Fig. 24
Fig. 25
Fig. 26
Handle R
Handle L
Switch
Soft start circuit
1
1
2
2
3
Over current relay
Noise suppressor
Knob Flat washer 8 (large)
Flat washer 8 (small)
Hex nut M8
Hex lock nut M8-13
Hex lock
nut M8-13
Front base
Main base
Bracket cover
Main bracket
Main base

Circuit diagram
Wiring diagram
P 7 / 8
Color index of lead wires
Black
without soft start feature
and over current relay
White
Orange
2
4 5
3
White or blue
Black or brown
KP312
KP312
without soft start feature
and over current relay
Pass the following lead wires
back side of switch (opposite
side of switch trigger.)
* Power supply cord (black or brown)
* Support unit's lead wires
(black and orange)
Pass the power supply
cord (white or blue) through
the illustrated position.
Hold Support unit's lead wires (black and orange)
with lead holders as illustrated.
To avoid pinching, do not
pup any lead wires in this
area.

Circuit diagram
Wiring diagram
P 8 / 8
Color index of lead wires
Black
with soft start feature
and over current relay
White
Orange
2
4 5
3
Over current
relay
Noise
suppressor
Soft start
circuit
White or blue
Black or brown
KP312S
KP312S
Connect noise suppressor
as per the circuit diagram,
if any.
To avoid pinching, do not
pup any lead wires in this
area.
Hold the following lead wires
with lead holders as illustrated.
* Support unit's lead wire (black )
* Lead wire of soft start circuit
Hold the following lead wires
with lead holder as illustrated.
* Support unit's lead wire (orange )
* Lead wire of soft start circuit
Hold support unit's lead wires (black and orange)
with lead holder as illustrated.
Hold the following lead wires
with this lead holder.
* Lead wire of soft start circuit
* Noise suppressor's lead wire
But lead wire of soft start circuit
has to be put on the noise
suppressor's lead wire.
Hold the lead wires of soft start circuit
with this lead holder.
Pass the following lead wires
back side of switch (opposite
side of switch trigger.)
* Power supply cord (black or brown)
* Support unit's lead wires (orange)
* Lead wire of soft start circuit
with soft start feature
and over current relay
Other manuals for KP312
11
This manual suits for next models
1
Table of contents
Other Makita Safety Equipment manuals
Popular Safety Equipment manuals by other brands

Covalliero
Covalliero 3225307 Instructions for use

Rockwell Automation
Rockwell Automation Allen-Bradley GuardShield 450L-B4FNxYD user manual

CGM
CGM 205 Disassembly

mcmurdo
mcmurdo CREWFIT 180N PRO Fitting instructions

ENNUI
ENNUI Park Shin Guard instruction manual

Kapriol
Kapriol 32560 Instruction and Information Manual