MediCrystal THERMOGEM User manual
QUICK START GUIDE
printed owner’s
guide
CARRY AND STORAGE
BAG for your vest
All products, controllers, specications and data as well as a set of items packaged in a box are subject to change without notice to improve reliability, function or design of the devices.
Please, check for the most updated products details at www.MediCrystal.com web site.
EMF
FREE
HEATING
SYSTEM
11
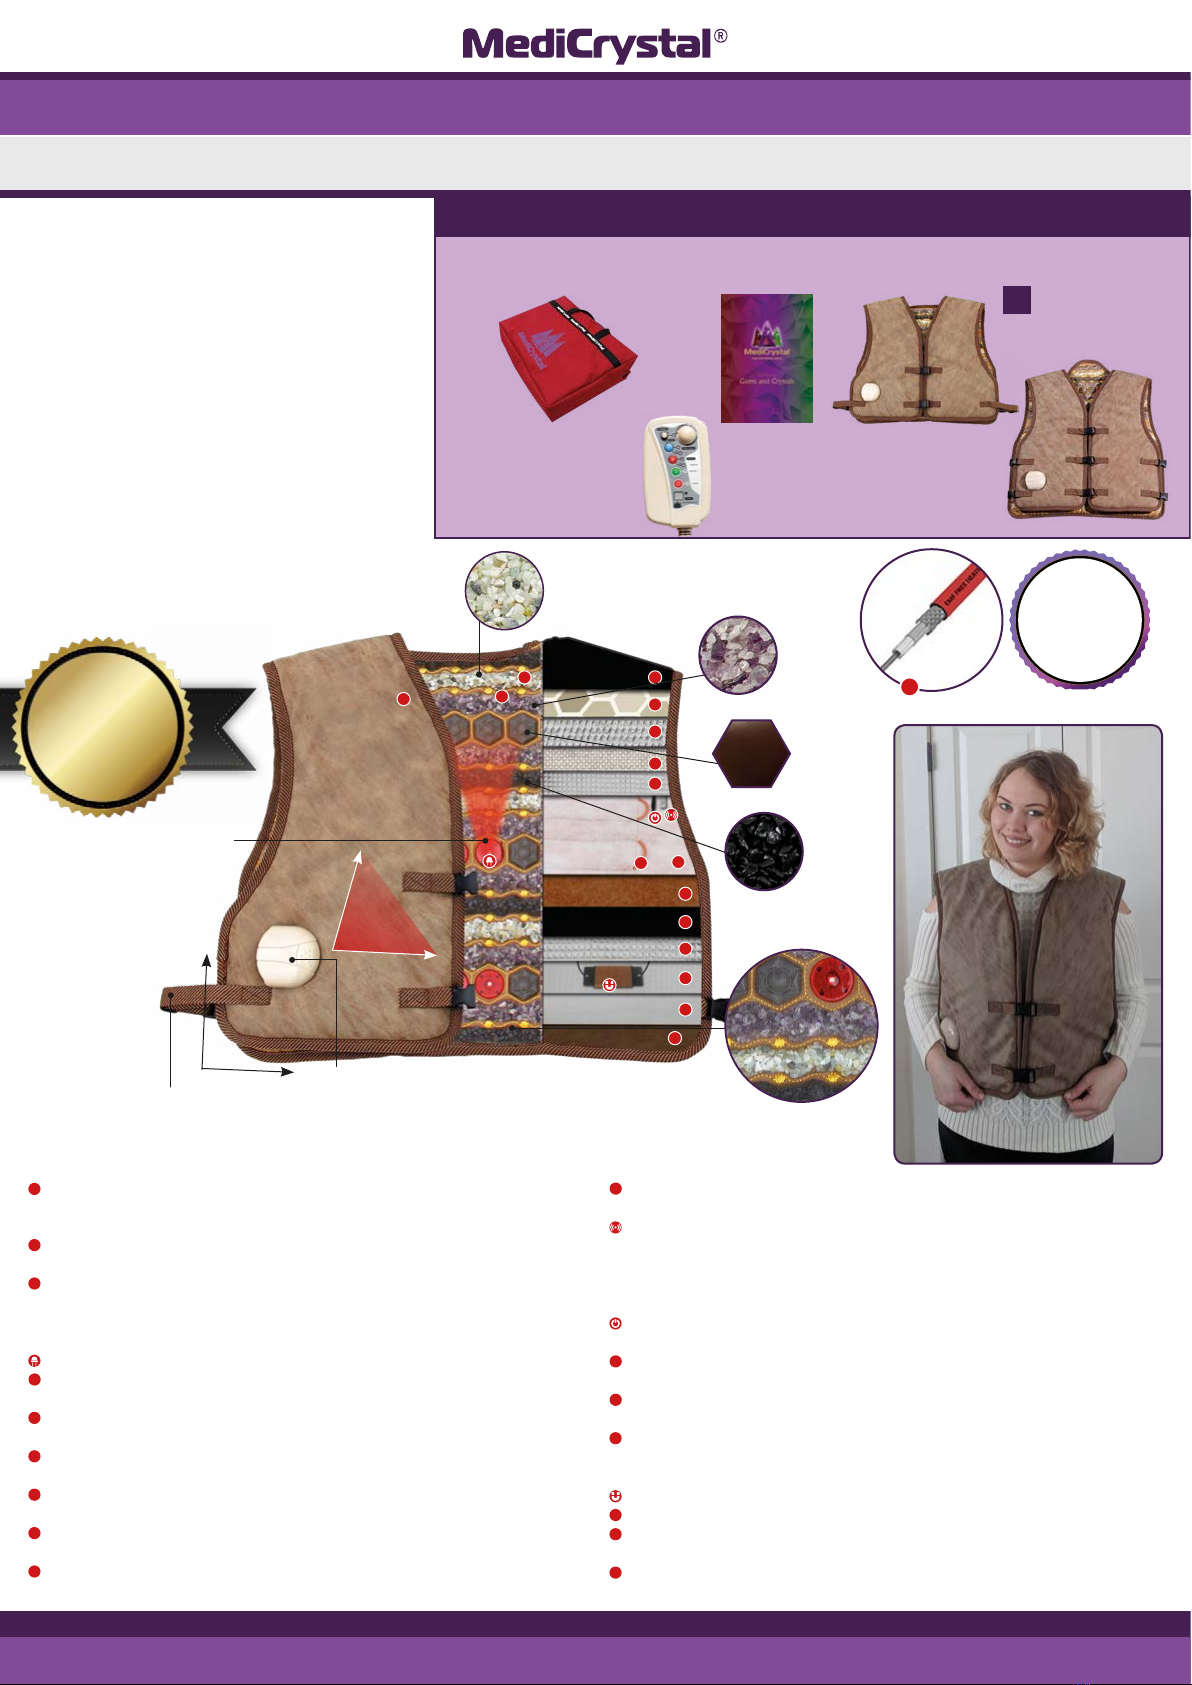
1Layer 1 – High quality heat resistant tan brown bicolor articial leather and eco-suede
which is elegant, durable, comfortable, and easy to clean, featured with ThermoGem™
Logo on the top.
2Layer 2 – Heat resistant Mesh fabric with elegant embroidery to x Amethyst, Jade and
Tourmaline by no glue artisan sewing process.
3Layer 3 – High Grade «A-AB» crushed to 2-10 mm and tumbled Natural, Not chemically
treated Purple Amethyst Crystals, Natural (non-ceramic) Black Tourmaline and Green
Jade Gems and Ceramic Tourmaline Hexagons. Hot crystals and gems release heating Far
InfraRed (FIR) rays and Negative Ions.*
Layer 4 –
Bio-stimulation Photon Red Light LEDs. Visible red light, at wavelength with 660 nm.
5Layer 5 – Cotton layer with charcoal lamination for thermal preservation and even heat
distribution.
6Layer 6 – Non-woven anion fabric layer for increased release of Negative Ions upon heat
distortion.
7Layer 7 – Waterproof and thermal preservation complex aluminum lm layer for protection
of vest’s temperature sensors and heating systems from moisture and sweat.
8Layer 8 – Electronic-wave proof copper ber fabric EMI (Electro Magnetic Interceptor)
layer for primary shielding user from any remaining electromagnetic elds (EMF).
9Layer 9 – Aluminum foil EMI layer blocking EMFs and uniformly distributing the heat to
the upper layer with gemstones.
10 Layer 10 – Durable 0.2 mm non-woven glass ber fabric layer for heating wire xing and
protection.
11 Layer 11 – Unique silicon heating wires in teon insulation twice shielded with copper
and foil to completely eliminate EMFs.
Layer 12 – Thermostat sensors measuring temperature in the dierent points of multilayer
structure and reporting to the controller. This is the current vest’s temperature that you
can see on the controller display. The temperature sensors help to maintain uniform
heat level throughout the vest as set by user. They are also a part of overheat protection
controller system.
Layer 13 – Bimetal switches for emergency overheat protection with automatic power
shut-o feature if the vest heats up to 80 °C or 176 °F.
14 Layer 14 – Cotton fabric laminated with red clay accumulating heat, discharging Negative
Ions, naturally releasing Far InfraRed rays.
15 Layer 15 – Charcoal fabric layer releasing Far InfraRed (FIR) Rays and Negative Ions,
decomposing and deodorizing smell.
16
Layer 16 – Pure aluminum foil FIR reection layer blocks heat from being conducted
downwards and assists other layers to evenly distribute and continually release the
heat.
Layer 17 – VLF PEMF (Very Low Frequency Pulsed Electromagnetic Fields) system coils.
18 Layer 18 – Non woven fabric layer for heat absorption and preservation.
19 Layer 19 – Compressed non-woven cotton padding for thermal protection and increased
comfort.
20 Layer 20 – Waterproof polyester peach skin fabric for durability, tension resistance, and
protection from moisture, dirt and wear.
20
layers
THERMOGEM™ BIO-MAGNETIC AMETHYST TOURMALINE JADE VEST
THERMOGEM™ VEST SET INCLUDES:
Standard Vest
Vest electrical connector
for controller plug. Tight
connection between the vest
and controller is essential to
avoid errors and faults
1
2
3
5
6
7
8
9
10
11
14
15
16
18
19
39-44"
37-44"
The VEST CLOSURES PROVIDE
comfortable t for men and
women of all ages
standart: size: 39"x37" (100x95 cm)
heating area: 37"x22" (95x55 cm)
xl: size: 44"x44" (112x112 cm)
heating area: 43"x22" (110x55 cm)
FIR HEAT ADJUSTABLE FROM 86 °F TO 158 °F
1BIMETAL SENSOR 1thermostat SENSOR
24 Red Light LEDs 3PEMF COILS
3.7 lbs/ 5lbs of crushed Amethyst Crystals
1.8 lbs/ 2.2 lbs of crushed tourmaline gems
1.8 lbs/ 2.2 lbs of green jade stones
58/70 pcs ceramic tourmaline hexagons
HEATING POWER: 150w/180w, voltage 110v, 60hz
Total weight: 10 lbs/ 16 lbs
20
Monochromic 660 nm
Red Light LEDs
Natural
Amethyst
Natural Black
Tourmaline
Green Jade
Ceramic
Tourmaline
Tumbled Natural Amethyst, Tourmaline, Jade crystals,
and 1/4 inch thick ceramic Tourmaline hexagons are
xed without glue by special heat resistant mesh fabric
H-60PVA
operational
CONTROLLER
with wires
37-43"
22"
heating area
XL Vest
or

QUICK START GUIDE
All products, controllers, specications and data as well as a set of items packaged in a box are subject to change without notice to improve reliability, function or design of the devices.
Please, check for the most updated products details at www.MediCrystal.com web site.
*ThermoGem™ stone mattresses, mats, pads, belts, wraps, pillows can
help you create a relaxing, soothing and re-energizing environment to
maintain your wellness, balance, good sleeping, physical strength and
tness and awaken the restfulness, comfort and invigoration powers and
energies. Together with exercises and healthy diet ThermoGem™ products
may supplement your daily activity and become an important part of your
healthy lifestyle which can improve your ability to do the everyday things
and enhance life experience. ThermoGem™ products are not intended to
diagnose, cure, treat, mitigate, or prevent any disease, illness or medical
condition or to substitute medical treatment of any kind or to aect the
structure or any function of the body. Information here is never to be
construed a medical advice. It does not reect or represent a product
claim. FDA has not approved or evaluated ThermoGem™ products or this
information. All products, specications, and data are subject to change
without notice to improve reliability, function or design of the products.
LEGAL DISCLAIMER
THERMOGEM™ BIO-MAGNETIC AMETHYST TOURMALINE JADE VEST
1
Power ON/OFF Toggle Button – Push it to turn the vest ON/OFF. When you turn it ON, the Display will show ON. It means that the
controller is ON and ready to choose the program. If controller display shows -- it means that the Power is connected but the Button
has not been activated and no functions can be operated. Press power button again with some eort so that display
shows ON.
2POWER indicator – Lights up when Power is ON.
3Timer Control Toggle Button – Choose one of 4 options shown on the Display : 1H, 4H, 8H, 0H for 1, 4, 8, 12 hours heating
session with auto shut-o when time expires or you can choose -H (NO HEATING MODE) for only PEMF function without heating.
Press and hold for 5 seconds to turn OFF Auto-Protection Feature, Display will show S-. Press and hold again to reactivate
this feature, Display will show SA.
4«HEATING» Operation indicator – ON when vest is heating, OFF when set temperature is reached.
5
Temperature, Timer, Frequency and Program Display – Switches into Temperature Mode when the Temperature Dial is rotated.
Display shows the current Celsius temperature (30–70 °C), ashes to the set temperature when dial is rotated, then back again.
If the temperature is more then 122 °F (50 °C) for longer than 3.5 hours, Auto-Protection Feature will decrease it to safe
115 °F (45 °C) level and display will show [ ].
In Timer mode Display shows one of 5 heatings time settings 1H, 4H, 8H, 0H or -H chosen by Timer Control Button . When the
heating program is over the temperature display will show --, OF or ON indicating that Power is ON but the time set has expired.
Add time to resume heating or push the Power Button to turn-o the Controller.
In PEMF Program mode Display shows one of PEMF program settings. P- (PEMF OFF for FAR INFRARED heating function only), PO
(manual frequency adjust mode), P1, P2, P3, P4, P5, P6, P7, P8, P9, PA, PC, PE, PF (automatic PEMF programs). Please, check
Controller user guide for details.
If Manual Frequency adjust dial is in active mode Display shows current PEMF frequency in Hz (1–30 number of pulsations per
second). Please, check Controller user guide for details.
In PHOTON Program mode Display shows one of three PHOTON program settings. 1P = PHOTON ON 30 minutes. 2P = PHOTON runs 8
program cycle (One cycle = PHOTON ON 30 minutes OFF 30 minutes). -P (PHOTON OFF for FAR INFRARED and/or PEMF functions only).
Display may also show OF, ickering or static -- if the Power Button is not pressed or if connection between the controller and the
vest is lost. Press Power Button to turn ON all other functions of controller or reconnect controller to the vest tightly to resume.
6Adjust Temperature Dial – Use to increase or decrease heat 30~70 °C (86~158 °F). The dial range is marked, indicating the
desired temperature in °F.
7PEMF Program Button – Choose P- (PEMF o) one of 13 automatic Program options P1, P2, P3, P4, P5, P6, P7, P8, P9, PA,
PC, PE, PF shown on the Display or switch to manual frequency adjust mode PO. Press and hold for 3 seconds to quickly return
to P- (PEMF o). Please, check Controller user guide for details.
8Adjust PEMF Frequency Dial – Use to increase or decrease magnetic pulsation frequency from 1 to 30 times per second. You
can try dierent frequencies to nd what works better for you.
9Adjust PEMF Frequency Dial ON Indicator – Lights up when PEMF manual adjust dial is ON, frequency is chosen in manual
mode, PEMF is ON, OFF when it stops.
10
PEMF ON Indicator – Lights up when PEMF function is ON, OFF when it stops.
11 PEMF PROGRAM CYCLE Indicator – Lights up when PEMF is auto cycled by
program. OFF when the whole Program is over.
12
PHOTON Program Button – Choose one of three PHOTON program settings. 1P
turns ON Red Light LEDs for 30 minutes. 2P runs 8 cycles program (One cycle =
PHOTON ON 30 minutes, OFF 30 minutes). -P (PHOTON OFF for FAR INFRARED
and/or PEMF functions only). Please, check Controller user guide for details.
13 PHOTON ON Indicator – Lights up when the Red Light LEDs are ON, OFF
when PHOTON function stops.
14 PHOTON PROGRAM CYCLE Indicator – Lights up when Red Light is auto
cycled by program. OFF when the whole Program is over.
1. Consult your health professional to make sure that you can use red light, hot stones,
FIR sauna, and PEMF (pulsed electromagnetic elds). Take extra care if you have any
health issues.
2. Read the USER GUIDE, safety instructions, «use with caution» and contraindication
sections to be sure that the vest is OK for you, especially if you are going to use it on high
heat settings or sleep with it.
3. Drink a lot of water, juices, herbal teas before, during, and aer sessions, and replenish
minerals such as calcium, potassium, sodium, magnesium and others which may be lost
with perspiration or urine.
4. Create a relaxing surrounding atmosphere.
5. Put the belt on your bed or on the oor with crystals facing up.
6. Connect the controller to the vest very tightly, then to the power socket.
7. Turn the controller ON and set the timer, only then set the max temperature to test the
vest for an hour. While it is cooling down, test PEMF functions for 15-20 minutes. Do
not put the protector on the vest or lay on it during this time.
8. Cover the vest ENTIRELY with a blanket to pre-heat the stones for 30-60 minutes to
set level. If the belt is covered only PARTIALLY, it may cause dierent temperatures in
dierent parts of the belt, sensors disruption and controller malfunction.
9. The vest is rather exible but it is important not to apply excessive pressure to amethyst
pad, never stand on the vest or bend it too much.
10. If the vest is too hard for you, or you sweat a lot and it gets wet put on your T-shirt
or pajama under the vest. It will also cushion it and eliminate the crystals’ pressure.
You may use a towel instead if necessary. For more Red Light try a bare vest for 15-30
minutes.
11. Start with the vest on the lowest heat settings, 35-40°C or 96°–112°F, and short
sessions only for 15-20 minutes (do not forget to preheat the vest, it will be slightly
warm) and watch how your body reacts.
12. If you enjoy shorter sessions and your body reacts well, move up to longer or more
intensive and frequent sessions.
13. Gradually increase the temperature by several degrees and session time by 5 minutes
each other day, and only if you feel comfortable and want more intensive experience.
14. You should choose the length, intensity and frequency of the sessions so that you feel
comfortable and refreshed. If your belt is equipped with adjustable frequency controller,
it is suggested to start PEMF at a low frequency such as 4 Hz then increase to 8, 10 or 14
Hz. Usually lower frequencies have more calming eects while higher frequencies provide
more stimulation and promote activity.
15. You should also have some rest between the sessions and never start with more than
three a week before you are better informed as to how they inuence you.
16. You can also try the PEMF function, on the lowest heating levels, for 20-30 minutes
to check how your body reacts. Later if necessary you will be able to use all the functions
or any of their combinations together. However, we recommend not to use PEMF on high
heat to avoid overstimulating.
17. You should not feel any discomfort – but if there is any, rest several days, and restart
with the temperature, length and frequency set to the lowest possible.
18. Unplug your controller from the wall socket always when not in use. But do not
disconnect controller from the vest more frequently than necessary, in order to avoid
the connection becoming loose.
1
3
5
2
4
6
8
9
7
10
11
12 13
14
CONTROLLER H-60PVA for vest with PEMF and PHOTON
If your mat is rated for the North American 110-120V
voltage and your controller is with the U.S. standard NEMA
5-15P (two-pole with ground pin) plug, use it only with
the step-down 220-250V to 110V voltage converter in the
220-250V 50Hz countries. The maximum wattage of such
converter should be at least 2-3 times higher than the
mat’s power consumption. Do not connect the 110-120V
mat into the 220-250V outlet
through an adapter. If you plug
in a device that isn’t rated for
the outlet’s voltage, it may be
severely damaged, and cause
re risks!
Other manuals for THERMOGEM
3
Other MediCrystal Personal Care Product manuals

MediCrystal
MediCrystal BIO-MAGNETIC AMETHYST TOURMALINE MIDSIZE... User manual

MediCrystal
MediCrystal Mat Manual

MediCrystal
MediCrystal Classic Amethyst Mat User manual

MediCrystal
MediCrystal ThermoGem Bio-Magnetic Photon Belt User manual

MediCrystal
MediCrystal Classic Amethyst Mat User manual

MediCrystal
MediCrystal AMETHYST TOURMALINE HOT STONE BIO-MAGNETIC... User manual

MediCrystal
MediCrystal THERMOGEM User manual

MediCrystal
MediCrystal Classic Amethyst Queen Mat User manual

MediCrystal
MediCrystal CLASSIC AMETHYST BELTS User manual

MediCrystal
MediCrystal THERMOGEM 3-GEMS BIO-MAGNETIC PHOTON FULL SIZE... User manual


