MERITECH CleanTech 500EZ User manual

CleanTech®500EZ
INSTALLATION AND OPERATION MANUAL
March 31, 2020

2
CLEANTECH® 500EZ
Automated Hand and Glove Cleansing System
INSTALLATION AND OPERATION MANUAL
Manufactured by:
Meritech Systems, LLC
720 Corporate Circle, Suite K
Golden, CO 80401 USA
Phone:(800) 932-7707
Fax:(303) 790-4859
www.meritech.com
E-mail: [email protected]
E-mail: [email protected]
WARNING: The performance and effectiveness of CleanTech® systems have been extensively tested
when using solutions provided by Meritech Systems, LLC. Satisfactory performance or effectiveness
cannot be guaranteed when other solutions are used.
FAILURE TO USE MERITECH SYSTEMS, LLC SUPPLIED
CHEMICALS WILL VOID ANY AND ALL WARRANTIES.
March 31, 2020

3
MERITECH Systems, LLC. CleanTech®
Installation and Operation Manual
Table of Contents
3
Introduction
4
Overview
5
Facility Installation Instructions
6 - 7
Wall-mount
New Construction Rough-In Diagram
Who to Call if You Need Help
8
The Hand Cleansing Cycle
9
Helpful Pointers For Trouble Free Operation
10
Top Cover Indicators
11
Detailed System Reference
12
Water and Temperature Controls
Cylinder Rotation
Solution Delivery
13
Changing Solution Containers
14
Removing and Empty Container
Installing a New Container
Solutions Replacement Diagram
15
Maintenance
16 - 17
Warning Symbols
17
Unpacking Instructions
18
Installation Guide
19
Cut Sheet
20
Wall Mount Template
21
System Specifications
22-23
If External Backflow Prevention is needed
24
Contacting Meritech
25
Meritech Systems, LLC Warranty
26
Terms & Conditions of Sale
27
4
Introduction
Thank you for selecting the CleanTech® 500EZ Automated Hand Cleansing System as a component in
your hand washing regimen. We designed the Series 500EZ to provide your facility with an automated,
turnkey system that meets or exceeds your hand washing requirements for compliance, standardization
and effectiveness.
This manual describes everything you will need to properly site, install and maintain your system. The
CleanTech® 500EZ will connect to your standard hot and cold-water lines and drain. A more detailed
description of the installation procedure can be found in the Installation Guide of this manual.
Select an area for installation that encourages frequent use in your facility. We recommend positioning
the Series 500EZ near the main work area, lunch facilities, restroom facilities, and close to the entrance
and exit doors.

5
Overview
Achieving the Optimum Wash
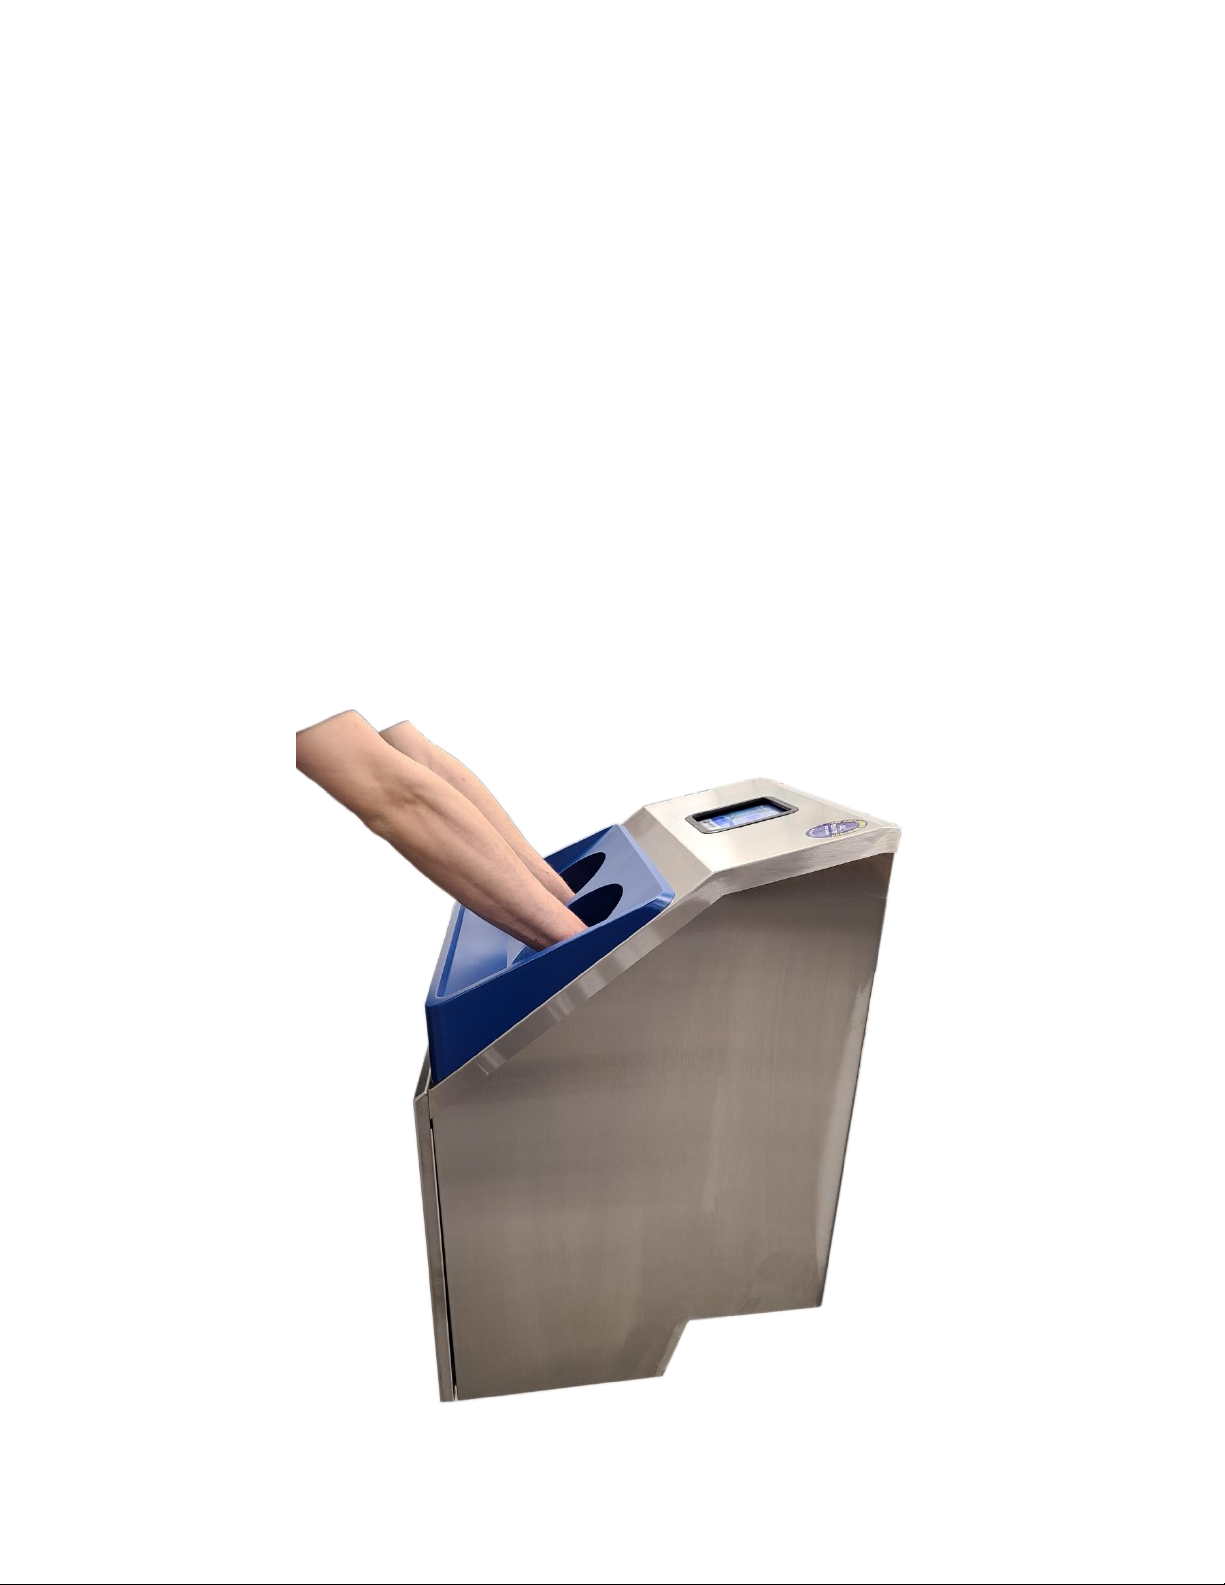
The CleanTech® 500EZ system provides a no-touch, completely automatic hand wash by sequentially
delivering handwashing solution and water in a stimulating spray to the hands or gloves from finger tips
to wrist. The system uses the Ultrapure hygiene solution and water to remove 99.9% and greater
pathogens from the hands or gloves. The system can also remove particles, sodium’s and other
contaminants. The standard system configuration is 12 seconds which consists of a wash cycle using
hand washing solution that clean and sanitize and a potable water rinse cycle. A helical configuration of
jet nozzles located within the two rotating cylinders is used to spray the mixture of solutions and
pressurized water onto the hands followed by a potable water rinse.
To minimize cross-contamination, an infrared photo optical sensor positioned directly above the
cylinders automatically senses the presence of your hands when they enter the cylinders. To trigger a
wash cycle, it will not be necessary to touch any part of the system; simply insert your hands into the
cylinders.
One complete hand wash cycle will automatically dispense the appropriate volume of hygiene solution
followed by a potable water rinse. The minimum time interval between user cycles is approximately 2
seconds.
The optional air curtain can be installed on the system to automatically turn on at the end of the cycle
and blow compressed air on to the hands as long as the photoeye is blocked. This can be used to just
knock of most of the water drops in just about 3 seconds or used to completely dry the hands in
approximately 35 seconds.

6
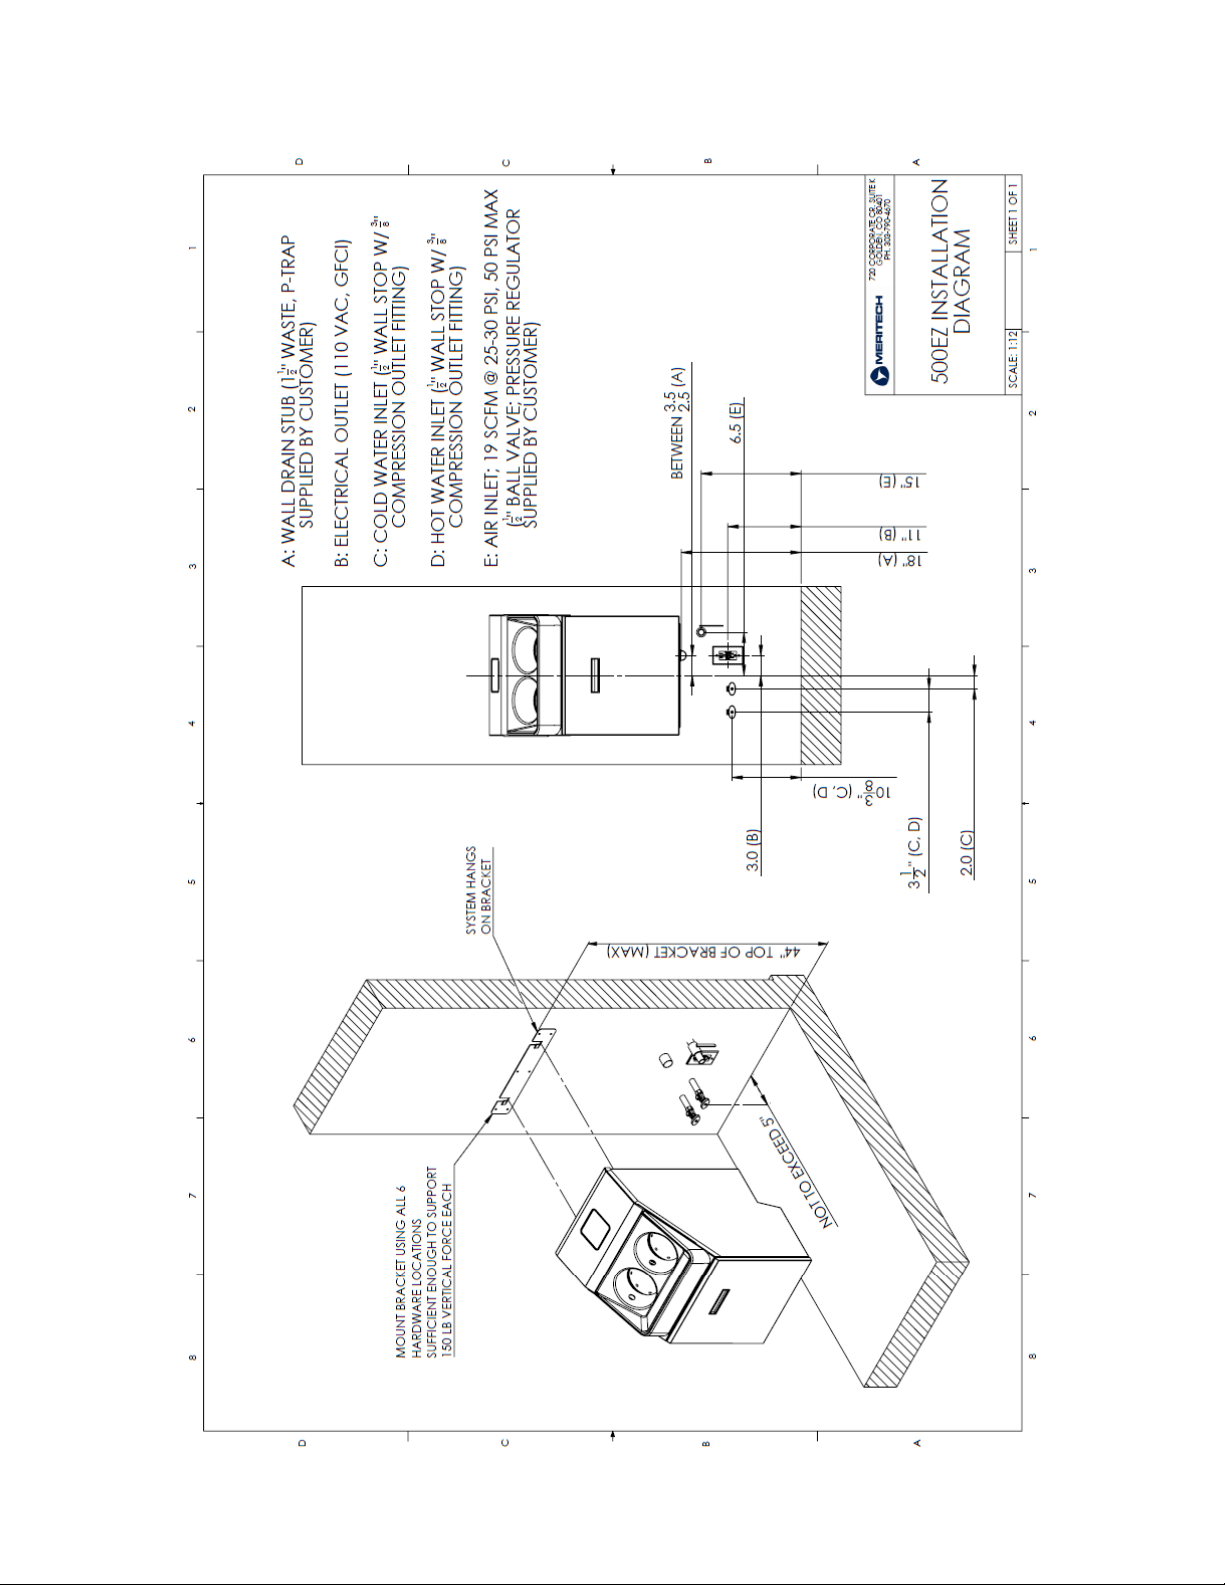
Facility Installation Instructions
(For detailed specifications, see the system specifications of this manual)
Wall-Mount:
1
Remove wall mount template from packaging.
2
Place top of the wall mount bracket facing up on wall at desired height and location.
Recommended height is 44” from finished floor to top of wall mounting bracket,
however top of wall mount bracket must be a minimum of 26” above the wall drain.
Trace the 6-hole locations from the wall mount bracket onto wall.
3
Install the wall mount bracket with fasteners compatible with wall construction at the 6
traced hole locations. Fasteners length and material should be such that fastener is
capable of supporting a 200-pound vertical force each.
4
Hang the 500EZ onto the wall mount brackets two “Hooks”. Verify the system is level and
securely attached to the wall.
5
Hook up hot/cold supplies and drain lines. Do not hard pipe to water inlets of the system
–Use flexible hoses supplied with system. Plug in power cord. Install three fresh gallons
of soap per label instructions.
6
Turn water on and inspect for leaks. Repair as necessary.
7
Install the 2 ½ gallon container and verify the solutions meter on the display has full bars.
System is now ready for operation.
CAUTION: Do not ground metal chassis during installation or operation.
Consult local and national codes: conformity and compliance to local and national codes is the
responsibility of the installer.
7
New Construction Rough-In Diagram

8
Who to call if you need help
The CleanTech® 500EZ connects easily to your existing hot and cold-water lines using standard 3/4 inch
"garden hose" style fittings. These fittings were chosen because they are commonly available, very
reliable and can be disconnected quickly. You will also need a grounded 120V electrical outlet, and a
standard 1 1/2” drain line.
If these hook-ups are not readily available, you will need to consult with your commercial plumber or
electrician. Because of the different building codes and licensing regulations, Meritech cannot accept
responsibility for providing plumbing and electrical modifications to your facility. However, a Meritech
representative will be happy to provide the necessary guidance to ensure a correct installation. Follow
the instructions in the installation guide of this manual for further installation information.
Consult local and national codes: conformity and compliance to local and national codes is the
responsibility of the installer.
IF YOU SHOULD EXPERIENCE ANY DIFFICULTY OR ARE UNSURE ABOUT THE
INSTALLATION PROCEDURE, WE ENCOURAGE YOU TO CONSULT
IMMEDIATELY WITH MERITECH.
Manufactured by:
Meritech Systems, LLC
720 Corporate Circle, Suite K
Golden, CO 80401 USA
Phone:(800) 932-7707
Fax:(303) 790-4859
www.meritech.com
E-mail: [email protected]
E-mail: [email protected]

9
The Hand Cleansing Cycle
Check all water hook-ups to ensure they are open and not leaking. Plug the power cord into an electrical
outlet and verify power on (the display panel, master count, & resettable counter will be illuminated).
The system is ready for hand washing.
Solution will be drawn from the 2 ½ gallon container. As solution is consumed the light bar will indicate
the level of solution in the bottle and will flash when the contain is empty. The display will also tell you
when the solution is empty.
FOLLOWING THIS PROCEDURE WILL ENSURE THE MOST EFFECTIVE WASH IN THE SHORTEST PERIOD
OF TIME
1. To initiate a cycle, stand directly in front of the system and place your hands simultaneously into
the center of each cylinder.
2. The hygiene cycle will automatically start as your hands enter the cylinders. Position your hands
at a depth so the outer most ring of the water spray cover the wrist.
3. The countdown timer will begin to countdown from 12 –0 and the display will show
“WASHING”.
4. You will receive the most effective wash with the hygiene solution is you relax, center your hands
within the cylinder with your fingers slightly spread.
5. At 6 seconds the system will switch from “WASHING” to “RINSHING”.They cycle is complete.
NOTE: The infrared photo optical sensor will not reset for the next cycle until the hands are removed.

10
Helpful Pointers for Trouble Free Operation
Avoid touching or resting your hands and forearms on the cylinders themselves. If you apply pressure to
the cylinder walls, the cylinders have been designed to stop spinning and will restart once you have
stopped impeding their rotation.
Occasionally you may encounter a condition where you have placed your hands into the cylinders, but
nothing happens. This condition generally occurs when the next cycle is requested before the previous
wash cycle is completed. To reset the cycle, simply remove your hands, wait for 3 seconds and reinsert
your hands into the cylinders.
During periods of infrequent use, the water temperature may cool. This will have no effect on the
quality of the hygiene event and the wash you will receive, the cleansing solution works properly
through a broad range of temperatures. The period of time for the warm water to return to the station
will depend on the distance of the hot water source from the station. In extreme cases or in cold
environments it may be beneficial to have a booster water heater near the system.
The Series 500EZ has been designed to be left in the power "on" mode over normal periods of operation.
During extended periods of time (a month or longer) when the system will not be used, we recommend
removing the solution container, placing the pick-up tube from the solution container, into a container
of hot water and running several hand wash cycles. This will flush the lines of solutions, which tend to
thicken significantly with time and may clog the system. After flushing the lines, close the facility water
shut-off valves and unplug the system.

11
Top Cover Indicators
The CleanTech 500EZ system is equipped with a solutions indicator light bar to indicate the level of
the solutions in the container. The station has a display that will indicate when solutions are empty
and needs to be replaced, Master & Resettable Compliance Monitor, when washing and when
rinsing. The station also has a countdown timer that counts down from 12 –0 and when it hits 0 it is
safe to remove the hands and the hygiene cycle is complete.
Display
Station
Master
Counter
Optional
Resettable
Counter
Countdown
Timer
Solutions Light Bar
Indicating Full
Solutions Light Bar
Indicating Empty
Ultrapure
Empty

12
Detailed System Reference
Water and Temperature Controls
The CleanTech® 500EZ blending valve is calibrated at the factory at a pre-set temperature (usually
between 100° - 107° Fahrenheit). While the calibrated temperatures are usually accurate within +/-
1° F, temperature can be dependent upon the hot and cold-water inlet temperatures and pressures.
Hot water is not produced by the CleanTech® system. If facilities hot water is not 135°F or greater,
the CleanTech® system may not be able to achieve the recommended 105°F hand wash temperature.
In cold rooms where the hot water loses its heat through the hot water pipe and cold-water
temperature is extremely low, it may be necessary to have a booster heater located near the
CleanTech® system. CleanTech® systems are not compatible with instantaneous or tank-less water
heaters. For specific application assistance, contact Meritech at 1-800-932-7707.
Consult with local plumbing authorities for proper connections and installation requirements. The
customer installed hot and cold-water control shut-off valves should be located near the system.
These valves control the supply of water from the main water lines to the system. If you detect a
water leak, close both the hot and cold water shut-off valves and unplug the system.
To decrease water pressure, splash out, and flow; partially close the facility hot/cold water valves
equally to achieve the desired pressure/flow.
Cylinder Rotation
The wash cylinders are made of durable plastic and can be slowed at anytime by placing light
pressure on the cylinder walls. This feature has been designed to ensure safe operation at all times.
Do not worry if large pieces of debris fall into the cylinders. The bottom of the cylinders will act as a
trap. Simply reach in and remove the debris. Smaller pieces of debris will fall through the cylinder
and out through the system drain.

13
Solution Delivery
During each wash cycle, approximately 5 –7ml of hygiene solution is injected from its container and
delivered to the hands through the jet nozzles located in the walls of the cylinders. The CleanTech®
500EZ ensures the uniform delivery and dispersal of the antimicrobial solution with adequate water
pressure to the system. At least 40-PSI dynamic (during water flow) inlet water pressure is required.
The system will continuously monitor the delivery of the solution and will automatically signal an
improper delivery on the front panel monitor. Visually examine each container and its clear delivery
lines to determine if there is adequate fluid present and that the line is not blocked. Change the
solution containers if they are empty.
The hand wash cycle consists of a wash and potable water rinse. The wash portion of the cycle mixes
cleansing and sanitizing solution with water followed by a potable water rinse. The cycle length is
normally 12 seconds but can be programmed over a wide timing range. All system programming is
done either at the factory or by an authorized Meritech technician. DO NOT ATTEMPT TO PROGRAM
OR REPROGRAM YOUR SYSTEM.
When the hand wash solution container is empty, the light bar will flash empty and the display will
display “ULTRAPURE SOL. EMPTY”.

14
Changing Solution Containers
Removing an Empty Container
1
To remove an empty container, simply loosen the cap on the 2 ½ gallon container and
remove the tube assembly from the empty container. DISPOSE OF CONTAINER
ACCORDING TO LOCAL, STATE, AND FEDERAL REGULATIONS AND DO NOT REFILL USED
CONTAINERS.
Installing a New Container
The solution containers can be installed quickly and easily. Each case of solutions contains two
solution tube assemblies (each assembly consists of a cap, tube barb with tube). Follow these steps
for all installations:
1. Unscrew the protective cap from the new 2 ½ gallon solutions container and discard.
2. Place the new container in the system.
3. Install the pickup tube assembly from the system into the new container and tighten cap.
4. After installing the new solutions container, run 5 handwashes to re-prime the solutions line.
FOR FURTHER ASSISTANCE CHANGING THE SOLUTIONS CONTAINERS, REFER TO THE SOLUTIONS
REPLACEMENT DIAGRAM LOCATED ON PAGE 14 OF THIS MANUAL.

15
Solutions Replacement Diagram

16
Maintenance
Weekly:
➢Pour, rub or spray bleach, ammonium chloride, hydrogen peroxide or other hard surface
disinfectant into each cylinder to kill any bacteria that may be in the system or facility drain.
➢Clean front surfaces and cylinders with a cleaning agent that removes mineral deposits.
Quarterly:
➢Clean photo optical sensor lenses with water and a clean soft cloth.
➢Remove the solution bottle. Fill a container with hot water, put the system solution pickup
tube in the hot water. Run 20-30 hand wash cycles to flush hot water through soap lines. Let
soak for 15 minutes. Remove the pickup tube from the hot water and run 10 handwashes to
empty the water from the line. Reinstall pickup tube into solution container and run 5
handwashes to re-prime the station.
Biannually:
➢Unplug system and close facility water shut off valves. Remove hose fittings from hot and
cold-water inlets. Remove water filter screens, rinse clean with tap water and reinstall water
filter screens and hot and cold inlet lines. Turn facility water shut off valves on, plug system in
and check for leaks.
As Needed:
➢Replace cylinders every 30,000 –50,000 hand wash cycles or when mineral deposits buildup
or water splash out becomes excessive. This should be done by a Meritech technician.
Taring System:
➢On occasion it may be necessary to re-tare the solutions scale in the system.
a. To re-tare the solution scale, remove the solutions container from the system and
verify nothing is on the weigh plate.
b. Press the tare button and system will go into re-taring mode and display will indicate
taring. This takes only 2 seconds to re-tare the station.
c. Once complete, re-install the solutions container and verify the solutions light bar is
reading correctly. See next page for a picture of these steps.
ADJUSTMENTS:
Adjustments should be made by a Meritech technician. (See page 20 for contact information)

17
Maintenance - Continued
Taring:
Warning Symbols
The following is a description of the symbols used on the CleanTech500EZ system.
Tare Button

18
Unpacking Instruction
Preparing system for Unpacking/Installation
Carefully
Remove Tape
Carefully
Remove Tape
Carefully
Remove Tape
Carefully
Remove Tape
Carefully
Remove Tape

19
Installation Guide
Instructions for Installation & First Time Start-up
1
The facility will need to provide the appropriate grounded electrical outlet, hot and cold-
water supply lines with shut off valves and standard 3/4” male garden hose fittings for each
supply or the hoses that are supplied with the system. (USING ½” FULL PORT BALL VALVES
AND ½” ID HOSES IS PERFERRED FOR ADEQUATE WATER SUPPLY) A drain connection of
1.5” diameter minimum (see system specification of this manual for further assistance).
2
Connect the facility drain to the system drain with “P” trap.
3
Connect the facility hot and cold lines to the system hot and cold inlets.
4
Connect the solution container (see changing solutions containers section of this manual).
5
Apply water pressure by opening the facility supplied inlet valves and check for leaks.
6
Plug in the power cord.
7
Perform several hand wash cycles by blocking the photo optical sensor in the cylinder.
Allow enough time for the hot water supply to reach the system.
8
Check for leaks and the system is ready to use.
THE UNIT IS NOW READY FOR NORMAL HAND WASH OPERATION
20
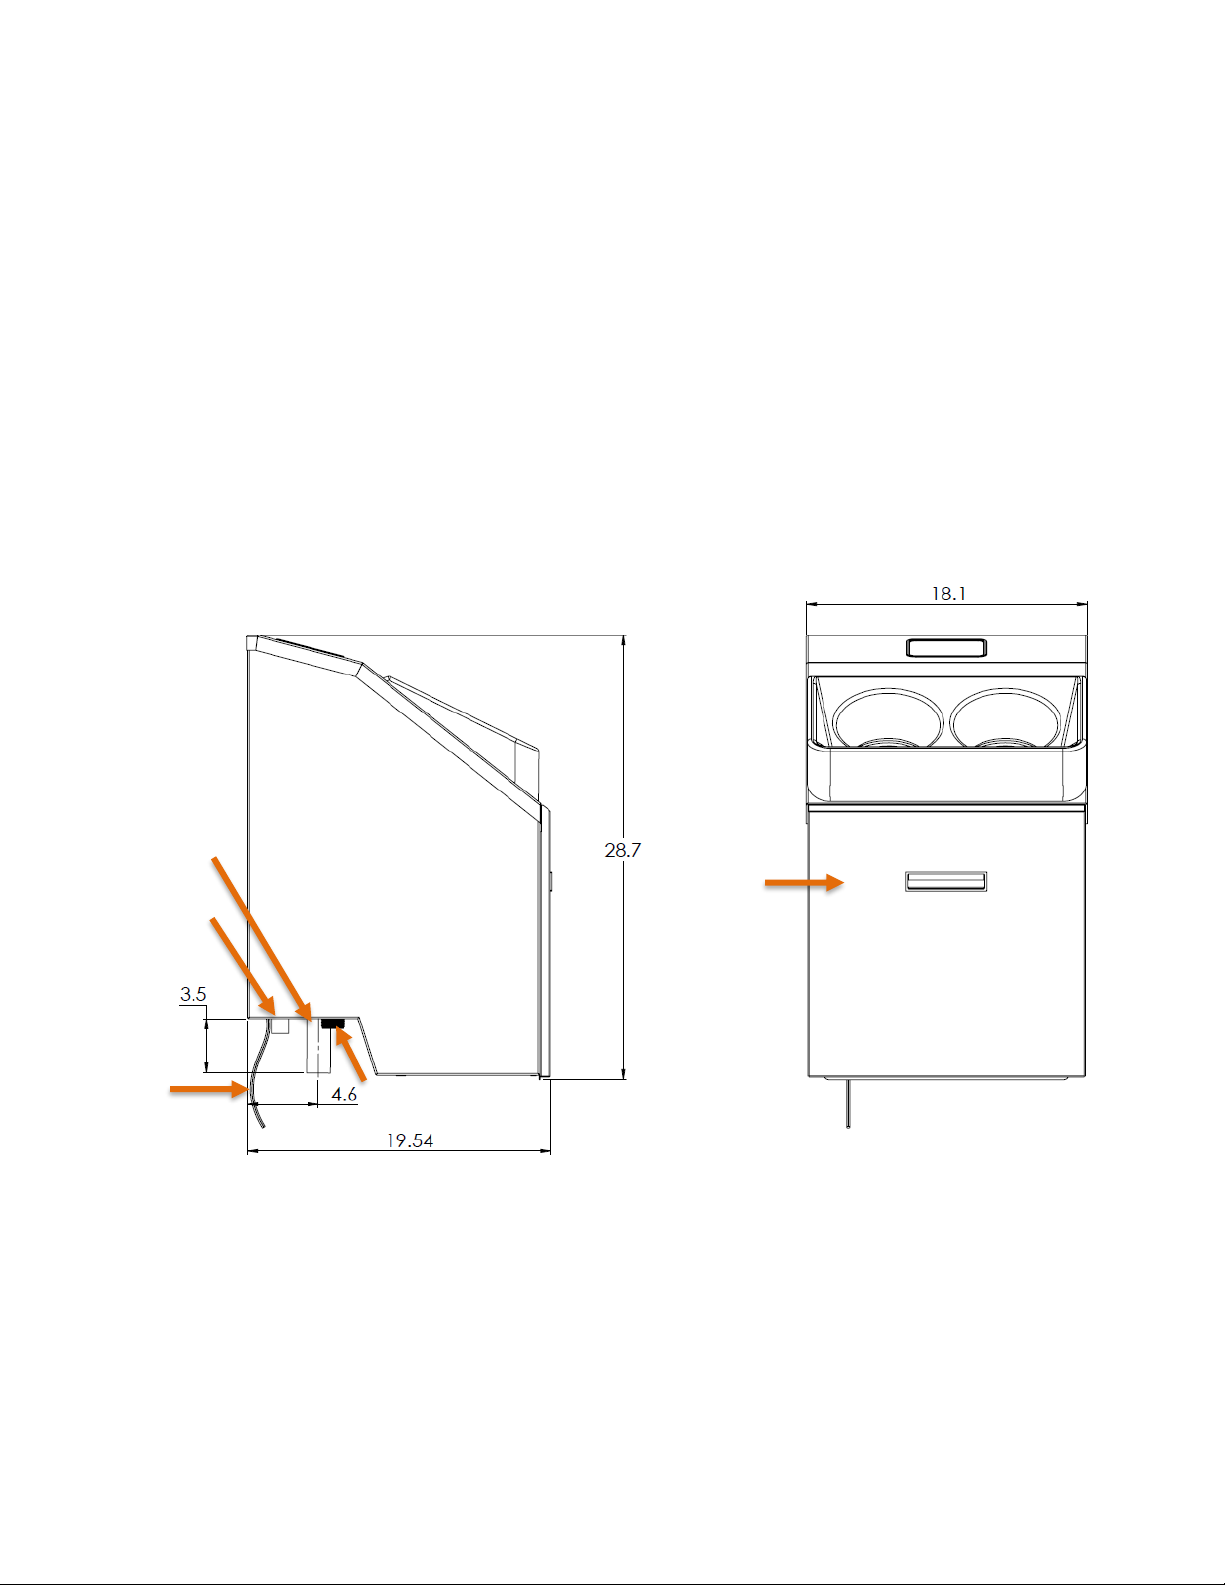
Cut Sheet
A - Solutions Housing
B –System Drain
C –Hot/Cold Water Inlets
D –Water Filter Screens
E –Power Cord
F –Air Curtain CDA/N2 Inlet
F
E
C, D
B
A
Table of contents
Other MERITECH Cleaning Equipment manuals


Popular Cleaning Equipment manuals by other brands


Suevia
Suevia 130.5011 EASYCLEANER Mounting instructions

i-MO
i-MO Öko 2000 user guide

unGer
unGer Hydro Power Ultra UNP01 operating instructions

Black & Decker
Black & Decker BHPC130 Original instructions

Uni-ram
Uni-ram UG5000E operating manual

Axi
Axi MTC HC-300 Installation, operating and maintenance manual