manuals.online logo
Brands
  1. Home
  2. •
  3. Brands
  4. •
  5. Metra Electronics
  6. •
  7. Automobile Accessories
  8. •
  9. Metra Electronics 88-00-8000 User manual

Metra Electronics 88-00-8000 User manual

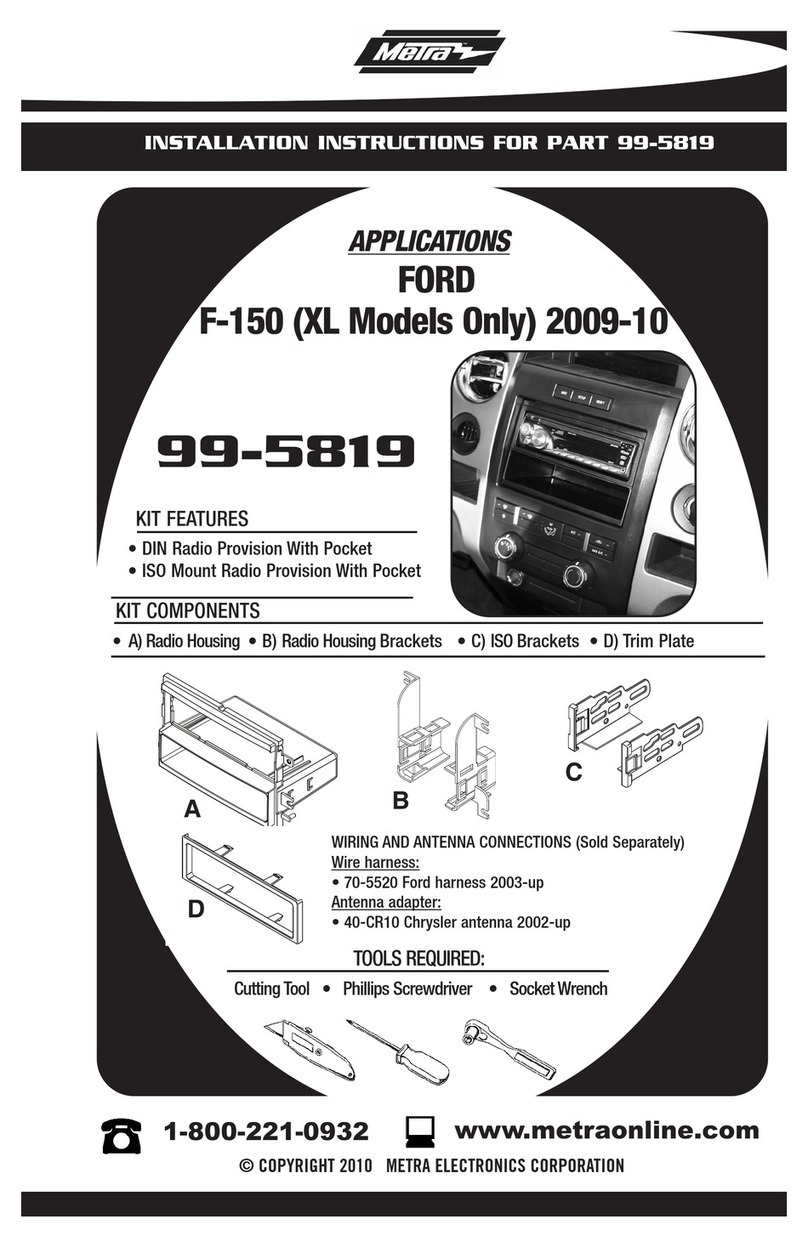
88-00-8000
AW-800PKUV
INSTALLATION
INSTRUCTIONS
APPLICATIONS
CAR PAGE
TOYOTA
4Runner 1984-88......................................................................... 1
4Runner 1989-95......................................................................... 1
4Runner 1996-99......................................................................... 2
Camry 1987-91............................................................................ 2
Celica(GT/GTS) 1986-89...............................................................3
Celica 1990-93............................................................................. 3
Corolla(GTS/SR5) 1984-87...........................................................4
Corolla(sedan/wagon-lowerdash) 1988-92.................................. 4
Corolla(sedan/wagon-upperdash) 1988-92..................................5
Corolla (coupe-lowerdash) 1993-97.............................................. 5
Corolla(coupe-upperdash) 1993-97............................................. 6
MR2 1991-94............................................................................... 6
Pickup 1984-88............................................................................ 7
Pickup 1989-91............................................................................ 7
Pickup 1992-95............................................................................ 8
Supra 1986-92............................................................................. 8
T100 1993-98.............................................................................. 9
Tacoma 1995-00...........................................................................9
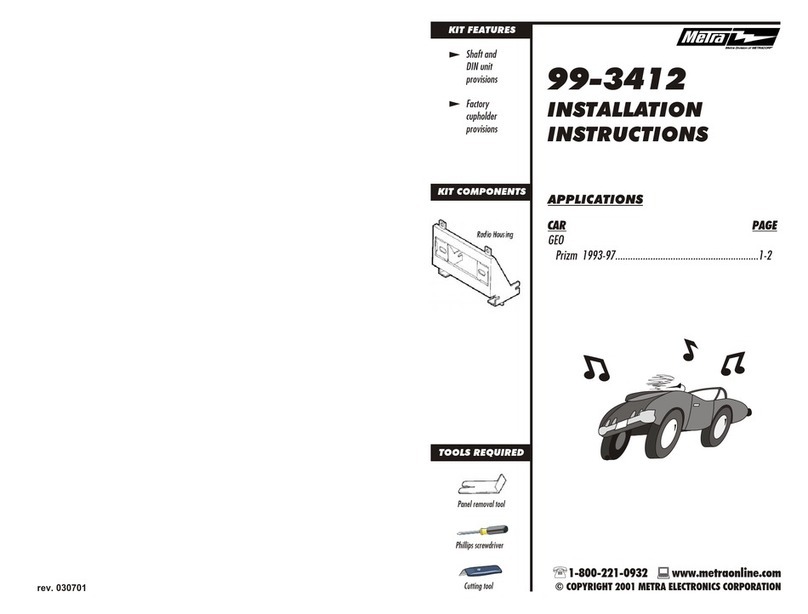
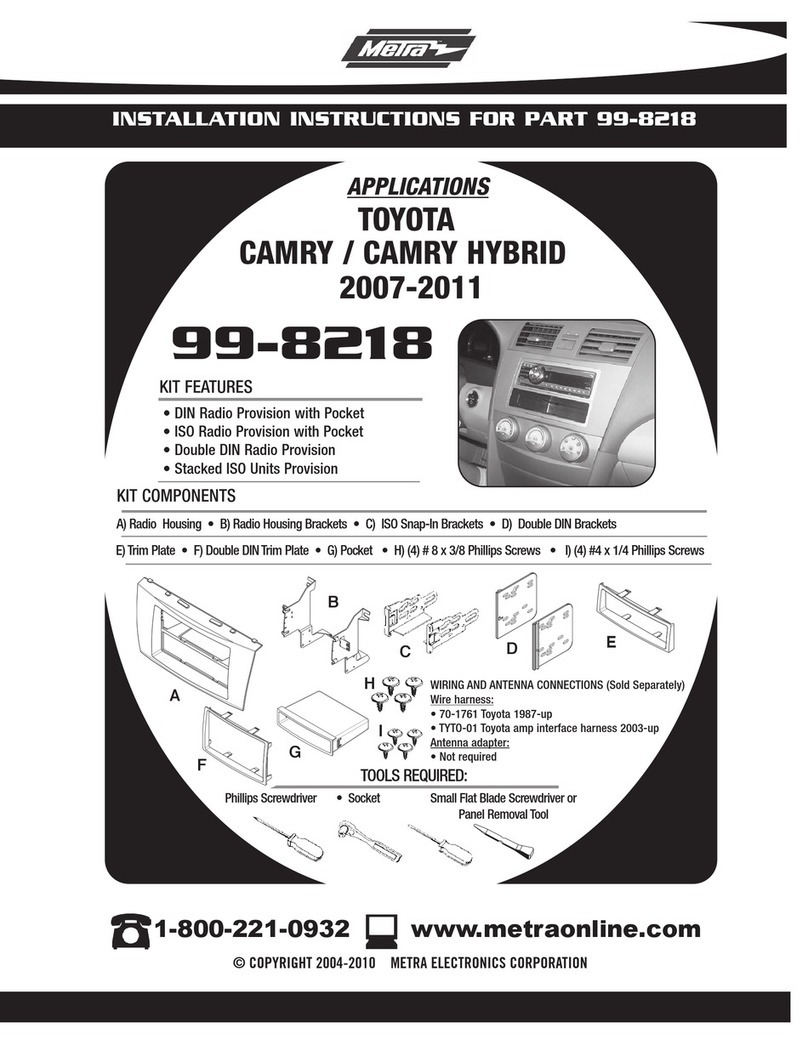
KIT FEATURES
Workswith
factorybrackets
orMetra's
99-8101
Fillsspaceleft
afterremoving
double-DINunit
KIT COMPONENTS
TOOLS REQUIRED
Cuttingtool
Phillipsscrewdriver
KIT FEATURES
Pocket
1-800-221-0932 www.metraonline.com
© COPYRIGHT 2001 METRA ELECTRONICS CORPORATION
Disconnect the negative battery terminal to
prevent an accidental short circuit. Remove
the ashtray and (3) screws from the ashtray
bracket. Remove (1) screw from each side
of the dash console and unsnap the trim
bezel.
1
TOYOTA 4Runner 1984-88
2
Disconnect the negative battery terminal to
prevent an accidental short circuit. Remove
the driver's side speaker panel by removing
(3) screws and (1) 10mm bolt. Remove (1)
screw from the left side of the housing and
unsnap the ignition cover. Remove the
glove compartment assembly by removing
(1) 10mm bolt from the bottom of the
speaker panel and (3) screws from the right
side of the housing. Remove the remaining
(3)screwssecuringtheradiotrimbezel.
1
TOYOTA 4Runner 1989-95
1
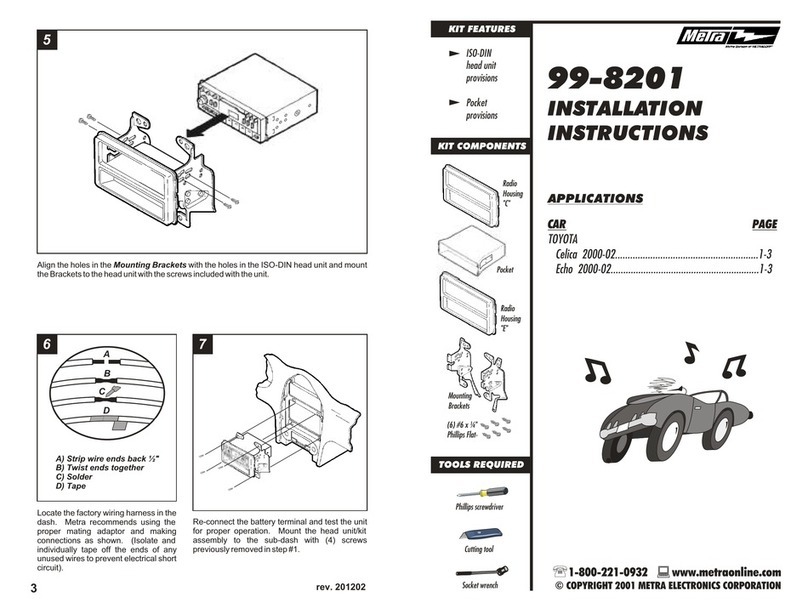
Remove the mounting brackets from the
factory head unit assembly. Align the holes
inthemountingbracketswiththeholesinthe
Pocket. Mount the factory mounting
brackets to the Pocket with those screws
previouslyremoved.
2
Remove the mounting brackets from the
factory head unit assembly. Align the holes
inthemountingbracketswiththeholesinthe
Pocket. Mount the factory mounting
brackets to the Pocket with those screws
previouslyremoved.
USE THE FOLLOWING INSTRUCTIONS FOR APPLICATIONS USING
FACTORY BRACKETS. FOR APPLICATIONS USING METRA'S 99-
8101,USETHEINSTRUCTIONSPROVIDEDWITHTHATKIT.
Disconnect the negative battery terminal to
prevent an accidental short circuit. Open
the center armrest door. Unsnap the
parking brake trim panel to access the gear
shifter trim panel. Unsnap the gear shifter
trimpanel and remove. Removetheclimate
control knobs. Remove the climate control
trim plate and (2) Phillips screws exposed.
Unclip the radio trim bezel and remove.
Remove (4) Phillips screws securing the
factoryheadunitanddisconnectthewiring.
1
TOYOTA 4Runner 1996-99
Disconnect the negative battery terminal to
prevent an accidental short circuit. Remove
(2) screws above the climate controls and
gentlyunsnapthedashtrimbezel. Remove
(4) screws securing the factory head unit
anddisconnectthewiring.
1
TOYOTA Camry 1987-91
2
2
Remove the mounting brackets from the
factory head unit assembly. Align the holes
inthemountingbracketswiththeholesinthe
Pocket. Mount the factory mounting
brackets to the Pocket with those screws
previouslyremoved.
2
Remove the mounting brackets from the
factory head unit assembly. Align the holes
inthemountingbracketswiththeholesinthe
Pocket. Mount the factory mounting
brackets to the Pocket with those screws
previouslyremoved.
Disconnect the negative battery terminal to
prevent an accidental short circuit. Remove
(2) screws from the lower steering column
panel and remove. Remove the (2) screws
exposed on the radio trim bezel. Open the
glove box and remove (1) screw and (1) bolt
exposed. Remove (2) screws from the ash-
tray cavity and (2) screws from the bracket.
Remove (2) screws from each lower side of
thetrimbezelandunsnapthebezel.
1
TOYOTA Celica (GT/GTS) 1986-89
Disconnect the negative battery terminal to
preventanaccidentalshortcircuit. Carefully
pry up on the gear shifter trim panel and
remove. Remove (2) screws exposed on
the bottom edge of the radio trim panel.
Unsnap the panel and disconnect the
ashtrayandcigarettelighterwiring.
1
TOYOTA Celica 1990-93
3
2
Remove the mounting brackets from the
factory head unit assembly. Align the holes
inthemountingbracketswiththeholesinthe
Pocket. Mount the factory mounting
brackets to the Pocket with those screws
previouslyremoved.
2
Remove the mounting brackets from the
factory head unit assembly. Align the holes
inthemountingbracketswiththeholesinthe
Pocket. Mount the factory mounting
brackets to the Pocket with those screws
previouslyremoved.
Disconnect the negative battery terminal to
prevent an accidental short circuit. Remove
(1) screw located to the right of the ignition
switch. Remove (1) screw located above
the driver's side speaker. Carefully unsnap
the dash trim bezel (some force may be
required).
1
TOYOTA Corolla (sed/wag-lower dash) 1988-92
Disconnect the negative battery terminal to
prevent an accidental short circuit. Remove
(2) Phillips screws from each side of the
console trim bezel. Remove (4) screws
securing the factory head unit and
disconnectthewiring.
1
TOYOTA Corolla (GTS/SR5) 1984-87
4
2
Remove the mounting brackets from the
factory head unit assembly. Align the holes
inthemountingbracketswiththeholesinthe
Pocket. Mount the factory mounting
brackets to the Pocket with those screws
previouslyremoved.
2
Remove the mounting brackets from the
factory head unit assembly. Align the holes
inthemountingbracketswiththeholesinthe
Pocket. Mount the factory mounting
brackets to the Pocket with those screws
previouslyremoved.
Disconnect the negative battery terminal to
prevent an accidental short circuit. Remove
the climate control knobs, unsnap the upper
trim bezel and disconnect the hazard and
clock leads. Remove (2) screws from the
lowertrimbezelandremove.
1
TOYOTA Corolla (coupe-lower dash) 1993-97
Disconnect the negative battery terminal to
prevent an accidental short circuit. Remove
(4) screws from the top edge of the
instrument trim bezel and (2) screws below
the radio opening. Remove (1) screw from
the lower-left tab of the bezel ( to the right of
thea/cvent)andunsnapthebezel.
1
TOYOTA Corolla (sed/wag-upper dash) 1988-92
5
2
Remove the mounting brackets from the
factory head unit assembly. Align the holes
inthemountingbracketswiththeholesinthe
Pocket. Mount the factory mounting
brackets to the Pocket with those screws
previouslyremoved.
2
Remove the mounting brackets from the
factory head unit assembly. Align the holes
inthemountingbracketswiththeholesinthe
Pocket. Mount the factory mounting
brackets to the Pocket with those screws
previouslyremoved.
Disconnect the negative battery terminal to
prevent an accidental short circuit. Remove
the climate control knobs and unsnap the
dash trim bezel. Disconnect the clock and
hazardleads.
1
TOYOTA Corolla (coupe-upper dash) 1993-97
Disconnect the negative battery terminal to
prevent an accidental short circuit. Remove
the ashtray and (2) screws from the ashtray
cavity. Unsnap and remove the shifter
consolebezel. Remove(1) screwbelowthe
ignition switch and remove the dash trim
bezel.
1
TOYOTA MR2 1991-94
6
2
Remove the mounting brackets from the
factory head unit assembly. Align the holes
inthemountingbracketswiththeholesinthe
Pocket. Mount the factory mounting
brackets to the Pocket with those screws
previouslyremoved.
2
Remove the mounting brackets from the
factory head unit assembly. Align the holes
inthemountingbracketswiththeholesinthe
Pocket. Mount the factory mounting
brackets to the Pocket with those screws
previouslyremoved.
Disconnect the negative battery terminal to
prevent an accidental short circuit. Remove
the ashtray and (3) screws from the ashtray
bracket. Remove (1) screw from each side
of the dash console and unsnap the trim
bezel.
1
TOYOTA Pickup 1984-88
Disconnect the negative battery terminal to
prevent an accidental short circuit. Remove
the driver's side speaker panel by removing
(3) screws and (1) 10mm bolt. Remove (1)
screw from the left side of the housing and
unsnap the ignition cover. Remove the
glove compartment assembly by removing
(1) 10mm bolt from the bottom of the
speaker panel and (3) screws from the right
side of the housing. Remove the remaining
(3)screwssecuringtheradiotrimbezel.
1
TOYOTA Pickup 1989-91
7
2

This manual suits for next models

1

Other Metra Electronics Automobile Accessories manuals
Metra Electronics 95-7418 User manual

Metra Electronics

Metra Electronics 95-7418 User manual

Metra Electronics 99-7581 User manual

Metra Electronics

Metra Electronics 99-7581 User manual

Metra Electronics 99-7400 User manual

Metra Electronics

Metra Electronics 99-7400 User manual

Metra Electronics 99-7328 User manual

Metra Electronics

Metra Electronics 99-7328 User manual

Metra Electronics 95-7332 User manual

Metra Electronics

Metra Electronics 95-7332 User manual

Metra Electronics MAZDA CX7 2007-09 99-7508 User manual

Metra Electronics

Metra Electronics MAZDA CX7 2007-09 99-7508 User manual

Metra Electronics 99-8201 User manual

Metra Electronics

Metra Electronics 99-8201 User manual

Metra Electronics 95-6545B User manual

Metra Electronics

Metra Electronics 95-6545B User manual

Metra Electronics 99-5719 User manual

Metra Electronics

Metra Electronics 99-5719 User manual

Metra Electronics 99-7389B User manual

Metra Electronics

Metra Electronics 99-7389B User manual

Metra Electronics 99-8216 User manual

Metra Electronics

Metra Electronics 99-8216 User manual

Metra Electronics 95-9308B User manual

Metra Electronics

Metra Electronics 95-9308B User manual

Metra Electronics MAZDA 6 2009 99-7511S User manual

Metra Electronics

Metra Electronics MAZDA 6 2009 99-7511S User manual

Metra Electronics 99-3012G User manual

Metra Electronics

Metra Electronics 99-3012G User manual

Metra Electronics iBeam TE-AHD7M User manual

Metra Electronics

Metra Electronics iBeam TE-AHD7M User manual

Metra Electronics 109-TO7 User manual

Metra Electronics

Metra Electronics 109-TO7 User manual

Metra Electronics 99-6503 User manual

Metra Electronics

Metra Electronics 99-6503 User manual

Metra Electronics JP-RGBKT-1 User manual

Metra Electronics

Metra Electronics JP-RGBKT-1 User manual

Metra Electronics 99-3308G User manual

Metra Electronics

Metra Electronics 99-3308G User manual

Metra Electronics 71-1729 Instruction manual
Metra Electronics

Metra Electronics 71-1729 Instruction manual

Metra Electronics GMOS-06 User manual

Metra Electronics

Metra Electronics GMOS-06 User manual

Metra Electronics 95-8208 User manual

Metra Electronics

Metra Electronics 95-8208 User manual

Metra Electronics TE-RVMCBT User manual

Metra Electronics

Metra Electronics TE-RVMCBT User manual

Metra Electronics 99-8206 User manual

Metra Electronics

Metra Electronics 99-8206 User manual

Popular Automobile Accessories manuals by other brands

HKS 80310-AF003 installation manual

HKS

HKS 80310-AF003 installation manual

Yakima 1032045 quick start guide

Yakima

Yakima 1032045 quick start guide

Menabo ZB4980 manual

Menabo

Menabo ZB4980 manual

Prorack K323 manual

Prorack

Prorack K323 manual

JL Audio Stealthbox SB-F-SUPRCNSL/8W7 installation guide

JL Audio

JL Audio Stealthbox SB-F-SUPRCNSL/8W7 installation guide

Whispbar K800W Fitting Instructions for Basic Carrier

Whispbar

Whispbar K800W Fitting Instructions for Basic Carrier

Carrier TRANSICOLD INTEGRA 30S Operation and service manual

Carrier TRANSICOLD

Carrier TRANSICOLD INTEGRA 30S Operation and service manual

Hella AREIA 7040 installation instructions

Hella

Hella AREIA 7040 installation instructions

AUTOTECH 10.411.01.219K installation instructions

AUTOTECH

AUTOTECH 10.411.01.219K installation instructions

Motorola MOTOROKR T3 quick start guide

Motorola

Motorola MOTOROKR T3 quick start guide

Cruz Alu-Rack L13-120 Assembly instructions

Cruz

Cruz Alu-Rack L13-120 Assembly instructions

WeatherTech No-Drill MudFlap installation instructions

WeatherTech

WeatherTech No-Drill MudFlap installation instructions

Maxxhaul 50220 Instruction manual & parts list

Maxxhaul

Maxxhaul 50220 Instruction manual & parts list

Aries 2051182 installation manual

Aries

Aries 2051182 installation manual

ipf EXP Series installation manual

ipf

ipf EXP Series installation manual

Saris MTR Assembly instructions

Saris

Saris MTR Assembly instructions

HKS 70018-AT006 manual

HKS

HKS 70018-AT006 manual

Alexo Sweden 641-1110 Installation and operating instructions

Alexo Sweden

Alexo Sweden 641-1110 Installation and operating instructions

manuals.online logo
manuals.online logoBrands
  • About & Mission
  • Contact us
  • Privacy Policy
  • Terms and Conditions

Copyright 2025 Manuals.Online. All Rights Reserved.