MGI ZiP Series User manual

User Manual
VERSION 4.2

Thank you for purchasing the Game Changing MGI Zip
Navigator. To get the most out of your Zip Navigator
please follow these quick steps before use.
•Register your Zip Navigator online [section 1.0]
•Assembling the Zip Navigator [section 3.0]
•Charge the battery [section 4.0]
For Customer Support, please contact MGI directly
for immediate and professional advice.
mgigolf.com
MGI AUSTRALIA
Service Email: customerservice@mgigolf.com
Live Chat: visit mgigolf.com
Toll Free within Australia: 1300 644 523 (excludes mobiles) Western
Australia/ Internal phone +61 3 8872 6700
Local Service Centres: visit mgigolf.com
to locate you local Service Centre.
MGI USA
Service Email: serviceusa@mgigolf.com
Live Chat: visit mgigolf.com
Telephone: 1800 617 2990
MGI GLOBAL
Sales Email: globalsales@mgigolf.com
Service Email: globalservice@mgigolf.com
Live Chat: visit mgigolf.com
NOTE: This user manual was correct at time of printing.The online version
is the most up-to-date and must be referred to as the
correct version.To download the most current user manual please
visit www.mgigolf.com. Images shown throughout this manual
may not be of the particular model you have purchased.

Contents
1.0 Registration 04
2.0 What Is Included 04
3.0 Assembling the Zip Navigator 05
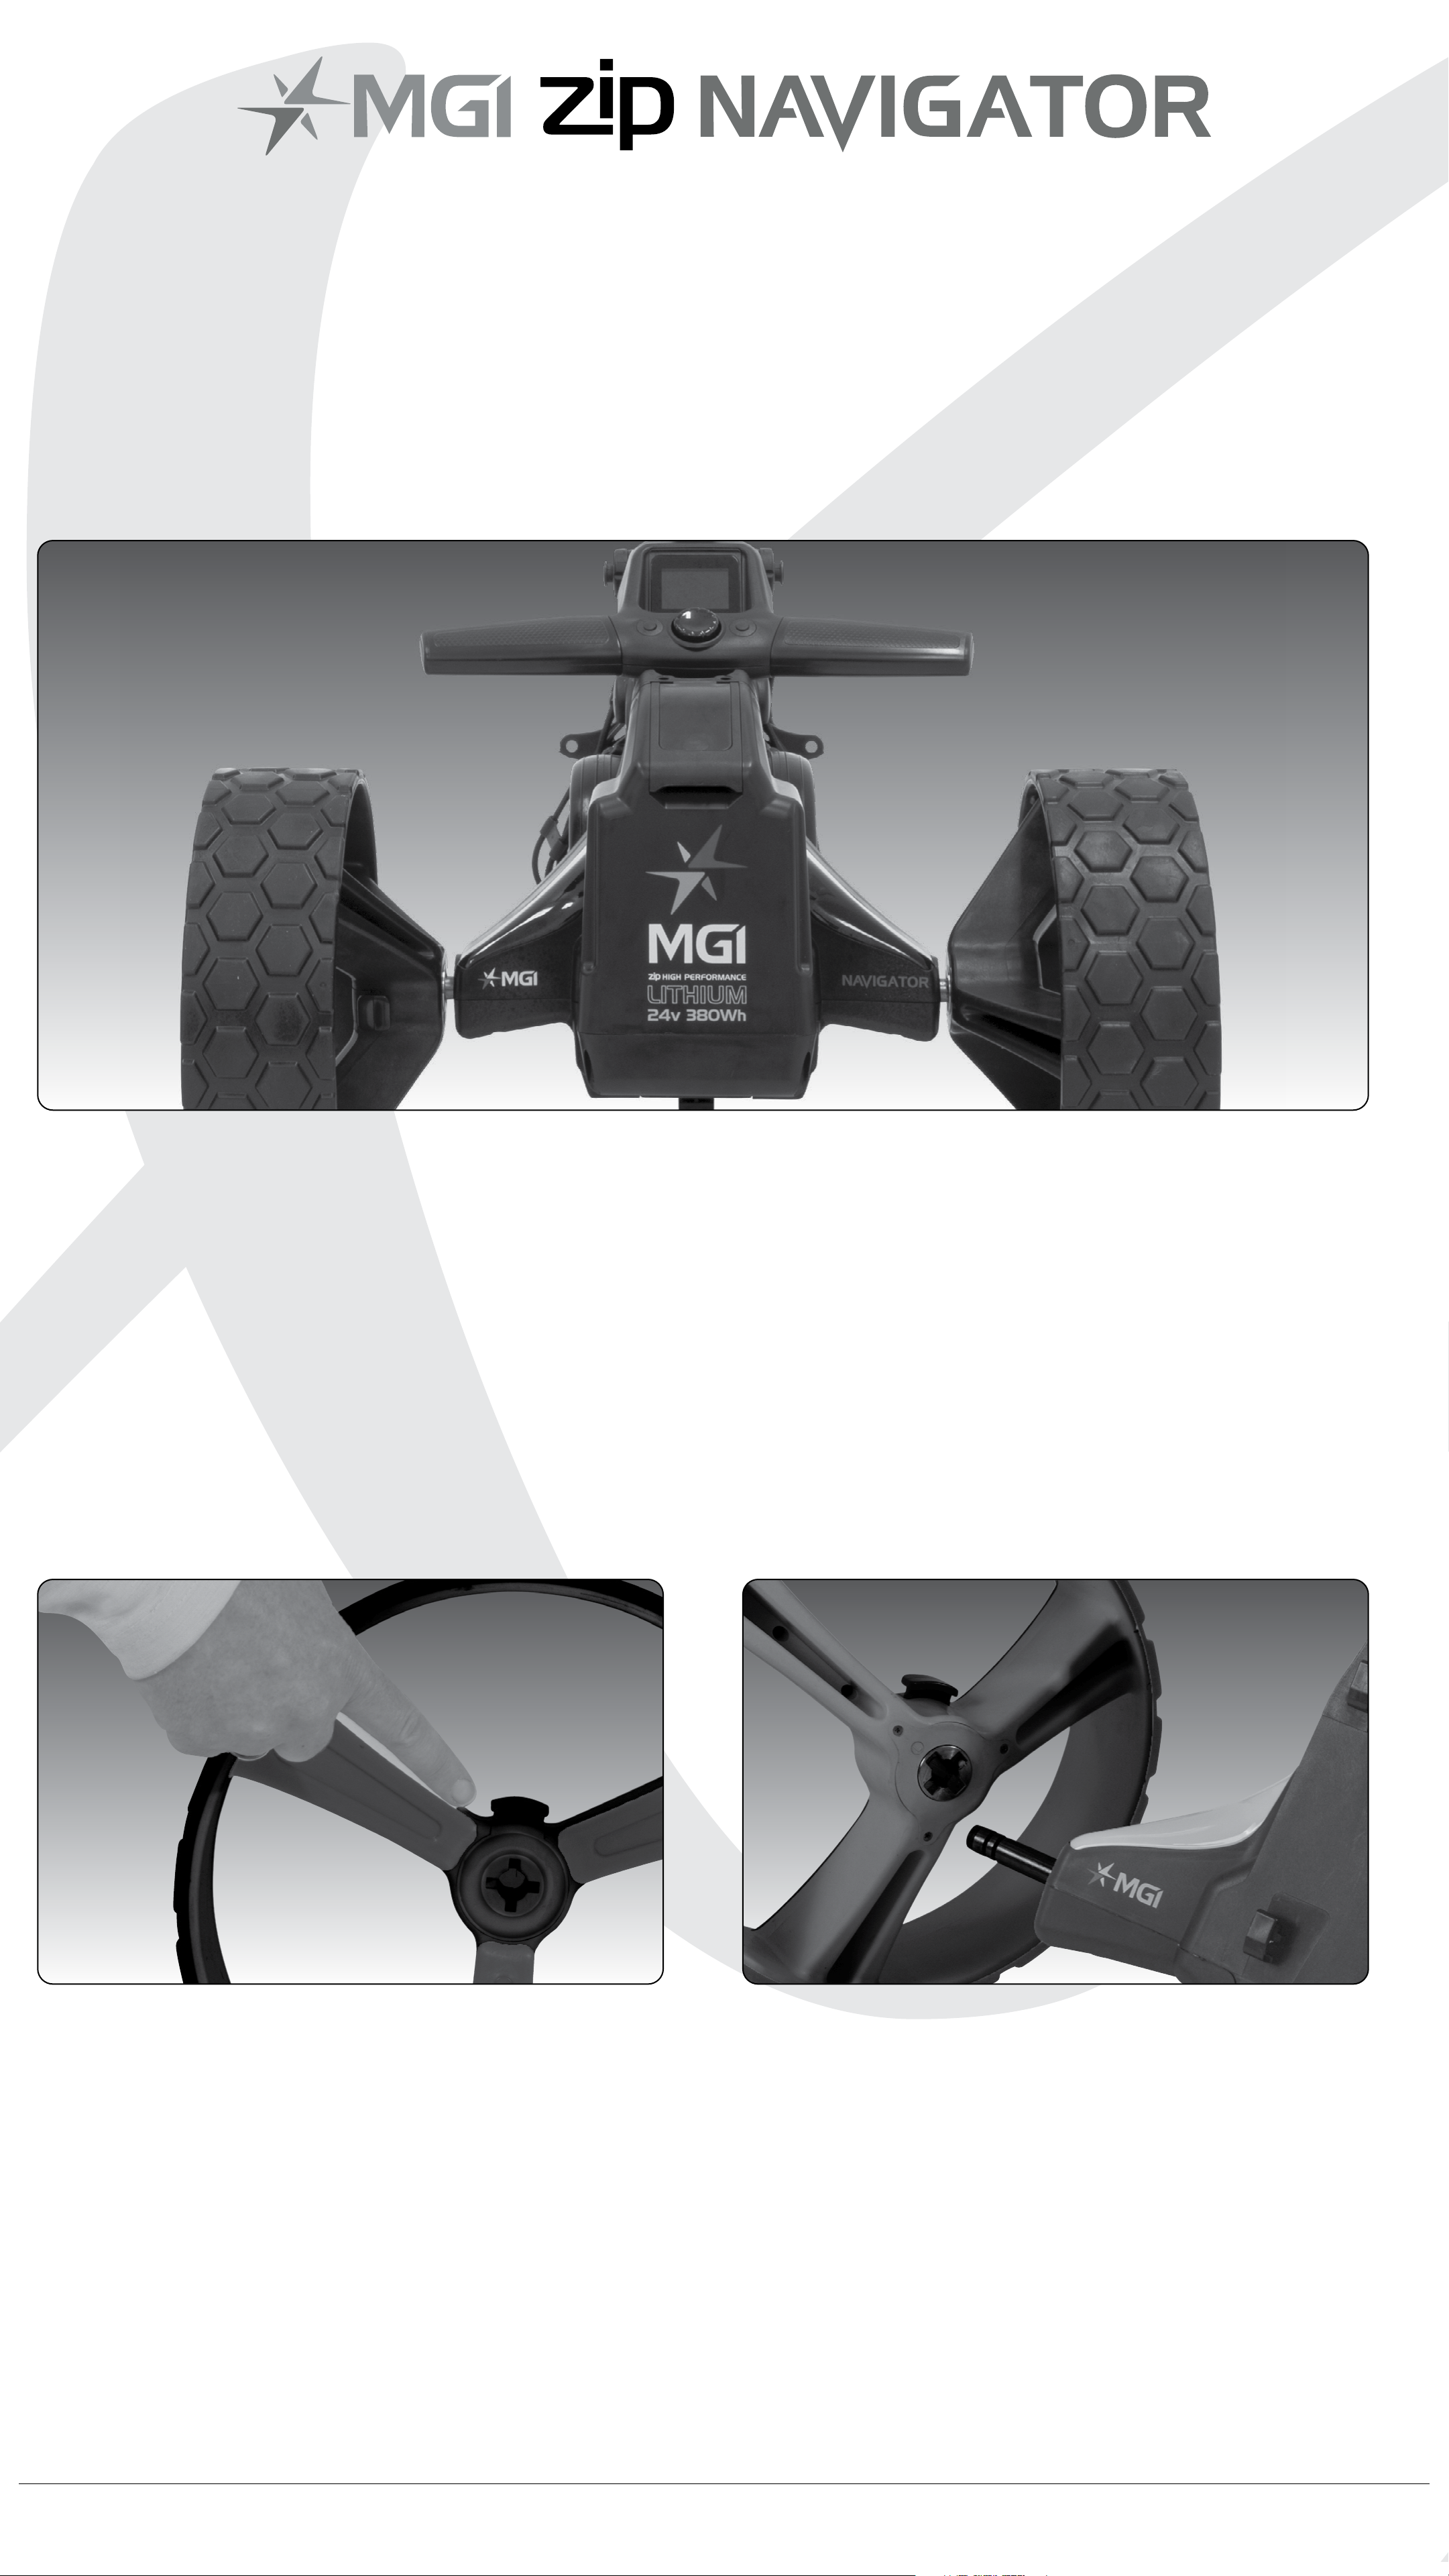
3.1 Attaching the Rear Wheels 05
3.2 Rear Wheel Positions 06
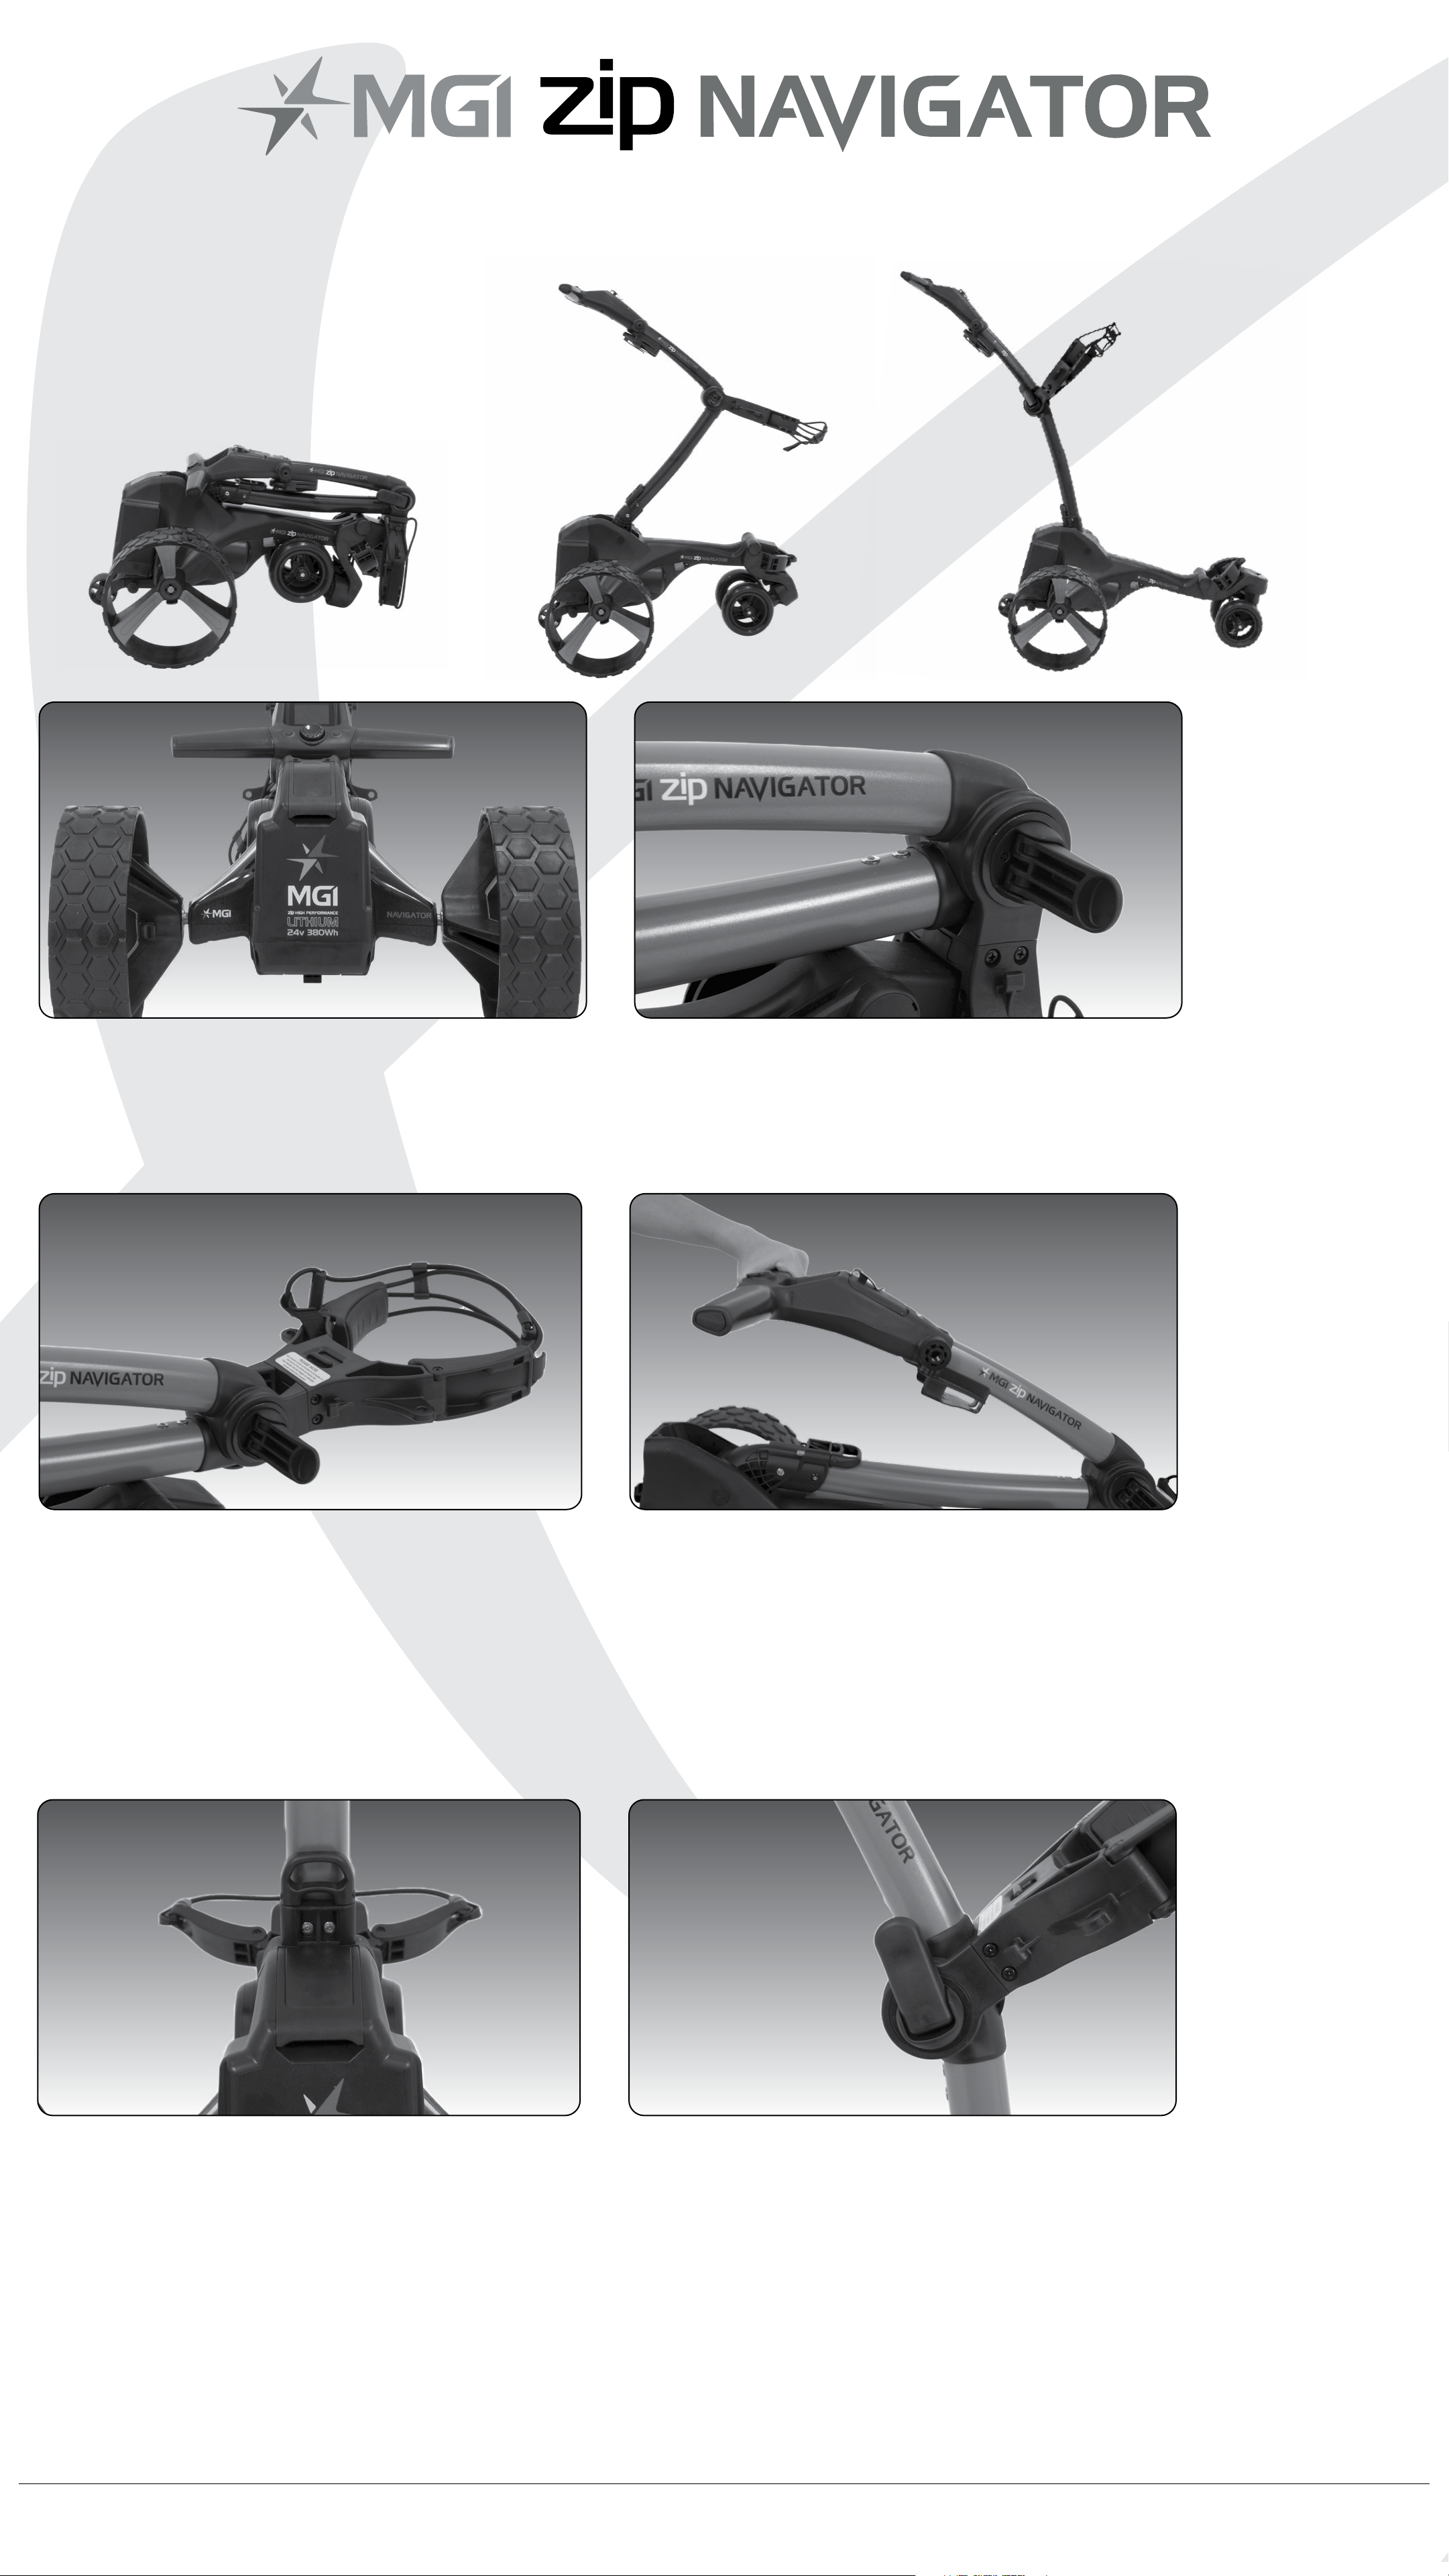
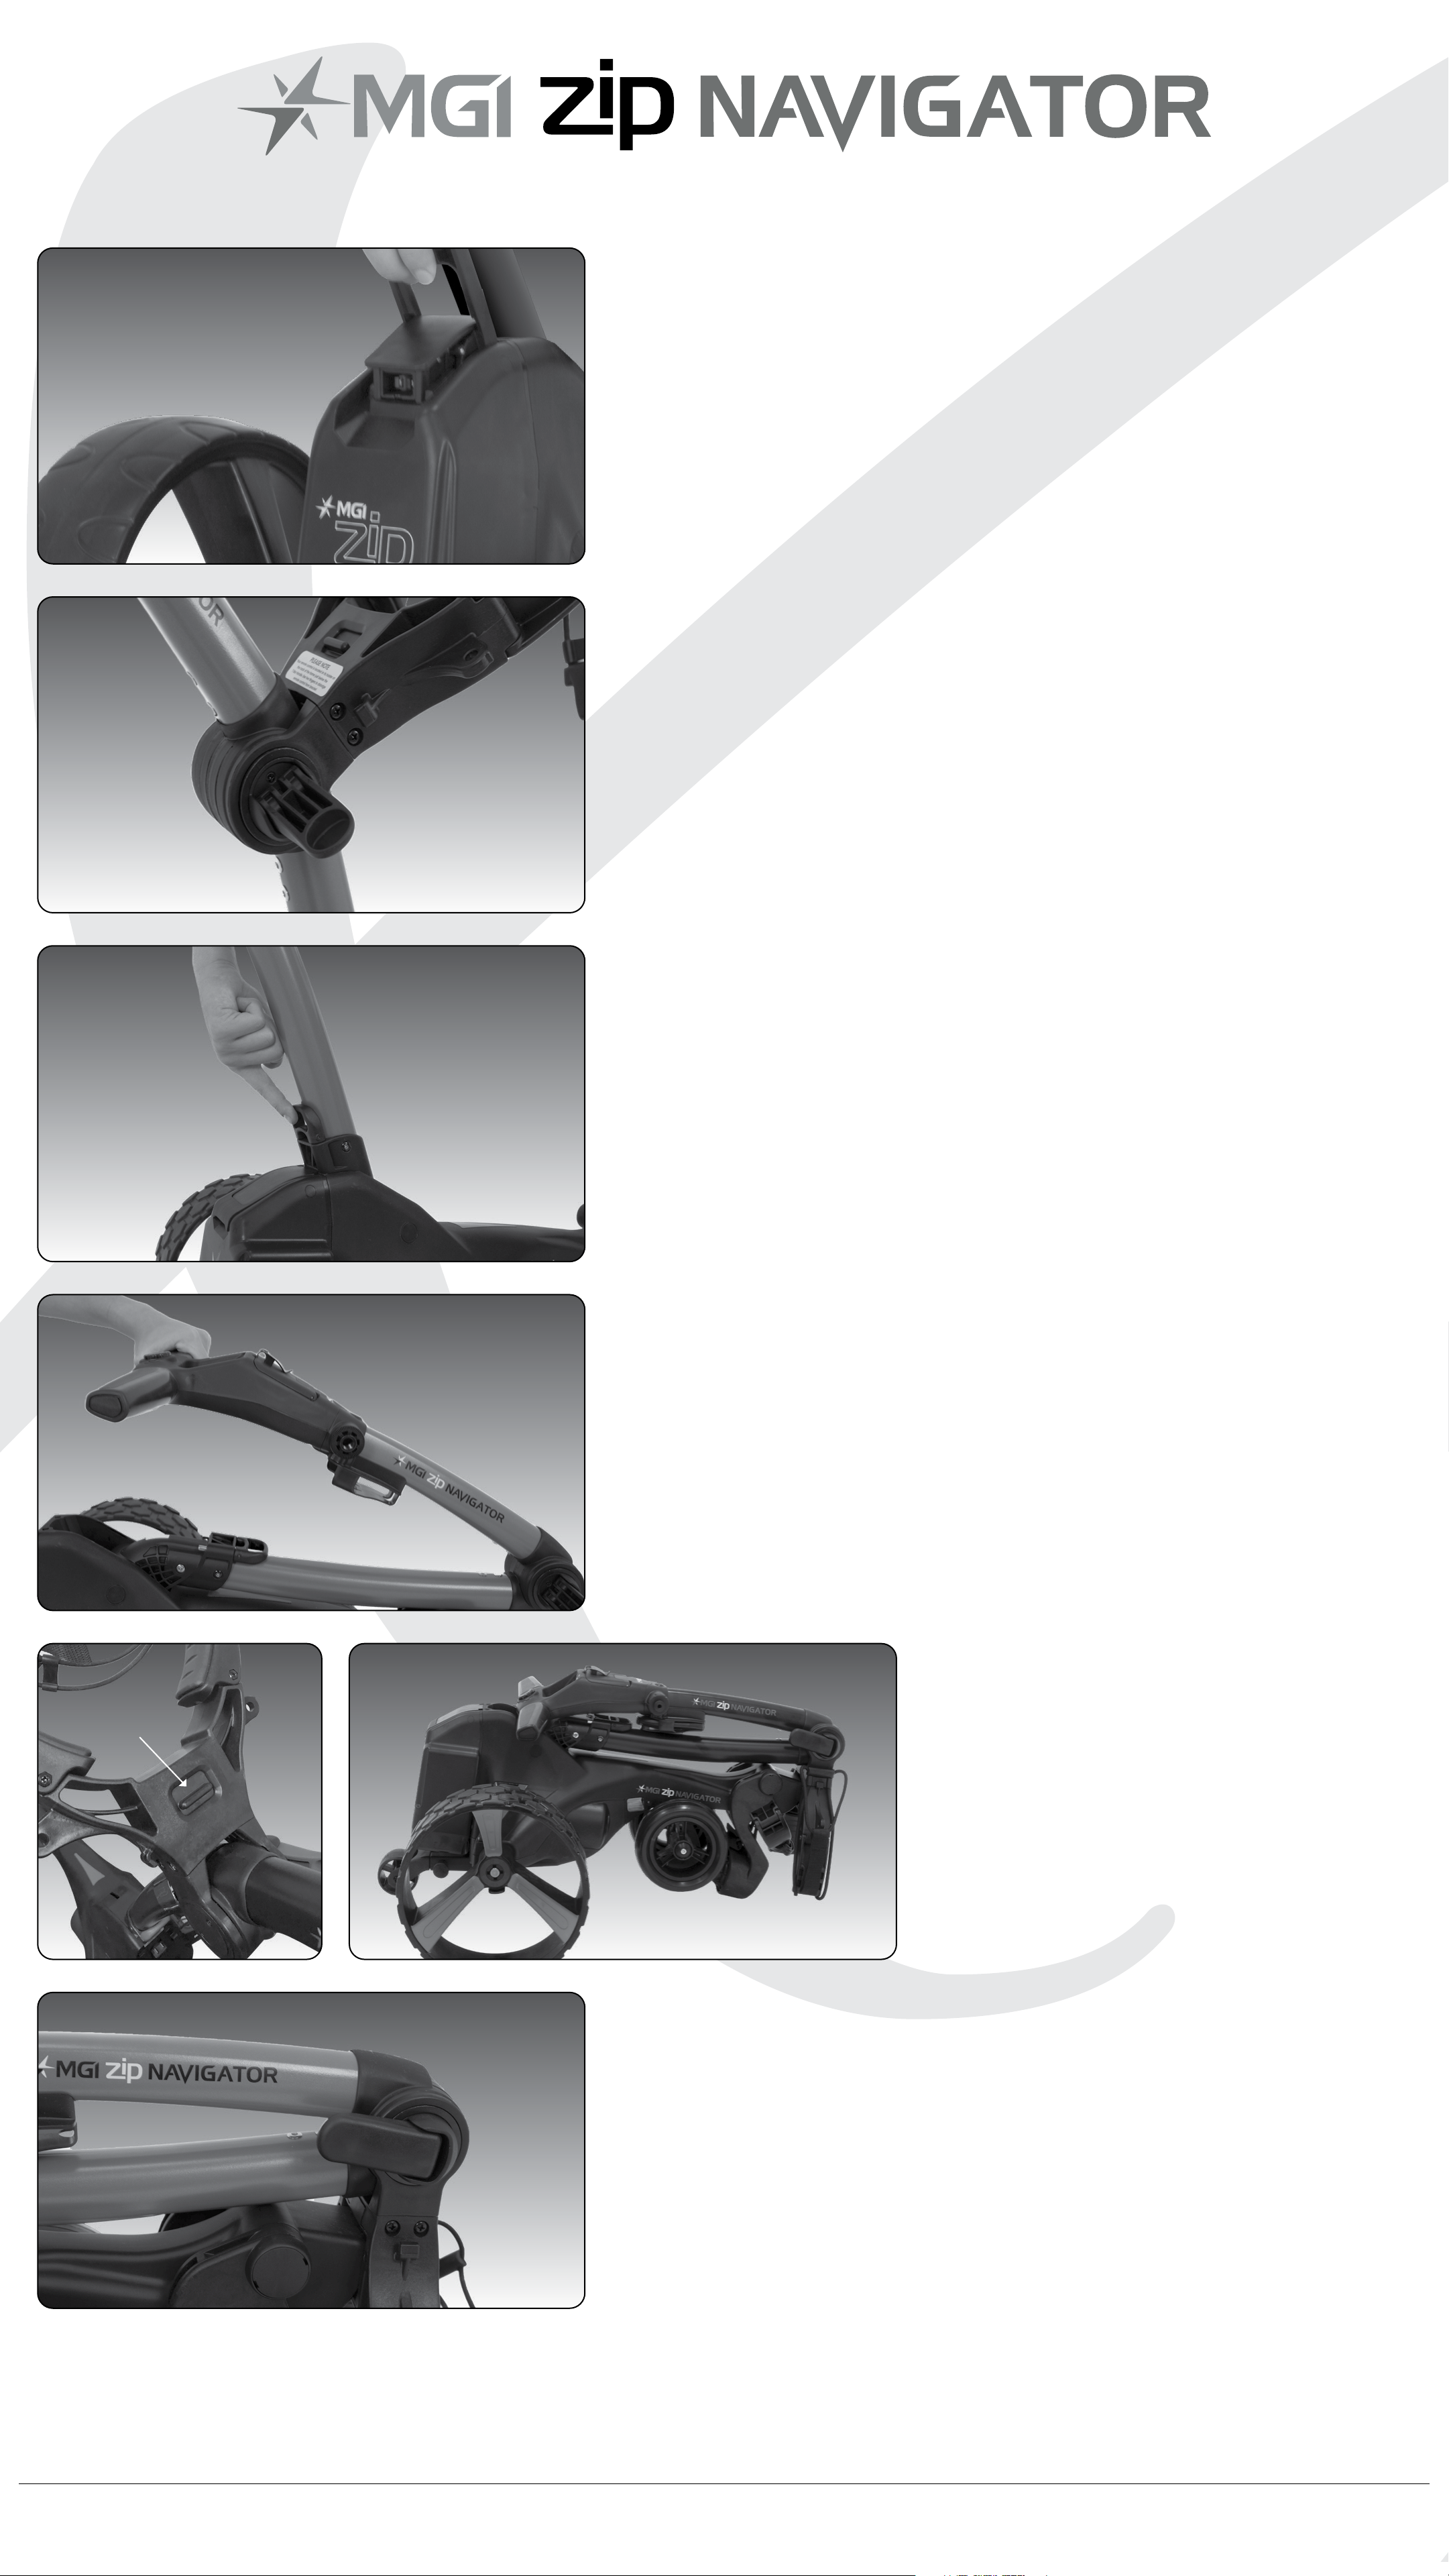
3.3 Unfolding 07
3.4 Folding 08
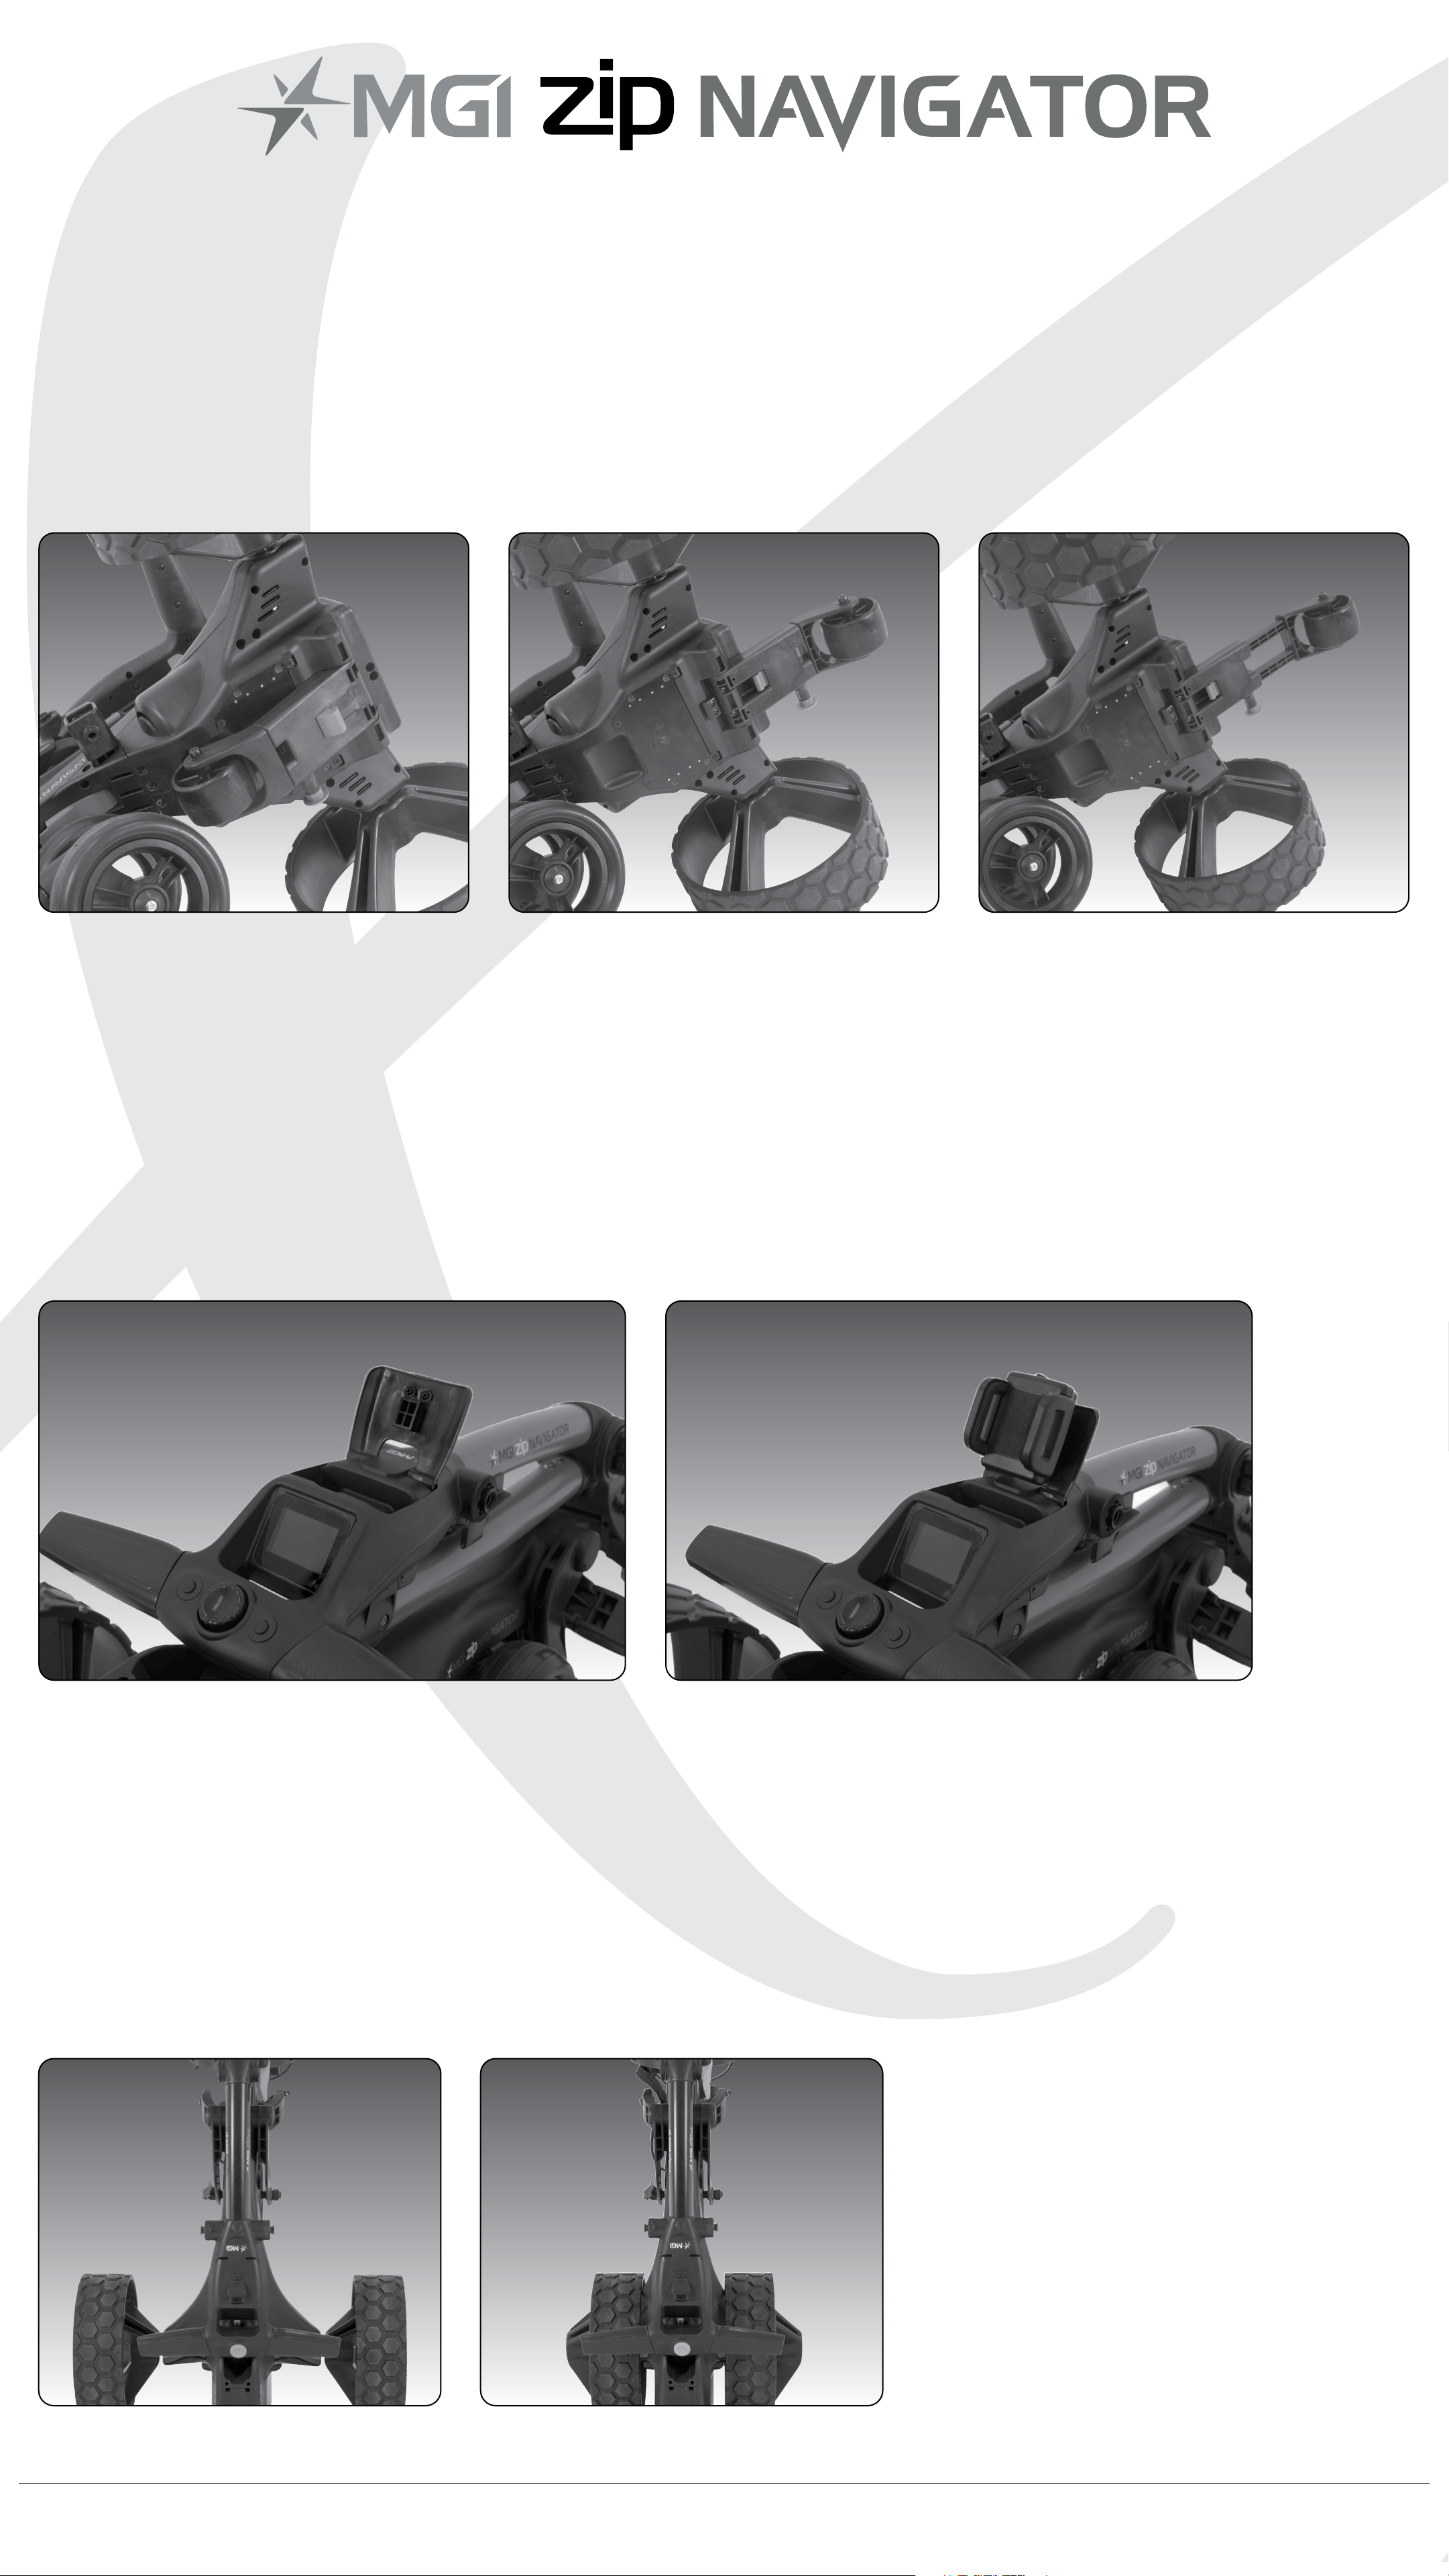
3.5 Fourth Foldable Rear Wheel 09
3.6 GPS Holder and Top Handle Compartment 09
3.7 Inverting Rear Wheels 09
4.0 Battery Charging & Connection 10
4.1 Initial Charge 10
4.2 Connecting the Battery onto the Zip Navigator 10
4.3 Charging the Battery after Use 11
5.0 Fitting the Golf Bag 11
6.0 Operating the Digital Top Box 12
6.1 Top Box Display 12
6.2 Start / Stop the Zip Navigator 12
6.3 Turn the Zip Navigator Off 13
6.4 Battery Level Indicator 13
6.5 Unit Measurements 13
6.6 Distance Modes 13
6.7 Competition Mode 14
7.0 Remote Control 15
7.1 Charging Your Remote Control 15
7.2 Forward Arrow 15
7.3 Down Arrow 15
7.4 Left and Right Arrow 16
7.5 Speed Control – Manually and Remotely 16
7.6 Keypad Unlock and Lock 16
7.7 Remote Range and Safety Stop 16
7.8 Pairing a Remote 16
8.0 Gyroscope Straight Tracker Navigation System 17
9.0 Warranty 17
9.1 Warranty Policy 17
9.2 Warranty Exclusions 18
9.3 Parts Installed During Warranty 19
10.0 Preventative Maintenance Program 19
10.1 Cleaning Your Zip Navigator 19
10.2 Rear Wheel Axles Maintenance 19
10.3 Upper and Lower Bag Strap 20
10.4 Correcting the Alignment 20
10.5 MGI Service Schedule 20
10.6 Service Record 21
11.0 Service and Repair Centres 22
12.0 Purchasing Parts and Accessories 22
13.0 Contacting MGI 22
14.0 Contacting Local Agent 23
15.0 Frequently Asked Questions 23
MGI Zip Navigator User Manual 03

1.0 Registration
It important you register your MGI Zip Navigator online immediately
as registration:
• Records your Zip Navigator for warranty purposes
• Speeds up any servicing required on your Zip Navigator
• Assists us to contact you with any updates to your
Zip Navigator
To register your Zip Navigator, visit mgigolf.com
You will need to record your MGI serial number.This is found within
the top handle compartment or on the rear of the buggy chassis.
Please keep this user manual on le for your own reference
and a copy of your serial number;
My MGI Zip Navigator Serial Number is
[example AZXNV7223012345]
Purchased Date
/ /
You may be required to show proof of purchase so we recommend
you keep your receipt with this manual.
2.0 What’s Included
• MGI Zip Navigator
• 24v Lithium Battery
• Battery Charger
• GPS Holder
• Remote Control
• MGI Pouch with:
- Quick Guide
- Accessory Guide
MGI Zip Navigator User Manual 04

3.0 Assembling Your Zip Navigator
3.1 Attaching the Rear Wheels
First, lubricate both axles using the black lubricant cloth provided
in the MGI Pouch. Lubrication of the axles should be performed
regularly to keep your cart in optimal condition. (Refer to 10.5 MGI
Service Schedule)
Press the grey release button on the wheel hub. Place the wheel
onto the axle.You will need to match up the inner female groove on
the axle and the male of the wheel.When placed in position simply
release the button.You hear a “click” when the wheel is properly
secured.
To check that the wheel is properly in position pull on the wheel. If it is
properly in position it will not slide off. Repeat for the other wheel.
MGI Zip Navigator User Manual 05

3.2 Rear Wheels Positions
The MGI Zip Navigator is designed to allow the rear wheels to be
in two positions.The position is determined by where the wheel is
locked on the axle in either of the two grooves [see picture].The drive
position is used during the normal operation of the Zip Navigator.The
free wheel position is used to push the Zip Navigator freely, if required.
i. Drive position – Lock the wheel onto the groove closest to the
battery base.To do this, press the grey release button on the wheel
hub, push the wheel on to the axle as far as possible.To test for drive
position try rolling the wheel backwards. If you feel resistance then
the wheel is now in drive position and ready to use. Repeat for other
wheel.
ii. Free wheel – Lock the wheel into the groove closest to the end of
the axle.To do this, press the grey release button on the wheel hub,
push the wheel on to the axle and push the release button onto the
groove.To test for free wheel position try rolling the wheel backwards.
The wheel should spin freely with no resistance. Repeat for other
wheel.
MGI Zip Navigator User Manual 06
Free wheel position
Drive position

3.3 Unfolding
Please see below the steps to unfold a Zip Navigator Handle.
Step 7: Push the top bag support down to move it into position.
Step 1: Ensure both rear
wheels are attached.
Step 2: Release fold lever.
Step 4: The handle is now free to pull
upwards.The handle will naturally
unfold as you continue to pull until the
handle is completely open.
Step 3: Move the top bag
support away from front
wheel assembly until you
hear it click.
Step 6: Close the fold lever to lock
the handle into place in one of three
positions.
Step 5: Ensure that the
latch at the bottom of the
handle clicks into place.
MGI Zip Navigator User Manual 07

3.4 Folding
Step 1: Disconnect the battery by lifting
the battery handle. It can be left on or
removed from the Zip Navigator.
Step 2: Open the fold lever to release
the handle.
Step 3: Pull the latch up at the bottom of
the handle.
Step 4: Lower the handle until at.
Step 6: Close the fold lever to lock the
handle into place.
Step 5: Push the toggle
down on the top bag
support and then move
the top bag support
down so that it locks
over the front wheel
assembly.
Toggle
MGI Zip Navigator User Manual 08

3.5 Fourth Foldable Rear Wheel
The MGI Zip Navigator comes standard with a fourth foldable and
extendable rear wheel.This wheel MUST be unfolded and extended
into position at all times when the Zip Navigator is in use.This will
provide the ultimate stability across all terrains.This fourth wheel should
be cleaned regularly with a cloth to ensure it can be folded and
retracted as required for storage.
3.6 GPS Holder and Top Handle Compartment
In the top handle compartment there is a position for a GPS/mobile
device holder. Open the compartment and connect the holder into
position.To open, press the button at the top of the holder. Place the
GPS into the cradle, then close the holder by squeezing the two sides
closer together.To remove, gently push the GPS Holder up and away
from the Navigator
3.7 Inverting Rear Wheels
The rear wheels can be inverted on the axle to reduce the size of the
Zip Navigator when folded.To invert the rear wheels, press the grey
release button on the wheels hub and remove from the axle. Invert the
rear wheels so that the wheels hub protrudes away from the axles.
Press the grey release button on the wheels hub and release once the
wheel is tted onto the axle.
MGI Zip Navigator User Manual 09

4.0 Battery Charging & Connection
The MGI Zip Navigator can only be used with the:
MGI 24v 380Wh Lithium battery
4.1 Initial Charge
• Before using your MGI Zip Navigator for the rst time you must
fully charge the battery overnight.
• Plug the charger AC lead into a power point - the green LED
illuminates to indicate the charger is on.
• Plug the charger output connection into the connector on
the front of the battery - the red LED illuminates to indicate it is
charging.
• When the charging LED indicator has turned green, the
battery is fully charged and ready for use.
Please refer to the battery charger user manual for further information.
4.2 Connecting the Battery onto the Zip Navigator
Position the battery on the Zip Navigator and push the battery down
to secure it.
Push the handle down to connect the battery to the
Zip Navigator.
Your Zip Navigator has been equipped with a fail safe battery
connection, so the Zip Navigator will not move when you connect the
battery.Your Zip Navigator will only start via the top handle button or
the remote.
MGI Zip Navigator User Manual 10

4.3 Charging the Battery after use
• Disconnect the battery by lifting the handle.
• The battery can be left on or removed from the Zip Navigator
for charging.
• Plug the charger AC lead into a power outlet - the green LED
illuminates to indicate the charger is on.
• Plug the charger output connection into the connector
on the front of the battery - the red LED illuminates to indicate
charging.
• When the charging LED indicator has turned green, the
battery is fully charged and ready for use.
*The Zip Navigator AT battery MUST be charged after every use.
Failure to do so maybe damage the battery.
5.0 Fitting a Golf Bag
Ensure that the top bag support straps are disconnected.
Position the golf bag on the Zip Navigator.
Secure the top bag support strap
• Select a good position for the elasticised straps to be put
around the golf bag.
• Stretch the longer end of the strap and loop the rounded
plastic bar underneath the hook on the shorter end.
• The top bag support straps should now be connected.
Please ensure the top bag support straps are hooked in place
securely before releasing. Failure to do so could result in injury to
the user.
Adjusting the length of the top bag support strap
The rounded plastic bar on the longer strap can be adjusted to
ensure the bag is securely in place.
Secure the lower bag strap and pull the lower bag strap over the
base of the golf bag.
MGI Zip Navigator User Manual 11

6.0 Operating the Digital Top Box
6.1 Top Box Display
6.2 Start / Stop the Zip Navigator
Zip Navigator Speed Control
Please note the following points regarding the Zip Navigator Speed
Control.
1. To select the desired speed, rotate the speed control button.Turning
the speed control button clockwise will increase the speed, whilst
anti-clockwise will decrease speed.
2. The speed setting chosen is displayed in the centre of the
screen.
Please note you will feel notches as you rotate the speed control. The notches
do not indicate a change in speed.The speed will only increase or decrease as
the number changes in the display.
3. To start the Zip Navigator at this desired speed, press the speed
control button.
4. Another tap will stop the Zip Navigator.
5. The desired speed can be altered up or down while the
Zip Navigator is moving.
Speed Control
1. Distance Mode Button
2. Unit Setting Button
3. ON / OFF Speed Control
Button
4. Speed Setting Indicator
5. Main Battery Level Indicator
6. Distance Mode
7. Distance
8. Unit Measurement
9. Remote Battery Level Indicator
1. 3.
2.
8.
9.
7.
6.
5.
4.
MGI Zip Navigator User Manual 12

6.3 Turn the Zip Navigator Off
Zip Navigator Battery
Please note the following points regarding the Zip Navigator battery.
Connecting the Battery onto the Zip Navigator
1. Position the battery on the Zip Navigator and push the
battery down to secure it. Push the battery handle down to
connect the battery to the Zip Navigator.
2. To turn the Zip Navigator Top Box Display off:
Hold down the Start/Stop Speed Control Button and Left Hand
Distance Mode Button for four seconds and the display will turn off
thereby disabling the Top Box.
Please note that the battery will still be connected to the Zip Navigator and will
continue to draw power whilst connected.
Please note that the Zip Navigator display will also turn off if the
Speed Control is not operated for 30 minutes.
Once again, please note that the battery will still be connected
to the Zip Navigator and will continue to drain whilst connected.
3. To reactivate the Top Box Display, whilst the battery is
connected, hold down the Start/Stop Speed Control Button and Left
Hand Distance Mode Button for four seconds and the display will turn
on, thereby enabling the Top Box.
4. To fully shut down the Zip Navigator and prevent the battery
from discharging, disconnect the battery by lifting its handle.
The battery can be left on or removed from the Zip Navigator.
6.4 Main Battery Level Indicator
Battery indication is located on the left side of the top box screen.
Four coloured bars are highlighted showing full charge.The number
of bars displayed, indicates the battery life available.You should
always check the battery status before you play golf to ensure the
main battery is fully charged.
6.5 Unit Measurements
You can change from meters / kilometres / yards / miles simply by
pressing the Unit Setting Button [on the right].
6.6 Distance Modes
There are three distance measurement modes.To move between the
modes, press the Distance Mode Button [DM] on the left.
Distance A and B: resettable distance measurements can be used to
measure how far you hit your shot and to measure how far you have
walked for the day.To reset, simply press the DM Button [left side] for 3
seconds until the reading displays “0”.
Distance Total: cannot be reset as it is the odometer for the life of the
Zip Navigator.This feature will assist with service reminders which is
recommended every 500km (310 miles) or 6 month period.
MGI Zip Navigator User Manual 13

6.7 Competition Mode
In the unlikely event that the club you are playing at does not allow
the use of distance devices you will need to disable the distances
feature on the MGI Zip Navigator.
To disable the distance recording feature, simply hold down
the left and right buttons at the same time for 3 seconds and
“COMP MODE” will appear on the screen. In addition, the distance
recording will be removed from the screen.
To exit COMP MODE hold down the left and right buttons at the same
time.
MGI Zip Navigator User Manual 14

7.0 Remote Control
PLEASE NOTE: Your remote control is located in a holder on the
back of the handle just below
the T Bar Handle. Use two ngers to remove the remote control from
the holder.
7.1 Charging Your Remote Control
Before you start using your Zip Navigator you must fully charge the
remote control battery for approximately 6 hours or overnight using
the USB cord provided.The top left UNLOCK button will ash while
charging.When a full charge is complete, the green light will stay on
and stop ashing.
To charge the remote, plug the other end of your cable into the Zip
Navigator USB port located underneath the handle.Alternatively , the
remote can be charged via PC, Laptop or AC adaptor (not included).
To check the level of power in the remote, press any button to signal
the digital top box and the remote control battery level will show on
the screen of the Zip Navigator.
We recommend recharging your remote battery when recharging
your main battery after each round.
7.2 Forward Arrow
Press the forward button to start and accelerate the
Zip Navigator. The longer you press the button, the faster the
Zip Navigator travels.The Zip Navigator will always start at speed 2
when using the remote.
7.3 Down Arrow
The down arrow decreases the speed and initiates reverse.
If you are moving forward, the down arrow can be used to decrease
speed, the longer the pressure, the slower the speed.
If you hold down the button the Zip Navigator will reverse. If you
release the down arrow, whilst the Zip Navigator is in Reverse Mode,
the Zip Navigator will stop [safety feature].
Remote
Control
MGI Zip Navigator User Manual 15

7.4 Left and Right Arrow
When the Zip Navigator is stopped, press the appropriate turn
command and keep depressed until the degree of turn is achieved,
then press the forward button for the Zip Navigator
to go forward.
Whilst the Zip Navigator is moving, press the appropriate turn
command, and keep depressed until the degree of turn is achieved.
Momentary pressure will make a small adjustment to the direction,
whilst prolonged pressure will increase the degree of turn and speed
of the turn.
7.5 Speed Control – Manually and Remotely
Under manual control, you can adjust the speed by turning
the speed control button clockwise [increase speed] or
anti-clockwise [decrease speed].When changing to the remote
control, irrespective of the speed level indicated on the display, the Zip
Navigator will always start at speed 2.
7.6 Keypad Unlock and Lock
The remote control has two buttons at the top which allow you to
LOCK and UNLOCK the keypad.This will eliminate accidental button
input when the remote is kept in your pocket.The STOP button will
continue to work, when the LOCK feature is activated.
7.7 Remote Range and Safety Stop
The Zip Navigator can be remotely controlled up to 100m. If the
remote control loses contact with the Zip Navigator, then the
automatic safety stop will initiate after ve seconds.This is for the
protection of your Zip Navigator, yourself and others. If the Zip
Navigator was last activated using the manual control, the auto safety
stop feature will not operate. Please note, the top left UNLOCK button
will ash every 3 seconds while the Zip Navigator is running under
remote control.
7.8 Pairing a Remote
In the unlikely event that your remote loses pairing with your Zip
Navigator, or you have replaced your remote, it will need to be paired
as follows:
1. Lift the main battery handle, disengaging the battery terminals.
2. Hold down the STOP Button on the remote until both the LOCK and
UNLOCK buttons illuminate and remain solid– then release the STOP
Button.
3. Re-engage the main battery by pushing the handle back down,
ensuring the lights on the remote remain illuminated.
4. The remote will synchronise with the Top Box – the process will
be complete once the LOCK and UNLOCK buttons are no longer
illuminated
Please note, if you do not connect the Zip Navigator, as per point 3,
with a battery, the remote will exit pairing after one minute.
MGI Zip Navigator User Manual 16

8.0 Gyroscope Straight Tracker Navigation System
The Zip Navigator is built with a Patented Gyroscope Straight Tracker
Navigation System.This technology ensures the Zip Navigator
maintains its direction regardless of the terrain.The Zip Navigator
will automatically brake or accelerate either wheel to maintain its
direction.
When the Zip Navigator is controlled by the remote, the navigation
system is always ON.
When the Zip Navigator is controlled manually, the navigation system
is always OFF.
Tip: On a steep incline or if the Zip Navigator hits a divot or other
object, the gradient may force the Zip Navigator off line.You do not
need to adjust the Zip Navigator.The Zip Navigator will work its way
back on course.
9.0 Warranty
9.1 Warranty Policy
The MGI Zip Navigator is covered by a limited 3 year manufacturer’s
warranty from the date of purchase. Duration of this warranty is:
– 3 years on parts*
– 3 years on Lithium batteries and chargers
*MGI or an authorised service centre will repair or replace any parts
found to be defective in materials or workmanship under normal use
provided that:
1. The MGI Zip Navigator has been properly used, maintained and
regularly serviced [see section 10.5]
2. The replacement or repair is performed by an authorised MGI
service centre or the owner with MGI approval.
Our goods come with guarantees that cannot be excluded under
Consumer Law.You are entitled to a replacement or refund for
a major failure and for compensation for any other reasonably
foreseeable loss or damage.You are also entitled to have the goods
repaired or replaced if goods fail to be of acceptable quality and the
failure does not amount to a major failure.This warranty is in addition
to other rights and remedies available to the consumer under law.
If a warranty claim is to be made, please cease use of the goods
immediately and contact your place-of-purchase or your nearest
Authorised Service Centre.Alternatively, MGI can be contacted
directly via details on the back of this User Manual. Proof-of-purchase
is required.
MGI Zip Navigator User Manual 17

9.2 Warranty Exclusions
The following events are not covered under warranty:
Normal wear and tear;
•(e.g. tyres, rubber handlebar, elastic straps, paintwork, battery
performance, axles threads, charging ports on batteries and remotes,
screen glass etc.)
•Minor appearance defects which bear no effect on the operation
of the unit and are considered by the manufacturer to be within the
accepted standards.
The following events will void warranty:
• Battery BMS failure caused by improper charging cycles, i.e. letting
battery drain to zero charge.
• Any alteration performed by non-authorised people or companies.
• Fitting of parts or accessories not recommended by MGI.
• Any damage caused by continued operation of the product after it
is known to be defective.
• Damage to the seat and/or seat support bracket on the unit.
• Damage caused by partial or full submersion in water - affecting
the drive system or electronics.*
• Damage caused by the unit being driven into bunkers, other course
hazards or clubhouse and carpark hazards.
• Damage caused by golf balls or golf clubs.
• Application of external force to any part of the unit or battery.
• Fusion/overheating of motor or electronics through overload (i.e.
using the product to aid the user uphill) or continued operation whilst
stationary.
• All implied warranties [save those preserved by statute] are
excluded.
• Liability for consequential damages under any and all warranties
are excluded to the extent exclusion is permitted by law.
* In the event of submersion in water (partial or full) of your
Zip Navigator; MGI advises the complete write-off of your
Zip Navigator.
The cost of replacing the water-damaged components (including
labour) exceeds the price of a replacement Zip Navigator.
If you elect to purchase replacement components, i.e. motors,
gearbox, motor controller and electronics, we advise the replacement
of ALL components simultaneously. Replacing individual components
on a water-damaged Zip Navigator poses a higher risk of future failure
of other components and therefore these parts will not be covered
under warranty.
Please note that MGI does not warrant water-damaged batteries and,
due to re risk, under no circumstances should they continue to be
used.
MGI Zip Navigator User Manual 18

9.3 Parts Installed During Warranty
Warranty coverage for components installed during a motorised
Zip Navigator’s warranty period shall consist of the duration of the
Zip Navigator’s warranty period, provided the warranty installation is
performed by MGI, an authorised service centre or the Zip Navigator
owner on approval. Replacement of parts under warranty will not
extend the warranty of the Zip Navigator or parts.
Warranties are non-transferable.The warranty applied to a product, on
purchase, is limited to the original purchaser.
10.0 Preventative Maintenance Program
To properly provide for the continued operation of your MGI Zip
Navigator, MGI has introduced its Preventative Maintenance Program
[PMP].The PMP consists of work to be carried out by both the owner
and authorised service centres.To maintain the warranty of your MGI
Zip Navigator, it is essential that this work is carried out. If the work
carried out by the authorised Service Centre is to replace parts that
are part of the maintenance schedule, the owner will be charged for
the parts and labour. If the work to be carried out is covered under
warranty, MGI will bear the cost.
10.1 Cleaning Your Zip Navigator [See Maintenance Schedule]
For years of good operation, your Zip Navigator requires care and
attention:
• Keep your Zip Navigator clean by using a cloth with warm
water and a mild detergent.
• Do not hose down your Zip Navigator under any circumstance, as
the Zip Navigator has electronic components.
• Ensure that the seat stem bracket is free of sand and debris.
• Do not submerge your Zip Navigator, partially or fully as it will
damage the drive system and/or the electronics.The Zip Navigator
is designed to withstand wet weather (in conjunction with a Zip Rain
Cover [sold separately]).
• Clean the Zip Navigator battery base when the battery
is removed from the Zip Navigator.
• Regularly brush away sand/dirt from moving parts and toggles for
smooth operation.
10.2 Rear Wheel Axles Maintenance [See Maintenance Schedule]
The rear wheel stub axles need to be lubricated regularly. Remove the
rear wheels by depressing the spring clip and at the same time pull
off the wheel.Apply Petroleum Jelly or light grease to the stub axles.
Use a very small amount as the lubricant can attract sand. If you
play in sandy conditions you should clean the axle and re-lubricate
fortnightly. Once your cloth has dried out, please lightly coat the axle
with Petroleum Jelly.
MGI Zip Navigator User Manual 19

10.3 Upper and Lower Bag Strap Maintenance [See Maintenance
Schedule]
The bag straps should be replaced as per the Service Schedule.The
upper bag strap can be replaced by:
• Removing the left and right hand straps form the upper bag
support.
• Undo and remove the screws holding the strap in position on the
bag support.
• Remove and replace both bag straps.
• Insert bag strap securing screws.
10.4 Correcting the Alignment
Please see Zip Navigator Motor Trimming at mgigolf.com.
10.5 MGI Service Schedule
It is the owner’s responsibility to ensure that all periodical checks,
necessary adjustments and services are carried out. If in doubt please
contact the MGI service centre:
Australia 1300 644 523
USA 1800 617 2990
Any work performed on your Zip Navigator should be recorded on
your service record (see page 21) regardless of the work.
MGI Zip Navigator Monthly 6
Monthly
Every
2 yrs
Every
3 yrs
Wipe down the Zip
Navigator with a warm
cloth after each use [do not
hose]
BO
Lubricate rear wheel stub
axles BO
Check and tighten nuts and
bolts BO
Check and tighten handle
pivots BO
Check alignment of Zip
Navigator – ensure that it
runs straight
BO
Replace Speed Controller
and On/Off switch assembly BO /SC
Replace rear and front
wheels BO
Replace upper and lower
bag straps BO
BO = Zip Navigator owner can carry out this work
SC = Charged work to be carried by approved service centre
BO/SC = The six monthly service can be completed by either an authorised
service centre or the owner of the Zip Navigator.
MGI Zip Navigator User Manual 20
Other manuals for ZiP Series
2
This manual suits for next models
1
Table of contents
Other MGI Golf Trolley manuals

MGI
MGI ZIP series User manual

MGI
MGI ZIP series User manual

MGI
MGI Ryder R75 User manual

MGI
MGI zip X5 User manual

MGI
MGI ZiP Series User manual

MGI
MGI ZIP series User manual

MGI
MGI ZIP Navigator User manual

MGI
MGI ZIP series User manual

MGI
MGI NAVIGATOR GPS Manual

MGI
MGI Navigator G800 Troubleshooting guide