Midea MY-WCS603 User manual

Table of Contents
Electric Pressure Cooker
Model:
MY-WCS603
Thank you for purchasing Midea pressure cooker. Please read and understand the instruction manual
before using and keep it safely for your future reference.
(Pictures are for reference only, actual
product may differ from pictures shown.)
Important Safeguards
Specifications
Product Diagram
Cooking Examples
11
Cautions
14
Troubleshooting
13
Circuit Diagram
13
Service Warranty
13
Cleaning
Notice Prior to Use 05
04
Cooking Preparation 06
01
03
Function Selection 07
Safe Cover Opening 07
Preset Function
Warm-keeping Function 10
08
08
Care and Maintenance 10
10
Safety Cautions
Time
Roast
Curry
Soup
White
Rice
Brown
Rice
Keep Warm
Cancel
Slow
Cook
Saute


02
cook these f oods in the Midea MY-WCS603.
See Operating Your
See Operating Your Hannex
Hannex EPMD614S .

03
Power Working
pressure
Model Power Supply Volume Calibero
f
inner pot
Warm
Temperature
Accessories
Manual Measuring Cup Power Cord Components
Specifications
1000W 6L 70kPa22cm 60°C80°C
120V~60Hz
MY-WCS603
This appliance has a polarized plug (one blade is wider than the other).To reduce the risk
of electric shock, this plug is intended to fit into a polarized outlet only one way. If the plug
does not fit fully into the outlet, reverse the plug. If it still does not fit, contact a qualified
electrician. Do not attempt to modify the plug in any way.
SAVE THESE INSTRUCTIONS.
POLARIZED PLUG
Do Not use this pressure cooker for presure frying with oil.
(a) A short power-supply cord (or detachable power-supply cord) is to be provided to
reduce risks resulting from becoming entangled in or tripping over a longer cord.
(b) Longer detachable power-supply cords or extension cords are available and may
be used if care is exercised in their use.
(1) The marked electrical rating of the detachable power-supply cord or extension
cord should be at least as great as the electrical rating of the appliance.
(2) If the appliance is of the grounded type, the extension cord should be a
grounding-type 3-wire cord, and.
(3) The longer cord should be arranged so that it will not drape over the counter top
or table top where it can be pulled on by children or tripped over.
( ) If along detachable power-supply cord or extension cord is used.

04
Handle cover
Cover Exhaust valve
Float valve
Anti-block shield
Gasket ring
of float valve
Product Diagram
Structure diagram
of floate valve
Method of using
scoop holder
Warm tip:
1.Before use each
time, be sure to
inspect the float
valve anti-block
shied and gasket
for mounting
2.Before put the
inner pot to outer
pot, be sure to
remove debris and
water attached to
the outside of the
inner pot and inside
of the outer pot.
3.when moving the
product, please lift
the cooker handle.
4.The outer casing
having water,
please use c loth
wipe.
Rice paddle shelf
Housing
Base
Control panel
Exterior pot
Handle
Inner pot
Gasket
Inside of cover

Time
Roast
Curry
Soup
White
Rice
Brown
Rice
Keep Warm
Cancel
Slow
Cook
Saute
Preset
Steam
Bean
Soup
White
Rice
Brown
Rice
Keep Warm
Cancel
Slow
Cook
“Preset” function
“White Rice” function
“Bean/Chili” funciton
“Brown Rice” function
Display Screen
“Sauté” function
“Slow Cook” funciton
“Soup” funciton
“Steam” function
“Keep Warm/Cancel” funciton
Operation Section White Rice function, Brown Rice
function, Bean/Chili function, Soup
function and Roast function
The function to select length of
maintenance pressure time
according to personal
preference. Adjust time By
pressing “+” “-“ key.
Slow Cook function
The function to select length of
cooking time according to
personal preference. Adjust time
By pressing “+” “-“ key.
Preset function
Set the end of cooking time by
pressing “+” “-“ key.
Notice Prior to Use
Before first use, please take out all accessories from the cooker body and read
the User's manual carefully, special care must be given to use directions and
cautions to avoid any damage to property or human injury.
05
Chili
Disassembly and installation of anti-block shield and gasket
Screw off upward
counterclockwise
Screw up downward
clockwise
Pull up Press down
1.Prior to each use,
inspect whether the
gasket and anti-block
shield are mounted to the
upper cover.
2.After use, remove any
foreign object from the
gasket and anti-block
shield. Keep clean to
avoid odor.
3.Never pull the gasket,
as pull deformation may
affect sealing and
pressure effect.
4.A damaged gasket
should not be used, and
shall be sent to the
service center for
replacement.
Sauté

Cooking Preparation
Open the cover correctly
1
Hold the cover handle with a hand, counter clock wise
rotate approximaterly 30 degrees until the cover
marking “▼” alignment the outer casing marking
“Open” and lift the cover.
2
Check whether parts on the cover are mounted properly
Check the float valve and exhaust valve for obstruction,
and confirm whether such parts as gasket and anti-block
shield are installed properly.
Before that, be sure to remove foreign object and water
droplets from the exterior of the inner pot and inside of
the housing;
After putting in, rotate the inner pot slightly left to right to
ensure good contact between the inner pot and heating
plate.
Put the inner pot in the electric pressure cooker
4
Remove the stainless steel inner pot, then put food and water in the inner pot
3
Total amount of food and water shall not exceed the MAX
level of inner pot height.
In work, align the small handle of exhaust valve with
the sealing small icon, indicating that the pressure
cooker is in airtight condition;
When manual exhausting is needed, align the small
handle of exhaust valve with the exhaust small icon,
indicating that the pressure cooker is in exhaust
condition;
Move to the sealing zone and inspect whether the
float valve has fallen (the float valve falls before
heating)
6Position the exhaust valve properly
5Close the cover completely
Before closing, check whether the gasket has been put in
the steel rim inside the cover.
Hold the cover handle with a hand, clockwise rotate
approximaterly 30 degrees until the cover marking “▼”
aligment the outer casing marking “ Close ”。
06
Release Position
VENTING
VENTING
SEALING
VENTING
VENTING VENTING
VENTING
SEALING
SEALING

1.Disconnects the power or t ake off the power plug.
2.Exhaust method
A.Quick opening method
Slide the exhaust valve to the exhaust position until the float valves falls. (for non-fluid food)
Put a wet towel on the cover to quicken cooling until the float valve falls. (for non-fluid food)
B.General opening method
Have the pressure cooker to cool naturally, until the float valve falls.
3.Open the cover
Hold the cover handle firmly, turn the cover clockwise to the spacing edge, and pull up the cover.
Do not open the cover until pressure inside the spot is released adequately.
Never pull out the exhaust valve when it is exhausting.
For fluid foods (porridge and sticky liquid), do not slide the exhaust valve for exhaust when
cooking is just finished, and otherwise the food will eject from the exhaust valve core. Be sure
to disconnect the power supply, have the unit cool naturally or put a wet towel around the cover
to speed up cooling until the float falls, and finally open the cover.
When large quantity of food is cooked, do not exhaust immediately after cooking. It is
recommended to open the cover and have the food after some time of warm-keeping.
Function Selection
General Functions
1.Finish cooking preparation according to Page 6
2.Switch on
The nixie tube flashes and displays a red horizontal
line “---”, indicating that the electric pressure cooker
has entered preparation state;
3.Select a required function level
4.
program selected.
Press a function key, and then10s later, the electric pressure cooker will perform a corresponding function
5. After cooking, enter the warm-keeping state automatically
After cooking, a corresponding function indicator goes out, the warm indictor illuminates , the display
screen shows “0.0”, and gives out the prompt sound.(10 beeps), with the electric pressure cooker going
into warm state.
Once a function key is pressed, the indicator of a corresponding
function level will illuminate (red);
Cooking time varies with different function level.The bigger the
food amount, the longer the cooking time.
You can cancel current working state and
return to standby state by pressing the
“Keep Warm/Cancel” key.
During operation, the machine may
sometimes generate the “cluck” sound,
which is not malfunction.
For cooking of little amount, the inner pot
may be sucked up when the cover is
opened. In this case, shake the inner pot
manually, and remove the inner pot cover
after the inner pot falls into the cooker body.
Warm Tips:
Safe Cover Opening
07
Within 10s, you can re-select preset time and function level, and finally confirm that the electric
pressure cooker will start work in 10s after selection.
The red horizontal line “---” on the display screen is bright, indicating that the electric pressure
cooker has entered working state.
During the operation, you can cancel current working state and return to standby state by pressing
the “Keep Warm/Cancel” key.

Cooking Examples
1. Finish cooking preparation according to Page 6
2. Select a corresponding function level
When any function key is pressed after preparation, a corresponding function
indicator illuminates; you can also select another function level within 10s. (To cancel
the operation, press the “Keep Warm/Cancel” key)
No preset function is made available to “Saute” function.
3. Press “Preset” key to Set end time of cooking
unit is equipped with 24-hour preset function, which can be operated as
follows:
Within 10s after function selection, press the “Preset” key to set a cooking end time.
First the key is pressed, the screen displays “Preset End Time 2.0 ”, Hour portion
flashes, and or is used to adjust the Hour portion. After setting of Hour portion, the
key is pressed again, and Minute portion flashes. Press or to adjust the Minute
portion.
Timer time shall not be less than 24h, if so, it will return to “2” .
After completion of setting ,the time displayed on the screen means working end
time of pressure cooker. (to cancel the operation, press the “Keep Warm/Cancel” key)
(This drawing represents that the cooking will end in 10h)
4. After cooking, the unit enters the warm state automatically
After preset time elapses, after cooking, the warm indicator illuminate and the unit will
go into warm-keeping state. Long time warm keeping is not recommended.
Preset Function
(Content in this section can be read selectively based on actual configuration)
08
Beef in
red wine
2kg blade or chuck steak,cubed
1cup/150g flour
Salt and pepper,to taste
2tablespoons/40g butter
2tablespoons/40ml olive oil
2onions,diced
1Finish cooking preparation according to page 6
Toss meat in flour and seasonings.
2、Press the “Saute” key
At the moment, the “Saute” function indicator illuminates, with other function indicators going out.
The electric pressure cooker begins cooking within 10s after selection.
Melt the butter and oil. Place the meat into the removable cooking bowl in 4batches, sealing for 5
minutes each.
Add onions, leek, carrots, garlic, parsley and chives.
Pour red wine over the top of the food and bring to the boil.
Press the “Keep Warm/Cancel” key.
3、Press the “Slow Cook” key
At the moment, the “Slow cook” function indicator illuminates, with other function indicators going
out.The electric pressure cooker begins cooking within 10s after selection.
4、After cooking, the unit enters warm state automatically
5、Open the cover on according to “Safe Cover Opening” on Page 7
1leek,finely chopped
2carrots,chopped
2cloves garlic,minced
2tablespoons parsley,chopped
2tablespoons chives,chopped
1x750ml red wine

Cooking
Rice
Store it in a cool and dry place;
Pay attention to shelf life of rice;
Odor may occur if rice is retained for
a long time;
Do not buy too much rice at one time.
Tip: method of rice storage
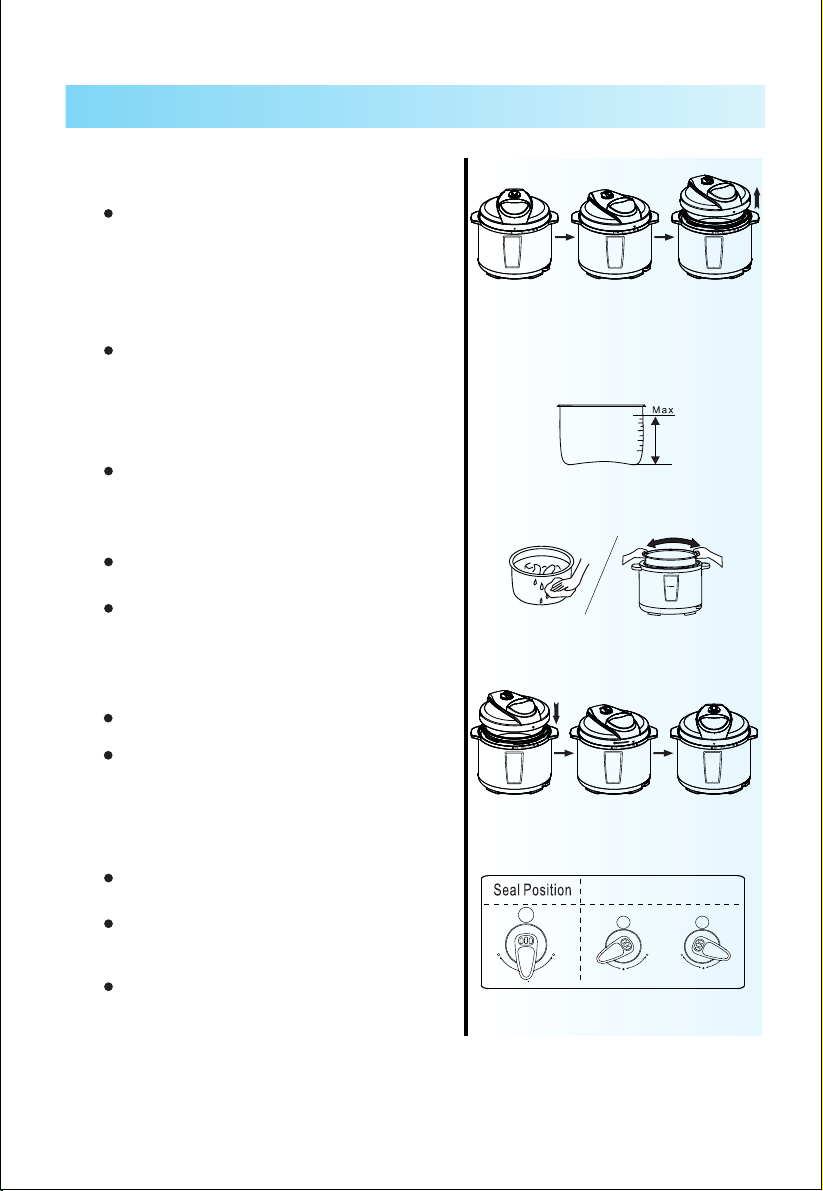
Measure the rice portion with a measuring cup and clean it
One measuring cup of rice is about 150g, a portion
served for one person;
It is recommended not to wash rice in the inner pot;
Correct methods of using
the measuring cup:
Add water to corresponding water level
Put the cleaned rice into the interior pot and fill it
with water to a corresponding water level;
The scale line inside the inner pot means the one
for cooking reference water level; Example: to
cook 2 cups of rice, add water to the scale line “2”;
Water quantity can vary with rice category and
hardness of rice, but never have water to exceed
the MAX level inside the inner pot.
Replace the wiped inner pot to the cooker body
According to Page 4, put the cover in place and switch on
Press the “White Rice” key
After cooking, the unit enters warm state automatically
Open the cover on according to “Safe Cover Opening” on Page 7
After putting in, rotate the inner pot lightly from left
to right to ensure full contact between inner pot and
heating plate.
At the moment, the “Rice” function indicator illuminates,
with other function indicators going out.
The electric pressure cooker begins cooking within 10s
after selection.
Cooking time is around 35min, but the time may slightly
vary with rice amount or rice quality;
After cooking, the rice is recommended to be served after
1-3 min warm-keeping, but long time warm-keeping is not
recommended to avoid influence on rice quality.
Cooking Examples
09
Butter
Chicken
2tablespoons olive oil
1teaspoon ginger,minced
3small onions,sliced thinly
2teaspoons cayenne pepper,ground
2teaspoons paprika,ground
1teaspoon coriander seeds,ground
1、Finish cooking preparation according to page 6
2、Press the “
Sauté
” key
At the moment, the “
Sauté
” function indicator illuminates, with other function indicators going out.
The electric pressure cooker begins cooking within 10s after selection.
Add the oil,garlic and onions and saute until softened.
Add the spices and stir until combined.Stir through the tomatoes and chicken breast until
everything is evenly coated.
Pour the stock over the chicken and securely place and seal the lid onto the pressure
cooker.
Press the “Keep Warm/Cancel” key.
3、Press the “Bean/Chili” key
At the moment, the “Bean/Chili” function indicator illuminates, with other function indicators going out.
The electric pressure cooker begins cooking within 10s after selection.
4、After cooking, the unit enters warm state automatically
5、Open the cover on according to “Safe Cover Opening” on Page 7
2teaspoons turmeric,ground
2teaspoons cumin,ground
2x420ml cans tomatoes,diced
2kg chicken breast,diced
300ml pure cream
Fresh coriander to serve

Time
Roast
Curry
Soup
White
Rice
Brown
Rice
Keep Warm
Cancel
Slow
Cook
Saute
Preset
Steam
Bean
Soup
White
Rice
Brown
Rice
Keep Warm
Cancel
Slow
Cook
Care and Maintenance
Safety Cautions
When the following circumstances take place Solutions
Power cord and plug suffer from expansion, deformation,
discoloration, damages, etc.
A portion of the power cord and the plug are hotter than usual.
Electric pressure cooker heats abnormally, emitting a burnt smell.
When power-on, there is an unusual sound or shock.
Stop use immediately, and send
it to a service center authorized
by Midea.
There is dust or dirt on the plug or socket. Remove dust or dirt with a dry
brush.
Meanings of icons :displayed
Ignoring these signs can/may cause injuries.
Warning
Caution
violation of warnings may cause personal death and
serious injuries
violation of cautions may cause injuries to persons and
properties.
For safety, please observe the following caution signs displayed:
After cooking, the electric pressure cooker goes into the
warm state automatically; in the warm state, the warm
indicator is bright, and “OH” is shown on the display screen;
You can also in standby perform the warm function by
pressing the “Keep Warm/Cancel” key;
0
The warm-keeping temperature is 60-80 C;
Optimal warm-keeping time is less than 8 hours.
Warm-keeping Function
Regular care or maintenance is essential in ensuring that this product is safe for
use.
10
Chili
Sauté

Cautions
CAUTIONS
A socket shall be used independently .
Using other cover during heating is strictly prohibited
Stop the use of an damaged power cord
Do not insert foreign object
Keep away from children
No moditications Do not wash or immerse it in water
As this may cause electric
shock and short circuit.
Warning on cover lifting Regular inspection
Do not insert foreign objects
such as metal scraps and
needles into a gap.
May cause electric shock or
unusual action.
It is strictly prohibited to use
non-brand cover during
heating.
May cause electric shock or
other serious injury.
It is prohibited to modify or
repair the unit by a non-
technician.
As this may cause fire or
electric shock.
Please send it to a designated
service agency for repair or
replacement of spare parts.
When the electric pressure cooker does not work,
there is no pressure inside the pot and the float
valve falls down;
When the unit works, pressure inside is on the
rise, and so is the float valve. Do not open the
cover forcibly until pressure is completely
discharged;
Otherwise scald or other injury may be caused.
Please use an individual
socket with earthed wire of
more than 10A rated current;
Joint use of the same socket
with other appliance may
cause unusual heat and fire.
The damaged power cord
must be replaced with a
special flexible cord or a
special component bought
from the manufacturer or
service agency.
Place it away from children.
This may cause burn or
electric shock.
Carry out regular inspection
of the exhaust valve and
anti-block shield to make
sure that they are
unobstructed;
Do not add any heavy object
to the exhaust valve or
replace it with other object.
Please use a 120V-60Hz socket
Fire or electric shock may
occur if 120V AC-
60Hz is not used.
AC
11
120V

Cautions
CAUTIONS
Do not insert and pull off
the plug with wet hand
May cause electric
shock.
When removing the plug, be
sure to pinch the plug handle
When not in use, remove plug from socket.
May cause creepage,
fire or malfunction.
During operation, never move your
hand to the exhaust valve vent
Never touch the cover during operation
Cooking amount shall not
exceed MAX level
Use only the special inner pot Do not place the inner pot on
other appliance for heating
When moving the product,
please hold the cooker handle
To move the unit, never
lift the cover handle directly
to prevent the cover from
falling down.
Never use the product in
following places
Unstable place;
Places near water or fire;
Adjacent to walls and furniture;
Places exposed to direct sunshine or oil splash.
When pulling out the plug,
be sure to pinch the plug
handle;
Never pull the power cord as
this may cause damage to
the power cord and result in
electric shock or short circuit.
In cooking, never move your
hand or face to the exhaust
valve vent to avoid scald.
In cooking, do not cover the
exhaust valve vent with a
rag.
Food to be cooked should
not exceed the MAX level,
and otherwise the food
may be half-cooked or
failure may happen.
When the unit is operating,
the cover has a higher
temperature, so never
touch it with your hand;
This may cause scalding.
When there is foreign object
between the inner pot
bottom and heating plate,
first remove the foreign
object before using.
May cause overheat or
abnormal operation.
To avoid deformation or
failure of inner pot.
Please use the supplied
special inner pot.
12

1.After each use, give timely cleaning of the product.
2.Before cleaning, unplug the unit and carry out cleaning and
maintenance after the product cools down completely.
3.Take out the cover and inner pot, wash them with a detergent,
rinse with fresh water and then wipe them dry with a sofe cloth.
4.Using clear water, clean the cover, including the gasket, exhaust
valve, anti-block shield,exhaust valve core and float valve, and wipe
it clean with a rag. After cleaning install it on the cover correctly .
5.Clean the cooker body with a rag. Do not immerse the cooker in
water or wash with splashing water.
Cleaning
1.There is one year's guarantee with this Midea electric pressure cooker. (for
household products only)
2.The starting date of the service warranty is based on the date of the invoice.
3.In any one of the following cases, the warranty will be invalidated:
�Damage by unsuitable operation, storage and maintenance by the
consumer;
�Damage due to use of non-specified accessories by any person other than a
service agency authorized by this company.
�Failure to produce an effective invoice.
�Damage by force majeure;
4.For product maintenance beyond the warranty scope, the Customer Service Center
of this company will still serve you warmly.
Circuit Diagram
Service Warranty
13
Cooking plate
Socket
Connecting line
Display panel
Detective switch
Temperature sensor
Temperature fuse
Temperature fuse
Power board
Pressure
switch
120V~60Hz
N
L
E
N
L
Power panel
power supply

Troubleshooting
The following unusual cases are not completely caused by mechanical failures.
Please carry out a careful examination before sending the unit for repair .
S/N Problem Possible Reason Solution
Difficult to close the cover
Push rod jammed by float valve
Difficult to open the cover
Pressure exists inside the cooker
Float valve fails to fall after steam
release
Press the float valve lightly with
chopsticks
Open the cover after the pressure
lowers down
Leakage from cover
No gasket Put the gasket according to the
requirement
Food leavings attached to gasket
Push the push rod lightly with
a hand
Gasket not positioned well Locate the gasket well
Replace the gasket ring
Cover not closed firmly Close the cover again
Gasket worn
Clean the gasket ring
Leakage from float valve
Food leavings attached to float
valve gasket ring Clean the float valve gasket
Float valve gasket ring worn Replace the float valve gasket
Float valve unable to rise
Excessively little food and water
inside pot
Send it to the service agency for
inspection
Put food and water according to
the rule
Little leakage from cover or
exhaust valve
Exhaustion from exhaust
valve does not stop
Exhaust valve not in sealing
position
Pressure control fails
Slide the exhaust valve to the
sealing position
Send it to the service agency
for maintenance
Lamp not bright after power on Bad contact with socket Please inspect the socket
All
lamps
flash
C1 appears on nixie tube
C2 appears on nixie tube
C5 appears on nixie tube
C6 appears on nixie tube
Sensor fails Send it to the service agency
for inspection
Temperature is too high because
there is no water inside the inner pot
Add water as required
Temperature is too high because
inner pot is not placed Put the inner pot properly
Pressure switch fails Send it to the service agency
for inspection
Rice half cooked/too hard
Too little water added Add more water
Cover closed prematurely After the time is up, release steam
and open the cover in 5 minutes
Rice too soft Too much water added Reduce water level
14

Addition: Any technical improvements shall be placed in the
revised manual without notice; For any changes in
appearance and color, those of the actual product shall
Prevail.
Special Declaration
Table of contents
Other Midea Electric Pressure Cooker manuals

Midea
Midea INNERCHEF Series User manual

Midea
Midea MPC176-SS User manual

Midea
Midea MY-CS5039P User manual

Midea
Midea MY-12CH501B User manual

Midea
Midea MY-CS SERIES User manual

Midea
Midea MY-SS5051P User manual

Midea
Midea 350110 User manual

Midea
Midea MPM50010ADKH User manual

Midea
Midea MY-CS6037WPB User manual

Midea
Midea MY6021D User manual

Midea
Midea MY-CS6004WP User guide

Midea
Midea MY-CS6019WP User manual

Midea
Midea MY-D6004B User manual

Midea
Midea MY-D6007SS2 User manual

Midea
Midea MY-CS6037WP2 User manual

Midea
Midea MY-CS SERIES User manual

Midea
Midea MY-CS6022WPA User manual

Midea
Midea MY-CH502A User manual

Midea
Midea InstaChef MY-SS6062 User manual

Midea
Midea MY-CS6037WP User manual