manuals.online logo
Brands
  1. Home
  2. •
  3. Brands
  4. •
  5. Midland
  6. •
  7. Radio
  8. •
  9. Midland WR120B Manual

Midland WR120B Manual

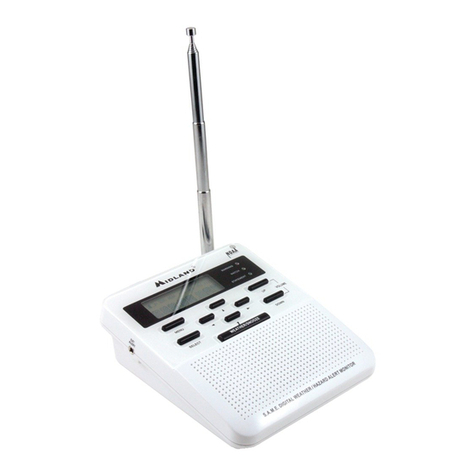
Set Up Instructions for Midland
Weather Alert Radio
1. Take all of the items out of the package and
remove all plastic.
2. There should be a total of 3 items in the
package:
a. Weather Unit b. AC Power Adapter
c. User’s Guide
How To Use:
1. Directional Pad:
Use these arrows to
navigate through different
menu options.
2. Menu button:
Use this button
to enter the menu options.
3. Select button:
Use this to choose options.
4. Up button:
Use this to turn the volume up.
5. Down button:
Use this to turn the volume down.
6. Watch Light:
This light indicates a watch
for potential weather emergencies.
7. Warning Light:
This light indicates a weather
emergency.
8. Weather/Snooze button:
Use this button to listen to local weather
reports on the radio.
Use this button to snooze alerts or sirens.
9. Advisory Light:
This light is the lowest warning level.
This light indicates a weather advisory.
Set Up:
3. First, Switch the
On/Off switch to the
On position.
4. Pull antenna out and
fully extend it.
5. Insert 3 AA batteries
into the back.
6. Plug the AC Power Adapter into the Power
Jack and into the wall.
7. The radio will
display the word
“Welcome”, then it will show “Set Language”.
8. To Set Language:
a. Press the Menu button.
b. Press the up button to scroll to Set
Language. Press Select.
c. Use the up arrow to choose your
language preference. Press Select.
9. To Set Location:
a. Press the Menu button.
b. Use the up arrow to scroll to Set Location,
then press Select.
c. Press the up arrow to Single, then press
Select.
d. 01 EMPTY will be displayed. Press Select.
e. Use the up and down arrows to select your
country, state/province, and county/area.
Press Select after each selection.
f. Press Menu to exit.
10. To set time:
a. Press the Menu button.
b. Press the up arrow to scroll through the
menu options.
c. Press the Select button. Use the up arrow to
change the hour.
d. Press the right arrow to save the hour and
move on to setting the minutes.
e. Use the up arrow to set the minutes and use
the right arrow to save it.
f. Press Select to save the current time.
g. Press Menu to exit the menu mode.
11. To set an alarm:
a. Press the Menu button.
b. Press the up button to scroll to Set Alarm.
Press Select.
c. Press the up arrow to display ON. Press
Select.
d. Press the up arrow to choose the hour.
e. Press the right arrow to save the hour.
f. Use the up arrow again to program the
minutes.
g. Press the Select button to save the time.
h. Press Menu to exit.
12. To set alert type:
a. Press the Menu button.
b. Use the up arrow to scroll to Alert Type,
then press Select.
c. Use the up arrow to choose Voice, Tone, or
Display, then press Select.
d. Press Menu to exit.
13. To test the alerts:
a. Press the Menu button.
b. Use the up arrow to scroll to Alert Test.
c. Press Select and a siren will sound.
d. Press Menu to turn off or Weather/Snooze
to snooze it.
e. Press Menu to exit.
14. To set the channel and volume:
a. Press the Menu button.
b. Use the up arrow to scroll to Set Channel,
then press Select.
Voice: alert tone will sound for 8 seconds, then a voice
will announce the weather broadcast for 3 minutes.
Tone: alert tone will sound for 3 minutes.
Display: only a text alert will scroll on the display.
c. Use the up and down arrows to find the
radio station you desire.
d. Use the Volume up and down buttons to
adjust volume.
e. Press Menu to exit.
15. To adjust the backlight:
a. Press the Menu button.
b. Use the up arow to scroll to Backlight, then
press Select.
c. Use the up arrow to select BLT NORM,
BLT ON, or BLT OFF. Press Select.
d. Press Menu to exit.
16. To adjust the button noises:
a. Press the Menu button.
b. Use the up arrow to scroll to the Button
Beeps, then press Select.
c. Use the up arrow to choose ON or OFF.
Press Select.
BLT NORM: the backlight turns on
when a button is pressed.
BLT ON: the backlight is always on.
BLT OFF: the backlight is always
d. Press Menu to exit.
17. To set events:
a. Press the menu button.
b. Use the up arrow to scroll to Set Events,
then press Select.
c. Use the up arrow to choose ALL ON, ALL
OFF, ALL DEFAULT, or EDIT EVENTS.
d. Press Select. Press Menu to exit.
18. To edit events:
a. Press the Menu button.
b. Use the up arrow to Set Events, then press
Select.
c. Use the up arrow to scroll to Edit Events.
Press Select.
ALL ON: turns on tones for all applicable alerts.
ALL OFF: turns off tones for all alerts.
ALL DEFAULT: returns all alert settings to default.
EDIT EVENTS: allows individual alert sirens to be
enabled.
d. Use the up arrow to select your desired
alert, then press Select.
e. Use the up arrow to choose ON or OFF,
then press Select.
f. Press the Menu button to exit.

Other Midland Radio manuals

Midland GXT444 User manual

Midland

Midland GXT444 User manual

Midland G-223 User manual

Midland

Midland G-223 User manual

Midland Syn-Tech III P25 User manual

Midland

Midland Syn-Tech III P25 User manual

Midland GXT760 series User manual

Midland

Midland GXT760 series User manual
Midland BR180 User manual

Midland

Midland BR180 User manual

Midland 248XL User manual

Midland

Midland 248XL User manual

Midland 75-509 User manual

Midland

Midland 75-509 User manual

Midland G7XT Manual

Midland

Midland G7XT Manual

Midland TITAN User manual

Midland

Midland TITAN User manual

Midland 77321 Manual

Midland

Midland 77321 Manual

Midland Syn-Tech II User manual

Midland

Midland Syn-Tech II User manual

Midland 200 User manual

Midland

Midland 200 User manual

Midland 71-506-10D User manual

Midland

Midland 71-506-10D User manual

Midland 4001 User manual

Midland

Midland 4001 User manual

Midland ER310 User manual

Midland

Midland ER310 User manual

Midland 210 DS User manual

Midland

Midland 210 DS User manual

Midland SYN-TECH III P25 - REV 6.0 User manual

Midland

Midland SYN-TECH III P25 - REV 6.0 User manual

Midland Syn-Tech III P25 User manual

Midland

Midland Syn-Tech III P25 User manual

Midland M-222P User manual

Midland

Midland M-222P User manual

Midland 5001z User manual

Midland

Midland 5001z User manual

Midland ML801 User manual

Midland

Midland ML801 User manual
Midland BR01 Manual

Midland

Midland BR01 Manual

Midland X-TRA TALK GXT Series User manual

Midland

Midland X-TRA TALK GXT Series User manual

Midland 75-785 User manual

Midland

Midland 75-785 User manual
Popular Radio manuals by other brands

Dataradio JSLM2 manual

Dataradio

Dataradio JSLM2 manual

Logik L2DAB12 instruction manual

Logik

Logik L2DAB12 instruction manual

Grace Digital GDI-IR2600 user guide

Grace Digital

Grace Digital GDI-IR2600 user guide

Clas Ohlson DAB373 manual

Clas Ohlson

Clas Ohlson DAB373 manual

Grundig GUSR91DAB user guide

Grundig

Grundig GUSR91DAB user guide

Sony URX-P03D operating instructions

Sony

Sony URX-P03D operating instructions

Makita MR003GZ instruction manual

Makita

Makita MR003GZ instruction manual

ClearClick VR47 Quick start guide & user manual

ClearClick

ClearClick VR47 Quick start guide & user manual

Telefunken TF-1572 instruction manual

Telefunken

Telefunken TF-1572 instruction manual

Kongsberg MBR 144 instruction manual

Kongsberg

Kongsberg MBR 144 instruction manual

Sony SRF-M80V Marketing operating instructions

Sony

Sony SRF-M80V Marketing operating instructions

Pinell Explorer user manual

Pinell

Pinell Explorer user manual

Madison FREESOUND-VR40B user manual

Madison

Madison FREESOUND-VR40B user manual

Cobra 75WXST operating instructions

Cobra

Cobra 75WXST operating instructions

Sony Walkman SRF-56 operating instructions

Sony

Sony Walkman SRF-56 operating instructions

Maxon CIC Europe CM10 user manual

Maxon CIC Europe

Maxon CIC Europe CM10 user manual

Roadstar TRA-2295 instruction manual

Roadstar

Roadstar TRA-2295 instruction manual

Cobra 29 LTD Classic user manual

Cobra

Cobra 29 LTD Classic user manual

manuals.online logo
manuals.online logoBrands
  • About & Mission
  • Contact us
  • Privacy Policy
  • Terms and Conditions

Copyright 2025 Manuals.Online. All Rights Reserved.