Mizco International ToughTested TT-PBW-SW24 User manual

TT-PBW-SW24
BIG FOOT SOLAR BATTERY PACK
BLOC-PILES SOLAIRE / BATERIA SOLAR
USER MANUAL
GUIDE D’UTILISATION
MANUAL DE USUARIO
Mizco International Inc.
80 Essex Avenue East Avenel, NJ 07001
www.toughtested.com

01
Package contents and features ....................................................................................................................
Operating instructions .................................................................................................................................
Charging other devices ...............................................................................................................................
Specifications .............................................................................................................................................
Limited warranty ........................................................................................................................................
02
03
06
08
09
TABLE OF CONTENTS
Thank you for purchasing this solar power bank. Please carefully read this manual before operating your
solar charger and keep it in a safe place for future reference.

02 03
OPERATING INSTRUCTIONS
PACKAGE CONTENTS AND FEATURES
Package Includes:
1X 24000mAh Solar Power Bank
1X USB A to USB C Cable
1X Micro USB Cable
1X User Manual
1X Carabiner
To collect and store solar power to the solar charger’s internal battery:
• Place the solar charger in direct sunlight; make sure the embedded solar panel is positioned towards the sun.
• The LED indicator light glows solid green while charging by sunlight.
Note: Note that the solar panel is designed for emergency charging. It should not be the primary source of
charging. Prolonged exposure under the burning sun will cause damage to the solar panel.
Charging the solar charger from an external power sourse:
• Plug in one of the included cables to a power source such as a wall or car charger.
• Battery’s charging status is indicated by 4 LED indicators in the following manner:
Features:
1. Monocrystalline solar panel 6. LED indicators
2. Quick Charge 3.0 Output Port 7. Power switch
3. USB output port A 8. Carabiner hole
4. Micro USB input port 9. LED flashlight
5. USB-C input/output port 10. Solar charging indicator

04 05
OPERATING INSTRUCTIONS
Note:
1. The powerbank can rapidly charge multiple devices at the same time.
2. For fastest charging speed it is recommended to charge a maximum of two devices at a time.
3. The powerbank does not allow charging and discharging at the same time i.e. charging external devices
and having its internal battery recharged at the same time.
Solid blue • The LED indicators will turn off after the power bank is fully charged
Solid blue
OPERATING INSTRUCTIONS
How to check the power level of the battery pack
1. At any time you can check the power level of the battery pack by pressing and releasing the power button.
2. The LEDs will automatically turn off after 30 seconds to conserve power.
Charging
status 0% to 25% 25% to 50% 50% to 75% 75% to 99% 100%
LED
Indicator
1st LED
indicator Flashing
Blue
2nd LED
indicator Off Flashing
Blue
3rd LED
indicator Off Off Flashing
Blue
4th LED
indicator Off Off Off Flashing
Blue
Remaining
Capacity 0% to 5% 5% to 25% 25% to 50% 50% to 75% 75%-100%
LED
Indicator
1st LED
indicator Flashing
Blue
2nd LED
indicator Off Off
3rd LED
indicator Off Off Off
4th LED
indicator Off Off Off Off

06 07
CHARGING OTHER DEVICES
Charging another device: Charging the power bank from
an external powersource:
Smartphone charging diagram DC 5V/2A wall adapter connected via micro USB cable
Charging your portable devices
• Use the original cable that came with your device. Connect the USB-A/USB-C end to one of the USB output
ports on the power bank
• The device will start charging.
CHARGING OTHER DEVICES
Note: When the solar charger is in use and the capacity is less than 2%, the solar charger will automatically
shut off to avoid over discharge of the battery.
Operating the emergency LED flashlight:
• To turn on the Emergency LED flashlight press and hold the power button for 3 seconds
• Press again to shift to caution light
• Press again to shift to SOS light
• Long press the power button to turn off the LED light

08 09
SPECIFICATIONS
Capacity: 24000mAh
Solar Panel: 5V-400mA
Micro USB input: 5V 2A
Type-C Input: 5V 3A (MAX)
QC 3.0 OUTPUT: 5V 3A 9V-2A 12V-1.5A
Type-C output: 5V 3A
USB output: 5V 3A
Size: 180*89*30mm
Product net weight: 553(g)
Battery type: Li-polymer
Operating temperature: 0~45(°C)
Flashlight: 1W*1
IMPORTANT NOTES:
1. Charging times are for reference, actual
charging times may vary slightly.
2. To ensure long life of this powerbank fully
charge at least one time every six months.
3. Do not leave this powerbank on a hot
dashboard or the battery may be damaged.
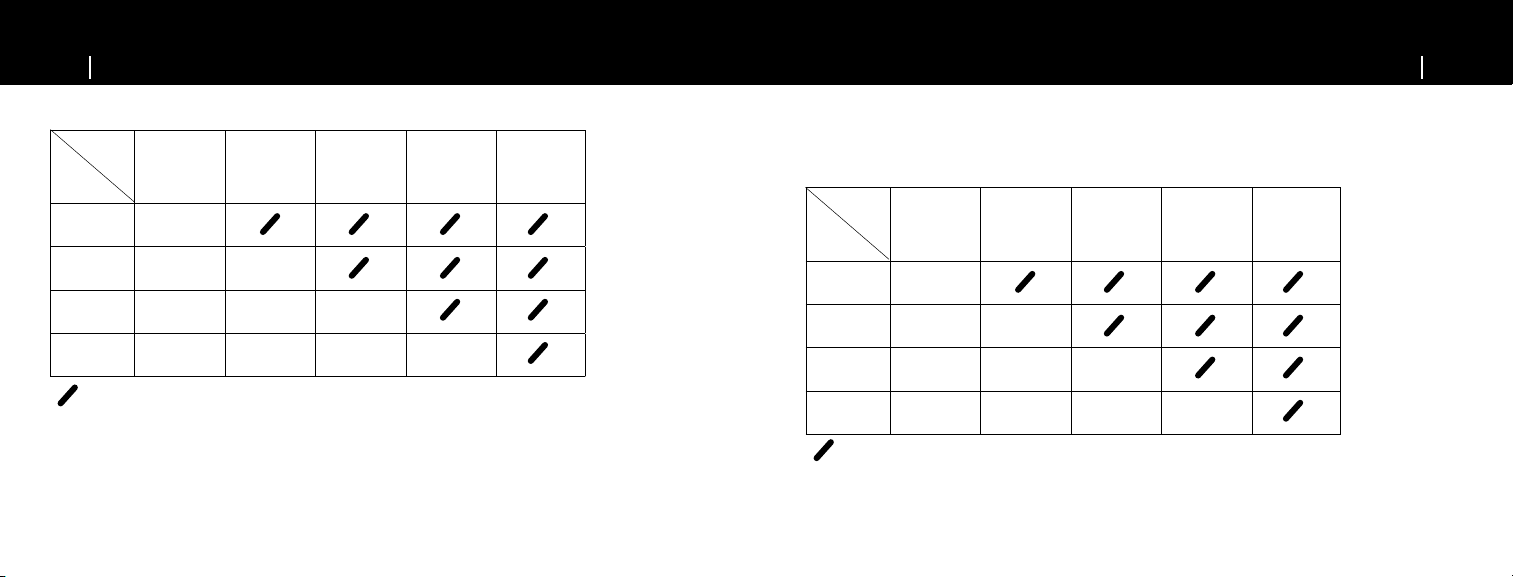
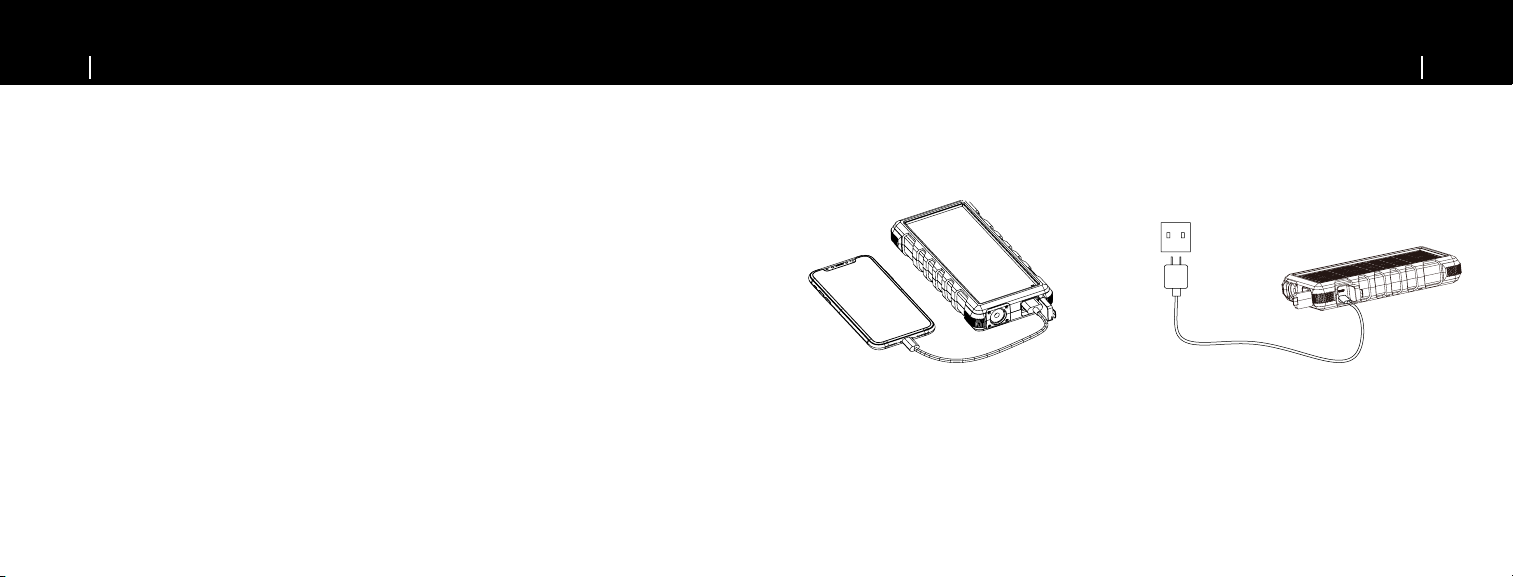
• Time to fully charge the power bank: via
Type-C port 11~12 hours; via Micro 14~15
hours; via Type-C & Micro 7~8 hours
• Time to fully charge via solar power only:
9 days at 8 hours of bright sunlight per day.
LIMITED WARRANTY
Thank you for purchasing a ToughTested®product from Mizco international, Inc.
We want you to enjoy this product without any problems. However, in the unlikely event that it malfunctions,
we will either repair or replace it as part of the product’s limited warranty.
At the first sign of trouble and before returning the product, we encourage you to contact ToughTested®.
If the product has malfunctioned during normal use, the responsibility of ToughTested®is limited solely to the
repair or replacement, at its option, of the product. This warranty does not extend to damage or failure that
results from misuse, neglect, accidents, alteration, abuse, improper installation or maintenance.
All brands represented herein are registered trademarks of their respective manufacturers. Design and
specifications are subject to change without notice.
©Mizco International, Inc. All rights reserved.
All trade names are registered trademarks of the respective manufacturers listed.
Mizco International Inc., Avenel, NJ 07001
www.mizco.com

11
Merci d’avoir choisi ce chargeur solaire portatif. Veuillez lire attentivement le présent guide avant d’utiliser
votre chargeur solaire et gardez-le dans un endroit sûr pour référence future.
TABLE DES MATIÈRES
Contenu de l’emballage et caractéristiques ................................................................................................
Mode d’emploi ............................................................................................................................................
Chargement d’autres appareils ...................................................................................................................
Spécifications .............................................................................................................................................
Garantie limitée ..........................................................................................................................................
12
13
15
18
19

12 13
Liste d’accessoires:
1X Chargeur solaire portatif de 24000mAh
1X Câble USB-A à USB-C
1X Câble micro-USB
1X Guide d’utilisation
1X Mousqueton
Illustrations du produit:
1. Panneau solaire monocristallin 6. Voyants DEL
2. Port de sortie de charge rapide 3.0 7. Interrupteur
3. Port de sortie USB A 8. Trou du mousqueton
4. Port d’entrée micro-USB 9. Lampe torche DEL
5. Port d’entrée/sortie USB-C 10. Voyant indicateur de
charge solaire
CONTENU DE L’EMBALLAGE ET CARACTÈRISTIQUES MODE D’EMPLOI
Pour capter et stocker l’énergie solaire sur la pile interne du chargeur solaire:
• Placez le chargeur solaire en plein soleil, en vous assurant de positionner le panneau solaire en direction du soleil.
• Le voyant DEL s’allume en vert lorsqu’il se charge au soleil.
Remarque: Il est à noter que le panneau solaire est conçu pour le chargement d’urgence, et non comme source
principale de courant de charge. Une exposition prolongée au soleil brûlant pourrait endommager
le panneau solaire.
Chargement du chargeur solaire à partir d’une source d’alimentation externe:
• Branchez un des câbles fournis sur une source d’alimentation telle qu’un chargeur mural ou pour voiture.
• Quatre voyants DEL indiquent l’état de la charge de la pile de la façon suivante:

14 15
Remarque:
1. Le chargeur portatif peut charger rapidement plusieurs appareils à la fois.
2. Toutefois, pour obtenir la charge la plus rapide, il est recommandé de charger un maximum de deux appareils à la fois.
3. Le chargeur portatif ne permet pas de charger et de décharger en même temps, c.-à-d. de charger des
périphériques externes tout en rechargeant sa pile interne.
MODE D’EMPLOI
Lumière bleue solide •
Les voyants DEL s’éteindront une fois que le chargeur portatif sera complètement chargé.
État de
charge 0% to 25% 25% to 50% 50% to 75% 75% to 99% 100%
Indicateurs
LED
1er voyant Bleu
clignotant
2er voyant Éteint Bleu
clignotant
3er voyant Éteint Éteint Bleu
clignotant
4er voyant Éteint Éteint Éteint Bleu
clignotant
MODE D’EMPLOI
Lumière bleue solide
Vérification du niveau de charge du bloc-pile
1. Vous pouvez à tout moment vérifier le niveau de charge du bloc-pile en appuyant sur le bouton d’alimentation,
puis en le relâchant.
2. Les voyants s’éteindront automatiquement après 30 secondes pour conserver l’énergie.
Capacité
restante 0% to 5% 5% to 25% 25% to 50% 50% to 75% 75%-100%
Indicateurs
LED
1er voyant Bleu
clignotant
2er voyant Éteint Éteint
3er voyant Éteint Éteint Éteint
4er voyant Éteint Éteint Éteint Éteint

16 17
Chargement d’autres appareils :
• Utilisez le câble d’origine fourni avec votre appareil. Branchez l’extrémité USB-A/USB-C sur un des ports de
sortie USB du chargeur portatif.
• L’opération de charge commencera aussitôt.
CHARGEMENT D’AUTRES APPARAEILS
Remarque: Si le chargeur solaire est en cours d’utilisation et que sa capacité est de moins de 2%,
il s’éteindra automatiquement pour éviter de trop décharger la pile.
Utilisation de la lampe torche DEL de secours:
• Pour allumer la lampe torche DEL de secours, appuyez sur l’interrupteur d’alimentation pendant 3secondes.
• Appuyez de nouveau pour passer à la lampe d’avertissement.
• Appuyez de nouveau pour passer à la lampe SOS
• Appuyez longuement sur le bouton d’alimentation. pour éteindre la lampe DEL.
CHARGEMENT D’AUTRES APPARAEILS
Chargement d’un autre appareil :
Schéma de charge de téléphone intelligent Adaptateur mural 5V c.c./2A branché au moyen d’un
micro-câble USB
Chargement du chargeur portatif à partir
d’une source d’alimentation externe:

18 19
GARANTIE LIMITÉE
Merci d’avoir choisi un produit ToughTested®de Mizco International, Inc.
Nous voulons que vous profitiez de ce produit en n’ayant aucun problème. Cependant, dans le cas peu
probable de mauvais fonctionnement, nous le réparerons ou le remplacerons dans le cadre de la garantie
limitée du produit.
Au premier signe de mauvais fonctionnement et avant de retourner le produit, nous vous invitons à
communiquer.
Si le produit devient défectueux pendant une utilisation normale, la responsabilité de ToughTested®se limitera
à la réparation ou au remplacement, à son gré, du produit. Cette garantie ne s’applique pas aux dommages
ou aux pannes résultant d’une mauvaise utilisation, d’une négligence, d’un accident, d’une modification, d’un
abus, d’une mauvaise installation ou d’un entretien inadéquat.
Toutes les marques mentionnées aux présentes sont les marques de commerce déposées de leurs fabricants
respectifs. Les caractéristiques techniques et de conception sont susceptibles d’être modifiées sans préavis.
©Mizco International, Inc. Tous droits réservés.
Toutes les marques de commerce sont des marques déposées des fabricants respectifs énumérés.
Mizco International Inc., Avenel, NJ 07001
www.toughtested.com
SPECIFICATIONS
Capacité 24000mAh
Panneau solaire: 5V-400mA
Entrée micro-USB: 5V 2A
Entrée USB-C: 5V 3A (MAX)
Sortie Qc3.0: 5V 3A 9V-2A 12V-1.5A
Sortie USB-C: 5V 3A
Sortie USB: 5V 3A
Taille: 180*89*30mm
Poids net du produit: 553(g)
Type de pile: Li-polymère
Température de
fonctionnement:
0~45(°C)
Lampe torche: 1W*1
NOTES IMPORTANTES:
1. Les temps de charge sont donnés à titre
de référence car les temps réels peuvent
varier légèrement.
2. Pour assurer une longue vie à ce chargeur
portatif, chargez-le complètement au moins
une fois tous les six mois.
3. Ne laissez pas ce chargeur sur un
tableau de bord chaud, car vous
risqueriez d’endommager la pile.
• Temps nécessaire pour une charge
complète du chargeur portatif: via le port
de type-C 11~12heures; via le câble
micro 14~15 heures; via le port de type-C
et le câble micro 7~8heures
• Temps nécessaire pour une charge
complète via le chargeur solaire: 9 jours à
raison de 8heures par jour de plein soleil.

21
ÍNDICE
Contenido del paquete y características ......................................................................................................
Instucciones de operación ..........................................................................................................................
Para Cargar otros dispositivos .....................................................................................................................
Especificaciones .........................................................................................................................................
Garantie limitée ..........................................................................................................................................
22
23
26
28
29
Gracias por comprar este banco de energía solar. Favor de leer este manual con cuidado antes de operar su
cargador solar y manténgalo en un lugar seguro para consultas futuras.

22 23
INSTRUCCIONES DE OPERACIÓN
Para recolectar y almacenar energía solar en la batería interna del cargador solar:
• Coloque el cargador solar directamente bajo la luz del sol; asegúrese que el panel solar integrado está
colocado hacia el sol.
• La luz del indicador LED brillará en verde sólido mientras se está cargando con la luz solar.
Nota: Tome nota de que el panel solar está diseñado para carga de emergencia. No debe ser la fuente principal
de carga. La exposición prolongada bajo un sol intenso puede provocar averías al panel solar.
Para cargar el cargador solar con una fuente de energía externa:
• Enchufe uno de los cables incluidos a una fuente de energía, como un cargador de pared o de auto.
• El estado de carga de la batería se muestra por los 4 indicadores LED de la siguiente manera:
Lista de accesorios:
1X Banco de energía solar de 24000 mAh
1X Cable USB A a USB C
1X Cable Micro USB
1X Manual de usuario
1X Mosquetón
Diagramas del producto:
1. Panel solar monocristalino 6. Indicadores LED
2. Puerto de salida Quick Charge 3.0 7. Interruptor de corriente
3. Puerto A de salida USB 8. Orificio para mosquetón
4. Puerto de entrada Micro USB 9. Linterna LED
5. Puerto de entrada/salida USB-C 10. Indicador de carga solar
CONTENIDO DEL PAQUETE Y CARACTERÍSTICAS

24 25
INSTRUCCIONES DE OPERACIÓN
Nota:
1. El banco de energía puede cargar rápidamente varios dispositivos a la vez.
2. Para la velocidad más rápida de carga se recomienda cargar un máximo de dos dispositivos a la vez.
3. El banco de energía no permite cargar y descargar al mismo tiempo; es decir, la carga de dispositivos
externos mientras se recarga la batería interna.
INSTRUCCIONES DE OPERACIÓN
Azul solido • Los indicadores LED se apagarán cuando el banco de energía esté completamente cargado
Estado de
carga 0% to 25% 25% to 50% 50% to 75% 75% to 99% 100%
Indicadores
LED
1er
Indicador Azul
intermitente
2ndo
indicator Apagado Azul
intermitente
3er
indicator Apagado Apagado Azul
intermitente
4to
indicator Apagado Apagado Apagado Azul
intermitente
Azul solido
Para verificar el nivel de carga del paquete de batería
1. En cualquier momento puede verificar el nivel de carga del paquete de batería oprimiendo
momentáneamente el botón de encendido.
2. Las luces LED se apagarán automáticamente después de 30 segundos para conservar energía.
Capacidad
restante 0% to 5% 5% to 25% 25% to 50% 50% to 75% 75%-100%
Indicadores
LED
1er indicador Azul
parpadeante
2ndo indicador Apagado Apagado
3er indicador Apagado Apagado Apagado
4to indicador Apagado Apagado Apagado Apagado

26 27
PARA CARGAR OTROS DISPOSITIVOS
Para cargar otro dispositivo:
Diagrama de carga de un teléfono inteligente Adaptador de pared CD 5v/2A conectado a través de
un cable micro USB
Para cargar el banco de energía de una
fuente de energía externa:
PARA CARGAR OTROS DISPOSITIVOS
Nota: Cuando el cargador solar está en uso y la capacidad es menor al 2%, el cargador solar se apagará
automáticamente para evitar la sobre descarga de la batería.
Para operar la linterna LED de emergencia:
• Para encender la linterna LED de emergencia, oprima y mantenga oprimido el botón de encendido por 3 segundos
• Oprima nuevamente para cambiar a la luz de precaución
• Oprima nuevamente para cambiar a luz de emergencia
• Oprima y mantenga oprimido el botón de encendido por unos instantes para apagar la luz LED
Para cargar otros dispositivos:
• Use el cable original que vino con su dispositivo. Conecte el extremo USB-A/USB-C a uno de los puertos de
salida USB en el banco de energía
• El dispositivo empezará a cargarse.

28 29
NOTAS IMPORTANTES:
1. El tiempo de carga son de referencia
únicamente. Los tiempos de carga reales
pueden variar ligeramente.
2. Para asegurar una larga vida de este banco de
energía, cárguelo por completo al menos una
vez cada 6 meses.
3. No deje este banco de energía sobre un
tablero del automóvil caliente pues la batería
podría averiarse.
• Tiempo para cargar por completo el banco
de energía: por el puerto Tipo-C 11~12
horas; por el puerto Micro 14~15 horas; por
el puerto Tipo-C y Micro 7~8 horas
• Tiempo para cargar por completo usando
energía solar únicamente: 9 días con 8
horas de luz solar brillante por día.
ESPECIFICACIONES
Capacidad: 24000mAh
Panel solar: 5V-400mA
Entrada Micro USB: 5V 2A
Entrada USB-C: 5V 3A (MAX)
Salida Qc3.0: 5V 3A 9V-2A 12V-1.5A
Salida USB-C: 5V 3A
Salida USB: 5V 3A
Tamaño: 180*89*30mm
Peso neto del producto: 553(g)
Tipo de batería: Li-polímero
Temperatura de operación: 0~45(°C)
Linterna: 1W*1
GARANTIE LIMITÉE
Gracias por comprar un producto ToughTested®de Mizco International, Inc.
Queremos que disfrute de este producto sin ningún problema. Sin embargo, en el caso improbable de un
desperfecto, nosotros lo repararemos o reemplazaremos como parte de la garantía limitada del producto.
Ante la primera señal de un problema y antes de devolver el producto, le recomendamos que se comunique
directamente con ToughTested®.
Si el producto no funciona correctamente durante su uso normal, la responsabilidad de ToughTested®se
limita exclusivamente a la reparación o reemplazo, según su preferencia, del producto. Esta garantía no
abarca daños o fallas que resulten de un mal uso, negligencia, accidentes, alteraciones, abuso, instalación o
mantenimiento inadecuados.
Todas las marcas representadas en este documento son marcas comerciales de sus respectivos fabricantes.
El diseño y las especificaciones están sujetos a cambios sin previo aviso.
©Mizco International, Inc. Todos los derechos reservados.
Todos los nombres comerciales son marcas comerciales registradas de los
respectivos fabricantes enumerados.
Mizco International Inc., Avenel, NJ 07001
www.toughtested.com
Other manuals for ToughTested TT-PBW-SW24
1
Table of contents
Languages:
Other Mizco International Batteries Pack manuals
Popular Batteries Pack manuals by other brands

Master Battery
Master Battery UPOWER Ecoline UE-48Li400 manual

Ronde & Schwarz
Ronde & Schwarz R&S TSMA6B-BP Getting started

enphase
enphase IQ Battery 5P owner's guide

UPOWER Ecoline
UPOWER Ecoline NauticBattery NA-12Li200BL quick start guide

ToughTested
ToughTested ROC user guide

V-TAC
V-TAC ESS Series instruction manual