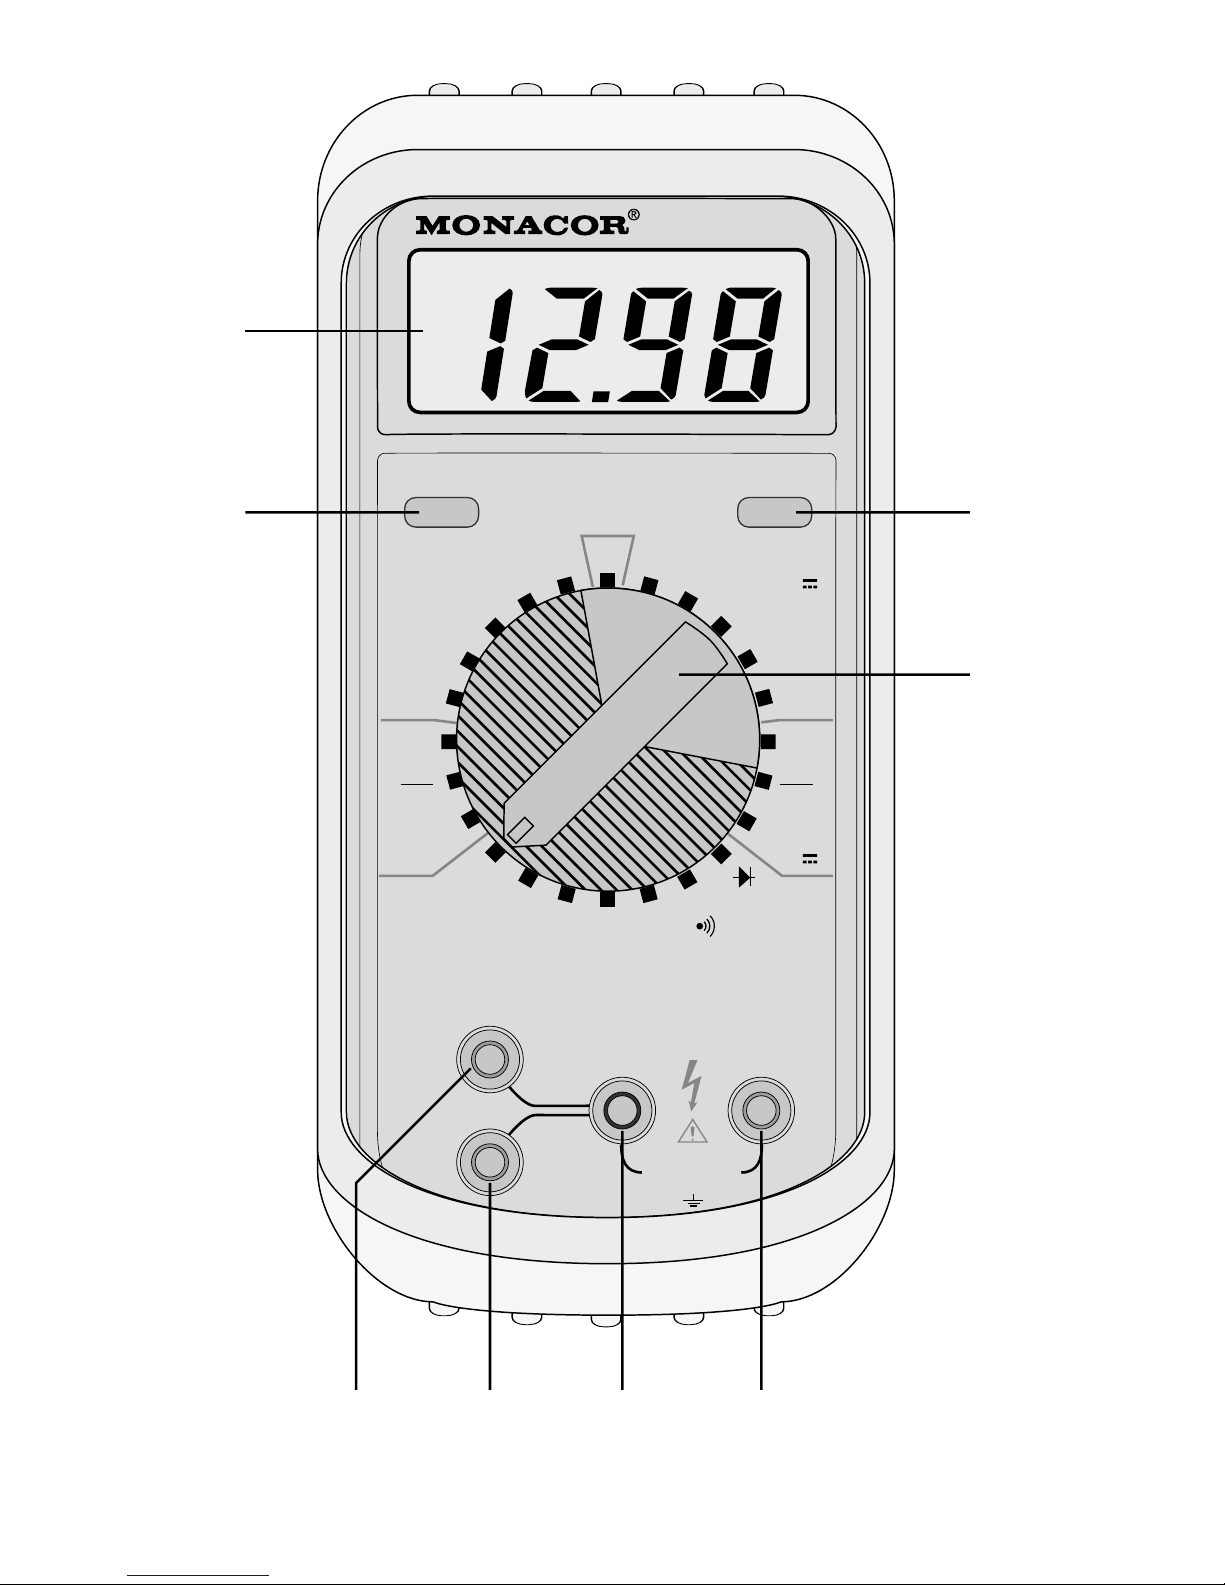
Monacor DMT-3060 User manual

Bedienungsanleitung
Instruction manual
Mode d’emploi
Istruzioni per l’uso
Gebruiksaanwijzing
Handleiding
Manual de instrucciones
Brugsanvisning
Bruksanvisning
Käyttöohje
®
DMT-3060
Best.-Nr. 29.1740
Digital-Multimeter
Digital Multimeter

2
Bevor Sie einschalten
Wir wünschen Ihnen viel Spaß
mit Ihrem neuen MONACOR-
Gerät. Bitte lesen Sie vor dem
Gebrauch zu Ihrer eigenen
Sicherheit diese Anleitung.
Der deutsche Text beginnt auf
der Seite 4.
Avant toute utilisation
Nous vous remercions d'avoir
choisi un appareil MONACOR.
Pour votre sécurité, nous vous
prions de lire ce mode d’em-
ploi avant l’utilisation de l’ap-
pareil.
La version française commen-
ce à la page 20.
Alvorens u inschakelt
Wij wensen u veel plezier met
uw nieuwe MONACOR-toestel.
Lees voor uw eigen veiligheid
deze handleiding, alvorens het
toestel in gebruik te nemen.
De Nederlandse tekst begint
op pagina 36.
Inden De tænder for appa-
ratet
Vi ønsker Dem god fornøjelse
med Deres nye apparat. Læs
denne brugsanvisning for din
egen sikkerhed før brug.
Den danske tekst starter på
side 52.
Ennen kuin kytket päälle
Toivomme, että uudesta
MONACOR laitteesta on
sinulle paljon iloa. Ole hyvä ja
lue nämä ohjeet oman turvalli-
suutesi vuoksi ennen käyttöä.
Suomenkielinen teksti alkaa
sivulla 67.
Prima di accendere
Vi auguriamo buon diverti-
mento con il Vostro nuovo
strumento MONACOR. Per
Vostro sicurezza, Vi preghia-
mo di leggere le presenti istru-
zioni prima dell'uso.
Il testo italiano inizia a pagina
28.
Innan enheten tas i bruk
Vi önskar mycket glädje med
din nya MONACOR produkt.
Läs gärna instruktionerna för
din egen säkerhet innan du
använder instrumentet.
Den svenska texten finns på
sidan 60.
Before you switch on
We wish you much pleasure
with your new MONACOR
unit. Please read for your own
safety these instructions be-
fore use.
The English text starts on
page 12.
Antes de la conexión
Le agradecemos el haber
adquirido un equipo
MONACOR. Por favor, lee
atentamente las instrucciones
de uso.
La versión española se encu-
entra en la página 44.
®
D
A
CH
F
B
CH
DK
FIN
NL
B
GB
I
E
S

3
OFF
600 600 200200
20 20
2000
m 2000
m
200
m 200
m
200
m 200
m
20
m
10
A20
m
10
A
200
µ200
µ
20
M
20
k
2
M200
k2
k200
VV~
AA~
Ω
MAX HOLD DATA HOLD
COM VΩ
FUSED
10A/60sec
MAX
MAX
200mA
FUSED
µA
mA
10
A
600V¿
MAX
600V~
DMT-3060
5678
1
4
23

Bitte klappen Sie die Seite 3 heraus. Sie sehen dann immer
die beschriebenen Bedienelemente und Anschlüsse.
Inhalt
1 Übersicht der Bedienelemente und Anschlüsse . . . . . . . . 4
2 Hinweise für den sicheren Gebrauch . . . . . . . . . . . . . . . . . 5
3 Verwendungsmöglichkeiten . . . . . . . . . . . . . . . . . . . . . . . . 5
4 Inbetriebnahme . . . . . . . . . . . . . . . . . . . . . . . . . . . . . . . . . 5
5 Messungen durchführen . . . . . . . . . . . . . . . . . . . . . . . . . . 6
5.1 Spannungsmessung . . . . . . . . . . . . . . . . . . . . . . . . . . . 6
5.2 Strommessung . . . . . . . . . . . . . . . . . . . . . . . . . . . . . . . 7
5.3 Widerstandsmessung und Durchgangsprüfung . . . . . . 8
5.4 Diodentest . . . . . . . . . . . . . . . . . . . . . . . . . . . . . . . . . . . 8
6 Batterie oder Sicherung austauschen . . . . . . . . . . . . . . . . 9
7 Technische Daten . . . . . . . . . . . . . . . . . . . . . . . . . . . . . . 10
1 Übersicht der Bedienelemente und Anschlüsse
1LCD-Display
2Taste „MAX HOLD“ zum Festhalten des höchsten Meßwertes
bei schwankender Anzeige
3Taste „DATA HOLD“ zum Festhalten eines Meßwertes
4Drehschalter zum Einstellen des Meßbereichs
5Anschlußbuchse „µA mA“ für die rote Meßleitung (Pluspol) bei
Messungen von Strömen unter 200mA
6Anschlußbuchse „10A“ für die rote Meßleitung (Pluspol) bei
Messungen von Strömen ab 200mA bis max. 10A
7Anschlußbuchse „COM“ für die schwarze Meßleitung (Minus-
pol)
8Anschlußbuchse „VΩ“ für die rote Meßleitung (Pluspol) bei
Spannungs- und Widerstandsmessungen sowie bei Dioden-
tests
D
A
CH
4

2 Hinweise für den sicheren Gebrauch
Dieses Gerät entspricht der Richtlinie für elektromagnetische Ver-
träglichkeit 89/336/EWG und der Niederspannungsrichtlinie
73/23/EWG.
Mit diesem Gerät können lebensgefährlich hohe Spannungen
gemessen werden. Bei Messungen von Spannungen ab 42V ist
besondere Sorgfalt geboten!Achten Sie beimAnlegen der Meß-
spitzen darauf, daß Ihre Finger sich hinter dem Abrutschschutz
befinden. Betreiben Sie das Multimeter nicht, wenn Sie Schäden
am Gerät oder an den Meßleitungen feststellen. Beschädigte
Meßleitungen müssen ausgetauscht werden.
Beachten Sie auch unbedingt die folgenden Punkte:
●Das Gerät ist nur zur Verwendung im Innenbereich geeignet.
Schützen Sie es vor Feuchtigkeit und Hitze (zulässiger Einsatz-
temperaturbereich 0–40°C).
●Wird das Gerät zweckentfremdet, falsch bedient bzw. ange-
schlossen, überlastet oder nicht fachgerecht repariert, kann für
eventuelle Schäden keine Haftung übernommen werden.
●Verwenden Sie für die Reinigung nur ein trockenes, weiches
Tuch, auf keinen Fall Chemikalien oder Wasser.
●
Solldas Gerätendgültigaus demBetriebgenommenwerden,über-
geben Sie es zur Entsorgung einem örtlichen Recyclingbetrieb.
3 Verwendungsmöglichkeiten
Das Digital-Multimeter DMT-3060 dient zur Messung von Gleich-
und Wechselspannungen, Gleich- und Wechselströmen sowie Wi-
derständen. Zur Durchgangsprüfung ist ein Summer vorhanden.
Außerdem lassen sich mit diesem Gerät Diodentests durchführen.
4 Inbetriebnahme
1) Soll das Gerät geneigt aufgestellt werden, den Aufstellbügel
des Gummi-Schutzrahmens herausklappen.
2) Den Drehschalter (4) auf den gewünschten Meßbereich stellen.
3) Im Display (1) erscheint eine Anzeige. Bleibt das Display dun-
kel, muß eine 9-V-Batterie eingesetzt werden. Erscheint im Dis-
play das Symbol , muß die Batterie ausgewechselt werden.
D
A
CH
5

Zum Einsetzen einer neuen Batterie siehe Kap. 6 „Batterie oder
Sicherung auswechseln“.
4) Nach dem Betrieb das Gerät immer ausschalten (Drehschalter
auf Position „OFF“), sonst wird die Batterie unnötig verbraucht.
Wird das Multimeter längere Zeit nicht gebraucht, sollte die
Batterie herausgenommen werden. So werden bei einem Aus-
laufen der Batterie mögliche Schäden am Gerät vermieden.
5 Messungen durchführen
Messungen in Stromkreisen, an denen über 42V anliegen,
dürfen nur von Personen durchgeführt werden, die Berüh-
rungssgefahren erkennen und entsprechende Sicherheits-
vorkehrungen treffen können. Bei Messungen mit Berüh-
rungsgefahr vermeiden Sie es, allein zu arbeiten. Bitten Sie
eine zweite Person dazu.
Um Überlastungen des Meßgerätes zu vermeiden, bei unbekann-
ten Meßgrößen immer im größten Meßbereich beginnen, und
dann auf den kleinstmöglichen Bereich herunterschalten. Die
Überschreitung eines Meßbereichs wird durch die Anzeige „OL“
oder „
-
OL“ im Display (1) signalisiert. In diesem Fall den nächst-
größeren Meßbereich anwählen.
Zum Festhalten eines Meßwertes dienen die Tasten „MAX
HOLD“ (2) und „DATA HOLD“ (3):
Taste „DATA HOLD“: zum Festhalten des Meßwertes, wenn das
Meßobjekt vom Multimeter getrennt wird
Taste „MAX HOLD“: zum Festhalten des höchsten Meßwertes
bei einer schwankenden Anzeige
Zum Aktivieren der Funktion die entsprechende Taste drücken
(Symbol bzw. MAX im Display). Zum Ausschalten der Funk-
tion die Taste erneut betätigen.
5.1 Spannungsmessung
●Bei Messungen ab 42V besonders sorgfältig vorgehen.Auf kei-
nen Fall das Meßobjekt oder die Meßspitzen berühren.
●Rechnen Sie mit unvorhergesehenen Spannungen an Meßob-
jekten. Zum Beispiel können Kondensatoren auch bei ausge-
schalteter Spannungsquelle gefährlich geladen sein.
D-H
B
D
A
CH
6

●Mit diesem Instrument dürfen Sie keine Messungen in Strom-
kreisen mit Korona-Entladungen (Hochspannung) durchführen.
Lebensgefahr!
●Die maximal zu messende Spannung darf 600V~/ nicht über-
schreiten. Andernfalls besteht für den Benutzer Lebensgefahr!
1) Die rote Meßleitung an die Buchse „VΩ“ (8) anschließen und
die schwarze Meßleitung an die Buchse „COM“ (7).
2) Bei Messungen von Wechselspannungen den Drehschalter (4)
in einen der Bereiche „V~“ stellen, bei Messungen von Gleich-
spannungen in einen der Bereiche „V “; am besten mit dem
600-V-Bereich beginnen.
3) Die Meßspitzen an das Meßobjekt halten, und auf dem Display
(1) den Meßwert ablesen. Liegt bei Gleichspannungsmessun-
gen an der roten Meßspitze der Minuspol und an der schwar-
zen Meßspitze der Pluspol, erscheint im Display vor dem Meß-
wert ein Minuszeichen.
5.2 Strommessung
●Der maximal zu messende Strom darf 10Anicht überschreiten.
●Ist das Meßgerät auf Strommessung eingestellt [rote Meßlei-
tung an der Buchse „µA mA“ (5) bzw. „10A“ (6) angeschlossen]
auf keinen Fall eine Spannung auf das Meßgerät geben! Das
Meßgerät und die Spannungsquelle können beschädigt werden.
1) Bei Messungen von Strömen unter 200mA die rote Meßleitung
an die Buchse „µA mA“ (5) anschließen und die schwarze Meß-
leitung an die Buchse „COM“ (7).
Bei Messungen von Strömen ab 200mAdie rote Meßleitung
an die Buchse „10A“ (6) anschließen und die schwarze Meßlei-
tung an die Buchse „COM“ (7).
2) Bei Messungen von Wechselströmen den Drehschalter (4) in
einen der Bereiche „A~“ stellen, bei Messungen von Gleichströ-
men in einen der Bereiche „A “; am besten mit dem größt-
möglichen Bereich beginnen.
3) Die zu messende Schaltung von der Spannungsversorgung
trennen. Den Stromkreis auftrennen, und das Meßgerät in Rei-
he in den Stromkreis schalten.
4) Auf dem Display (1) den Meßwert ablesen. Liegt bei Gleich-
strommessungen an der roten Meßspitze der Minuspol und an
D
A
CH
7

der schwarzen Meßspitze der Pluspol, erscheint im Display vor
dem Meßwert ein Minuszeichen.
5.3 Widerstandsmessung und Durchgangsprüfung
●Das Gerät ist bis 500V~/ überlastgeschützt. Trotzdem auf
keinen Fall innerhalb einer Schaltung messen, wenn diese
unter Spannung steht!
●Ein Widerstand sollte immer separat gemessen werden, sonst
wird die Messung ungenau. Dazu muß er ggf. aus der Schaltung
herausgelötet werden.
1) Die rote Meßleitung an die Buchse „VΩ“ (8) anschließen und
die schwarze Meßleitung an die Buchse „COM“ (7).
2) Bei Widerstandsmessungen den Drehschalter (4) in einen der
Bereiche „Ω“ stellen. Bei Durchgangsprüfungen den Drehschal-
ter in die Position stellen.
3) Die Meßspitzen an den Widerstand bzw. an die entsprechen-
den Meßpunkte halten, und auf dem Display (1) den Meßwert
ablesen. Bei einer Durchgangsprüfung ertönt der Summer,
wenn der Widerstandswert kleiner ist als 100Ω.
Hinweis: Im kleinsten Meßbereich „200Ω“ kann der Widerstand
der beiden Meßleitungen das Meßergebnis verfälschen. Um einen
exakten Meßwert zu erhalten, die Meßspitzen kurzschließen und
den dann im Display angezeigten Meßleitungswiderstand vom ei-
gentlichen Meßwert abziehen.
5.4 Diodentest
●Das Gerät ist bis 500V~/ überlastgeschützt. Trotzdem auf
keinen Fall innerhalb einer Schaltung messen, wenn diese un-
ter Spannung steht!
●Eine Diode sollte immer separat gemessen werden, sonst wird
die Messung ungenau. Dazu muß sie ggf. aus der Schaltung her-
ausgelötet werden.
1) Die rote Meßleitung an die Buchse „VΩ“ (8) anschließen und
die schwarze Meßleitung an die Buchse „COM“ (7).
2) Den Drehschalter (4) in die Position „ “ stellen.
3) Die Meßspitzen an die Anschlüsse der Diode halten. Wird die
Diode in Durchlaßrichtung gemessen (schwarze Meßleitung an
der Kathode, rote Meßleitung an derAnode) zeigt das Display (1)
D
A
CH
8

die Durchlaßspannung bis 1,999V an. Wird die Diode in Sperr-
richtung gemessen, erscheint die Anzeige „OL“ im Display.
Wenn sowohl in Durchlaßrichtung als auch in Sperrichtung die
Anzeige „OL“ erscheint, ist die Diode unterbrochen.
Bei Kurzschluß der Diode wird ein Wert nahe 0V angezeigt.
6 Batterie oder Sicherung austauschen
●Vor dem Öffnen des Gerätes unbedingt die Meßspitzen von den
Meßpunkten der Schaltung entfernen, um jegliche Gefahr eines
elektrischen Schlages zu vermeiden.
●Betreiben Sie das Gerät niemals im geöffneten Zustand.
a. Erscheint im Display das Symbol , ist die Batterie verbraucht
und muß durch eine neue 9-V-Blockbatterie ersetzt werden.
b. Wenn keine Strommessungen möglich sind, sollten die Siche-
rungen überprüft und ggf. durch Sicherungen des jeweils glei-
chen Typs ersetzt werden:
für den Bereich unter 200mA: 0,5A, superflink
für den Bereich ab 200mA: 10A, superflink
Für den Bereich unter 200mA liegt dem Gerät eine Ersatz-
sicherung bei.
Zum Öffnen des Gerätes den Gummi-Schutzrahmen entfernen,
die drei Schrauben auf der Geräterückseite abschrauben, und die
untere Gehäuseschale abnehmen. Das Batteriefach befindet sich
in der unteren Gehäuseschale, die Sicherungen F1 und F2 auf der
Leiterplatte in der oberen Gehäuseschale.
Nach dem Austausch der Batterie/Sicherungen die beiden
Gehäuseschalen wieder zusammensetzen und fest verschrauben.
Bei Bedarf den Schutzrahmen wieder aufsetzen.
D
A
CH
9

7 Technische Daten
Allgemein
Anzeige: . . . . . . . . . . . . . . 15-mm-LCD, 31/2stellig
Meßrate: . . . . . . . . . . . . . . 2,5 Messungen pro Sekunde
Stromversorgung: . . . . . . . 1 x 9-V-Blockbatterie
Einsatzbereich: . . . . . . . . . 0–40°C, rel. Luftfeuchtigkeit < 70%
Spannung
Meßbereiche (V~/ ): . . . . 200mV, 2000mV, 20V, 200V, 600V
Wechselspannungs-
frequenzbereich: . . . . . . . . 50–500Hz
Genauigkeit*
Gleichspannung: . . . . . . ±(0,8% + 1 Digit)
Wechselspannung: . . . . ±(1,5% + 3 Digits) für die Bereiche
200mV bis 20V
±(2,0% + 3 Digits) für die Bereiche
200V und 600V
Eingangswiderstand: . . . . . 10MΩ
Überlastschutz: . . . . . . . . . 600V~/ max.
Strom
Meßbereiche (A~/ ): . . . . 200µA, 20mA, 200mA, 10A
Wechselstrom-
frequenzbereich: . . . . . . . . 50–500Hz
Genauigkeit*
Gleichstrom: . . . . . . . . . ±(1,0% + 1 Digit) für die Bereiche
200µA bis 200mA
±(3,0% + 3 Digits) für den Bereich
10A
Wechselstrom: . . . . . . . ±(2,0% + 4 Digits) für die Bereiche
200µA bis 200mA
±(3,5% + 4 Digits) für den Bereich
10A
Sicherung: . . . . . . . . . . . . . 1 x 0,5A/250V, superflink
1 x 10A/600V, superflink
D
A
CH
10

Widerstand
Meßbereiche: . . . . . . . . . . 200Ω, 2kΩ, 20kΩ, 200kΩ, 2MΩ,
20MΩ
Genauigkeit*: . . . . . . . . . . ±(1,0% + 4 Digits) für die Bereiche
200Ωbis 2MΩ
±(2,0% + 4 Digits) für den Bereich
20MΩ
Durchgangssummer: . . . . . < 100Ω
Überlastschutz: . . . . . . . . . 500V~/ max.
Diodentest
Anzeige: . . . . . . . . . . . . . . Durchlaßspannung bis 2V
Meßstrom: . . . . . . . . . . . . . 0,8mA (±0,3mA)
Genauigkeit*: . . . . . . . . . . ±(3,0% + 1 Digit)
Überlastschutz: . . . . . . . . . 500V~/ max.
*bei 23°C (±5°C), rel. Luftfeuchtigkeit < 70%
Laut Angaben des Herstellers.
Änderungen vorbehalten.
D
A
CH
11

Please unfold page 3. Then you can always see the operating
elements and connections described.
Contents
1 Operating Elements and Connections . . . . . . . . . . . . . . . 12
2 Safety Notes . . . . . . . . . . . . . . . . . . . . . . . . . . . . . . . . . . 13
3 Applications . . . . . . . . . . . . . . . . . . . . . . . . . . . . . . . . . . . 13
4 Setting into Operation . . . . . . . . . . . . . . . . . . . . . . . . . . . 13
5 Carrying out Measurements . . . . . . . . . . . . . . . . . . . . . . 14
5.1 Voltage measurement . . . . . . . . . . . . . . . . . . . . . . . . . 14
5.2 Current measurement . . . . . . . . . . . . . . . . . . . . . . . . . 15
5.3 Resistance measurement and continuity test . . . . . . . 15
5.4 Diode test . . . . . . . . . . . . . . . . . . . . . . . . . . . . . . . . . . 16
6 Replacing of Battery or Fuse . . . . . . . . . . . . . . . . . . . . . . 17
7 Specifications . . . . . . . . . . . . . . . . . . . . . . . . . . . . . . . . . . 18
1 Operating Elements and Connections
1LCD display
2Button “MAX HOLD” for “freezing” the maximum measuring
value in case of fluctuation of the displayed value
3Button “DATA HOLD” for “freezing” a measuring value
4Rotary switch for measuring range adjustment
5Jack “µA mA” for the red test lead (positive pole) for current
measurements below 200mA
6Jack “10 A” for the red test lead (positive pole) for current
measurements from 200mA to 10A max.
7Jack “COM” for the black test lead (negative pole)
8Jack “V Ω” for the red test lead (positive pole) for voltage and
resistance measurements as well as for diode tests
GB
12

2 Safety Notes
This unit corresponds to the directive for electromagnetic compati-
bility 89/336/EEC and the low voltage directive 73/23/EEC.
With this unit, very high voltages dangerous to life can be
measured. Great care must be taken with voltage measure-
ments above 42V! When applying the test tips, make sure that
your fingers are behind the slip protection. Do not operate the
multimeter if damage to the unit or to the test leads is found.
Damaged test leads must be replaced.
It is essential to observe the following items:
●The unit is only suitable for indoor use. Protect the unit from
humidity and heat (permissible ambient temperature range
0–40°C).
●There will be no liability for any damage if the unit is used for pur-
poses other than originally intended, if it is overloaded, if it is not
operated or connected correctly or not repaired by specialists.
●Only use a dry, soft cloth for cleaning, by no means use chemi-
cals or water.
●If the unit is to be put out of operation permanently, take it to a
local recycling plant for disposal.
3 Applications
With this digital multimeter DMT-3060, DC and AC voltages, DC
and AC currents as well as resistances can be measured. For the
continuity measurement a buzzer is provided. Furthermore, diode
tests can be performed with this unit.
4 Setting into Operation
1) If the unit is to be put up in an inclined position, pull out the
stand of the protective rubber frame.
2) Set the rotary switch (4) to the desired measuring range.
3) A display (1) will appear. If the display does not appear, a 9V
battery must be inserted. If the symbol is displayed, replace
the battery — see chapter 6 “Replacing of Battery or Fuse”.
4) Always switch off the unit after operation (rotary switch in posi-
tion “OFF”), otherwise the battery will be wasted unnecessarily.
GB
13

Remove the battery if the multimeter will not be used for a
longer period. Thus, damage to the unit due to battery leakage
will be prevented.
5 Carrying out Measurements
Measurements of objects which carry more than 42V must
only be made by persons able to recognize a hazard of
contact and to take corresponding safety precautions. In case
of measurements with hazard of contact avoid working on
your own. Ask a second person to assist.
To avoid overload of the multimeter in case of unknown values to
be measured, start with the maximum measuring range and then
switch to the lowest possible measuring range. Exceeding of a
measuring range will be indicated by means of the display (1) “OL”
or “
-
OL”. In this case, select the next-higher measuring range.
To “freeze” a measuring value, use the buttons “MAX HOLD” (2)
and “DATA HOLD”(3):
button “DATA HOLD”: “Freezing” of the measuring value if the
object to be measured has been separated
from the multimeter.
Button “MAX HOLD”: “Freezing” of the maximum measuring value
in case of fluctuation of the displayed value.
To activate this function, press the corresponding button (symbol
resp. MAX on display). To deactivate the function, press the
button once again.
5.1 Voltage measurement
●Care must be taken with measurements exceeding 42V. The
object to be measured or the test tips must not be touched in
any case.
●Take into account unexpected voltages at test objects. For
instance, capacitors may be dangerously charged even if the
voltage source is switched off.
●With this meter no measurements in current circuits with corona
discharges (high voltage) must be carried out. Danger of life!
●The voltage max. to be measured must not exceed 600V~/ .
Otherwise there will be danger of life for the user!
D-H
B
GB
14

1) Connect the red test lead to jack “V Ω” (8) and the black test
lead to jack “COM” (7).
2) ForAC voltage measurements set the rotary switch (4) to one of
the “V~” ranges, for DC voltage measurements to one of the
“V ” ranges. Preferably start with the 600V range.
3) Hold the test tips to the measuring object and read the measur-
ing value on the display (1). In case of DC voltage measure-
ments, a minus sign will precede the measuring value if the
negative pole is at the red test tip and the positive pole at the
black test tip.
5.2 Current measurement
●The DC current max. to be measured must not exceed 10A.
●If the multimeter is set to current measurement [red test lead
connected to jack “µA mA”(5) resp. “10A” (6)], do not feed volt-
age to the meter! Both multimeter and voltage source may be
damaged in this case.
1) For current measurements below 200mA, connect the red test
lead to the jack “µA mA” (5) and the black test lead to the jack
“COM” (7).
For current measurements from 200mA on, connect the red
test lead to jack “10A” (6) and the black test lead to the jack
“COM” (7).
2) ForAC current measurements set the rotary switch (4) to one of
the “A~” ranges, for DC current measurements to one of the
“A ” ranges. Preferably start with the maximum range.
3) Separate the circuit to be measured from the power supply.
Open up the circuit and connect the multimeter in series to the
circuit.
4) Read the measuring value on the display (1). In case of DC cur-
rent measurements, a minus sign will precede the measuring
value if the negative pole is at the red test tip and the positive
pole at the black test tip.
5.3 Resistance measurement and continuity test
●The unit is overload-protected up to 500V~/ . In spite of this
protection do not measure within a circuit if it carries voltage!
GB
15

●Always measure a resistor separately, otherwise the measure-
ment will be inaccurate. For this measurement, the resistor must
be soldered out of the circuit, if necessary.
1) Connect the red test lead to jack “V Ω” (8) and the black test
lead to jack “COM” (7).
2) For resistance measurements set the rotary switch (4) to one of
the “Ω” ranges. For continuity tests set the rotary switch to posi-
tion .
3) Hold the test tips to the resistor resp. to the corresponding
measuring points and read the measuring value on the display
(1). With continuity test the buzzer will sound if the resistance is
below 100Ω.
Note: In the lowest measuring range “200Ω”, the resistance of the
two test leads may lead to inaccurate results. To obtain an exact
measuring value, short-circuit the test tips and then subtract the
test lead resistance shown on the display from the actual measur-
ing value.
5.4 Diode test
●The unit is overload-protected up to 500 V~/ . In spite of this
protection do not measure within a circuit if it carries voltage!
●Always measure a diode separately, otherwise the measure-
ment will be inaccurate. For this measurement, the diode must
be soldered out of the circuit, if necessary.
1) Connect the red test lead to jack “V Ω” (8) and the black test
lead to jack “COM” (7).
2) Set the rotary switch (4) to position “ ”.
3) Hold the test tips to the diode. If the diode is measured in for-
ward direction (black test lead to the cathode, red test lead to
the anode), the display (1) will show the forward voltage up to
1.999 V. If the diode is measured in reverse direction, “OL” will
be displayed.
If both in forward and reverse direction the display reads “OL”,
the diode is interrupted.
In case of short circuit of the diode, a value close to 0V will be
displayed.
GB
16

6 Replacing of Battery or Fuse
●Prior to opening the unit, in any case remove the test tips from
the measuring points of the circuit to avoid any danger of an
electric shock.
●Never operate the unit when it is open.
a. If the symbol is displayed, the battery is discharged and
must be replaced by a new 9V transistor battery.
b. If it is not possible to carry out current measurements, check the
fuses and replace them by fuses of the same type, if necessary:
for the range below 200 mA: 0.5A, super-quick-acting
for the range from 200 mA on: 10A, super-quick-acting
A spare fuse for the range below 200mA is included.
To open the multimeter, remove the protective rubber frame,
unscrew the three screws on the rear side of the unit and remove
the lower housing shell. The battery compartment is situated in the
lower housing shell; fuses F1 and F2 on the PCB in the upper
housing shell.
After replacing the battery or the fuses, reassemble the two
housing shells and fasten the screws tightly. Attach the protective
frame, if required.
GB
17

7 Specifications
General
Display: . . . . . . . . . . . . . . . 15mm LCD, 31/2digits
Measuring rate: . . . . . . . . . 2.5 measurements per secund
Power supply: . . . . . . . . . . 1 x 9V transistor battery
Operating range: . . . . . . . . 0–40°C, < 70% relative humidity
Voltage
Measuring ranges (V~/ ): 200mV, 2000mV, 20V, 200V, 600V
AC voltage frequency range:
50–500Hz
Accuracy*
Direct voltage: . . . . . . . . ±(0.8% + 1digit)
AC voltage: . . . . . . . . . . ±(1.5% + 3digits) for the ranges
from 200mV to 20V
±(2.0% + 3digits) for the ranges
200V and 600V
Input resistance: . . . . . . . . 10MΩ
Overload protection: . . . . . 600V~/ max.
Current
Measuring ranges (A~/ ): 200µA, 20mA, 200mA, 10A
AC current frequency range:
50–500Hz
Accuracy*
Direct current: . . . . . . . . ±(1.0% + 1digit) for the ranges from
200µA to 200mA
±(3.0% + 3digits) for the range 10A
AC current: . . . . . . . . . . ±(2.0% + 4digits) for the ranges
from 200µA to 200mA
±(3.5% + 4digits) for the range 10A
Fuse: . . . . . . . . . . . . . . . . . 1 x 0.5A/250V, super-quick-acting
1 x 10A/600V, super-quick-acting
GB
18

Resistance
Measuring ranges: . . . . . . 200Ω, 2kΩ, 20kΩ, 200kΩ, 2MΩ,
20MΩ
Accuracy*: . . . . . . . . . . . . . ±(1.0% + 4 digits) for the ranges
from 200Ωto 2MΩ
±(2.0% + 4digits) for the range 20MΩ
Continuity test buzzer: . . . < 100Ω
Overload protection: . . . . . 500V~/ max.
Diode test
Display: . . . . . . . . . . . . . . . forward voltage up to 2V
Measuring current: . . . . . . 0.8mA (±0.3mA)
Accuracy*: . . . . . . . . . . . . . ±(3.0% + 1digit)
Overload protection: . . . . . 500V~/ max.
*at 23°C (±5°C), < 70 % relative humidity
According to the manufacturer.
Subject to change.
GB
19

Ouvrez le présent livret page 3 de manière à visualiser les élé-
ments et branchements.
Table des matières
1 Eléments et branchements . . . . . . . . . . . . . . . . . . . . . . . 20
2 Conseils d’utilisation . . . . . . . . . . . . . . . . . . . . . . . . . . . . 21
3 Possibilités d’utilisation . . . . . . . . . . . . . . . . . . . . . . . . . . 21
4 Fonctionnement . . . . . . . . . . . . . . . . . . . . . . . . . . . . . . . . 21
5 Mesures . . . . . . . . . . . . . . . . . . . . . . . . . . . . . . . . . . . . . . 22
5.1 Mesure de tension . . . . . . . . . . . . . . . . . . . . . . . . . . . . 23
5.2 Mesure de courant . . . . . . . . . . . . . . . . . . . . . . . . . . . . 23
5.3 Mesure de résistance et test de continuité . . . . . . . . . 24
5.4 Test de diodes . . . . . . . . . . . . . . . . . . . . . . . . . . . . . . . 24
6 Remplacement de la batterie ou du fusible . . . . . . . . . . . 25
7 Caractéristiques techniques . . . . . . . . . . . . . . . . . . . . . . 26
1 Eléments et branchements
1Affichage LCD
2Touche “MAX HOLD”: gel de la valeur la plus élevée si la valeur
affichée fluctue
3Touche “DATA HOLD”: gel de la valeur mesurée
4Commutateur rotatif pour sélectionner la plage de mesure
5Prise “µA mA”: cordon de mesure rouge, pôle plus, pour des
mesures de courants inférieures à 200mA
6Prise “10A”: cordon de mesure rouge, pôle plus, pour des
mesures de courants de 200mA à 10A max.
7Prise “COM”: cordon de mesure noir, pôle moins
8Prise “V Ω”, cordon de mesure rouge, pôle plus, pour des
mesures de tension et de résistance et tests de diodes
20
F
B
CH
Table of contents
Languages:
Other Monacor Multimeter manuals

Monacor
Monacor MT-300 User manual

Monacor
Monacor DMT-4004 User manual

Monacor
Monacor DMT-1020 User manual

Monacor
Monacor DMT-1005 User manual

Monacor
Monacor DMT-1050 User manual

Monacor
Monacor DMT-3050 User manual

Monacor
Monacor DMT-3090RS User manual

Monacor
Monacor DMT-2004 User manual

Monacor
Monacor DMT-4010RMS User manual

Monacor
Monacor DMT-2050 User manual