Monarch ZENER User manual

Owner’s Manual
ZENER

Monarch Zener Owner’s Manual v2. © Scooters Australia 2017. 2
CONTENTS
1. INTRODUCTION
Features and Benefits 4.
2. SAFETY 5.
3. EMI / RFI 8.
4. OPERATION
Controls 9.
Seating 10.
Freewheel Mode 11.
5. RIDING YOUR SCOOTER 13.
Getting on 13.
Basic Driving 13.
Ramps and Curbs 14.
6. TRANSPORTING YOUR SCOOTER
Disassembly 15.
Assembly 16.
Transporting 17.
7. CARE AND MAINTENANCE
Cleaning 18.
Batteries and Charging 18.
Troubleshooting 19.
Diagnostics 20.
SPECIFICATIONS 22.
WARRANTY 23.

Monarch Zener Owner’s Manual v2. © Scooters Australia 2017. 3
Congratulations on the purchase of your new Monarch scooter.
Even though your new scooter is both user-friendly and designed for maximum manoeuverability
in even the tightest spaces, we ask that you please read, understand and follow all of the
instructions and suggestions in this manual before you operate your scooter for the first time.
The safe use of your new scooter is very important to us.
If you feel that you do not understand the instructions and suggestions presented in this Owner’s
Manual, or if, for any reason, you do not feel capable of performing the activities necessary to
assemble, disassemble, operate, or maintain your scooter, in the first instance please contact
your local dealer who supplied the scooter, or ring 1300 622 633.
While we have made every attempt to ensure that the information in this manual is correct at date
of publication we reserve the right to implement changes into our product lines when those
changes become desirable or necessary. If changes are implemented into our product line, there
may be minor differences between the product you purchased and the illustrations and
instructions in this Owner’s Manual.
The Monarch Zener is imported by Scooters Australia Pty Ltd. If you need any assistance, please
contact the dealer from whom you purchased the scooter.
Scooters Australia cannot be held responsible for personal injury or property damage resulting
from the unsafe or the improper use of any of our broad range of health and personal mobility
products. In addition, Scooters Australia cannot be held responsible for personal injury or property
damage resulting from attempts to follow instructions, suggestions, and guidelines presented in
this Owner’s Manual.
Importer:
Scooters Australia
4/355 South Gippsland Hwy
DANDENONG Vic 3175
Ph 03 9799 6622
For more information about our products and services or to send us your comments, please visit
our website at www.scootersaus.com.au
Happy scootering.

Monarch Zener Owner’s Manual v2. © Scooters Australia 2017. 4
1. INTRODUCTION
Features and Benefits
Control Panel: Easy to read display features backlit battery gauge; two horn buttons; the key
switch; and the red button that turns the headlight and tail-lights on and off.
Loop Tiller handle: Offers cushioned hand rests for comfort and dual throttle control levers for
easy right or left hand use.
Slide Seat Mechanism: This scooter features a mechanism that allows the seat to slide forward
or backward for easier access to the tiller and control panel and comfort.
Adjustable Armrests: Your scooter features width, height and angle adjustable armrests to find
the most comfortable position as well as to make transfers easier.
Tyres: Non-marking, non-scuffing, pneumatic tyres
Seat Swivel: Seat can swivel to the left or right for easy transfers or to sit more comfortably at a
table or desk.
Off-board charger: The charger port is located conveniently on the tiller behind a protective
cover.
Tiller: Easy to use tiller offers infinite adjustment with its angle adjustment lever and can be
adjusted without leaning forward.
Automatic Tiller Lock: The tiller will automatically lock when folded down completely so that it
does not swing from side to side during transport.
Headlights (and tail lights): A standard feature, the headlights and taillights feature bright, long-
lasting LED bulbs. The headlight is angle-adjustable.
Suspension: Zener 4 has soft ride suspension to give you a smoother ride over bumpy surfaces.
ARMREST ANGLE
Adjustment screw
DASHBOARD
FREEWHEEL
HANDLE
SEAT ROTATION
LEVER
REMOVEABLE
FRONT BASKET
ARMREST HEIGHT
Adjustment screw
TILLER ADJUSTMENT
LEVER
CHARGER
PORT
PNEUMATIC TYRES
SEAT ANGLE
ADJUST

Monarch Zener Owner’s Manual v2. © Scooters Australia 2017. 5
2. SAFETY
Your Monarch ZENER scooter is a battery-operated personal mobility vehicle. Please exercise
caution and consideration when you are operating it. Driving your scooter carefully and
thoughtfully will help ensure your personal safety and the safety of other people.
NOTE: Before learning to operate your scooter, have your authorised dealer determine if it is
advisable for you to practice getting on and off your scooter and operating it in the presence of an
attendant.
BEFORE GETTING ON YOUR SCOOTER
•Check to be certain that the power is turned off. See section 4. “Operation” in this manual.
This will eliminate the possibility of accidentally activating the throttle controls and causing
injury to yourself or to others.
•Check to be certain that your scooter’s freewheel handle is in the engaged position. See
section 6 “Disassembly” in this manual.
•Swivel the seat.
WARNING: When getting on or off your scooter, keep your weight toward the middle of the foot
platform. Putting most or all of your weight on the edge of the platform may cause an unstable
condition.
GETTING ON YOUR SCOOTER
•Position the seat for safe and easy mounting. See section 4. “Operation.”
•Return tiller to full upright position
•Carefully place one foot on the approximate center of the deck and seat yourself
comfortably and securely on the seat, and lock the seat in the forward position.
•Fasten the seat belt, if your scooter is so equipped.
•Flip down or replace the armrests if they are in the incorrect position.
GETTING OFF YOUR SCOOTER
•Make certain that the power is turned off and the key is removed.
•Return tiller to full upright position
•Rotate the seat or flip up or remove the armrests.
•Unfasten the seat belt.
•Carefully place one foot on the ground, transfer your weight to that leg, and slowly come to
a standing position.
•Step away from the scooter.
MAXIMUM WEIGHT
Your scooter has been rated to a maximum payload (operator and anything else being carried on
the scooter) of 160 kg. Exceeding the maximum weight rating will void the warranty.
WARNING: Exceeding the maximum weight rating may result in injury to yourself and to others.
DRIVING ON INCLINES
•For maximum stability, lean forward in your scooter’s seat while proceeding up ramps,
inclines, curbs, or any low rise. See Fig. 1.
•Drive with caution when attempting to negotiate any incline, even access ramps.
•Always climb or descend an incline by driving straight up or straight down the face of the
slope.
•Do not traverse or drive across the face of an incline in any direction. See Fig. 2.
•Do not attempt to negotiate an incline that is covered with snow, ice, cut or wet grass,
leaves, or any other potentially hazardous material.
•Do not back down an incline.
•Try to keep your scooter moving when climbing an incline. If you do come to a stop, restart
and accelerate slowly and carefully, leaning forward.
•Do not try to descend or climb a slope whose gradient is greater than recommended.*

Monarch Zener Owner’s Manual v2. © Scooters Australia 2017. 6
WARNING: If, while you are driving down a slope, your scooter starts to move faster than you feel
is safe, release the throttle control lever and allow your scooter to come to a stop. When you feel
that you again have control of your scooter, push the throttle control lever and continue safely
down the remainder of the slope.
DRIVING DOWN A DECLINE
•Lower speed setting
•Whenever it is safely possible, drive forward down any ramp, low rise, or incline.
WARNING: We do not recommend that you drive your scooter in reverse down any incline,
ramp, curb, or low rise. Backing down any slope may create a very hazardous situation.
Motor Braking System
Your scooter is equipped with a system that uses the motor to aid in braking. This Motor Brake
system is designed to work when the key is in either the On position or the Off position. When the
key is in the On position, the freewheel is in the engaged position, and the scooter is under power,
the motor will help slow down the scooter as soon as you take your hand off of the throttle lever.
When the key switch is in the OFF position and the freewheel is in the disengaged position, the
motor brake system will keep you from pushing the scooter too fast. You may notice this when
pushing the scooter. The scooter will move freely until you reach a certain speed. You will then
encounter some resistance as the motor brake system is activated.
WARNING: When your scooter is in freewheel mode, the brake is released. The weight of the
scooter on a slope may cause you to lose control of the scooter. If you do not feel capable of
manually controlling your scooter down the slope, request assistance or do not attempt to use this
Procedure.
WARNING: Do not connect or allow anyone except an authorised dealer to connect any electrical
or mechanical device to your scooter. Unauthorised accessories will void the warranty and may
cause injury.
MEDICATION
Always check with your doctor to determine if any of the medications you are taking may affect
your judgement and/or your ability to operate your scooter. Also check with your doctor
concerning your physical ability to operate a scooter.
ROAD RULES
NOTE: Please remember that while on your scooter, you are a motorised pedestrian. You must
observe and obey all pedestrian rules and regulations for the locale in which you are riding.
Figure 1. *Maximum slope 8º
Figure 2.

Monarch Zener Owner’s Manual v2. © Scooters Australia 2017. 7
RULES FOR USE AND OTHER SAFETY CONSIDERATIONS
•Read completely and understand this owner’s manual before assembling, operating,
transporting, or disassembling your scooter.
•Always operate your scooter with thought, care, and safety.
•Do not attempt to use your scooter on an escalator. Always use a lift.
•Do not carry passengers under any circumstances.
•Do not get on or off your scooter unless the freewheel lever is engaged.
•Always make sure that the key switch is set to “Off” before getting on or off your scooter.
•Do not back your scooter down an incline or across an uneven surface.
•Do not turn your scooter suddenly at full speed.
•Always make sure the seat is locked forward before operating your scooter.
•Always come to a full stop before changing direction from forward to reverse or from reverse
to forward.
•Do not operate your scooter where you could not safely or legally walk.
•Do not climb ramps or curbs that exceed your scooter’s capacity.
•Always approach curbs and inclines straight on.
•Always turn on your scooter’s lights when operating near traffic, at night, and in any poorly lit
area.
•Always be aware of and careful near mechanical pinch points especially when assembling
and disassembling your scooter.
•Never sit on your scooter when it is being transported.
•Always fasten down your scooter securely with an approved tie-down system while
transporting your scooter.
•Never operate your vehicle if it is not functioning properly.
•Always use caution when driving on soft or uneven surfaces such as grass, gravel. Also use
caution on decks where there is no railing.
•Never drive on the roadway, except when you must cross the street.
•Always cross streets at intersections and use crossings or the most direct route, making sure
that your path is clear and that you are visible to motor traffic.
•Never drive your scooter up or down a step or curb that is higher than the ground clearance
on the specifications page.
•Never back up or down a step or curb.
•Never operate your scooter while you are under the influence of alcohol.
DAILY CHECKLIST
Make sure each day your check your tyre pressure, battery charge, and seat swivel mechanism to
ensure it is locked in position.

Monarch Zener Owner’s Manual v2. © Scooters Australia 2017. 8
3. ELECTROMAGNETIC INTERFERENCE / RFI
The rapid development of electronics, especially in the area of communications, has saturated our
environment with electromagnetic (radio) waves that are emitted by television transmitters, cellular
phones, citizen’s band radios (CBs), amateur radios (ham radios), wireless computer links,
microwave transmitters, paging transmitters, etc. These electromagnetic (EM) waves are invisible
and increase in strength the closer one gets to the source of transmission. When these energy
waves act upon electrical devices and cause them to malfunction or to function in an erratic or
uncontrolled manner, they are referred to as Electromagnetic Interference (EMI) or Radio
Frequency Interference (RFI).
EMI/RFI AND YOUR SCOOTER
All electrically powered vehicles, including scooters are susceptible to Electromagnetic
Interference/Radio Frequency Interference (EMI/RFI). This interference could result in abnormal,
unintended movement of your scooter.
WARNING: Unintended movement or brake release could cause an accident or injury.
The US FDA has determined that each make and model of scooter can resist EMI/RFI to a certain
level. The higher the level of resistance, the greater the degree of protection from EMI/RFI—
measured in volts per meter (V/m). The US FDA has also determined that current technology is
capable of providing 20 V/m of resistance to EMI/RFI, which would provide useful protection
against common sources of interference. This product has been tested and has passed at an
immunity level of 20 V/m.
EMI/RFI RECOMMENDATIONS
•Do not turn on or use hand-held personal electronic communication devices such as
cellular phones, walkie-talkies, and CB radios while your scooter is turned on.
•Be aware of any nearby transmitters (radio, television, microwave, etc.) on your intended
route and avoid operating your scooter close to any of those transmitters.
•Turn off the power if your scooter is going to be in a stationary position for any length of
time.
•Be aware that adding accessories or components or modifying your scooter may make it
more susceptible to EMI/RFI.
•If unintended movement or brake release occurs, turn your scooter off as soon as it is safe
to do so.
•Report all incidents of unintended movement or brake failure to your authorised dealer.
WARNING: Turn off your scooter as soon as it is safely possible if unintended or uncontrollable
motion occurs or if unintended brake release occurs.

Monarch Zener Owner’s Manual v2. © Scooters Australia 2017. 9
4. OPERATING YOUR SCOOTER
CONTROLS
Speed Adjustment Dial
•The speed adjustment dial allows you to preselect the maximum top speed of your scooter.
See Fig. 3.
•Turn the dial counterclockwise to operate your scooter at the lowest speed level.
•Turn the dial clockwise to increase the operational speed of your scooter.
•We recommend that you select a speed setting at which you feel comfortable, safe, and in
control of your scooter.
Key Switch
This switch turns the power on and off to your scooter. See Fig. 3.
•Insert the key into the key switch.
•Turn the key 90 degrees clockwise to turn on your scooter’s power.
•Turn the key back to the vertical position to turn off your scooter’s power.
NOTE: Always make certain that the key is removed from the key switch before getting on or off
your scooter or before lowering the tiller completely.
Power Indicator LED
When the power to your scooter is turned on, the Power Indicator LED (Light Emitting Diode) will
light up. See Fig 3. This LED is used for diagnosing operational problems that may arise. Please
see the Diagnostics section of this manual.
Horn Button
Press this button to sound the horn. See Fig 3.
Light Switch Button
This button operates your scooter’s lighting system. See Fig 3.
•Press the button once to turn on your scooter’s lights.
•Press the button a second time to turn off the lights.
NOTE: The lights on your scooter are for safety purposes only! They were designed for you to be
seen and not for driving at night.
Delta Tiller Throttle Control Lever
The Delta Tiller enables you to use only one hand (either the right or left) to operate both the
speed and the direction of the scooter. This self-centering lever system controls your scooter’s
speed (up to the maximum speed set by the speed adjustment dial) and its forward and reverse
direction. See Fig 3.
Figure 3. Dashboard
Battery Gauge
Ignition Key
Reverse Throttle
Horn Buttons
Lights Switch
Speed Adjustment Dial
Forward Throttle
On / Off LED

Monarch Zener Owner’s Manual v2. © Scooters Australia 2017. 10
To drive forward use either of the following:
•Use your right hand fingers to pull back on the right side of the throttle control lever.
•Use your left thumb to push the left side of the throttle control lever.
NOTE: Always bring your scooter to a full stop before changing direction from forward to reverse,
or from reverse to forward.
To drive in reverse use either of the following:
•Use your left hand fingers to pull back on the left side of the throttle control lever.
•Use your right thumb to push the right side of the throttle control lever.
When the throttle control lever is completely released, it automatically returns to the center “stop”
position and engages your scooter’s brakes, bringing you to a complete stop. You will hear a
“click” when the brake engages.
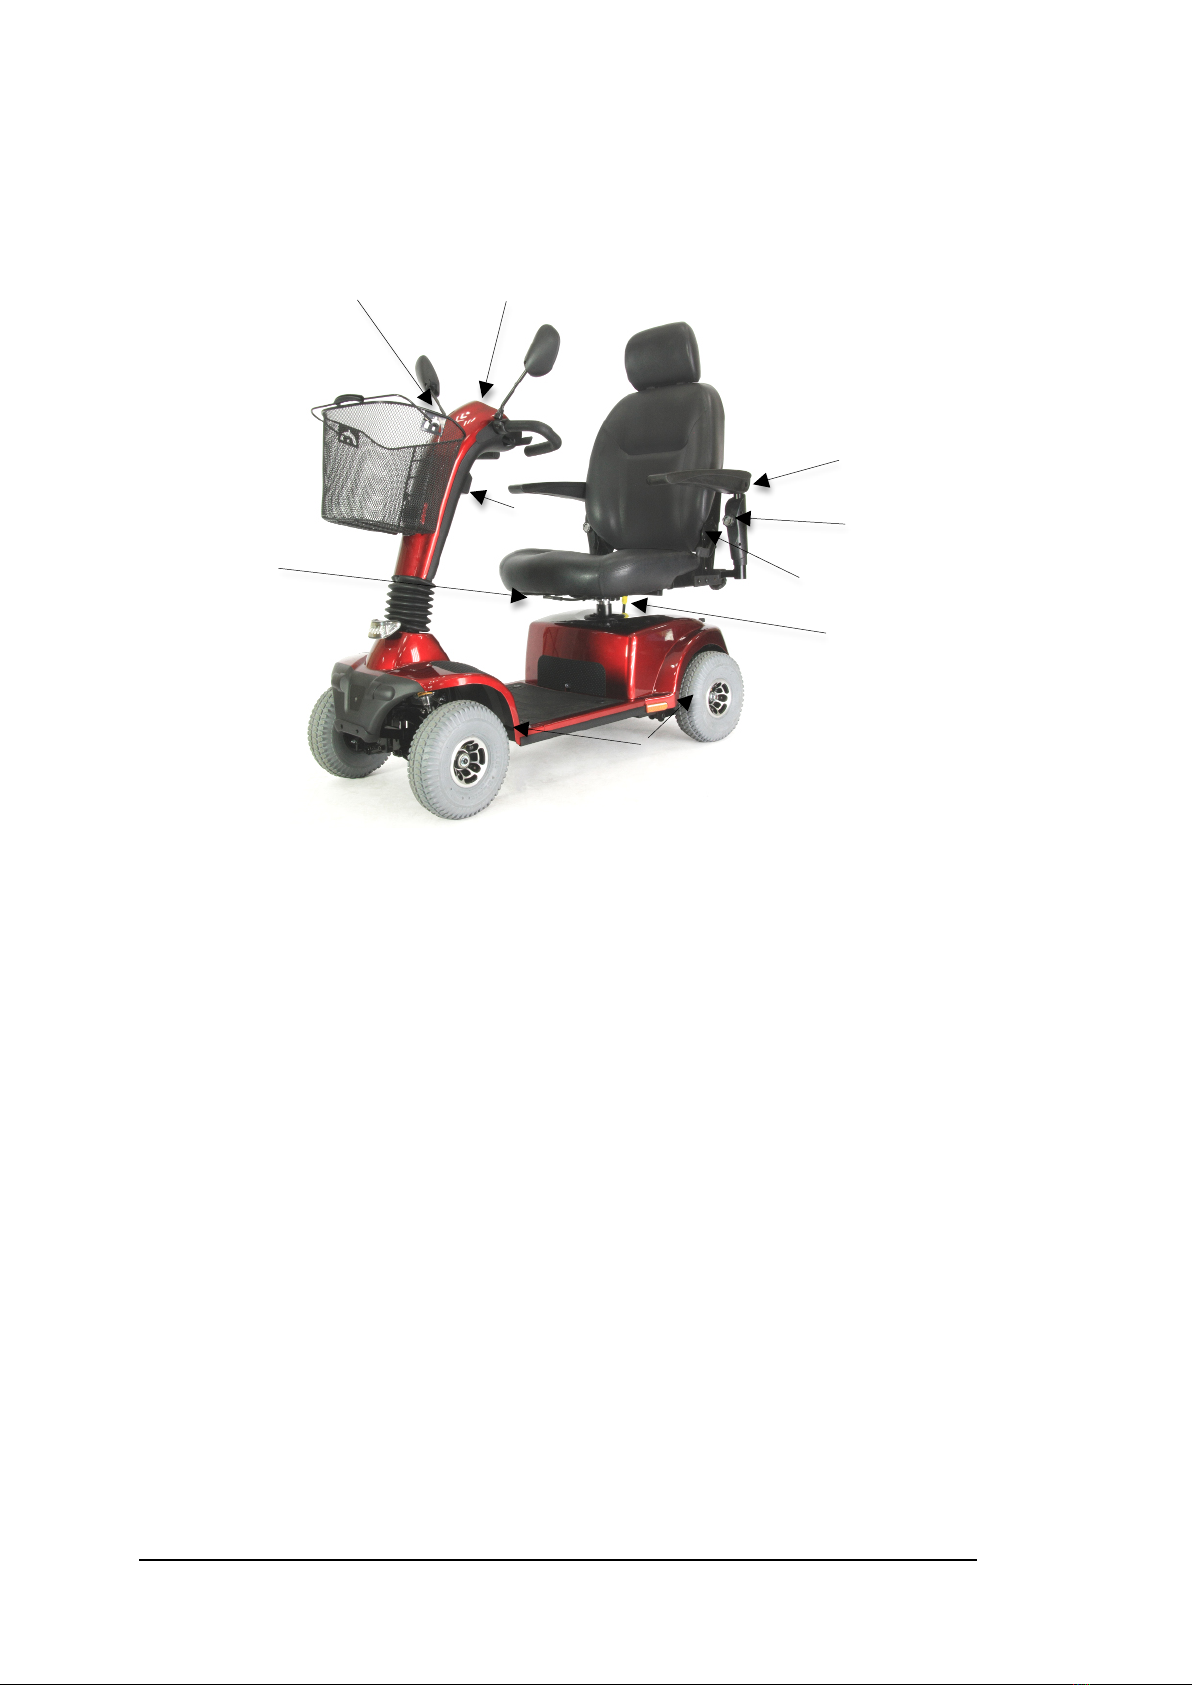
Battery gauge
This meter (see Fig. 3) shows the amount of voltage in your scooter’s batteries.
•Green indicates a full charge on the batteries.
•Yellow indicates caution and approximately a one-half charge of the batteries.
•Red indicates that the batteries have less than one-half of a charge remaining.
See section X. “Care and Maintenance” for instruction concerning charging the batteries.
NOTE: Your scooter will automatically turn itself off if the battery output falls to/or below 17.5v
Finger Tip Tiller Adjustment Lever
The Tiller on your scooter employs a pneumatic piston to provide you with infinite tiller angle
settings for your driving comfort.
•Use one hand to grasp a handgrip.
•Pull on the release lever and position the tiller at a comfortable and safe operating angle.
•Release the tiller adjustment lever. It will automatically lock the tiller at the selected angle.
CONTROL OPTIONS
Your authorised dealer can reverse the throttle control lever controls so that when you pull on the
left side of the lever, your scooter will move in the forward direction, and when you pull on the right
side of the lever your scooter will move in the reverse direction.
SEATING CONTROLS
Armrest Height Adjustment
1. Loosen “Armrest Height Adjustment Knob” until you can pull it outward. See Fig. 4. Note:
The knob is retained in its housing with a spring.
2. While keeping the knob pulled, raise or lower the armrest to the desired position then
release the knob. After releasing the knob, you may have to raise or lower the armrest
until it aligns with the nearest locking position.
3. Tighten the height adjustment knob.
Armrest Width Adjustment
To adjust the armrest width:
1. Loosen the adjustment knobs at the rear of the seat.
2. Slide the armrests in or out to the desired width. See Fig. 5.
3. Tighten the adjustment knobs.
Seat Height Adjustment
To adjust the seat height:
1. Remove the seat by raising the lever and lifting the seat straight up.
2. Set the seat aside.
3. Remove the bolt, nut, & washer that hold the seat post in the seat pedestal. See Fig 6.
4. Position the seat post at the desired height while aligning the holes in the seat post and the
seat pedestal.
5. Reinstall and tighten the nut, bolt, and washer. The bolt must be installed from the back of

Monarch Zener Owner’s Manual v2. © Scooters Australia 2017. 11
the pedestal, with the nut and washer to the front of the scooter.
6. Raise the lever when placing the seat back on the seat post.
Seat Rotation Lever
The seat can be rotated through 360° and locked at any 45° position.
1. Pull up on the seat rotation lever and rotate the seat to the desired position.
2. Release the handle to lock the seat at any 45° position.
Flip-up Armrests
Pull up on the end of either armrest to flip it up for easy transfer on & off your scooter. Fig 7.
Armrest Angle
To increase the armrest angle, turn the armrest angle screw (under armrest) clockwise. See Fig 4.
To decrease the armrest angle, turn the armrest angle screw counterclockwise.
Freewheel Mode
Your scooter is equipped with a freewheel lever (red or yellow) that can set your scooter in or out
of freewheel mode. The freewheel lever engages your park brake.
To disengage the brake and put your scooter in freewheel mode:
•Push the brake handle in the direction of “disengage” on the label. See Fig 9.
To engage the brake and take your scooter out of freewheel mode:
•Push the brake handle in the direction of “engage” on the label. See Fig 8.
Pushing the scooter too quickly in freewheel will cause the motor to act as a generator causing
the scooter to become difficult to push. Freewheel slowly.
Height
Adjustment
Figure 4.
Figure 5.
Figure 6.
Figure 7.
Figure 8.
Figure 9.
Angle
Adjustment

Monarch Zener Owner’s Manual v2. © Scooters Australia 2017. 12
WARNING: Do not sit in or attempt to move your scooter unless the frame and rear carriage are
securely engaged. Accidental separation of the frame from the rear carriage may occur and cause
injury or damage.
WARNING: Never set your scooter in freewheel mode when it is on an incline.
Never disengage the brake handle while you are operating your scooter.
Always make certain that your scooter brake is engaged before inserting the key into the key
switch.
WARNING: Never sit on your scooter while it is being transported in a vehicle.

Monarch Zener Owner’s Manual v2. © Scooters Australia 2017. 13
5. RIDING YOUR SCOOTER
GETTING ON YOUR SCOOTER
NOTE: For your first driving sessions, make certain that your scooter starts out on a level surface
and that you will continue driving on a level surface.
To get on your scooter:
1. Stand behind your scooter.
2. Make certain that the freewheel lever is in engaged position. See Fig. 8.
3. Pull up on the seat rotate lever.
•NOTE: This lever is normally located on the right-hand side of the seat, but your
scooter may be configured to have the lever positioned on either side of the seat.
•Once the lever is pulled up and held in the “up” position, the seat can be freely
rotated.
•Release the lever to lock the seat into one of the eight preset positions.
4. Make certain that the seat is positioned for safe and easy mounting.
5. Position yourself in the seat.
6. Use the seat rotate lever to position the seat so that it is locked in the fully forward
direction.
7. Fasten your lap belt, if your scooter is so equipped.
8. Place the key into the key switch.
9. Rotate the key to the on position.
BASIC DRIVING
1. Make certain that you are seated safely and properly on your scooter.
2. Turn the speed control dial fully counterclockwise to its slowest setting.
3. Insert the key into the key switch—if you have not already done so.
4. Turn the key clockwise to the “On” position.
5. Place your hands on the handgrips.
•If you wish to drive forward, pull back on the right side of the throttle control lever (or
push the left side of the throttle control lever forward.)
•If you wish to drive in reverse, pull back the left side of the throttle control lever (or push
the right side of the throttle control lever forward.)
6. Pull on the throttle control lever to gently accelerate your scooter.
7. Release the throttle control lever to allow your scooter to come gently to a full stop.
8. Practice these two basic functions until you feel that you have control of your scooter.
Steering
Steering your scooter is easy and logical.
1. With both hands on the handgrips of the tiller, turn the tiller to the right to travel to the right.
2. With both hands on the handgrips of the tiller, turn the tiller to the left to travel to the left.
3. Make certain to maintain sufficient clearance when turning your scooter so that the rear
wheels will clear any obstacle.
NOTE: Turning your scooter too sharply at too high a speed may create a situation where one of
the rear wheels will leave the ground and the possibility of tipping the scooter. Avoid this danger at
all times by decelerating and steering a wide arc around corners and obstacles.
Steering in a Tight Spot
If you must steer in a tight spot, such as entering a doorway or when turning around:
1. Bring your scooter to a full stop.
2. Set speed at the lowest setting.
3. Turn the tiller to the direction in which you wish to drive.
Steering in Reverse
Backing up your scooter requires attention to what you are doing:

Monarch Zener Owner’s Manual v2. © Scooters Australia 2017. 14
1. Use your right fingers to push the throttle control lever or use your left fingers to pull back
on the throttle control lever. See Fig. 3.
2. Turn the tiller to the left to drive in reverse to the left.
3. Turn the tiller to the right to drive in reverse to the right.
NOTE: Your scooter’s speed in reverse is fifty percent of the speed set at the speed control dial.
CONTROL THROUGH TIGHT SPOTS
As you use your scooter to greatly increase your mobility, you will undoubtedly encounter some
obstacles that will require practice to negotiate smoothly and safely. Below are some common
obstacles that you may meet during the daily use of your scooter. Listed with those obstacles are
some driving tips that should help you conquer those obstacles. Learn and follow those tips, and
with surprising ease you will soon be in control of your scooter as you maneuver it through doors,
up and down ramps, up and over curbs, through grass and gravel, and up and down inclines.
RAMPS AND CURBS
When proceeding up any ramp, curb, or incline always lean forward in your seat to move your
center of gravity forward for maximum stability and safety. If the ramp has a switchback, good
cornering ability is required.
•Manoeuvre your scooter so that the front wheels take wide swings around the corners of
the ramp.
•Doing this will allow your scooter’s back wheels to follow a wide arc around the corner,
staying clear of obstacles.
If you must stop your scooter while driving up a ramp:
•Starting up again simply requires that you apply gentle and steady forward power pressure
to the throttle control lever, while leaning forward.
•Accelerate gently after stopping on any incline.
Driving down a ramp:
Keep your scooter’s speed control dial set fully counterclockwise at the slowest
speed setting. If you must come to a stop, release the throttle control lever slowly and smoothly.
Curbs
See specifications for maximum curb height.
Always use caution when negotiating any curb.
•Go up or down a curb head on at a direct 90° angle.
•Approach and negotiate the curb so that both back wheels of your scooter go over the curb
at the same time.
•Never negotiate inclines or curbs by traversing them. Doing so may cause the scooter to tip
over.
•Go down a curb slowly to avoid a jarring bump. Use as little power as possible.
Grass and Gravel
Your scooter performs admirably on grass, gravel, and hills, but you must follow the operational
parameters presented in this manual. Refer to the “Safety” section. If you are unsure about any
situation, avoid it. Common sense is your best protection.

Monarch Zener Owner’s Manual v2. © Scooters Australia 2017. 15
6. TRANSPORTING YOUR SCOOTER
DISASSEMBLY
Removing the Seat
1. Remove the key.
2. Make sure that the scooter brake is engaged.
3. Loosen the adjustment knobs. Slide the arms off the scooter if you are not able to carry the
seat with the weight of the arm-rests attached. See Fig. 5.
4. Remove the seat by pulling up and holding the seat lever and lifting the seat straight up and
out of the seat post. See Fig. 10.
5. The seat can be folded for compact storing.
Removing the Rear Shroud
1. Undo two plastic screws and pull up on the sides of the shroud.
2. Lift the shroud up and off the scooter. See Fig. 11.
Removing the Batteries
1. After removing the shroud, loosen the Velcro ™ straps from around each battery. See Fig.
12.
2. Squeeze the locking ear on the connector and disconnect the batteries from the frame. See
Fig. 13.
3. Remove the batteries one at a time.
4. Lower the tiller, which will automatically lock into place once lowered.
5. Wrap the V straps around the Delta tiller to help secure it.
NOTE: The key must be removed from the key switch to fully lower the tiller. The tiller will only
lock when it is in the center position.
Figure 10.
Figure 11.
Figure 12.
Figure 13.

Monarch Zener Owner’s Manual v2. © Scooters Australia 2017. 16
Disconnecting the Front and Rear Frame
1. Pull up on the T handle next to the seat post. Pulling up on the T handle will separate the
front and rear section.
2. Your scooter is now fully disassembled. See Fig. 14.
ASSEMBLY
The scooter is easy to assemble. Make sure the key is out of the key switch before assembling
your scooter.
Connect the frame sections.
1. Position the front and rear sections of the frame as shown in Fig. 15 so that they align
properly.
2. Pull up on the T handle to lift the front section.
3. Once the frame hooks are properly aligned (See Fig. 16), push down on the seat post to
secure the frame together. You will hear and feel a positive “snap” sound to confirm that
the front and rear frames are connected.
4. Undo the Velcro straps from around the tiller and raise the tiller.
Battery Installation.
1. Install the batteries onto the scooter.
2. Reconnect the batteries. See Fig 13.
3. Wrap the hook and loop strap around the battery and the battery harness. See Fig. 17.
Figure 14. (with low back seat)
Figure 15.
Figure 16.
Figure 17.

Monarch Zener Owner’s Manual v2. © Scooters Australia 2017. 17
WARNING: Do not sit in or attempt to move your scooter unless the frame and rear carriage are
securely engaged. Accidental separation of the frame from the rear carriage may occur and cause
injury or damage.
REINSTALL THE SEAT.
1. Make certain that the seat post is mounted in the seat post pedestal and adjusted to the
desired height.
2. Raise and hold the seat swivel lever and then lift seat and position the seat swivel post into
the seat post. See Fig. 18.
3. Push down on the seat to make certain that the seat swivel post is fully inserted and locked.
See Fig. 19.
WARNING: Failing to assure proper installation of the seat could result in injury.
REINSTALL THE ARMRESTS.
1. Insert the right arm into the arm bracket.
2. Tighten the right arm bracket adjustment knob.
3. Insert the left arm into the arm bracket.
4. Tighten the left arm bracket adjustment knob.
Your scooter is now successfully assembled.
SEAT SWIVEL LEV
TRANSPORTING
To Transport Your scooter:
•Disassemble or fold down the seat and tiller (see section VII. “Disassembly”) as close as
possible to the loading area of the vehicle to be used for transporting your scooter.
oThe degree to which you disassemble your scooter or fold the seat and tiller
depends on the size and shape of the cargo area of the transporting vehicle.
•Do not lift your scooter by its plastic body parts or tiller. Breakage of these parts is not
covered by the warranty.
•Do not use the tyres or wheels to lift the rear carriage. The carriage may rotate and cause
injury or damage.
•Blankets or other forms of padding may be used to protect your scooter during
transportation.
WARNING: If your scooter and its components are not properly and securely stowed during
transportation, the scooter or the components may move or become airborne and cause injury or
damage.
WARNING: Never sit on your scooter when it is being transported. Always fasten down your
scooter securely with an approved tie-down system while transporting your scooter.
Figure 18.
Figure 19.

Monarch Zener Owner’s Manual v2. © Scooters Australia 2017. 18
7. CARE AND MAINTENANCE
ROUTINE MAINTENANCE EVERY TWELVE MONTHS
To protect your scooter and ensure that it remains in a safe and reliable condition, we strongly
advise you to have your scooter serviced every 12 months by an authorised dealer. This also
protects your warranty. Services can be arranged by contacting your nearest dealer and
organising either a home service or a service in the workshop. Fees may apply for additional time
taken if you organise a home service.
CLEANING YOUR SCOOTER
Tyres: Clean the tyres with ordinary kitchen-type cleaners and a damp cloth. Do not use solvents
on the tyres. Solvents can cause the tyre material to break down or become too soft.
Body: The body (rear shroud, tiller shroud, deck shroud) of your scooter is formed ABS plastic
and coated with a durable automotive-type finish. Use cool water mixed with a mild soap to
remove dirt and oils. Use a nonabrasive car wax on the ABS body parts. Buff by hand with a soft
cloth. Mr Sheen or similar is a good product to use.
Seats: Clean with a mild soap or mild detergent and a damp cloth. A vinyl cleaner may also be
used.
Floor mat:Wipe over the floor mate with a damp cloth.
BATTERIES AND CHARGING
Battery maintenance is the most important part of maintaining your scooter. Keeping the
batteries fully charged helps to extend battery life. Use the following guidelines to help keep
your batteries in optimum condition. Batteries need about 20 cycles to reach their maximum
potential.
•For daily use, keep batteries fully charged. We recommend that you plug in the off-board
charger at the end of each day the scooter is used and charge overnight for at least 8
hours.
•If you are not going to use the scooter for more than a week, fully charge the batteries and
then disconnect them from the scooter. See Fig. 13.
To Charge the Batteries:
The charger for is an off-board type of charger. To charge the batteries:
1. Plug the charger into the charger port on the tiller. See Fig 20.
2. Plug the charger into the power point
3. Turn the power point on
4. Turn the Charger on and leave on until at least 1 hour after the green light has come on.
NOTE: Do not turn the charger off and leave it plugged into the scooter
Battery Maintenance
Your batteries are a sealed type and cannot leak (see Fig. 21). They are capable of about 300
discharge cycles. If you discharge them less than fully, they will achieve a higher number of
cycles. They are maintenance free.
Figure 20.
Figure 21.

Monarch Zener Owner’s Manual v2. © Scooters Australia 2017. 19
When the batteries need replacing (the scooter will not have as big a range as when new), phone
your local authorised dealer who will be able to supply and fit new batteries either in your home or
at the workshop. These batteries are matched to your charger.
Do not settle for inferior batteries that do not fit the specifications of both the scooter and the
charger as you risk poor scooter performance and low battery life.
TROUBLESHOOTING
IF YOUR SCOOTER DOES NOT OPERATE:
•Make certain that the freewheel lever is set to the engaged position. See page 11.
•Check the main circuit breaker. If necessary, reset the circuit breaker.
•Make certain that the speed adjustment dial is at the desired setting.
•Make certain that the key switch is set to the “On” position.
•Make sure the scooter is properly charged –including making sure the power point is
switched on during charging.
If none of the above procedures solve the problem, contact your authorised dealer.
WARNING: Do not attempt electrical repairs. Consult your authorised dealer.
Main Circuit Breaker Tripping
The 50-amp main circuit breaker reset button is located under the seat on the front of the rear
shroud panel. See Fig. 22.
If, for no apparent reason, your scooter stops operating, the main circuit breaker may have
tripped.
Possible causes for the main circuit breaker to trip:
•If your scooter is equipped with pneumatic tyres, low tyre pressure can cause the motor to
overload and trip the main circuit breaker.
•Driving up a long, steep hill.
•Driving over a curb.
•Run-down batteries.
As you operate your scooter, battery voltages go down and battery current must rise to satisfy the
demands of the motor and of other electrical devices operating on your scooter. This can cause a
heavy current draw that may trip the main circuit breaker.
Remedy: Recharge your scooter’s batteries. See “Charger and Batteries” in this section of this
manual.
1. If the problem continues, have your authorised dealer load test the batteries.
2. If the batteries are good, the charger may be the problem. Consult your authorised dealer.
Figure 22.

Monarch Zener Owner’s Manual v2. © Scooters Australia 2017. 20
Resetting the Main Circuit Breaker
•If the main circuit breaker trips as a result of run-down batteries or because of a temporary
overload, reset the circuit breaker:
•Wait ten minutes or so for the motor control board to return to the normal operating
temperature range.
•Make certain that the key switch is set to the “Off” position.
•Press in on the main circuit breaker reset button. See Fig. 22.
NOTE: If the main circuit breaker continues to trip, there is probably an underlying electrical fault
that needs attention. Contact your authorised dealer.
WARNING: Do not keep resetting the main circuit breaker without correcting the underlying
electrical problem.
DIAGNOSTICS
The diagnostics feature of your scooter’s microprocessor based motor control board functions as
follows:
•Any fault condition on the controller or on an associated system will cause the Power
Indicator LED to flash and a beep to sound.
•The flashing of the LED occurs as one flash / beep or as a series of flashes / beeps
separated by a two second pause.
•The number of flashes / beeps in each series is referred to as the “Flash Code.”
•The flash code indicates the nature of the condition or fault –see below
The Flash and Beep Codes
1 Flash:
Indicates that the battery voltage (with the throttle control lever in the neutral position) is
below 19 volts. The batteries need to be charged. Your scooter will continue to operate at
reduced speeds until the voltage falls to 17.5 volts. As the voltage drops you will experience
a power loss.
Remedy: Charge your scooter’s batteries. See “Batteries and Charging” in this section.
2 Flashes:
Indicates that the battery voltage has dropped to 17.5 volts. At this voltage your scooter will
cease operation. If you have charged the batteries and the condition continues, one or both
of the scooter’s batteries may be at fault. The continuance of this condition after you have
charged your scooter’s batteries may also indicate a problem with the battery charger.
3 Flashes
Consult your authorised dealer.
4 Flashes
Indicates that the motor control board is overloaded and overheated. An overload can occur
if you have been driving your scooter for an extended period of time up an incline that is
steeper than the recommended grade (see “Specifications” on page 22). An overload can
occur if your scooter is carrying a payload that is higher then the recommended weight
capacity. See “Specifications” on page 22 for your scooter’s weight capacity. If your scooter
is equipped with pneumatic tyres and they are underinflated, an overload can also occur.
Underinflated tyres cause the motor to draw large amounts of current. This high draw
overheats the motor control board. Your scooter will not operate until the motor control
board cools back to its operational temperature range.
Remedy: Turn off your scooter’s key switch and allow the scooter to sit for 10 minutes.
Have your authorised dealer perform a battery load test.
5 Flashes
Indicates a brake problem. The freewheel lever may be in the disengaged position. See
page 11. The brake or the brake wiring may be damaged. For safety reason, your scooter
Table of contents
Other Monarch Scooter manuals