MSI KT6-V User manual

i
KT6V
Version1.1
G52-M7021X5
MS-7021 (v1.X)ATXMainboard

ii
ManualRev:1.1
ReleaseDate:January2004
FCC-BRadioFrequencyInterference Statement
Thisequipmenthasbeentestedand found tocomplywiththelimitsforaclass
Bdigitaldevice,pursuanttopart15 oftheFCC rules.Theselimitsaredesigned
toprovidereasonableprotection againstharmfulinterference whentheequip-
mentisoperatedinacommercialenvironment.Thisequipmentgenerates,uses
and canradiateradiofrequencyenergyand,ifnotinstalledand usedinaccor-
dance withtheinstruction manual,maycauseharmfulinterference toradio
communications.Operation ofthisequipmentinaresidentialarea islikelyto
causeharmfulinterference,inwhichcasetheuserwill berequiredtocorrect
theinterference athisownexpense.
Notice1
Thechangesormodificationsnotexpresslyapprovedby thepartyrespon-
sibleforcompliance couldvoidtheuser’sauthoritytooperatetheequipment.
Notice2
Shieldedinterfacecablesand A.C.powercord,ifany,mustbeusedinorderto
complywiththeemission limits.
VOIRLANOTICED’INSTALLATIONAVANTDERACCORDERAU
RESEAU.
Micro-StarInternationalMS-7021
Testedtocomply
withFCCStandard
ForHomeorOfficeUse

iii
CopyrightNotice
ThematerialinthisdocumentistheintellectualpropertyofMICRO-STAR
INTERNATIONAL.We takeeverycareinthepreparation ofthisdocument,
butno guarantee isgivenastothecorrectness ofitscontents.Ourproducts
areundercontinualimprovementand wereservetherighttomakechanges
withoutnotice.
Trademarks
All trademarksarethepropertiesoftheirrespectiveowners.
AMD,Athlon™ ,Athlon™ XP,Thoroughbred™ ,and Duron™ areregistered
trademarksofAMDCorporation.
PS/2and OS®/2areregisteredtrademarksofInternationalBusiness Machines
Corporation.
Windows®95/98/2000/NT/XPareregisteredtrademarksofMicrosoft
Corporation.
Netware®isaregisteredtrademarkofNovell,Inc.
Award®isaregisteredtrademarkofPhoenixTechnologiesLtd.
AMI®isaregisteredtrademarkofAmericanMegatrendsInc.
RevisionHistory
RevisionRevisionHistoryDate
V1.1Add QuickInstallationGuideJanuary2004
TechnicalSupport
If aproblemariseswithyoursystemand no solution canbeobtainedfromthe
user’smanual,pleasecontactyourplace ofpurchaseorlocaldistributor.
Alternatively,pleasetrythefollowing helpresourcesforfurtherguidance.
Visit theMSIwebsiteforFAQ,technicalguide,BIOSupdates,driver
updates,andotherinformation:http://www.msi.com.tw/
Contactourtechnicalstaffat: support@msi.com.tw

iv
1.Alwaysreadthesafetyinstructionscarefully.
2.KeepthisUser’sManualforfuturereference.
3.Keepthisequipmentawayfromhumidity.
4.Laythisequipmenton areliableflatsurface beforesetting it up.
5.Theopeningson theenclosureareforairconvection hence protectsthe
equipmentfromoverheating.DONOTCOVERTHEOPENINGS.
6.Makesurethevoltageofthepowersource and adjustproperly110/220V
beforeconnecting theequipmenttothepowerinlet.
7.Place thepowercordsuchawaythatpeoplecannotstepon it.Donot
place anything overthepowercord.
8.AlwaysUnplug thePowerCordbeforeinsertinganyadd-oncardormodule.
9.All cautionsand warningson theequipmentshouldbenoted.
10.Neverpouranyliquidintotheopening thatcoulddamageorcauseelectri-
calshock.
11.If any ofthefollowing situationsarises,gettheequipmentcheckedby a
service personnel:
lThepowercordorplug isdamaged.
lLiquidhaspenetratedintotheequipment.
lTheequipmenthasbeenexposedtomoisture.
lTheequipmenthasnotworkwell oryou cannotgetit workaccording
toUser’sManual.
lTheequipmenthasdroppedand damaged.
lTheequipmenthasobvioussign ofbreakage.
12.DO NOTLEAVETHISEQUIPMENTINAN ENVIRONMENT
UNCONDITIONED,STORAGETEMPERATUREABOVE600C(1400F),IT
MAYDAMAGETHEEQUIPMENT.
SafetyInstructions
CAUTION:Dangerofexplosion ifbatteryisincorrectlyreplaced.
Replace onlywiththesameorequivalenttyperecommendedby the
manufacturer.

v
CONTENTS
FCC-BRadioFrequencyInterference Statement........................................ ii
CopyrightNotice ......................................................................................iii
Revision History......................................................................................iii
TechnicalSupport.....................................................................................iii
SafetyInstructions.................................................................................. iv
Chapter1.GettingStarted.................................................................... 1-1
MainboardSpecifications.................................................................1-2
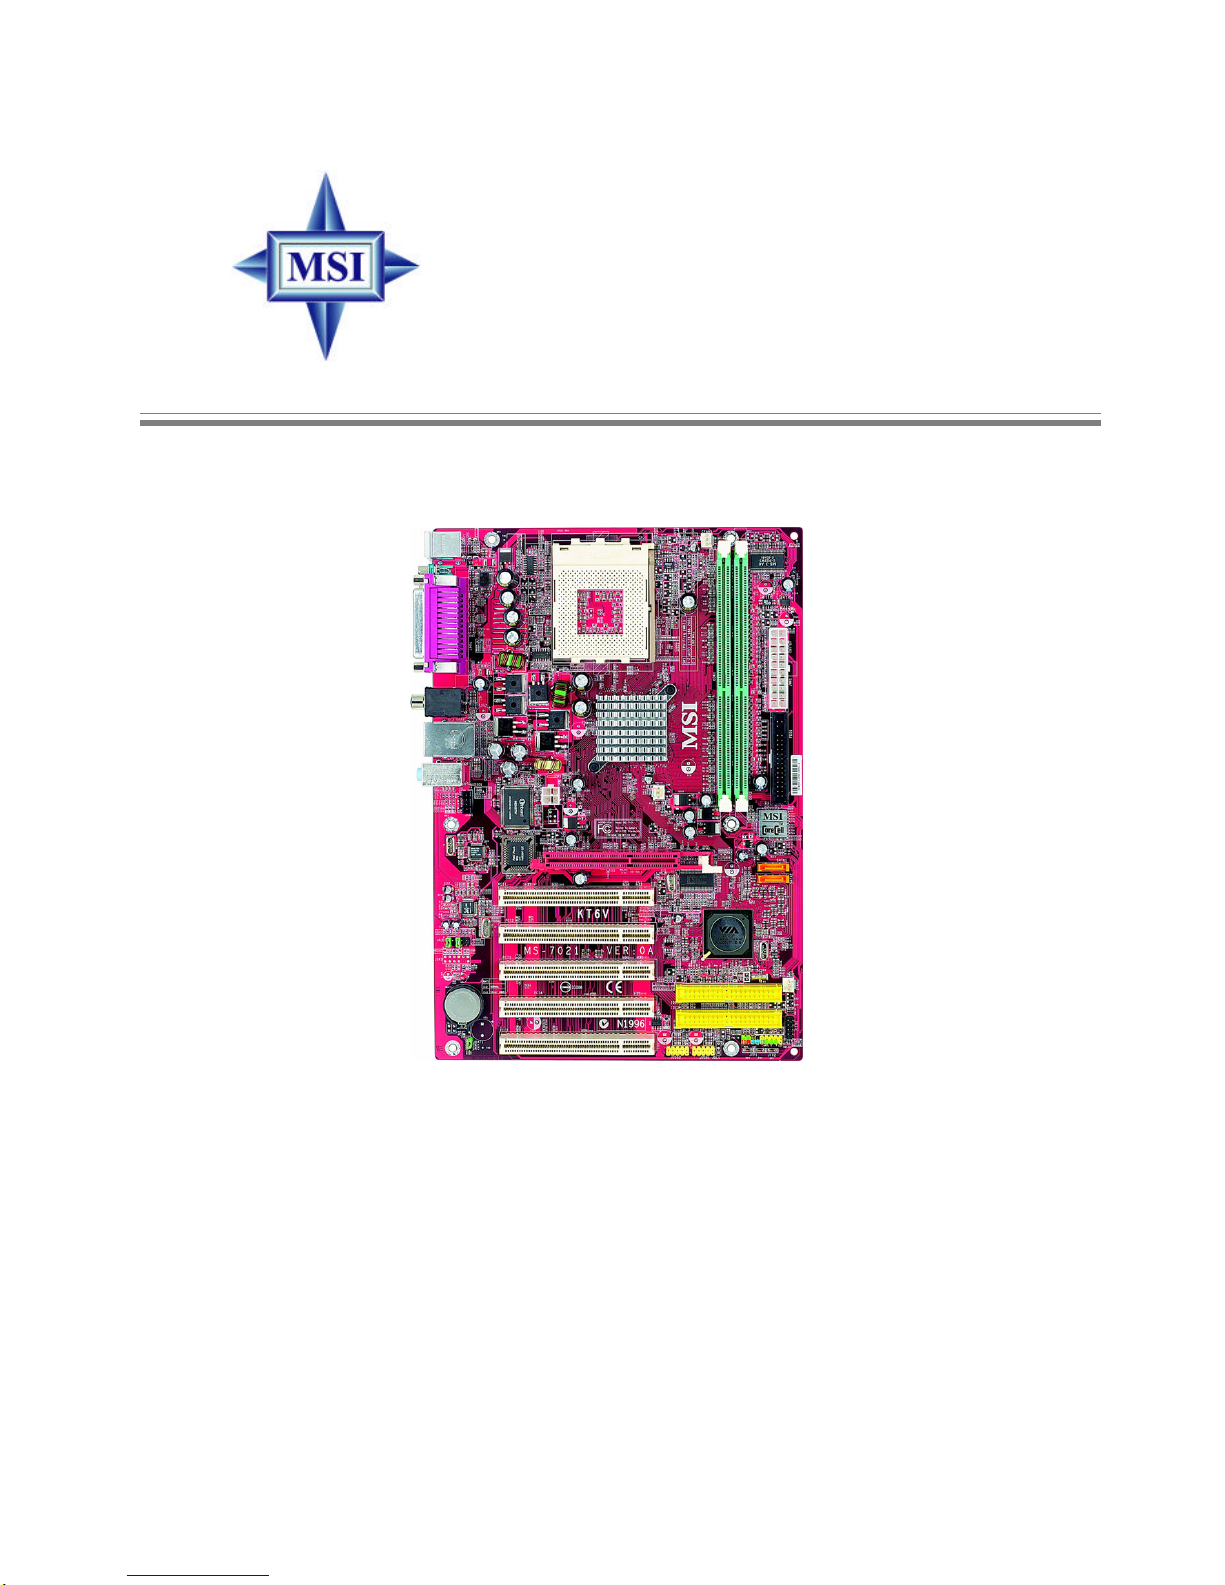
MainboardLayout...........................................................................1-4
MSISpecialFeatures........................................................................1-5
ColorManagement....................................................................1-5
D-Bracket™2(Optional)............................................................1-6
CoreCenter...............................................................................1-8
CoreCell™Chip...................................................................... 1-10
LiveBIOS™/LiveDriver™....................................................... 1-11
LiveMonitor™........................................................................ 1-12
Round Cable(Optional)........................................................... 1-13
CPUThermalProtection ........................................................... 1-13
Chapter2.HardwareSetup ................................................................... 2-1
CPUClockFrequencySelection through BIOS..................................2-2
MemorySpeed/CPUFSBSupportMatrix..........................................2-2
DIMM ModuleCombination ............................................................2-2
Installing DDRModules...................................................................2-3
BackPanel&PowerSupply..............................................................2-4
Connectors,Jumpersand Slots.........................................................2-5
Chapter3.BIOSSetup.......................................................................... 3-1
TheMainMenu ...............................................................................3-2
StandardCMOSFeatures.................................................................3-4
Frequency/VoltageControl...............................................................3-5

vi
SetSupervisor/UserPassword..........................................................3-8
LoadHigh Performance/BIOSSetup Defaults....................................3-9
AppendixA:Using4-or6-ChannelAudioFunction.............................. A-1
AppendixB:VIAVT8237SerialATARAIDIntroduction..................... B-1

1-1
GettingStarted
Thank you forpurchasing KT6V(MS-7021 v1.X)ATX
mainboard.TheKT6VmainboardisbasedonVIA®KT600North
Bridge&VT8237 SouthBridgechipsetforoptimalsystem
efficiency.Designedtofit theadvancedAMD®Athlon™ ,
Athlon™ XPorDuron™ processors,theKT6Vmainboardde-
liversahigh performance and professionaldesktop platform
solution.
GettingStarted

1-2
MS-7021 ATXMainboard
MainboardSpecifications
CPU
†SupportsSocketA(Socket-462)forAMD®Athlon™ /Athlon™ XP/Duron™
processors
†SupportsAthlon XP1500+to3200+orhigherspeed
Chipset
†VIA®KT600 NorthBridge
-Supports200/266/333/400MHzfrontsidebus
-SupportsDDR200/266/333/400
-SupportsAGP8Xand PCIadvancedhigh performancememorycontroller
†VIA®VT8237 SouthBridge
-SupportsdualchannelnativeSATAcontrollerup to150MB/swithRaid0
&Raid1
-IntegratedHardwareSound Blaster/DirectSound AC’97 audio
-UltraDMA66/100/133mastermodePCIEIDEcontroller
-SupportsUSB2.0up to8ports
MainMemory
†Supportstwo184-pinDDRDIMMs
†Supportsup to2GBDDR200/266/333/400 SDRAMs
†Supports2.5vDDRSDRAM
Slots
†OneAGP(AcceleratedGraphicsPort)1.5Vslot
†Five32-bit PCIbusslots(support3.3v/5v PCIbusinterface)
On-BoardIDE
†AnIDEcontrolleron theVT8237 chipsetprovidesIDEHDD/CD-ROMwith
PIO,BusMasterand UltraDMA66/100/133 operation modes
†SerialATA150 controllerintegratedbyVT8237
-Upto150MB/stransferrate
-Canconnectup totwoserialATAdevices
On-BoardPeripherals
†On-BoardPeripheralsinclude:
-1floppy portsupports2FDDswith360K,720K,1.2M,1.44Mand
2.88Mbytes

1-3
GettingStarted
-1serialport
-1parallelportsupportsSPP/EPP/ECPmode
-3audioportsinvertical
-1RCASPDIF-Out
-1D-Bracket2pinheader
-1RJ-45LANJack
Audio
†AC’97linkcontrollerintegratedinVIA8237
†5.1ChannelaudiosupportedbyRealtekALC655 codec
-CompliancewithAC’97 v2.2spec.
-MeetPC2001audioperformancerequirement
BIOS
†ThemainboardBIOSprovides“Plug &Play” BIOSwhichdetectsthepe-
ripheraldevicesand expansion cardsoftheboardautomatically.
†ThemainboardprovidesaDesktop ManagementInterface (DMI) function
whichrecordsyourmainboardspecifications.
Dimension
†ATXFormFactor:29.5cm(L)x20.5cm(W)
Mounting
†6mounting holes
Others
†Suspend toRAM/Disk(S3/S4)
†PC2001compliant

1-4
MS-7021 ATXMainboard
MainboardLayout
KT6V(MS-7021 v1.X)ATXMainboard
BATT
+
DDR1
DDR2
ATX
PowerSupply
JUSB2
JUSB1
JAUD1
JCD1
SOCKET 462
PCI Slot 5
PCI Slot 4
PCI Slot 3
PCI Slot 2
PCI Slot 1
IDE 2
IDE 1
JBAT1
J6
JLED1
JFP1 JFP2
SATA2
SATA1
Top: LAN jack
Bottom: USB ports
Top : Parallel Port
Bottom:
COM A
Top : mouse
Bottom: keyboard
NBFAN1
JPW1
CFAN1
SFAN1
Winbond
W83697HF
Codec
Realtek
8201BL
T:Line-In
M:
B:Mic
Line-Out
FDD1
AGP Slot
Top: Coaxial SPDIF Out
Bottom: USB ports
VIA
VT8237
VIA
KT600

1-5
GettingStarted
MSISpecialFeatures
ColorManagement
MSIhasaunifiedcolormanagementruleforsomeconnectorson the
mainboards,whichhelpsyou toinstall thememorymodules,expansion cards
and otherperipheralsdevicesmoreeasilyand conveniently.
†Intelspec IDEATA133 connector:yellow
†SerialATA150 connector:orange
†AGP8Xslot: red
†USB2.0connector:yellow
†FrontpanelconnectorJFP1:HDD LEDinred,ResetSwitchinblue,
PowerSwitchinblack,PowerLEDinlightgreen.
†FrontpanelconnectorJFP2:PowerLEDinlightgreen.
FrontPanelConnectorJFP2
USB2.0Connectors
AGPSlot
IntelSpecIDEATA133 Connectors
FrontPanelConnectorJFP1
SerialATAConnectors

1-6
MS-7021 ATXMainboard
D-Bracket2Description
SystemPowerON
-TheD-LEDwill hanghereiftheprocessorisdam-
agedornotinstalledproperly.
EarlyChipsetInitialization
MemoryDetectionTest
-Testingonboardmemorysize. TheD-LEDwill hang
ifthememorymoduleisdamagedornotinstalled
properly.
DecompressingBIOSimagetoRAMforfastbooting.
12
34
InitializingKeyboardController.
TestingVGABIOS
-Thiswill startwritingVGAsign-onmessagetothe
screen.
D-Bracket™2(Optional)
D-Bracket™2isanexternalUSBbracketintegrating fourDiagnostic
LEDs,whichusegraphicsignaldisplaytohelpusersunderstand theirsystem.
TheLEDsprovideup to16 combinationsofsignalstodebug thesystem.The
4LEDscandebug all problemsthatfail thesystem,suchasVGA,RAMor
otherfailures.Thisspecialfeatureisveryusefulfortheoverclocking users.
Theseuserscanusethefeaturetodetectifthereareany problemsorfailures.
D-Bracket™2supportsbothUSB1.1&2.0spec.
D-Bracket™2
12
34

1-7
GettingStarted
RedGreen
D-Bracket2Description
ProcessorInitialization
-Thiswill showinformationregardingtheprocessor
(likebrandname, systembus, etc...)
TestingRTC(RealTimeClock)
InitializingVideo Interface
-Thiswill startdetectingCPUclock, checkingtypeof
video onboard. Then, detectandinitializethevideo
adapter.
BIOSSignOn
-Thiswill startshowinginformationaboutlogo, pro-
cessorbrandname, etc...
TestingBaseandExtendedMemory
-Tetingbasememoryfrom240Kto640Kandex-
tendedmemoryabove1MBusingvariouspatterns.
AssignResourcestoall ISA.
InitializingHardDriveController
-Thiswill initializeIDEdriveandcontroller.
InitializingFloppyDriveController
-Thiswill initializeFloppyDriveandcontroller.
BootAttempt
-Thiwill setlowstackandbootviaINT19h.
OperatingSystemBooting
12
34

1-8
MS-7021 ATXMainboard
CoreCenter
CoreCenter(TM)-containsOCMenu panel,whereinuserscandetermine
theirprocessorand memorytypetooptimize itsmemorycapacity.Thisall-in-
onehardwareconsoleisadvancedcombination ofthepopularPCAlertand
FuzzyLogic.Including powerfulfunction withhardwaremonitor,systemalert
and instinctiveUIofoverclocking,CoreCenterisjustlikeyourPCdoctorthat
candetect,viewand adjustthePChardwareand systemstatusduring realtime
operation.
Intheleftsideit showsthecurrentsystemstatusincluding theVcore,
3.3V,+5Vand 12V.Intherightsideit showsthecurrentPChardwarestatus
suchastheCPU&systemtemperaturesand all fansspeeds.
Whenyou clicktheredtrianglesintheleftand rightsides,twosub-
menuswill openforuserstooverclock,overspec ortoadjustthethresholdsof
systemtosend outthewarning messages.If you clicktheCoreCenterbutton
inthetop,ascreenpopsup foryou tochoosethe“Automode”or“User
mode”ofCPUfan.

1-9
GettingStarted
Left-wing:Currentsystemstatus
Intheleftsub-menu,you canconfigurethesettingsofFSB,Vcore,
MemoryVoltageandAGPVoltagebyclicking theradiobutton infrontofeach
itemand makeit available(theradiobutton will belightedasyellowwhen
selected),usethe“+”and “-”buttonstoadjust,thenclick“OK”toapplythe
changes.Thenyou canclickSave tosavethedesiredFSByou justconfigured.
Alsoyou mayclickAutotostarttesting themaximalCPUoverclocking
value,TheCPUFSBwill automaticallyincreasethetesting valueuntil thePC
reboots.Oryou mayclickDefault torestorethedefault values.
Right-wing:PChardwarestatusduringrealtimeoperation
Intherightsub-menu,hereyou canconfigurethePChardwarestatus
suchasCPU&systemtemperaturesand fanspeeds.You mayusethescroll
barstoadjusteachitem,thenclick“OK”toapplythechanges.Thevaluesyou
setforthetemperaturesarethemaximumthresholdsforthesystemforwarnings,
and thevalueforfanspeedsaretheminimumthresholds.
Top-side:Usermode/Automode
Hereyou mayadjusttheCPUfanspeed.If you chooseUsermode,you
mayadjusttheCPUfanspeedin8differentmodes,fromLowSpeedtoHigh
Speed.

1-10
MS-7021 ATXMainboard
BuzzFree
-- Diagnosescurrentsystem
utilization &temperature.
-- ControlsCPUfan.
-- Cutsup to50%ofsys-
temnoise.
LifePro
-- Prolongsmotherboard,CPUand fanlife.
-- Maintainsmotherboard&CPUinconstanttemperature.
-- Preventscomponentsfromoperating beyond specifications.
PowerPro
-- Savesup to65%power.
-- Assuresmotherboard
stability.
-- EmpowersO.CCapability.
Speedster
-- AdvancedO.C.design.
-- SuperiorO.C.capability.
-- GreaterO.C.method.
FeaturesofCoreCell™
Core CellTMChip
Bydiagnosing thecurrentsystemutilization,the
CoreCell™Chipautomaticallytunesyourmotherboardtothe
optimalstate,leadingtolessnoise,longerduration,morepower-
saving and higherperformance.

1-11
GettingStarted
LiveBIOS™/LiveDriver™
TheLiveBIOS™/LiveDriver™isatoolusedtode-
tectand updateyourBIOS/driversonlinesothatyou don’t
needtosearchforthecorrectBIOS/driverversion through-
outthewholeWebsite.Tousethefunction,you needto
install the“MSILiveUpdate3” application.Afterthe
installation,the“MSILiveUpdate3” icon (asshownon
theright)will appearon thescreen.
Doubleclickthe“MSILiveUpdate3”icon,and thefollowing screenwill
appear:
Sixbuttonsareplacedon theleftcolumnofthescreen.Clickthedesired
button tostarttheupdateprocess.
öLiveBIOS–UpdatestheBIOSonline.
öLiveDriver –Updatesthedriversonline.
öLiveVGABIOS–UpdatestheVGA BIOSonline.
öLiveVGADriver –UpdatestheVGA driveronline.
öLiveOSD–UpdatesthefirmwareoftheOSDproductsonline.
öLiveUtility–Updatestheutilitiesonline.
If theproductyou purchaseddoesnotsupportany ofthefunctionslisted
above,a“sorry” messageisdisplayed.Formoreinformation on theupdate
instructions,insertthecompanion CDand refertothe“LiveUpdateGuide”
underthe“Manual”Tab.

1-12
MS-7021 ATXMainboard
LiveMonitor™
TheLiveMonitor™isatoolusedtoschedulethesearch
forthelatestBIOS/driversversion on theMSIWebsite.Touse
thefunction,you needtoinstall the“MSILiveUpdate3”
application.Afterinstallation,the“MSILiveMonitor”icon (as
shownon theright)will appearon thescreen.Doubleclickthis
icon torun theapplication.
Doubleclickthe“MSILiveMonitor”icon atthelower-rightcorner
ofthetaskbar,and thefollowing dialog box will appear.You canspecifyhow
oftenthesystemwill automaticallysearchfortheBIOS/driversversion,or
changetheLAN settingsrightfromthedialog box.
You canright-clicktheMSILiveMonitoricon toperformthefunctions
listedbelow:
lAutoSearch–SearchesfortheBIOS/driversversion you needimmediately.
lViewLastResult–Allowsyou toviewthelastsearchresult ifthereisany.
lPreference –ConfigurestheSearchfunction,including theSearchschedule.
lExit–ExitstheLiveMonitor™application.
lFAQ–Providesalink toadatabasewhichcontainsvariouspossiblequestions
aboutMSI'sproductsforuserstoinquire.

1-13
GettingStarted
RoundCable(Optional)
Round cableisanenhancedcableforPCIIDEand UltraDMAcontroller.
Ithasthefollowing benefits:
†Datatransferratestartedby133MB/s
†Backwardcompatibility(ATA33/66/100/133)
†HigherperformancethantraditionalFlatcable(datarate)
†Improveddatarobustness
†BetterairflowduetothinnerATA/133 cable
CPUThermalProtection
AimedtopreventtheCPUfromoverheating,MSIhasdevelopedaCPU
ThermalProtection mechanismforAMD®CPUplatform.ThisCPUThermal
Protection mechanismworkson athermalsignalsensor.If themechanism
sensesanabnormaltemperaturerise,itwill automaticallyshutdownthesystem
and theCPUtemperaturewill thendrop downand resumenormal.Withthis
uniquefeature,userscanbetterprotecttheirCPU.Pleasenotethatthisfeature
isforAMD®CPUonly.
Connectone end tothe
floopydisk drive
connector(FDD1)and
the otherend tothe
standardflooydisk.
Connecttothe system
connectorson the mainboard.
Connecttothe slavedrive.
Connecttothe masterdrive.

2-1
HardwareSetup
Chapter2.Hardware
Setup
Thischaptertellsyou howtosetup theconnectorsand
jumperson themainboard.Also,it providestheinstructionson
connecting theperipheraldevices,suchasthemouse,keyboard,
etc.
Whiledoingtheinstallation,becarefulinholdingthecom-
ponentsand followtheinstallation procedures.
HardwareSetup
This manual suits for next models
1
Table of contents
Other MSI Motherboard manuals

MSI
MSI Z170A KRAIT GAMING User manual

MSI
MSI Z370 PC PRO User manual

MSI
MSI B75A-G43 series User manual

MSI
MSI 915GMB-F User manual

MSI
MSI B450M-A PRO MAX User manual

MSI
MSI Z590 PRO Wi-Fi User manual

MSI
MSI K9A2 Platinum series User manual

MSI
MSI Z87 MPOWER MAX User manual

MSI
MSI P67A-GD80 series User manual

MSI
MSI MS-6532 User manual

MSI
MSI Z170A KRAIT GAMING User manual

MSI
MSI ATX BX13 User manual

MSI
MSI K7T266Pro2-A User manual

MSI
MSI H110M PRO-VD User manual

MSI
MSI B760 GAMING PLUS WIFI User manual

MSI
MSI K8N Diamond User manual

MSI
MSI C847MS-E33 Series User manual

MSI
MSI 915P Neo2 User manual

MSI
MSI H170M BAZOOKA User manual

MSI
MSI J1750I Series User manual