manuals.online logo
Brands
  1. Home
  2. •
  3. Brands
  4. •
  5. NANOLUX
  6. •
  7. Lighting Equipment
  8. •
  9. NANOLUX SUMMIT 1000W User manual

NANOLUX SUMMIT 1000W User manual

OPERATING
MANUAL
BALLAST
SUMMIT 1000W
NCCS-RTU / 0-10V COMPATIBLE
DOUBLE ENDED FIXTURE
Symptom Cause
Incorrect Lamp
Knob Selection
Incorrect Dimming
Knob Selection
Incorrect Lamp
Installation
Faulty Lamp
Faulty Power Input
Incorrect Controller
Programming
Faulty Control Input
Lamp turns
on, but
shuts off.
Lamp tries
to strike but
never fully
comes on.
Lamp does
not turn on.
Incorrect Lamp
Knob Selection
Faulty Lamp
Corrective Action
Make sure lamp knob is set to proper setting for your
lamp.
Make sure dimming knob is not set to NCCS-RTU
/NCCS-0-10V if you are not using that function.
Verify that bulb is installed correctly, and the
electrical contacts in ceramic bulb holder are not
damaged.
Replace lamp with a known working lamp. Refer to
"Lamp Replacement" section.
Use voltmeter to confirm incoming voltage is within
90-280VAC, or plug ballast into a different socket
that you know is working.
Make sure controller is programmed to turn the lights
on.
Remove NCCS-RTU/NCCS-0-10V control, set
dimming knob to 100%, and see if that solves problem.
If so, the error is with the control, not the ballast.
Remove NCCS-RTU/NCCS-0-10V control, set
dimming knob to 100%, and see if that solves problem.
If so, the error is with the control, not the ballast.
Make sure lamp knob is set to proper setting for
your lamp.
Replace lamp with a known working lamp. Refer to
"Lamp Replacement" section.
Make sure lamp knob is set to proper setting for
your lamp.
Replace lamp with a known working lamp. Refer to
"Lamp Replacement" section.
Faulty Control Input
Incorrect Lamp
Knob Selection
Faulty Lamp
TROUBLESHOOTING
SCOPE OF USE AND MAINTENANCE
WARRANTY
Nanolux warrants the mechanical and electronic components of this product to be free of
defects in material and workmanship if used under normal operating conditions for a
period of three (3) years from the original date of purchase. If the product shows any
defects within this period and that defect is not due to user error or improper use,
Nanolux shall, at its discretion, either replace or repair the product using suitably new or
refurbished parts. For Nanolux lamp and reflector, the warranty period is one (1) year
from the original date of purchase. In case Nanolux decides to replace the entire product,
the replacement product will have the remaining warranty of the original product, i.e.
three (3) years from the date of purchase of the original product. For service return the
ballast to your shop with the original sales receipt.
For more information about Nanolux product please visit nanoluxtech.com
Fixture hanging equipment included with unit for necessary mounting.
1. Attach the ring bolt to the reflector support frame(a).
2. Attach the carbineers on the steel wire hanger to ballast hanging holes(b).
3. Hang the fixture in the desired location(c).
Fixture Hanging
Ø5-Ø8mm/0.20-0.31inch
≥20mm/0.79inch
Mounting
Surface 4-8mm/0.16-0.31inch
262.5mm/10.3inch for
AC120V/240V/277V ballast
215.5mm/8.5inch for
AC240V ballast
Input cord Screw Hole
Screw Hole
HPS/MH
1000W
HPS/MH
600W
CMH
1000W
CMH DE630W/
SE315W 2
● Comply with local installation regulations.
● Only compatible with Nanolux DE HPS/MH 600W/1000W, CMH 1000W/630W
/315W 2 lamp preventing damage to the lamp and your ballast.
● Store the fixture in a dry and clean environment, with an ambient temperature
of -10 ~ 40 °C and ambient humidity of less than 90% RH. It is recommended
to store it no more than (6) months. If it is expired (6) months, please have an
experiment on it to insure the secure operation.
● Please keep products safe. Avoid mechanical pressure, excessive vibration
and dropping the unit during the process of assembly to protect the reflector
and lamp.
● Keep away from water, oil and organic solvent, or it will decrease the
reflectivity and have the potential risk of electric leakage.
● All equipment, devices and machines shall be effectively grounded.
● Do not touch hot ceramic socket.
● Disconnect the mains first if you need to clean the lamp with wet cloth.
Check your electrical connection regularly.
● Opening the luminaire will void warranty.
ABOUT OUR PRODUCT
1
2
3
8
9
11
4
5
6
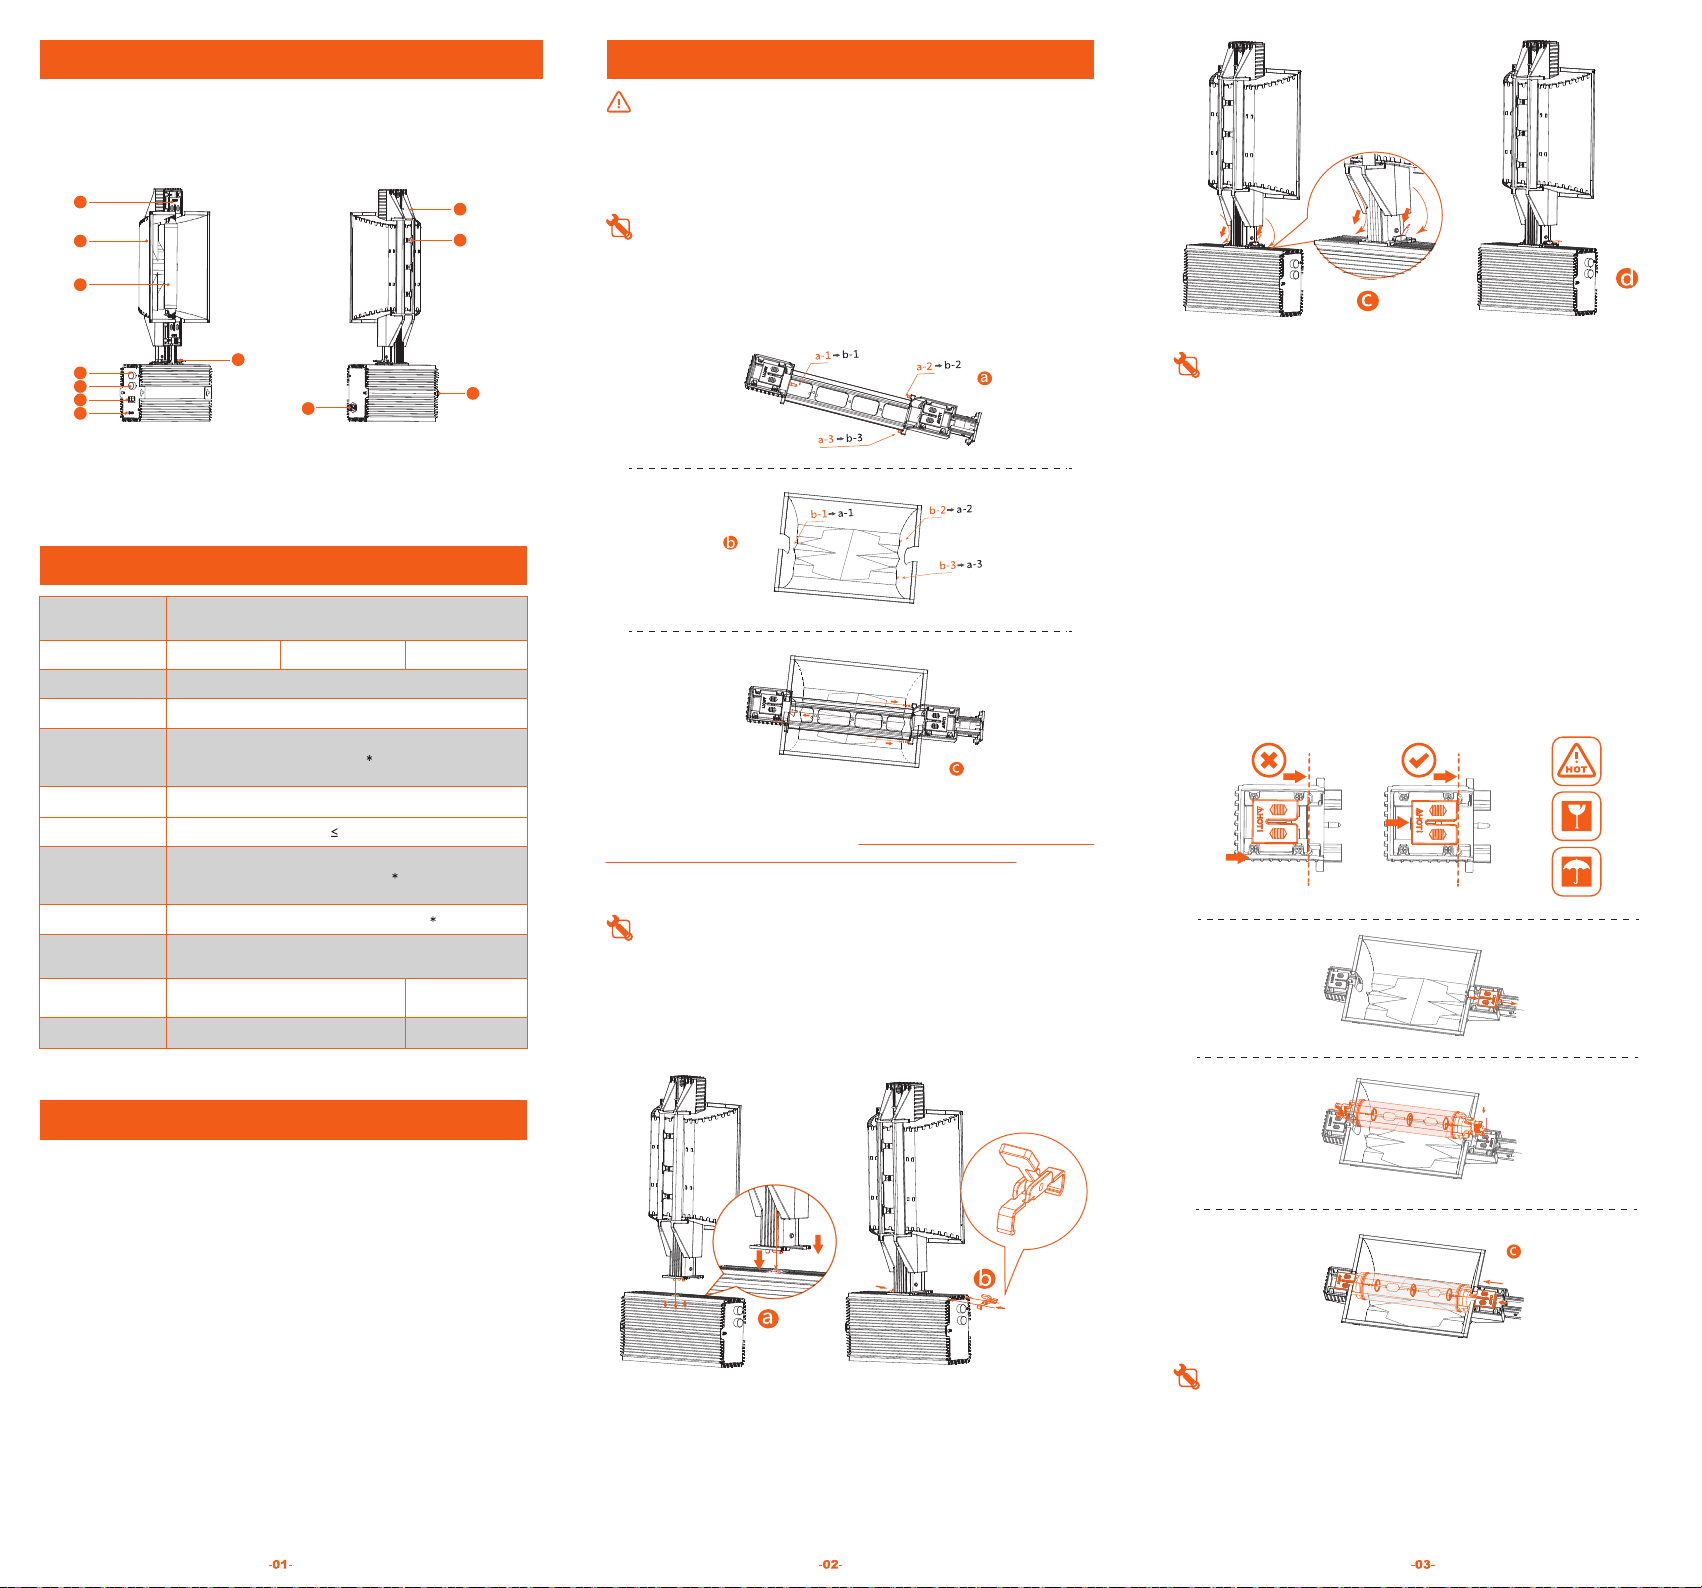
1. Ceramic Socket 2. Reflector 3. Lamp 4. Dimming Knob
5. Lamp Selector 6. NCCS-0-10V Jack 7. NCCS-RTU Jack
8. Mounting Clip 9. Lamp Bracket 10. Hanging Hole 11. Power Input
TECHNICAL SPECIFICATION
7
10
10
SUMMIT1000W fixture is a low-frequency square-wave (LFSW) electronic ballast with a
digital signal processor (DSP) and a high frequency resonant ignition, which provides a
definitive solution to prevent acoustic resonance, increase reliability in ballast and
prolong the life of your lamps.
Ballast Size (L*W*H)
Ballast Weight
Protection
Function
Strike Lamp
Model
Input Voltage
Output Voltage
Input Frequency
Output Power
Power Factor
THD
Max Current Draw
9.4*6.4*3.3 inch
238*162*84 mm
11.2*6.4*3.3 inch
285*162*84 mm
Over Temperature Protection; Under Voltage Protection;
Open/Short Circuit Protection
7.7 lbs / 3.5 kgs 6.2 lbs / 2.8 kgs
SUMMIT SERIES 1000W
AC120V/240V/277VAC120V/240V AC240V
90V-280V
50/60Hz
HPS/MH 600W: 300W-660W; HPS/MH 1000W: 500W-1100W
CMH 1000W: 8.9A
HPS/MH 600W: 5.9A; HPS/MH 1000W: 9.8A
≥0.97
10%
The Nanolux SUMMIT series ballast is compatible with industry standard NCCS-0-10V
wired control as well as Nanolux's exclusive NCCS-RTU wireless control. If you wish to
use these functions, make sure the dimming knob is set on "NCCS-RTU / NCCS-0-10V",
otherwise the ballast will not respond to the controller.
When using NCCS, if the RTU is accidentally removed from the USB port or the RTU
loses communication with the DTU, the ballast will automatically turn off within 10
minutes. After fixing the issue, you must reset power or switch dimming knob to 100%
and then back to NCCS -RTU / NCCS-0-10V to resume functioning.
If you are using NCCS-0-10V control and the ballast loses signal or detects other errors
(short circuit, excessive noise), ballast will shut off immediately. After fixing the issue, the
ballast will turn back on automatically, or you can switch dimming knob to 100% and then
back to NCCS-RTU / NCCS-0-10V to resume functioning.
**IMPORTANT NOTE: BEFORE APPLYING POWER TO THE BULB, MAKE SURE
THE LAMP SELECT KNOB IS AT THE CORRECT SETTING FOR YOUR BULB.
FAILURE TO DO SO MAY RESULT IN DAMAGE***
DIMMING FUNCTION
Dimming range for lamps:
INSTALLATION AND REPLACEMENT
Caution
● DISCONNECT THE MAINS FIRST and let the reflector cool down for 30 mins
if it has been operating to prevent an injury.
● Keep the fixture at least 1m\3ft above the plants. It depends on where pecies
gets planted.
At the end of the reflector bracket, you will find a chrome knob. Pull the knob outward to
release the pin holding the reflector in place (a-1). The reflector can then be pulled away
from the end of the bracket (a-2 & a-3). When inserting the new reflector, slide it into the
two pins (a-2 & a-3) and then release the pin (a-1) to secure it in place.
Reflector Installation And Replacement
Install Fixture On Ballast
1. Hold the fixture from its base and plug in the fixture by inserting the male plug
into the socket(a).
2. Slide the fast mounting clips into the grooves on the ballast until they are in
place to hold the fixture(b).
3. Press the fast mounting lever to lock fixture base to ballast(c).
4. Confirm the fixture is installed on ballast properly and is not loose(d).
Lamp Replacement
● Hang the ballast on the wall via its hanging legs and two screws(a).
● Make sure these two screws are installed with below exact specifications(b).
● The distance between two screws is required to be 262.5mm/10.3inch for
AC120V/240V/277V ballast and 215.5mm/8.5inch for AC240V ballast (c).
● Put the ballast side of lamp selector knob and dimming knob downwards and
hang the ballast on the wall as the above mentioned.
Ballast Hanging
NOTICE: Reflectors are made from a high grade pure aluminum, which will oxidize
and degrade over time. This results in lower reflectivity and reduced efficiency,
and over 10% light loss at the canopy. It is recommended that you mark the
installation date on the outside of reflector with a permanent marker, and replace
reflectors once a year.
TO TAKE OUT A LAMP:
● DISCONNECT THE MAINS FIRST
● Open the lamp holders by sliding them outward. The lamp is held by a metal
spring at each side. It is recommended to hold the lamp while opening the
lamp holders to prevent the lamp from falling.
TO INSTALL A NEW LAMP:
● DISCONNECT FROM MAINS FIRST
● Make sure the lamp is clean, wear cotton gloves and clean the lamp after
installation with a dry soft cloth. Never use detergents to clean a lamp, use
pure alcohol or wipe clean with a dry clean soft cloth.
● Make sure the end wires are straight.
● Open the lamp holders by sliding them outward. Press the lamp in the fitting
until the metal springs hold the lamp, with the glass vacuum seal pointed
downward.
● Close the lamp holders by sliding them inward.
● Wipe the lamp with a clean soft cloth.
● Be sure not to touch the reflective material of the reflector with your bare
hands.
CMH DE630W/SE315W*2 & CMH1000W: 75%-100%, **NOTE: If you use CMH lamp
and select Super-Lux, it will default back to 100%; HPS/MH 600W & HPS/MH1000W:
50%-100%, Super-Lux = 110%.
CMH DE630W/SE315W 2: 473W-630W;
CMH 1000W: 750W-1000W
CMH DE630W/SE315W 2: 5.6A
DE HPS/MH 600W/1000W, CMH 630W/315W 2/1000W Lamp

Other NANOLUX Lighting Equipment manuals

NANOLUX CMH-315NC User manual

NANOLUX

NANOLUX CMH-315NC User manual

NANOLUX Base Ballast User manual

NANOLUX

NANOLUX Base Ballast User manual

NANOLUX SUMMIT 1000W User manual

NANOLUX

NANOLUX SUMMIT 1000W User manual

NANOLUX SUPER DE 600Wx2 User manual

NANOLUX

NANOLUX SUPER DE 600Wx2 User manual

NANOLUX SUMMIT 1000W User manual

NANOLUX

NANOLUX SUMMIT 1000W User manual

NANOLUX CMH 630NC 1000W User manual

NANOLUX

NANOLUX CMH 630NC 1000W User manual

NANOLUX SUPER DE 1000W User manual

NANOLUX

NANOLUX SUPER DE 1000W User manual

NANOLUX OG Series User manual

NANOLUX

NANOLUX OG Series User manual

NANOLUX SUMMIT 1000W User manual

NANOLUX

NANOLUX SUMMIT 1000W User manual

Popular Lighting Equipment manuals by other brands

Ecco ED3777 Series Assembly, installation and operation instructions

Ecco

Ecco ED3777 Series Assembly, installation and operation instructions

LIVARNO LDS 3 A1 operating manual

LIVARNO

LIVARNO LDS 3 A1 operating manual

Beghelli MPL Series installation instructions

Beghelli

Beghelli MPL Series installation instructions

nedis WIFILS Series quick start guide

nedis

nedis WIFILS Series quick start guide

Telco MD02 Series Installation & maintenance manual

Telco

Telco MD02 Series Installation & maintenance manual

Lightmaxx Platinum CLS-3 QUAD user manual

Lightmaxx

Lightmaxx Platinum CLS-3 QUAD user manual

DS Produkte WTG-014 instructions

DS Produkte

DS Produkte WTG-014 instructions

olympia electronics GR-900/30L/SC installation instructions

olympia electronics

olympia electronics GR-900/30L/SC installation instructions

XTline XT102768 user manual

XTline

XTline XT102768 user manual

Ledvance ENDURA STYLE WALL WIDE SENSOR 12W DG manual

Ledvance

Ledvance ENDURA STYLE WALL WIDE SENSOR 12W DG manual

SAC SAC-STAR-LED manual

SAC

SAC SAC-STAR-LED manual

Advatek Lights PixLite E16-S Mk3 quick start guide

Advatek Lights

Advatek Lights PixLite E16-S Mk3 quick start guide

MaxLite MSF Series operating instructions

MaxLite

MaxLite MSF Series operating instructions

EUROPOLE ELIOS SOLAR 2,5W quick start guide

EUROPOLE

EUROPOLE ELIOS SOLAR 2,5W quick start guide

Westcott 4892 Setup instructions

Westcott

Westcott 4892 Setup instructions

Saber light ATD-80058 owner's manual

Saber light

Saber light ATD-80058 owner's manual

Magicshine MONTEER 8000S V2.0 user manual

Magicshine

Magicshine MONTEER 8000S V2.0 user manual

Inspire VASKA 757578 instruction manual

Inspire

Inspire VASKA 757578 instruction manual

manuals.online logo
manuals.online logoBrands
  • About & Mission
  • Contact us
  • Privacy Policy
  • Terms and Conditions

Copyright 2025 Manuals.Online. All Rights Reserved.