BEFORE INSTALLATION, PLEASE
READ THESE INSTRUCTIONS FIRST.
Congratulations on the purchase of your new Nanolux DE-CHILL SUMMIT luminaire.
The DE-CHILL SUMMIT air-cooled hood removes the heat from the lamp and ballast
through air ducts and vents to the outside growing environment. This lowers air
conditioning costs in the facility by removing the hot air building up.
We have done everything to insure a long life and safe operation of your new
product, but the installation and use of the ballast is at the responsibility of the end
user. Incorrect use or installation can lead to failure and damage to the ballast.
Damage to the luminaire and electronic circuitry as a result of incorrect installation or
use revokes your warranty. Read this manual carefully before installing your
luminaire.
TECHNICAL SPECIFICATIONS
INSTALLATION
COMPLY WITH LOCAL INSTALLATION REGULATIONS
These luminaires are suitable for a damp indoor location. Do not install your
luminaires in a wet environment or outdoors.
Do not operate these luminaires close to combustible materials. The lamp and
reflector will get hot during operation. Do not touch the reflector or lamp during or
right after operation. Make sure the power cord does not touch any hot part of the
luminaire. Make sure the lamp is clean and inserted correctly. A normal operating
environment temperature should be below 122°F. Exceeding the maximum
environmental temperature will trigger over temperature protection, leading to
shorter lifetime and decreased reliability.
1. Make sure power is OFF!
2. Connect fixtures with 8'' diameter ventilation pipe.
3. Distance between fixtures within two meters.
4. No more than six fixtures can be placed in series.
5. Do not turn on lamp until fully installed.
6. Do not touch fixture enclosure with bare hands as it may cause injury.
7. Fan must operate while fixture is on or thermal protection sensor will turn it off.
CAUTION:
• Always install the lamp before connecting your luminaire to power supply.
• Allow lamp to cool 10 minutes before restarting (hot restrike).
• When changing the lamp always disconnect the luminaire from power supply by
removing the ballast’s plug. Let the lamp and reflector cool down for 10 minutes
before changing as they are very hot. When replacing a defect lamp you must
disconnect the power for the ballast to restart.
• DO NOT touch hot ceramic socket.
• Make sure the DE lamp wires are placed correctly within the sockets copper wire
clamps.
• Make sure to fully close the ceramic socket to the correct position and keep the
socket clean.
• Fragile !! Be careful and do not exert excessive force while moving the ceramic
slider on the ceramic socket connection.
• To replace lamp, open the fixture’s bottom glass window.
• DE-CHILL fixtures use heat-resistant glass with high light transmittance.
LAMP REPLACEMENT AND HOT
RESTRIKE
LAMP INSTALLATION:
• DISCONNECT FROM POWER SUPPLY FIRST.
• Make sure the lamp is clean: wear cotton gloves and clean the lamp after installation
with a dry soft cloth. Never use detergents to clean a lamp: use pure alcohol or wipe
clean with a dry clean soft cloth.
• Make sure the end wires are straight.
• Open the lamp holders by sliding them outward. Press the lamp in the fitting until
the metal springs hold the lamp, and the glass vacuum seal pointed downward.
• Close the lamp holders by sliding them inward.
• Wipe the lamp with a clean soft cloth.
• Be sure not to touch the reflective material on the reflector with your bare hands.
LAMP REMOVAL:
• DISCONNECT FROM POWER SUPPLY FIRST.
• Open the lamp holders by sliding them outward. The lamp is held by a metal spring
at each side. It is recommended to hold the lamp while opening the lamp holders to
prevent the lamp from falling.
INSTALL FIXTURE
1. Remove the 10 screws from the top of the fixture.
2. Lift the top cover upwards and unplug the three cables from the ballast.
HOW TO REMOVE BALLAST
This model is compatible with SLC & NCCS-0-10V.
Insert telephone wire into the jack of the SLC or NCCS-0-10V Controller, and then
Dimming function on the luminaire will be enabled.
● Maximum of 120 units can be controlled.
● Simulate sunrise and sunset for dimming.
● Turn off the device automatically with time and temperature setting.
In & Out jacks included on the ballast allows for multifixtures connected.
0-10V DIMMING
CAUTION:
After installation, verify installation was a success by cycling the lights on/off a few
times, by setting 'over temperature shut down' to a low value like 85°F, and rubbing
the temperature probe with your fingers, tricking the controller/NCCS RTU into an
over temperature condition and shutting the lights off. Then leave the probe alone,
and after recommended 10-15 minutes the controller/NCCS RTU should turn all the
lights back on.
For detailed instructions, please refer to SLC & NCCS-0-10V operating manual.
• Normal glass may burst due to high temperature and may block reflected light
from the inside geometry of the reflector.
8inch
SUMMIT 1000W
AC120/240V
90V-280V
50/60Hz
≥0.97
≤1.7
≤10%
455*320*131 mm
17.9*12.6*5.2 inch
DE HPS/MH 600W/1000W, CMH 1000W/630W Lamp
Over Temperature Protection; Over/Under Voltage
Protection; Open/Short Circuit Protection.
4.7 kgs
10.4 lbs
Size
(L*W*H)
Model
Weight
Protection
Function
Strike Lamp
Input Voltage
Output Voltage
Input Frequency
Power Factor
Crest Factor
THD
Output Power CMH630W: 473W-630W CMH1000W: 750W-1000W
HPS/MH600W: 300W-660W HPS/MH1000W: 500W-1100W
Max Current Draw CMH630W: 5.8A CMH1000W: 9.2A
HPS/MH600W: 6.1A HPS/MH1000W: 10.1A
DIMMING FUNCTION
The Nanolux SUMMIT series ballast is compatible with industry standard NCCS-0-10V
wired control as well as Nanolux's exclusive NCCS-RTU wireless control. If you wish to
use these functions, make sure the dimming knob is set on "NCCS-RTU /
NCCS-0-10V", otherwise the ballast will not respond to the controller.
When using NCCS, if the RTU is accidentally removed from the USB port or the RTU
loses communication with the DTU, the ballast will automatically turn off within 10
CMH630W/CMH1000W: 75%-100%, **NOTE if you use this lamp and select
Super-Lux, it will default back to 100%; HPS/MH 600W/1000W: 50%-100%, Super-Lux
= 110%.
**IMPORTANT NOTE: BEFORE APPLYING POWER TO THE BULB, MAKE SURE THE
LAMP SELECT KNOB IS AT THE CORRECT SETTING FOR YOUR BULB. FAILURE TO DO
SO MAY RESULT IN DAMAGE***
Dimming range for lamps:
minutes. After fixing the issue, you must reset power or switch dimming knob to
100% and then back to NCCS -RTU/NCCS-0-10V to resume functioning.
If you are using NCCS-0-10V control and the ballast loses signal or detects other
errors (short circuit, excessive noise), ballast will shut off immediately. After fixing the
issue, the ballast will turn back on automatically, or you can switch dimming knob to
100% and then back to NCCS-RTU/NCCS-0-10V to resume functioning.
2
1
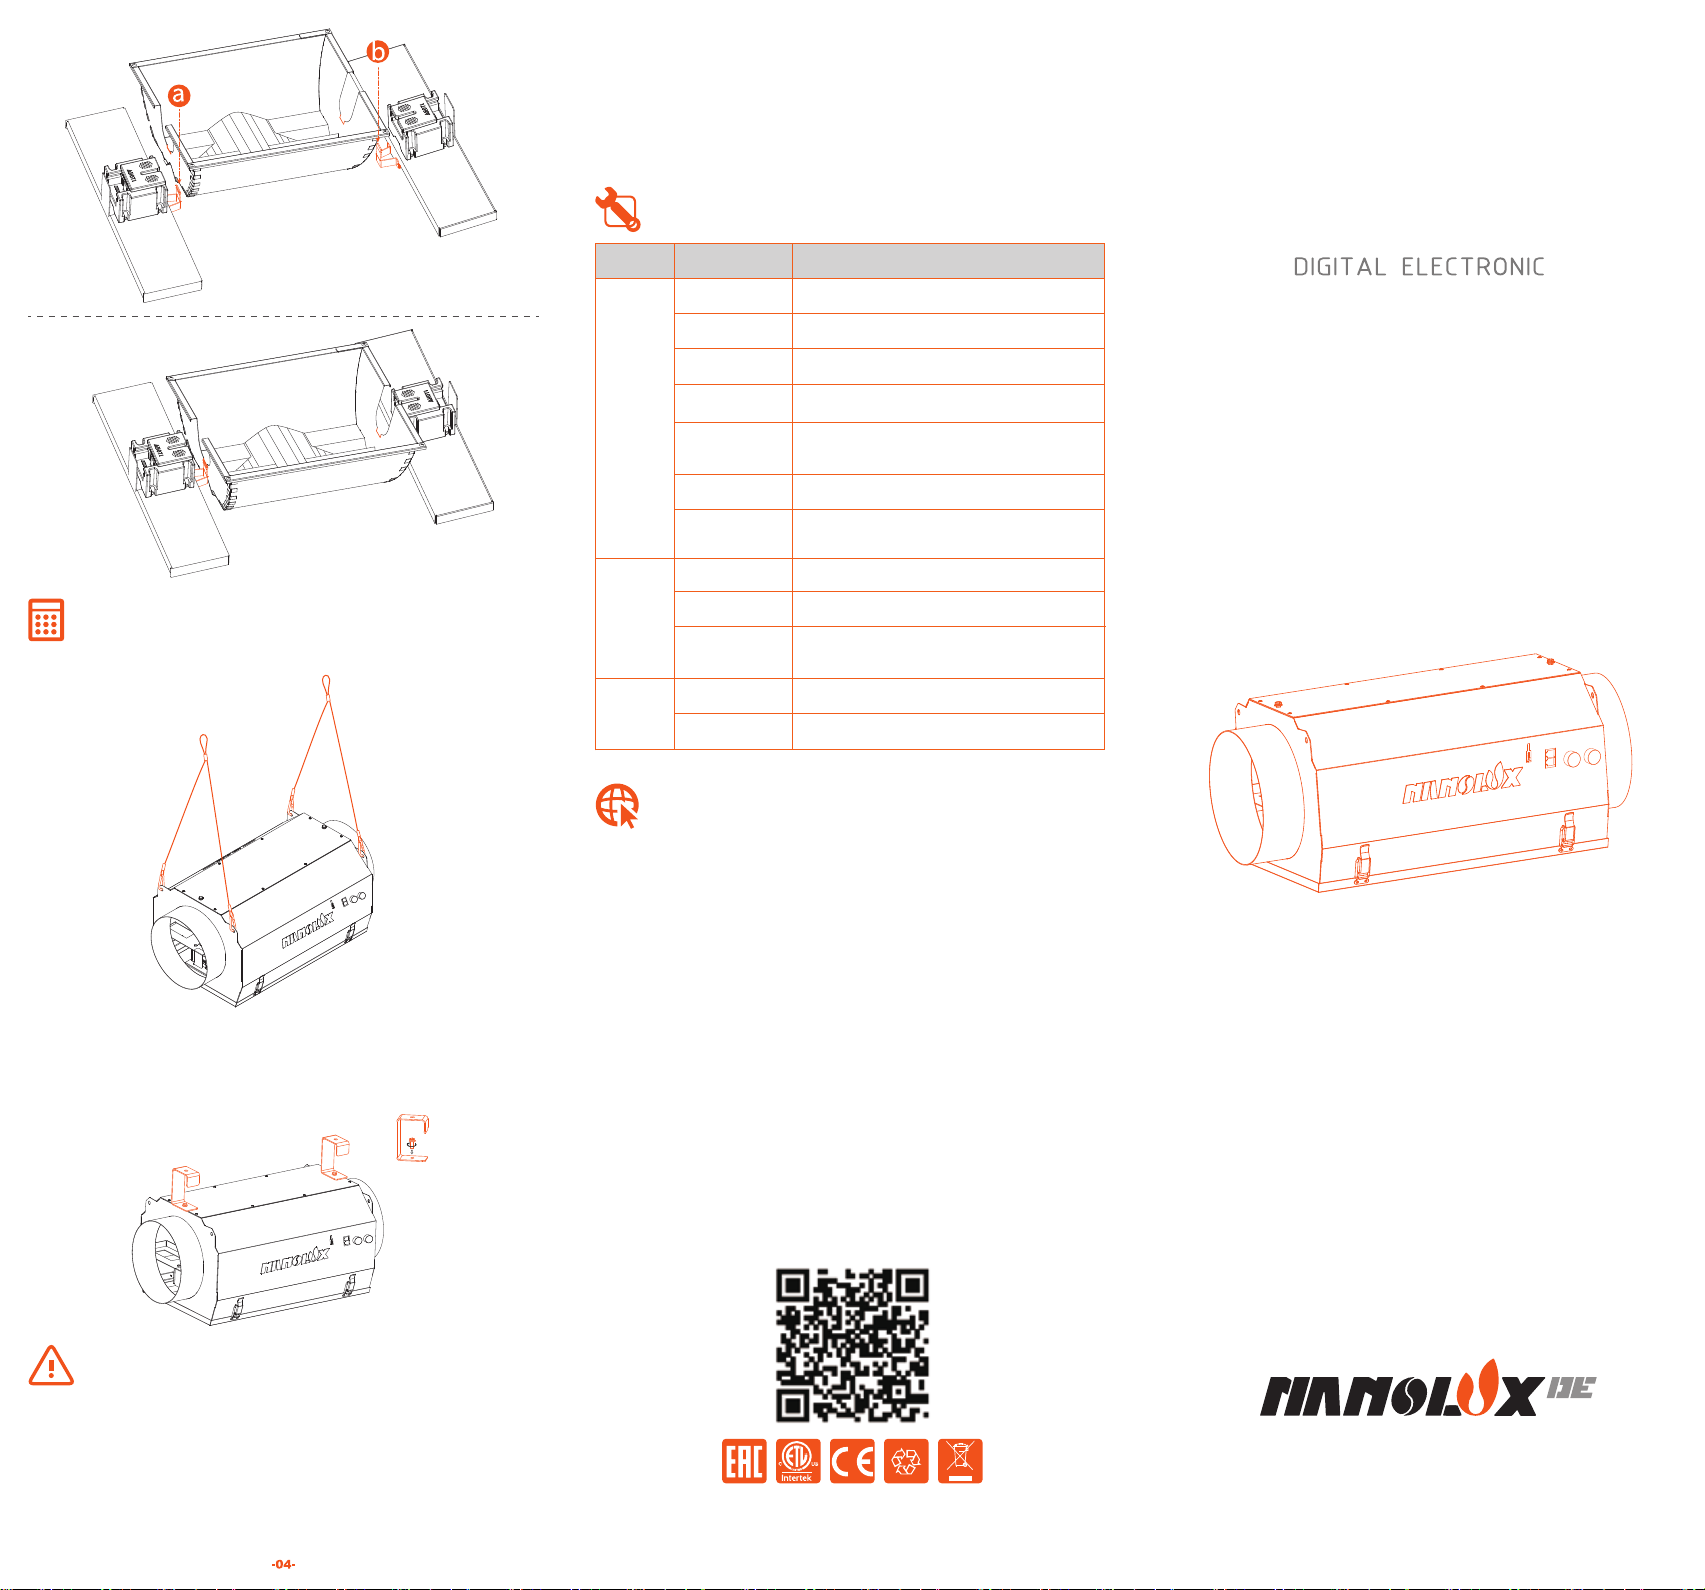
The Nanolux DE-CHILL SUMMIT fixture should be handled with care. If it is damaged
or deformed you should replace it. We recommend you change the reflector every
year for optimal results. Replacement reflectors are available through your Nanolux
Technology reseller.
REFLECTOR REPLACEMENT
TO REPLACE REFLECTOR:
• Please wear cotton gloves before your replacement.
• To replace the reflector, you must remove the lamp first as described above in "lamp
removal" area.
• Let the reflector cool down if it has been operating to prevent an injury.
1. Both reflector sides have the gap. Please find the fixed buckle on the lamp bracket
at first.
2. Apply amount of force to properly put the reflector into the fixed buckle [on the
bracket] to secure in place (a & b).