NanoVibronix UROSHIELD User manual

UserManual
Cat. # USUM005 Ver. 07


UroShield® User Manual
USUM005 Ver. 07 3
Without prior notice and without obligation, the contents of this manual may be revised
to incorporate changes and improvements.
Every effort is made to ensure that the information is complete and accurate at the time
of publication. Nevertheless, NanoVibronix cannot be held responsible for errors or
omissions.
Trademarks, patents, and copyrights apply.
NanoVibronix Inc.
525 Executive Boulevard,
Elmsford, N.Y. 10523, USA
Tel.: 1 (914) 233-3004
Fax: 1 (914) 376-6111
Email: info@nanovibronix.com
Website: www.nanovibronix.com
NanoVibronix Ltd,
9 Derech Hashalom St,
Nesher 3665112, Israel.
Tel: +972–4-8200581
Fax: +972-4-8202794
E-mail: info@nanovibronix.com
Website: www.nanovibronix.com
CEpartner4U BV,
Esdoornlaan 13,
3951 DB Maarn,
The Netherlands
Tel.: +31.343.442.524
Mobile: +31.6.516.536.26
Fax: +31.343.442.162

UroShield® User Manual
USUM005 Ver. 07 4
Table of Contents
1 Introduction......................................................................................... 6
1.1 Biofilm Formation and Urinary Tract Infections......................... 6
1.2 Pain, Discomfort, and Spasm ..................................................... 7
1.3 General Safety............................................................................ 7
2 Indications for Use............................................................................... 8
3 Safety Warnings and Cautions............................................................. 9
4 Product Features ............................................................................... 11
4.1 Mains and Battery Operation .................................................. 11
4.2 Operating Cycle........................................................................ 11
5 Product Components......................................................................... 12
5.1 The Actuator ............................................................................ 12
5.2 The UroShield®Driver .............................................................. 13
6 Operation .......................................................................................... 14
6.1 Connecting the UroShield®....................................................... 14
6.2 Switching the UroShield®ON or OFF ........................................ 17
6.3 Instructing the Patient ............................................................. 18
6.4 Monitoring the UroShield®....................................................... 19
6.5 Disconnecting the Driver from the Actuator............................ 21
6.6 Showering and Bathing ............................................................ 22
7 Frequently Asked Questions.............................................................. 23
8 Product Care...................................................................................... 24
8.1 Storage..................................................................................... 24
8.2 Environmental Operating Conditions....................................... 24
8.3 The Driver ................................................................................ 24
8.4 The Actuator ............................................................................ 25

UroShield® User Manual
USUM005 Ver. 07 5
Appendix A: Electromagnetic Compliance.............................................. 26
Appendix B: Specifications...................................................................... 30
Appendix C: Labels.................................................................................. 31
Appendix D: Symbols .............................................................................. 32
Appendix E: Warranty ............................................................................ 33
Appendix F: Z-Shield for Percutaneous Nephrostomy Catheters ........... 34

UroShield® User Manual
USUM005 Ver. 07 6
1 Introduction
Thank you for choosing the UroShield®. This manual contains general
instructions for operation, application, precautions and care. In order to obtain
maximum life and efficiency from the UroShield® and to assist in its proper
operation, please read and understand this manual thoroughly. This
UroShield® is to be used only as directed in this manual.
1.1 Biofilm Formation and Urinary Tract Infections
Catheter-associated urinary tract infection (CAUTI) and other indwelling-device
associated infections are a major cause of morbidity and mortality in
hospitalized patients.(1) Urinary catheters readily acquire biofilms after
insertion; and the longer the catheter remains in place, the greater is the
tendency for the formation of biofilms, resulting in urinary tract infections.
The initial step in biofilm formation is the adhesion or attachment of planktonic
bacteria to the catheter surface. It is thought that the bacteria use touch
sensors to attach to a solid surface.(2) This occurs within a few hours after
urinary catheter placement. After attachment the bacteria begin to interlock, a
process known as docking. The bacteria then secrete an extra-cellular
polymeric matrix (ECM), which allows them to survive and proliferate. The
complex of the bacteria and ECM, now adherent to the catheter surface, is
known as biofilm. The established biofilm is highly resistant to antibiotics and
to the body's immune system.
The UroShield® is intended to prevent bacterial biofilm formation by
generating acoustic waves on the surface of the catheter. The waves interfere
with the attachment of bacteria (which is the initial step in biofilm formation)
and increase antibiotic efficacy against biofilm bacteria.
1Pugach JL, DiTizio V, Mittelman MW et al; Antibiotic Hydrogel Coated Foley Catheters
for Prevention of Urinary Tract Infection in a Rabbit Model. The Journal of Urology,
Volume 162, 883-887, September 1999.
2Princeton University News- Discovery of bacterial touch sensor could lead to Biofilm
treatments. http://www.princeton.edu/pr/news/02/q1/0205-touchsensor.htm.
UroShield® User Manual
USUM005 Ver. 07 7
1.2 Pain, Discomfort, and Spasm
By means of the same acoustic waves that mitigate against biofilm, the
UroShield® also reduces friction between the catheter and the patient’s
internal tissues. This decreases the pain, discomfort and spasm associated with
indwelling urinary catheters.
1.3 General Safety
Thoroughly read and understand the precautionary and operating instructions
before attempting to operate the UroShield®. Observe the precautionary and
operational labels on the product. Periodically review the operation
procedures and safety precautions outlined in this manual.

UroShield® User Manual
USUM005 Ver. 07 8
2 Indications for Use
The UroShield® is intended for use with indwelling urinary catheters. It
addresses the two major problems associated with urinary catheters:
Urinary tract infection due to biofilm formation
Pain, discomfort, and spasm
The UroShield® can be used with catheters made of any material and sized 14,
16, 18, 20, or 22 French, for up to 30 days.
Note that the UroShield® is not for use with percutaneous nephrostomy
catheters. With these you can use its sister product, Z-Shield: see Appendix F.

UroShield® User Manual
USUM005 Ver. 07 9
3 Safety Warnings and Cautions
W A R N I N G
Insertion and removal of catheters and
connection, operation, and disconnection of
the UroShield® should be performed only by
qualified medical staff and in accordance
with the relevant medical facilities care
guidelines.
Do not use the UroShield® as a treatment for
an active urinary infection.
Do not use the UroShield® in the presence of
flammable materials and liquids. The
UroShield® is classified as internally-
powered, intermittently-operated, ordinary
equipment with a disposable type BF applied
part.
The UroShield® is not MRI compatible and
therefore, should be detached from the
catheter before entering the MRI suite.
Use the UroShield® only as instructed in this
manual.
Do not use the UroShield® or any accessory
pieces if they appear to be damaged.
Do not modify the UroShield® in any way.
The UroShield® has no user serviceable parts.
If it is not operating correctly, contact the
local representative of NanoVibronix. No part
of the UroShield® should be replaced with
components or parts other than those
supplied by NanoVibronix.

UroShield® User Manual
USUM005 Ver. 07 10
C AU T I O N
The UroShield® driver is not waterproof.
Do not expose it to water.
Charge the UroShield® only with the
supplied charger.
Do not attempt to open or remove any of
the covers of the UroShield®.
The lithium ion rechargeable battery in
the UroShield® must not be
disassembled, heated above 100 degrees
Celsius, incinerated, or exposed to water.

UroShield® User Manual
USUM005 Ver. 07 11
4 Product Features
4.1 Mains and Battery Operation
The UroShield® can be powered by the mains or by its rechargeable battery. In
normal use it should be continuously connected to a mains socket. However, to
provide patient mobility it can be powered by the battery for up to 6 hours
(when fully charged).
The battery can be fully charged in about 2 hours.
4.2 Operating Cycle
When the UroShield® is ON, it alternates between 2 phases:
Active phase—the UroShield® generates acoustic waves on the
surface of the catheter. This phase is 15 minutes long (a low audible
sound is heard).
Idle phase—the UroShield® does not generate acoustic waves on the
surface of the catheter. This phase is 5 minutes long.

UroShield® User Manual
USUM005 Ver. 07 12
5 Product Components
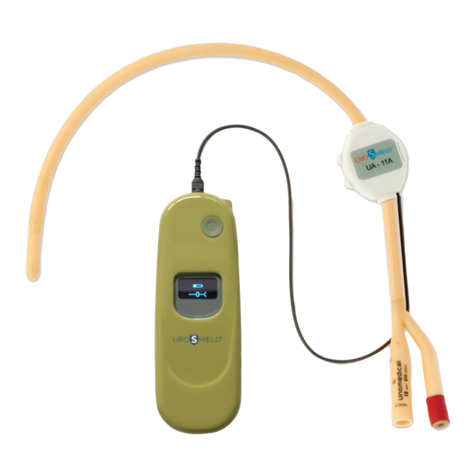
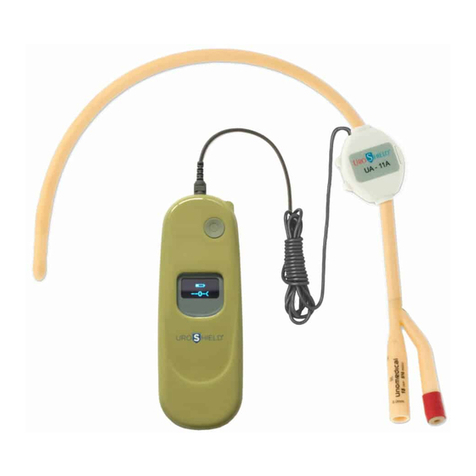
The UroShield® has two components: an actuator and a driver.
A power supply/charger is supplied.
5.1 The Actuator
The small, lightweight actuator clips onto the urinary catheter after the
catheter’s insertion into the patient's bladder. When the UroShield® is active,
the actuator generates acoustic waves on the surface of the catheter. The
actuator itself does not have contact with the patient’s skin. It is for single use
only: that is, for use with one catheter only (until the catheter is replaced or for
a maximum of 30 days).
Urinary catheter
(not included)

UroShield® User Manual
USUM005 Ver. 07 13
5.2 The UroShield®Driver
The driver supplies electrical signals to the actuator. It has the following parts:
Built-in rechargeable battery
Charging port
Connection cable
ON/OFF button
Operational display screen
The driver is small and lightweight and can be placed on the patient’s bed.
When the patient needs to be mobile, it can be placed in a pocket or on a belt.

UroShield® User Manual
USUM005 Ver. 07 14
6 Operation
6.1 Connecting the UroShield®
1. Make sure that UroShield application occurs shortly following
catheter insertion into the bladder.
2. Gently pull on the catheter until you feel slight resistance.
3. Remove the actuator from its packaging.
4. Peel off the protective strips from the inside of both halves of the
actuator.

UroShield® User Manual
USUM005 Ver. 07 15
5. Place the actuator on the catheter in accordance with the following:
-In females, make sure that there are 2 to 3 cm between the
actuator and the point where the catheter exits the body.
-In males, make sure that there are 5 to 10 cm between the
actuator and the point where the catheter exits the body.
-Make sure that the direction of the actuator connection cable is
towards the patient.
-Make sure that the patient’s clothing is between the actuator
and the patient’s skin.
-Attach the actuator to the catheter so that the catheter enters
and exits the actuator through the grooves at either end of the
actuator.
6. Carefully close the actuator so that the two halves snap together.
7. Make sure that the catheter is not pinched or deformed at either end
of the actuator.

UroShield® User Manual
USUM005 Ver. 07 16
8. Insert the actuator cable plug into the driver cable socket, making
sure to orient the plug correctly in relation to the socket, and also
making sure that the plug is fully inserted and secured.
9. Connect the supplied charger to the driver charging port.
10. Plug the charger into the mains.
The driver display shows the following screens in quick succession:
After about 1 minute, the display dims.

UroShield® User Manual
USUM005 Ver. 07 17
The UroShield® is now charging and is ready to be switched on (you do not
need to wait for the battery to charge fully, which takes about 2 hours).
6.2 Switching the UroShield®ON or OFF
To switch the UroShield® ON or OFF, press the ON/OFF button for 2–3 seconds.
About 30 seconds after you switch the UroShield® ON, the driver display shows
the status of the battery and actuator connection as shown in the following
screen:
If another screen appears instead of the above, see section 6.4.2 Alarms and
Troubleshooting.
After another 3 minutes, the display dims and shows the screensaver:
Note: when the screensaver is shown, you can return to the battery/actuator
status and brighten the screen by pressing the ON/OFF button briefly (that is,
for less than 2 seconds).
UroShield

UroShield® User Manual
USUM005 Ver. 07 18
6.3 Instructing the Patient
Instruct the patient as follows:
The patient should not pull or open the actuator.
The patient should not disconnect the actuator from the driver.
The patient should not press the ON/OFF button.
The patient should inform medical staff if an alarm is heard.
The patient should not expose the driver to water: see section 0
Showering and Bathing

UroShield® User Manual
USUM005 Ver. 07 19
6.4 Monitoring the UroShield®
6.4.1 Driver Display Icons during Normal Functioning
The table below explains the icons and text that may be shown on the driver
display during normal functioning of the UroShield®.
Icons/Text Shown
Explanation
Manufacturer’s name
(shown briefly when you plug the
UroShield® into the mains or switch it ON).
Product name.
Software version number
(shown briefly after the manufacturer’s
name).
Battery charge indicator.
The battery is charging. The UroShield®
is OFF.
The battery icon fills gradually to show
charging progress.
If the screen has dimmed, you can brighten
it by pressing the ON/OFF button briefly
(that is, for less than 2 seconds).

UroShield® User Manual
USUM005 Ver. 07 20
Icons/Text Shown
Explanation
1. Battery charge indicator
2. Actuator status = correctly connected
and correctly working
The UroShield® is ON.
Screensaver. The display is dimmed.
The UroShield® is ON.
You can show the battery charge indicator
and actuator status (and brighten the
screen) by pressing the ON/OFF button
briefly (that is, for less than 2 seconds).
6.4.2 Alarms and Troubleshooting
When the UroShield® requires attention, an audible alert sounds and the driver
display flashes. The icon on the display will indicate what action is required:
see the table below.
Icon on Flashing Display
Explanation
Action Required
The battery is less than
10% charged.
Connect the driver to the
mains with the supplied
charger.
UroShield
Other manuals for UROSHIELD
2
Table of contents
Other NanoVibronix Medical Equipment manuals

NanoVibronix
NanoVibronix UROSHIELD User manual

NanoVibronix
NanoVibronix Wound Shield User manual

NanoVibronix
NanoVibronix PAINSHIELD MD User manual

NanoVibronix
NanoVibronix URO SHIELD User manual

NanoVibronix
NanoVibronix PainShield User manual

NanoVibronix
NanoVibronix PainShield User manual

NanoVibronix
NanoVibronix UROSHIELD User manual

NanoVibronix
NanoVibronix PAINSHIELD MD User manual

NanoVibronix
NanoVibronix PainShield FD-14A User manual