Neopost SA50S User manual

November 2002
NEOPOST Address Printer
User Guide

NEOPOST Address Printer
User Guide SA50S 2
NEOPOST Address Printer
Ink-jet printer
© Copyright 2001, RENA Informationstechnik GmbH & Co. KG.
All rights reserved. No part of this manual may be reproduced or
transmitted in any form or by any means, copied onto electronic media or
translated into any language without the manufacturer’s express written
permission.
The manufacturer is not liable for any damage resulting either from
incorrect use or from repairs and modifications carried out by a third
unauthorized party. This manual was produced with great care. However,
liability for any errors which it may contain is excluded. The manufacturer
reserves the right to make any technical or design changes to the
equipment during the development process. All specified values are
purely nominal. Consequently, any legal claims made on the basis of this
manual cannot be enforced.
The manufacturer is not liable for any damage or disturbance resulting
from the use of options or accessories which are not original products or
do not have the express approval of the manufacturer.
Trademarks:
HP is a registered trademark of the Hewlett-Packard Corporation.
Microsoft und Windows are registered trademarks of the Microsoft
Corporation.

NEOPOST Address Printer
User Guide SA50S 3
Contents
1. Safety .....................................................................................................4
1.1 Hazards associated with the printer....................................................4
1.2 General notes on safety.....................................................................4
1.3 Handling the print cartridges ..............................................................6
1.4 Location of the printer........................................................................6
1.5 Disposal............................................................................................6
2. System requirements.............................................................................7
3. Transport and packaging.......................................................................7
3.1 Dispatch............................................................................................7
3.2 Unpacking the printer.........................................................................7
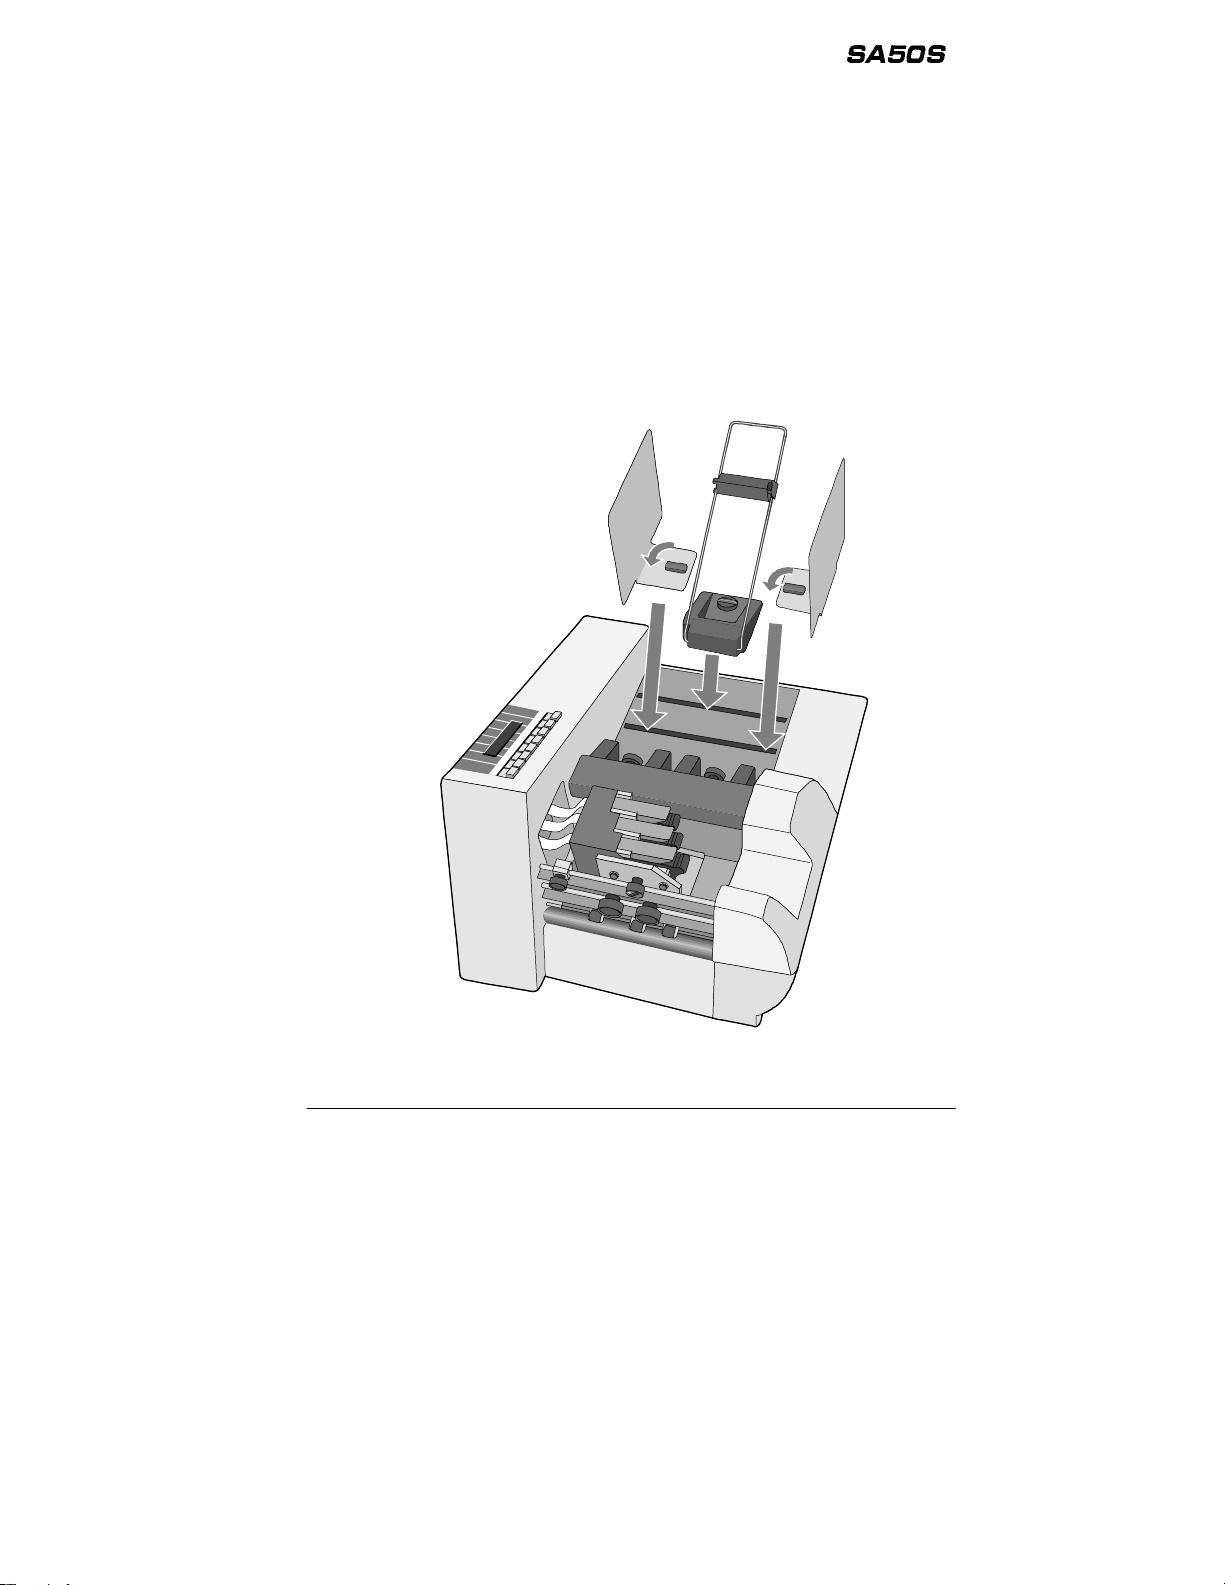
3.3 Assembly of contact brackets and guide bar.......................................8
4. Description of the address printer.........................................................9
4.1 Applications.......................................................................................9
4.2 Description of functions .....................................................................9
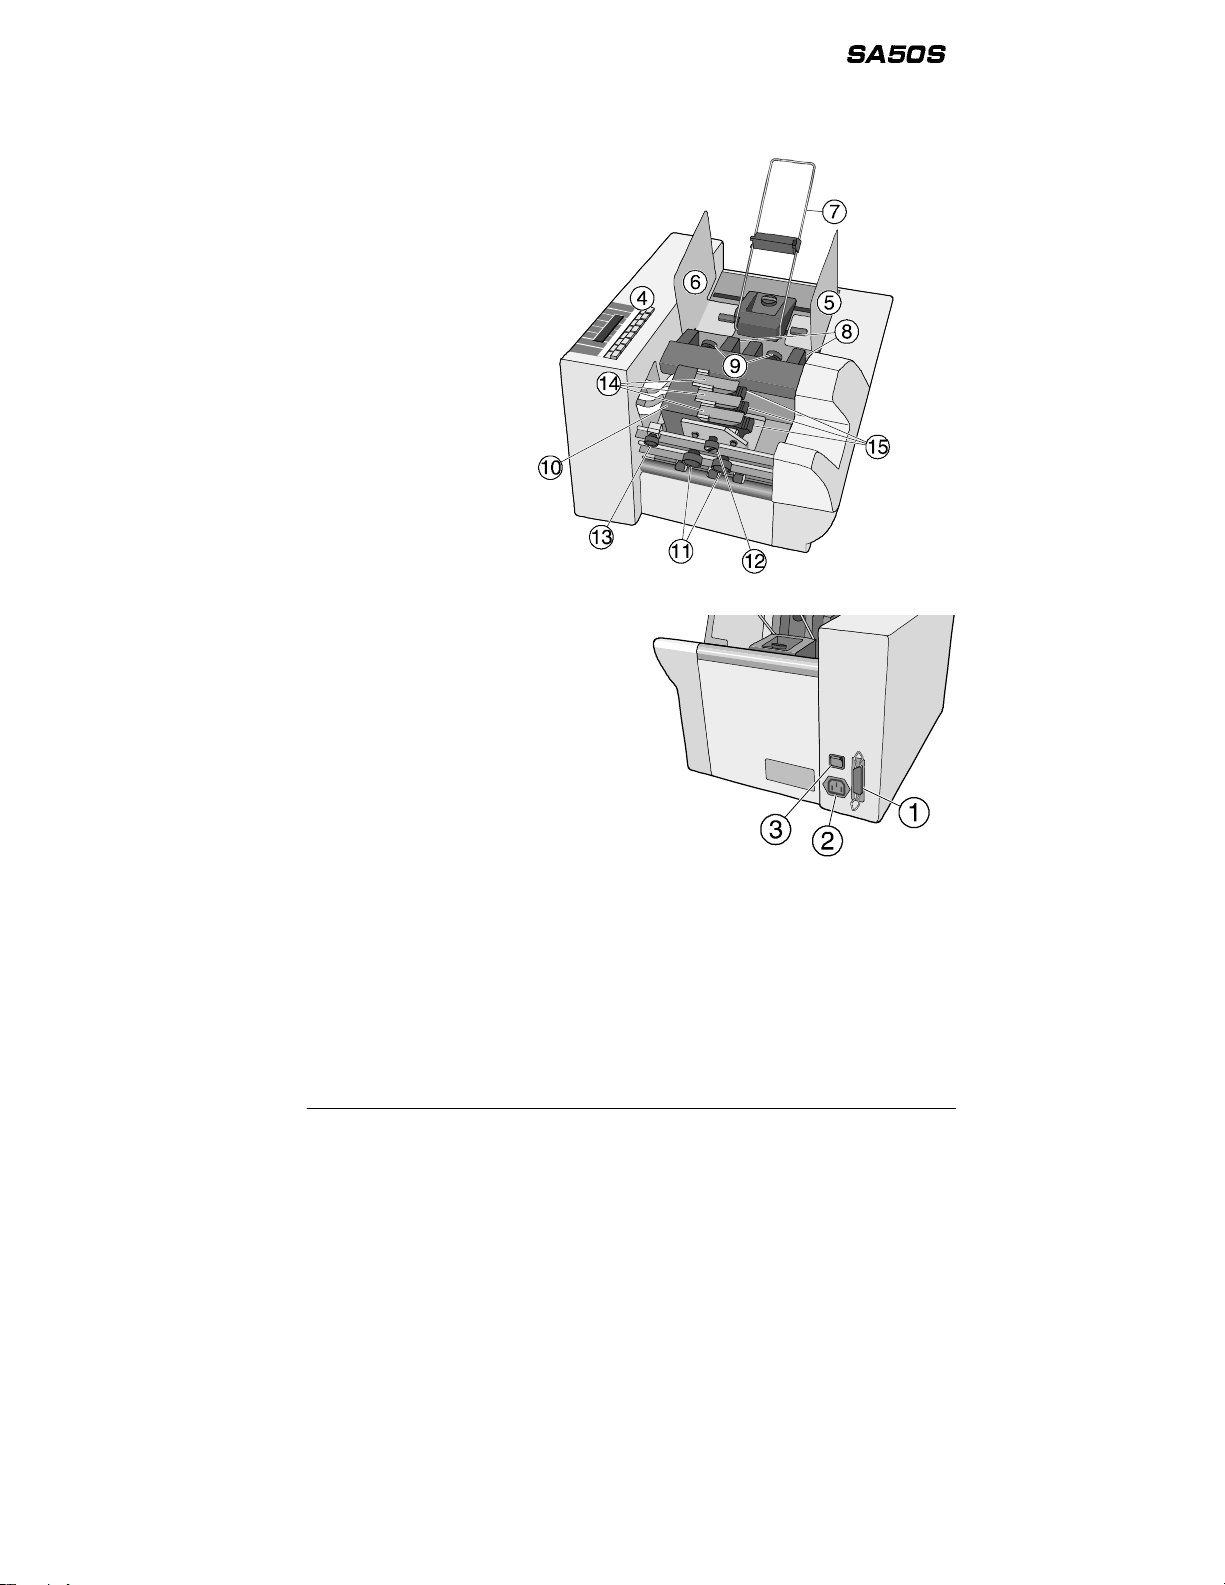
4.3 Overview of the printer.....................................................................10
5. Installation and operation....................................................................11
5.1 Installing and connecting the printer.................................................11
5.2 Inserting print cartridges ..................................................................11
5.3 Installing printer drivers....................................................................13
5.4 The control panel.............................................................................14
5.5 Key combinations............................................................................15
5.6 Switching the printer on...................................................................15
5.7 Adjusting the printer to the medium..................................................16
5.8 Setting the address print position .....................................................21
5.9 Printing addresses...........................................................................23
5.10 Resetting the address printer...........................................................24
6. Programming mode .............................................................................25
6.1 The purpose of programming mode..................................................25
6.2 The control panel in programming mode...........................................25
6.3 Menu overview................................................................................27
6.4 Description of parameters................................................................29
7. Accessories .........................................................................................38
8. Technical data......................................................................................40
9. Annex...................................................................................................42
9.1 Contact brackets .............................................................................42
9.2 Meanings of some displayed messages ...........................................43
9.3 Error messages and warnings..........................................................44
9.3.1 Error messages...............................................................................44
9.3.2 Warnings.........................................................................................46
9.4 Notes on maintenance.....................................................................47

NEOPOST Address Printer
User Guide SA50S 4
1. Safety
Before operating your printer, read the following safety hints carefully
both for your own safety as well as to ensure the reliable operation of the
printer. Be sure always to heed all warnings and other information
marked or labeled on the printer.
Keep this manual in a safe place so that the information it contains is
available to you at all times.
1.1 Hazards associated with the printer
The address printer has been constructed in line with state-of-the-art
technology and is safe to operate. However, hazards cannot be excluded
if it is operated by persons unfamiliar with its use. The same applies if it
is used in an inappropriate way or in a manner not in accordance with its
intended purpose.
If you ignore the information given in this manual, the following
hazards cannot be excluded:
•Electric shock,
•Injury by rotating rollers,
•Damage to the printer.
1.2 General notes on safety
•The address printer may be connected only to a voltage of 230 V /
50 Hz or to 115 V / 60 Hz, depending on the country-specific
version. It is therefore vital to check the information on the type-
plate.
•The power plug may only be connected to a grounded socket! Make
sure that the grounding has not been rendered ineffective by the use
of an extension cable with no ground conductor. Any break in the
ground conductor inside or outside the printer is dangerous and is
not permissible.
•The printer is secured via only one terminal! Even if a fuse blows,
electrical parts in the printer may continue to be live.
•Run the power lines so that no-one can trip over them. Make sure
that no objects are placed onto the power cables.
•Unplug the printer from the power supply if it is not being used for a
longer period of time. This avoids any damage in the event of
voltage surges.

NEOPOST Address Printer
User Guide SA50S 5
•Never touch any moving parts of the printer! Such action can lead to
injury from being caught up in the rotating rollers. Also be sure to
keep long hair and clothing away from the printer while it is running.
•Protect the printer from moisture. If moisture does penetrate it, this
may lead to the danger of electric shock.
•Always unplug the printer before cleaning it.
•Do not use any cleaning agents. Use a damp cloth.
•You must unplug the printer and have it checked by an authorized
service technician in the following circumstances:
•If the power cable or power plug has worn or been damaged.
•If water or other liquid has penetrated the printer.
•If the printer does not operate properly even after the operating
instructions have been followed.
•If one of the printer parts has been dropped or its housing is
damaged.
•If the printer shows marked discrepancies from normal
operation.
•Do not dismantle the printer beyond the level described in this
manual. The housing must not be opened by unauthorized persons.
Repairs may be carried out only by authorized service personnel.
•Prohibition of conversions: any conversions or modifications carried
out by unauthorized persons are prohibited for reasons of safety.
•Caution!
This is a class-A instrument. It may disturb radio equipment in the
home. If this happens, the operator may be required to take
appropriate action.

NEOPOST Address Printer
User Guide SA50S 6
1.3 Handling the print cartridges
•Keep all print cartridges out of the reach of children.
•Under normal circumstances, ink cannot run out of a cartridge. Wash
off any ink spray which gets onto the skin immediately under running
water. If any ink gets into your eyes, rinse it out immediately with
plenty of water.
•The ink cartridge should not be shaken, allowed to drop, or be struck
against the palm of the hand or a hard surface.
•Install the print cartridge immediately after removing the protective
tab. Be sure not to exceed the expiry date.
•Do not try to open or re-fill an ink cartridge. This could damage the
printer.
•Clean the ink cartridge as described in Section 9.4 – Notes on
maintenance.
1.4 Location of the printer
•When setting up the printer, ensure that it is placed on a smooth and
level surface which is wider than the printer.
•The surface on which the printer stands must be sufficiently stable. If
the printer tips or is dropped, this may lead to injury or damage the
printer.
•Select an installation or storage location which protects all parts of
the printer from extreme temperature and humidity fluctuations,
direct sunlight and excessive heat.
•The printer must not be exposed to vibrations or shocks.
•Place the printer so that you can pull the power plug from its socket
easily at any time.
1.5 Disposal
•The printer may not be disposed of as an item of domestic refuse. Its
disposal must be carried out on the basis of the statutory
requirements.

NEOPOST Address Printer
User Guide SA50S 7
2. System requirements
The printer is designed for use with a PC (Pentium 200 MHz) equipped
with a parallel and serial interface. It can be operated with the following
operating systems: Windows 3.x, Windows 95 / 98 / 2000 or Windows
NT4.
You will need a shielded, twisted parallel interface cable (not included
within the scope of delivery).
3. Transport and packaging
3.1 Dispatch
The address printer is dispatched in appropriate packaging so that it
reaches its destination without damage via a regular mode of transport.
The carrier is liable for any damage during transport. Transport
and storage should take place under normal conditions, i.e. at
temperatures between +5°C and +70°C and relative air humidity
of up to 80%. Impermissible conditions may lead to damage which
is not externally visible.
3.2 Unpacking the printer
Remove all packaging and take out the printer with its accessories.
Use the following list to check that all parts of the printer are present and
undamaged:
•1 printer
•1 power cable (option)
•2 contact brackets, short
•1 guide bar
•1 printer driver (installation guide and floppy disk or CD)
If you do not wish to use the packaging later, e.g. for returning the printer
for repair, be sure to dispose of it in an environmentally appropriate way.
.
..
.

NEOPOST Address Printer
User Guide SA50S 8
The print cartridges and the printer cable are not included within the
scope of delivery:
•Suitable print cartridges: C8842A (fast-drying ink) or HP 51645A,
6168A, 6169A, 6170A (the printer accommodates three) are
available from your dealer
•Suitable printer cable: twisted parallel interface cable
3.3 Assembly of contact brackets and guide bar
•Insert the contact bracket into the lower panel slot and lock it in
place by giving the bayonet lock a quarter turn.
•Insert the guide bar into the upper panel slot in the same way.

NEOPOST Address Printer
User Guide SA50S 9
4. Description of the address printer
4.1 Applications
The address printer is an ink-jet printer offering high print speed and high
print quality. It prints addresses in the correct positions on print media
such as envelopes, cards, leaflets and periodicals up to dimensions of:
•minimum
135 mm x 85 mm with a thickness of 0,1 mm.
•maximum
353 mm x 225 mm with a thickness of 2 mm (without spec. accessories)
and
450 mm x 357 mm with a thickness of 2 mm (with special accessories).
The maximum print area is 444 mm wide and 38 mm high (corresponding
to 9 lines at a font size of 12 pt. and a line spacing of 12 pt.).
4.2 Description of functions
The printer is designed to operate with an IBM-compatible PC running
most word-processing, database or other programs suitable for handling
addresses.
The print unit of the printer contains three HP print cartridges. This
means that addresses can be printed while the print unit remains
stationary.
The print media is inserted above the print unit and positioned exactly by
the contact bracket. Printing takes place as the print medium passes
below the print unit. The print orientation is always identical to the
direction of transport: print-out can take place in either forward or reverse
(rotated by 180°) sequence.
As a rule, the address height is positioned by shifting the print unit
accordingly. The address width can be set either via the software on the
PC or directly on the printer.
Operation is very simple. You will need about half an hour to put the
printer into operation for the first time.

NEOPOST Address Printer
User Guide SA50S 10
4.3 Overview of the printer
1 Printer cable terminal
2 Power cable terminal
3 ON/OFF switch
4 Control panel with display
5 Outer contact bracket
6 Inner contact bracket
7 Guide bar
8 Separator
9 Knurled screw for separator
10 Print unit
11 Knurled screws for print-unit cradle
12 Height adjuster for print unit
13 Position stop for print unit
14 Stop lever for ink cartridges
15 Ink cartridge (HP51645A, C8842A, 6168A, 6169A, 6170A)

NEOPOST Address Printer
User Guide SA50S 11
5. Installation and operation
5.1 Installing and connecting the printer
Install the printer as described in Section 1.4 – Location of the printer.
•Make sure that your PC and the printer are both switched off.
•Connect the printer cable to your PC and to the printer.
The type of power terminal depends on the country version of the printer.
Ensure that the power cable connector is suitable for your location.
•Connect the power cable to the printer’s power socket. Connect the
power plug to a grounded socket.
•For the moment, leave the printer switched off.
5.2 Inserting print cartridges
To equip the printer with print cartridges you will need three Fast Dry
Inkjet cartridges of the HP type with the designation C8842A or three
Inkjet cartridges with the designation HP51645A, 6168A, 6169A or
6170A. (They all are usually available from PC dealers or by mail order.)
Observe the notes on “Handling the print cartridges” as well as the
directions given by the cartridge manufacturer.
•If the printer unit is located on the rear side panel, unscrew its two
lower knurled screws and push the unit into mid-position.
•Fully release all restraining levers.
•Take the first cartridge from its packaging and remove the protective
tab.

NEOPOST Address Printer
User Guide SA50S 12
To ensure that a secure contact exists between the print cartridge and
the printer electronics at all times, the restraining lever has two functions:
•To place the ink cartridge into its final position
•To restrain it securely during operation
This means that the cartridge must not be inserted manually
into its final position.
When the cartridge is inserted, it should only be pressed downwards into
the mount in a straight movement without being rotated. Before the
restraining lever is closed, the cartridge still has a slight tilt. The lever
then swings the cartridge intoits final position.
•Insert the cartridge with the print field facing downwards into the first
mount with a straight movement – do not press it toward the
restraining lever.
•Close the restraining lever so that the cartridge is swung into its final
position and the contact to the electronics is correctly made.
•Insert the two other cartridges in the same way.
.
..
.
/
//
/

NEOPOST Address Printer
User Guide SA50S 13
Note on replacing used cartridges:
If the message “NO INK!! CHANGE PRINTHEAD“ appears in the display,
then one or more cartridges are empty.
•To replace the cartridges, put the printer into off-line mode with the
start key (the display must show OFF).
•Proceed exactly as during the initial insertion. As soon as the
restraining lever is opened, the used cartridges can be easily pulled
out upwards.
Use the menu to perform a “HEAD RESET“ (see page 37)
5.3 Installing printer drivers
To allow the address printer to be operated from your PC, you must first
install one of the printer drivers supplied with the printer.
•Insert the CD ROM supplied into the drive.
•Follow the instructions on your monitor.
•The product number can be obtained from the case of your CD
ROM.
When you have completed the installation, you can configure the printer
as described in Section 6 - Programming mode.

NEOPOST Address Printer
User Guide SA50S 14
5.4 The control panel
A 2-line display is integrated into the control panel.
The first line displays how much ink is left, the selected font and the
counter status.
The second line shows the operating mode (e.g. On for on-line mode),
the resolution, the configuration number and finally the print direction.
The keys for print operation are explained below. The applicable key
lettering is shown directly above the keys (the lettering in the gray fields
applies to programming mode).
The start key is always operational; all other keys are operational only in
off-line mode.
start: Switch printer ONLINE/OFFLINE
pap: start/stop paper feed
[
[[
[end]
]]
]:Leave menu/abort changes
test: Initiate/stop print of test addresses
[
[[
[next]
]]
]:Select next menu point/Increase value
clean: Spray print nozzles clear.
[
[[
[prev]
]]
]:Select previous menu point/Decrease value
: Rotate address by 180°, Nor = Normal, Rev = Reverse.
[
[[
[enter]
]]
]:Activate Menu/option field. (Last Status stored)
prog: Switch over to programming mode.
: Repeat print of the last address(es).
: Paper length measurement.

NEOPOST Address Printer
User Guide SA50S 15
5.5 Key combinations
The key combinations have the following functions in conjunction with
turning the printer on:
++++
Initiate download of new
firmware or other software
supplied by RENA
+Default Reset
(Default setting)
+
Hex Dump (all received
characters are printed
immediately as HEX code)
Key function in OFFLINE mode
+
Print of black bars at 600DPI to
clean the cartridges before the
print job.
+Measuring and display of
current speed.
+Resetting the counter status.
5.6 Switching the printer on
Switch the printer on with the on/off switch on the right-hand side.
The following display appears on the printer:
If no paper size has been set, the following message appears:
You are now requested to set the paper size.
This message appears to remind you to measure the paper size. This is
required for a correct print-out.
SA50S Inkjet
Initialisation
Please set Pap.Size
START to continue!

NEOPOST Address Printer
User Guide SA50S 16
•Now press the start key: the display changes:
Do you want to measure the paper size now?
Press enter key = YES. Press end key = NO.
Keep the enter key pressed down until an (L) appears on the display!
(The paper length has now been measured and locked.)
•Press the end key.
The printer is now ready for operation:
The first line shows theink level, then the set font and size as well as the
counter status.
The second line shows ON for on-line mode (OFF for off-line), the print
quality, the configuration and the print direction.
Print direction Nor means that the address is printed in normal read
mode – seen from the operator side, and Rev means that the address is
rotated by 180° when it is printed.
Use the start key to switch the printer to off-line mode and return to on-
line mode by pressing it again.
In on-line mode, all other keys are locked. A detailed description of the
key functions may be found in Section 6 – Programming mode.
5.7 Adjusting the printer to the medium
To ensure that a correct and well-defined print-out appears in exactly the
right place on the medium, you must adjust the printer to the print
medium used. The printer processes various thicknesses (up to 2 mm)
and various formats (from postcard size to B4 format, with special
accessories up to format C3). This means that the thickness and format
must be adjusted. For this step, keep the print media which you wish to
use next in readiness.
100% Cour12 00000
On 600DPI Set1U Nor
Set Paper Size Now?
Enter=YES End=NO

NEOPOST Address Printer
User Guide SA50S 17
Adjusting the printer to the thickness of the medium
1. Height adjustment of the print unit
To obtain a well-defined print-out, it is important to adjust the height of
the print unit above the print medium. This can only be done when the
cradle of the print unit has been detached:
•To do this, loosen the two knurled screws of the cradle.
•For print media up to 0.3 mm in thickness,
the smallest spacing may be used for
printing. Turn the height adjustment control
so that the white dot is right at the bottom of
the knurled screw.
•For print media with a thickness of 2 mm, the
largest spacing is used for printing. Turn the
height adjustment control so that the white
dot is right at the top of the knurled screw.
•For print media with a thickness of 1 mm,
turn the height adjustment control to its mid-
position. The white point will then be either to
the right or to theleft of the knurled screw.
•Tighten the two knurled screws of the cradle again. At the same
time, press the cradle lightly downwards so that it lies flush with the
guide.
2. Height adjustment of the two separators
To make sure that only one sheet of print medium is fed in at a time, the
two separators must be set to the thickness of the print medium.
Note:
Both separators must always be adjusted, even in the case that a print
medium of small format lies against only a single separator. If this
condition is not observed, the free separator may drag on the transport
rollers. The wear on these rollers is then increased and feeding may
damage the medium.

NEOPOST Address Printer
User Guide SA50S 18
•Loosen the knurled screws of the
two separators.
•Lift the two separators and place the
print medium under the separator
fingers. If the print medium is
narrow, such as postcards and C10
envelopes, only two separator
fingers may contact it. In this case,
lift the outside separator up to the
top stop and clamp it tight.
•This step is also recommended if a
separator finger only partially contacts narrow print media, such as
C6 and DL envelopes.
If only three separator fingers contact the print medium, then
another sheet of medium should be placed under the fourth
separator finger. (It may be necessary to remove the outside contact
bracket to do this.)
If these steps are not observed, the separator rollers may
suffer from premature wear.
•Allow both separators to drop onto the print medium, without
applying any pressur, and then fix the knurled screws again.
Test pattern 1 incorrect Test pattern 2 correct
(Excessive pressure on the separator)
The inserted sheet will be ejected by the paper transport mechanism.
Caution! Never touch any internal parts of the printer when it
is running.
•If the printer is not in off-line mode, press the start key and switch
the printer OFF. If you press the pap key, the print medium will be
ejected. The paper transport is stopped when the pap key is pressed
again.
/
//
/ /
//
/

NEOPOST Address Printer
User Guide SA50S 19
Adjusting to the format of the print medium
1. Adjusting the contact bracket
You must first of all know whether your print medium runs through the
printer in a longitudinal or transverse direction.
The lines are always printed in the direction in which the print
medium moves.
If the lines are parallel to the longer side, the medium must be fed in via
the narrow side.
If the lines are parallel to the shorter side, the medium must be fed in via
the longer side.
•Push the rear contact bracket all the way to the side wall of the
printer.
•Place your print medium between the contact brackets all the way up
to the separators.
•Push the front contact bracket up to the print medium. However, the
medium must not be clamped. In the case of very narrow formats, it
may be necessary to turn the outer contact bracket.

NEOPOST Address Printer
User Guide SA50S 20
If your print medium exceeds the holding capacity of the two contact
brackets supplied, a medium and a long contact bracket are also
available (see p. 38 – “Accessories”) as an alternative to the front contact
bracket.
You can see which contact brackets are used for the various format sizes
from the overview tables of the PAPER SIZE parameters on p. 31 and
from Section 9.1 ”Adjustable widths of the contact brackets“ in the annex.
2. Adjusting the guide bars
•Place a single sheet of paper into the feed tray.
•Arrange the bar in the middle between the two contact brackets.
•Push the plastic runner (riffling aid) along the guide bar up to the
paper so that it just touches it.
•Riffle the paper stack so that the lowest sheet can be pulled in first
and then place it onto the guide bar.
•Push the plastic cross-bar of the guide bar right up to the paper
stack. The lowest sheet of paper must just touch the cross-bar.
For high stacks of large-format medium (e.g. C4), use bar
R0612.3.051 and stack extender R0612.1.040 (cf. Section 7 -
Accessories).
Now check that the print medium is fed in correctly. Let a media stack
traverse the printer with the aid of the paper transport function in off-line
mode as follows:
Warning! Never touch the inside of the printer while it is
running.
•If the printer is not in off-line mode, press the start key and switch
the printer OFF.
•Press the pap key: the medium is transported or ejected. When the
pap key is pressed again, the paper transport is stopped.
Table of contents
Other Neopost Printer manuals

Neopost
Neopost DS-63 User manual

Neopost
Neopost HD-MF14DN Assembly instructions

Neopost
Neopost AS-520C User manual

Neopost
Neopost RENA MACH 5 User manual

Neopost
Neopost AS-970C User manual

Neopost
Neopost MACH 6 User manual

Neopost
Neopost Mach 8 User manual

Neopost
Neopost AS-830 User manual

Neopost
Neopost AS-520C User manual

Neopost
Neopost AS73P User manual

Neopost
Neopost AS 268p User manual

Neopost
Neopost RENA MACH 5 User manual

Neopost
Neopost AS-930 User manual

Neopost
Neopost RENA MACH 5 User manual

Neopost
Neopost AS-970C User manual

Neopost
Neopost AS-710 User manual

Neopost
Neopost DS-600i User manual

Neopost
Neopost AS-150 User manual

Neopost
Neopost ij25 User manual

Neopost
Neopost SA60 User manual