Newa NEWA Hobby NH 20 Installation guide

IT
ACQUARIO COMPLETO
PRONTO PER L’INSTALLAZIONE
Istruzioni e garanzia
COMPLETE AQUARIUM
READY TO INSTALL
Instructions and warranty
FR
AQUARIUM COMPLET
PRÈT POUR L’INSTALLATION
Mode d’emploi et garantie
DE
KOMPLETTES AQUARIUM,
FERTIG ZUR MONTAGE
Gebrauchs-anleitung und Garantie
NL
COMPLEET AQUARIUM
KLAAR VOOR GEBRUIK
Aanwunzingen garantie
ES
Собранный аквариум
готовый к установке
Инструкция и гарантия

2

IT
Italiano
pag.
4
EN
English
page
10
FR
Français
page
17
DE
Deutsch
seite
23
NL
Nederlands
pag.
29
RU
Русский
стр .
34
RICAMBI ED ACCESSORI
SPARE PARTS AND ACCESSORIES PIÈCES
DE RECHANGE ET ACCESSOIRES ERSATZ-
UND ZUBEHÖRTEILE RESERVEONDERDELEN
EN ACCESSOIRES ЗАПЧАСТИ И
АКСЕССУАРЫ
1
NH 20
2
SPARE PARTS
Codes
Mod. NEWA Hobby
Ref.
NH 20
NH 30
NH 60
1
00.65.020
00.65.021
00.65.022
2
00.65.023
00.65.024
00.65.025
1
NH 30
2
NH 60
3

OK
NH30
NH20
NH 60
Рис.10
5
Рис.9
Рис.11
Рис.13
Рис.12

IT
Istruzioni d’uso
IT
Indice
I.
NORME IMPORTANTI PER LA SICUREZZA
pag. 6
II.
DATI TECNICI
pag. 8
III.
DISIMBALLAGGIO E CONTROLLI PRELIMINARI
pag. 8
IV.
DOVE COLLOCARE L’ACQUARIO
pag. 8
V.
INSTALLAZIONE E ACCENSIONE DELL’ACQUARIO
pag. 9
V.a
Pulizia della vasca
pag. 9
V.b
Messa in funzione
pag. 9
V.c
Filtrazione
pag. 9
V.d
Accensione dell’acquario
pag. 9
VI.
GESTIONE E PULIZIA
pag. 9
VII.
PROBLEMI E SOLUZIONI
pag.10
VIII.
CORRETTO SMALTIMENTO DEL PRODOTTO
pag.10
IX.
GARANZIA
pag.11
RICAMBI ED ACCESSORI
pag. 3
I. NORME IMPORTANTI PER LA SICUREZZA
Questo apparecchio è destinato all’uso come acquario di acqua dolce da usarsi all’interno delle abitazioni. Qualsiasi altro uso non
è ammesso e conseguentemente non è coperto dalla responsabilità del costruttore. Newa Hobby è conforme alla norma di
sicurezza vigente nella EU EN60598-2-11 mentre la pompa è conforme alla norma EN60335-2-41. Il riscaldatore (quando
presente) è conforme alla norma EN60335-2-55. Il prodotto è stato progettato e realizzato in conformità alle direttive 2014/30/ UE e
2014/35/UE per garantire un utilizzo sicuro in tutto il ciclo di vita. Tuttavia un uso scorretto del prodotto (un uso non conforme alle
prescrizioni del presente manuale) può provocare danni al prodotto e compromettere la sicurezza dell’utilizzatore.
ATTENZIONE: Il presente simbolo riportato sull’etichetta del Newa Hobby indica che è necessario leggere
attentamente questo manuale di istruzioni operative prima di mettere in funzione, usare e manutenzionare l’apparecchio.
ATTENZIONE: Durante l’installazione e la manutenzione scollegare l’acquario e tutti i suoi accessori dalla corrente
elettrica. Non collegare l’acquario alle prese di alimentazione se non è completamente pieno d’acqua.
Onde evitare qualsiasi tipo di infortunio osservare scrupolosamente, oltre alle più
elementari disposizioni di sicurezza, le seguenti avvertenze:
1) ATTENZIONE: L’apparecchio può essere utilizzato da bambini di età non inferire a 8 anni e da
persone con ridotte capacità fisiche, sensoriali o mentali, o prive di esperienza o della necessaria
conoscenza, purché sotto sorveglianza oppure dopo che le stesse abbiano ricevuto istruzioni relative
all’uso sicuro dell’apparecchio e alla comprensione dei pericoli ad esso inerenti. I bambini non devono
giocare con l’apparecchio perché questo non è un giocattolo. La pulizia e la manutenzione destinata ad
essere effettuata dall’utilizzatore non deve essere effettuata da bambini senza sorveglianza.
2) ATTENZIONE: Scollegare o spegnere tutti gli apparecchi presenti
nell’acquario prima di svolgere operazioni di installazione e manutenzione.
3) Il cordone di alimentazione non può essere né riparato né sostituito. Se danneggiato, sostituire
l'accessorio (pompa o riscaldatore). Il cavo di alimentazione della luce dell’ acquario, se danneggiato, può essere
sostituito solo da un installatore qualificato, esclusivamente con un cavo originale di ricambio.
4)Leggere gli avvertimenti ed osservare i simboli riportati nelle etichette di tutti gli
apparecchi elettrici e riportate nelle istruzioni.
6

5)Riempire la vasca l’acqua fino a raggiungere il livello desiderato, facendo attenzione che la distanza
minima del livello dell’acqua dalla lampada sia di 15 mm quando il coperchio è chiuso (fig. 1).
6) Controllare che il voltaggio stampato sull’etichetta presente all’interno del coperchio, sulla pompa e, se presente sul IT
riscaldatore, corrisponda a quello della rete di alimentazione.
7)Non inserire le spine dei cavi di alimentazione prima di aver riempito completamente l’acquario d’acqua.
8)Verificare che gli accessori elettrici contenuti siano privi di ammaccature e segni indicanti cadute e schiacciamenti.
9) I cavi di alimentazione dovrebbero essere inseriti nella presa di corrente in modo tale che un punto del cavo formi un’ansa ad un livello
inferiore rispetto alla presa di corrente. Questo evita che gocce d’acqua, seguendo il cavo, possano entrare nella presa (fig. 2).
10) Staccare sempre le spine quando l’acquario non è in uso, nonché prima di inserire o togliere suoi componenti e prima di
procedere alla pulizia. Non cercare di staccare le spine degli apparecchi, tirando il cavo, ma prenderle con la mano per staccarle.
11)Non toccare con mani bagnate le spine di alimentazione, inoltre non toccare a mani nude le spine se queste risultano bagnate.
12)Nel caso l’acquario sia alla portata di bambini, utilizzare particolari precauzioni e verificare più volte la
corretta installazione e funzionamento.
13)La massima temperatura dell’acqua veicolata dalla pompa non deve superare i 35°C.
14)ATTENZIONE: il simbolo significa che gli apparecchi elettrici devono essere utilizzati solo all’interno delle abitazioni.
15)L’acquario non deve funzionare a secco.
16)Il prodotto ha dei componenti in vetro. Maneggiare con cura e posizionarlo secondo le istruzioni del
presente manuale evitando di appoggiare la vasca direttamente sugli spigoli.
17)Non appoggiare il prodotto su piani inclinati (fig.13).
18)Dopo l’installazione, non movimentare il prodotto. Se necessario, muoverlo solo se la vasca è completamente vuota.
19)Ogni componente è parte integrante del prodotto e non deve essere utilizzato su altri prodotti.
20)Non utilizzare il prodotto per uso alimentare.
21)Non utilizzare il prodotto come terrario.
22)Non utilizzare il prodotto danneggiato e/o smontato.
23)Non danneggiare e/o togliere il sigillante posto sulle giunzioni dei vetri della vasca.
24)Non appoggiare direttamente sul fondo della vasca rocce, sassi o altri elementi ornamentali pesanti.
25)Non posizionare alcun oggetto sopra al prodotto.
26)E’ importante che l’acquario, come tutti gli altri dispositivi elettrici, sia protetto, a monte, da uno
speciale interruttore differenziale (salvavita) con corrente d’intervento Idn < 30 mA.
27)Si consiglia di spegnere la lampada durante la manutenzione e di non fissare mai la stessa quando è accesa.
CONSERVARE QUESTE ISTRUZIONI PER FUTURE CONSULTAZIONI.
7

II. DATI TECNICI
IT
Modello (220-240V, 50Hz)
NH 20
NH 30
NH 60
Dimensioni
Altezza (mm)
290
335
400
Larghezza (mm)
420
475
625
Profondità (mm)
205
275
325
Peso
A secco (Kg)
3,63
6,80
10,00
Capacità
Volume (lt)
20
30
60
Riscaldatore
Tipo
---
---
NTT50
Potenza (W)
---
---
50
Pompa
Portata (l/h)
80 - 190
100 - 250
270 - 540
Potenza (W)
2,6
3
5,1
Illuminazione
Potenza (W)
4,5
4,5
5
Lumen
657
657
670
Kelvin (K)
6500
6500
6500
III. DISIMBALLAGGIO E CONTROLLI PRELIMINARI
a. Aprire la confezione;
b. Estrarre il prodotto maneggiandolo con cura;
c. Appoggiare l’acquario su una superficie piana e liscia;
d. Smaltire i materiali d’imballaggio nel rispetto delle normative vigenti del Paese di smaltimento.
L’acquario NEWA Hobby è confezionato in modo tale che possa resistere ai normali urti e pressioni che si verificano
durante il trasporto. Può comunque capitare che urti eccessivi o errate manipolazioni possano causare danni all’acquario
perciò consigliamo di seguire queste avvertenze per attuare un controllo della tenuta della vasca:
•Collocare la vasca su un piano orizzontale asciutto, appoggiandolo sopra un telo di tessuto o fogli di giornale.
•Riempire la vasca d’acqua e controllare attentamente ogni lato. Verificare che non vi siano
perdite d’acqua passando un panno asciutto lungo i bordi esterni di giunzione dei vetri (fig. 3).
•Se vi sono perdite d’acqua, consegnare l’acquario al rivenditore affinché venga controllato attentamente o sostituito.
ATTENZIONE: non svuotare l’acquario sollevandolo e rovesciandolo, potrebbe rompersi ! (fig. 4).
IV. DOVE COLLOCARE L’ACQUARIO
ATTENZIONE: leggere attentamente e rispettare scrupolosamente queste istruzioni.
a. Collocare l’acquario (vasca e base) su un supporto solido e idoneo a sopportare il peso massimo
previsto del prodotto (vedi dati tecnici) dotato di un piano di appoggio livellato, liscio e pulito.
b. Verificare che la superficie del piano d’appoggio sia perfettamente orizzontale, in
caso contrario il livello dell’acqua contenuta nell’acquario risulterebbe obliqua.
c. Non appoggiare il prodotto su piani inclinati.
d. Collocare l’acquario vicino ad almeno un paio o più prese di corrente rispettando le istruzioni per la sicurezza.
e. Collocare l’acquario lontano da fonti di calore e correnti d’aria fredda, come stufe, termosifoni, caminetti e finestre (fig. 5).
f. Non collocare l’acquario vicino a televisori, radio o altri apparecchi elettrici che temono gli spruzzi d’acqua.
ATTENZIONE: la luce solare diretta, o diffusa ma intensa (ambienti con molte finestre), favorisce la crescita ipertrofica di
alghe che pregiudicano lo sviluppo delle piante superiori e compromettono l’equilibrio biologico dell’acquario. La corretta
“dose” di luce deve provenire esclusivamente dall’impianto di illuminazione in dotazione all’acquario.
8

V. INSTALLAZIONE E ACCENSIONE DELL’ACQUARIO
V.a PULIZIA DELLA VASCA
Pulire accuratamente l’interno della vasca utilizzando un panno umido o una spugna pulita. IT
Non utilizzare detergenti o spugne venute a contatto con saponi, solventi o altri composti chimici.
V.b MESSA IN FUNZIONE
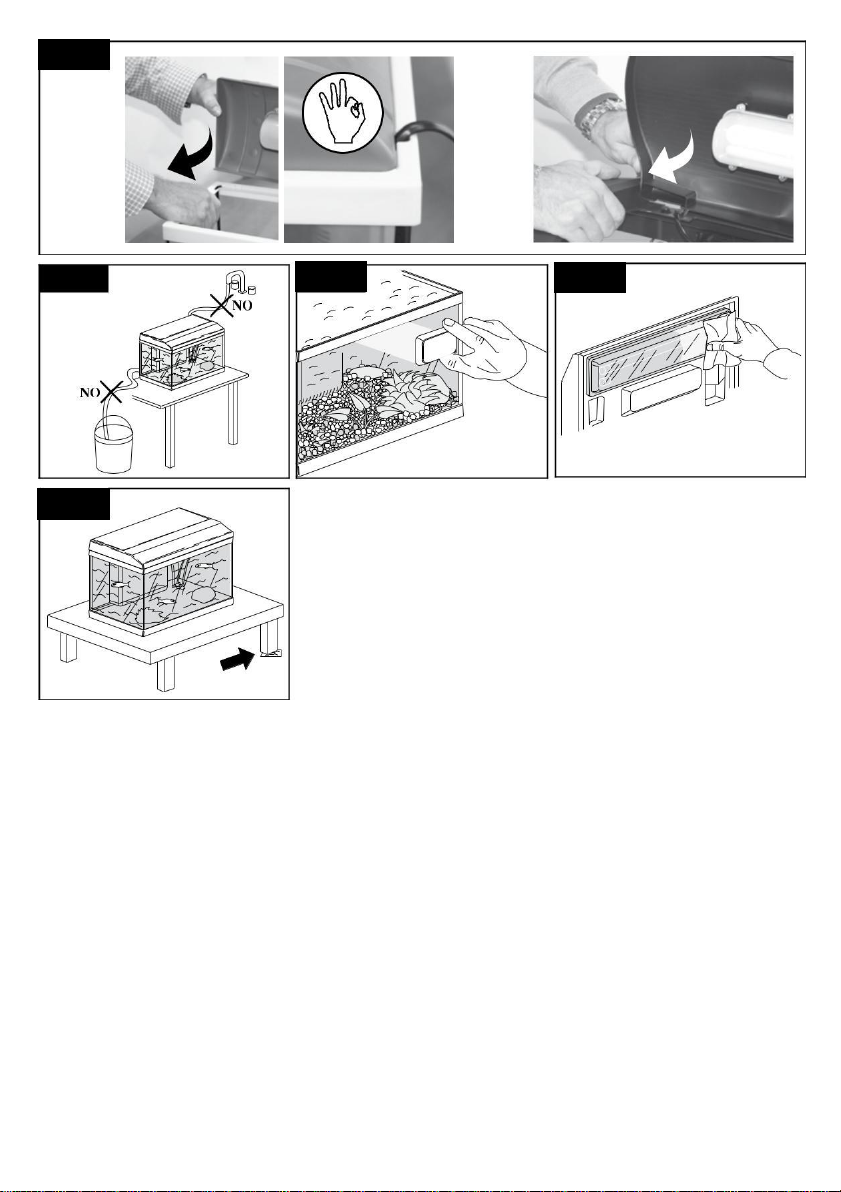
Aprire il coperchio e sganciarlo dalle appositi sedi, premendo con un dito da un lato (fig. 6). Togliere del tutto il coperchio dalle sedi
(fig.7). Passare i cavi di alimentazione della pompa, della lampada e riscaldatore negli appositi fermacavi presenti sulla cornice
dell’acquario (fig.8). Riposizionare il coperchio nelle sedi e chiudere (fig. 9).
V.c FILTRAZIONE
IL FILTRO È UN SISTEMA DI DEPURAZIONE A “CICLO CHIUSO” CHE RENDE L’ACQUARIO COMPLETAMENTE SVINCOLATO DAL COLLEGAMENTO
CON SORGENTI E SCARICHI D’ACQUA (fig. 10). Il filtro è uno strumento fondamentale nella gestione dell’acquario, senza il quale
occorrerebbero cambi d’acqua molto frequenti. Il potente ed efficace ha lo scopo di far circolare e “pulire” l’acqua, trattenendo sia le
impurità in sospensione sia le sostanze invisibili disciolte che derivano da escrementi di animali, da foglie morte e da residui di cibo.
V.d ACCENSIONE DELL’ACQUARIO
ATTENZIONE: Collegare alla rete di alimentazione elettrica gli apparecchi elettrici solo
dopo aver allestito l’acquario a proprio piacimento e riempitolo d’acqua.
1.Introdurre le spine nelle prese di alimentazione, seguendo con attenzione le istruzioni per la
sicurezza descritte al capitolo I. Da questo momento i cavi di alimentazione non andranno mai
scollegati se non in occasione delle periodiche operazioni di pulizia e di manutenzione.
2.Verificare il funzionamento dei vari apparecchi (nel caso di malfunzionamenti fare riferimento al cap. VII):
•Dalla mandata della pompa deve uscire acqua;
•La spia luminosa del riscaldatore deve accendersi qualora la temperatura dell’acqua risulti inferiore a quella impostata;
•Agendo manualmente sui pulsanti d’accensione delle luci queste si dovranno attivare.
3.Attendere che la temperatura dell’acqua raggiunga il valore impostato nel riscaldatore. Si consiglia di verificare
periodicamente la temperatura dell’acqua perché i riscaldatori possono avere una piccola tolleranza sul valore impostato.
4.Procedere all’eventuale inserimento dei pesci secondo la propria esperienza e nel rispetto delle regole di
“buona prassi” relative all’acquariologia.
VI. GESTIONE E PULIZIA
OGNI SETTIMANA:
a. Pulire i cristalli interni dell’acquario con una spazzola magnetica (non inclusa nella
confezione) per eliminare la patina di alghe (fig. 11).
b. Pulire con una spugna o un panno bagnato la protezione del sistema illuminante a LED (fig. 12).
c. Controllare il livello dell’acqua. Se troppo basso, riportarlo al livello desiderato con
acqua avente circa la stessa temperatura di quella dell’acquario.
d. Controllare la temperatura dell’acqua con apposito termometro ad immersione.
OGNI MESE:
a. Sostituire la cartuccia del filtro NEWA Cobra scegliendo tra quelle disponibili nella gamma NEWA AQUA media filter cartridges.
OGNI 3 MESI:
a. Sciacquare la cartuccia filtrante in spugna del filtro NEWA Cobra con acqua
prelevata dall’acquario, al fine di preservare le colonie batteriche.
b. Pulire il fondo dell’acquario aspirando delicatamente l’eventuale sedimento depositatosi. Si consiglia l’uso
dell’aspira-rifiuti NEWA Pgr. Questa operazione deve essere fatta con molta cautela al fine di non sradicare le
piante e lasciare scoperte le radici. c. Pulire il rotore e la girante della pompa da eventuali incrostazioni.
9

VII. PROBLEMI E SOLUZIONI
IT
Se l’installazione è stata eseguita in modo corretto e gli accessori elettrici funzionano regolarmente, molto difficilmente
potranno comparire problemi tecnici. Nel caso vi fossero, consultare un installatore qualificato di materiale elettrico o rivolgersi
al rivenditore di prodotti per acquari per l’attuazione di un accurato controllo o per la sostituzione dell’acquario.
ANOMALIE
CAUSE
RIMEDI
Il piano d’appoggio dell’acquario non è
Agire sul mobile o sul piano d’appoggio con
opportuni spessori al fine di renderlo
Il coperchio dell’acquario
perfettamente orizzontale.
perfettamente orizzontale (fig. 14).
non chiude bene
Il coperchio dell’acquario non è ben
Rivolgersi al rivenditore di fiducia
collegato alla vasca
L’impianto d’illuminazione non è collegato
Collegare la spina alla presa di alimentazione
L’ impianto d’illuminazione
alla presa di alimentazione elettrica
elettrica
Black out momentaneo
-
non funziona
L’impianto d’illuminazione
Rivolgersi al rivenditore di fiducia
non funziona correttamente
Il riscaldatore non è collegato alla presa di
Collegare la spina alla presa di alimentazione
La temperatura dell’acqua
alimentazione elettrica.
elettrica.
non raggiunge i livelli
La pompa è bloccata per sporcizia o usura
Provvedere alla manutenzione della pompa.
impostati.
del rotore
ll riscaldatore non funziona correttamente
Rivolgersi al rivenditore di fiducia
La pompa di movimento non è collegata
Collegare la spina alla presa
alla presa di alimentazione elettrica
di alimentazione elettrica
Portata d’acqua
Cartuccia intasata
Sciacquare o sostituire la cartuccia
limitata o assente
La pompa è bloccata per sporcizia
Provvedere alla manutenzione della pompa.
o usura del rotore
La pompa non funziona correttamente
Rivolgersi al rivenditore di fiducia
VIII. CORRETTO SMALTIMENTO DEL PRODOTTO
DIRETTIVA EUROPEA RAEE 2012/19/UE (EN50419)
Applicabile nei paesi dell’Unione Europea e in quelli con sistema di raccolta differenziata.
Nel momento in cui si decide di rottamare l’acquario, al fine di recuperare le materie riciclabili (plastiche, vetro, ecc.) e di
smaltire in sicurezza le componenti elettriche, si provveda a dividere e smaltire separatamente i diversi materiali secondo
le vigenti norme locali. Si dovrà aver cura di dividere l’apparecchio di illuminazione (coperchio) dalla vasca in vetro e
dagli accessori elettrici. L’apparecchio di illuminazione e gli apparecchi elettrici, in base alla Direttiva Europea RAEE,
seguono la via dello smaltimento secondo quanto esposto nel paragrafo sottostante. Prima di procedere alla
separazione dei componenti dell’acquario, scollegare tutte le spine dalle prese di corrente e vuotare completamente
l’acquario. Il coperchio dell’acquario con la parte illuminante è quanto va conferito come RAEE.
10

II marchio riportato sul prodotto o sulla sua documentazione indica che il prodotto non deve essere smaltito con altri rifiuti domestici
al termine del ciclo di vita. Per evitare eventuali danni all’ambiente o alla salute causati dall’inopportuno smaltimento
dei rifiuti, si invita l’utente a separare questo prodotto da altri tipi di rifiuti e di riciclarlo in maniera responsabile per favorire il IT
riutilizzo sostenibile delle risorse materiali.
•Gli utenti domestici potranno riconsegnare l’apparecchio giunto a fine vita al rivenditore al momento dell’acquisto di un nuovo
apparecchio di tipo equivalente in ragione di uno a uno, oppure contattare l’ufficio locale preposto per tutte le informazioni relative
alla raccolta differenziata e al riciclaggio per questo tipo di prodotto. Verificare con il rivenditore, in base alla sua dimensione
commerciale, la possibilità di ritiro dei RAEE gratuitamente anche senza acquisto di un apparecchio nuovo.
•Gli utenti aziendali sono invitati a contattare il proprio fornitore e verificare i termini e le condizioni del
contratto di acquisto. Questo prodotto non deve essere smaltito unitamente ad altri rifiuti commerciali.
•Lo smaltimento abusivo da parte dell’utente comporta l’applicazione delle sanzioni amministrative come da vigente legge.
IX. GARANZIA
L’acquario NEWA Hobby è garantito secondo la Direttiva Europea 1999/44 CE da difetti di materiali e di lavorazione per un periodo
di 24 mesi dalla data d’acquisto. Se l’apparecchio non funzionasse correttamente entro questo termine dalla data d’acquisto,
restituirlo al rivenditore di zona. L’apparecchio verrà sostituito senza alcun costo aggiunto. Per il servizio di garanzia restituire
l’apparecchio allegando la prova d’acquisto e una dettagliata motivazione del reclamo. L’apparecchio deve essere svuotato
completamente dall’acqua e dai decori, confezionato accuratamente e protetto per evitare eventuali danni da trasporto. La garanzia
non copre danni dovuti a urti o cadute successive alla vendita. La garanzia non è valida nel caso di uso improprio del prodotto, né
risponde a danni causati da manomissioni o negligenza da parte dell’acquirente con conseguente perdita di pesci o altri animali,
danni personali, perdita della proprietà o altri danni che possono insorgere.
CONSERVARE QUESTE ISTRUZIONI.
11

EN
Operating Instructions
Contents
I.
IMPORTANT SAFETY REGULATIONS
page 12
II.
TECHNICAL DATA
page 13
III.
UNPACKING AND PRELIMINARY CHECKS
page 14
IV.
WHERE TO POSITION THE AQUARIUM
page 14
V.
INSTALLING AND SWITCHING ON THE AQUARIUM
page 14
V.a
Cleaning the tank
page 14
V.b
Starting Operation
page 14
EN
V.c
Filtering
page 14
V.d
Switching -on the aquarium
page 14
VI.
OPERATING AND CLEANING
page 15
VII.
TROUBLESHOOTING
page 15
VIII.
CORRECT DISPOSAL OF THE PRODUCT
page 16
IX.
WARRANTY
page 16
SPARE PARTS AND ACCESSORIES
page 3
I. IMPORTANT SAFETY REGULATIONS
This appliance is intended for use as a fresh water aquarium in homes. Any other use is not permitted and therefore the
manufacturer shall not be held liable. NEWA Hobby complies with current EU safety regulations EN60598-2-11 whereas
the pump complies with the EN60335-2-41 standard. The heater (when provided present) comply with the EN60335-2-55
standard. The aquarium has been designed and made in compliance with the directives 2014/30/UE and 2014/35/UE in
order to guarantee safe use throughout its life cycle. Nevertheless, improper use of the aquarium (use not compliant with
the provisions of this manual) may cause damage to the aquarium and compromise user safety.
WARNING: the symbol on the label of Newa Hobby indicates that you must thoroughly read this operating
instruction manual before starting up, operating or carrying out any maintenance operations on the appliance.
WARNING: during installation and maintenance, disconnect the aquarium and all its accessories from the
electrical mains. Do not connect the aquarium to power sockets unless it is completely filled with water.
To avoid any kind of accident, carefully follow the simplest safety provisions and the following warnings:
1) CAUTION: This appliance can be used by children aged from 8 years and above and persons
with reduced physical, sensory or mental capabilities or lack of experience and knowledge if they
have been given supervision or instruction concerning use of the appliance in a safe way and
understand the hazards involved. Children shall not play with the appliance because this is not a
toy. Cleaning and user maintenance shall not be made by children without supervision.
2) WARNING: turn off and disconnect all the electrical equipment in
the aquarium before carrying out any maintenance tasks.
3) The power cord must not be repaired or replaced. If it is damaged, replace the entire accessory (pump
or heater). If the power cord of the aquarium lighting facility is subject to damage,
it can be replaced only by a qualified technician using original spare parts.
4)Read the warnings and observe the symbols on the labels of all electrical appliances and in the instructions.
5)Fill the aquarium tank to the desirable level, given that the minimum distance between the water
surface and the lamp should be 15 mm when the cover is closed (Fig. 1).
6)Check that the voltage printed on the label inside the aquarium lid, on the pump and also
on the heater, if included, to make sure it corresponds to the main power supply.
7)Do not insert the plugs of the appliances before completely filling the tank with water.
12

8)Check that all the electrical accessories have no knocks or marks indicating falls or crushing.
9)The power supply cables should be inserted in the socket so that a part of the cable forms a loop at a lower
level than the socket. This will prevent water droplets from entering the socket (Fig.2) by running along the
cable.
10) Always disconnect the plugs when the aquarium is not in use, before inserting or removing its components and before
cleaning. Do not try to disconnect from the socket or the plugs of the appliances by pulling the cable, but disconnect it by hand.
11)Do not touch the power plugs with wet hands or touch the plugs with your bare hands if they are wet.
12)If the aquarium is within children’s reach, take special precautions and check correct installation and operation several times.
13)The maximum water temperature conveyed from the pump must not exceed 35°C.
14) WARNING: the symbol indicates that the electrical appliances must only be used in homes.
15) The aquarium must not run dry.
16) The aquarium has glass components. Handle it with care and position it according to the instructions given in this manual,
avoiding placing the tank directly on its edges.
EN
17) Do not place the aquarium on tilting surfaces (Fig. 13).
18)After installation, do not move the aquarium. If necessary, only move it if the tank is completely empty.
19)Each component is an integral pa rt of the aquarium and must not be used with other products.
20)Do not use the aquarium for food use.
21)Do not use the aquarium as a terrarium.
22)Do not use the aquarium if it is damaged and /or dismantled.
23)Do not damage and/or remove the seal on the couplings of the glass panels of the tank.
24)Do not place rocks, stones or other heavy ornamental elements directly on the bottom of the tank.
25)Do not position any objects on the aquarium.
26)It is important for the aquarium, just like all other electrical appliances, to be protected upstream by a special
differential safety switch (safety cutout) with a trip current of Idn < 30 mA.
27)We recommend to switch-off the lamp off during maintenance and never fix it when it is on.
KEEP THESE INSTRUCTIONS FOR FUTURE REFERENCE.
II. TECHNICAL DATA
Version (220-240V, 50Hz)
NH 20
NH 30
NH 60
Dimensions
Height (mm)
290
335
400
Width (mm)
420
475
625
Depth (mm)
205
275
325
Weight
Dry (Kg)
3,63
6,80
10,00
Capacity
Volume (l)
20
30
60
Heater
Type
---
---
NTT50
Power (W)
---
---
50
Pump
Flow rate (l/h)
80 - 190
100 - 250
270 - 540
Power (W)
2,6
3
5,1
Lighting
Rated input (W)
4,5
4,5
5
Lumen
657
657
670
Kelvin (K)
6500
6500
6500
13

III. UNPACKING AND PRELIMINARY CHECKS
a. Open the packaging.
b. Take out the aquarium, handling it with care;
c. Place the aquarium on a smooth flat surface;
d. Dispose of the packaging materials in compliance with current regulations in the country of disposal;
The NEWA Hobby aquarium has been packaged so that it can withstand normal knocks and pressures during transport. However,
excessive knocks or incorrect handling may cause damage to the aquarium therefore we recommend you follow these warnings
in order to check that the tank is watertight:
• Place the tank on a dry horizontal surface, on a layer of fabric sheeting or sheets of newspaper.
• Fill the tank with water and carefully check each side. Check that there are no leaks by wiping along the outer edges of the glass
panel couplings with a dry cloth (Fig. 3).
EN
• If there are leaks, take the aquarium to the dealer so that it can be carefully checked or replaced.
WARNING: do not empty the aquarium by lifting or tilting it, as it may break! (Fig. 4).
IV. WHERE TO POSITION THE AQUARIUM
WARNING: carefully read and strictly follow these instructions.
a. Position the aquarium (tank and base) on a solid support, which is appropriate for bearing the maximum intended weight of
the aquarium (see technical data), with a smooth, clean and level support surface.
b. Check that the support surface is perfectly horizontal; otherwise the water level in the aquarium will tilt.
c. Do not position the aquarium on tilting surfaces.
d. Position the aquarium near at least a couple or more power sockets, following the safety instructions.
e. Position the aquarium away from sources of heat and cold draughts such as stoves, radiators, fireplaces and windows (Fig. 5).
f. Do not position the aquarium near a television, radio or other electrical appliances that should be protected from splashes of water.
WARNING
: direct or diffused yet intense sunlight (rooms with many windows) encourage the hypertrophic growth of algae,
which can prevent the growth of plants higher up and jeopardise the biological balance of the aquarium. The correct amount of
light should only be provided by the lighting system in the aquarium.
V. INSTALLING AND SWITCHING ON THE AQUARIUM
V.a CLEANING THE TANK
Carefully clean the inside of the tank using a damp cloth and a clean sponge.
Do not use detergents or sponges that have come into contact with soap, solvents or other chemical substances.
V.b STARTING OPERATION
Open the cover and detach it from its proper seats by pressing one side with your finger (fig. 6). Remove the cover completely
from its seats (fig. 7). Pass the pump, light and heater power cables through the special cable clips located on the aquarium
frame (fig. 8) Place the cover in its seats again and close (fig. 9).
V.c FILTERING
THE FILTER IS A “CLOSED CYCLE” PURIFICATION SYSTEM THAT MAKES THE AQUARIUM TOTALLY INDEPENDENT FROM CONNECTIONS
WITH WATER INLETS AND OUTLETS (Fig. 10). The filter is an essential tool for operating the aquarium. Without it, the water would
need to be changed very often. The powerful and effective filter is intended to circulate and “clean” water, trapping suspended
impurities and invisible dissolved substances derived from animal excrement, dead leaves and food debris.
V.d SWITCHING ON THE AQUARIUM
1. Insert the plugs into the power sockets, carefully following the safety instructions given in Chapter I. From this point onwards, the
power supply cables should not be disconnected unless regular cleaning or maintenance operations are to be carried out.
2.Check that the various appliances are operating (in the event of a fault, see Chapter VII):
•Water should come out of the pump outlet;
•The heater indicator light should switch on when the water temperature is lower than the set temperature;
14

• When the lights buttons are pressed, they should switch on.
3. Wait for the water temperature to reach the value set in the heater. Must be adjusted to the
desired aquarium temperature using the special knob. It is advisable to periodically check the water
temperature, to ensure that a constant temperature is maintained.
4.Proceed with adding any fish according to your own experience and complying with the
“good practice” regulations for aquariums.
VI. OPERATING AND CLEANING
EVERY WEEK:
a. Clean the inside of the aquarium glass panels with a magnetic brush (not included) to remove the patina of algae (Fig. 11).
b. Clean the LED lighting system protection with a sponge or a wet cloth (Fig. 12).
c. Check the water level. If it is too low, top it up to the required level with water at about the
same temperature as the water in EN the aquarium.
d. Check the water temperature using the immersion thermometer provided.
EVERY MONTH:
a. Replace the Newa Cobra filter cartridge choosing among the NEWAQUA media filter cartridges range.
EVERY 3 MONTHS:
a. Rinse the foam cartridge using the aquarium water, so that the bacterial colonies are preserved.
b. Clean the bottom of the aquarium by gently sucking up any deposited sediment. It is advisable to use
the NEWA Pgr gravel cleaning set. This operation should be done with great care in order not to uproot
any plants or leave any roots uncovered. c. Remove any deposits from the rotor and the pump impeller.
VII. TROUBLESHOOTING
If installation has been carried out correctly and the electrical accessories are operating normally, it is
unlikely that any technical problems will arise. If they should, consult an installer specialised in electrical
appliances or contact the aquarium product dealer to make a careful check or to replace the aquarium.
FAULTS
CAUSES
SOLUTIONS
Apply specific pads on a movable part or along
The cover does not remain
The cover does not remain properly closed.
the perimeter of the support, making it finally
completely horizontal (Fig. 14).
properly closed.
The perimeter of the support is not
Contact your local dealer
horizontal.
The lighting system is not connected to the
Connect the plug to the electrical socket
electrical socket
The lighting system are not
A temporary black out
---
in operation
The lighting system is not operating
Contact your local dealer
correctly
The heater is not connected to the
Connect the plug to the electrical socket
The water temperature
electrical socket
does not reach the set
The pump is clogged due to dirt or wear
Carry out maintenance on the pump.
levels
and tear on the rotor
The heater is not operating correctly
Contact your local dealer
15

FAULTS
CAUSES
SOLUTIONS
The flow pump is not connected to the
Connect the plug to the electrical socket
electrical socket
Limited or no water flow
The filter cartridge is clogged
Rinse or replace the filter cartridge
The pump is clogged due to dirt or wear
Carry out maintenance on the pump.
and tear on the rotor
The pump is not operating correctly
Contact your local dealer
EN
VIII. CORRECT DISPOSAL OF THIS PRODUCT
(WASTE ELECTRICAL & ELECTRONIC EQUIPMENT)
2012/19/UE (EN50419)
(Applied in European Union and countries, where the separate waste collection system is in force).
Please dispose of this equipment (plastic, glass, etc.) separately from other waste according to local legislation. The glass cover of the case
and electrical appliances should be disposed of separately. According to the directive on the ‘RAEE’, electrical and electronic equipment
should be recyclable as described in this pharagraph. Disconnect the unit from the electric network before removing parts from the aquarium.
Make sure it is empty. The aquarium cover with the lighting system must be disposed as WEEE.
This marking shown on the product or its literature, indicates that it must not be disposed with other household wastes at the end of
its working life. To prevent possible harm to the environment or human health from uncontrolled waste disposal, please separate
this from other types of wastes and recycle it responsibly to promote the sustainable reuse of material resources.
•Household users should contact either the retailer where they purchased this product, or their local
government office, for details of where and how they can take this item for environmentally safe recycling.
Check with the distributor (depending on its activities) if they can collect WEEE even without the condition of
purchasing a new appliance. • Business users should contact their supplier and check the terms and conditions
of the purchase contract. This product should not be mixed with other commercial wastes for disposal. • Illegal
release of wastes by the user implicates administrative actions in accordance with the effective legislation.
IX. WARRANTY
This product is guaranteed, in compliance to European directive 1999/44. As fee from faults both in materials and workmanship for a period of
24 months from date of purchase. If the product fails to operate correctly within the first two years of the date of purchase, return it to the
retailer where it was purchased. The product shall be replaced free of charge. During the period of warranty the product shall be replaced if: 1)
The product is returned carefully packaged and has not been damaged intransport. 2) Proof of purchase is supplied along with a detailed
explanation of reasons for the claim. The warranty is subject to the following restrictions and conditions:
1)The warranty does not cover accidental damage or breakage. 2) Replacement of the product in
no way represents admission of responsibility. 3) The warranty is not valid in the case of improper
use, and does not cover damage caused by tempering or negligence on the part of the purchaser.
KEEP THESE INSTRUCTIONS.
16

FR
Instructions d’utilisation
Sommaire
I.
CONSIGNES IMPORTANTES DE SÉCURITÉ
page 17
II.
CARACTÉRISTIQUES TECHNIQUES
page 19
III.
DÉBALLAGE ET CONTRÔLES PRÉLIMINAIRES
page 19
IV.
CHOIX DE L’EMPLACEMENT DE L’AQUARIUM
page 19
V.
INSTALLATION ET ALLUMAGE DE L’AQUARIUM
page 20
V.a
Nettoyage de la cuve
page 20
V.b
Mise en marche
page 20
V.c
Filtration
page 20
V.d
Allumage de l’aquarium
page 20
VI.
GESTION ET NETTOYAGE
page 20
VII.
PROBLÈMES ET SOLUTIONS
page 21
VIII.
COMMENT ÉLIMINER CE PRODUIT
page 21
IX.
GARANTIE
page 22
PIÈCES DE RECHANGE ET ACCESSOIRES
page 3
I. CONSIGNES IMPORTANTES DE SÉCURITÉ
FR
Cet appareil est destiné à être utilisé comme aquarium d’eau douce à l’intérieur des logements. Aucune autre utilisation n’est
admise et le fabricant décline toute responsabilité si cette interdiction n’est pas respectée. Newa Hobby est conforme à la norme de
sécurité en vigueur dans l’Union européenne EN60598-2-11 et le pompe est conforme à la norme EN60335-2-41. Le chauffage
(s’ils sont installés) sont, quant à eux, confeormes à la norme EN60335-2-55. Le produit a été conçu et fabriqué conformément aux
directives 2014/30/ue et 2014/35/UE afin de garantir une utilisation en toute sécurité pendant tout son cycle de vie. Cependant, une
utilisation incorrecte du produit (une utilisation non conforme aux prescriptions fournies dans ce manuel) peut provoquer des
dommages au produit et compromettre la sécurité de l’utilisateur.
ATTENTION: le présent symbole reporté sur l’étiquette du Newa Hobby indique qu’il est nécessaire de lire
attentivement ce manuel d’instructions avant de mettre l’appareil en service, de l’utiliser et de procéder à son entretien.
ATTENTION: lors des opérations d’installation et d’entretien, débrancher l’aquarium et tous ses accessoires du courant électrique.
Ne pas brancher l’aquarium aux prises d’alimentation s’il n’est pas entièrement rempli d’eau. Afin d’éviter tout risque d’accident,
respecter scrupuleusement non seulement les consignes de sécurité les plus élémentaires mais aussi les avertissements suivants:
1) ATTENTION: L’appareil peut être utilisé par des enfants âgés de 8 ans au moins et par des
personnes dont les capacités physiques, sensorielles ou mentales sont réduites ou qui ne possèdent pas
l'expérience et les connaissances nécessaires, à condition que cette utilisation se déroule sous
surveillance ou après que les personnes en question ont reçu des instructions sur l'utilisation de
l'appareil en conditions de sécurité et sur les dangers liés à son utilisation. Les enfants ne doivent pas
jouer avec l'appareil parce que ce n'est pas un jouet. Les opérations de nettoyage et d'entretien
incombant à l'utilisateur ne doivent pas être effectuées par des enfants sans surveillance.
2) ATTENTION: Débrancher ou éteindre tous les appareils se trouvant dans l’aquarium ou dans le
bassin avant d’installer le chauffage ou d’effectuer une opération d’entretien quelconque.
3) Le câble d’alimentation ne peut pas être réparé, ni changé. S’il est abîmé, il faut changer de pièce
(pompe ou réchauffeur). Le câble d’alimentation de l’appareil d’éclairage de
l’aquarium peut être changé seulement avec un câble original des pièces de rechange.
4)Lire les avertissements et respecter les symboles figurant sur les étiquettes de tous les appareils
électriques et reprises dans les instructions.
5)Remplir le bassin de l’eau pour atteindre le niveau désiré faisant attention que la distance minimale du niveau d’eau à la lampe
17

soit 15 mm quand le couvercle est fermé (fig. 1).
6) Contrôler que le voltage imprimé sur l’étiquette du couvercle, sur la pompe et - si present - sur le chauffage, correspond à celui
du réseau d’alimentation.
7) Ne pas brancher les fiches des câbles d’alimentation avant d’avoir entièrement rempli l’aquarium d’eau.
8) Vérifier qu’aucun accessoire électrique fourni ne présente de bosses ou de signes de chutes et d’écrasements.
9) Il faudrait brancher les câbles d’alimentation dans la prise de courant de façon à ce qu’un point du câble forme un coude à un
niveau inférieur par rapport à la prise de courant. Ceci évite que des gouttes d’eau ne puissent pénétrer dans la prise en suivant
le câble (fig. 2).
10) Toujours débrancher les fiches lorsque l’aquarium n’est pas utilisé ainsi qu’avant d’introduire ou de retirer ses composants
et avant de le nettoyer. Ne pas essayer de débrancher le boîtier d’alimentation et les fiches des appareils en tirant sur leur câble
mais les prendre avec la main pour les débrancher.
11) Ne pas toucher les fiches d’alimentation avec les mains mouillées ; de même, ne pas toucher les fiches avec les mains nues
si ces fiches sont mouillées.
12) Si l’aquarium se trouve à la portée des enfants, prendre des précautions particulières et vérifier plusieurs fois que l’installation
est correcte et qu’il fonctionne parfaitement.
13) La température maximum de l’eau acheminée par la pompe ne doit pas dépasser 35 °C.
14)
ATTENTION
: le symbole
indique que les appareils électriques ne doivent être utilisés qu’à l’intérieur des logements.
15) L’aquarium ne doit pas fonctionner à sec.
16) Le produit est équipé de composants en verre. Le manipuler avec soin et le positionner en suivant les instructions fournies
dans ce manuel et en évitant de déposer la cuve directement sur les arêtes.
FR
17) Ne pas appuyer le produit sur des plans inclinés (fig. 13).
18) Après son installation, ne pas déplacer le produit. Le cas échéant, ne le déplacer que lorsque la cuve est entièrement vide.
19) Tous les composants font partie intégrante du produit et ne doivent pas être utilisés sur d’autres produits.
20) Ne pas utiliser le produit pour un usage alimentaire.
21) Ne pas utiliser le produit comme terrarium.
22) Ne pas utiliser le produit s’il est détérioré et/ou démonté.
23) Ne pas abîmer et/ou retirer le mastic appliqué sur les jonctions des vitres de la cuve.
24) Ne pas déposer de rochers, de pierres ou d’autres éléments de décoration lourds directement sur le fond de la cuve.
25) Ne placer aucun objet sur le produit.
26) Il est important que l’aquarium, comme tous les autres dispositifs electriques, soit protegé en amont par un
interrrupteur différentiel spécial (coupe-circuit) avec un courant d’intervention qui ne soit pas supérieur à 30 mA.
27) On recommande d’éteindre la lampe pendant l’entretien et de ne jamais la fixer quand elle est allumée.
CONSERVER CES INSTRUCTIONS POUR TOUTE CONSULTATION FUTURE.
18

II.
CARACTÉRISTIQUES TECHNIQUES
Modèle (220-240V, 50Hz)
NH 20
NH 30
NH 60
Dimensions
Hauteur (mm)
290
335
400
Largeur (mm)
420
475
625
Profondeur (mm)
205
275
325
Poids
À sec (Kg)
3,63
6,80
10,00
Capacité
Volume (l)
20
30
60
Chauffage
Type
---
---
NTT50
Puissance (W)
---
---
50
Pompe
Débit (l/h)
80 - 190
100 - 250
270 - 540
Puissance (W)
2,6
3
5,1
Éclairage
Puissance (W)
4,5
4,5
5
Lumen
657
657
670
Kelvin (K)
6500
6500
6500
III.
DÉBALLAGE ET CONTRÔLES PRÉLIMINAIRES
FR
a. Ouvrir l’emballage ;
b. Extraire le produit en le manipulant avec soin ;
c. Appuyer l’aquarium sur une surface plate et lisse ;
d. Éliminer les matériaux d’emballage en respectant les réglementations en vigueur dans le pays d’élimination.
L’aquarium NEWA Hobby est emballé de façon à pouvoir résister aux chocs normaux et aux pressions qui se produisent
pendant le transport. Il est cependant possible que des chocs excessifs ou des manipulations incorrectes puissent
endommager l’aquarium et nous conseillons donc de suivre ces avertissements afin de contrôler l’étanchéité de la cuve :
•Placer la cuve sur une surface horizontale sèche, en la déposant sur une toile en tissu ou sur des feuilles de journal.
•Remplir la cuve d’eau et contrôler attentivement tous les côtés. Vérifier qu’il n’y a pas de pertes
d’eau en passant un chiffon sec le long des bords extérieurs de jonction des vitres (fig. 3).
•En cas de pertes d’eau, remettre l’aquarium au revendeur afin qu’il soit attentivement contrôlé ou remplacé.
ATTENTION : ne pas vider l’aquarium en le soulevant et en le retournant, il pourrait se casser ! (fig. 4).
IV. CHOIX DE L’EMPLACEMENT DE L’AQUARIUM
ATTENTION: lire attentivement et respecter scrupuleusement ces instructions.
a. Placer l’aquarium (cuve et base) sur un support solide, en mesure de supporter le poids maximum prévu pour
le produit (voir caractéristiques techniques) et muni d’un plan d’appui horizontal, lisse et propre.
b. Vérifier que la surface du plan d’appui est parfaitement horizontale ; dans le cas
contraire, le niveau de l’eau contenue dans l’aquarium serait oblique.
c. Ne pas appuyer le produit sur des plans inclinés.
d. Placer l’aquarium à proximité de deux prises de courant au moins en respectant les instructions de sécurité.
e. Placer l’aquarium loin de sources de chaleur et de courants d’air froid, comme poêles, radiateurs, cheminées et fenêtres (fig. 5).
f. Ne pas placer l’aquarium à proximité de téléviseurs, de radios ou d’autres appareils électriques craignant les éclaboussures
d’eau. ATTENTION: la lumière solaire directe, ou diffuse mais intense (pièces avec de nombreuses fenêtres), favorise la
croissance hypertrophique d’algues qui nuisent au développement des plantes supérieures et compromettent l’équilibre biologique
de l’aquarium. La « dose » correcte de lumière ne doit provenir que du système d’éclairage fourni avec l’aquarium.
19

V. INSTALLATION ET ALLUMAGE DE L’AQUARIUM
V.a NETTOYAGE DE LA CUVE
Nettoyer soigneusement l’intérieur de la cuve en utilisant un chiffon humide ou une éponge propre.
Ne pas utiliser de détergents ou des éponges entrées en contact avec des savons, solvants ou autres composés chimiques.
V.b MISE EN MARCHE
Ouvrir le couvercle et le détacher de son embase en pressant d’un côté avec vos doigts (fig. 6). Retirer complètement le couvercle
de son embase (fig. 7). Passer le câble de la pompe, de l’ampoule et du chauffage à travers les supports spéciaux situés dans le
cadre du couvercle (fig. 8). Remettre le couvercle dans ses embase et le fermer (fig. 9).
V.c FILTRATION
LE FILTRE EST UN SYSTÈME D’ÉPURATION À «CYCLE FERMÉ» QUI LIBÈRE COMPLÈTEMENT L’AQUARIUM DE
L’OBLIGATION D’ÊTRE RELIÉ À DES SOURCES ET DES ÉVACUATIONS D’EAU (fig. 10). Le filtre est un instrument
fondamental dans la gestion de l’aquarium, sans lequel il faudrait changer l’eau très fréquemment. Le filter, filtre puissant
et efficace, est chargé de faire circuler et de « nettoyer » l’eau, en retenant non seulement les impuretés en suspension
mais aussi les substances invisibles dissoutes dérivant d’excréments animaux, de feuilles mortes et de résidus d’aliment.
V.d ALLUMAGE DE L’AQUARIUM
1. Introduire les fiches dans les prises d’alimentation en suivant attentivement les instructions de sécurité décrites au chapitre
FR
I. Par la suite, les câbles d’alimentation ne devront jamais être débranchés sauf au moment des opérations périodiques de
nettoyage et d’entretien.
2. Vérifier le fonctionnement des différents appareils :
• de l’eau doit sortir du refoulement de la pompe ;
• le témoin lumineux du chauffage doit s’allumer lorsque la température de l’eau est inférieure à celle réglée ;
• en agissant manuellement sur les boutons d’allumage de l’éclairage à LED, celui-ci doit s’allumer.
3. Attendre que la température de l’eau atteigne la valeur réglée sur le chauffage. Il est recommandé de vérifier régulièrement
la température de l’eau de l’aquarium, car il existe une petite tolérance de réglage.
4. Procéder à l’introduction éventuelle des poissons selon son expérience et dans le respect des règles de « bonne pratique »
concernant l’aquariophilie.
VI. GESTION ET NETTOYAGE
TOUTES LES SEMAINES:
a. Nettoyer les vitres intérieures de l’aquarium avec une brosse magnétique (non
comprise dans l’emballage) pour éliminer la patine d’algues (fig. 11).
b. Nettoyer avec une éponge ou un tissus mouillé la protection du systéme d’éclairage au LED (fig. 12).
c. Contrôler le niveau de l’eau. Si le niveau est trop bas, le reporter au niveau souhaité
en ajoutant de l’eau ayant à peu près la même température que celle de l’aquarium.
d. Contrôler la température de l’eau avec un thermomètre à immersion.
TOUS LES MOIS:
a. Remplacez la cartouche du filtre NEWA Cobra en la choisissant dans la gamme NEWAQUA media filter cartridges.
TOUS LES 3 MOIS:
a. Rincez la cartouche filtrante en éponge avec de l’eau prélevée de l’aquarium afin de préserver les colonies bactériennes.
b. Nettoyer le fond de l’aquarium en aspirant délicatement le sédiment qui s’y est éventuellement
déposé. Nous conseillons d’utiliser le nettoyeur de sable NEWA Pgr. Cette opération doit être faite très
prudemment afin de ne pas déraciner les plantes et de ne pas laisser les racines découvertes.
c. Nettoyer le rotor et la roue de la pompe de toute incrustation éventuelle.
d. Au cas où les matériaux filtrants supplémentaires de l’action chimique sont installés
dans le corps de dessous, il faut les changer pour de nouveaux.
20
This manual suits for next models
2
Table of contents
Languages:
Other Newa Aquarium manuals

Newa
Newa NEWA Mirebello MIR 30 LED Installation guide

Newa
Newa PGR 1000 Installation guide

Newa
Newa Mirabello MIR 40 Installation guide

Newa
Newa FRESH DAYLIGHT Installation guide

Newa
Newa More NMO 20 CRNE Installation guide

Newa
Newa Duetto DJ50 Installation guide

Newa
Newa More NMO20 User manual

Newa
Newa Mirabello MIR 30 Installation guide

Newa
Newa Mirabello young Installation guide

Newa
Newa More NMO20 Installation guide